
One of the benefits of Windows Media Center (WMC) is its ability to help you enjoy music, photos, and videos stored on other PCs on your home network. This won’t happen, though, if you don’t configure those PCs properly. However, configuring PCs for media sharing is more than setting up their operating systems properly. To get the best performance, especially with today’s huge digital photo and HD video files, upgrading to faster wired and wireless network hardware might also be necessary.
This chapter helps you to assure that the computers on your home network can work together to bring your WMC PCs a full load of media goodness.
If you have a home network, the PC running WMC probably isn’t the only PC on the network with media you’d like to enjoy through WMC’s “10-foot UI.” You might have other Windows Vista–based systems with their own collections of photos, videos, and music, or you might have systems running Windows XP or older versions of Windows that include media assets you’d like to share. While the process of configuring WMC to use other PCs’ shared folders was covered in Chapter 3, “Setting Up Windows Media Center,” WMC can’t find those folders if they’re not shared properly. In the following sections, you’ll learn just how to do it.
If you have Windows XP, there are several ways to share media:
You can run the Network Setup wizard to configure folders for media sharing.
You can manually share folders containing media as read-only folders.
After sharing the Shared Documents folder, you can place files and folders you want to share in that folder only.
You can set up a separate computing running Windows Home Server and use it to share media.
Not all of these methods are created equal, as you will see in the coming sections.
The Network Setup Wizard (Figure 12.1) included in Windows XP should be used to set up a home network or to add a computer to an already-existing home network. If you run it on a system that is already on the home network and is working properly, you might change the existing computer name or workgroup name.

By default, the Network Setup Wizard uses MSHOME as the workgroup name. Windows XP uses WORKGROUP as the default name if you don’t run the Network Setup Wizard or change the workgroup name manually. If the workgroup name is changed, the shared files on that computer will become inaccessible to other PCs. As you can see, the odds of this happening are pretty high if you’re unfamiliar with the wizard.
Another problem with the Network Setup Wizard is that it’s designed to share the Shared Documents folder only; it’s much more likely that the media files you want to share with WMC are found in other folders.
However, if you want to use the Network Setup Wizard on a Windows XP system that’s new to your network to enable it to share folders, here’s how to do it:
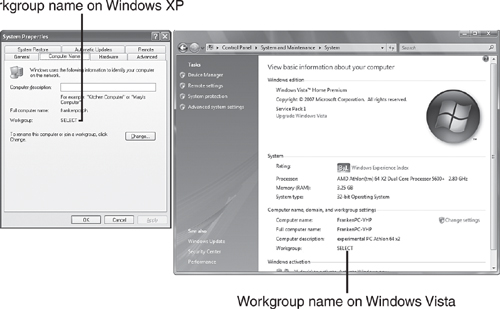
First, make sure you know the name of the home network (also known as the workgroup name). Go to a system that’s already on the network to learn this information:
On a Windows XP system, open the System icon in Control Panel (available from Classic View or from the Performance and Maintenance category) and click the Computer Name tab (Figure 12.2).
On a Windows Vista system, open the System icon in the System and Maintenance category of Control Panel. It’s listed in the Computer Name, Domain, and Workgroup Settings section (Figure 12.2).
Next, make sure the new computer has a working connection to the network. If the system uses a wired connection, make sure you have connected the network cable between the PC’s network port and a switch or router on the network. If the system uses a wireless connection, make sure you have configured the PC with the SSID, encryption type (preferably WPA2 or WPA), and encryption key used by the wireless network.
Next, run the Network Setup Wizard. Select the option to connect to the Internet through another computer or a residential gateway (Select a Connection Method). If you have both a wired and wireless connection, select the connection you are configuring (Select the Connection to Bridge). When prompted for a computer name (Give This Computer a Description and Name), be sure to use a name that is not already in use on the home network. However, when prompted for the workgroup (Name Your Network), be sure to use the network name you discovered in the first step.
Next, at the end of the process, choose the option to Just Finish the Wizard. Reboot the system when prompted, and after the system reboots, its Shared Documents folder will be visible to other network users.
Now that your system has been configured to share folders, you can manually select other folders to share, such as the My Pictures or My Music folders. For details, see the next section.
Note
For a much more detailed examination of the processes of building and configuring a wired or wireless network with Windows XP, see my book Absolute Beginner’s Guide to Home Networking, Que, 2005 (ISBN 0-7897-3205-X). For much more detailed information on networking Windows Vista, see Networking with Windows Vista, by Paul McFedries, Que, 2008 (ISBN 0-7897-3777-9).
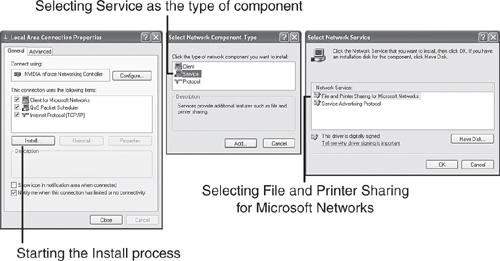
To manually share media folders, you must first have the File and Printer Sharing for Microsoft Networks service installed. If you previously ran the Network Setup Wizard on your system, it’s already installed. However, if you didn’t run the wizard, you must install File and Printer Sharing manually.
To determine if you have File and Printer Sharing installed (see Figure 12.3), take the following steps:
Click Start and open My Network Places.
Click View Network Connections in the Network Tasks pane.
Right-click your network connection and select Properties.
Review the list of components. If File and Printer Sharing for Microsoft Networks is listed, you’re ready to share media folders.

If File and Printer Sharing for Microsoft Networks is not listed, follow this procedure to install it (see Figure 12.4):
Click the Install button.
Select Service from the Select Network Component Type dialog and click Add.
Highlight File and Printer Sharing for Microsoft Networks in the Select Network Service dialog and click OK.
File and Printer Sharing for Microsoft Networks now appears in the list of network components (refer back to Figure 12.3). Click Close.
Once you have File and Printer Sharing installed, it’s time to figure out where your media files are installed. Don’t laugh! Although Microsoft provides preconfigured folders for pictures (My Pictures), music (My Music), and videos (My Videos), there’s no rule requiring third-party apps to use them. Some of the biggest offenders, in my experience, have been digital photo downloader programs supplied by camera vendors; these programs often store pictures in a subfolder of the application. Fortunately, it doesn’t matter where your media files are stored. As long as you can find the folder on your system, you can share it.
Windows XP editions support two types of file sharing on workgroup networks (the type of network used at home and in small businesses that don’t use domains):
Simple File Sharing
Permissions-Based File Sharing
Simple File Sharing is the default (in fact, the only) method used by Windows XP Home Edition. It is also the default for Windows XP Professional and other Windows XP editions when the computer is connected to a workgroup. (Your home network is a workgroup, by the way.)
Simple File Sharing is exactly what the name implies: simple. You don’t need to set up users or access permissions. The only option you have is to allow full access (network users can add, edit, or delete files) or read-only access (network users can read files but can’t delete or change them). I recommend using the read-only access option for media sharing to ensure that the media files on your system don’t get nuked by another user on the network.
Note
If you create a share name including more than 12 characters, you will see a warning that computers running old Windows versions such as NT 4.0, Millennium Edition, 98SE, or earlier can’t access the share. Unless your network doubles as a computer museum, click Yes to use the share name anyway. If you have old Windows versions on your home network, click No and rename the share with a name containing no more than 12 characters.
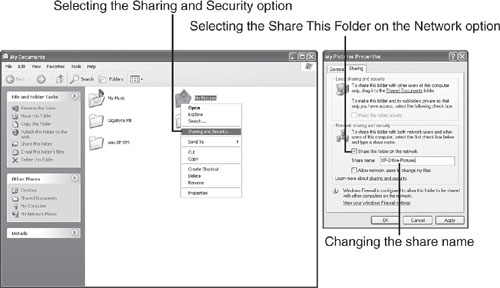
To share a folder in Windows XP with Simple File Sharing enabled
Navigate to the parent folder of the folder containing the media you want to share. For example, My Pictures and My Music are subfolders of each user’s My Documents folder. If you want to share either or both of these folders, navigate to My Documents.
Right-click the folder and select Sharing and Security (Figure 12.5). The Sharing tab of the folder’s properties sheet opens.
Click the Share This Folder on the Network check box. Do not click the Allow Network Users to Change My Files check box unless other users need to add, delete, or edit files in the shared folder.
By default, the folder name is used for the share name. To avoid confusion, rename the share name with a descriptive name, such as the computer name plus the type of media being shared. (The actual folder name is not changed, but network users will see the share name.) For example, instead of the default My Pictures name, I used XP-Office-Pictures (see Figure 12.5). Click Apply.
Click OK to close the dialog.
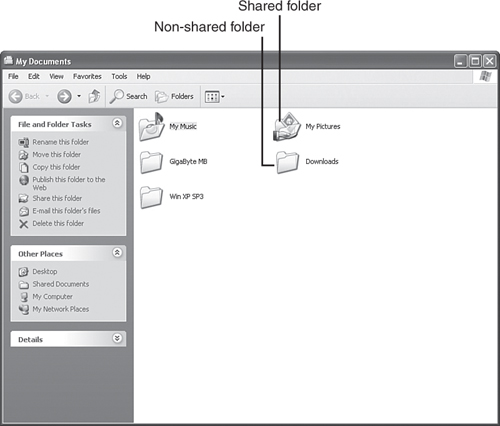
When you view the contents of the folder containing a shared folder in Windows Explorer, each folder share has a hand icon indicating it’s being shared (Figure 12.6).
Caution
Do not store confidential personal or work documents in a folder sbeing shared on the network. Remember, WMC and other network clients can see all of the videos and photos stored in a shared folder.
When the folder is shared as a read-only folder, other users can view the contents of the folder but cannot change the folder’s contents. This is the easiest method for sharing media—assuming that all of the media in the folder should be shared.
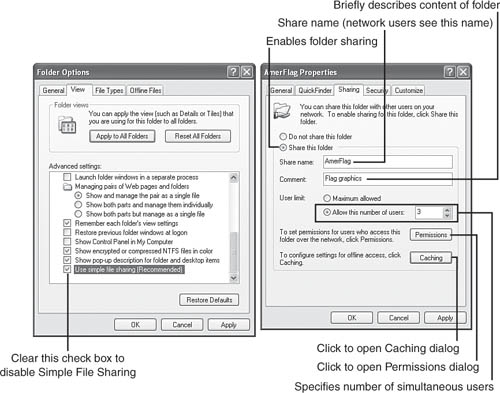
If it is necessary to enable different levels of access for a shared folder on a drive that uses the NTFS file system, Simple File Sharing must be disabled. To disable it:
Open My Computer or Windows Explorer and click Tools, Folder Options.
Click the View tab and scroll down to Use Simple File Sharing (Recommended). Clear the check box (Figure 12.7).
Click Apply and then OK.
Note
Most users of WMC will never need to use permissions–based networking to access a share on a Windows XP–based system. However, if you do, I recommend reading Special Edition Using Windows XP Professional, Third Edition, Que, 2005 (ISBN 0-7897-3280-7).
Once you disable Simple File Sharing, the Sharing dialog (Figure 12.7) looks very different. You can configure the number of simultaneous users that can share a folder (up to 10), and there are new dialogs for Permissions and for Caching.
Before you can assign permissions to users, you must create user accounts for each user on your network that you want to allow to connect to a share, and then you must use the Permissions button shown in Figure 12.7 to configure each user.
If you don’t want to provide unrestricted shared access to media files but don’t want to mess around with the complexities of setting up permissions (and believe me, it is complicated if you’re not a full-time network jockey), you might prefer to use a third approach: After sharing the Shared Documents folder, place files and folders you want to share in that folder.
The Shared Documents folder is automatically shared with the network when you run the Home Network Setup Wizard, or you can use the manual sharing method in the previous section to share the Shared Documents folder on the network. Thus, if you use that wizard to add a PC to your home network, you can copy media files to that folder, and they’ll be shared with other users. It isn’t necessary to share the media folders themselves.
Consider this approach if you want to keep most of your media files private but want to share some of them with other network users.
As you’ll see in the next section, sharing media files on a Windows Vista machine is a lot easier and can be done from a single menu.
The Windows Vista Network and Sharing Center (Figure 12.8) is the one-stop-shop for configuring media sharing. To launch it, open Control Panel’s Network and Internet category or select the link displayed in Network Explorer.

To enable read-only sharing of the contents of the Public folder (equivalent to Windows XP’s Shared folders) and allow other systems to find your folders, enable Network Discovery, File Sharing, and Public Folder Sharing (Read-only), as shown in Figure 12.8
You can also enable Password Protected Sharing, but this is not necessary for home networks. If you enable this option, you must set up users and permissions.
To enable sharing of media folders, open the Media Sharing portion of the Networking and Sharing menu, click Change, and make sure Share My Media To is checked. Click OK (see Figure 12.9).

From the next menu (Figure 12.9), select the PCs to which you want to permit access. You can do this by selecting each one and clicking Allow. If your system is never used outside a secure network, click Settings and then click the Allow New Devices and Computers Automatically check box (Figure 12.9). Computers and devices that are added to the network will automatically share media folders.
Note that you can also specify what types of media to share, what ratings to share, and what parental ratings to share. This last option is useful for preventing the kids from listening or viewing inappropriate material. Once other PCs are permitted to access shared folders, they are listed with check marks (refer back to Figure 12.9).
Note that you can also customize sharing with individual PCs or devices. To block a particular device, select it and click Deny. To change sharing settings for a particular device, select it and click Customize. Clear the Use Default Settings menu, and you can fine-tune what you share with a particular system or device.
Now you’re ready to share media folders. Open your user explorer, right-click the media folder you want to share, and select Share. From the Share menu (Figure 12.10), click Advanced Sharing and then click the Share This Folder checkbox on the Advanced Sharing dialog (Figure 12.10). Enter a new name for the share, click Apply, then OK to close this dialog, and then click Close.

Other computers running WMC can then use the Library Setup menu to watch the newly shared folders for media (Figure 12.11).
→ | For more information on the Library Setup menu, see “Optional Setup: Music, Pictures, and Videos Library,” Chapter 3, p. 74. |
More and more users have MacOS or Linux systems on their networks. If your network includes MacOS or Linux computers with media files you’d like to view in WMC, this section will help you access media on these systems.
Note
For details, see the article, “Windows Vista File Sharing in Mac OS X Leopard,” at http://pelz-sherman.net/blog/?p=46.
In MacOS X “Leopard” and newer versions, the user needs to configure file sharing to use SMB (which is not the default method) and might need to manually enter the IP address of the MacOS X computer in Windows Vista’s Network Explorer. Media in the Mac’s Public folder will then be available to Windows Vista (and other Windows versions on the network).
To enable Windows Vista to view shared folders on a Linux system, you must install Samba version 3.0.22 or greater on the Linux system. This version of Samba supports the default password authentication method used by Windows Vista (NTLM version 2). You must also configure Samba with the name and password of the Vista user who will be accessing the share.
Note
For details, see Ed Bott’s article, “Vista Hands On #13: Connect to a shared folder on a Linux machine,” at http://blogs.zdnet.com/Bott/?p=236.
The Windows Home Server operating system enables Windows home networks to have a centralized storehouse for media and other types of files and a centralized backup for valuable information. Windows Home Server (WHS) can provide media files for WMC and can back up media created or edited with WMC and complementary programs such as Windows Movie Maker and Windows Live Photo Gallery.
Windows Home Server is included in home servers from various vendors and is available separately for use on existing hardware. The following sections discuss how to use Windows Home Server in conjunction with WMC.
Note
For more information about Windows Home Server, read the documentation available from the Microsoft website (you can find a guide to most of this information at http://mswhs.com/documentation/, which is part of the excellent MS Windows Home Server blog) and the book Microsoft Windows Home Server Unleashed by Paul McFedries (Sams, 2008).
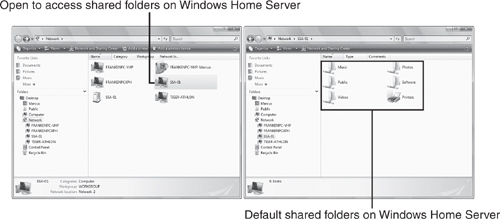
Windows Home Server has several preconfigured folders that can be used for sharing media (see Figure 12.12). These include
Music
Photos
Videos
Before you can store media in these folders, you must set up an account on Windows Home Server. You can either set up a user account that matches the username and password you use on the system connected to Windows Home Server, or you can activate the Guest account, which requires no password and enables all systems on the network to access folder shares on WHS.
Note
The Guest account is easier to use in a home network environment, but you should not use the Guest account unless you use a secure wireless network or a wired network.
A secure wireless network should use a non-standard SSID (the name of the wireless network) and should use WPA2 (or WPA if WPA2 is not supported by all hardware) security with a strong mixed-case alphanumeric key (capital and lowercase letters and numbers).
To enable the Guest account in WHS, log into the WHS Console and click the User Accounts icon. Click Enable Guest (Figure 12.13) and click OK to enable the Guest account.
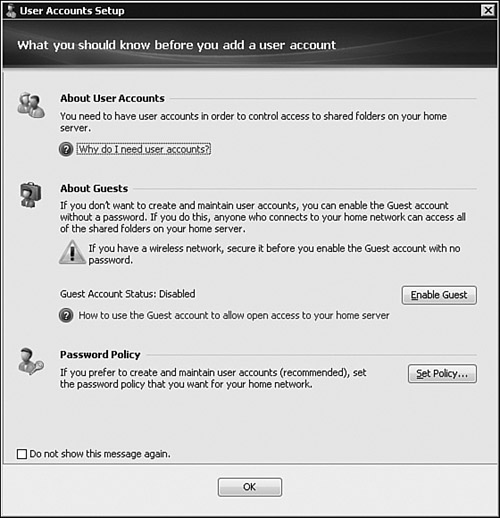
After setting up a user account or a Guest account, you can close the Windows Home Server Console.
You can copy/paste or drag and drop media from your photo, video, or music folders into the corresponding folders on your server (Figure 12.14). After media is copied to a share in Windows Home Server, you view the share the same way you’d view any other shared or local folder (Figure 12.14).

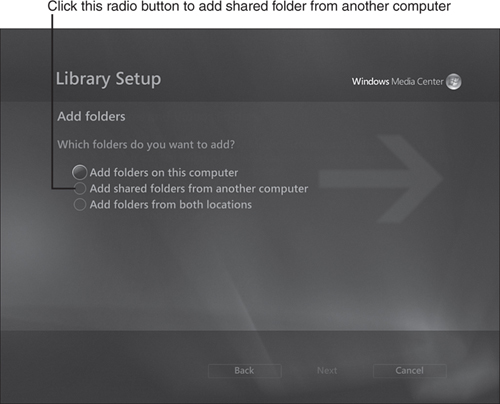
To access shared media stored on Windows Home Server from WMC, use Library Setup, specify the option Add Shared Folders from Another Computer, and select the folders you want to watch on the system running WHS (Figure 12.15).

You can work with the media stored in Windows Home Server shared folders the same way you would work with media stored in other shares on the network.
→ | For details, see “Optional Setup: Music, Pictures, and Videos Library,” Chapter 3, p. 74. |
Whether you use WMC to view media shared by other PCs on your local network, Windows Home Server shares, or Internet video and TV content, the last thing you want to see is the WMC animated circle icon (WMC’s replacement for the traditional Windows hourglass) telling you to wait. Although system performance has some impact on how fast WMC delivers network and Internet media to you, the choices you make in Internet and network connection types and configuration have a bigger effect on how fast—or how slow—you receive media. Faster is better, and the following sections will help you choose the fastest connection types and best configuration tricks for your hardware.
If you live in an area that has both cable and DSL broadband connections, keep in mind that it’s no longer always the case that cable connections are faster than DSL. Many cable and DSL providers have switched from a single “one-size-fits-all” broadband package to various tiered services ranging in speed from 768Kbps down/384Kbps up to as much as 10Mbps down/1Mbps up or faster.
Tip
You can save money by bundling multiple services, such as telephone, TV, or wireless on the same bill.
You might have four or more tiered packages to choose from, so how can you make sure you’re getting the performance you need for enjoying the online media you crave? Skip the low-end packages and choose from the following:
If you’re mainly using the Internet for streaming music or web-quality (YouTube-style) video, a mid-range package offering download speeds of 1.5Mbps to 4Mbps will be sufficient.
If you want to stream standard-quality video and web TV, opt for a 6Mbps to 8Mbps package.
If you want to stream HD Video, or if your home network has multiple users who want to stream various types of media at the same time, opt for a 10Mbps or faster package.
If you’re beyond the reach of cable or DSL connections, your choices are far more limited:
Satellite Internet services such as HughesNet and StarBand offer maximum download speeds of 1.5Mbps, and downloading excessively large media files or other content can trigger significant download speed reductions under the terms of each company’s Fair Access Policy.
Point-to-point wireless broadband services are available in some rural areas. Generally, these services depend on a direct line-of-sight connection to the service provider’s towers.
Note
HughesNet’s Fair Access Policy is available at http://go.gethughesnet.com/faPolicy.cfm.
StarBand’s Fair Access Policy is available at http://www.starband.com/acceptableuse.html#fairaccesspolicy.
HughesNet determines Fair Access on a daily usage basis, while StarBand uses a rolling seven-day window to determine Fair Access.
Although IEEE-802.11n (Wireless-N) networking is becoming the preferred network type for new home and small-business wireless networks, the vast majority of existing home wireless networks use the IEEE-802.11g (Wireless-G) standard, which is a faster version of the 802.11b standard. A few home and office networks use the 802.11a standard.
To help you get the most out of the following sections, it’s useful to understand how the various flavors of 802.11-based wireless networks compare to each other. Table 12.1 provides that comparison.
Table 12.1. 802.11-Based Wireless Network Types
Wireless Ethernet (Wi-Fi) Standard | Radio Frequency Used | Maximum Speed | Number of Channels[1] | Also Known As | Connects With |
|---|---|---|---|---|---|
802.11a | 5GHz | 54Mbps | 12 | Wireless-A | —[2] |
802.11b | 2.4GHz | 11Mbps | 3 | Wireless-B | 802.11g |
802.11g | 2.4GHz | 54Mbps | 3 | Wireless-G | 802.11b |
802.11n[3] | 2.4GHz & 5GHz[4] | 130Mbps[5] 300Mbps[6] | 3(2.4GHz) 12 (5GHz) | Wireless-N | 802.11b, g (2.4GHz) 802.11a (5GHz) |
[1] Non-overlapping [2] Requires dual-frequency hardware to connect to other standards [3] 802.11n is not yet a final standard; Wi-Fi Certified 802.11n products are currently certified as meeting Draft 2.0 (or later) pre-release specifications. [4] 5GHz support optional and not available on most 802.11n hardware [5] Narrow (20MHz) channel; same channel width as used by 802.11a, b, and g [6] Wide (40MHz) channel | |||||
Most wireless routers can connect with more than one 802.11-based standard, so you can have a mixture of devices on a wireless network. However, if all of the devices on your wireless network use the same standard, you can change your router’s configuration to improve performance.
→ | For details, see “Changing Your Router’s Configuration,” this chapter, p. 361. |
The following sections provide tips and tricks to boost the performance of your network, many of which apply to more than one type of wireless network.
The speed of a wireless network is heavily influenced by the signal strength you receive. Most systems are configured to display a signal strength icon in the Windows notification area or system tray (directly to the left of the clock). If you are seeing only one or two bars, your system is getting a low signal and is probably not running as fast as it could. What can you do?
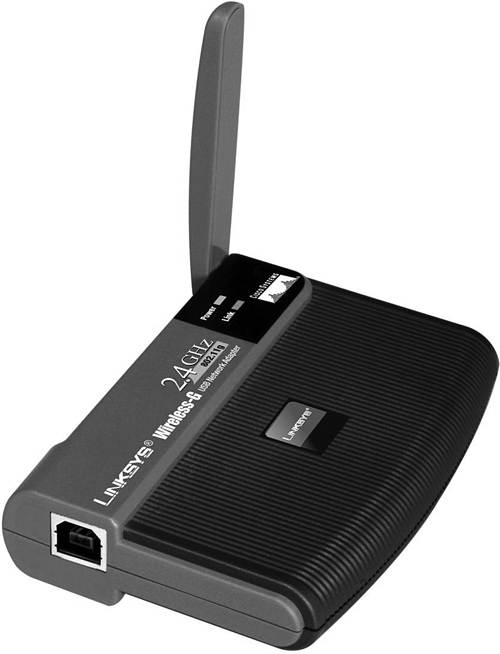
If your wireless adapter has an adjustable antenna, move the antenna around to see if you can improve signal strength. Most PCI desktop adapters have a swivel antenna, as do some USB adapters for notebook or desktop computers (see Figures 12.16 and 12.17).
If you use a compact USB adapter that has a fixed antenna, connect the adapter to the computer with a USB extender cable. You can then move the adapter around to see if you can find a stronger signal.
If your wireless adapter is built into your notebook computer, move the computer to a different position or adjust the screen angle. (Most notebook computers with onboard adapters use an antenna that surrounds the LCD panel.)
If your wireless router or desktop adapter has a removable antenna (or antennas), check with the vendor or a third-party source to see if a stronger antenna is available. Antennas are rated in dB gain: the higher the number, the more powerful the antenna.

Caution
There are several connector types used for removable router and desktop adapter antennas. The most common include RP-SMA, RP-TNC, and MC. If you decide to order a third-party antenna, you must be sure to specify the correct connector type. You can see examples of these and other connectors and the wireless routers and network adapters that use each connector type by visiting http://www.radiolabs.com/products/cables/cable.php?length=5#connector.
When you configured your 802.11g or other 2.4GHz wireless network, you might have read that you could choose from wireless channels ranging from 1–11. You can, but the dirty little secret of wireless networks that use signals in the 2.4GHz range is that only channels 1, 6, and 11 don’t overlap with each other. In other words, instead of 11 channels, you have only three that are worth choosing.
Even though channels 1, 6, and 11 don’t interfere with each other, if your wireless network uses the same channel as other nearby networks, interference from those networks can reduce the range of your wireless network and can cause your network to run at slower speeds.
So how can you find out what other networks are running in your neck of the woods—and the channels they’re using? There are a couple of ways:
If one or more of the PCs on your wireless network use proprietary client software instead of the standard Windows wireless network software, you can use the site survey feature found in most proprietary wireless network client programs to see the channels used by other networks. As shown in Figure 12.18, a site survey shows the name of the wireless network (its SSID), its channel, and other information.
If you use only the standard Windows (XP or Vista) wireless network client software, you can download and run a third-party program to detect and display information about nearby wireless networks. I currently recommend Metageek’s InSSIDer, available from www.metageek.net/products/inssider. Figure 12.19 shows how InSSIDer shows nearby networks.

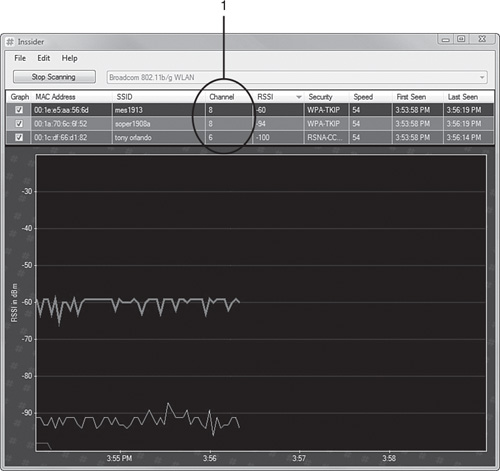
If you find that one or more wireless networks use the same channel that you are using, you should reconfigure your router to use a channel that is not in use by other nearby networks. If that is not possible, use a channel that is used by weaker signals. (The lower the dB rating shown in InSSIDer, the weaker the signal.)
→ | To learn how to change the channel in your wireless router’s configuration, see “Changing the Channel,” this chapter, p. 363. |
Before you can determine whether (and how) to change your wireless network’s configuration, you need to determine the types of wireless clients on your network. That is, you need to find out which computers have 802.11g, 802.11n, or other wireless adapters.
You can use each computer’s Windows Device Manager to determine this information.
Follow this procedure to open the Device Manager in Windows XP:
To open the Device Manager in Windows Vista, follow this procedure:
Figure 12.20 shows the Device Manager from a laptop with an integrated 802.11b/g wireless adapter and an 802.11n dual-band USB wireless adapter.

To change the channel used by your wireless router or to make other changes to your router’s configuration, you need to log into your router’s built-in configuration dialogs. Although some wireless network adapters include a proprietary wizard that can be used for changing some router settings, you’re usually better off making the needed changes manually.
To log into the router manually, follow this basic procedure:
Connect a CAT5, 5e, or 6 UTP cable between your computer’s Ethernet port and the LAN (not WAN) port on the router. Most routers include a multiport switch for wired clients, and you can use any available port.
Open your web browser and enter the IP address of the router into the address field. For example, if your router’s IP address is 192.168.1.1, enter http://192.168.1.1.
Enter the username and password needed to open the configuration dialog.
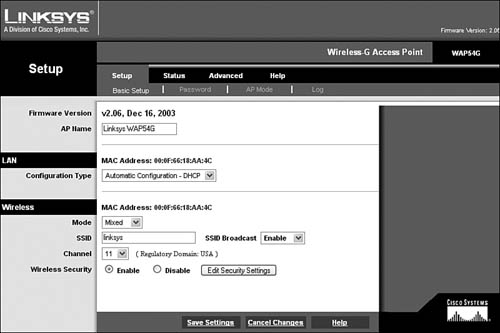
The router’s configuration dialog appears. Figure 12.21 shows a typical configuration dialog from a Linksys WAP54G wireless router.
Tip
To determine the IP address of your router, check the documentation for the router. If you don’t have the documentation, look it up at the vendor’s website. The website will also list the default username and password needed to access the configuration dialog.
Another way to determine the IP address of your router is to open a command prompt in Windows and enter the command ipconfig. The IP address listed for your network’s Default Gateway is the router’s IP address.
If you changed the default password or username when you set up your router, enter that information when prompted. Otherwise, enter the default values.
To change the channel, select a channel from the Channel menu (see Figure 12.22). Be sure to choose a channel that is not in use by nearby networks or a channel used by a low-powered network.

802.11n networks can provide faster performance than other 802.11-based wireless networks if wide channel settings are used. You can select this option from the basic wireless settings dialog. Available options include Standard (20MHz), Wide (40MHz), or Auto. Figure 12.23 shows you a typical example.

Note
Use the Auto setting if there are other nearby wireless networks, as this setting enables the router to use the faster Wide setting when possible, and switch back to the default (and slower) Standard setting if Wide would interfere with other networks.
If you select Standard or Wide, you must also select the appropriate channel to use.
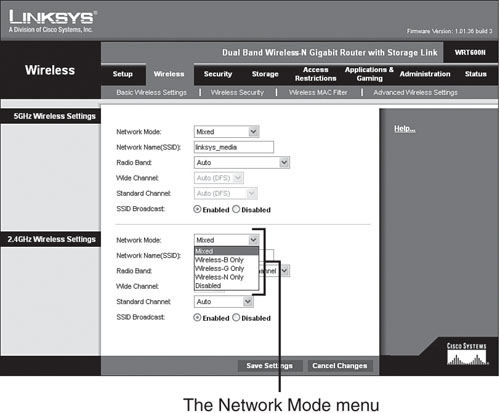
802.11g and 802.11n-based routers are designed to work with other versions of the 802.11 family. To enable a router designed to support one version of the 802.11 standard to connect with other versions, use the Mixed setting in the Network Mode menu. (Mixed is the default setting in most routers.) However, using Mixed mode slows down the network and should be used only if the network has different types of 802.11-based clients. If all clients on the network use the same 802.11 standard, choose the appropriate standard from the Network Mode menu, as shown in Figure 12.24.
Back when 802.11b (the first widely available version of wireless Ethernet networking) was new, the only way to secure the network was to use WEP encryption. Unfortunately, WEP encryption caused huge slowdowns in performance and wasn’t very secure.
The only reason to keep using WEP encryption these days is if you have some old 802.11b devices on the network. If you don’t, you need to switch to WPA or WPA2 encryption. (WPA2 is preferred.) These encryption standards have a relatively low effect on network performance and are much more secure.
To change to WPA or WPA2 encryption, you must change both the router and each client setting.
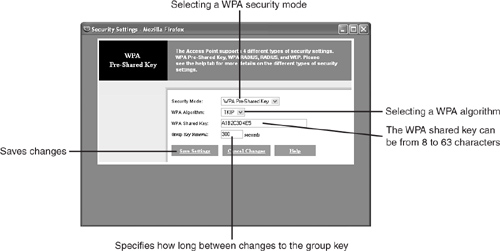
On the router (Figure 12.25)
Open the Wireless Security menu.
Select WPA Personal (also known as WPA-PSK) or WPA2 Personal (WPA2-PSK) encryption; WPA uses the TKIP algorithm, while WPA2 uses the AES algorithm.
Enter an alphanumeric shared security key.
Save the changes.
On a Windows XP client (Figure 12.26)
Open the Network Properties menu.
Click the Association tab.
If necessary, enter the SSID used by the wireless network.
Select/enter the options used on the router for encryption type, algorithm, and security key.
Click OK.

On a Windows Vista client when the wireless network is shown in the Connect to a Network dialog
Select the network to connect to.
When prompted, enter the encryption key (Figure 12.27). Vista will automatically determine the encryption settings for you.
Save the network settings when prompted.

If the wireless network is not displayed in the Connect to a Network dialog
Click Manually Connect to a Wireless Network.
Enter the SSID (Network Name), security type, encryption type, and encryption key using the same settings as those used on the router (Figure 12.27).
Check the Start This Connection Automatically and Connect Even If the Network Is Not Broadcasting check boxes.
The changes are saved for you.
Caution
As soon as you reconfigure the router to use a different type of wireless security, no one can access the network (or the Internet) until each client is configured with the same settings. Make sure nobody’s using the network or the Internet when you start this process!
Tip
To generate a strong (e.g., hard to crack) encryption key, visit the Ultra High Security Password Generator page at Gibson Research Corporation: https://www.grc.com/passwords.htm. Every time you visit (or refresh) the page, new random passwords are generated.
To make it easy to configure your router and client PCs with the new encryption key, visit the page, highlight the key you want to use, and copy/paste the key into Notepad. Save the file.
When you configure the router, open the file you saved in Notepad, highlight the key, copy it, and paste it into the encryption field on the router’s configuration dialog.
When you configure each client PC, use the same procedure to copy/paste the encryption key.
Although wireless Ethernet (802.11 or Wi-Fi) networking is very popular, if you have PCs that are near your router, you can get even faster performance if the PC and the router support Gigabit Ethernet.
Gigabit Ethernet runs at 1000Mbps, which is several times faster than even the fastest wireless standard (802.11n), and it’s also ten times faster than Fast Ethernet (100Mbps).
To determine if your router supports Gigabit Ethernet, check its documentation. You can also check your computer’s documentation, but if you’ve added your own network adapter or your computer manual’s lost in a drawer some-where, you can also check the Windows Device Manager (Figure 12.28).

Although many recent PCs (both desktops and laptops) include Gigabit Ethernet adapters, many routers only support Fast Ethernet. (Gigabit Ethernet also supports Fast Ethernet.) If you want to use Gigabit Ethernet networking, you might need to upgrade your router.
If the PCs on your home network have faster wired or wireless network adapters than the router supports, the router is slowing down your network and should be replaced. Here are some typical examples:
Your computers have Gigabit Ethernet network adapters, but they connect to a router that supports only Fast Ethernet.
Your computers have 802.11a or 5GHz versions of 802.11n wireless Ethernet adapters, but they connect to a router that supports only 2.4GHz 802.11n or 802.11g.
Your computers have 2.4GHz 802.11n wireless Ethernet adapters but connect to a router that supports only 802.11g or 802.11b.
Before you replace your router, make sure you record
The type of encryption used to secure the wireless network (WEP or preferably WPA or WPA2)
The encryption algorithm used
The encryption key used to secure the wireless network
Channel, mode, and channel width settings
The MAC (hardware) address of the router; by using the MAC address cloning feature found in most routers, you might be able to switch the router without needing to contact your Internet service provider (ISP)
Any other special settings, such as DMZ, port forwarding, MAC address filtering, and so on
Note
If you are unable to connect to the Internet, contact your ISP. You might need to reregister your new router as an access device.
After you unplug the old router from your broadband device (cable, DSL, or satellite modem) and plug in the new router, you must reconfigure the new router to use the same encryption type, algorithm, and encryption key used by the wireless devices on your network. You must also plug in any network cables from PCs into the switch ports on the new router. After the new router is configured, your systems should be able to reconnect to the Internet and to each other.