
If you use Windows Media Center (WMC) as the primary (or sole) Windows task on your WMC PC, keeping your system working well is even more important than with a regular PC. After all, your WMC PC might be the primary or sole repository of family pictures, videos, and your CD and DVD collection, or you might use it as the main way to enjoy your digital entertainment assets. If you use it with a TV tuner, it might be your digital video recorder.
However you use WMC, keeping the system or systems where you use WMC running properly will help you enjoy glitch-free media. Use this chapter to learn how.
WMC is a CPU-intensive application, which is why we recommend using it on a fast dual-core or multi-core processor. However, making sure that other computer settings that affect CPU performance are also set properly can have a big effect on overall system performance, especially when you change between live TV and the Guide, encode a DVD, burn a CD or DVD, or other tasks.
WMC needs every bit of performance available from your system’s processor. However, default settings in Windows can rob you of maximum performance. Use the following tips to restore your system to full performance.
By default, both desktop and notebook/portable computers running Windows Vista use the Balanced power management scheme. Balanced drops CPU performance to 5% of maximum performance during idle periods, which can reduce heat and fan noise. Unfortunately, switching from 5% to maximum performance can cause lags and glitches in WMC performance.
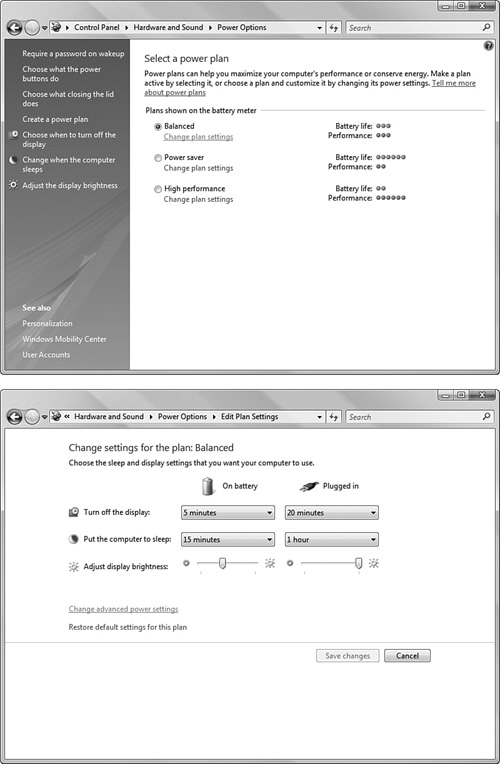
To reduce or eliminate lag, use High Performance, which never changes the processor speed. You can switch to High Performance through the Power Plan icon in the notification area of the Windows Desktop (Figure 16.1).

If your system is too noisy when you use High Performance continually and you have a fast dual-core system, you might prefer to set a higher minimum for the processor state in the Balanced Power Plan.
Here’s how:
Open Control Panel.
Open the Hardware and Sound category.
Select Power Options.
Click Change Plan Settings under the Balanced power plan (Figure 16.2) selection.
Select Change Advanced Power Settings in the Edit Plan Settings dialog (Figure 16.2).
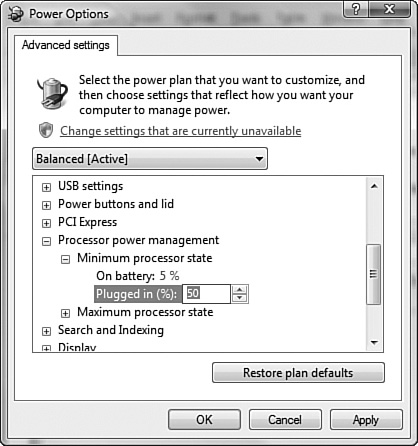
Expand the Processor Power Management category in the Power Options dialog (refer to Figure 16.3).
Expand the Minimum Processor State category, and change the value when plugged in from 5% to 50% (Figure 16.3).
Click Apply and then OK to save changes.
As noted in other chapters, systems running WMC need lots of disk space, especially if they are used for TV recording or other types of video storage. Use the tips in this section to maximize disk space and drive performance.
If you record TV and delete recordings frequently, your hard disk’s available space will become fragmented over time. The result? The system has to work harder to store TV recordings and other information, and you could wind up with choppy recordings. To stay out of trouble, make sure you keep at least 20% of your system drive free for defragmentation and for temporary file creation. On a 250GB hard disk, for example, you should keep at least 50GB free for these purposes.
To find out how much of your hard disk is currently in use
Open Computer.
Right-click your system drive (C:) and select Properties.
The blue section is the area in use, while the magenta section is the unused space (Figure 16.4).

To free up additional space, click the Disk Cleanup button and specify whether you want to clean up files for all users (provide UAC credentials as prompted) or only for yourself. After the wizard checks for various types of files, it displays file types that can be removed. Files that can be removed without affecting the operation of your system are checked (Figure 16.5).

Other types of files can also be selected if you don’t need them around anymore. If you’re not sure what to do, take a look at Table 16.1.
Table 16.1. File Types That Can Be Deleted by Disk Cleanup
File Type | Used For | When to Delete Safely |
|---|---|---|
Downloaded Program Files | Programs used by your browser, such as Java applets and ActiveX controls | Anytime |
Temporary Internet Files | HTML files, images, and other web page contents | Anytime |
Office Setup Files | Temporary log and setup files used by Microsoft Office | Anytime |
Recycle Bin | Files removed from normal folders with After Delete but not yet removed from system | After checking to be sure you don’t need these files anymore |
Setup Log Files | Files logging Windows Vista installation | After Vista is installed and is working properly |
Temporary Files | Files used as temporary workspace for applications and installers | After you close all other open applications; do not delete if you use applications that store information for future processing in the Temp folder |
Thumbnails | Displays thumbnails of image and other files in Windows Explorer in Extra Large, Large, and Medium Icons views | Only if you don’t use these views |
Per User Archived Windows Error Reports | Error reports for individual users already sent to Microsoft using the Problems and solutions Solutions applet in Control Panel | After reviewing reported problems and solutions |
Per User Queued Windows Error Reports | Error reports waiting to be sent to Microsoft | Only if you don’t want to send the reports |
System Archived Windows Error Reports | Systemwide error reports already sent to Microsoft using the Problems and Solutions applet in Control Panel | After reviewing reported problems and solutions |
After selecting the files you want to delete, click OK and then click Delete Files on the confirming dialog. A progress dialog appears as the files are deleted. Click the Close button on the Disk properties sheet to complete the process.
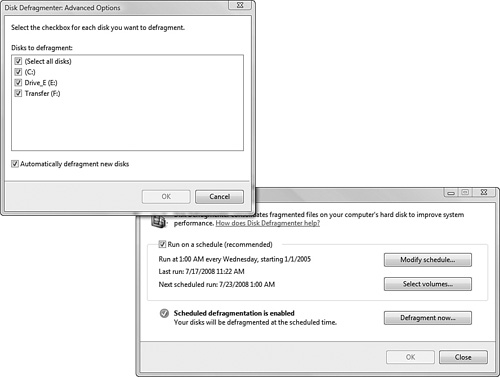
Windows Vista’s disk defragmenter helps improve the performance of your system by putting files and unused disk space into contiguous allocation units (“clusters”). To schedule defragmentation for a time that you normally aren’t using your WMC computer (including times you normally aren’t recording TV programs)
Open Control Panel.
Select System and Maintenance.
Select the Defragment Your Drive task under the Administrative Tools section.
Provide administrator-level credentials if prompted by User Account Control.
The Disk Defragmenter dialog (Figure 16.6) displays the current settings. By default, all connected hard disks are defragmented at the same time weekly.
To change the current schedule, click Modify Schedule and select the preferred frequency (daily, weekly, monthly), day of the week, and time desired (Figure 16.7). Click OK to close the dialog.
To add or remove volumes (drive letters), click Select Volumes (refer to Figure 16.6). Checked drives will be defragmented. Make any changes desired and click OK to close the dialog.
To defragment now, click Defragment Now. Defragmentation will run as a background task.
After reviewing current settings on the main dialog or making changes, click OK and then Close to close the Disk Defragmenter dialog.

Note
By default, Disk Defragmenter usually operates in the early morning hours. However, if you prefer to watch (or record) TV at night, but find that other times of the day are “vast wastelands” of TV viewing, choose a time when you don’t usually watch or record TV. Weekly defragmentation is recommended for best performance.
WMC, especially when you are using it to watch TV, movies, or videos, is very display-intensive. Use the tips in the following sections to improve display performance.
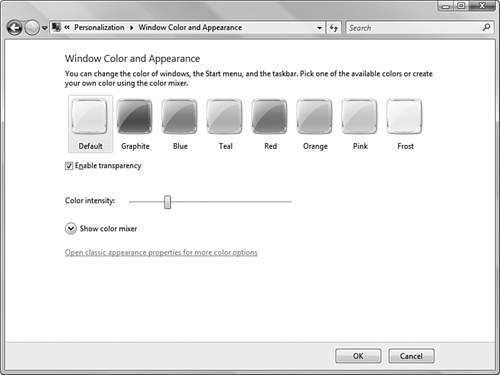
Almost all Windows Vista systems running WMC are configured to use the Windows Aero 3D desktop scheme. While Aero’s see-though overlapping windows and 3D task switching are great benefits for standard Windows users, if you’re spending most (or all) of your time looking at WMC, you’re losing about 5% of CPU time to the Desktop Window Manager (dwm.exe). To get back lost CPU performance, switch to Vista Basic. Here’s how:
Right-click an empty section of the Windows desktop and select Personalize or open Control Panel, select Appearance and Personalization, and click Personalize.
From the Personalization menu, click Windows Color and Appearance.
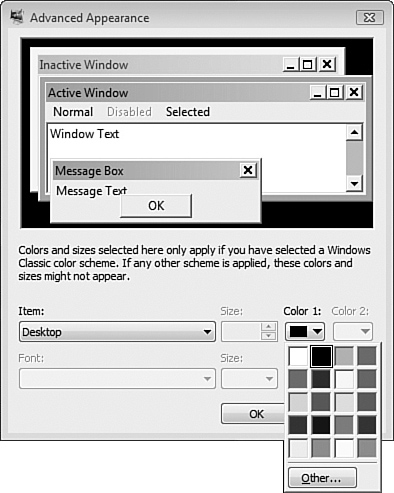
From the Window Color and Appearance menu, click the Classic Appearance Properties link (Figure 16.8).
Select Vista Basic from the Appearance Settings tab.
To change the color of the desktop, click Advanced and select the desired color from the Desktop color palette (Figure 16.9).
To accept changes, click Apply and then OK.
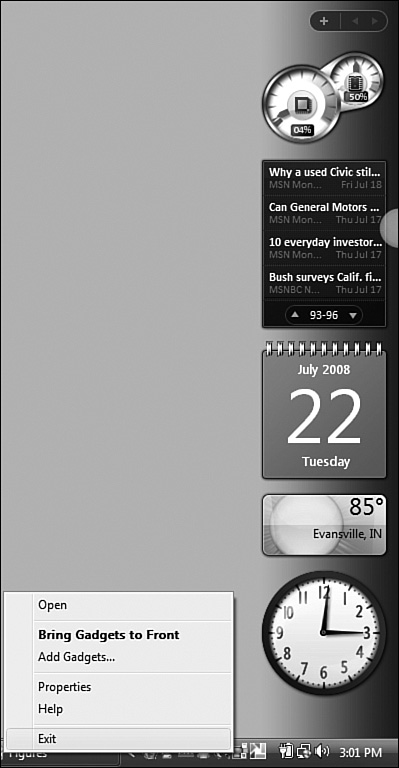
Windows Sidebar (Figure 16.10) is another productivity booster in Windows Vista that has no function once you leave the standard Windows desktop for the “10-foot UI” of WMC. When Windows Sidebar is running, it consumes about 12MB of RAM and uses some processor time.

Note
You can restart Windows Sidebar from the Start Menu’s Accessories menu. To enable it to run automatically when Windows starts, select Properties from the right-click menu and click the Start Sidebar when Windows Starts check box.
Closing Sidebar doesn’t free up the resources it uses. However, you can stop Sidebar from starting by using this procedure:
Right-click the Windows Sidebar icon in the notification area and select Exit. The Windows Sidebar dialog opens.
Clear the Start Sidebar when Windows Starts check box (Figure 16.11).
Click Exit. The Sidebar closes.
Some symptoms of network or Internet problems include
You can’t connect to the Internet to update Guide listings (Figure 16.12).
You see a prompt to Set Up an Internet Connection Before Trying to Update the Guide.
You can’t view other computers’ shared folders in Library Setup’s Add Folders wizard.
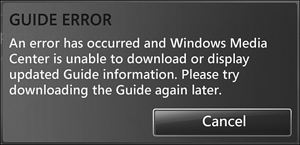
If you see an error message like the one in Figure 16.12, but retrying the connection works, try the following:
Update the drivers for your network card or internal adapter. If your WMC computer uses a removable network adapter, check with the adapter vendor for an updated driver. If your WMC computer has a built-in network adapter, check with the computer vendor for an updated driver. Note that you can use the Update Driver option in the network adapter’s properties sheet in Device Manager (Figure 16.13) to look for a driver update.
If your wireless network adapter or wireless router has a movable antenna, try adjusting the antenna position. If your wireless network adapter plugs directly into the USB port, use an extension cable to move the adapter away from your PC. Try different positions until you find a location with the most reliable (and fastest) connection. More bars equals a better connection.
If the problem is sporadic, you might be encountering interference from other devices that use the same frequency as your wireless network. 2.4GHz phones, microwave ovens, and other wireless networks can interfere with the operation of 802.11g, 802.11b, and most 802.11n networks.

To avoid interference, upgrade to 5.8GHz or 6GHz wireless phones, or use 5GHz 802.11n wireless network hardware. Microwave ovens can interfere with 2.4GHz wireless networks, especially those that use channel 11. Other wireless networks near yours can also interfere with your wireless network if they use the same channel. To avoid interference from other wireless networks, configure your wireless router to automatically select the channel, or use a program like InSSIDer to determine the channels being used by other nearby wireless networks.
→ | For more information about InSSIDer, see “Checking for Interference from Other Wireless Networks,” in Chapter 12, “Connecting with Windows Home Server and Other PCs.” |
→ | To learn more about using InSSIDer to find the best channel to use for 2.4GHz networks, see “Checking for Interference from Other Wireless Networks,” in Chapter 12, p. 359. |
Tip
If you are somewhat familiar with home networking but need more help in understanding how networking works in Windows Vista, see my book Maximum PC Microsoft Windows Vista Exposed (Que Publishing, 2007). For a more in-depth treatment of networking, see Networking with Microsoft Windows Vista: Your Guide to Easy and Secure Windows Vista Networking (by Paul McFedries, Que Publishing, 2008).
If you see a “No connection was detected” error message along with a prompt to “Set up an Internet Connection” message, it could mean that your computer is not connected to a network or that the network adapter is not working or is not connected to the computer. Check the simple stuff first:
If you use a wireless adapter that plugs into a USB port, make sure the adapter is plugged into a working USB port—Move the adapter to a different port.
If the adapter plugs into a USB cable, or if you use a wired network, replace the cable. A bad cable prevents the computer from detecting any device connected to it.
Check the Network and Sharing Center in Control Panel to see the status of your network (Figure 16.14). An X over the connection between the router and the Internet indicates a router connection problem, while an X over the connection between your PC and the router indicates a PC connection problem. Click the X to diagnose the problem. Keep in mind that a problem between the router and the Internet usually indicates a problem such as a loose or missing cable between your broadband modem and router or a configuration problem in the router.

If you use an HDTV to display WMC, its dual nature (TV and monitor) can cause some interesting problems. Use this list of common problems and solutions to get your WMC viewing back to normal.
Can’t see any picture (Windows Desktop or WMC desktop): The HDTV has probably been switched to a different input than the one needed for your computer. Most HDTVs have two or more digital (HDMI) inputs and several types of analog (composite, S-video, and component) inputs. Select the appropriate connection from the HDTV’s onscreen menu. If you still don’t see any picture after selecting the correct input, your WMC system might be running in a power-saving mode. Wake up the system by moving the mouse, tapping the keyboard, or pressing the WMC green button on your WMC remote.
Picture looks distorted: As discussed in Chapter 5, “Watching and Recording Movies,” the best way to handle different aspect ratios for TV and movies in WMC is to set your display to use Full aspect ratio and to adjust for other aspect ratios using the Zoom control. If you see distorted aspect ratios when viewing TV and movies in WMC, make sure your HDTV is configured to use Full aspect ratio using its onscreen controls.
Tip
To prevent the screen saver from turning on, open the Personalization menu in Control Panel, select Screen Saver, and choose (None) as the screen saver type.
To prevent the screen from blanking, open the Power Plan menu in Control Panel, click the Change Plan Settings link, and change the Turn Off Display option to Never.
→
To learn how to use the Zoom control in WMC, see “Selecting Zoom Settings,” Chapter 5, p. 156.
Picture looks distorted, even after adjusting HDTV to Full aspect ratio and using all Zoom options: This usually indicates that Windows is not using the correct screen resolution for the display. Here’s an easy way to check the screen resolution: Minimize WMC and display the Windows Sidebar. Add a round gadget, such as the CPU meter or the Clock, to the Sidebar. If a round gadget looks oval, your display is not configured properly.
WMC enables you to watch and record TV, but if you’re having problems, the following sections will help you solve the problem and get back to your favorite TV show.
Tip
If you’re having a hard time finding the right display settings for your HDTV or widescreen monitor, download driver updates for your display card. You can use the Update Driver option in the Device Manager properties sheet for your display card, or you can visit the vendor’s website.
If your display adapter is built into the motherboard, visit the motherboard vendor’s website for an updated driver.
If you don’t use a set-top box to receive cable TV, you have what I refer to in this book as “basic” cable TV (although your provider probably has another name for it). In basic cable TV, the TV tuner in your PC tunes in the channel. Use the following checklist to find your problem and its solution:
Can’t receive TV channels: First, rerun TV setup in WMC. If TV setup doesn’t detect a cable TV signal, check the connection between the wall jack and the TV tuner. Replace the coaxial cable if necessary. Use a TV set to verify that the jack is working correctly. After making the necessary changes, rerun TV setup. If you have more than one coaxial connection on your TV tuner, make sure you use the one intended for cable TV.
Some TV channels are fuzzy: You might not be getting a full-power video signal. If you are using a splitter to split the signal between your PC and a TV, try replacing the splitter with one that has lower signal loss or attach a signal booster to the connection before splitting the signal. If the cable is damaged, replace the cable. Rerun TV setup in WMC.
Some TV channels in the Guide can’t be viewed: First, rerun TV setup and make sure you have selected the correct cable TV provider and service type. Some cable TV providers have more than one level of basic cable TV service. In such cases, the Guide might list TV channels that are not part of your service package. Edit your guide listing to show only the channels your service provides.
The Guide listing doesn’t match the actual program being shown: This problem can be caused by selecting the wrong cable TV provider or by having an incorrect date/time setting in your computer’s clock. Check your computer’s date and time by opening the Date and Time applet in the Windows desktop’s notification area. Be sure to check the time zone setting as well.
→ | To learn how to edit channel listings in WMC, see “Editing Channel Listings” in Chapter 4, “Viewing and Recording Live TV,” p. 107. |
→ | To learn how to set up your TV signal in WMC, see “Setting Up Your TV Signal,” Chapter 4, p. 91. |
If you use the TV tuner on your system to receive output from a cable or satellite TV set-top box, an IR blaster from your PC is used to send channel-control signals to the set-top box. Check these problems and solutions:
Can’t change channels: First, replace the batteries in the remote. Then check the position of the IR blaster emitter. If the emitter is not over the IR receiver in the set-top box, the set-top box will not receive signals. If the emitter appears to be properly positioned, make sure the IR blaster is connected properly to the appropriate jack on your WMC remote control receiver or your PC’s integrated IR blaster jack. If it is connected properly, use the remote control provided by your cable company to change channels. If you are unable to change channels with the set-top box remote, the set-top box might be defective.
Can’t detect set-top box: If you can watch TV using a standard or HDTV, but WMC can’t detect the set-top box, check the connection between the set-top box and your PC’s TV tuner. Make sure the cable is connected to the correct connection on the PC’s TV tuner and the set-top box. Tighten the cable and rerun TV setup. If WMC still can’t detect the set-top box, replace the cable between the set-top box and the TV tuner.
Channel changing is erratic: Rerun the TV setup and make sure to select set-top box as the signal type. Be sure to run the channel changing and remote control configuration tests provided.
Some channels in your service pack aren’t listed: Rerun TV setup and make sure you selected the appropriate service provider. Note that if you have digital cable TV, you should choose the digital service provided by your provider.
Some channels listed in the Guide are not available: Many providers offer multiple levels of service. Use the Edit Channels feature to remove channels that are not part of your TV package.
→ | To learn how to configure your system for use with a set-top box, see “Digital Cable TV,” Chapter 4, p. 88. |
→ | To learn how to set up your TV signal in WMC, see “Setting Up Your TV Signal,” Chapter 4, p. 91. |
WMC can recognize lots of set-top boxes and the remote control codes they use. However, it’s possible that you might have an oddball that WMC can’t recognize. Don’t panic! Here’s what to do.
WMC doesn’t recognize your set-top box: If WMC does not recognize your set-top box during TV setup, you will be asked to choose your set-top box brand (Figure 16.15) and then choose the remote control code to use. During this process, you will be asked to test the code by changing channels. If you are unable to change channels with the first code selected, choose another and repeat the process until you find a code that works.
WMC doesn’t recognize your set-top box’s remote: If WMC isn’t able to identify your remote (Figure 16.16), you can train WMC to “learn” the codes used by your set-top box’s remote control.

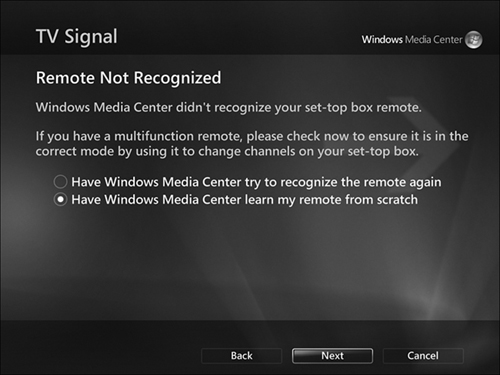
First, you are prompted to point the set-top box’s remote directly at the IR receiver used by your WMC remote control and to move the remote so it is almost touching the receiver window. Next, follow the prompts to identify the remote’s buttons (numbers, channel up, down, and so forth), as shown in Figure 16.17.

After set-top box codes are set up successfully, you must then test the IR signal speed by changing channels with your WMC remote (Figure 16.18). Once you find the correct speed, the process is complete.

Note
You can learn more about making the switch to digital TV (if you are using an antenna to receive your television signal) from Que’s Switching to Digital TV: Everything You Need to Know by Michael Miller.
Broadcast TV uses an antenna connection to the standard TV/cable TV connection on your TV tuner. See the following list of problems and solutions to help you get your standard TV connection working properly.
You can’t receive any TV channels: If you are in the U.S., check the calendar. If the date is February 18, 2009, or later, time’s up for virtually all broadcast TV signals. Starting at midnight on February 17, 2009, basically all analog TV broadcasting in the United States will be replaced by digital (ATSC) broadcast TV. Until then, check the connection between your TV antenna and your TV tuner. Make sure you are using the standard TV/cable TV connector on your TV tuner. Rerun TV setup in WMC.
You can’t pick up some TV channels: Check the position of your antenna. If the antenna is powered, make sure the antenna is turned on. Change the position of the antenna.
Some TV channels in the Guide can’t be picked up, or some channels you can pick up aren’t in the Guide: Edit the channel listings to match the channels you can receive.
ATSC (digital broadcast TV) will replace traditional NTSC broadcast TV in virtually every market in the U.S. starting February 18, 2009. While you can use the same types of antennas that are used for traditional broadcast TV, to pick up ATSC signals, you must use a TV tuner designed for ATSC signals. If you’re having problems, use this list of problems and solutions to help you see your favorite crisp, clear ATSC TV channels again.
You can’t receive ATSC TV channels: First, check your TV tuner. Is it designed to pick up ATSC TV signals? If not, replace it. If it is, make sure the antenna lead is connected to the correct lead on the TV tuner. On most tuners, a separate lead is provided for ATSC TV signals. Next, rerun the WMC TV setup program. Make sure TV setup detects ATSC signals. If you are unable to pick up ATSC TV channels, make sure you are using a powered antenna, preferably a directional antenna.
You can’t pick up all of the ATSC channels listed for your area: This is normal, especially if you use an indoor antenna. Rerun TV setup and use the ATSC signal strength wizard to run through available ATSC channels. Adjust the antenna for each channel, and delete any channels that display no signal or a minimal (red lined) signal.
The TV picture freezes or audio/video becomes desynchronized: Digital TV looks better than traditional broadcast TV, but it’s an on/off signal. A weak signal will cause the picture to freeze or will cause video and audio to become desynchronized. Make sure the antenna is properly positioned and is turned on.
Tip
If the antenna you use for ATSC (or traditional broadcast TV) can store different positions and settings for each channel, use this feature to store and recall the best setting for each channel.
→ | To learn how to configure your system for ATSC broadcast TV, see “Digital Broadcast TV (ATSC),” Chapter 4, p. 87. |
→ | To learn how to use the ATSC signal strength wizard in WMC, see “Checking ATSC Channel Signal Strength,” Chapter 4, p. 102. |
If you use WMC to watch TV, you probably use it to record TV as well. Use this list of common problems and solutions to make your TV recording hassle-free.
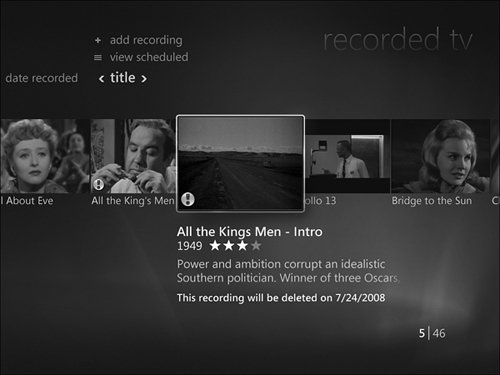
Already-recorded programs in Recorded TV are labeled with an exclamation mark (!): WMC uses the ! symbol as a general alert to tell you all is not well in Recordingland. To find out what this means, click one of the marked recordings. As you can see from Figure 16.19, the symbol indicates that the recording will be deleted on the day listed to make room for new recordings. If you want to keep the recording longer, change the Keep Until setting.
→
To learn more about Keep Until settings in WMC, see “Customizing Recording Options,” Chapter 5, p. 150.
→
To learn how to change Keep Until settings for existing recordings, see “The Recorded TV Menu,” Chapter 4, p. 122.
Already-scheduled movies and TV shows now display an (!) symbol: WMC will not let you schedule a movie to record if there’s not enough space, so if the Scheduled recordings dialog suddenly displays warning messages (Figure 16.20), and the Movie Details dialog indicates there’s not enough space to record the movie, something has happened to available space. Open the Recorder Storage menu to see how much available space is listed. If you used an additional drive for recorded TV but it is no longer listed, you need to find out why the drive is no longer visible. Once you get the drive working again, you will need to go back to the Recorder Storage menu and reconfigure it to use the additional hard disk.
→ | To learn more about Recorder Storage settings in WMC, see “Recorder Storage,” Chapter 4, p. 110. |
Music, TV, movie, and video content you enjoy in WMC should include some type of an audio track. If you’re not hearing anything, that’s bad. Before you start shopping for a hearing aid, use the checklist in this section to fix audio playback problems.
You can’t hear audio from the PC’s speakers: First, press the mute button on your WMC remote (or press the Mute icon on the mouse panel) to toggle audio on and off. (When audio is muted, you will see a Mute display appear briefly in the upper-right corner of your WMC display.) If the system isn’t muted, use the volume control on your WMC remote (or mouse panel) to raise the volume to an audible level. If nothing happens, check the speaker connection to the computer and make sure the speakers are turned on and are receiving power. If you have a sound card as well as integrated audio, plug the speaker into whichever audio device you actually use.
You can’t hear audio from a home theater system connected to your PC: Before checking mute and volume controls on the PC as in the previous suggestion, make sure the amplifier is turned on and that it is configured to receive audio from the PC. For example, if the PC is plugged into jacks marked “Video” on the amplifier, the amplifier must be set to “Video,” or the PC’s audio will not be received.
You can’t hear digital (SPDIF or coaxial) audio from your PC, either through its own speakers or a home theater system: By default, your PC uses analog mini-jack connections for audio output. If you want to use SPDIF fiber optic or coaxial digital output, you must select this option in the audio mixer. You can access the audio mixer through the Hardware and Sound category of Control Panel.
Note
Almost all desktop systems follow the PC99 color coding system for audio jacks. Pink is used for microphones; light blue for line in; lime green for stereo speaker or headphones; orange for subwoofers. On systems that support 5.1 or 7.1 surround audio with mini-jack (analog) speakers, use the lime green jack next to the pink jack for stereo speakers.
As you learned in previous chapters, a codec is a program that encodes and decodes various types of digital media. Although Windows Vista includes codecs for playing back and creating digital music, video, and photo files, you can have a variety of problems caused by codec issues, such as
Can’t play some types of media files in WMC: Windows Vista doesn’t support some types of video files, such as DivX, or it might not include the codecs used to create some files in file types it can normally use.
Can’t burn video DVDs from WMC or from Vista’s DVD Maker: If you install third-party DVD burning software but decide to use Vista’s own burning programs afterward, you might encounter this problem. It typically manifests itself by the encoding process quitting with an error long before the actual burning process begins. Although third-party DVD burning software offers many additional features over the built-in components in Windows Vista, I sometimes prefer to use Vista’s own burning programs.
To solve these problems, I recommend downloading and installing the freeware Vista Codec Package available at http://shark007.net. The Vista Codec package enables Vista to recover from problems caused by third-party DVD burning programs and enables WMC to work with a wider variety of media types.
Although you can install codecs provided by camera vendors to enable Windows Photo Gallery and its replacement, Windows Live Photo Gallery, to display RAW file types in Windows Vista, WMC does not support RAW files.
Note
If you have other playback problems, be sure to see the extensive help provided on the Vista Codec Package website for solutions.
However, if you want to view RAW files from within WMC, here’s a workaround: use the EMUCenter program discussed in Chapter 9, “Playing Games and Enjoying Online Resources,” to set up Windows Photo Gallery or Windows Live Photo Gallery as a “Windows game.” You can then launch either of these programs from within WMC and return automatically to WMC when you are finished.
Windows Photo Gallery is located here on a typical system: C:Program FilesWindows Photo GalleryWindowsPhotoGallery.exe
Windows Live Photo Gallery is located here on a typical system: C:Program FilesWindows LivePhoto GalleryWLXPhotoGallery.exe
→ | To learn more about EMUCenter, see “EMUCenter,” Chapter 9, p. 254. |
→ | To learn more about Windows Photo Gallery and Windows Live Photo Gallery, see “Windows Photo Gallery, Meet Windows Live Photo Gallery” in Chapter 14, “Creating Photo and Video Content for Media Center,” p. 396. |
Some of the tips in this chapter were suggested by the following resources:
Andrew Grant’s Shiny Things blog (www.andrewgrant.org) covers WMC and Windows Home Server.
Office Watch (http://news.office-watch.com) covers Microsoft Office and Windows + Office interactions.
The How-To Geek (www.howtogeek.com) offers several tutorials for Windows Vista.
Paul Thurrott’s Windows Supersite (www.winsupersite.com) is a must-read for Windows Vista users or for users of older Windows versions who are moving to Vista and to Vista’s WMC.