
Windows Media Center (WMC) can bring both broadcast and cable TV to your desktop, as well as the growing world of Internet TV. This chapter helps you understand your TV options, learn to equip your PC to tune in your preferred TV format, watch live TV, record live TV for enjoyment later, and enjoy Internet TV.
Even without the February 17, 2009, changeover from analog to digital broadcast TV in the U.S., understanding TV-watching options would be difficult enough. Although there’s the risk you might have a bad attack of MEGO (my eyes glaze over) by reading this section, you need to understand what your viewing options are before you choose TV-tuner hardware for your PC. The choices you make will have a big influence on the TV signals you can watch on your PC—and what you can do with those TV signals.
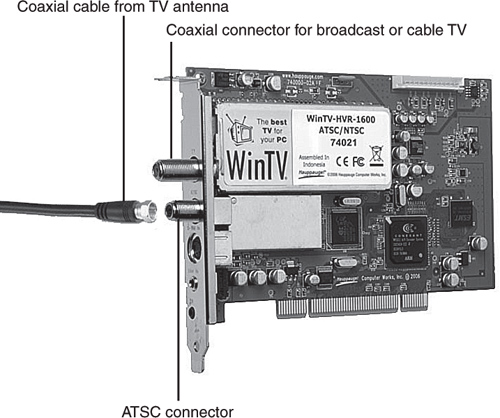
If you want to watch conventional broadcast or basic cable TV on your PC, any Vista-compatible TV tuner will work. Connect the coaxial lead from the cable TV service port (you don’t need a tuner box) or from a TV antenna into the broadcast TV/cable TV connector on the TV tuner, as shown in Figure 4.1.

However, after February 17, 2009, only low-power analog TV stations (basically repeaters and public-access channels) will remain on the air; today’s local and network-affliate TV stations will be broadcasting digital TV signals. An analog broadcast (NTSC)/cable TV tuner will still be able to pick up basic cable TV signals after the changeover date but will no longer be able to pick up broadcast TV.
What you need: standard TV tuner device (USB 2.0, PCI, PCI Express, or Express Card); antenna (for broadcast TV); cable TV input (for cable TV)
What changes after February 17, 2009: only cable TV can be received
Note
Some late-model TV tuners have two coaxial connectors, one for cable and NTSC (analog broadcast TV) and the other for ATSC (broadcast HDTV). Use the connector marked “TV” or “cable TV.” Figure 4.2 shows an example of a TV tuner card with an ATSC connector.
What’s replacing NTSC analog broadcast TV? ATSC digital broadcast TV! In most U.S. broadcast TV markets, ATSC is already here, broadcasting side-by-side with conventional analog TV until the February 2009 changeover. ATSC digital TV comes in two flavors:
SDTV (standard definition TV): SDTV is the same resolution as traditional analog broadcast TV but provides better picture quality because it uses a digital signal.
HDTV (high-definition TV): HDTV supports 16:9 widescreen displays at 720p, 1080i, or 1080p resolutions, depending on the signal broadcast by the TV station.
Most 22-inch and larger widescreen computer displays are capable of displaying HDTV, or you can send your TV output to a true HDTV, but regardless of how you watch broadcast TV on your PC, you won’t be watching any broadcast TV after the changeover unless your PC has an ATSC-compatible TV tuner device.
Connect the lead from the antenna to the ATSC connection on the TV tuner device, as shown in Figure 4.2.
An ATSC-compatible TV tuner can also pick up analog broadcast TV (as long as it’s around) as well as basic cable TV. However, for best results, you should use a directional powered TV antenna for picking up ATSC TV broadcasts instead of that cheap $10 set of rabbit ear antennas. Depending on where you live and how close you are to digital TV sources, you might even need a rooftop antenna for best results. Figure 4.3 illustrates a directional TV antenna you can use for picking up close-range HDTV broadcasts.

What you need: ATSC TV tuner device (USB 2.0, PCI, PCI Express, or Express Card); directional powered antenna
What changes after February 17, 2009: You might see higher-powered signals from existing ATSC stations, making it easier to pick them up; some stations might start broadcasting ATSC signals only after the changeover.
An increasing number of consumers are opting for digital cable TV. Unlike standard cable TV, digital cable TV offers more channels (including music), on-demand TV, premium content, and current-movie networks such as HBO, Cinemax, and others. Unfortunately, it’s a lot tougher to get your PC to work with digital cable TV.
Unlike standard cable TV, viewing digital cable TV with WMC almost always requires the use of a set-top box provided by the cable TV company. Here’s why: Most digital cable TV is encrypted, and only the set-top box provided by the cable TV company can decrypt the signals transmitted so they can be used by your TV—or by your PC.
Ironically, this means that if your TV tuner has two connections, one for conventional broadcast and cable TV and another for digital signals (ATSC HDTV or clear QAM cable TV), you use the regular TV connection, not the digital connection!
What you need: Digital cable set-top box (provided by digital cable TV provider); WMC remote control with IR blaster cable (the IR blaster transmits control signals picked up the WMC remote to the set-top box); TV tuner device (USB 2.0, PCI, PCI Express, or Express Card). Figure 4.4 shows you how it all fits together.
What changes after February 17, 2009: Nothing.
Although some late-model TV tuners now support unencrypted QAM (also known as “clear QAM”) digital TV (typically by using the same connector as the one for ATSC broadcast HDTV), most installations of Windows Vista Media Center do not directly support Clear QAM digital cable TV. Although the Media Center TV Pack released to OEM suppliers in July 2008 adds support for Clear QAM digital cable TV channels, it is not known whether, or when, Media Center TV Pack will be available as an update for existing WMC users.
However, the lack of Clear QAM support might not be as great a disadvantage as it seems. To see if your digital cable TV provider offers Clear QAM channels, you can try the following experiment if you currently have digital cable TV service and a TV tuner that supports Clear QAM:
Disconnect the coaxial cable running to the digital cable TV box.
Connect this cable to the connection used for Clear QAM cable TV on your TV tuner.
Start the TV tuner application provided with your TV tuner hardware.
Use its search function to look for Clear QAM TV channels (see the software’s documentation for details).
Compare the channels detected by the TV tuner with the channels available when you use the digital cable set-top box.
Prepare to be underwhelmed. When I tried this experiment, I discovered only two usable channels (a couple of local broadcast channels; the remainder were placeholders for pay-per-view sports channels) out of a dozen channels total, compared to over 150 via my digital cable TV set-top box. However, your mileage might vary; depending upon your cable TV supplier, you might find a lot of channels available.
If you discover that you can actually get a decent number of digital cable TV channels via Clear QAM, you can get WMC to “see” those channels by installing the Media Center TV Pack (if and when it becomes available), or by adding an HD HomeRun device from Silicon Dust (www.silicondust.com) to your Ethernet-based home network.
The HD HomeRun tuner from Silicon Dust enables all of the Windows Vista Media Center PCs on your Ethernet home network to view and record both ATSC and Clear QAM (unencypted digital TV) channels. (It also supports Windows XP Media Center and most third-party TV tuner applications, by the way.)
To learn more about using HD HomeRun with Windows Vista and to find a handy application for remapping channels, visit http://jarkhd.blogspot.com/2007/06/getting-hd-over-cable-with-vista-media.html.
The only way you can watch and record HD cable TV at present is by using an OCUR-compatible HDTV tuner, such as the ATI Digital Cable Tuner device from AMD.
→ | For physical setup and configuration details, see “Digital Cable Tuner,” this chapter, p. 97. |
WMC will not directly support satellite TV until the release of “Fiji,” the code name for the next release of WMC. In the meantime, though, you can use the method described in the section on Digital Cable TV to connect your satellite TV set-top box to your TV tuner.
→ | For physical setup details, see “Digital Cable TV,” this chapter, p. 88. |
→ | For software configuration details, see “Configuring Cable/Satellite TV Using a Set-Top Box,” this chapter, p. 93. |
You can set up your TV signal either by running the Optional Setup: TV selection during the initial configuration of WMC or by selecting Tasks, Settings, TV, and Set Up TV Signal.
The Set Up Your TV Signal wizard appears. Click Next to continue.
On the next screen, WMC asks you to confirm your region, based on the locale settings used by Windows. Select Yes if the information is correct or No if it is not correct. If you select No, provide the correct locale information as prompted. Click Next to continue.
Note
When you select this option, you will see a TV Signal Setup pop-up warning that using this option affects TV recording and may interrupt TV or radio on an MCE device. Click Yes to continue.
The Automatic TV Signal Setup dialog appears next. I recommend using the default setting (automatic) as shown in Figure 4.5.
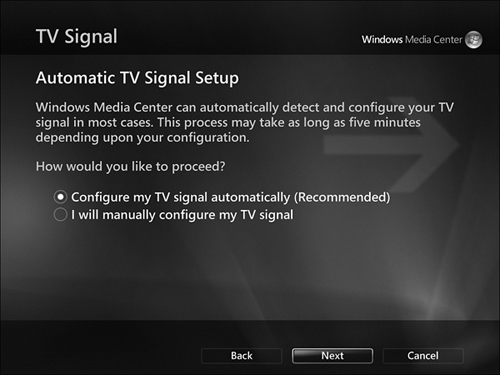
During the next few minutes, the system scans for set-top box signals, cable signals, antenna, and digital antenna signals. It’s a good time to take a break away from the PC. When finished, WMC displays the results. You should expect to see a message such as
TV Signal: Cable (if you have standard cable TV without a set-top box)
TV Signal: Set-top box (if you have cable or satellite TV routed through a set-top box)
TV Signal: Broadcast (if you use only broadcast TV)
If your TV tuner also has an ATSC (broadcast HDTV) antenna lead connected to an antenna, you will see a reference to Digital TV Antenna connections. Figure 4.6 shows a system with both digital cable TV and ATSC (digital TV) connections.

What happens next depends on the type of connection you have. If you have standard cable (no set-top box) or broadcast (analog or digital) TV, WMC goes directly to the TV Program Guide setup. However, if you have a set-top box or a Digital Cable Tuner, there are more steps to perform first, as described in the next sections.
→ | For information on the TV Program Guide, see “Configuring the TV Program Guide,” this chapter, p. 100. |
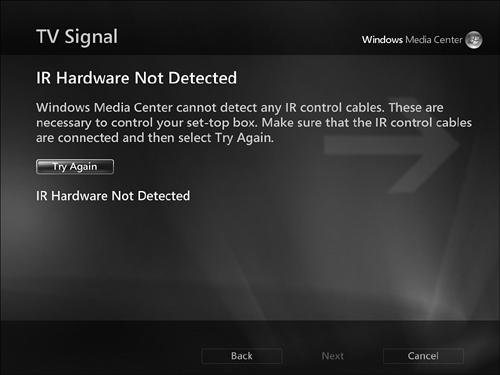
If you have a set-top box, you must next indicate whether you receive cable or satellite TV. After specifying your connection type, WMC checks to see if the IR control cable (also known as an IR blaster) is connected to your Media Center remote’s receiver. If it isn’t, you will see the dialog shown in Figure 4.7. Connect the IR control cable (refer back to Figure 4.4), and then click Try Again. When the cable is connected, you can continue.
Next, WMC asks you if you have a remote for your set-top box. Answer Yes, and you are prompted to identify the codes used by your set-top box remote control so they can be duplicated by the WMC remote.
During the Identify Set-Top Box Remote process, you are asked to press and hold specified buttons (typically 0 and Enter) on your set-top box remote. Watch the screen for prompts. Figure 4.8 shows a typical example of this process.

If you have problems with WMC identifying your set-top box or remote, see “Troubleshooting Set-Top Box and Remote Not Recognized Problems,” Chapter 16, “Troubleshooting Media Center,” p. 487. |
After you complete this process, pick up your WMC remote when prompted by the Set-Top Box Remote dialog and click Next to continue. To complete configuration of your remote, answer the following questions:
Select Number of Digits: Choose the number of digits in the highest channel your set-top box receives.
How Do You Change Channels?: Specify whether you press Enter (OK) or just enter the channel number.
Tip
If the channel didn’t change properly, make sure the IR blaster cable is connected to the WMC receiver and make sure the IR blaster emitter is over the IR receiver window on the set-top box (refer to Figure 4.4). Rather than use the stick-on pad, I use easily removable tape, such as masking tape, to secure the emitter until I’m sure of the correct location. If you have problems with cats or curious toddlers who like to play with cables, consider using electrician’s tape or duct tape to prevent the IR blaster from being pulled out of position.
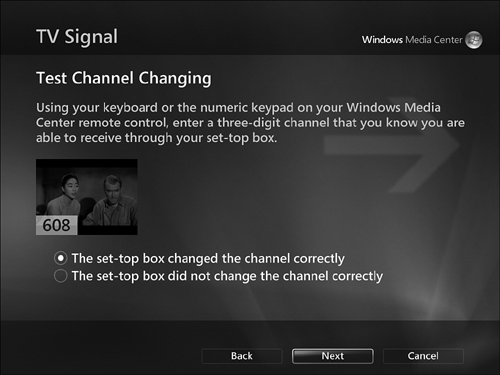
Next, it’s time to test channel changing. Enter the number of a channel you can pick up. (You can use either a keyboard or your WMC remote.) The WMC remote’s receiver uses the IR blaster cable to transmit the channel-change code to the set-top box. Keep your eye on the small TV picture, and select whether the box changed channels correctly or not (Figure 4.9). Then click Next to continue.
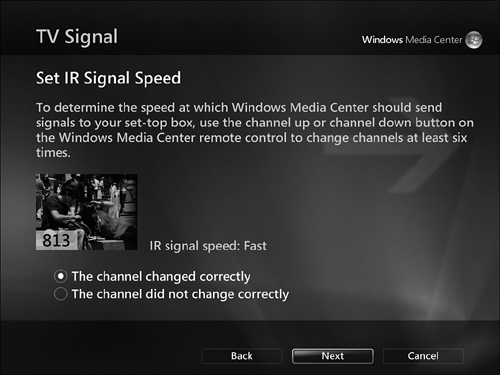
Chances are you’ll probably also want to use your WMC remote for some classic channel surfing, using the channel-change buttons. On the Set IR Signal Speed dialog (Figure 4.10), you are prompted to change channels using the channel up or down buttons on your remote at least six times. WMC starts out using Fast IR signal speed. If the channel did not change correctly, select The Channel Did Not Change Correctly, and WMC will use medium speed and then slow speed. When the test process is finished, WMC announces the selected speed on the next dialog.
Click Next, and you will continue to the TV Program Guide configuration wizard.
→ | For details, see “Configuring the TV Program Guide,” this chapter, p. 100. |
As discussed in Chapter 2, “Equipping Your PC for Media Center,” the Digital Cable Tuner (DCT) is the only way to receive and record cable-delivered encrypted HDTV, such as HBO, Showtime, and other premium channels, and it is only available for computers designed to support the Digital Cable Tuner with appropriate BIOS and other configurations. DCTs are available only in the U.S.
Generally, the DCT is sold as part of a system that supports it, but additional tuners can be bought separately. WMC officially supports two DCTs, but registry modifications permit the use of up to four DCTs (or other TV tuners). By using multiple DCTs, you can enjoy picture-in-picture support or record one channel while watching another.
Caution
If you are considering buying a PC that includes a DCT or adding a DCT to a PC that incorporates DCT support (these PCs are known as Premium Digital Cable Ready PCs), don’t do it until you verify that your cable TV company supports CableCARD and DCTs. A DCT is a one-way device. However, if your cable TV provider uses switched digital video (SDV), a two-way service being developed to provide more HD content, you cannot use a DCT to receive HD cable TV signals.
Although it’s possible for the end user to configure a DCT, in most cases, configuration is performed by a technician sent out from the cable TV provider. The technician must install a special PC Card known as a CableCARD into the DCT and activate it. The CableCARD, like a digital cable set-top box, decrypts HD cable signals.
Many vendors recommend that you configure your TV setup before installing the CableCARD to verify that you can pick up basic cable TV. Follow this procedure:
Make sure the DCT is properly connected or installed in your PC.
Start WMC.
Start the Setting Up Your TV Signal process as described earlier in this chapter.
Digital Cable should be detected as the TV signal type.
When you continue, you see a dialog called Are You Digital Cable Ready? Select the option to continue without a CableCARD.
On the next dialog, enter the Digital Cable Product Key from the Certificate of Authenticity sticker on your PC. (It might also be found on your system DVD or in your documentation.)
When you set up the Guide, be sure to choose your cable TV provider’s Digital service.
Record the serial number and ID numbers on the CableCARD. This information is needed to install it.
Shut down the PC. If the DCT is external, disconnect its power source.
Slide the CableCARD into the slot on the DCT.
If the DCT is an external unit, reconnect its power source.
Restart the computer.
Start WMC.
Go to Tasks, Settings, TV, and Set Up TV Signal.
The system will detect your CableCARD and prompt you to continue.
Enter the serial number for the CableCARD when prompted.
When prompted, call your cable TV provider and tell the representative you want to activate a CableCARD on a Windows Vista Media Center system. You might need to provide the serial and ID numbers for the CableCARD during this call.
After you activate the CableCARD, go to Set Up Guide Listings. Then verify that you can watch HD cable channels.
→ | For details, see “Configuring the TV Program Guide,” this chapter, p. 100. |
The DCT is a specific type of network device, and if you are unable to view TV channels with it or display some types of programs, you might need to adjust firewall settings, update firmware, or perform other diagnostic tasks. Contact your cable TV provider for assistance.
Note
If you have more than one DCT, you must install each CableCARD separately. Once a CableCARD has been activated, it cannot be moved to a different DCT unless the cable TV company has been informed of the change and the CableCARD is reconfigured to an uninstalled configuration.
You can buy a converter box to enable old-school NTSC TVs to pick up digital TV. Can you use the same box (the ones you can buy with the aid of a $40 voucher you get from https://www.dtv2009.gov/) to enable an analog-only TV tuner to pick up ATSC TV channels? After buying a couple of these boxes, I decided to find out.
For my experiment, I used the popular Magnavox TV100MW9 converter box along with an Hauppauge WinTV USB2 external TV tuner (29xxx) series and a Radio Shack directional powered antenna (the same one pictured earlier in this chapter). Could I get this combination to work? Not exactly.
After fiddling around with trying to run the automatic TV signal detection feature, which stubbornly insisted on seeing the converter box as a cable or satellite TV set-top box (and couldn’t, therefore, see any ATSC channels), I was forced to set up the TV signal as a plain old antenna configuration. When I tuned into Channel 3, I was able to display the setup dialog for the converter box (the converter box sends signals to Channel 3 by default but can be configured to use Channel 4), but I couldn’t switch to other channels to view ATSC TV.
The converter box supports digital TV channels like this: 7.1, 7.2, and so on. Unfortunately, WMC can’t handle subchannels unless you use an ATSC TV tuner, and even then, it only recognizes the first subchannel (the one that carries the same content as the analog broadcast channel) and assigns each one a four-digit number well beyond the reach of even the most high-end cable TV service. Channel 14.1, for example, shows up on my ATSC TV tuner as 1141.
Trying to edit the Program Guide to let me select or change channels was equally useless. In the end, there was only one way to get WMC to see ATSC TV channels delivered via the converter box: I tuned WMC to Channel 3 and then used the remote control included with the converter box to manually select the channels I wanted to watch, using the converter box’s own tuner. If this sounds like the way you used to connect your VCR to your TV, you’re right. Not exactly 21st Century, is it?
In the end, I concluded that buying a digital converter box instead of a new TV tuner with ATSC support was a good way to waste $10-20 (plus tax) of your own money, not to mention $40 of the taxpayers’ money (which, come to think of it, is your money, too!). If you want to watch over-the-air HDTV, you’ll save plenty of time and headaches by using an up-to-date TV tuner with ATSC support. My converter boxes are now doing the job they were designed to do: bringing digital broadcast TV to TVs that don’t have cable TV hookups.
After WMC determines the type of TV signals you receive, it’s time to set up the TV program guide, officially known as the Guide. This process can also be started manually from the Settings menu.
On the opening screen of the Set Up Your TV Program Guide process, click Next to continue. You must then agree to the Guide’s privacy statement and terms of service before you can continue.
Note
If you select the option to view the privacy statement, your web browser opens and displays the privacy statement in a separate window. If you are running WMC on a system that makes using a web browser difficult, you can also access the Privacy Statement at http://www.microsoft.com/windowsxp/mediacenter/evaluation/privacy/mcevistaprivacy.mspx.
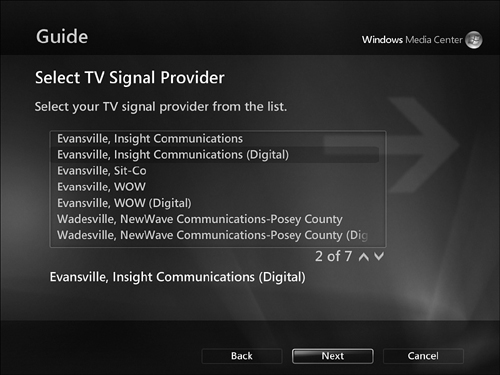
Next, you must enter your ZIP Code to continue. The ZIP Code is used to look up cable TV providers in your area. Select the appropriate provider from the list that is displayed on the next dialog (Figure 4.11).
Caution
There are three ways to foul up the TV signal selection process:
Enter the wrong ZIP Code.
Choose the wrong provider.
Choose the wrong version of the provider’s service.
If you don’t see your cable TV provider, click Back and re-enter your Zip Code. Make sure you choose the Digital option for your provider if you use a digital set-top box or DCT. Otherwise, you won’t see the digital channels you’re paying for.
After you select your provider, WMC downloads the latest Guide information from the Internet. This can take a couple of minutes or more, even on a fast connection.
→ | If you have persistent problems with downloading Guide updates, see “Solving Network and Internet Problems,” Chapter 16, p. 480. |
Note
You might see a Guide Error pop-up message with a Cancel button during the process. This message is displayed if an error takes place. Click Cancel, select Yes on the Download Incomplete dialog, and click Next. Usually, the second try will work.
After the download is complete, click Finish or Next as prompted. If you’re using cable or set-top box TV signals, you’re ready to watch TV. However, if you’re using ATSC signals, there’s another step to complete.
If your TV tuner picks up ATSC (digital HDTV), the next step is to check signal strength. Click Next when prompted to continue. You can also start this process manually by selecting Digital TV Antenna Signal Strength from the TV section of the Settings menu.
Tip
Be sure to record the position of the antenna for each ATSC station you can pick up. If you use a powered rotating antenna, see if the remote control has a recall or memory function that can store antenna positions for reuse.
Note that some antennas don’t rotate fast enough to the right position during the individual channel scan. To verify that you have the antenna in the best position for a particular channel, position the antenna, wait until WMC rescans the channel, and check the signal strength indicator. Green bars indicate the strongest signal, and orange bars indicate a weaker but still acceptable signal.
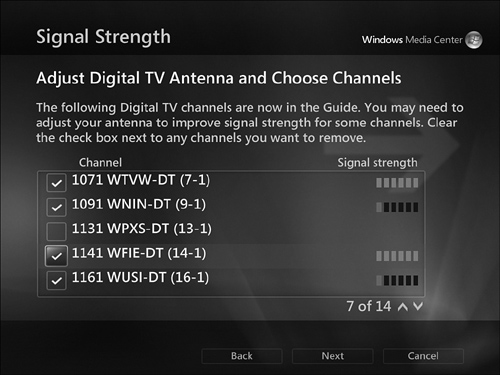
The ATSC providers in your area are listed, and WMC checks signal strength for each channel in turn. The process repeats until you click Next, enabling you to perform two tasks during the process:
Adjusting the position of the antenna you use to pick up ATSC signals.
Clearing the check box for channels that display minimal (none, one, or two bars) signal strength. When you clear the check box, the channel will be removed from the Guide.
The process is illustrated in Figure 4.12. For best results, a rotating roof-mounted antenna is recommended. After you click Next, a You Are Done! dialog appears. Click Finish to exit.
Note
You might have more ATSC channels listed than will fit on one screen. To see additional screens, click the down arrow icon below the signal strength bars. To return to the first screen, click the up arrow icon.
If you add a more powerful ATSC antenna later, repeat this process to determine if you can pick up more stations.
If you’re planning to install a roof-mounted antenna to help pick up ATSC channels, some useful web resources include
The AntennaWeb site (www.antennaweb.org) helps you choose the best antenna for your location, based on your input, and provides a color-coded listing of nearby ATSC channels and the best type of antenna for each category of station.
How to Install a TV Antenna (www.terrestrial-digital.com/antenna_installation.html) provides basic tips on what you need, including when to use a pre-amp.
Denny’s Antenna Service (www.dennysatennaservice.com) offers lots of resources. Go to the Site Map to find specific recommendations by state and locality for antennas, pre-amps, and related equipment.
Crutchfield’s Choosing and Installing an Antenna for HDTV (www.crutchfield.com/Learn/learningcenter/home/antenna.html) provides a useful introduction to ATSC along with links to help rural users tune in distant ATSC (HDTV) signals.
To watch TV with WMC, you have three options:
→ | For more information about Search, see “Using the Search Tool,” Chapter 5, “Watching and Recording Movies,” p. 145. |
If you’re a hard-core channel surfer, you might be OK with clicking the channel-changer on your remote or the channel change control on the mouse control panel, but if you’re looking for a particular program that’s on now (or later), check out the TV Program Guide.
The Guide is the fast way to find out what’s on TV now—and later. To access the Guide from the WMC desktop, scroll to the TV + Movies menu stripe and move across to the Guide. As Figure 4.13 shows, you can navigate to the Guide or other parts of the WMC desktop while continuing to watch TV. And even when the Guide is displayed, the current TV show continues to play behind it.
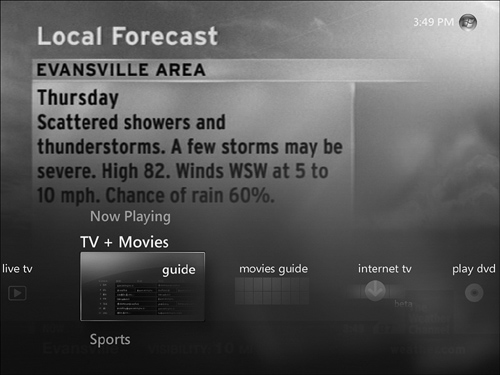
The basic Guide displays a range of channels (if you’re watching TV, the current channel is shown at the top of the list) and the grid for the current block and subsequent blocks of time. Programs in the current time block are shown in white type; future programs are shown in blue type. The resolution and aspect ratio of your display determines how much of the grid you can see at a time. (With a widescreen display, you’ll see more than you will see in standard mode.)
Tip
To switch quickly to the WMC desktop, click the WMC button on your WMC remote. If your WMC remote has a Guide button, you can use it to go directly to the Guide.
To use the Guide to find out the details of a particular show, highlight the show block. The series name, episode name, and other details appear. To watch a particular show, highlight the show block in the current time period and click OK on your WMC remote (or click the show with your mouse).
To see information about the show while you watch it, click the Info button on your remote or right-click your mouse; select Program Info from the menu (Figure 4.14).

If you select a show in a future time period, you can record the show or see more information about the show. To see additional information about a forthcoming show, click its listing in the Guide.
Figure 4.15 compares Program Info listings for a TV show currently being broadcast and a forthcoming show.

Options in the Program Info menu include
Watch: Returns this program to full-screen for watching (applies only to a program currently being broadcast).
Record: Records this episode only.
Record Series: Records this and all future episodes of the show.
Advanced Record: Configures recording quality and other settings.
Other Showings: Displays other broadcast times for the series.
→ | For more information about recording TV, see “Recording Live TV,” this chapter, p. 110. |
To quickly move around in the Guide with your mouse, click the left/right/up/down arrows visible above the mouse control panel (Figure 4.16).

To see only the upcoming episodes on a single channel, highlight it, and the current and next two shows are listed below the guide. To see more upcoming episodes, click the channel, and a vertically scrolling list appears.
Tip
Want to surf the Guide even faster? Enter the channel number with your WMC remote or keyboard, and the Guide will display that channel (or the nearest channel if you enter a number not in your service package) at the top of the current listing.
Prefer to choose TV by categories? Click the Categories section at the left side of the Guide to expand it. From the expanded Categories list, move the selector over a category, and the Guide will display only the channels in the selected category (see Figure 4.17). Click the category, and you can then choose a channel from the list. To view all channels, click Categories again and select All.

Unless you subscribe to every cable channel offered by your provider or are lucky enough to pick up every ATSC channel listed for your area, there are channels listed in the program guide that you can’t pick up.
If you can’t pick up an ATSC broadcast channel, you will see a No TV Signal message after you tune to it. (It can take a few seconds for this message to be displayed.)
If you select a cable channel that’s not in your package, you’ll see a message from your cable operator encouraging you to place your order.
Tip
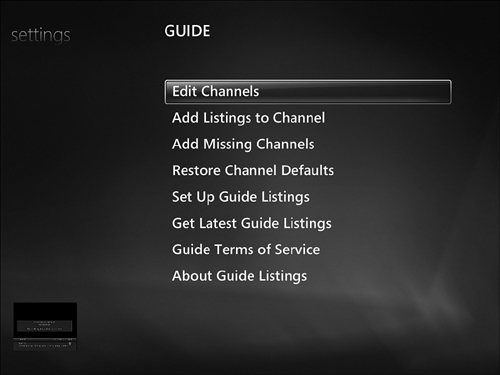
If you upgrade your cable service or buy a better antenna for picking up ATSC signals, you can use the Restore Channel Defaults option shown in Figure 4.18 to restore all channels in the Guide. You can then re-edit your list.
Instead of trying to remember which channels are not available, use the Edit Channels option in the Guide section of the Settings menu (Figure 4.18). To get there from the WMC desktop, select Tasks, Settings, Guide.
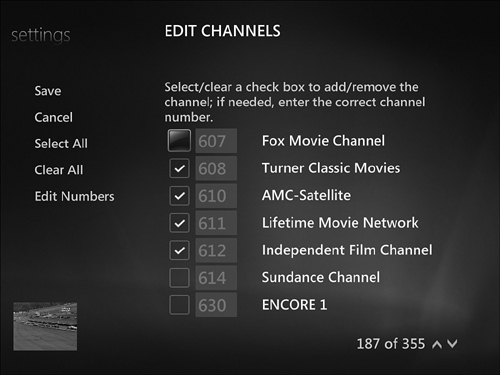
To remove channels, select Edit Numbers, scroll through the Edit Channels listing, and clear check boxes for channels you can’t pick up or don’t have included. (Figure 4.19 shows a typical example.) After you’re done editing channels, click Save to save your changes.
WMC isn’t just a way to watch TV—it can act as a DVR, enabling you to time-shift TV programs or create a long-term library of favorite TV shows. The following sections show you how to record TV and manage your TV recordings.
To configure TV recording defaults, open the TV settings menu and select Recorder. This opens the Recorder Settings menu.
The Recorder Settings menu has three sub menus:
Recorder Storage: Specifies where to store TV recordings.
More TV Locations: Selects where to look for TV recordings to view with WMC.
Recording Defaults: Specifies quality, timing, and other settings used for recording TV and movies.
The Recorder Storage dialog provides a visual representation of available recording space at the current quality setting and offers options for changing where and how you record TV. The number of hours of TV you can record depend on three factors:
Whether you’re recording standard or HD video
The amount of hard disk space available
The quality setting used for recording standard video
Figure 4.20 compares the available recording space and time for a system hard disk with 60GB available for HDTV recording to an external hard disk with 200GB available for HDTV recording, both using Best recording quality. As you can see, using a larger hard disk, either as a system or an additional hard disk, permits much more TV to be recorded.

You can record even more standard-definition TV by reducing recording quality. Table 4.1 lists the possibilities for a system with 50, 100, and 200GB of space available for TV recording at available quality levels. Note that Better, Good, and Fair selections work only if you are recording analog TV, either from a broadcast source or from cable TV. Better, Good, and Fair options are ignored if you are recording standard digital or HDTV. ATSC standard-definition TV and digital cable TV is recorded in Best mode, and HDTV from either cable or ATSC sources is recorded in HD mode.
The easiest way to increase available recording time without reducing recording quality is to connect or install an additional hard disk and use it strictly for TV recording.
To switch to a different drive, click the plus (+) sign next to the current Record on Drive setting and choose another drive from the list.
By default, the Maximum TV Limit setting shown in Figure 4.20, which specifies how much of your hard disk is available for recording TV, uses most of the available hard disk space on your system drive. Should you adjust it? I recommend that you change this amount only if you specify an additional drive for recording and use it only for TV recording. For example, I attached an external hard disk to my WMC PC and increased the Maximum TV limit from the default of 200GB to 225GB. (The drive was empty and has 232GB available/total space.) I don’t recommend increasing the Maximum TV limit on your system drive, though, because Windows needs space for temporary files and for other types of data files.
After you change the Recorder Storage values, click Save to save your settings.
Use the More TV Locations menu selection to select additional folders where TV recordings are stored so you can view them using WMC. Use this feature to specify various locations for Recorded TV on your computer.
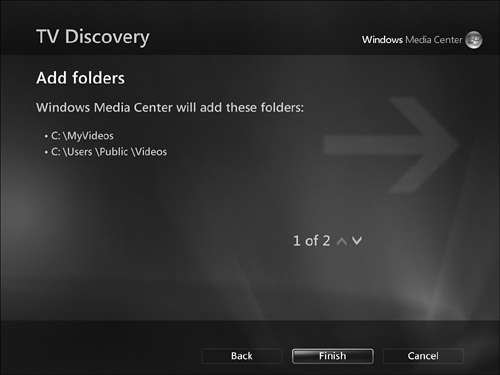
Select Add Folder to Watch to search for other folders in which TV recordings are stored.
From the Select folders menu, click the check box for additional folders that contain (or might contain) TV recordings. By default, the Recorded TV folders on the system drive and on drives you add through the Recorder Storage menu are already checked. Click Next and then Finish to add specified folders. See Figure 4.21.
The Recording Defaults menu (Figure 4.22) is used to configure general recording settings. These settings are used for all recordings, except when they are overridden by customized settings selected for particular recordings.

Recording defaults are split into two sections. (Defaults are shown in italics.) The General section includes
Keep: Until space needed, For 1 week, Until I watch, Until I delete
Quality: Best, better, good, fair (default is the setting chosen in Recorder Storage)
Start time: 4 minutes before, 3 minutes before, 2 minutes before, 1 minute before, on time
Stop time: 2 minutes after, 3 minutes after, 4 minutes after, on time
Preferred Audio Language: Installed language used by Windows[1], any language
The Series Only section includes
Show type: First run and rerun, first run, live
Channels: One channel only, any channel
Airtime: Anytime, specific time
Keep up to: As many as possible, or a specified number of recordings (10, 7, 6, 5, 4, 3, 2, 1)
In most cases, the defaults are satisfactory, but consider the following reasons to make changes:
If you want to build a permanent library of a particular TV series, use the Until I Delete option.
If you want to minimize the likelihood of TV recording conflicts, choose the Any Channel option.
If you want to record only the first broadcast of the episodes in a particular series, choose the First Run option.
After making any desired changes, click Save.
Once you have configured your recording settings, it’s time to start using WMC as your deluxe personal video recorder.
To record a TV show while you’re watching it, just press the Record button on your WMC remote or click the red dot on the mouse control panel (Figure 4.23). WMC will record the program from the current point to the end of the program.

One-touch recording is great if you want to grab a copy of the interview you did for a local TV news program, but if you want to record complete TV shows, there are better ways to do it. Once again, it’s time to use the Guide.
Thanks to WMC, you don’t need to miss a program that will be playing while you’re busy with the rest of your life.
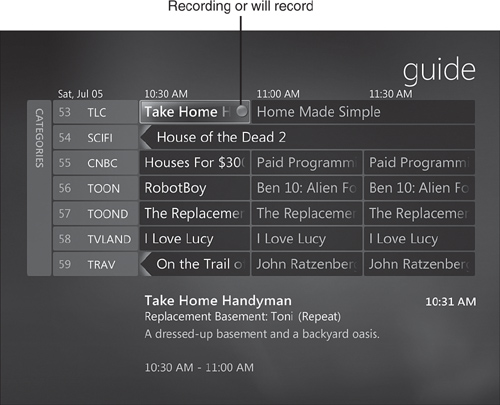
To schedule a TV recording using the Guide, find the program you want to record and press the Record button on your WMC remote or click the red button on the mouse control panel. The program listing in the Guide displays a red dot to indicate it’s being recorded or will be recorded (Figure 4.24).
If you’re a fan of a particular TV series and you don’t want to wait for the DVD set, you can use WMC to record all future episodes of your favorite series. Here’s how.
To record a series directly from the Guide, right-click an episode of the series and select Record Series.
Note
You can also use the Advanced Record (also known as Record Settings) dialog for an individual episode of a TV series to record the series. Change the Frequency setting from the default Record Single Show to Record Series. See Figure 4.29.
To record a series from the Program Info menu, open the episode’s Program Info menu and click Record Series (Figure 4.25).

When you schedule a series to record, you might see a Conflict dialog. The Conflict dialog appears when some or all of the episodes of a series you want to record conflict with other scheduled recordings. (It also appears if you want to record a single show that conflicts with an already-scheduled recording.)
You have three options for resolving the conflict. You can record all episodes of the new series (conflicting series will not record), record only episodes of the new series that don’t conflict with already-scheduled recordings, or select the instances to record. If you choose the last option, a Series Info dialog displays episode dates and show conflicts with the ! symbol (Figure 4.26). Look at the bottom of the screen to determine the conflict and for scroll up and scroll down buttons.

When you choose a conflicting episode, a special version of the Program Info dialog appears. Click Resolve Conflict to open the dialog shown in Figure 4.27. Choose the show you want to record and click Done.

To view a list of the episodes that will be recorded, open the Series Info menu. A typical list is shown in Figure 4.28.

→ | To resolve the conflict, see “Dealing with Recording Conflicts,” this chapter, p. 117. |
By default, TV recordings use the Recording Defaults configured through the TV Settings menu. However, if you want to change recording quality or other settings for a particular TV episode or series, you can override the Recording Defaults settings.
To change recording settings for an individual TV episode, open the Program Info menu and select Advanced Record. The Record Settings menu (Figure 4.29) includes four settings (Frequency, Stop, Quality, and Keep) that affect only the individual episode.
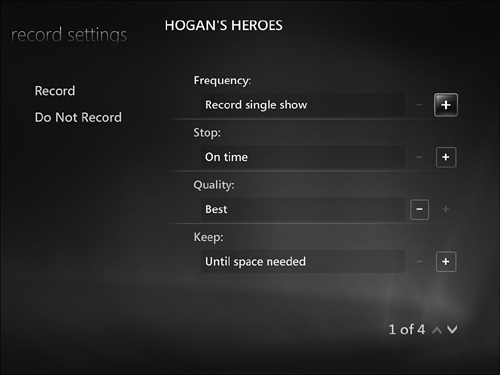
To record the episode with the settings shown, click Record. To cancel recording, click Do Not Record.
Note
If you change frequency from the default Record Single Show to Record Series, the settings in Figure 4.29 are used to record the entire series.
Once you have selected a TV series to record, you can access recording settings for a TV series in the following ways:
Go to the listing for an episode of the series, open the Program Info menu, select Record Settings, and select Series Settings.
Right-click an episode selected for recording, select Series Info, and select Series Settings.
Either method displays the seven-option Series Settings dialog shown in Figure 4.30.

Make the desired changes and click Save to save your changes.
→ | To learn more about these options, see “Recording Defaults,” this chapter, p. 113. |
Once you start clicking Record, you’re going to accumulate a bunch of TV to watch whenever you want. Here’s how to watch it and manage it.
To open the Recorded TV menu, go back to the WMC desktop, scroll to the TV + Movies strip menu, and select Recorded TV.
By default, recordings are listed by date, with the current date’s recordings listed first. To view programs by title, select Title. In the Title view, episodes of the same program are grouped together. Figure 4.31 shows the date view.

When you use the Title view, click the thumbnail for a particular series to display individual episodes. You can then select the episode you want to play.
To see details about a recording, such as the program name, episode name, channel number/name, date recorded, and duration, highlight it. The information is displayed below the program’s thumbnail.
To play or manage a recording, click it, and the Program Info menu opens (Figure 4.32). From the Program Info menu, you can play the recording, delete it, specify how long to keep it, record the series, view other showings, or burn a CD or DVD.

To learn more about burning a CD or DVD, see “Transferring TV Recordings to DVD” in Chapter 10, “Creating CDs and DVDs,” p. 295. |
To find out what TV shows or series you have scheduled for recording, click the View Scheduled icon. By default, programs are listed by date and time, but you can also sort them by title. Figure 4.33 shows the date/time view.
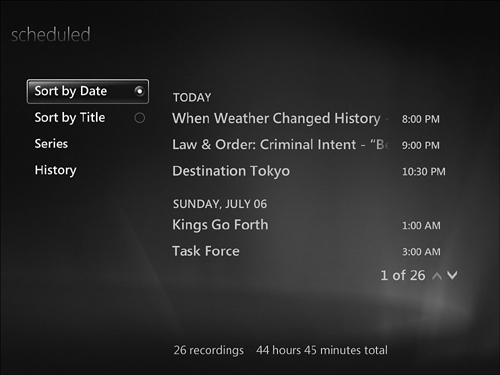
At the bottom of the screen, WMC provides you with the total time and number of recordings scheduled.
To view more information for a particular episode, such as the episode title and plot outline, highlight it. To bring up the complete Program Info dialog, click the episode. You can view the information in brief form or in complete form, as shown in Figure 4.34.

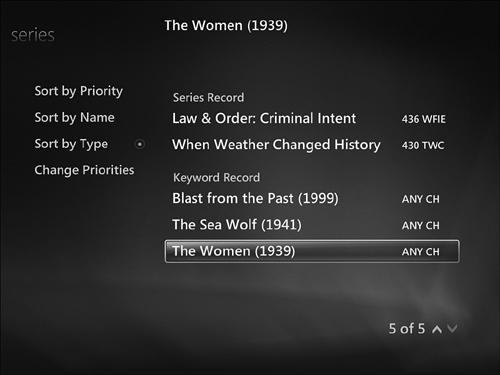
The Series view shows TV series in order by priority. (You can also sort them by name and type.) If you have also used the Movies Guide’s Record in Future option, you will also see movies listed here with Any Channel as the channel. Figure 4.35 shows the Type view, which is an easy way to distinguish series recordings from other types.
→ | To learn more about the Record in Future option, see “Recording Movies Not Listed in the Guide” in Chapter 5, p. 148. |
To view more information about a series, click it. The Series Info display (Figure 4.36) lists the episodes scheduled to record, the channel, the recording frequency, and the Keep settings. To change these or other settings, click the Series Settings button, and the Series Settings dialog appears.

→ | To learn more about Series Settings, see “Recording Settings for a TV Series” in this chapter, p. 121. |
When you’re done with a recording, you can delete it from the main Recorded TV dialog or from the recording’s Program Info dialog. When you select the option to delete the recording, you must click Yes on the confirming dialog to complete the operation.
If you decide you’d rather not record a series, select Cancel Series from the Series Info dialog shown in Figure 4.36 or right-click the series and select Cancel Series. Click Yes on the Cancel Series pop-up dialog.
The Add Recording option in the Recorded TV dialog provides a quick way to choose your favorite recording method. You can choose to record an individual program or series from the Guide or by using Search, or you can create a custom recording using Channel and Time or Keyword.
→ | To learn more about recording an individual TV program from the Guide, see “Scheduling Recordings Using the Guide,” this chapter, p. 116. |
→ | To learn more about recording a TV series from the Guide, see “Recording a TV Series,” this chapter, p. 116. |
→ | For more information about Search, see “Using the Search Tool,” Chapter 5, p. 145. |
Selecting the Channel option seems, at first glance, like a step backwards to the days of recording with a VCR. When you select the Channel option, the Manual Record dialog shown in Figure 4.37 appears. You must specify the channel, frequency, date, start and stop time, keep until setting, and recording quality. The main reason to use the Channel/Manual Record dialog is if you want to record a contiguous block of shows, such as a Batman marathon, without needing to select each and every show separately.

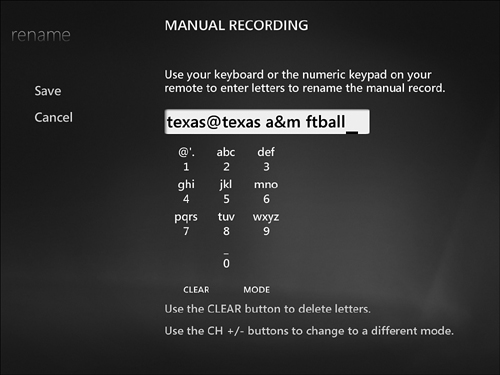
To name the recording, select Change Title, and the Rename dialog (Figure 4.38) appears. Enter the title of the recording using your WMC remote or keyboard. After you complete naming the recording, the recording name replaces the MANUAL RECORDING text at the top of the dialog. Click Record to save the recording. The recording will be displayed in your list of scheduled recordings.
If you have a recording conflict, the Conflict dialog appears. You must then select whether to keep the manual recording or go with the recording(s) you’ve already set up.
→ | To learn more about handling recording conflicts, see “Dealing with Recording Conflicts,” this chapter, p. 117. |
U.S. users of WMC can also watch TV content without using a TV tuner. As long as you have a broadband Internet connection, you can watch Internet TV.
To get started, select Internet TV from the TV + Movies strip menu. Internet TV includes the following categories: TV, movies, music, viral (videos), lifestyles, sports, tech, news, and top picks. Here’s what to expect in each category:
TV: Complete TV series, full episodes from other series, and clips from major broadcast and cable TV channels
Movies: Trailers for current and forthcoming movies, new movies on DVD, cast interviews, and reviews
Music: Concerts and most-watched movie trailers
Viral videos: Wild and wacky news stories, TV show clips, and web sensations; as well as shorts from iFilm, VideoJug, and others; SuperBowl ads; and much more
Lifestyles: Make your life better, from golf swings to cooking, from travel to new car models, and much more
Sports: Current sports news—baseball, football, basketball, soccer, motorsports, and more
Tech: The latest gadgets, trade shows, TechWatch, Microsoft news, and Media Center tips
News: Current news stories, in-depth coverage, and celebrity news
Top Picks: A grab bag of the most popular videos
The quality of the video featured on Internet TV varies from slightly below standard TV quality to near HD-quality. The faster your Internet connection, the better it looks.
To navigate through Internet TV, select a category at the top of the screen and then through the subcategories until you find your video. Highlight a video and click OK on your WMC remote (or click it with your mouse) to play the video full-screen.
Internet TV is best regarded as a way to sample what’s on TV, rather than as a true replacement for a TV tuner. However, it’s a useful way to stay up-to-date on what’s happening if you have an Internet connection but no TV connection.
Note
To find more sources for web-based TV and video, such as TV Tonic, MSN TV Today, and more, check out Chapter 9, “Playing Games and Enjoying Online Resources.”
WMC, like Windows Vista itself, includes a powerful parental controls system. However, it doesn’t require that each user has his or her own account. Because people of different ages might be sharing a single computer running WMC, WMC uses an access code-based system to control access to TV programs, movies, and DVDs. The following sections show you how to use these features to make WMC family-friendly.
To enable the parental control feature, switch to the Tasks strip, select Settings, and select General from the Settings menu. In the Settings menu, select Parental Controls.
Note
Once you create an access code, you will need to re-enter it every time you enter the Parental Controls menu.
When you open Parental Controls, the first task you must perform is to create an Access Code (Figure 4.39), which, like a PIN number, must contain four digits.

WMC then displays the Parental Controls menu.
The Parental Controls menu includes four selections:
TV Ratings
Movie/DVD Ratings
Change Access Code
Reset Parental Controls
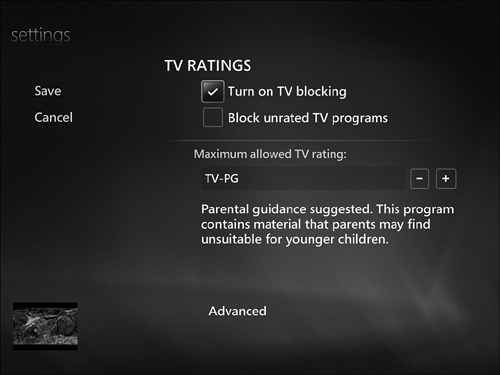
Select TV Ratings from the Parental Controls menu to display the TV Ratings dialog. To enable TV blocking, click the Turn on TV Blocking check box. Select the maximum rating permitted. You also have the option to block unrated TV programs. Figure 4.40 shows the TV Ratings dialog as it appears after enabling TV blocking.
The TV Ratings system used by WMC is the same one supported by the V-chip technology built into recent televisions. Because WMC doesn’t use the TV tuner in your TV set, you must use the TV blocking feature in WMC if you want to use TV ratings to control access to undesirable TV programs.
The TV ratings supported by WMC in the U.S. include
TV-MA (Mature Audiences Only; similar to MPAA’s R rating for movies)
TV-14 (Parents Strongly Cautioned; similar to MPAA’s PG-13 rating)
TV-PG (Parental Guidance Suggested; similar to MPAA’s PG rating)
TV-G (General Audience; similar to MPAA’s G rating)
TV-Y7 (designed for children age 7 and older)
TV-Y (all children)
None (all TV programs with ratings are blocked)
Most networks add additional information to the basic TV ratings used by WMC to indicate content types. For example, TV-Y7 FV indicates a show for children ages 7 and above that contains fantasy violence.
To learn more about the TV Ratings system and additional rating codes, see http://www.timewarnercable.com/centralny/programming/tvrating.html. To learn more about the MPAA movie rating system, see http://www.mpaa.org/FlmRat_Ratings.asp.
When you select any TV rating other than None, a link to an Advanced dialog is provided. You are prompted to save the changes you have made to the TV Ratings dialog before opening the Advanced dialog. The Advanced dialog (Figure 4.41) enables you to customize the basic restrictions for the TV rating you selected in the following areas:
Fantasy Violence
Suggestive Dialogue
Offensive Language
Sexual Content
Violence

When you’re finished customizing your changes, click Save to lock in your settings.
After you enable TV blocking, any attempt to watch a TV program that exceeds the rating brings up a “Program Blocked” screen. To override the block, press the OK button on your remote control and enter the access code.
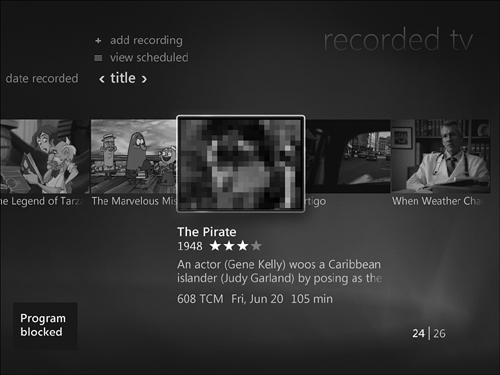
TV blocking doesn’t affect your ability to record TV programs or movies that exceed the specified rating. However, the Recorded TV menu displays blocked programs with a distorted thumbnail (see Figure 4.42). When you attempt to view the recording, the Blocked Program dialog appears, and you are prompted to provide your access code before you can view the recording.
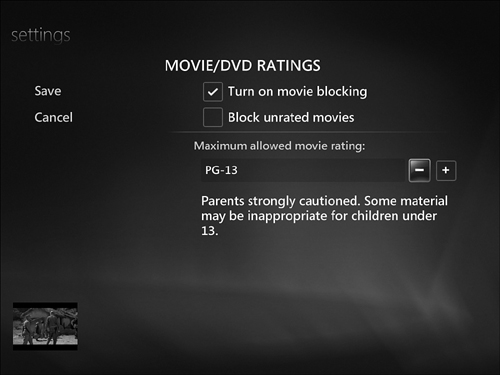
To control movie and DVD access, select the Movie/DVD Ratings from the Parental Controls menu. The Movie/DVD Ratings dialog (Figure 4.43) works in a similar fashion to the TV ratings dialog. You have the option to turn on movie blocking, to specify a maximum allowed movie rating, and to block unrated movies.
When you enable Movie/DVD Ratings, any attempt to play a movie or DVD that exceeds the rating specified brings up the same Program Blocked dialog used by TV Ratings. And, as with TV Ratings, you must enter the access code to view the movie.
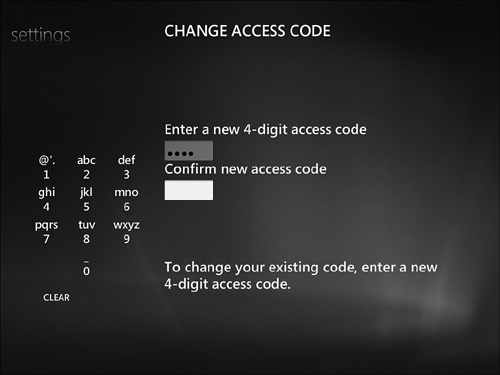
You might want to change your access code from time to time, especially if somebody’s been paying a little too close attention whenever you enter your access code. To change the current access code, select Change Access Code. Enter a new four-digit access code and reenter it to confirm the change (Figure 4.44).
You can reset parental control settings back to their defaults and clear out your access code by selecting Reset Parental Controls from the Parental Controls menu. Click Yes on the confirming dialog to reset all controls.
If you decide to re-enable Parental Controls later, follow the steps in the previous sections as needed.