
Windows Media Center (WMC) automatically launches your choice of Express or Custom Setup when you start it for the first time, or you can start WMC and then set it up later. Although you can go back and set up missing pieces of your system later, you’re probably better off making sure it has all of the pieces in place first.
So, how do you get started? First, make sure you’ve installed all of the hardware recommended in Chapter 2, “Equipping Your PC for Media Center,” for the types of media you plan to use with WMC, including TV tuners, FM radio tuners, and so on.
→ | For hardware recommendations and installation tips, see Chapter 2. |
What’s next? Drivers. Because WMC is designed to run on standard and HDTVs as well as traditional computer displays, make sure you’re using the latest vendor-supplied drivers for your graphics card or integrated display adapter. If you’re using the bare-bones graphics drivers provided by Microsoft, you’re missing out on support for 3D configuration, HDTV configuration, and other options. If your display offers Vista-compatible drivers, be sure to download and install them as well.
Using a wireless mouse and keyboard? Check the range. If your system responds when you’re in your usual easy chair, you’re OK. However, if the system ignores your mouse and keyboard until you move closer, you may need a Bluetooth mouse and keyboard combo. Bluetooth input devices can work up to 30 feet away from the transceiver, compared to as little as 6 feet for old-school wireless devices. Windows Vista-certified non-Bluetooth input devices can have a range as far as 15 feet from the transceiver.
Note
Bluetooth mouse and keyboard combos are available from Microsoft (Wireless Entertainment Desktop 8000 and 7000) and Logitech (diNovo Media Desktop Laser, Cordless Desktop MX 5000 Laser). These and other vendors also offer Bluetooth mice.
Worried about screen savers? If your system automatically boots into the Windows desktop (it will if you have set up only one user and not assigned a password), WMC disables the desktop screen saver when you’re viewing TV or videos. However, if you are using a password, see http://support.microsoft.com/kb/929526 to learn how to disable the requirement to log back in after the screen saver kicks in.
Tip
For emergency troubleshooting, keep a lightweight 14 or 15-inch LCD stashed away in a closet. You can plug it into your system in case of problems. Just make sure the unused connector on your dual-display graphics card matches the LCD display’s connector type or use an adapter. You might be able to find a used display for under $100, as many companies are phasing out these sizes in favor of larger models.
If you’re using WMC with a standard monitor or with an HDTV that connects to your system via a VGA or DVI port on the display, you don’t need to worry about display support. If you forgot to enable a port in the BIOS or need to run the Recovery Environment or startup menu in case you’ve hosed your system, no problem—you can see what you’re doing in full widescreen glory. However, if you are using a TV (standard or HDTV) that connects via composite, S-Video, component, or HDMI connectors, keep in mind that you will not see anything onscreen until the friendly Windows Vista logon menu or desktop is displayed. Error or status messages that show up on a normal computer display during boot don’t make it to the TV screen.
How’s your network? Your Internet connection? Take a few moments with the Network and Sharing Center and Internet Explorer (IE) 7 to make sure your network is working. You must connect your WMC box to a working Internet connection if you are planning to use it to record live TV. The Internet provides the correct information needed to configure the tuner. And remember, if you want to enjoy everybody’s music, video, and photo collections through WMC, their systems must be configured to allow network connections to their media folders. In Windows Vista, use the Network and Sharing Center, and turn on Media Sharing in the Sharing and Discovery portion of the dialog. With older Windows versions, make sure the folders you use for shared media, such as the Shared Documents folder on each system, are configured for sharing.
Once you’ve made sure your system is ready, it’s time to set up WMC.
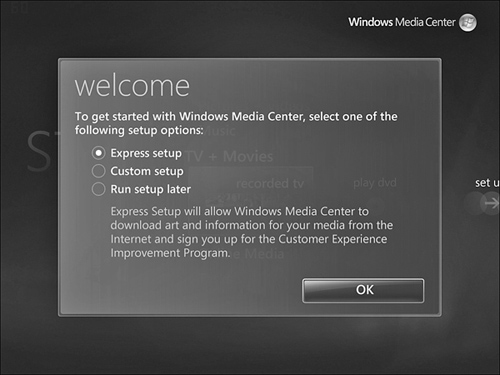
To start WMC for the first time, click the Start orb, click All Programs, and click Windows Media Center. The first time you run WMC, a Welcome dialog appears (Figure 3.1), prompting you to choose one of three options:
Express setup
Custom setup
Run setup later
Note
If you’ve already installed drivers for your remote control, you can use it to navigate through the setup program.
The Express setup option provides a shortcut to getting started with WMC. It downloads art and information for your media and puts you into the Customer Experience Information Program. Basically, Express setup is designed for users who plan to use WMC mainly for music, DVD, and photo playback.
If you’re using WMC as a live TV and TV recording solution or want to fine-tune display colors or speaker configurations, you need a comprehensive setup program. Choose Custom setup, which is discussed in the following section.
Of course, if you’re in too much of a hurry to set up anything, you can run setup later. Keep in mind that you must finish Custom Setup in a single setting. If you close Custom Setup, you must start over. Give yourself about 30 to 45 minutes to do everything, especially if you are planning to fine tune your display quality.
When you select Custom setup, WMC displays a full-screen Welcome message and prompts you to click Next to continue. The Custom setup process is divided into two parts:
Required Setup configures network and Internet settings.
Optional Setup configures other features and advanced settings.
After reviewing these steps, click Next to continue setup. On the next screen, you will see the Windows Media Center Privacy Statement screen. Take a moment to review it now, or you can review it later.
On the next dialog, specify whether you’d like to join the Customer Experience Improvement Program. Select Yes, I’d Like to Join, and WMC configures your system to periodically send anonymous reports to Microsoft on how WMC is working. Feeling paranoid? Select No, Thank You. On the fence? Click the link to view the privacy statement online. Fortunately, the text is delivered using the easy-on-the-eyeballs WMC interface, not in a browser window. Make a selection, and click Next to continue.
On the next dialog, you are prompted to choose whether to let WMC download album art, movie and music information, and TV Program Guide listings. If you’re planning to use WMC as a DVR or just want to make your digital life easier and more enjoyable, click Yes.
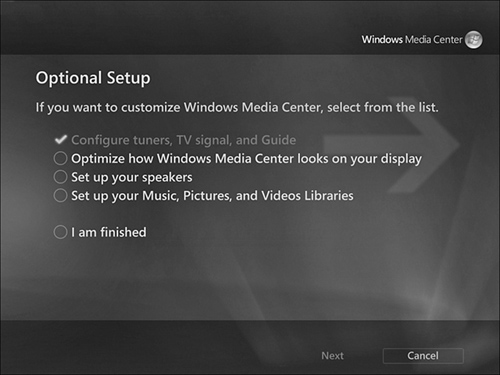
On the Required Components Have Been Set Up dialog, click Next. The Optional Setup dialog appears (refer to Figure 3.2).
If you don’t need to configure TV tuners, optimize your display, set up speakers, or set up access to other users’ and other systems’ media libraries, click the I Am Finished button, click Next to finish setup, and get on with enjoying your media library.
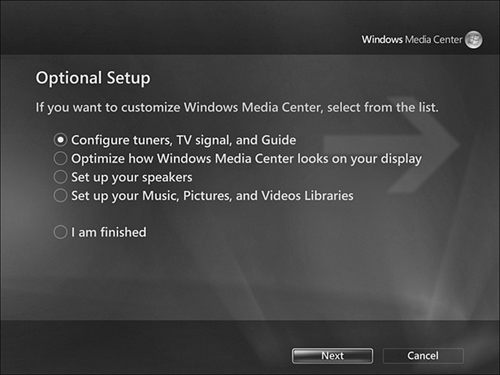
As you can see from the previous section, the required setup for WMC doesn’t do much at all. While it assures that you get the online connections you need to make your media library easy to use, it doesn’t touch the specifics of your hardware or home network configuration. That’s the job of the Optional Setup menu (refer to Figure 3.2).
The Optional Setup menu can be used in any order, and you can stop at any time after you have completed a section. Just click I Am Finished after completing the portions that apply to your system, and WMC stores and uses your settings. However, in the following sections, I am assuming you have a “loaded for bear” WMC system that requires configuration of all features.
The first option on the Optional Setup menu configures TV tuners, TV signals, and the TV Program Guide (often referred to simply as “Guide”). Select it, click Next, and continue.
Note
Why do you have an option to specify a different region? You can use this option to pick up over-the-air TV signals that Microsoft doesn’t support in your country. For example, ATSC (over-the-air HDTV) can be picked up in Canada as well as the United States. However, Microsoft does not include ATSC support in the Canada region. The solution? Pretend you live in the U.S.! See the full write-up (which includes some Registry wizardry) at http://thenears.wordpress.com/2006/11/22/atsc-in-canada-with-media-center-vista-rtm/.
First, you must specify the region you are in. This enables you to receive the correct local TV program sources to choose from. If the default region is correct, click Yes then Next to continue. If you need to select a different region, click No, Next, and select the region.
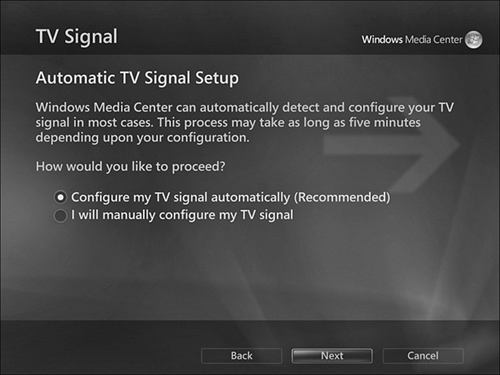
After you select the region, WMC downloads the appropriate TV information for your region. On the following screen, you are prompted to set up TV signals. Click Configure My TV Signal Automatically, and click Next (see Figure 3.3).
During the scan process, WMC checks for signals from a set-top box, cable TV, and other supported TV signal types, including antenna signals. When the scan process is finished, WMC reports what it found (refer to Figure 3.4 for a typical example). Click Yes to accept the scan results, No, I Want to Try Again, or No, Proceed to Manual TV Signal Setup if you have problems. Selecting the scan results prompts you to accept the TV Program Guide (“Guide”).

→ | see “Activating the TV Program Guide,” this chapter, p. 62, for details. |
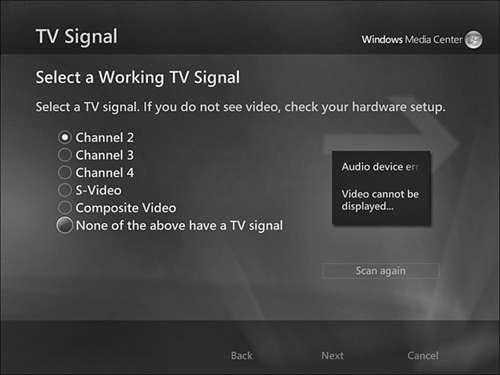
If an automatic channel scan isn’t working for you, you can select No, Proceed to Manual TV Signal Setup and set up your TV signal manually. On the first dialog, you select the type of TV signal you use: Cable, Satellite, or Antenna.
If you select Satellite, the next dialog reminds you to verify that your satellite receiver is working correctly. Click Next to continue. Select from channels 2, 3, and 4, S-Video, or composite video to find a TV signal. A preview window displays the TV signal (refer to Figure 3.5). Click Scan Again if you need to rescan your TV after making adjustments. WMC detects the infrared (IR) hardware used by your set-top box and completes setup.
If you select Antenna or Cable, you are prompted to use the TV Program Guide (“Guide”). See the next section for details.
Whether you are automatically or manually setting up your system for cable or antenna (over-the-air) TV, WMC asks you if you want to use the TV Program Guide (“Guide”). The Guide is a virtual necessity if you want to record live TV or movies automatically, but you can turn down the offer. (If you do, you will need to record manually or use another source for TV listings.) If you’re feeling paranoid, you can view the Guide privacy statement before you answer the question, but be prepared for 68 screens of data (as delivered by the 10-foot WMC graphical user interface (GUI), so you don’t need to squint).
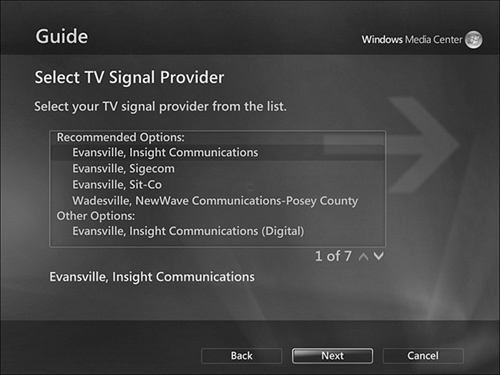
After signing off on the Guide, U.S. residents are prompted to enter their zip codes. This information is used to find and download appropriate over-the-air (antenna) or cable TV providers to choose from. Select your TV signal provider from the list (see Figure 3.6 for a typical example), and the appropriate TV Program Guide downloads to your system, completing the TV portion of Optional Setup.
After checking off TV tuner and signal configuration, the second step listed on the Optional Setup menu (refer to Figure 3.7) optimizes how WMC looks on your display.
On the first screen, WMC offers a video you can play to help you adjust color, contrast, aspect ratio, and brightness on your display. Click “Watch Video” to start the video, which features an attractive quartet of media-savvy yuppies playing pool, watching others play pool, and playing with projectors and displays while they explain how the display optimization process that follows will help you set up your display.
On the next dialog, WMC asks if you are running the wizard on your preferred display. Click Yes if you are or No for instructions on rerunning the wizard on your preferred display later.
Note
If you want to run WMC on a secondary display, make sure you reduce it to a window and drag it to the secondary display before running this wizard.
On the next dialog, select your display type: monitor (CRT), built-in (laptop and all-in-one desktop units), flat panel (LCD monitor), television (all types), or projector.
Tip
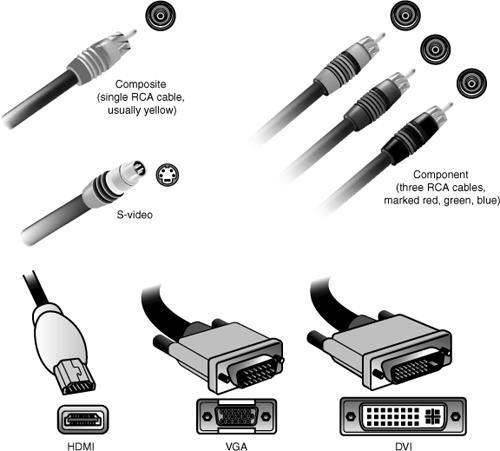
Confused? Use this rule of thumb: If you connect to a VGA or DVI port on the display, it’s a flat panel. If you connect to a HDMI or component port on the display, it’s a TV.
Next, select your connection type from three families:
Composite or S-Video
DVI, VGA, or HDMI
Component (YPbPr)
Move your mouse over each selection to see pictures of each connection type, or refer to Figure 3.8 (pictures of cable connectors).
Next, select the width (aspect ratio) of your display: traditional TV/monitor 4:3 ratio (also known elsewhere as 1.33:1) or widescreen 16:9 ratio.
Note
If you use an adapter to connect a DVI port on your PC to a component port on your display (refer to Figure 3.8), select Component.
After you select the width of your screen, it’s time to review your current display resolution. Click Yes to accept it or No if it is not correct.
Note
Don’t get picky here: Some widescreen flat panel LCD displays actually use a 16:10 ratio in some resolutions. Put away your calculator, and select widescreen for any widescreen display.
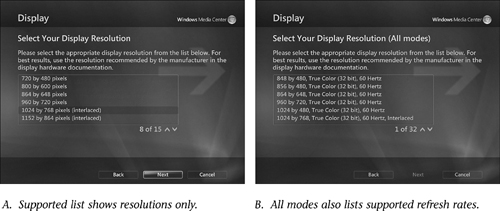
If you answer No, a list of supported display resolutions appears (refer to Figure 3.9 A). Select the best one from the list. If you don’t see the mode you want to use, click Select All Modes to see additional display resolutions along with the refresh rates they support (see Figure 3.9 B). Choose the mode you want to use.
When you select a different mode, WMC attempts to switch to the new resolution, apply an overscan correction, and optimize colors and fonts. Use the Preview option to see if the changes can be made. You will be notified if the resolution switch was successful. Click Yes to accept the changes. If you don’t want to accept the changes or if the resolution changes didn’t work, you are prompted to try a different resolution or stick with your current selection.
If you answer Yes, WMC applies overscan correction and optimizes the colors and fonts on your display. Use the Preview option to see the adjustments first. Click Yes to accept the changes.
Tip
If you are not using the best display resolution for WMC, but you cannot change it within WMC, you might need to change it through Control Panel’s Personalization menu. Choose the Display Settings option.
If you are using an HDTV as your preferred WMC display, use the special HDTV support features of your graphics card driver’s control center to change the resolution of your display. This might be available from the Advanced portion of the Display Settings dialog, or you might need to run a separate program.
Note that some resolutions might use interlaced video (refer to Figure 3.9). Interlaced video writes every other screen line with each pass of the electron gun that creates the picture inside the TV or CRT monitor. Although these resolutions look just as good within WMC as non-interlaced modes, interlacing makes the standard Windows desktop look jumpy. If you plan to switch between WMC and the standard Windows desktop, avoid interlaced resolutions if you can—your eyes will thank you!
After you confirm (or adjust) your display resolution, it’s time to adjust display settings. If you’re satisfied with contrast, brightness, color, and other settings, click Finish This Wizard, and WMC checks off another task. However, if you want to fine-tune these settings, click Adjust Display Controls.
Tip
Make sure you know how to access the picture adjustment controls for your display before you start this process.
If you are using an HDTV, you will probably use an onscreen menu operated by your TV’s remote control to make adjustments. Typical monitors, LCD flat panels, and standard TVs use adjustment knobs or onscreen menus operated by buttons on the display.
For built-in displays, such as those in laptop computers, see the computer’s instruction manual. Many laptops include brightness and contrast controls on FN keys that are overlaid on the standard function keys F1-F12.
First, it’s time to calibrate your display. Click Next to display a list of changes you can make. These include
Onscreen centering and sizing
Aspect ratio (shape)
Brightness (black and shadow detail)
Contrast (white)
RGB color balance
Select the option you want to adjust, and click Next. You can run these tasks in any order and skip tasks you don’t need to perform.
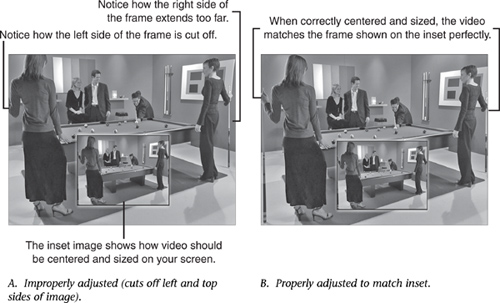
To adjust onscreen centering and sizing, watch the video (starring our old friends, the pool players), and use the centering and sizing controls to adjust the large picture so it matches the inset picture. Figure 3.10 shows you an example of an improperly and a properly adjusted display. Keep a careful eye on the edges of the display, which can be cut off if you don’t adjust centering and sizing properly.
Tip
If you are using HDTV via a DHCP connection or a monitor (CRT or flat panel), you probably don’t need to run the Adjust Display Controls section of the wizard. However, if you are using a conventional TV using S-Video or composite or an HDTV that connects through component video, you should run the tests in this section to ensure that your display is in tip-top shape.
The video plays several times to allow you adequate time to make adjustments. However, if you are not satisfied (or just plain out of time to make adjustments), go back and run the test again. After the test is completed, it is checked off the Display Calibration list, and you can proceed to the Aspect Ratio adjustment.
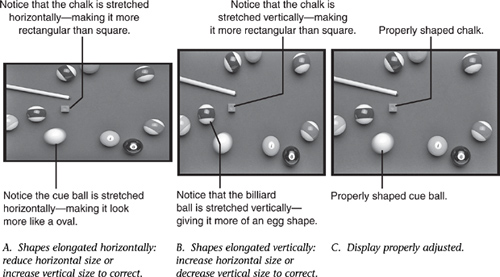
The Aspect Ratio (Shape) helps you fine-tune the screen geometry of your display. Even though you selected the aspect ratio of your display earlier in the setup process, you might still need to tweak the size and centering (screen geometry) of your display to ensure that squares are square, circles are circles, and so forth. During the video playback (which features the pool table seen in previous videos), adjust the display to make sure the billiard balls are round and the chalk block is square. Figure 3.11 shows you examples of incorrect and correct screen geometry.
Tip
If you need to adjust display centering, see if your display includes a zoom feature that adjusts both horizontal and vertical settings at the same time to aid display centering. If your display is not properly configured to show shapes accurately, you will still need to adjust horizontal or vertical sizing individually.
The video plays several times so you can make the necessary adjustments. At the end of playback, Aspect Ratio is checked off the Display Calibration list, and it’s time to adjust Brightness.
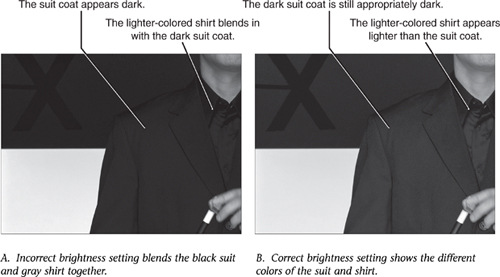
Brightness calibration, despite the name, maybe ought to be called “black and shadow” calibration. It’s designed to make sure you don’t lose important details in the shadows. Look for the brightness or “black level” control on your display, and while the video of the black-suited, gray-shirted pool player runs, adjust the controls if necessary so that the suit is black, and you can tell the difference between the suit and the shirt. Figure 3.12 shows an example of an incorrectly and correctly adjusted display.
The video plays several times so you can make the necessary adjustments. At the end of playback, Brightness is checked off the Display Calibration list, and it’s time to adjust Contrast.
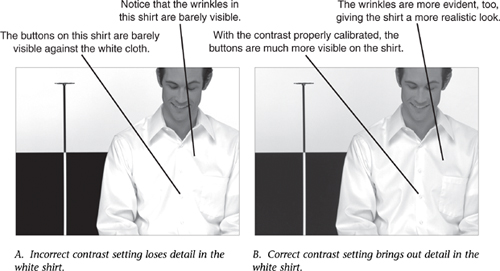
Contrast calibration is used to make sure bright areas don’t lose detail. Look for the contrast or picture control on your display or display menu, and while the video of the white-shirted pool player runs, adjust the contrast if necessary to ensure that you can see the wrinkles and buttons on the shirt (see Figure 3.13).
As with other adjustments, you might get tired of watching the video play or be glad you have several chances to make the needed adjustments. At the end of playback, Contrast is checked off the Display Calibration list, and it’s time to adjust your display’s RGB color balance.
RGB color balance calibration is designed to make sure your display produces accurate colors. If you can select a color temperature setting of 6500ºK on your display’s controls, use that setting, and you don’t need to run this calibration. Otherwise, go to the next screen, and play the video. While the video plays, adjust color settings to remove any off-color appearance of the white and gray bars behind the pool player (Figure 3.14). The camera pans up from the table and zooms in on the bars.
At the end of playback, RGB Color Balance is checked off the list, and you’re done with Display Calibration (Figure 3.15). Click Next to see a message that shows you’re finished with Display setup. Click Next again to return to the Optional Setup menu.

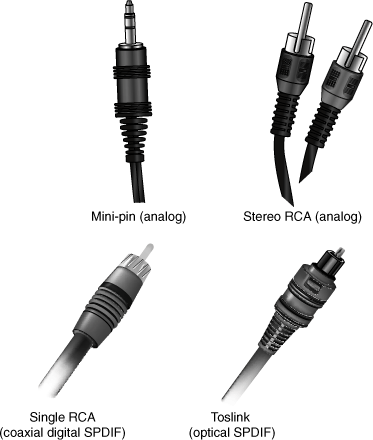
With TV and display settings optimized, it’s time to set up your speaker system. Select Set Up Your Speakers, and click Next to continue. The speaker setup dialogs are used to specify how many speakers you have and to test each speaker. From the Speaker Connection Type dialog, select from the following analog speaker connection types:
Mini-plug
Stereo RCA
Or from the following digital speaker connection types:
Single RCA (coaxial SPDIF)
Toslink (optical SPDIF)
Or built-in (for laptops and all-in-one units with integrated speakers).
As with the display connector type dialog, illustrations of each speaker cable type are shown. You can also refer to Figure 3.16 for help.
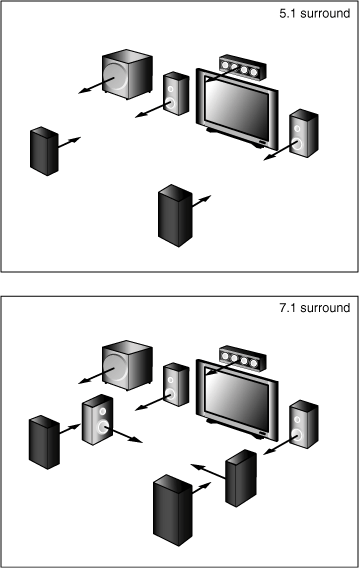
Next, specify your speaker configuration:
2 speakers (stereo)
5.1 surround (refer to Figure 3.17)
7.1 surround (refer to Figure 3.17)
Select your speaker type and on the next dialog, click Test. A different tone is played through each speaker. If all of your speakers are working, click I Heard Sound.... WMC displays the speaker setup you tested. Click Finish to wrap up this part of setup.
If some speakers didn’t play, select I Did Not Hear Sound..., and a speaker troubleshooting guide is displayed on the next dialog. It reminds you to check speaker cable connections, audio/video codec installation, and to make sure Windows audio devices and drivers are properly configured. Click Back if you want to retry the test after making adjustments or Finish if you want to set up your audio later.
Note
If you are sending audio to a home theater system’s amplifier, make sure the home theater system is properly set up to play through all of its speakers. For example, on my 5.1 system, I can select two-channel output, which disables my rear and center speakers. Another possible gotcha is the audio source. Make sure you select the proper source for audio. For example, my system offers “Video” and “DVD” sources. You must select the source corresponding to the correct input jack(s), or you’ll hear nothing from any speakers. Finally, check the volume control on your home theater system.
If you are using speakers connected directly to your PC (or integrated speakers), make sure you haven’t muted your audio or have the volume set so low you can’t hear it. Some laptop computers include a mute/unmute button as part of the multimedia keys.
Library Setup is used to configure the folders that WMC uses for media it will play back. These folders can be located on your system or on other systems in your home network. By default, WMC watches the current user’s Music, Pictures, and Videos folders for media files. However, you can configure WMC to watch other users’ folders and folders on other systems, or you can prevent WMC from watching a particular folder.
→ | To learn how to add or remove folders later, see Chapter 12, “Connecting with Windows Home Server and Other PCs.” |
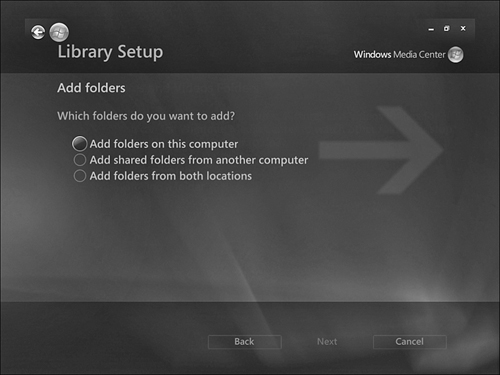
To add a folder, click Add Folder to Watch. You can add folders on your computer, other computers, or both (refer to Figure 3.18). I recommend that you select the option to set up both local and network folders.
Note
To add folders from all users, open the C: drive, navigate to the Users folder, and select it. All media folders from all users will then be available to WMC.
When you add folders on your computer, you see a list of folder locations, including your desktop, the current user’s folders, Public Documents, the system hard disk, and CD/DVD drives (see Figure 3.19 A). To see subfolders of a particular location, click the plus (+) sign. To select a folder (and its subfolders), highlight it with your mouse or your remote, and click the checkbox or press the OK button on your remote. Use the scroll arrows to move to additional screens as needed. Click Next to continue.

Review the folders added, and click Finish to add those folders to WMC’s watch list (refer to Figure 3.19 B). A pop-up dialog appears as folder contents are being added to WMC’s libraries. Click OK to continue, or wait until the dialog is cleared away.
When you add folders from other systems, a list of shared folders is displayed on your monitor (see Figure 3.20 A). Click the checkbox next to each folder that contains media files you want to play. Use the scroll arrows to move to additional screens as needed.
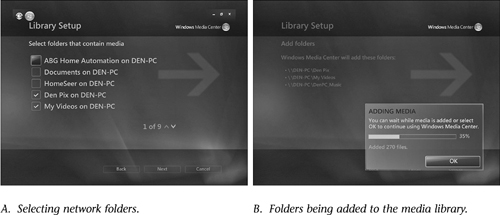
Review the folders added, and click Finish to add those folders to WMC’s watch list. A pop-up dialog appears as folder contents are being added to WMC’s libraries (see Figure 3.20 B). When you add folders from remote systems, it takes longer than adding folders on local systems. Click OK to continue, or wait until the dialog is cleared away.
After you complete Library Setup, the Optional Setup checklist is complete (see Figure 3.21). Click I Am Finished and then Next. Click Finish on the You Are Done! dialog, and you can start using WMC with a fully-configured system.

OK, so you’ve configured WMC the way you want it—until you change your hardware. Maybe you’re swapping your 25-inch conventional TV for a 42-inch HDTV, or you’re ready to connect your PC audio to a new 7.1 surround home theater system. Whatever the change is you make to your WMC system, you don’t need to run the entire setup process again. Instead, go to Tasks, and select Settings.
The Settings menu contains seven sections:
General
TV
Pictures
Music
DVD
Extender
Library Setup
The following sections discuss how to use these menus to reconfigure your original setup options and to set up additional features.
The General Settings menu includes nine different menu selections that govern the general operation of WMC:
Startup and Window Behavior
Visual and Sound Effects
Program Library Options
Windows Media Center Setup
Parental Controls
Automatic Download Options
Optimization
About Windows Media Center
Privacy
Select the category, and a submenu with additional options appears.
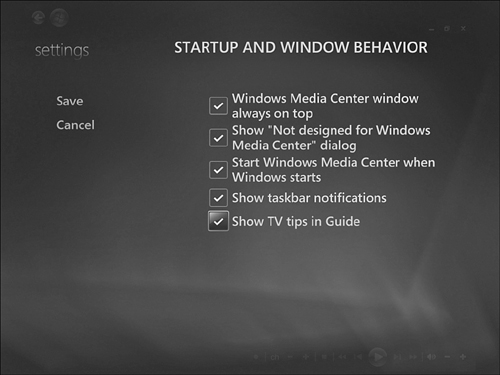
By default, WMC displays taskbar notifications, shows TV tips in the TV Program Guide, and displays a Not Designed for WMC dialog (if you try to run programs designed for the standard Windows GUI from within WMC). To change these options, to enable WMC to run on top at all times, or to run when Windows starts, check or uncheck the corresponding settings in the Startup and Window Behavior menu (see Figure 3.22). Click Save to save changes or Cancel to discard changes.
By default, WMC produces various types of beeps, boops, and chimes as you navigate its features. To disable the sound effects or to disable the transition animations WMC uses, clear the appropriate checkboxes in the Visual and Sound Effects menu (refer to Figure 3.23).
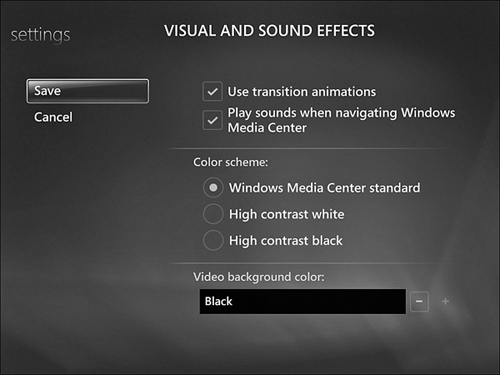
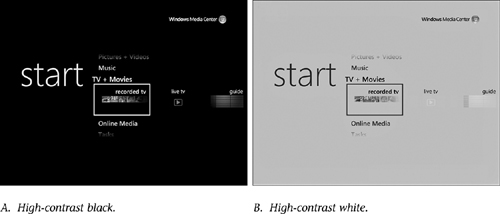
You can also use this menu to switch to high-contrast white or high-contrast black menus (see Figure 3.24) or to change the background color used behind videos. Click Save to save changes or Cancel to discard changes.
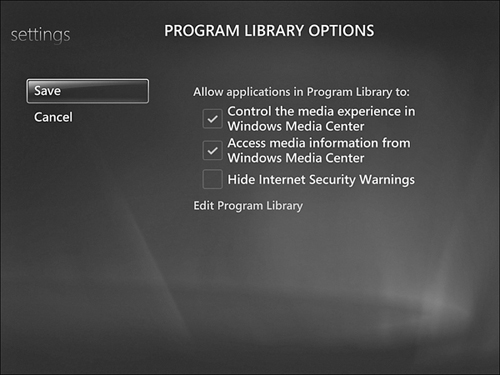
WMC’s Program Library includes any third-party applications optimized for Vista WMC that you might install, such as Adobe Photoshop Elements 5.0. Change how these programs work with the Program Library Options menu (see Figure 3.25).
Caution
If you choose Run Setup Again, WMC discards all of its current setup information and restarts Setup from the beginning.
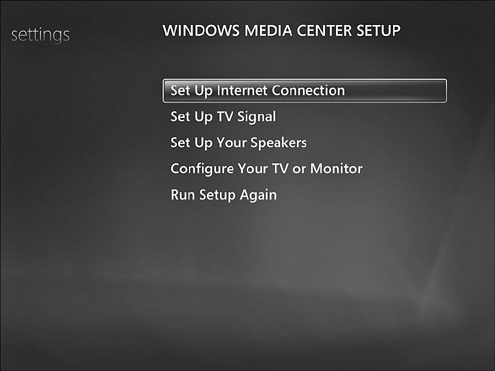
If WMC’s current setup is not working, you can rerun selected portions of setup or all of setup by selecting Windows Media Center Setup from the General menu and choosing the portions of setup to rerun (see Figure 3.26). If you change audio, display types, or add a TV tuner, you can rerun only the portions of setup affected by your change in hardware.
The Parental Controls menu is used to configure TV and movie viewing. Automatic Downloads is used to configure when WMC downloads the TV Program Guide. Optimization configures when WMC performs system optimizations. About WMC displays the current WMC version, the TV Program Guide Terms of Service, and the credits information for data providers. Privacy displays the current privacy statement and configures privacy and customer experience settings.
The TV Settings menu is used to configure TV signals, TV/monitor displays, audio, and closed captioning. The Pictures Settings menu adjusts how pictures are displayed. The Music Settings menu configures visualizations that play while music is being played. The DVD Settings menu configures language, closed captioning, and remote control options used during DVD playback. The Extenders Settings menu is used to configure WMC extenders, such as the Xbox 360. Library Setup is used to add or remove media folders from the watch list.
→ | To learn more about the TV settings menu, see Chapter 4. |
→ | To learn more about the DVD Settings menu, see Chapter 5. |
→ | To learn more about the Music Settings menu, see Chapter 6, “Importing and Playing Audio.” |
→ | To learn more about the Pictures Settings menu, see Chapter 7, “Importing and Viewing Photos.” |
→ | To learn more about the Extenders Settings menu, see Chapter 11, “Adding and Using Media Center Extenders.” |