Chapter at a Glance

Using the Microsoft Outlook 2010 Calendar is a big step toward efficient time manage-ment. The Outlook calendar differentiates between working time and nonworking time—only working time is available to co-workers when they schedule meetings with you through Outlook. If the default working times set by Outlook don't match your actual work schedule, you can change the Work Week settings. You can also configure the Outlook calendar to track your schedule in two time zones and smoothly switch between time zones when you travel.
In addition to the default Outlook calendar, you can create, import, and manage other calendars within the Calendar module. In the Calendar pane, you can view either discrete or compiled views of information stored in multiple calendars. Other calendars might include Microsoft Exchange Server account calendars that Outlook creates, secondary calendars you create within your Outlook configuration, calendars other people share with you, and online calendars that you download or subscribe to.
There are several ways to share your calendar information with other people. You can share an entire calendar or only selected information with people inside or outside of your organization.
If you need to access your calendar information when you're away from your computer, and don't have access to it from a mobile device, or if you want to share calendar information with other people in a hardcopy form, you can print out the information for specific date ranges. Outlook offers many different formats for printed calendars; you can choose the print style and level of detail that fit your needs.
In this chapter, you'll define your work time and learn how to configure Outlook for use in multiple time zones. You'll learn about different types of secondary calendars, and experiment with the different ways you can display and switch among multiple calendars. You'll share selected calendar information by embedding it in an e-mail message. Finally, you'll print daily and monthly calendars.
Note
Practice Files You don't need any practice files to complete the exercises in this chapter. For more information about practice file requirements, see Using the Practice Files at the beginning of this book.
In your Outlook calendar, the time that you indicate you are available for other people to schedule meetings with you is referred to as your work week. The calendar timeslots within your work week are colored differently from those outside of your work week, and are the only timeslots made available to people on your network when they are searching for a time to meet with you.
The default work week is defined as from 8:00 A.M. to 5:00 P.M. (in your local time zone) Monday through Friday. You can change this to match your individual work schedule. In Outlook 2010, you can specify a start time and end time for your standard work day, specify the days of the week that you work, and specify the day of the week you'd like to appear first when you display only the work week in your calendar.
You define your work week in the Work Time area on the Calendar page of the Outlook Options dialog box.
Note
See Also For more information about locating available meeting times, see Scheduling Meetings in Chapter 5.
In this exercise, you'll view and change your work week.
Note
SET UP You don't need any practice files to complete this exercise. Display your calendar in Week view, turn off the Daily Task List, and then follow the steps.
 On the Home
tab, in the Arrange group, click
the Work Week button.
On the Home
tab, in the Arrange group, click
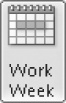
the Work Week button.Scroll up and down the calendar page to display the beginning and/or end of the work day.
Time slots during working hours are white. Time slots during nonworking hours are colored.
 Click the Arrange dialog box launcher.
The Outlook Options dialog box opens with the Calendar page displayed.
For the purposes of this exercise, assume that you work as a catering manager in a restaurant. You start work at 12:00 P.M. and finish at 8:00 P.M. You work Wednesday through Sunday, and have Monday and Tuesday off.
In the Work time area, click the Start time arrow and then, in the list, click 12:00 PM.
Click the End time arrow and then, in the list, click 8:00 PM.
Next to Work week, select the Sun and Sat check boxes, and clear the Mon and Tue check boxes.
Click the First day of week arrow and then, in the list, click Wednesday.
The days and display of your work week are now defined as Wednesday through Sunday.
In the Outlook Options dialog box, click OK.
The Work Week view of the calendar now displays only Wednesday through Sunday.


When you travel with your portable computer to locations in other time zones, you'll probably change the time zone on your computer to match the time zone you're in. You can do this from Windows or from Outlook. When you change the time zone, information, such as the receipt time of e-mail messages and appointment times, changes to match the new time zone; if you display the clock in the Windows Taskbar notification area, the time shown there also changes.
To change the time zone of your computer from Outlook:
Display the Calendar module.
On the Home tab, click the Arrange dialog box launcher.
The Outlook Options dialog box opens, displaying the Calendar page.
In the Time Zones area, click the Time Zone arrow and then, in the list, click the time zone you want. Then click OK to close the dialog box and return to your calendar.
When you prepare to travel, or if you schedule meetings involving participants in different time zones, you might want to configure Outlook to display two time zones in your calendar. Outlook then displays the time zones in Day view, Work Week view, and Week view in two columns to the left of the Calendar pane.

To simultaneously display two time zones in your calendar:
On the Home tab, click the Arrange dialog box launcher.
In the Time Zone area, select the Show A Second Time Zone check box. Then in the second Time Zone list, click the time zone you want to display.
Type a label for each time zone (such as San Diego and Copenhagen) in the corresponding Label box.
Click OK.
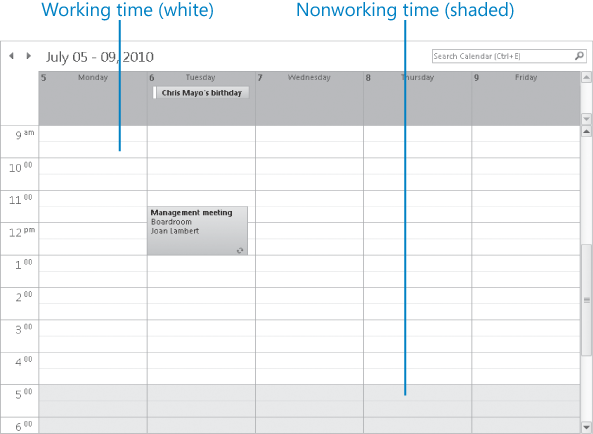
The Calendar button in the Navigation Pane links to the calendar of your default e-mail account. In addition, you can display these other types of calendars in the Calendar module:
Calendars of other e-mail accounts These are available automatically when you configure Outlook to connect to an account.
Custom calendars You create a calendar in the same way that you do a folder that contains mail, contact records, or other items.
To create a calendar, click the New Calendar button in the New group on the Folder tab of the Calendar module.
Shared calendars Other Outlook users may share their calendars with you.
Internet calendars You can subscribe to or import calendars from the Internet.
Note
See Also For information about Internet calendars, see the sidebar Connecting to Internet Calendars later in this chapter. For information about SharePoint calendars, see Working with SharePoint Site Content in Chapter 12.
All these types of calendars are available to you from the Navigation Pane in the Calendar module or the Folder List in the Mail module.
In the Calendar module, the Navigation Pane displays a list of the available calendars. You display or hide a calendar by selecting or clearing its check box.
In the Mail module, calendars are shown in the expanded folder list. You display a calendar in the Calendar module by clicking it in the folder list.

You can display calendars individually, or you can display more than one calendar at a time. For example, you might have separate business and personal calendars and want to view them together. You can view multiple calendars next to each other, or you can overlay them to display a composite view of the separate calendars. When you view and scroll through multiple calendars, they all display the same date or time period.
You can copy items from one calendar to another, by dragging with the right mouse button and then clicking Copy on the shortcut menu.
In this exercise, you'll create custom calendars and then view multiple calendars in Side-By-Side mode, Overlay mode, and Schedule View.
Note
SET UP You need access to multiple calendars to complete this exercise. Display your calendar in Day view, and then create, import, subscribe to, or share one or more additional calendars. For best results, display a day on which one or more appointments, meetings, or events appear on the calendar.
In the Navigation Pane, under My Calendars, ensure that the check box for your default calendar (simply titled Calendar) is selected. Then under Other Calendars or Shared Calendars, select the check box for at least one additional calendar.
By default, Outlook displays the calendars side by side and in different colors.
In Side-By-Side mode, each calendar tab has a Close button (an X) near its right edge. The tab of each calendar other than your default calendar has a View In Overlay Mode button (a left-pointing arrow) near its left edge.
 Click the Calendar tab to make your default calendar
the active calendar. Then on the tab of each secondary calendar,
click the View in Overlay Mode button.
Click the Calendar tab to make your default calendar
the active calendar. Then on the tab of each secondary calendar,
click the View in Overlay Mode button.The secondary calendars overlap your default calendar. The Search box indicates the active calendar.
Each of the overlapping calendar tabs now has a View In Side-By-Side Mode button (a right-pointing arrow) near its left edge.
Click the Calendar tab.
Your default calendar now overlaps the secondary calendars.
 On each of the secondary calendars, click
the View in Side-By-Side Mode
button to return to the standard display.
On each of the secondary calendars, click
the View in Side-By-Side Mode
button to return to the standard display. On the Home
tab, in the Arrange group, click
the Schedule View button.
On the Home
tab, in the Arrange group, click
the Schedule View button.Note
See Also For more information about keyboard shortcuts, see Appendix A at the end of this book.
The calendars change to a horizontal format that displays appointments and meetings, but not events. A timeline at the top of the Calendar pane indicates the date and time being displayed.
 If necessary, click the Zoom Out button at the right end of the status bar until the
Calendar pane displays several
hours of each calendar.
If necessary, click the Zoom Out button at the right end of the status bar until the
Calendar pane displays several
hours of each calendar.You can click the scroll bar or drag the scroll box at the bottom of the Calendar pane to change the displayed time period.
- In the Arrange group, click the Work Week button to return to Side-By-Side mode.
If you changed the zoom level of the calendar in Schedule View, the side-by-side view of the calendar now displays a greater range of timeslots than it did previously.
 Close each secondary calendar by clicking
the Close Calendar button at the
right end of its tab or by clearing its check box in the Navigation Pane.
Close each secondary calendar by clicking
the Close Calendar button at the
right end of its tab or by clearing its check box in the Navigation Pane.


Co-workers can see your available working time when they schedule meetings with you, and in some instances they can see the details of any appointment that you haven't marked as private. If you want to share more information with co-workers or with people outside of your organization, you have several options for doing so.
You can allow selected co-workers to see your entire calendar by sharing the calendar with them.
You can allow selected co-workers to see your entire calendar and to make appointments and respond to meeting requests on your behalf by delegating control of the calendar to them.
You can publish your calendar to the Office.com Web site or to a corporate Web server and then share the published calendar with any person who has access to the Internet.
You can send a professional graphic representation of your appointments during a selected date range by e-mail to any person who uses an HTML-capable e-mail program (not only people who use Outlook), including colleagues, friends, and family members.
The options for sending, sharing, and publishing calendar information are available from the Share group on the Home tab of the Calendar module.
If your e-mail address is part of an Exchange network, you can give permission to other people on your network to view, modify, or create items within a calendar or any other type of Outlook folder. The level of access each co-worker has is governed by the permissions you assign to him or her.
Using this method, you can share your default calendar or a secondary calendar that you create, import, or subscribe to.
To share a calendar with a co-worker:
In the Calendar module, display the calendar you want to share.
On the Home tab, in the Share group, click the Share Calendar button.
An e-mail message opens.
Note
Troubleshooting The appearance of buttons and groups on the ribbon changes depending on the width of the program window or item window. For information about changing the appearance of the ribbon to match our screen images, see Modifying the Display of the Ribbon at the beginning of this book.
Address the message to your co-worker. If you'd like to request that your co-worker reciprocate by sharing his or her calendar with you, select the Request Permission To View Recipient's Calendar check box. Then send the message, and click Yes in the Microsoft Outlook dialog box that asks you to confirm that you want to share the calendar with the default permissions.

After you share a calendar, you can specify the actions each person with whom you share the calendar can take. On the Permissions tab of the Calendar Properties dialog box, which you display by clicking the Calendar Permissions button in the Share group on the Home tab, you can select a Permission Level, which includes specific Read, Write, Delete, and Other settings, or you can select individual settings in each category.

You can delegate control of your calendar so that a co-worker or assistant can create and respond to meeting requests on your behalf. Then meeting requests sent to you are delivered to your delegate rather than to you. You receive copies of the meeting requests and copies of your delegate's responses, but you don't have to respond. Your delegate can also create meeting requests on your behalf (that is, they appear to come from you).
Tip
You can delegate access of your calendar from Outlook 2010 only to a co-worker who also uses Outlook 2010.
To delegate control of your calendar to another Outlook user, follow these steps:
On the Info page of the Backstage view, click Account Settings and, in the list, click Delegate Access.
In the Delegates dialog box, click Add.
In the Add Users dialog box, click the person you want to delegate control to, click Add, and then click OK.
In the Delegate Permissions dialog box, set the permission level you want the delegate to have, and then click OK.
The delegate is now shown in the Delegates dialog box.
In the Delegates dialog box, select the delivery option you want for meeting requests and responses, and then click OK.


You can share calendar information with people who are not on your Exchange network through e-mail or on the Web. When you share a calendar by using one of these methods, you can choose the period of time for which you want to share information (Today, Tomorrow, Next 7 Days, Next 30 Days, or Whole Calendar, or you can specify a custom date range) and the level of detail you want to share, as follows:
Availability only Shows only whether time periods are marked as Free, Busy, Tentative, or Out Of Office during scheduled time periods.
Limited details Shows your availability and the subject of each appointment, meeting, or event scheduled on the calendar.
Full details Shows your availability and the full details (such as location and notes) of each appointment, meeting, or event scheduled on the calendar.
The E-mail Calendar feature of Outlook 2010 provides a simple method of sharing specific calendar information with people outside of your organization. For example, if a friend is arranging a get-together and needs to know what days and times you're free this week, you can send her your free/busy information for the week.
If you need to distribute calendar information to a large number of people outside of your organization, you can publish it to a Web site and then give specific people permission to view the calendar. However, this feature works only with your default calendar and not with any secondary calendars that you create, import, or subscribe to, so you can't use it, for example, to share calendar information for a club or organization for which you keep a secondary calendar.
The process for publishing calendar information externally is similar for both methods.
In this exercise, you'll embed information about your schedule in an e-mail message.
Note
SET UP You don't need any practice files to complete this exercise. Display your calendar, and then follow the steps.
 On the Home tab, in the Share group, click the E-mail Calendar button.
Outlook opens a new message window and the Send A Calendar Via E-mail dialog box.
In the Advanced area, click Show to display all the options.
The options appear, and the Show button changes to a Hide button.
Click the Date Range arrow, and then in the list, click Next 7 days.
Click the Detail arrow, and then in the list, click Full details.
In the Advanced area, you can choose whether to include private appointment details and attachments, and whether to present schedule information as a daily schedule or only a list of events.
With Daily schedule selected in the E-mail Layout list, click OK.
Outlook embeds the selected calendar information in the e-mail message window and also attaches the same information as an .ics file. You can send the e-mail message to any recipient. A recipient using an e-mail program that supports .ics files can add your calendar information to his or her calendar list.
Scroll through the content pane to view the embedded calendar information. Then experiment with other time periods, details, and layout options on your own.


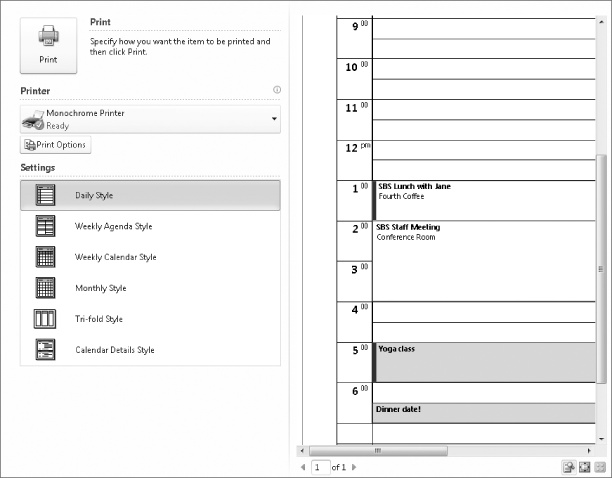
From time to time, you might find it convenient to print a day, week, month, or other period of your calendar—for instance, if you're traveling without a laptop or want to have your weekly schedule quickly available in your briefcase. You can easily print any time period of your calendar. The amount of detail that appears depends on the period you print and the print style you choose.
Outlook offers several built-in print styles, and you can create others if you want. The available print styles vary based on what view you're in when you choose the Print command. The default print styles include:
Daily Style Prints the selected date range with one day per page. Printed elements include the date, day, TaskPad, reference calendar for the current month, and an area for notes.
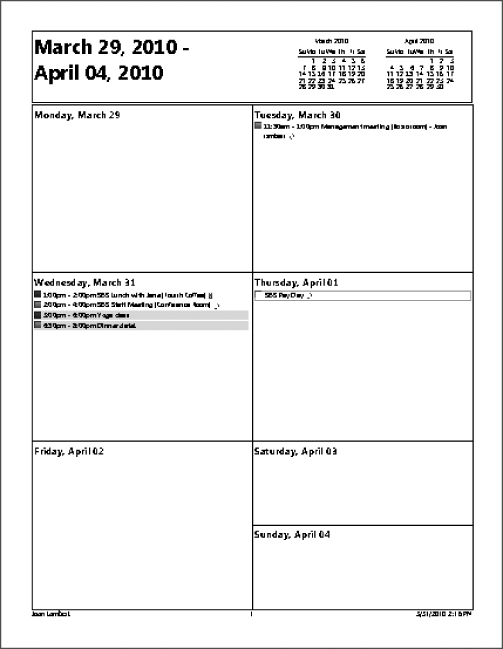
Weekly Agenda Style Prints the selected date range with one calendar week per page, including reference calendars for the selected and following month.
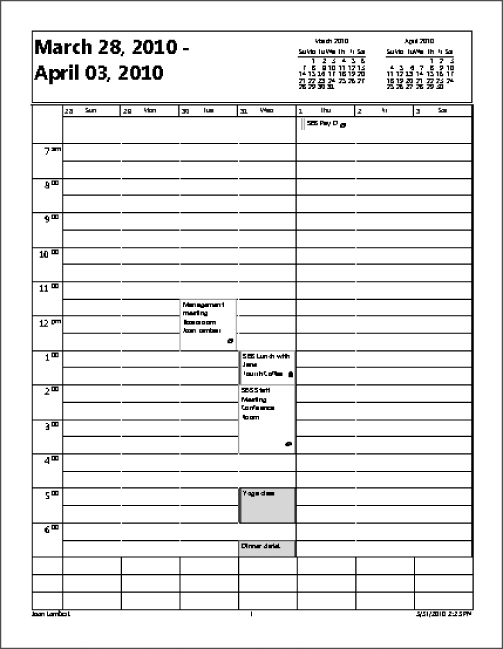
Weekly Calendar Style Prints the selected date range with one calendar week per page. Each page includes date range and time increments, reference calendars for the selected and following month, and TaskPad.
Monthly Style Prints a page for each month in the selected date range. Each page includes the selected month with a few days showing from the previous and subsequent months, along with reference calendars for the selected and following month.
Tri-fold Style Prints a page for each day in the selected date range. Each page includes the daily schedule, weekly schedule, and TaskPad.
Calendar Details Style Lists your appointments for the selected date range, as well as the accompanying appointment details.
You can select the date or range of dates to be printed and modify the page setup options to fit your needs.
In this exercise, you'll preview the available print styles, make changes to a standard print style, and print information from your calendar.
Important
To fully complete this exercise, you must have a printer installed. If you don't have a printer installed, you can perform all steps of the exercise other than printing.
To install a printer, click the Start button, click Devices And Printers, and then on the toolbar, click Add A Printer. Follow the wizard's instructions to install a local or network printer. If you are working on a corporate network, your network administrator can provide the information you need to install a printer.
Note
SET UP You don't need any practice files to complete this exercise. Display your calendar in Day view before beginning this exercise. For best results, display a day on which one or more appointments, meetings, or events appear on the calendar.
Display the Backstage view. In the left pane, click Print.
The Print page of the Backstage view displays the available printing options and a preview of the selected day's calendar as it would be printed in the Daily Style format.
 In the right pane, click the Actual Size button. If necessary, scroll up or down the page to
display appointment information.
In the right pane, click the Actual Size button. If necessary, scroll up or down the page to
display appointment information.The calendar page entries are magnified to a legible size, with the Actual Size view selected.
Note
See Also For information about applying color categories to appointments, see Organizing Outlook Items by Using Color Categories in Chapter 7.
 In the left pane of the Print page, click the Print Options button.
The Print dialog box opens. You can make many types of changes to the appearance of the printed content.
In the Print dialog box, click Preview or Cancel.
The Print dialog box closes, and you return to the Print page of the Backstage view.
On the Print page, in the Settings list, click Weekly Agenda Style.
A preview of the print style appears in the right pane. The time period displayed in the printed calendar has been expanded to include the entire week (from Monday through Sunday) that contains the originally selected day.
In the Settings list, click Weekly Calendar Style.
A preview of the print style appears in the right pane. The time period displays the week from Sunday through Saturday. A vertical line precedes the day that is designated as the first day of the week.
Note
See Also For information about setting the first day of the week, see Defining Your Available Time earlier in this chapter.
Click the Print Options button and then, in the Print dialog box that opens, click Page Setup.
The Page Setup dialog box for the selected print style opens.
For the Weekly Calendar Style, you can choose a vertical or horizontal layout, split the week across two pages, include the Daily Task List or To-Do Bar Task List, add an area for handwritten notes, specify the range of hours to print, and print only your designated work week rather than a standard seven-day week.
On the Format page of the Page Setup dialog box, do the following:
Click To-Do Bar in the Tasks list.
Select the Notes area (blank) check box.
In the Print from list, click 8:00 AM.
In the Print to list, click 5:00 PM.
Select the Only Print Workdays check box.
Click the Paper and Header/Footer tabs to display the additional options, and then click OK.
In the Print dialog box, click Preview.
Your changes are reflected in the page preview.
In the Settings list, click Monthly Style.
A preview of the print style appears in the right pane. The time period displays the calendar month containing the originally selected day.
In the Settings list, click Tri-fold Style.
A preview of the print style appears in the right pane. The left section displays the detailed schedule for the originally selected day, the middle section displays the Daily Task List, and the right section displays the seven-day week.
Click the Print Options button and then, in the Print dialog box that opens, click Page Setup.
The Page Setup dialog box for the selected print style opens.
In the Options area of the Page Setup dialog box, click the Right section arrow.
The Right Section list includes the elements you can choose to display in each section of the printed calendar.
Experiment with various arrangements of information in the Tri-fold Style calendar, clicking OK in the Page Setup dialog box and Preview in the Print dialog box to preview the results.
On the Print page of the Backstage view, in the Settings list, click Calendar Details Style.
A preview of the print style appears in the right pane, displaying information for only the originally selected day.
Experiment with different print styles and date ranges. If you want to print a calendar page, click the Print button on the Print page of the Backstage view.


You can display a traditional calendar view of your schedule by the day, work week, full week, or month. You can also display multiple list views of calendar items.
You can display multiple time zones, change your calendar as you travel between time zones, and schedule appointments or meetings that start and end in different time zones.
You can import or subscribe to many types of calendars available from the Internet. Calendars that you subscribe to are automatically updated as new information is made available by the calendar publisher.
You can view two or more calendars next to each other or as a composite. Outlook displays each calendar in a different color, so you can easily tell them apart.
You can display multiple calendars in a horizontal view so that you can more easily compare schedules by scrolling through the calendars.
You can share entire calendars or selected calendar information with people inside or outside of your organization.
You can print selected schedule information in a number of different layout styles.