Chapter at a Glance

To more easily manage the information you receive through e-mail, you can specify how Microsoft Outlook 2010 alerts you to and processes incoming messages. You can also take advantage of the many security features built into Outlook 2010 to keep your outgoing communications secure and to protect your computer system from spam, viruses, Web beacons, and other modern electronic threats.
In this chapter, you'll learn how to maintain your information in Outlook in a secure and organized fashion. First you'll work with new mail notifications. You'll process incoming messages by using rules, and set up the Junk E-mail Filter to manage unwanted messages. Finally, you'll learn about ways of ensuring that your e-mail communications are secure.
Note
Practice Files The exercises in this chapter use Outlook items you created in exercises in previous chapters. If an exercise requires an item that you don't have, you can complete the exercise in which you create the item before beginning the exercise, or you can substitute a similar item of your own. A complete list of practice files is provided in Using the Practice Files at the beginning of this book.
When new messages, meeting requests, or task assignments arrive in your Inbox, Outlook alerts you in several ways so that you can be aware of e-mail activity if you are using another application or if you've been away from your computer.
A New Mail Message icon appears in the notification area at the right end of the Windows Taskbar.
A semi-transparent desktop alert appears on your screen for a few seconds, displaying the name of the sender, the subject, and the first few words of the message (approximately 125 characters).
You can change the location, transparency, and length of time desktop alerts appear, or you can choose not to display them.
You can position the alert inside or outside of the Outlook program window. For example, if you usually work with the taskbar hidden, you might want to position the alert away from the taskbar to prevent you from accidentally displaying the taskbar each time you point to an alert.
The alert can be a solid color or up to 80 percent transparent. The default is 20 percent transparent. You might find that transparent alerts are less likely to interfere with your view of the work you're doing.
The alert can stay on the screen for from 3 to 30 seconds. The default is 7 seconds.
If Outlook is minimized or another application window is active, a chime sounds. You can change the sound or turn it off.
The mouse pointer briefly changes shape, from an arrow to an e-mail message, and back. You can turn off this feature.

You can customize and turn off these notifications.
In this exercise, you'll customize your desktop alert settings and process messages by using desktop alerts as you receive them.
Note
SET UP You don't need any practice files to complete this exercise. Display your Outlook Inbox, and then follow the steps.
Display the Backstage view, and then in the left pane, click Options.
In the left pane of the Outlook Options dialog box, click Mail.
Scroll down the Mail page of the Outlook Options dialog box to display the Message arrival section.
From this section, you can customize the ways in which Outlook alerts you to the arrival of a new message.
In the Message arrival section, click Desktop Alert Settings.
Drag the Duration slider to the left end of the slider bar to set it to 3 seconds, and then click Preview.
A semi-transparent sample desktop alert appears in the lower-right corner of your desktop and fades away after three seconds.
Click Preview again, and when the alert appears, point to it.
The semi-transparent alert becomes solid. As long as the mouse pointer is positioned over the alert, it remains visible.
Drag the sample desktop alert to the upper-right corner of your screen.
Future desktop alerts will appear wherever you move the sample alert.
In the Desktop Alert Settings dialog box, drag the Transparency slider to the left end of the slider bar to set it to 0% transparent, and then click Preview.
The sample desktop alert appears in the upper-right corner of the screen and its transparency lessens until it is opaque.
Move the desktop alert to the position at which you want it to appear in the future. Then experiment with the options in the Desktop Alert Settings dialog box and set the duration and transparency as you want, previewing your changes as necessary.
When you're done, click OK in the Desktop Alert Settings dialog box, and click OK in the Outlook Options dialog box.
 On the Home
tab, in the New group, click the
New E-mail button.
On the Home
tab, in the New group, click the
New E-mail button.A new message window opens.
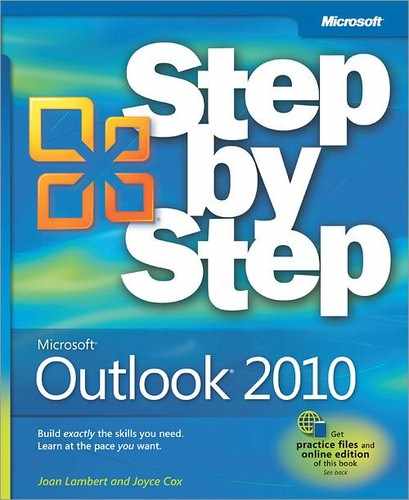
Enter your e-mail address in the To box, and then in the Subject box, type SBS Alert Test 1.
In the message body, type This is a test. Then send the message.
When the message arrives in your Inbox, the New Mail Message icon appears in the notification area at the right end of the taskbar, and a desktop alert appears on your screen.
When the desktop alert appears, point to (but don't click) its message text.
The message sender, subject, and text are underlined.
 In the desktop alert, click the Options button.
A menu of options appears.
On the Options menu, click Mark as Read.
The desktop alert closes, and in your Inbox, the message corresponding to the desktop alert is marked as read (whether or not the Inbox is visible).
 On the Home
tab, in the New group, click the
New Items button, and then in the list, click Meeting.
On the Home
tab, in the New group, click the
New Items button, and then in the list, click Meeting.A new meeting window opens.
Enter your e-mail address in the To box, enter SBS Alert Test 2 in the Subject box, and enter My Inbox in the Location box. Then send the meeting request. If a meeting reminder window opens, click Dismiss.
Note
See Also For more information about meeting requests, see Responding to Meeting Requests in Chapter 5.
 When the desktop alert appears, point to
it, and then click the Delete
Item button.
When the desktop alert appears, point to
it, and then click the Delete
Item button.The message corresponding to the desktop alert moves from your Inbox to the Deleted Items folder, and the desktop alert closes.


Tip
When the Outlook icon is active in the notification area of the status bar, you can click it to access commands for controlling the display of various types of alerts: Microsoft Exchange Server messages, network warnings, network connectivity changes, and new mail desktop alerts.
The Outlook icon is not shown by default. To display it, click the Show Hidden Icons button at the left end of the notification area, click Customize, and then in the Notification Area Icons window of Control Panel, in the Microsoft Outlook list, click Show Icon And Notifications.
You can have Outlook evaluate your incoming or outgoing e-mail messages and take various actions with them based on sets of instructions you set up, called rules. You can create rules based on different message criteria such as the message sender, message recipients, message content, attachments, and importance. By using rules, you can have Outlook automatically move, copy, delete, forward, redirect, reply to, or otherwise process messages based on the criteria you specify. You can choose from a collection of standard rules or create your own from scratch.
If you have an Exchange account, you can set up rules that are applied to messages as they are received or processed by your Exchange server, and you can set up rules that go into effect only when you indicate that you are unavailable, by setting up an Automatic Reply. Whether or not you have an Exchange account, you can set up rules that are applied to messages stored on your computer.
Note
See Also For information about setting up Outlook to automatically respond to and process messages when you are unavailable, see Automatically Replying to Messages in Chapter 12.
In this exercise, you'll create a rule to process incoming messages that meet specific criteria.
Note
SET UP You need the SBS Alert Test 1 message you created in the preceding exercise and the contents of the SBS Messages folder you created in Chapter 7. If you have not already created the message or created and populated the folder, you can you can do so now, or you can substitute any messages in your Inbox and adjust the rule criteria accordingly. Display your Outlook Inbox, and then follow the steps.
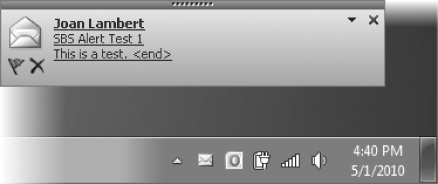
On the Info page of the Backstage view, click the Manage Rules & Alerts button.
The Rules And Alerts dialog box opens, displaying the E-mail Rules page.
On the E-mail Rules page, click New Rule.
You can base a rule on one of the nine rule templates provided by Outlook, or you can start from a blank rule for incoming or outgoing messages.
In the Select a template box, click each of the rule templates in the Stay Organized and Stay Up to Date lists.
The criteria and actions associated with the selected rule appear in the Edit The Rule Description box.
In the Start from a blank rule list, click Apply rule on messages I receive.
This basic information appears in the Step 2 box.
In the Rules Wizard, click Next.
The Step 1 box changes to display a list of conditions that you can apply to incoming messages.
In the Select condition(s) box, scroll down the list to see the conditions you can apply. Then select the with specific word(s) in the subject check box.
Outlook adds the selected condition to the Edit The Rule Description box. You can specify as many conditions as you want.
In the Edit the rule description box, click the underlined term specific words.
In the Specify words or phrases to search for in the subject box, enter SBS. Then click Add.
The specified term is enclosed in quotation marks and moves to the Search List box.
In the Search Text dialog box, click OK. Then in the Rules Wizard, click Next.
The Step 1 box changes to display a list of actions that can be performed on incoming messages.
Scroll through the Select action(s) list to review the actions Outlook can perform on incoming items that meet the criteria you specify. Then select the move a copy to the specified folder check box, and in the Edit the rule description box, click the underlined word specified.
The Rules And Alerts dialog box opens, displaying the folders in your mailbox.
 In the Rules and
Alerts dialog box, click the Expand button to the left of the Inbox, click the SBS
Messages folder, and then click OK.
In the Rules and
Alerts dialog box, click the Expand button to the left of the Inbox, click the SBS
Messages folder, and then click OK.In the Rules Wizard, click Next.
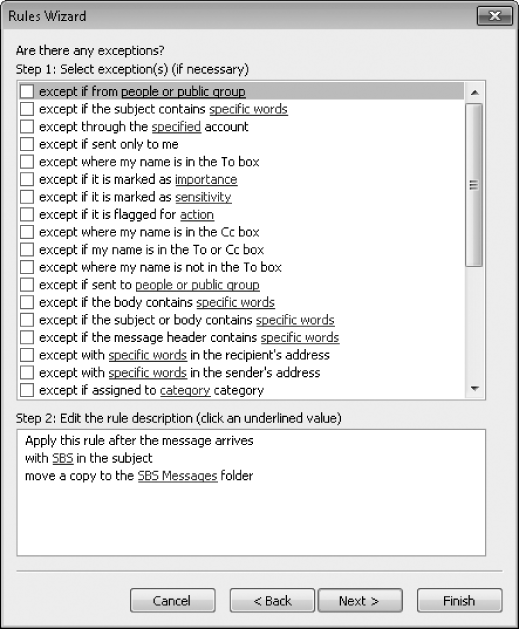
The Step 1 box changes to display a list of exceptions you can specify that will cause Outlook not to apply the rule to messages that meet the selected conditions.
In the Rules Wizard, without selecting an exception, click Next.
The final page of the Rules Wizard summarizes the parameters of the SBS rule.
Select the Run this rule now… check box, and then click Finish.
Outlook runs the rule on the contents of your Inbox and then saves the rule in the Rules And Alerts dialog box.
The selected check box to the left of the rule name indicates that this rule is active and that Outlook will apply it to all incoming messages.
In the Rules and Alerts dialog box, click OK.
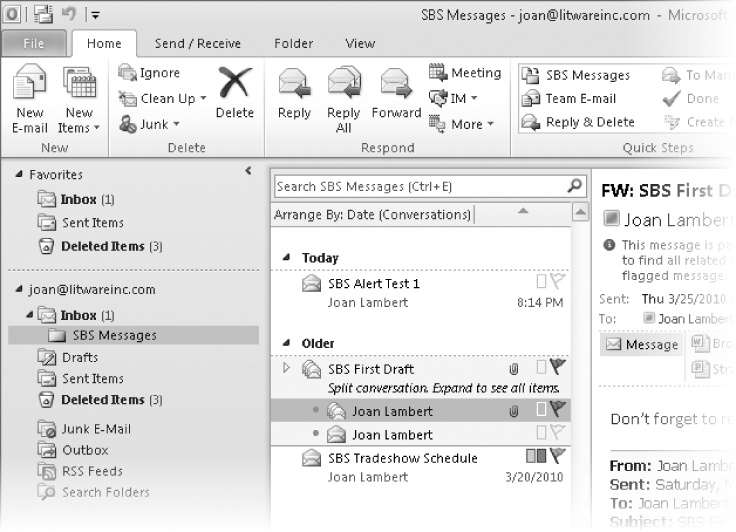
Click the Home tab. In the Navigation Pane, expand the Inbox if necessary, and then click the SBS Messages folder.
The folder contains practice messages you created in earlier chapters of this book, as well as the SBS Alert Test 1 message you created in the preceding exercise.
Note
Troubleshooting The appearance of buttons and groups on the ribbon changes depending on the width of the program window or item window. For information about changing the appearance of the ribbon to match our screen images, see Modifying the Display of the Ribbon at the beginning of this book.


Outlook offers levels of protection for managing junk e-mail messages (also called spam)—the unsolicited advertisements, sometimes containing dangerous attachments, that can swamp your Inbox if your e-mail address finds its way into the hands of unscrupulous mailing list vendors. When enabled, the Junk E-Mail Filter either moves messages that appear to be junk e-mail to a special folder or deletes them. You can specify a list of e-mail addresses or domains whose messages should always be treated as junk; you can also specify a list of e-mail addresses or domains from whom messages should never be treated as junk.
Outlook also offers protection from phishing—a widespread identity theft scam. Phishing messages are e-mail messages that contain links to phishing sites purporting to represent trusted, known entities, such as banks or e-commerce sites that would likely have your personal information on file. The messages request that you update your personal information through the link provided. If you do so, you inadvertently provide the requested information (which might include your social security number, bank account number, passwords, and other confidential information) to scam artists, who might then sell or otherwise use the information for their own financial gain. In the past, you were in danger only if you submitted your information through the phishing site, but these sites are becoming increasingly sophisticated, and many now host malicious keystroke-logging software. You can infect your computer just by visiting such sites, which makes it vital that you protect yourself from these threats.
Note
See Also Windows Internet Explorer 8 provides built-in protection against phishing sites. For more information, refer to Windows 7 Step by Step, by Joan Lambert Preppernau and Joyce Cox (Microsoft Press, 2009).
By default, when Outlook receives a message that it deems to be either junk mail or a phishing message, it delivers that message to the Junk E-Mail folder associated with your account rather than to your Inbox. (Each account you configure Outlook to connect to has its own Junk E-Mail folder.) You might not be aware that one or more messages has been redirected to your Junk E-mail folder; if someone tells you that he or she has sent you a message but you haven't received it, it's good idea to check whether it's in your Junk E-Mail folder.
You can display the contents of the Junk E-mail folder by clicking Junk E-Mail in the folder list of your account, in the Navigation Pane. When the Junk E-Mail folder contains one or more messages, the folder name is bold, and the number of messages in the folder is shown in parentheses at the end of the folder name. This is similar to the way that your Inbox folder name appears when the Inbox contains unread messages, but in this case, the bold formatting is not linked to the read status of the message.

When you open a message from the Junk E-Mail folder, Outlook converts the message content to plain text and disables any active links or content within the message. The information bar in the message header provides specific information about the message's status. Suspected junk e-mail messages have orange information bars; suspected phishing messages have pink information bars.
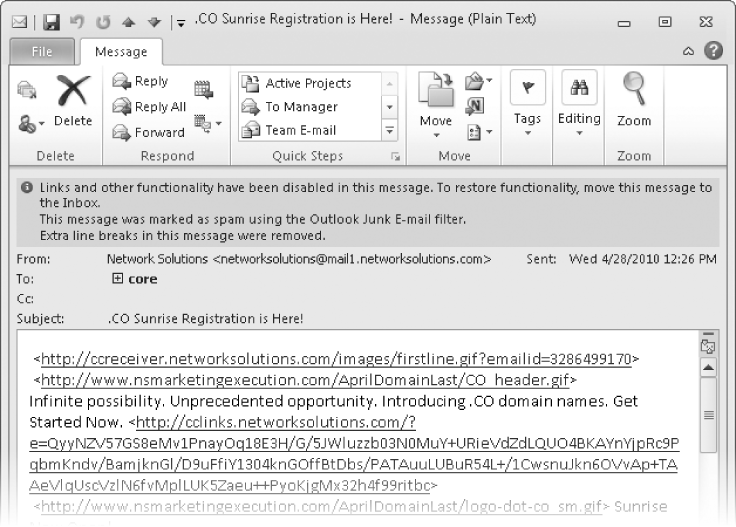
Any remote graphics (graphics that are displayed from Internet locations rather than embedded in the message—sometimes called Web beacons) that were present in the message are converted to URLs so you can easily see where the graphics originated.
Note
See Also For more information about Web beacons, see Blocking External Content to Protect Your Privacy later in this chapter.
Although the response options on the ribbon are active, you can't reply to a message from the Junk E-Mail folder—you must first move it to the Inbox or another folder. You can forward a message from the Junk E-Mail folder; you might want to forward a message to someone else who can verify for you whether the message is valid. The forwarded message will be in plain-text format rather than the original message format.
You can delete messages from the Junk E-Mail folder or indicate to Outlook how you would like the Junk E-mail filter to handle similar messages in the future.
To process a message from the Mail pane of the Junk E-Mail folder:
In the Mail pane, select the message you want to process.
On the Home tab, in the Delete group, click the Junk button.
The Junk list displays your options for processing the message.
Click one of the first four options to block the sender or to add the sender, the sender's domain, or the recipient group to your Safe Senders or Safe Recipients list.
Clicking an option does not remove the message from the Junk E-Mail folder.
To move the message to your Inbox, click Not Junk.
If you do not want to move the message to the Inbox, click the Close button. Otherwise, select one or both of the Always Trust check boxes, and then click OK.


To process an open message, click the Junk button in the Delete group on the Message tab of the message reading window, and then click the option you want.
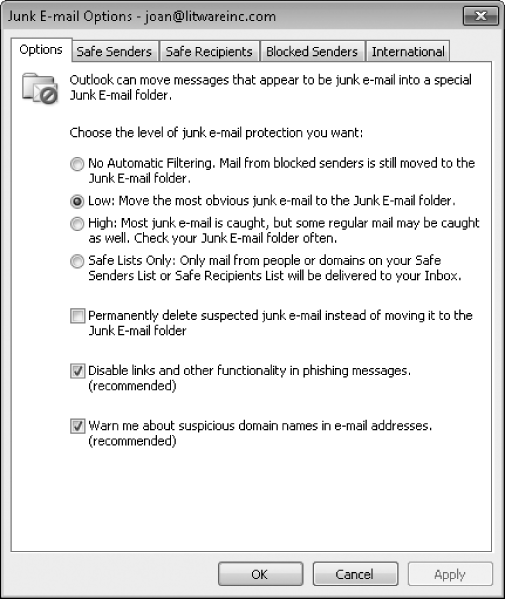
You manage junk mail settings from the Junk E-mail Options dialog box, which you open by clicking Junk E-mail Options in the Junk list. You set specific junk e-mail processing options for each account to which Outlook is configured to connect. The account for which you're configuring options is shown in the title bar of the Junk E-mail Options dialog box.
The Junk E-mail Options dialog box has five pages.
On the Options page, you select a level of protection. If you don't have additional filters in place, such as those that might be supplied by your organization, you might prefer to click High. Otherwise, click Low.
If you want Outlook to automatically delete suspected junk e-mail, select the Permanently Delete Suspected Junk E-Mail Instead Of Moving It To The Junk E-Mail Folder check box. Do not select this check box if you set the protection level to High or to Safe Lists Only. With these settings, it is likely that the Junk E-Mail Filter will catch quite a few valid messages that you don't want deleted.
Note that the Disable Links And Other Functionality In Phishing Messages check box is selected by default. Unless you are very confident that you have another protective system in place, leave this option selected.
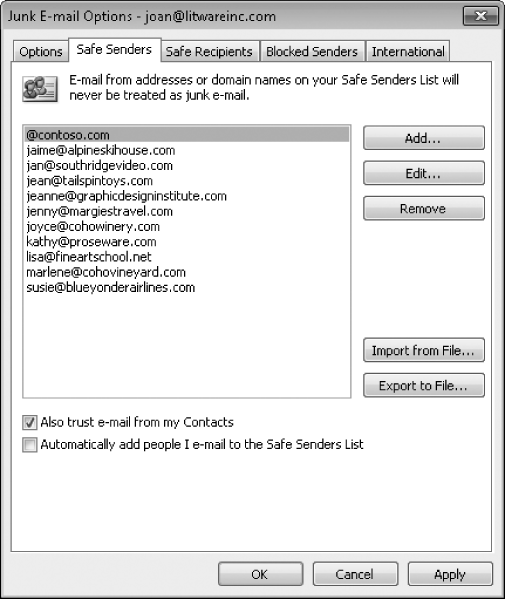
On the Safe Senders page, you can add a specific person's e-mail address to the Safe Senders list (for example, [email protected]) or specify that e-mail received from any sender at a particular domain is safe by adding only the domain (for example, @contoso.com).
To ensure that messages from your legitimate contacts aren't moved to the Junk E-mail folder by the Junk E-Mail Filter, select the Also Trust E-mail From My Contacts and Automatically Add People I E-mail To The Safe Senders List check boxes.
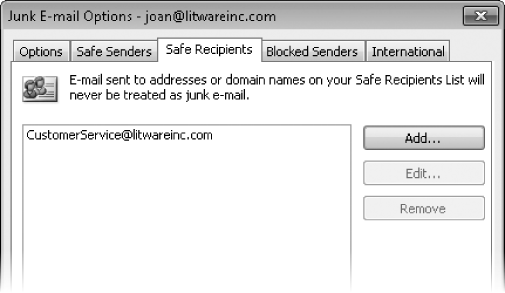
On the Safe Recipients page, you can add distribution lists or mailing lists of which you are a member to your Safe Recipients List to ensure that messages sent to you through the distribution list or mailing list will never be treated as junk e-mail.
On the Blocked Senders page, you can manually add e-mail addresses and domain names to the Blocked Senders list, or Outlook will add them for you whenever you identify a received message as junk e-mail.
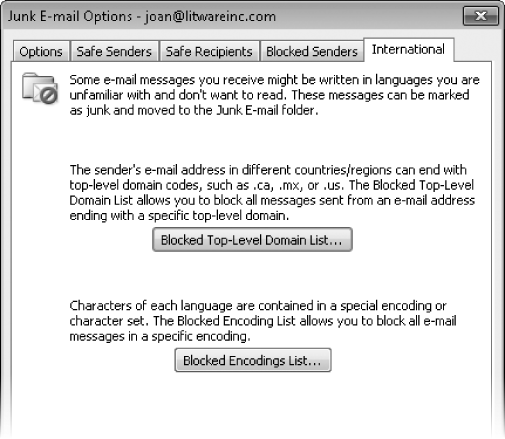
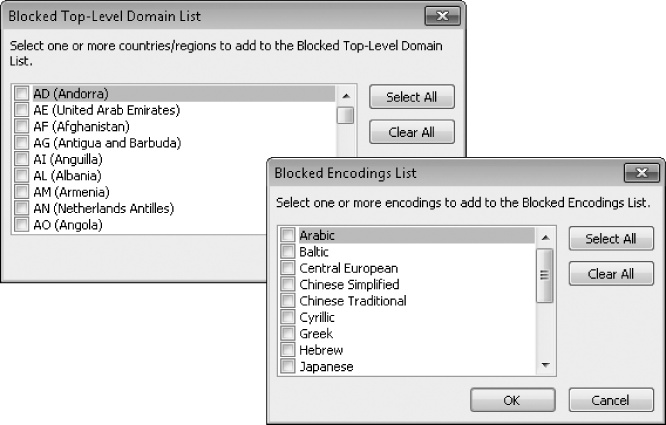
On the International page, you have the option of blocking all messages from a country-specific, top-level domain, or all messages containing specific non-English text encoding.
Click Blocked Top-Level Domain List to access the list of top-level domains you can block. Click Blocked Encodings List to access the list of languages you can block.

As your e-mail messages travel from server to server en route to you or other message recipients, they are vulnerable to interception by hackers and others who are intent on viewing them. With Outlook 2010, you can safeguard your messages in several ways, including implementing digital signatures, encryption, plain text messages, and Informa-tion Rights Management (IRM). In certain corporate environments, particularly those that handle sensitive data such as legal and accounting firms, specific e-mail security procedures might be mandated and enforced. In the absence of such guidance, only you can decide whether any of these additional security measures are appropriate for your situation.
When sending messages, you can reassure message recipients that they are receiving valid messages from you by using a digital signature—a piece of code that validates the identity of a message sender (not the actual person, but the e-mail account and computer from which the message originates).
To send digitally signed or encrypted messages over the Internet, you must obtain a digital ID from an independent certification authority. The first time you try to digitally sign or encrypt a message without having a valid digital ID installed on your computer, Outlook prompts you to obtain one. If you prefer, you can obtain one before you need it.
Obtaining some types of digital IDs, such as those used to certify the source of software programs, involves a stringent application process that can take weeks to complete. However, applying for a digital ID to certify documents and e-mail messages is a relatively simple process. You can have more than one digital ID on your computer, and you can select which one to use for each document or message. For example, you might have one digital ID for business use and one for personal use.
If you have an Exchange account, your Exchange administrator may be able to issue you a digital ID. Otherwise, you'll need to get one independently. Many U.S. and international certification companies offer digital IDs to certify e-mail. You'll probably be most comfortable purchasing a certificate in your native currency. Regardless of where you obtain it, your digital ID is valid worldwide.
To obtain a digital ID to sign or encrypt documents and messages:
On the Trust Center page of the Outlook Options dialog box, click Trust Center Settings.
In the left pane, click E-mail Security.
From this page you can configure many of the settings we discuss in this topic.
In the Digital IDs (Certificates) area of the E-mail Security page, click Get A Digital ID.
The Microsoft Office Online Web site opens in your default Web browser, listing providers from whom you can obtain a digital ID to certify documents and e-mail messages.
Tip
If you want to use a certification authority other than one of those recommended by Microsoft, search the Web for digital ID or certification authority, and you'll find a number of options. You can apply for a digital ID from any certification authority through its Web site. Digital IDs from non-recommended providers might have compatibility issues with Windows Internet Explorer, so if you use Internet Explorer and you want to be certain you won't run into problems, use one of the recommended providers.
Click the link at the end of a provider's description to display the provider's Web site.
Follow the instructions on the Web site to register for a digital ID.
Some certifying authorities charge a small fee, but most offer free digital IDs or a free trial period. As part of the process, you'll likely be required to respond to an e-mail message from your computer.

Your digital ID will be installed on the computer on which you complete the application process, but it is associated with your e-mail address; if you need to use it on another computer, you can reinstall it from the provider's site, or you can export the digital ID files from the original computer and import them on the other computer.
To export or import a digital ID:
Display the E-mail Security page of the Trust Center dialog box.
In the Digital IDs (Certificates) area of the E-mail Security page, click Import/Export.
In the Import/Export Digital ID dialog box, select whether you want to import or export your digital ID, provide the appropriate information, and then click OK.

Tip
You can also import a digital ID from the Certificates page of a contact record window. For information, see Working in the Contacts Module in Chapter 2.
You can digitally sign individual messages when you compose them, or you can instruct Outlook to digitally sign all outgoing messages.
The first time you digitally sign a message, you need to configure your security settings to use your digital certificate. You must do this from the Trust Center dialog box.
Note
Troubleshooting You can follow a similar process to configure security settings from the message window, but there appears to be a bug in the system that results in this not working—so be sure to follow the Trust Center process.
To configure digital certificate settings, follow these steps:
Display the E-mail Security page of the Trust Center dialog box.
To the right of the Default Setting box, click Settings.
In the Change Security Settings dialog box, to the right of the Signing Certificate box, click Choose.
In the Windows Security dialog box, click the digital certificate you want to use to digitally sign outgoing messages, and then click OK.
The selected certificate information appears in the Change Security Settings dialog box.
In the Security Settings Name box, enter a name by which you'll identify the signing certificate. Then click OK in the Change Security Settings dialog box, in the Trust Center dialog box, and in the Outlook Options dialog box.


After you complete this process, the Digital Signature and Encryption buttons appear in the Permission group on the Options tab of the message composition window.

To digitally sign an individual e-mail message:
A message with a valid digital signature has a red ribbon on its message icon and a digital signature icon (also a red ribbon) in its message header. When you receive a digitally signed message, you can click the digital signature icon to view information about the signature.
To digitally sign all outgoing messages:
Display the E-mail Security page of the Trust Center dialog box.
In the Encrypted E-mail area of the E-mail Security page, select the Add Digital Signature To Outgoing Messages check box.
If all your message recipients don't have Secure Multipurpose Internet Mail Extensions (S/MIME) security (for instance, if you're sending messages to people who you know aren't using Outlook), ensure that the Send Clear Text Signed Message When Sending Signed Messages check box is selected (this is the default setting).
You can secure the contents of outgoing messages by using encryption. Encryption ensures that only the intended recipients can read the messages you send. The message recipient's e-mail program must have corresponding decryption capabilities in order to read the message.
You can encrypt individual messages when you compose them, or you can instruct Outlook to encrypt all outgoing messages.
To encrypt an individual message:
On the Options tab, in the Permission group, click the Encrypt button.
Note
Troubleshooting If you haven't previously used the Encryption feature in Outlook 2010, the Encrypt Message Contents And Attachments button might not be visible. If this is the case, click the More Options dialog box launcher on the Options tab, and then in the Properties dialog box, click Security Settings. In the Security Properties dialog box, select the Encrypt Message Contents And Attachments check box, and click OK. Then close the Properties dialog box.
To encrypt all outgoing messages:
Display the E-mail Security page of the Trust Center dialog box.
In the Encrypted E-mail area of the E-mail Security page, select the Encrypt Contents And Attachments For Outgoing Messages check box.
To receive verification that a message recipient received an encrypted message in its encrypted format, select the Request S/MIME Receipt For All S/MIME Signed Messages check box.
An encrypted message has a blue lock on its message icon and an encryption icon (also a blue lock) in its message header. When you receive an encrypted message, you can click the encryption icon to view the message security settings.
These days, viruses and other harmful programs can easily be spread from computer to computer through active content embedded in or linked to from e-mail messages. To ensure that the e-mail messages you receive won't harm your computer, you might want to display them in plain text, rather than in Rich Text Format or HTML. Links, scripts, and other active content are disabled in plain text messages.
To receive all messages in plain text format:
If you don't want a message recipient to forward, copy, or print your message, you can send it with restricted permissions. You use Information Rights Management (IRM) to set these permissions, which control who can read your messages and what they can do with them. If the restricted message includes an attachment, such as a Microsoft Word document, an Excel workbook, or a PowerPoint presentation, the recipient can't edit, copy, or print the attachment (unless you have set individual permissions to allow those actions within the document).
To use IRM, you need access to an IRM server. If your organization has its own IRM server, your administrator can advise you how to set restricted permissions. If you don't have access to an IRM server, Outlook prompts you to sign up for a free trial on an IRM server provided by Microsoft the first time you try to set permissions for a message.

To take advantage of this free trial, you click Yes in the Service Sign-Up dialog box and then sign up for a Rights Management (RM) account certificate for your outgoing e-mail address (which must be registered as a Windows Live ID). The certificate is valid for six months. After finishing the sign-up process, you can restrict permissions for outgoing messages sent from the computer on which the certificate is installed.
Tip
Registering your e-mail address as a Windows Live ID provides you with the credentials necessary to sign in to many sites and services provided by Microsoft and other companies. To register your e-mail address as a Windows Live ID, visit home.live.com.
To prevent message recipients from forwarding, printing, or copying a message:
The information bar in the message header of the outgoing and received messages indicates what recipients can and can't do with the message.

To read a message sent with restricted permissions, recipients must have Outlook 2010, Outlook 2007, or Outlook 2003.
E-mail is increasingly used to deliver marketing information to customers and potential customers. Many companies include pictures in their marketing messages to help explain their product or to make the message more attractive and noticeable, but these pictures can make e-mail messages large. To avoid this problem, some companies include links to pictures that are hosted on their server. When you preview or open the message, you can see the pictures, but they aren't actually part of the message.
Some junk mail senders are using this technology to include Web beacons in their messages. Web beacons are small programs that notify the sender when you read or preview the e-mail message. The notification confirms that your e-mail address is valid, and as a result, you might receive more junk e-mail.
To help protect your privacy, Outlook includes features that block external content such as pictures, sounds, and Web beacons. In addition to helping ensure your privacy, this blocking technique can save bandwidth resources, because you choose whether to download images and sounds, rather than downloading them automatically when you open a message.
By default, Outlook 2010 blocks external content to and from all sources except those defined in the Safe Senders list and Safe Recipients list. When you open or preview a message that contains blocked content, an information bar in the message header provides options for handling the blocked content.
To view the blocked content in an individual e-mail message:
In the message header, click the information bar, and then click Download Pictures.
To change the way Outlook handles external content:
Display the Automatic Download page of the Trust Center dialog box.
Select the check boxes for the options you want, which include:
Don't download pictures automatically in HTML e-mail messages or RSS items.
Permit downloads in messages from senders and to recipients defined in the Safe Senders and Safe Recipients Lists used by the Junk E-mail filter.
Permit downloads from Web sites in this security zone: Trusted Zone.
Permit downloads in RSS items.
Permit downloads in SharePoint Discussion Boards.
Warn before downloading content when editing, forwarding, or replying to e-mail.
Click OK to save your settings.
Under most circumstances, the security provided by the default settings far outweighs the slight inconvenience of manually downloading content you want to see or hear. You will probably find that many of the messages with blocked pictures are not of interest to you anyway, because they are generally marketing messages.
Outlook alerts you to new messages in several ways, all of which are customizable.
You can set up rules so that Outlook can evaluate and process messages depending on the criteria you set.
You can digitally sign your messages, encrypt them, and set permissions for them. You can also display messages in plain text to disable any active content.
Built-in filters block annoying or hazardous messages that conform to typical spam patterns or that contain active content.