Chapter at a Glance

You don't need to have an active Internet connection to access the information you have stored in Microsoft Outlook 2010; you can work with messages, appointments, and other Outlook items while your computer is offline, by using the Cached Exchange Mode feature. This feature enables you to compose and read messages on your portable computer, for example, while you're on an airplane. When you're working online but have a slow Internet connection, you can configure Cached Exchange Mode settings to restrict the amount of information that is downloaded with each message, so that you can dedicate the available bandwidth to the tasks you most urgently need to complete.
When you travel or will be unavailable to respond to incoming e-mail messages for a period of time, you can use the Automatic Replies feature to inform message senders of your status and to set expectations for message response times.
It's increasingly common for people in disparate locations to work together, with a collaboration site providing a central location to store and distribute information and to manage team processes. Microsoft SharePoint products and technologies provide a simple and effective way for team members to share information and collaborate on projects. If your organization uses a SharePoint site to facilitate collaboration among team members, you can connect Outlook to SharePoint document libraries, lists, and calendars. Then you can work with the information stored on the SharePoint site from within Outlook, when you're online or offline.
In this chapter, you'll first configure Cached Exchange Mode so you can work offline in Outlook with a variety of items. You'll learn ways of working efficiently with Outlook items while you have a slow Internet connection. Then you'll set up automatic replies. Finally, you'll connect SharePoint document libraries, lists, and calendars to Outlook.
Note
Practice Files You don't need any practice files to complete the exercises in this chapter. For more information about practice file requirements, see Using the Practice Files at the beginning of this book.
Wireless Internet connections are now available at many airports, coffee shops, and restaurants, and even on airplanes, either for free or for a small fee. But even though it's easier than ever to connect to the Internet, there will still be times that you use your computer offline. Not having a connection to your mail server doesn't prevent you from using Outlook. You can read and create messages and other Outlook items while your computer is offline exactly as you do when it is online, by using the Cached Exchange Mode feature. Cached Exchange Mode was introduced as an option with Outlook 2003 and is turned on by default in Outlook 2010. It generally works in the background without any interaction from you.
Cached Exchange Mode creates a local copy (a copy that resides on your computer) of the contents of your Microsoft Exchange Server account mailbox. When you are working online (connected to Exchange), messages, appointments, meetings, tasks, and other Outlook items are synchronized between the server and the local cache. As a result, when you go offline (disconnect from Exchange, either voluntarily or involuntarily), you can still open and work with all your existing Outlook items—including attachments—as usual. You can't receive messages while you're offline, but you can send them—at least as far as your Outbox, where they are held until the next time Outlook connects to Exchange. Cached Exchange Mode has greatly streamlined the offline working process, making it simple, for example, to catch up on e-mail on your laptop when you're in an airplane—of the old-fashioned sort, without onboard Internet.
Using Cached Exchange Mode in Outlook 2010, you can have offline access not only to the contents of your Exchange mailbox, but also to the contents of shared folders and public folders (if your organization uses them).
Public Folders are shared storage folders in an Exchange environment. Exchange doesn't automatically create public folders; your Exchange administrator must specifically enable this feature.
If your organization uses public folders, they are available from the expanded folders list in the Navigation Pane of the Mail module.

You can store Outlook items in a public folder by manually copying or moving the items, or by creating a rule to automatically move or copy items that meet specific criteria.
If you have the necessary permissions, you can create public folders and make them available to the entire organization or to selected individuals or groups.
To create and configure a public folder:
On the Folder tab in any Outlook module, in the New group, click the New Folder button; or in the Navigation Pane, right-click the All Public Folders folder and then click New Folder.
In the Create New Folder dialog box, enter a name for the public folder and select the type of items it will contain. In the Select Where To Place The Folder list, expand Public Folders, and click All Public Folders. Then click OK.
In the Navigation Pane, display the public folders and expand the All Public Folders folder. Right-click the new folder, and then click Properties.
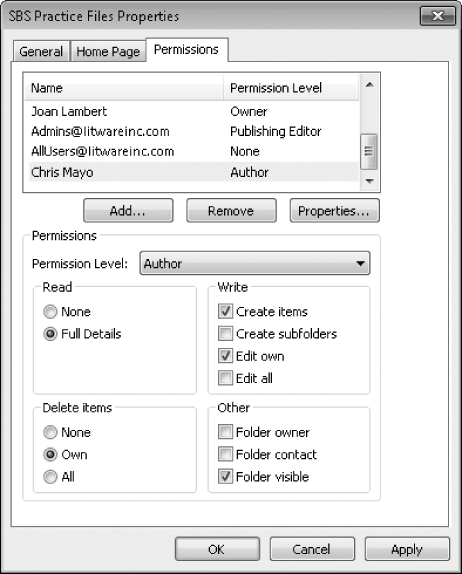
On the Permissions page of the Properties dialog box, specify the people and permissions you want to assign to the folder. Then click OK.
You can choose a predefined permission level or individually set read, write, delete, and other options.
Using Cached Exchange Mode, you can make the contents of specific public folders available to you when you're working offline.
To add a public folder to your Public Folder Favorites:
In the Navigation Pane, display the public folders and expand the All Public Folders folder.
Right-click the folder you want to make available offline, and then click Add To Favorites.
Click the Options button to display the subfolder and location options.
You can include or exclude subfolders of the selected public folder.
In the Add To Favorites dialog box, specify the name of the public folder as you want it to appear in the Favorites folder, select the subfolder and location options you want, and then click Add.

When configuring Outlook to connect to an account, or anytime thereafter, you can configure Cached Exchange mode to keep shared folders and public folders, as well standard Exchange account folders, in your local cache.
To manage the Cached Exchange Mode settings for your Exchange account:
Display the Backstage view. With your Exchange account active at the top of the Info page, click the Account Settings button, and then click Account Settings.
With your Exchange account selected in the list, click the Change button.
In the Change Account dialog box, click the More Settings button.
In the Microsoft Exchange dialog box, click the Advanced tab.
The check boxes available under Cached Exchange Mode Settings depend on your organization's Exchange settings.
To turn off Cached Exchange Mode, clear the Use Cached Exchange Mode check box.
To turn on Cached Exchange Mode, select the Use Cached Exchange Mode check box. Then select the optional folders you want to cache:
Select the Download Shared Folders check box to cache the contents of SharePoint document libraries and calendars and of shared Outlook calendars, Contacts folders, Tasks folders, and Notes folders.
Select the Download Public Folder Favorites check box to cache the contents of public folders that are in your Favorites folder.
After turning Cached Exchange Mode on or off, exit and restart Outlook to effect the change.


When you have a high-speed Internet connection, you probably give very little thought to the size of the messages, and particularly the message attachments, that other people send to you. When your computer has a slow Internet connection, however, downloading large attachments can keep Outlook busy for a long time and cause it to perform slowly. To prevent such delays, you can select the Cached Exchange Mode download option that is most appropriate for your current Internet connection.
Outlook offers these Cached Exchange Mode download options:
Download Full Items This option downloads all your messages and their attachments one at a time. When your computer is online and you have a high-speed Internet connection, this is the best option because it uses the least bandwidth to download all your messages. If you have a slow connection or receive messages with large attachments, messages might be slow to appear in your Inbox when you reconnect to your server.
Download Headers and Then Full Items This option downloads all the message headers quickly so that you can evaluate them while downloading the message bodies and attachments.
Download Headers This option downloads only the message headers, and does not download the body of messages or their attachments until you preview or open the messages. This is the best option if your connection is very slow or if you are charged for the amount of bandwidth you actually use. You can evaluate a message based on its header information (sender, subject, message size, and so on) and then choose whether to download the message and any attachments.
On Slow Connections Download Only Headers You can select this option in addition to the Download Full Items option or the Download Headers And Then Full Items option so that when Outlook detects that its connection to Exchange is slow, it downloads only the message header, but when the connection is not slow, it uses the original option. This option is not available when the Download Headers option is selected.
When you're connecting to the Internet through a local area network (LAN), broadband, or other fast connection, you probably won't notice much difference between the first two options. You'll notice obvious differences with the third option, and it might take some practice to determine whether to download a message based on only a few words in its header.
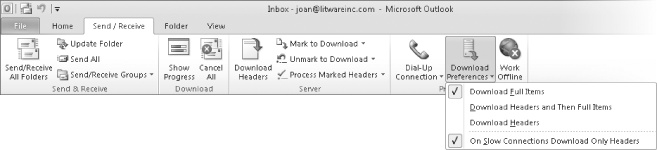
You can manage download options from the Send/Receive tab of the ribbon in any Outlook module.
Note
Troubleshooting The appearance of buttons and groups on the ribbon changes depending on the width of the program window or item window. For information about changing the appearance of the ribbon to match our screen images, see Modifying the Display of the Ribbon at the beginning of this book.
To view or change general download options, click the Download Preferences button in the Preferences group on the Send/Receive tab, and then click to select Download Full Items, Download Headers And Then Full Items, or Download Headers. (A check mark indicates the selected option.) If you usually have a fast Internet connection but might also use your computer in locations with slow Internet connections, also select On Slow Connections Download Only Headers.
If you choose the Download Headers option or the On Slow Connections Download Only Headers option, you can control the download of full items by using the commands in the Server group. After your computer downloads message headers to your Inbox, you can mark specific item headers to indicate that you want to download the entire item; if you change your mind, you can unmark one or all the marked items. After marking the items you want to download, click the Process Marked Headers button to download the full items.
Even while you have an available Internet connection, you can still choose to have Outlook work offline; it might be useful, for example, when you don't want to be interrupted by incoming e-mail messages but still want to have access to information stored in Outlook.
To switch between working online and working offline in Outlook:
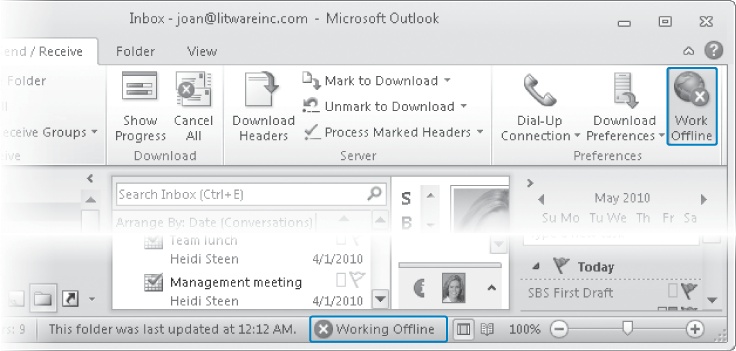
When you're working offline, your offline status is indicated by the active (orange) Work Offline button on the Send/Receive tab of the ribbon in any module and by the connection status message on the program window's status bar.
Choosing the Work Offline option in Outlook doesn't affect the online status of your Internet connection; you can still access the Internet through your Web browser.
When Cached Exchange Mode is enabled, as it is by default, Outlook downloads a copy of the Global Address List (GAL) along with your mailbox. This local copy of the GAL provides access to your co-workers' contact information regardless of whether you are online. If your network connection is slow and the address book is large, this download might take a long time. If you prefer, you can disable the automatic download of the address book or reduce the amount of information transferred, and then manually update your offline address book at your convenience.
To reduce the transfer of address book information during send/receive operations:
On the Send/Receive tab, in the Send & Receive group, click the Send/Receive Groups button and then, in the list, click Define Send/Receive Groups.
In the Send/Receive Groups dialog box, in the Group Name list, click the group you want to change. Then click Edit.
The Send/Receive Settings dialog box for the selected send/receive group opens.
Tip
You can turn off the automatic address book update entirely by clearing the Download Offline Address Book check box.
If the Download Offline Address Book option is unavailable (dimmed), it indicates that the selected account isn't included in the scheduled send/receive operation for this group. To activate the send/receive options for the account, select the Include The Selected Account In This Group check box.
In the Send/Receive Settings dialog box, with the Download Offline Address Book check box selected, click Address Book Settings.
The Offline Address Book dialog box displays the relevant download options.
In the Offline Address Book dialog box, click No Details, and click OK. Then click OK in the Send/Receive Settings dialog box, and click Close in the Send/Receive Groups dialog box.


To manually update your offline address book:
On the Send/Receive tab, in the Send & Receive group, click the Send/Receive Groups button and then, in the list, click Download Address Book.
The Offline Address Book dialog box displays the relevant download options.
In the Offline Address Book dialog box, with the Download Changes Since Last Send/Receive check box selected, select the Full Details check box, and then click OK.
If your organization is running Exchange, you can use the Automatic Replies feature (previously referred to as the Out Of Office Assistant) to inform people who send you e-mail messages of your availability. Turning on the Automatic Replies feature causes Outlook to reply automatically to messages received from other people (but only to the first message from each person). When you turn on this feature, you provide whatever textual information you want within the body of the automatic reply message (commonly referred to as an out-of-office message, or OOF message).
The out-of-office functionality in Outlook is actually provided by Exchange Server, so the specific automatic reply features differ depending on what version of Exchange Server your organization is running. If your organization runs Exchange Server 2010 or Exchange Server 2007, you have more control over the content and distribution of automatic replies than you do if your organization runs Exchange Server 2003. Regardless of which Exchange Server environment you're working in, this is a very useful feature.
The purpose of the Automatic Replies feature is to provide standard information to message senders. When you're away from your computer, an automatic reply can set expectations for when a message sender can expect a personal response from you. You don't have to be physically out of the office to use this feature; some people use it to let other people know when responses will be delayed for other reasons, such as when they are working on a project that will prevent them from responding promptly to messages, or to inform customers who might be in different time zones of their standard working hours.
In addition to having Outlook send automatic replies, you can have it process messages that arrive while you are out of the office by using rules that are in effect only when the Automatic Replies feature is on.
Note
See Also For information about using rules to automatically forward, reply to, delete, alert you to, or otherwise process incoming messages, see Creating Rules to Process Messages in Chapter 11.
The Automatic Replies feature is off until you explicitly turn it on; it does not coordinate with your free/busy information in the Calendar module.
When you are using an Exchange 2010 or Exchange 2007 account, Automatic Replies include the following features:
You can create two auto-reply messages—one that Outlook sends only to people in your organization (on the same domain) and another sent either to everyone else or only to the people in your primary address book.
Having separate internal and external messages allows you to distinguish the information made available to co-workers, to friends and business contacts, and to the general public (including senders of spam). For example, you might include your itinerary and mobile phone number only in an internal automatic reply, include your return date in a reply to your contacts, and not send any reply to other people.
You can specify the font, size, and color of automatic reply message text and apply bold, italic, or underline formatting.
You can format paragraphs as bulleted or numbered lists and control the indent level.
You can specify start and end dates and times for your automatic reply message so that you don't have to remember to turn off Automatic Replies.
In this exercise, you'll configure Outlook to automatically reply to incoming messages and to send one automatic reply to co-workers and another to the general public.
Note
SET UP You don't need any practice files to complete this exercise. Display your Inbox, and then follow the steps.
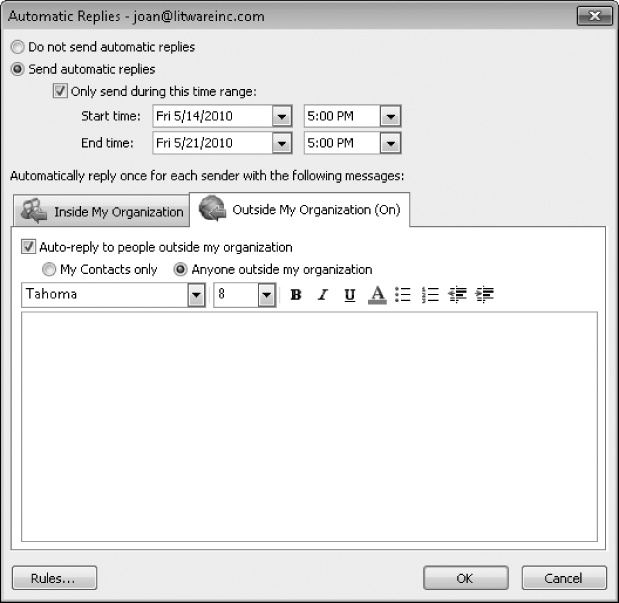
Display the Backstage view. On the Info page of the Backstage view, click the Automatic Replies button.
The Automatic Replies dialog box for your Exchange account opens. This dialog box includes two pages: Inside My Organization and Outside My Organization. The Outside My Organization page includes either (Off) or (On) to indicate either your organization's standard setting or, if you've previously used this feature, your most recent setting. The content pane is currently unavailable (dimmed).
Click Send automatic replies.
The time range settings, content pane, and formatting commands become available.
Select the Only send during this time range check box. Then set the Start time to the current time and date, and the End time to one hour from now.
Tip
To set up automatic replies when you'll be out of the office for a week, set the start time to the end of the day on the last business day preceding the week you'll be out of the office, and the end time to the end of the day on the last business day before you return. (For example, from 5:00 P.M. Friday until 5:00 P.M. the following Friday.) By using this schedule, anyone sending mail that you won't be able to respond to within a normal business response time period will receive an automatic reply.
On the Inside My Organization page, in the content pane, type the following sentence:
I'm testing the Outlook automatic reply feature!
A more typical internal automatic reply might be I'm on vacation! Call my mobile phone at (972) 555-0123 if you need to contact me. For the purpose of this exercise, though, we'll take the safe route and not include a message that might be confusing to your co-workers.
 Select the sentence you just entered. On
the toolbar at the top of the Inside My
Organization page, click the Font
Color button and then, in the gallery, click the Purple square.
Select the sentence you just entered. On
the toolbar at the top of the Inside My
Organization page, click the Font
Color button and then, in the gallery, click the Purple square.You can format the content of your automatic reply message by using the basic character and paragraph formatting commands available from the toolbar.
Click the Outside My Organization tab.
The Outside My Organization page includes options for sending automatic replies to all people outside of your organization, only to people with e-mail addresses that are present in your primary Outlook address book, or not at all.
A typical external automatic reply might be something like this:
I am out of the office this week and will respond to your message as soon as possible. For more information about Litware, Inc. products and services, please visit our Web site at www.litwareinc.com.
For the purposes of this exercise, you will not set up an external automatic reply message.
Tip
If you make changes to either the internal or the external reply message, but not to both, when you close the Automatic Replies dialog box, Outlook displays a message box asking whether you want to change the other reply message. This useful reminder helps ensure that you keep both versions up to date.
Clear the Auto-reply to people outside my organization check box, if it is currently selected.
In the lower-left corner of the Automatic Replies dialog box, click Rules.
In the Automatic Reply Rules dialog box, click Add Rule.
The Edit Rule dialog box opens.
The process of creating rules for messages that arrive when automatic replies are turned on is much simpler than the process of creating rules that apply to all messages.
Note
See Also For information about Outlook rules, see Creating Rules to Process Messages in Chapter 11.
Click Cancel in the Edit Rule dialog box, and then click Cancel in the Automatic Reply Rules dialog box.
The dialog boxes close without creating a rule.
In the Automatic Replies dialog box, click OK. Then in the Outlook program window, click the File tab to close the Backstage view.
The Automatic Replies information bar appears below the ribbon, and the Automatic Replies menu appears on the status bar, because you specified that Outlook should begin sending automatic replies immediately.
On the status bar, click Automatic Replies.
In the Automatic Replies dialog box, click Do not send automatic replies, and then click OK.
The Automatic Replies information bar and the Automatic Replies status bar menu disappear.


SharePoint products and technologies facilitate secure sharing of information within an organization. If your organization stores information on SharePoint sites, you might work with data recorded in SharePoint lists, schedules tracked on SharePoint calendars, or Office documents stored in document libraries. You can connect to SharePoint lists, calendars, and document libraries from Outlook, and work with data and documents stored on a SharePoint site from directly within Outlook.
You can create a copy of a SharePoint document library as a folder in Outlook 2010. You can then preview in Outlook any document, workbook, or presentation that is stored in the document library, or you can work with a local copy of the document, workbook, or presentation on your computer. Changes that you make to a document within Outlook are synchronized with the file on the SharePoint site.
To connect a document library or folder therein to Outlook, follow these steps:
On your organization's SharePoint site, display the document library or subfolder you want to work with.
The menu bar is at the top of the content pane.
On the Actions menu, click Connect To Outlook.
A Windows Internet Explorer dialog box opens, requiring that you give explicit permission for SharePoint to access Outlook.
In the Internet Explorer dialog box, click Allow and then, in the Internet Explorer Security dialog box that opens, click Allow.
Outlook starts, if it isn't already running. A Microsoft Outlook dialog box opens, asking you to confirm that you want to connect the SharePoint document library to Outlook.
Select or clear the Display This List On Other Computers With The Account check box, as follows:
To download a local copy of the document library to every computer on which Outlook is configured to connect to the specified account, select the check box.
To download the document library only to the computer you're currently using, clear the check box.
Select or clear the Update This Subscription With The Publisher's Recommendation check box, as follows:
To have the site publisher control updates, select the check box.
To manually control updates, clear the check box.
In the SharePoint List Options dialog box, click OK. Then in the Microsoft Outlook dialog box, click Yes. If a Windows Security or Connect dialog box appears, prompting you for your SharePoint site credentials, enter your user name and password, and then click OK.
Outlook creates and displays a folder, named for the site and document library, as a subfolder of the SharePoint Lists folder in your mailbox, and downloads a copy of each of the items stored in the document library as an Outlook item within the folder. The icon to the left of the item name indicates the file type (for example, document, workbook, presentation, or database).
Tip
Outlook creates the SharePoint Lists folder the first time you connect a document library or other SharePoint list to Outlook.
If the document library or subfolder you connect to contains subfolders, the content of the subfolders is also downloaded. The presence of subfolders is indicated by a transparent triangle to the left of the document library name; click the triangle to expand the folder and display the subfolders. (A black triangle indicates an expanded folder.)


You now have a local copy of the document library or subfolder contents on your computer, and you can work with the files from within Outlook.
You can preview any item in the Reading Pane by clicking it, or you can open a read-only version of the item by double-clicking it. When you open an item, a banner at the top informs you that you're working in an Offline Server Document; if you want to make changes that you can later merge them with the document stored in the document library, click Edit Offline.
While you work with an offline copy of a file, a local version is stored in your SharePoint Drafts folder (a subfolder of your Documents folder in Windows Explorer). To transfer changes from the offline file to the document library, save your changes and close the file. In the Edit Offline message box that appears, click Update.

Your organization's SharePoint site might include contact information for employees, project team members, or other groups of people. You can import the information stored in a SharePoint contacts list into Outlook as an Outlook contacts folder.
To connect a SharePoint contacts list to Outlook, follow these steps:
On your organization's SharePoint site, display the contacts list you want to work with.
The menu bar is at the top of the content pane.
Follow steps 2 through 7 of the previous procedure for connecting a SharePoint document library to Outlook.
Outlook creates a contacts folder, named for the SharePoint site and contacts list, containing contact records created from the information stored in the SharePoint contacts list. The new contacts folder is available in the Contacts module.


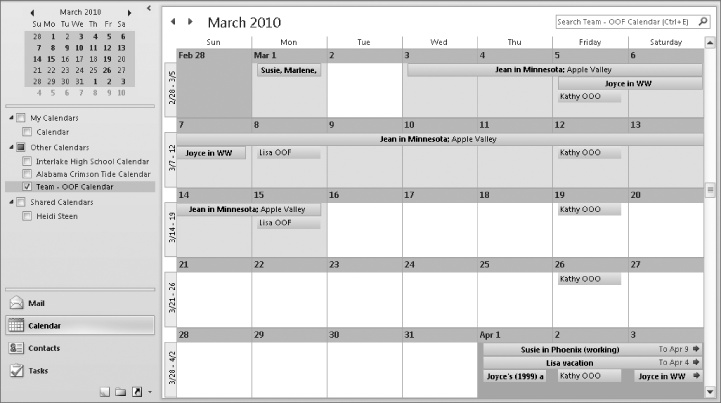
If your organization maintains team calendars on a collaboration site, you might find it convenient to view the calendar in Outlook rather than on the site. By connecting a SharePoint calendar to Outlook, you can display the SharePoint calendar in the Outlook Calendar module, either by itself, next to other calendars, or overlaid on other calendars. You can work with the SharePoint calendar as you would with any other calendar in Outlook. Any changes you make to the SharePoint calendar in Outlook are immediately reflected in the calendar on the collaboration site, and vice versa.
To connect a SharePoint Calendar to Outlook, follow these steps:
On your organization's SharePoint site, display the contacts list you want to work with.
The menu bar is at the top of the content pane.
Follow steps 2 through 7 of the procedure for connecting a SharePoint document library to Outlook.
Outlook creates a calendar, named for the SharePoint site and calendar, filled in with calendar items matching those recorded on the SharePoint calendar. The new calendar is available in the Calendar module.

Working away from your network or without an Internet connection doesn't mean that you can't use Outlook. If your organization uses Exchange, you have many options for accessing your e-mail messages and other information you manage within Outlook.
Cached Exchange Mode keeps a copy of your mailbox on your computer so you can keep working even when you are away from your network.
Cached Exchange Mode handles connecting to and synchronizing your local mailbox for you. You can set it to cache all messages or just headers, to save bandwidth.
When you'll be away from your computer for a while, Outlook can send an automatic reply once to each person from whom you receive a message. This is a convenient way of letting people know when to expect a personal response from you.
You can maintain a local copy of document library contents in Outlook, work with files, and upload your changes to the SharePoint site.
If your team keeps a calendar in SharePoint, you can work with that calendar from within Outlook.