Chapter at a Glance

A host of configuration and customization options are available to help you take advantage of everything that Microsoft Outlook 2010 has to offer.
You can change the appearance and arrangement of elements in the program window. To work more efficiently with Outlook, you can create custom Quick Steps that perform multiple actions with one click. You can specify the tabs that appear on the ribbon and the groups that appear on the ribbon tabs, and put frequently used commands at your fingertips by adding them to the Quick Access Toolbar. You can tailor many aspects of the program to suit the way you work.
In this chapter, you'll first customize the primary program window panes. Then you'll create a custom Quick Step. You'll change the commands that appear on the ribbon and on the Quick Access Toolbar. Finally, you'll personalize Office and Outlook settings to meet your needs.
Note
Practice Files You won't need any practice files to complete the exercises in this chapter. See Using the Practice Files at the beginning of this book for more information.
The Outlook program window includes four primary areas in which you work with Outlook items (e-mail messages, contact records, calendar entries, tasks, and notes).

Note
Troubleshooting The appearance of buttons and groups on the ribbon changes depending on the width of the program window or item window. For information about changing the appearance of the ribbon to match our screen images, see Modifying the Display of the Ribbon at the beginning of this book.
You might find that the default arrangement of these areas is ideal for the way you work. But if you're viewing the program window on a low-resolution screen, don't need all the available tools, or would like more space for the main work area, you can easily change the appearance and layout of the workspace of each of the program window elements.
Navigation Pane You can tailor the Navigation Pane to suit your preferences in the following ways:
You can minimize or expand the Navigation Pane by clicking the Minimize The Navigation Pane or Expand The Navigation Pane button (the left-facing or right-facing chevron, respectively) at the top of the pane.
You can change the width of the Navigation Pane by dragging the vertical frame divider to the right or to the left.
To display more buttons at the bottom of the Navigation Pane, drag the handle above the module buttons up to increase the height of the button area, or click the Configure Buttons button in the lower-right corner of the Navigation Pane and then click Show More Buttons. To display buttons in a small format or allocate more space to the Navigation Pane folders and options, drag the handle down to decrease the height of the button area, or click the Configure Buttons button and then click Show Fewer Buttons.
Module content pane You can display and organize content in this pane in many ways. These options are discussed in the chapters that cover individual modules, such as the Mail module and the Tasks module.
Reading Pane You can display the pane to the right of or below the content pane, or close it entirely.
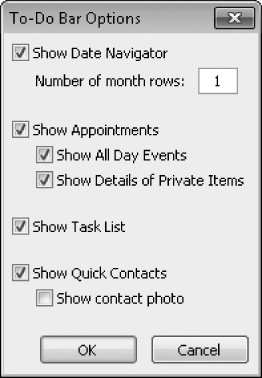
To-Do Bar You can hide or display the To-Do Bar, change the number of calendar months and appointments shown, and arrange the Tasks List in different ways. You can change the size of the module content pane by minimizing or maximizing the To-Do Bar—the minimized To-Do Bar displays only your next appointment and the number of active and completed tasks due today.
You can display or hide any of the workspace elements (other than the menu bar, which can't be changed) from the View menu. Your preferences are preserved from session to session. When you start Outlook, the Navigation Pane, To-Do Bar, and Calendar will appear the same way they did when you last exited the program.
In this exercise, you'll change the space allocated to the module content pane, change the content displayed on the To-Do Bar, and learn how to move the menu bar and move or hide the toolbars.
Note
SET UP You don't need any practice files to complete this exercise. Display your Outlook Inbox, and then follow the steps.
 At the top of the Navigation Pane, click the Minimize the Navigation Pane button.
The Navigation Pane contracts to display only a vertical bar on the left side of the program window. In the Mail module, buttons on the minimized Navigation Pane give you one-click access to the folders included in your Favorite Folders list.
Click the Folders button at the top of the minimized Navigation Pane.
Outlook displays your Favorite Folders and Mail Folders in a temporary pane.
 At the top of the To-Do Bar, if the To-Do Bar is minimized, click the Expand the To-Do Bar button.
The To-Do Bar expands to display the calendars of the current and next months, your next three appointments, and your task list.
 On the View
tab, in the Layout group, click the
To-Do Bar button, and then click
Options.
On the View
tab, in the Layout group, click the
To-Do Bar button, and then click
Options.Change the Date Navigator setting to display 2 months, and then click OK.
 In the Layout group, click the Reading Pane button, and then click Bottom.
The Reading Pane moves from the side of the content pane to the bottom.
In the Layout group, click the Reading Pane button, and then click Off to close the Reading Pane entirely.
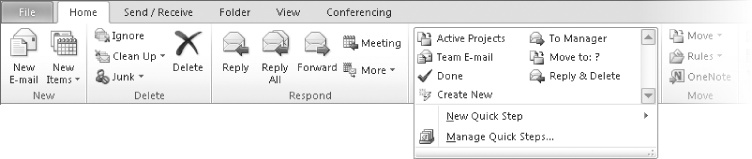
Outlook 2010 includes many features designed to increase the efficiency with which you perform tasks. WIth the new Quick Steps feature available in the Mail module, you can perform multiple processes on one or more e-mail messages with only one click. For example, you can reply to an e-mail message and delete the original message, or flag a message for follow-up and move it to a specific folder. Quick Steps can include any combination of up to 12 actions that you choose.
Quick Steps are available from the Quick Steps group on the Home tab of the Mail module, and from the shortcut menu that appears when you right-click a message or group of messages.
Tip
If you connect to multiple accounts, the Quick Steps in each Mail module are specific to that account.
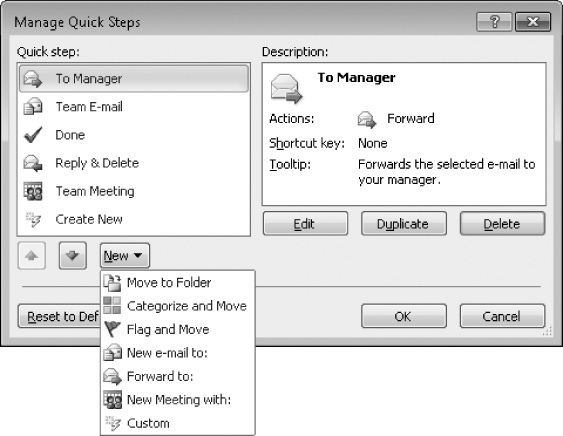
In a new installation of Outlook, the Quick Steps gallery includes five standard Quick Steps: Move To, Team E-Mail, Reply & Delete, To Manager, and Done. You can modify the actions performed by existing Quick Steps, add other common tasks to the Quick Steps menu by choosing them from the New Quick Step list, or create a custom Quick Step from scratch.
Note
See Also For information about using and modifying the standard Quick Steps, see Managing Messages by Using Quick Steps in Chapter 7.
In this exercise, you'll create a custom Quick Step that sends an e-mail message.
Note
SET UP You don't need any practice files to complete this exercise. Display the Inbox, and then follow the steps.
On the Home tab, in the Quick Steps gallery, click Create New.
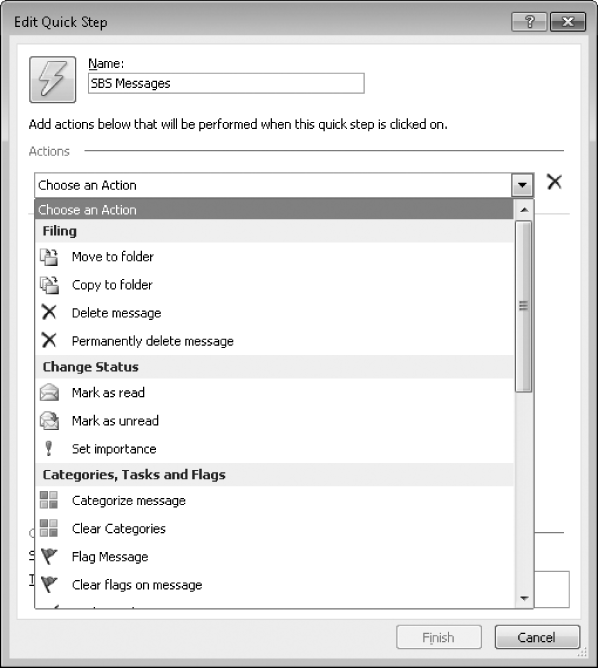
In the Name box, replace the selected temporary name with SBS Messages. Then click the Actions arrow to expand the list.
The Actions list includes 25 actions in six sections: Filing; Change Status; Categories, Tasks and Flags; Respond; Appointment; and Conversations.
Scroll down the Actions list to see the available actions. Then, in the Actions list, under Respond, click New Message.
The selected action appears in the Actions list and the information required to perform the action appears below it.
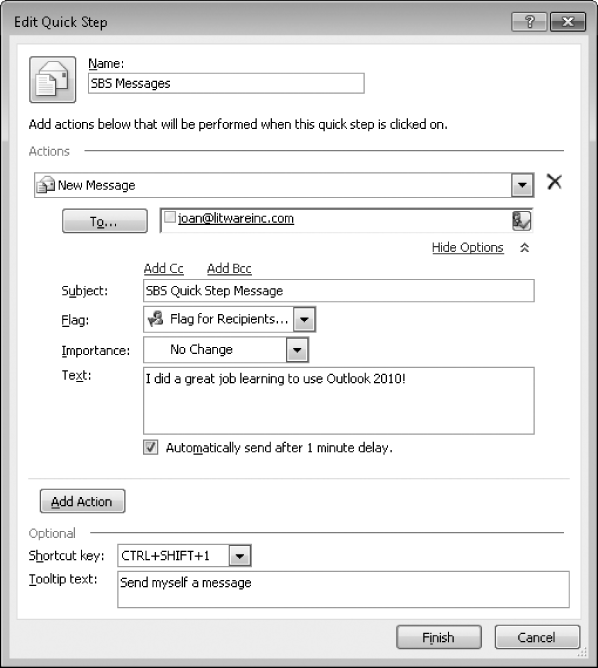
In the To box, enter your e-mail address. Then in the Actions list, under New Message, click Show Options.
The list expands to display optional settings for the new message.
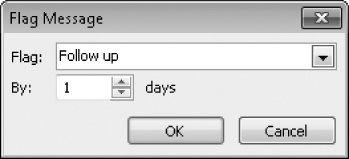
In the Flag list, click Flag for Recipients.
In the Flag list, click No Response Necessary. In the By box, click the down arrow one time to set the flag time to 0 days. Then click OK.
The Flag Message dialog box closes and you return to the Edit Quick Step dialog box.
In the Text box, enter the following sentence:
I did a great job learning to use Outlook 2010!
Select the Automatically send after 1 minute delay check box.
Below the existing New Message action, click Add Action.
A second Actions list appears. You can add more actions to the Quick Step by clicking an action in the list. However, the Quick Step you have created is one that doesn't take action on an existing message, so the other actions aren't appropriate.
 To the right of the Actions list that currently displays
Choose an Action, click the Delete button.
To the right of the Actions list that currently displays
Choose an Action, click the Delete button.The second Actions list disappears from the dialog box.
In the Shortcut key list, click CTRL+SHIFT+1.
In the Tooltip text box, enter Send myself a message.
Your Quick Step is complete.
In the Edit Quick Step dialog box, click Finish.
In the Navigation Pane, click your Outbox.
On the Home tab, in the Quick Steps gallery, point to SBS Messages.
A ScreenTip displays Send myself a message.
Click the SBS Messages Quick Step.
Because you chose the Automatically Send After 1 Minute Delay check box, the message appears automatically in your Outbox, and then is sent.
Display your Inbox.
The SBS Quick Step Message appears in your Inbox.
Open the message.
The follow-up flag is visible at the top of the message header.


Even if Outlook 2010 is the first version of the program you've worked with, by now you'll be accustomed to working with commands represented as buttons on the ribbon. The ribbon was designed to make all the commonly used commands visible so that people could more easily discover the full potential of the program. But many people use Outlook to perform the same set of tasks all the time, and for them, seeing buttons (or even entire groups of buttons) that they never use is just another form of clutter.
Note
See Also For information about minimizing and expanding the ribbon, see Customizing the Quick Access Toolbar later in this chapter.
Would you prefer to see fewer commands, not more? Or would you prefer to see more specialized groups of commands? Well, you can customize the ribbon in both ways. Clicking Customize Ribbon in the left pane of the Outlook Options dialog box displays the Customize The Ribbon page.
Tip
The tabs that appear on the ribbon in your Outlook configuration may differ from those shown here depending on the e-mail accounts to which you've configured Outlook to connect.
On this page, you can customize the ribbon in the following ways:
If you rarely use a tab, you can turn it off.
If you use the commands in only a few groups on each tab, you can remove the groups you don't use. (The group is not removed from the program, just from its tab.)
You can move a group from one tab and to another.
You can create a custom group on any tab and then add commands to it. (You can't add commands to a predefined group.)
You can even create a custom tab. For example, you might want to do this if you use only a few commands from each tab and you find it inefficient to switch among multiple tabs.
Don't be afraid to experiment with the ribbon to find the configuration that best suits the way you work. If at any point you find that your new ribbon is harder to work with rather than easier, you can always reset everything to the default configuration.
Tip
If you upgraded from an earlier version of Outlook, as you use Outlook 2010 you might identify a few commands that no longer seem to be available. A few old features have been abandoned, but others that people used only rarely have simply been pushed off to one side.
If you sorely miss one of these sidelined features, you can make it a part of your Outlook working environment by adding it to the ribbon. You can find a list of all the commands that do not appear on the ribbon but are still available in Outlook by displaying the Customize Ribbon page of the Outlook Options dialog box and then clicking Commands Not In The Ribbon in the Choose Commands From list.
In this exercise, you'll turn off tabs, remove groups, create a custom group, and add a command to the new group. Then you'll create a tab and move predefined groups of buttons to it. Finally, you'll reset the ribbon to its default state.
Note
SET UP You don't need any practice files to complete this exercise. Display your Outlook Inbox, and then follow the steps.
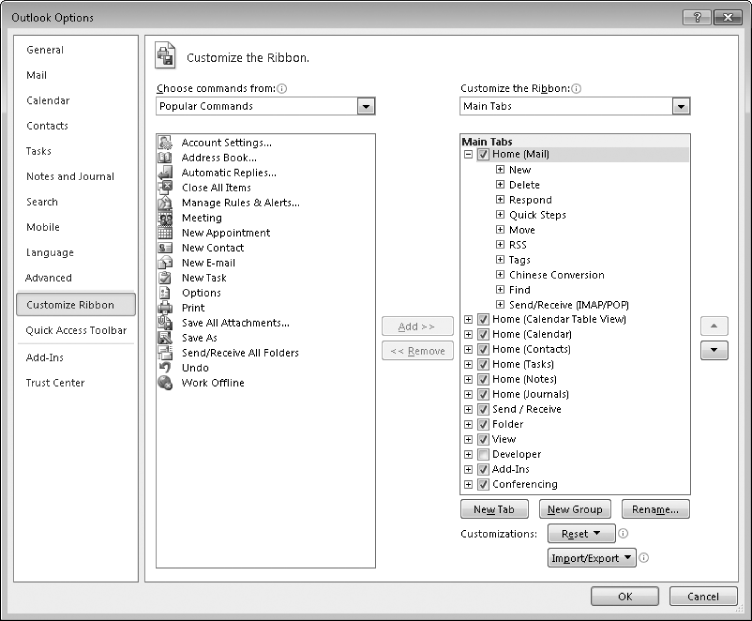
Open the Outlook Options dialog box, and then, in the left pane, click Customize Ribbon.
In the right pane of the Customize Ribbon page, clear the check boxes of the Folder tab, the Add-Ins tab, and the Conferencing tab (if that tab appears in the right pane). Then click OK.
The ribbon now displays only the File, Home, Send/Receive, and View tabs.
Redisplay the Customize Ribbon page of the Outlook Options dialog box, and in the right pane, select the Folder check box. Then click the plus sign adjacent to Folder to display the groups that currently appear on this tab.
In the Choose commands from list, click Main Tabs. Then in the list of available commands, click the plus sign adjacent to Folder to display the groups that are predefined for this tab.
In the right pane, click the IMAP group. Then between the left and right panes, click Remove.
The IMAP group is removed from the list of groups that are present on the tab (the pane on the right), but it is still present in the available commands list. You can add it back to the Folder tab, or add it to a different tab, at any time.
If the Home (Mail) group is not expanded in the right pane, click the plus sign adjacent to Home (Mail) to display the groups that currently appear on the Home tab in the Mail module. Then click the tab name, Home (Mail).
Below the right pane, click New Group.
A group named New Group (Custom) is added to the bottom of the Home (Mail) group list.
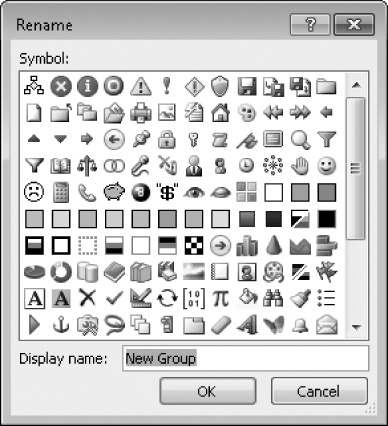
With the new group selected, click Rename.
 In the Rename dialog box, enter Housekeeping in the Display name box, and click OK. Then on the right side of the Customize Ribbon page, click the Move
Up button until the Housekeeping
(Custom) group is at the top of the groups list.
In the Rename dialog box, enter Housekeeping in the Display name box, and click OK. Then on the right side of the Customize Ribbon page, click the Move
Up button until the Housekeeping
(Custom) group is at the top of the groups list.Because it is first in the list, the custom group will appear at the left end of the Home tab.
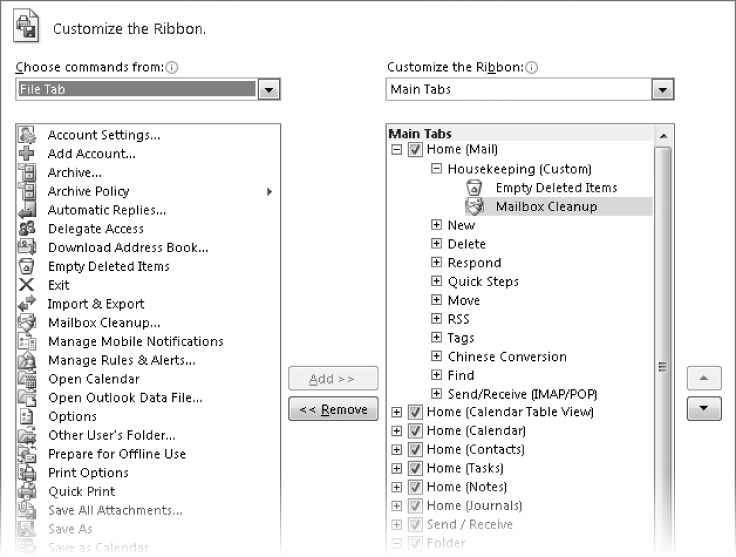
In the Choose commands from list, click File Tab.
The available commands list changes to include only the commands that are available in the Backstage view, which you display by clicking the File tab.
In the available commands list, click Empty Deleted Items. Then between the left and right panes, click Add. Repeat this step with the Mailbox Cleanup command.
The two commands are added to the custom group.
In the right pane, remove the Respond and Tags groups from the Home (Mail) tab.
Click the tab name, Home (Mail), and then click New Tab.
A custom tab named New Tab (Custom) is added after the Home (Mail) tab. The custom tab includes one custom group named New Group (Custom).
Remove the custom group from the custom tab.
Click the tab name, New Tab (Custom), and click Rename.
In the Rename dialog box, enter Follow Up in the Display name box, and then click OK.
In the Choose commands from list, click Main Tabs and then, in the available commands list, expand the Home (Mail) tab.
With the Follow Up (Custom) tab selected in the right pane, add the Respond and Tags groups from the available Home (Mail) groups.
The right pane shows the new configuration of the Home and Follow Up tabs.
In the Outlook Options dialog box, click OK.
The new Housekeeping group is at the left end of the Home tab, and the new Follow Up tab appears on the ribbon after the Home tab.
Display the Customize Ribbon page of the Outlook Options dialog box. In the lower-right corner, click Reset, and then click Reset all customizations. Then in the message box asking you to confirm that you want to delete all ribbon and Quick Access Toolbar customizations, click Yes.
In the Outlook Options dialog box, click OK.


The commands you use to control Outlook are available from the ribbon located at the top of the program window and in each Outlook item window. As you use Outlook, you will become familiar with the locations of the commands you use most frequently. To save time, you can place frequently used commands on the Quick Access Toolbar which is located, by default, in the upper-left corner of the program window. To save even more time, you can move the Quick Access Toolbar from its default position above the ribbon to below the ribbon, so your mouse has less distance to travel from the content you're working with to the command you want to invoke.
In the program window, the Quick Access Toolbar displays the Send/Receive button and the Undo button. In the individual item windows, the Quick Access Toolbar displays the Save, Undo, Redo, Previous, and Next buttons.
There are three ways to place the buttons and lists that represent commands onto the Quick Access Toolbar:
From the Quick Access Toolbar
From the ribbon
From the Outlook Options dialog box
Clicking the Customize Quick Access Toolbar button at the right end of the Quick Access Toolbar displays a list of commands pertinent to the type of window you're working in.

Clicking a command that is not already preceded by a check mark adds that command to the right end of the Quick Access Toolbar,
Right-clicking any button or list on the ribbon and then clicking Add To Quick Access Toolbar adds that button or list to the right end of the Quick Access Toolbar.
From the Quick Access Toolbar page of the Outlook Options dialog box, you can specify which commands you want to appear on the toolbar, control the order in which commands appear, and divide commands into logical groups. Note that the settings on the Quick Access Toolbar page of the Outlook Options dialog box apply to the program or item window from which you displayed the Backstage view.

On this page, you can customize the Quick Access Toolbar in the following ways:
You can define a custom Quick Access Toolbar for the Outlook program window or for a specific type of item window.
You can add any command from any group of any tab, including contextual tabs.
You can add commands that don't appear on the ribbon.
You can display a separator between different types of buttons.
You can move buttons around on the toolbar until they are in the order you want.
You can reset the Quick Access Toolbar to its default configuration.
If you never use more than a few buttons, you can add those buttons to the Quick Access Toolbar and then hide the ribbon by double-clicking the active tab or by clicking the Minimize The Ribbon button. Only the Quick Access Toolbar and ribbon tab names remain visible. You can temporarily redisplay the ribbon by clicking the tab you want to view. You can permanently redisplay the ribbon by double-clicking any tab or by clicking the Expand The Ribbon button.
As you add buttons to the Quick Access Toolbar, it expands to accommodate them. If you add many buttons, it might become difficult to view the text in the title bar, or all the buttons on the Quick Access Toolbar might not be visible, defeating the purpose of adding them. To resolve this problem, you can move the Quick Access Toolbar below the ribbon by clicking the Customize Quick Access Toolbar button and then clicking Show Below The Ribbon.
Tip
Even though most commands are now available on the ribbon, you can still invoke many commands by using keyboard shortcuts. For a list of the keyboard shortcuts available in Outlook 2010, see Appendix A at the end of this book.
In this exercise, you'll add and organize buttons on the Quick Access Toolbar that is shown in message composition windows.
Note
SET UP You don't need any practice files to complete this exercise. Display your Outlook Inbox, and then follow the steps.
 On the Home
tab, in the New group, click the
New E-mail button.
On the Home
tab, in the New group, click the
New E-mail button.A message composition window opens. The Quick Access Toolbar displays the Save, Undo, Redo/Repeat, Previous, and Next buttons.
 At the right end of the Quick Access
Toolbar, click the Customize Quick Access
Toolbar button.
At the right end of the Quick Access
Toolbar, click the Customize Quick Access
Toolbar button.The Customize Quick Access Toolbar menu opens, displaying a list of frequently used commands that you can click to add to the toolbar.
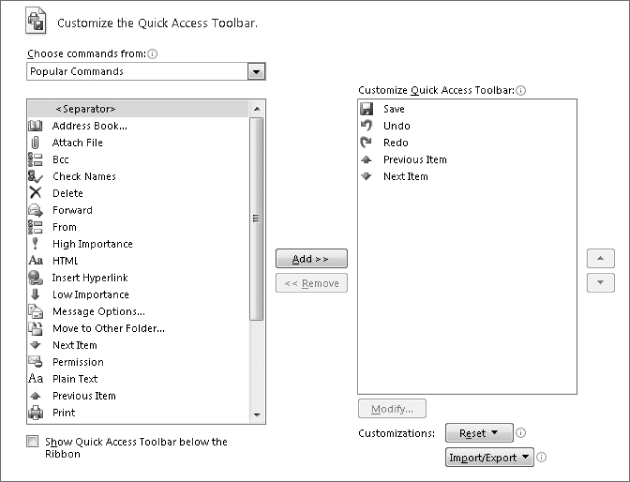
Near the bottom of the menu, click More Commands.
A list of available commands appears in the pane on the left, and a list of the commands currently displayed on the Quick Access Toolbar appears in the pane on the right.
At the top of the available commands list on the left, double-click <Separator>.
In the Choose commands from list, click All Commands.
Tip
In some cases, multiple instances of a command appear in the All Commands list—these correspond to the locations in which the command appears within the program. Pointing to a command displays the command location in a ScreenTip. Commands that appear on contextual tabs and commands that don't appear on any tab are also available from this list.
All the available commands, including those not shown on the ribbon, appear in the available commands list.
Scroll down the available commands list, click the New Appointment command, and then click Add.
The command appears in the right pane following the separator.
Repeat step 6 to add the New Contact, New E-mail, and New Task commands. Then scroll to the top of the available commands list, and add another separator following the New Task command.
The four commands you've added to the right pane are set off by separators, so they will appear on the Quick Access Toolbar as a cohesive group.
- In the right pane, click New E-mail. Then click the Move Up button two times to position this most commonly
used button first in the group.
In the Outlook Options dialog box, click OK.
The Quick Access Toolbar of the open message window now includes the default buttons and the New Appointment, New Contact, New E-mail, and New Task buttons, separated by a line.
To create new Outlook items, you no longer have to open the associated module, click the Home tab, and then click the New item button. You can now create a new Outlook item with a single click, from any module, whether or not the ribbon is displayed.
Close the message composition window. (Don't save your changes if Outlook prompts you to do so.)
Notice that there has been no change to the Quick Access Toolbar in the Outlook program window. It still displays only the Send/Receive and Undo buttons.
Open a new message composition window.
The custom Quick Access Toolbar is present in the new window.
Click the Customize Quick Access Toolbar button and then, at the bottom of the menu, click Show Below the Ribbon.
The Quick Access Toolbar moves from the title bar to the area between the ribbon and the message header, and becomes the full width of the message window.
From the message composition window, display the Quick Access Toolbar page of the Outlook Options dialog box, click Reset, and then click Reset only Quick Access Toolbar.
In the Reset Customizations message box, click Yes to return the Quick Access Toolbar to its default contents. Then click OK to close the Outlook Options dialog box.
The Quick Access Toolbar now displays only the default buttons for the message window, but is still located below the ribbon.


Note
CLEAN UP Reposition the Quick Access Toolbar if you want to, by clicking Show Above The Ribbon on the Customize The Quick Access Toolbar menu.
Customizing the Status Bar
The status bar, which is located at the bottom of the program window, displays information about the contents of the currently displayed folder, overdue reminders, send/receive status, online status, and other information. At its right end, the status bar displays a set of zoom controls with which you can control the magnification of content in the reading pane and in item windows.
Almost all the available information is shown on the status bar by default; the only information not shown is quota information that helps you to track how much of your available mailbox storage space is currently being used.
To change the information displayed on the status bar:
Right-click an empty area of the status bar.
The status bar shortcut menu appears.
Click an item on the menu to add it to or remove it from the status bar.

Many of the status bar entries are active, meaning that you can click them to display additional information. For example, when the Reminders item appears on the status bar it means that you have overdue reminders. Clicking the Reminders item opens the Reminders window in which you can see the current reminders.
While you are still becoming familiar with Outlook 2010, you might be quite content to work with the default settings (and it's good to do so until you understand the reasons they are as they are). But as you become more experienced, you might want to adjust some of the settings to better suit the way you work.
You can change many of the default program settings from the Outlook Options dialog box, which you open by clicking Options in the left pane of the Backstage view. From this dialog box, you can control the settings and appearance of many Outlook features, including the following:
E-mail accounts, functionality, and formatting
Editorial and archive functions
The Outlook program window panes (the Navigation Pane, the Reading Pane, and the To-Do Bar)
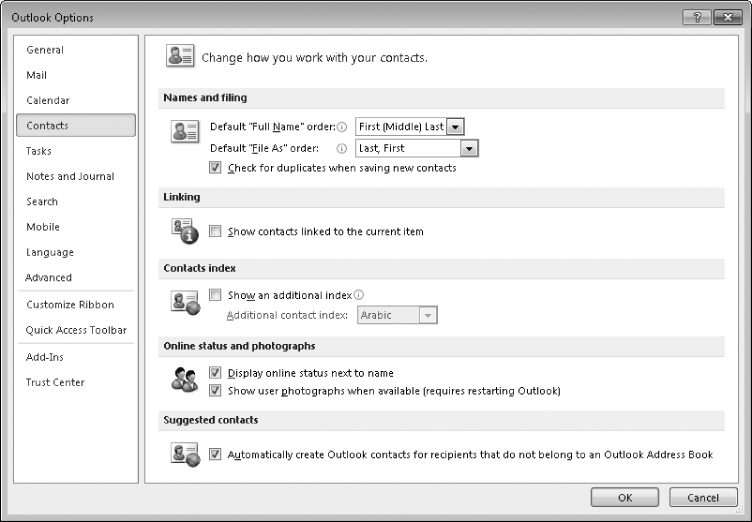
Your calendar, tasks list, contact list, and notes
The indexing and search functions
The telephone and voice mail functions
Earlier in this chapter, we experimented with modifying the ribbon and the Quick Access Toolbar to tailor the program window and item windows to your preferences. Now we'll examine the function-specific settings that you can modify to work most efficiently.
The Outlook Options dialog box is divided into 10 pages of function-specific settings, 2 pages of feature-specific settings (for the ribbon and for the Quick Access Toolbar), and 2 pages of security-related settings.
The default page of the Outlook Options dialog box is the General page.

The settings on the General page apply to all Outlook modules. These settings include showing the Mini Toolbar when you select text, enabling live previews of gallery options, changing the color scheme, and setting the ScreenTip style. In addition, you can specify your user information (name and initials) on this page. The user information that you set here applies to all Office programs, not only to Outlook.
Most of the settings you might want to change to modify the way Outlook works are available on the Mail page of the Outlook Options dialog box. These include settings for composing original messages, replies, and forwards; controlling the behavior of Outlook panes and desktop alerts; cleaning up conversations; saving, sending, and tracking messages, and default message format options.
Outlook includes a selection of options so that you can manage your e-mail most effec-tively. To avoid losing your work, you can choose to have Outlook automatically save messages you have created but not yet sent. When new messages arrive, you can choose to have Outlook alert you by playing a sound, briefly changing the mouse pointer to an envelope icon, showing an envelope icon in the notification area, or any combination of these effects. You can also set default options for sending a message. For example, if you are concerned about privacy, you might choose to set the sensitivity of all new messages to Private.
The Mail page is divided into 10 sections. Because this is where you'll make most of your changes, we'll take a look at each of these sections.
The Compose Messages section of the Mail page includes options for changing the behavior of Outlook while you're creating a new message.
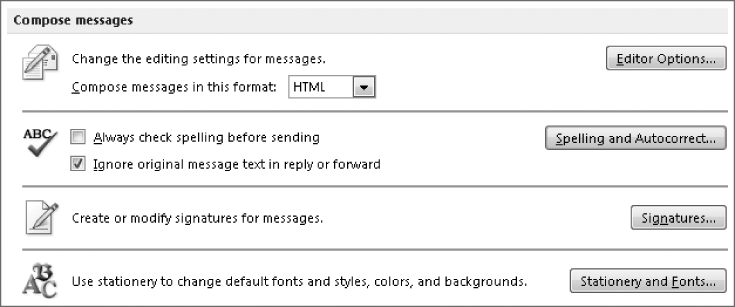
Clicking either Editor Options or Spelling And Autocorrect in the Compose Messages section of the Mail page displays the Editor Options dialog box. From this dialog box, you can set AutoCorrect options to specify how Outlook will correct and format the content of your messages as you type them, and customize the spelling and grammar-checking settings.
Note
See Also For information about automatic signatures, see Personalizing the Appearance of Message Text in Chapter 10.
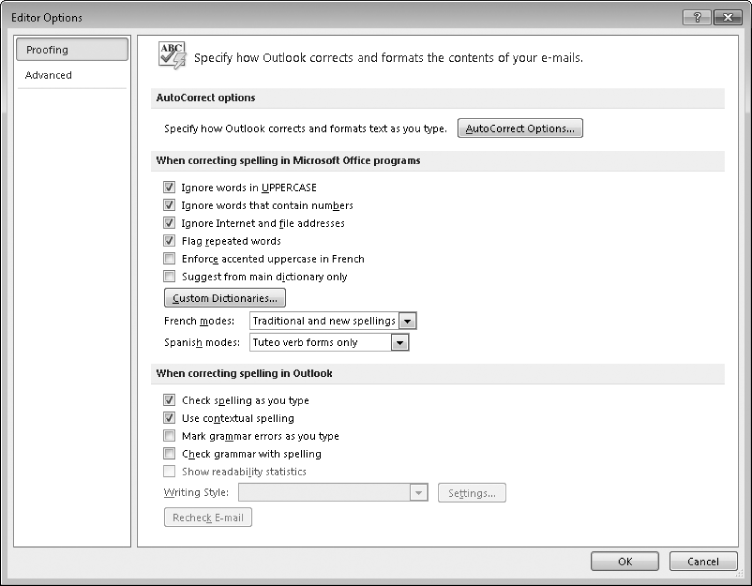
On the Advanced page of the Editor Options dialog box, you can control the way Outlook works with text.
In the Editing Options area of this page, you can turn on or off advanced editing features, such as how Outlook selects and moves text, whether to track formatting changes, and whether Overtype mode is available.
In the Cut, Copy, And Paste area, you can specify whether Outlook will apply source or destination formatting to text copied within a message, between messages, and from other programs. You can also set options for smart cut and paste (whether to automatically add and remove spaces as needed) and the Paste Options button (whether it appears after a past operation).
In the Display area, you can set whether measurements are shown in inches, centimeters, millimeters, points, or picas; whether pixels are shown for HTML features; whether ScreenTips display keyboard shortcuts; and whether character positioning is optimized for layout rather than readability.
The Outlook Panes section of the Mail page includes only one option, for changing the way items are marked as read when viewed in the Reading Pane.

Clicking the Reading Pane button opens the Reading Pane dialog box, in which you can specify how Outlook processes messages you display in the Reading Pane.

Note
See Also For information about the Reading Pane, see Viewing Messages and Message Attachments and Configuring Reading Pane Behavior in Chapter 3.
The Message Arrival section of the Mail page includes options for controlling the way Outlook notifies you of an incoming message.

Note
See Also For information about desktop alerts, see Working with New Mail Notifications in Chapter 11.
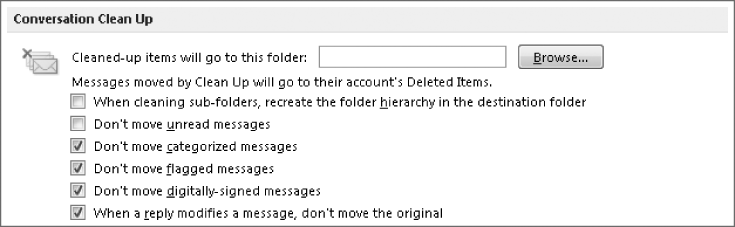
The Conversation Clean Up section of the Mail page includes options for controlling the new conversation-management features of Outlook 2010.
Note
See Also For information about conversations, see Working with Conversation View in Chapter 7.
The Replies And Forwards section of the Mail page includes options for the content of response messages. You can choose to close the original message window when you respond to a message, insert your name or some other identifier before text that you insert into original message text when responding, and whether and how to include original message text in a response.
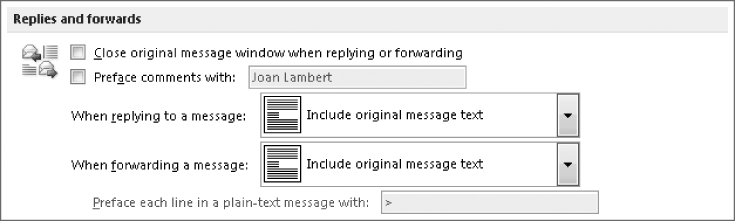
You can include original message text by attaching the original message to a blank response or by including the original message text and optionally indenting it or indenting it and inserting a vertical line to the left of the original message text block.

Note
See Also For information about replying to and forwarding messages, see Responding to Messages in Chapter 3.
The Save Messages section of the Mail page includes options for saving message drafts.

By default, Outlook saves the first draft of a message three minutes after you begin composing the message, and resaves the message every three minutes thereafter. You can select a save frequency of from 1 to 99 minutes, or choose to turn off the message draft saving feature.
The default location for saved message drafts is the Drafts folder, which is a top-level mailbox folder that appears in the Navigation Pane at the same level as your Inbox. You can alternatively save message drafts in your Inbox, in the Sent Messages folder, or in the Outbox.
Note
See Also For information about message drafts, see Creating and Sending Messages in Chapter 3.
The Send Messages section of the Mail page includes options for composing and sending messages.
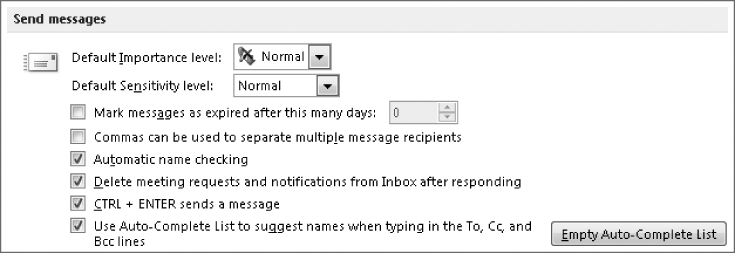
An important option to note in this section is the Commas Can Be Used To Separate Multiple Message Recipients option. Until you select this check box, you must separate e-mail addresses in the To, Cc, and Bcc boxes by using semicolons.
Note
See Also For information about importance and sensitivity level settings, see Changing Message Settings and Delivery Options in Chapter 10.
The MailTips section of the Mail page includes options for controlling the display of MailTips, which are server-generated messages that appear in the header of a message composition window to notify you of various conditions that apply to an outgoing message.

Note
Troubleshooting The MailTips section of the Mail page is present only when your Outlook configuration includes a Microsoft Exchange Server 2010 account that supports this feature.
Clicking the MailTips Options button opens the MailTips Options dialog box in which you can specify the types of MailTips you want Outlook to display while you're composing messages.
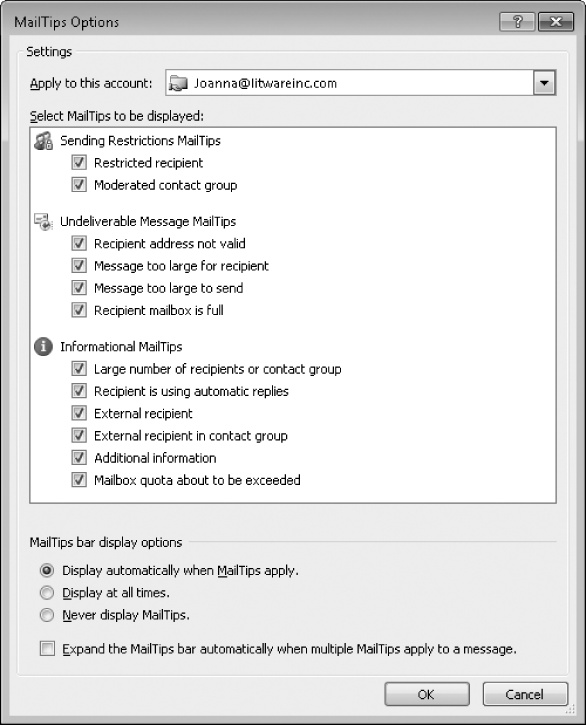
MailTip settings are specific to each Exchange account you have configured Outlook to connect to. You set your MailTip preferences for each account by selecting that account in the Apply To This Account list at the top of the dialog box.
The Tracking section of the Mail page includes options for requesting notifications when a message that you send is delivered to a recipient and when a message is marked by the recipient as read; and options for processing notification requests attached to messages that you receive. This section also includes options for processing responses you receive to meeting requests and voting requests that you send.

Delivery receipts can be a useful tool when you send an important message and need to know whether it's reached its intended recipient. (However, not all types of e-mail accounts support all types of receipts.) When you receive a message that has a read receipt request attached, Outlook prompts you to confirm that you want to send a read receipt. You can make this choice for each individual message or select the Never Send A Read Receipt option in the Tracking section of the Mail page to refuse all read receipt requests.
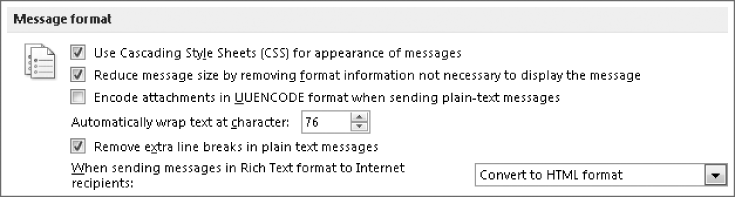
In the Message Format section of the Mail page, you can specify how Outlook displays your message content on screen and the format in which Outlook sends messages outside of your organization.
The Other section of the Mail page includes options for displaying the Paste Options button, allowing the use of Microsoft InfoPath forms, shading message headers, and expanding conversations when navigating through the Inbox by using the keyboard. You can also specify what occurs when you move or delete an open item. Options include opening the previous or next item in the folder, or returning to the folder without opening another item.

Options on the Calendar page control settings for displaying and managing Outlook calendars, and for scheduling appointments and resources.

Note
See Also For information about customizing calendar options, see Chapter 8.
Options on the Tasks page control settings for creating and managing tasks.
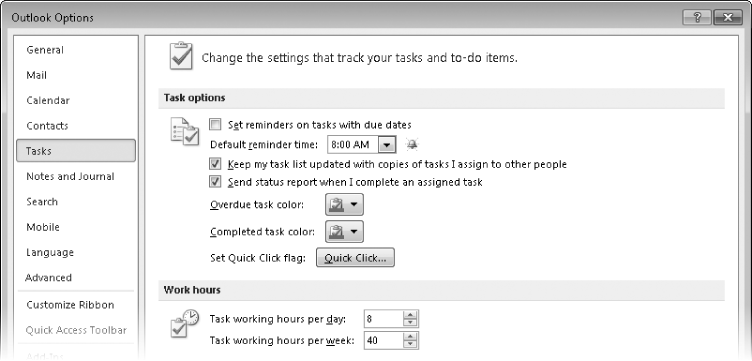
Note
See Also For information about customizing task options, see Chapter 6.
Options on the Notes And Journal page control settings for creating notes and for recording activities in the Outlook journal.

Options on the Search page control the scope of standard searches and the way Outlook displays search results.

Note
See Also For information about search options, see Quickly Locating Messages in Chapter 7.
Options on the Mobile page control settings for communications between Outlook and your mobile device.
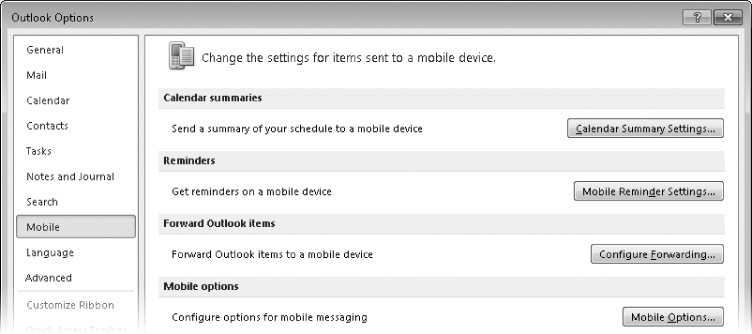
Tip
The Mobile features can be used only if you configure an SMS account for text messaging. If your organization doesn't provide SMS accounts, you can sign up for one with an online provider. Some providers allow you to experiment with free accounts for a short period of time; you can get started configuring an SMS account by clicking any of the buttons on the Mobile page of the Outlook Options dialog box.
Options on the Language page control the dictionaries used by Outlook when checking the spelling and grammar of message content as well as the language in which button labels, tab names, Help content, and ScreenTips are displayed. To use a language other than the standard Windows language, you must install a language pack. Language packs are available for download from the Microsoft Download Center at downloads.microsoft.com and might also be supplied to you through Windows Update.


You can rearrange the Outlook window to suit your working preferences. Any of the Outlook view panes—the Navigation Pane, To-Do Bar, and Reading Pane can be displayed in any Outlook module. Outlook preserves changes to the default arrangement from session to session.
Need one-click access to commands that are scattered in different places? Simply add a button for that command to the Quick Access Toolbar.
You can adjust many aspects of the Outlook environment to tailor it to the way you work.
Be sure to investigate the many options available in the Outlook Options dialog box at your leisure.