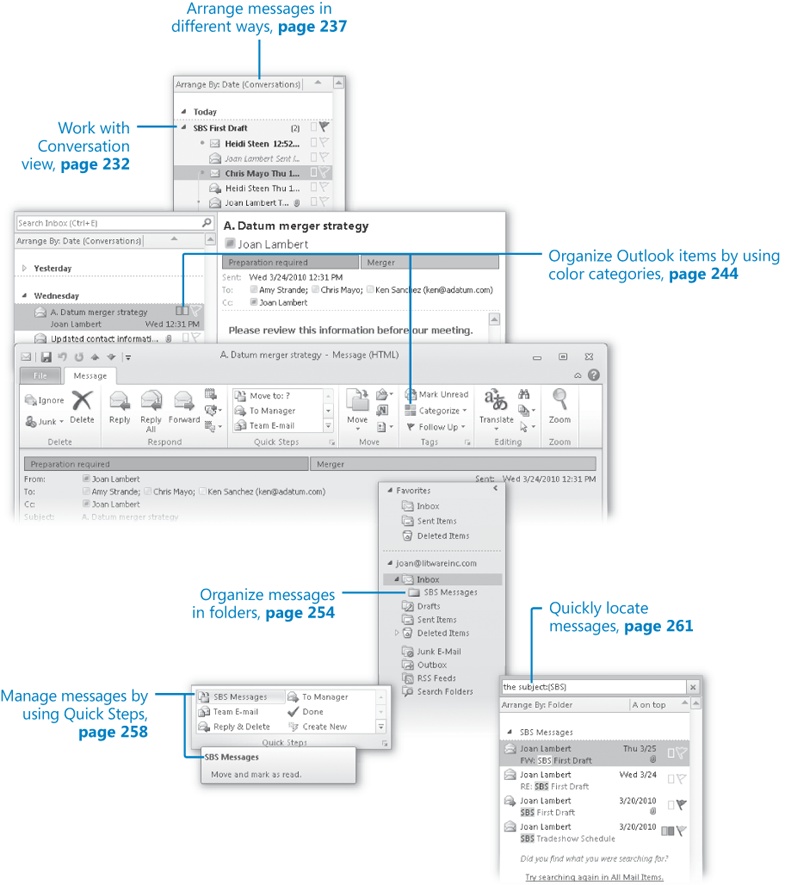
Chapter at a Glance
You can use Microsoft Outlook 2010 to manage multiple e-mail accounts, including multiple Microsoft Exchange Server accounts with their associated contacts, calendars, and so on. Even if you use Outlook only for sending and receiving e-mail messages, you can rapidly build up a mass of messages that make it difficult to locate information. Fortunately, Outlook is designed to act as a complete information-management system; it provides many simple yet useful features that enable you to organize messages and other Outlook items and to quickly find information that you need.
Outlook 2010 automatically handles certain types of organization for you. In your Inbox, Outlook makes it easy to follow related messages (message threads) from multiple people by displaying the messages in Conversation view. Outlook Search almost instantly locates items that contain specific content, and it allows you to save search results as Search Folders in which you can view up-to-date search results at any time.
You can organize items in Outlook by storing related items in folders and by assigning color categories to related items.
In this chapter, you'll work with Conversation view to locate different levels of messages in a series. You'll display the messages in your Inbox in a variety of arrangements and organize messages by assigning color categories and by moving them to folders within your Inbox. You'll filter and find messages by using the Search feature, and use Search Folders. You'll work with the built-in Quick Steps. Finally, you'll preview, print, and delete messages.
Note
Practice Files The exercises in this chapter use Outlook items you created in exercises in previous chapters. If an exercise requires an item that you don't have, you can complete the exercise in which you create the item before beginning the exercise, or you can substitute a similar item of your own. A complete list of practice files is provided in Using the Practice Files at the beginning of this book.
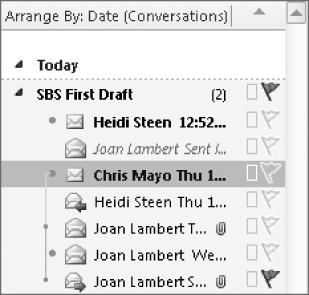
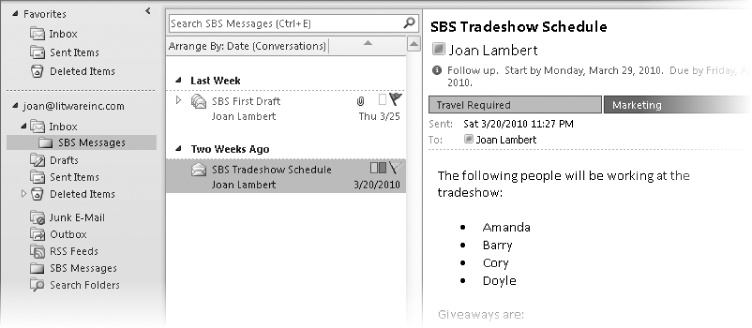
Conversation view is an arrangement of messages grouped by subject. All the messages with the same subject appear together in your Inbox (or other message list) under one conversation header.

The conversation header provides information about the messages within the conversation, including the number of unread messages and whether one or more messages includes an attachment, is categorized, or is flagged for follow up.
When you receive a message that is part of a conversation, the entire conversation moves to the top of your Inbox and the new message appears when you click the conversation header. When a conversation includes unread messages, the conversation header is bold. When there are multiple unread messages, the number is indicated in parentheses following the subject. The senders of the unread messages are listed below the subject.
When an e-mail conversation involves more than two people, it frequently happens that more than one person responds to the same message, and other people respond to each of those messages. Multiple conversations emerge from the primary conversation in a process that you might think of as branches growing out from a tree—each can split into additional branches that are farther and farther from the trunk (the original message). A conversation that contains multiple branches is called a split conversation. Within a split conversation, individual conversation branches are marked by orange and gray dots. Larger orange dots indicate the most current message in each branch. Small orange dots indicate older messages. Small gray dots indicate messages that may be considered redundant. Messages within each conversation branch are connected by orange and gray lines (referred to as visual threads).
You can display differing levels of messages within a conversation, as follows:
Click the conversation header or the Expand Conversation button to the left of the conversation header once to display the most recent message in the Reading Pane and to display the most recent message in each branch of a split conversation in the message list. These messages are indicated by orange dots.
Click the conversation header again to expand the conversation to display all messages in the conversation.
Click the most recent message in a split conversation to display the visual thread of that message branch.


By default, Conversation view displays messages stored in any folder, including sent messages that are stored in the Sent Items folder. (Within the expanded conversation, sent messages are indicated by italic font.) If you prefer to display only messages from the current folder, you can clear this setting on the Conversation Settings menu in the Conversation group on the View tab.
Other settings that you can turn on include:
Show Senders Above the Subject This setting reverses the order of the information in the conversation header; you see the names of the conversation participants above the conversation subject. In some cases, such as when Outlook displays a message on the second line, the subject might not be visible at all.
Always Expand Conversations This setting causes Outlook to display all messages in a conversation when you click the conversation header once, rather than twice.
Use Classic Indented View This setting causes Outlook to indent older messages within individual message threads to show the progression of the thread. This setting is not as effective as the default for displaying split conversations because a message might be at the root of multiple branches but can appear only once in the message list.


Although the most apparent function of Conversation view is the grouping of related messages, its greatest usefulness is as a message-management tool. It can be especially handy for Outlook users within large organizations that use distribution lists to disseminate information to a large group of people. When hundreds of message recipients use the Reply All function to respond to a message, your Inbox can quickly become cluttered.
Conversation view enables you to manage all the messages within a conversation as a group. You can do this by clicking the conversation header to effectively select all the messages in the conversation (they won't appear selected, but any action you apply to the conversation header applies to all the individual messages in the conversation) and then applying your action. Or you can use these new conversation-management tools:
Ignore Conversation This command moves the selected conversation and any related messages you receive in the future directly to the Deleted Items folder.
Note
See Also For more information about keyboard shortcuts, see Appendix A at the end of this book.
Clean Up Conversation This command deletes redundant messages—messages whose text is wholly contained within later messages—from a conversation. By default, Outlook doesn't clean up categorized, flagged, or digitally signed messages. You can modify conversation clean-up settings on the Mail page of the Outlook Options dialog box.
Note
See Also For information about modifying mail settings, see Personalizing Your Office and Outlook Settings in Chapter 13.
As the number of messages in your Inbox increases, it can be challenging to keep track of them. You can arrange, group, and sort messages in Outlook to help you quickly determine which are the most important, decide which can be deleted, and locate any that need an immediate response.
Note
See Also For information about the available message folder views, see Viewing Messages and Message Attachments in Chapter 3.
You can view a message list in Compact view, Single view, or Preview view. Regardless of the view you're displaying, you can arrange messages and conversations within the message list by choosing a standard arrangement from the Arrangement gallery on the View tab.
Alternatively, you can click the Arrange By bar at the top of the message list and then click an option in the Arrange By list.

Two options that affect the way messages appear within an arrangement are conversations and grouping. Both of these organizational options are turned on by default; you can turn either or both off.
Note
See Also For information about conversations, see Working with Conversation View earlier in this chapter.
Grouping gathers messages that fit within specific arrangement categories under arrangement-specific headings so that you can manage common messages as one. For example, when messages are arranged by date, they are grouped by date: groups include each day of the current week, Last Week, Two Weeks Ago, Three Weeks Ago, Last Month, and Older.
Each group has a header. You can expand or collapse an individual group by clicking the arrow to the left of the group name in the header. You can collapse the group containing the currently selected item by pressing the Left Arrow key, and you can expand a selected group by pressing the Right Arrow key. You can expand or collapse all groups by choosing a command from the Expand/Collapse list in the Arrangement group on the View tab.
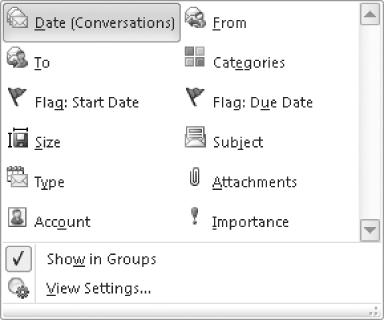
By default, Outlook displays messages arranged by date, from newest to oldest. Alternatively, you can arrange items by any of the following attributes:
Account Messages are grouped by the e-mail account to which they were sent. This is useful if you receive messages for more than one e-mail account in your Inbox (for example, if you receive messages sent to your POP3 account within your Exchange account mailbox).
Attachments Messages are grouped by whether they have attachments and secondarily by date received.
Categories Messages are arranged by the category you assign them to. Messages without a category appear first. Messages assigned to multiple categories appear in each of those category groups.
Flag: Start Date or Due Date Unflagged messages and messages without specific schedules appear first. Messages that you've added to your task list with specific start or due dates are grouped by date.
From Messages appear in alphabetical order by the message sender's display name. If you receive messages from a person who uses two different e-mail accounts, or who sends messages from two different e-mail clients (for example, from Outlook and from Windows Mail), the messages will not necessarily be grouped together.
Importance Messages are grouped by priority: High (indicated by a red exclamation point), Normal (the default), or Low (indicated by a blue downward-pointing arrow).
To Messages are grouped alphabetically by the primary recipients (the addresses or names on the To line). The group name exactly reflects the order in which addresses appear on the To line. Therefore, a message addressed to Bart Duncan; Lukas Keller is not grouped with a message addressed to Lukas Keller; Bart Duncan.
Size Messages are grouped by the size of the message, including any attachment. Groups include Huge (1–5 MB), Very Large (500 KB–1 MB), Large (100–500 KB), Medium (25–100 KB), Small (10–25 KB), and Tiny (less than 10 KB). This feature is useful if you work for an organization that limits the size of your Inbox because you can easily locate large messages and delete them or move them to a personal folder.
Subject Messages are arranged alphabetically by their subjects and then by date. This is similar to arranging by conversation except that the messages aren't threaded.
Type Items in your Inbox (or other folder) are grouped by the type of item—for example, messages, encrypted messages, message receipts, meeting requests and meeting request responses, tasks, Microsoft InfoPath forms, and server notifications.
After arranging the items in your message list, you can change the sort order of the arrangement by clicking the sort order indicator that appears on the right side of the message list header.
Regardless of the view and arrangement you choose, you can sort messages by any visible column simply by clicking its column heading (and reverse the sort order by clicking the column heading a second time). You can change the displayed columns from the Show Columns dialog box, which you display by clicking the Add Columns button in the Arrangement group on the View tab.

Outlook displays the selected columns in the order shown in the list on the right side of the Show Columns dialog box. If displaying all the columns requires more space than is available, only some of the columns will be visible. If necessary, you can change the number of lines shown to accommodate more columns. However, you are likely to find that one of the standard views fits your needs.
In a list view, you can control the message arrangement, sorting, grouping, visible columns, and other settings from the shortcut menu that appears when you right-click any column header.
In this exercise, you'll change the arrangement, sort order, and grouping of messages in your Inbox, and filter the Inbox content to display only specific messages. Then you'll restore the default settings.
Note
SET UP You don't need any specific practice files to complete this exercise; just use the messages in your Inbox. Display your Inbox in Messages view, and then follow the steps.
In the Arrangement gallery, click From.
Outlook rearranges and groups the messages in your Inbox alphabetically by sender.
In the message list header, click A on top.
Outlook reverses the order of the messages and changes the sort order in the message header to Z On Top.
In the message list header, click the Arrange By bar, and then click Subject.
Outlook rearranges and groups the messages by subject, in alphabetical order.
 In the Arrangement group, click the Expand/Collapse button and then, in the list, click Collapse All Groups.
Only the group headers are visible. There is a group header for each message or set of messages with the same subject.
Notice that the number of unread items in each group (if there are any) is indicated in parentheses following the conversation subject.
 On the Home
tab, in the Find group, click the
Filter E-mail button.
On the Home
tab, in the Find group, click the
Filter E-mail button.The Filter E-mail list expands. The list contains the same options that are present on the Search contextual tab.
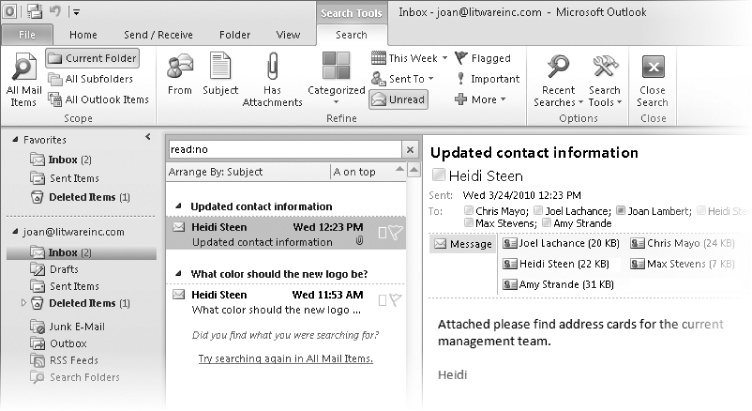
In the Filter E-mail list, click Unread.
Outlook enters the specified filter in the Search box at the top of the message list and filters your Inbox to display only unread messages. (If you have no unread messages in your Inbox, it appears to be empty.)
Note
Troubleshooting The appearance of buttons and groups on the ribbon changes depending on the width of the program window or item window. For information about changing the appearance of the ribbon to match our screen images, see Modifying the Display of the Ribbon at the beginning of this book.
 On the Search tab, in the Close group, click the Close Search button.
Outlook removes the filter and returns to the previous arrangement.
Experiment with the available arrangement, sorting, and grouping options.
 On the View
tab, in the Current View group,
click the Reset View button. Then in the Microsoft Outlook dialog box
that asks whether to reset the view, click Yes.
On the View
tab, in the Current View group,
click the Reset View button. Then in the Microsoft Outlook dialog box
that asks whether to reset the view, click Yes.The message list returns to its original arrangement: grouped, by date, in conversations.


To help you more easily locate Outlook items associated with a specific subject, project, person, or other condition, you can create a category specific to that condition and assign the category to any related items. You can assign a category to any type of Outlook item—a message, an appointment, a contact record, a note, and so on. For example, you might assign contact records for customers to a Customers category.
Outlook uses color categories, which combine named categories with color bars to provide an immediate visual cue when you view messages in your Inbox, appointments on your calendar, and so on. Depending on the view of the Outlook items, the category may be indicated by a simple colored block or a large colored bar.

Tip
You can locate, sort, and filter Outlook items by category. For information, see Quickly Locating Messages later in this chapter.
Outlook 2010 comes with six pre-configured color categories that are associated only with the color names. You can rename the six starting categories and create new categories. Each category can have the following elements:
Name The category name can be one simple word or a long, descriptive phrase. The first 32 characters of the category name are visible in the color categories dialog box, but pointing to a truncated name displays a ScreenTip containing the entire name.
Shortcut key You can assign any of the 11 available keyboard shortcut combinations (CTRL+F2 through CTRL+F12) to a color category. (You can assign only these 11 keyboard shortcuts within the dialog box.) By using a keyboard shortcut, you can assign a frequently used category in one step.
Color You can assign any of the 25 available colors to a category, or you can choose not to assign a color. (You can't choose colors other than the 25 shown.) When you assign a category that doesn't have an associated color to an Outlook item, the color block or color bar is shown as white. You can assign one color to multiple categories.

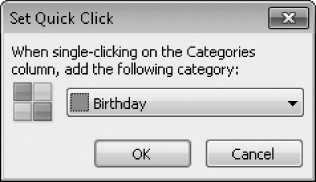
One category is designated as the Quick Click category. Outlook assigns the Quick Click category by default when you simply click the Category box or column associated with an item. You can change the Quick Click category by clicking Set Quick Click on any one of the Categorize menus and then making your selection in the Set Quick Click dialog box that appears.
Tip
You can also set the Quick Click category on the Advanced page of the Outlook Options dialog box. For more information, see Personalizing Your Office and Outlook Settings in Chapter 13.
You can apply a color category to a selected item or items by using any of these methods:
In any mail or contacts folder, click the Categorize button in the Tags group on the Home tab, and then in the list, click the category you want.
In any message list, click in the Categories column to assign the Quick Click category.
In any calendar, click the Categorize button in the Tags group on the contextual tab (Appointment, Meeting, and so on) that appears for the selected item, and then click the category you want.
In any folder, right-click an item or a selection of items, point to Categorize, and then click the category you want.
To quickly view the messages belonging to a category, you can group messages by category or include the category in a search. In a list view of any module, you can sort and filter by category. On the To-Do Bar, you can arrange your flagged messages and tasks by category.
Tip
You can instruct Outlook to automatically assign a category to an incoming message that meets specific criteria by creating a rule. For more information, see Creating Rules to Process Messages in Chapter 11.
In this exercise, you'll change the name and color of an existing category, assign a shortcut key to a category, and create categories. Then you'll categorize a message, and experiment with organizing your Inbox contents by using categories.
Note
SET UP You need the SBS Tradeshow Schedule, SBS First Draft, RE: SBS First Draft, and FW: SBS First Draft messages you created in Chapter 3. If you have not already created these messages, you can do so now, or you can substitute any messages in your Inbox. Display your Inbox, and then follow the steps.
In the message list, click the SBS Tradeshow Schedule message.
 On the Home
tab, in the Tags group, click the
Categorize button.
On the Home
tab, in the Tags group, click the
Categorize button.The Categorize list displays the available categories. Notice that you can remove all categories from a selected message or group of messages by clicking Clear All Categories.
In the Categorize list, click All Categories.
The Color Categories dialog box opens, displaying the currently available categories.
In the Color Categories dialog box, click the Blue Category name (not the check box), and then click Rename.
With the category name selected for editing, type Management, and then press Enter.
The category name changes. The category order doesn't immediately change, but the next time you display the categories in a list or dialog box, they are reordered alphabetically.
With the Management category still selected, click the Color arrow, and then in the lower-right corner of the color palette, click the Dark Maroon square.
The color associated with the Management category changes from Blue to Dark Maroon.
Repeat steps 4 and 5 to rename the Orange Category as Travel Required.
In the Color Categories dialog box, click New.
The Add New Category dialog box opens.
In the Name box, type Marketing. Click the Color arrow and then, in the color palette, click the Dark Green square. Then click the Shortcut Key list.
The list expands to display the keyboard shortcuts available to color categories.
In the Shortcut Key list, click CTRL+F2. Then in the Add New Category dialog box, click OK.
The new category appears at the bottom of the color categories list. Its selected check box indicates that it has been assigned to the currently selected message.
In the Color Categories dialog box, click the Green Category name (not the check box), and then click Delete. In the Microsoft Outlook dialog box confirming that you want to delete the category, click Yes.
Note
Keyboard Shortcut Press Alt+D to delete the selected category from the color categories dialog box.
The Green Category disappears from the list.
In the Color Categories dialog box, click OK.
In the message list and in the To-Do Bar Task List, the Category box of the selected message changes to a dark green square. In the Reading Pane, a dark green bar with the category name Marketing appears at the top of the message.
In the SBS Tradeshow Schedule message header, right-click the Category box.
The shortcut menu displays the color category options in alphabetical order.
On the shortcut menu, click Travel Required.
The second category box appears in the message header and in the To-Do Bar Task List.
Tip
You can assign an unlimited number of categories to a message, but only the three most recently assigned appear in the message header.
The Reading Pane displays two colored category bars. If you assign more than three categories to a message, Outlook displays additional rows of category bars.
In the message list, expand the SBS First Draft conversation twice to display its messages. Click any message in the conversation, and then press Ctrl+F2.
The Marketing category is assigned to the selected message and also appears in the conversation header.
Click another message in the SBS First Draft conversation. On the Home tab, in the Tags group, click the Categorize button and then, in the list, click Management.
The Management category is assigned to the selected message, and also appears as a second category in the conversation header.
In the message list header, click the Arranged By bar and then, in the list, click Categories.
The messages are arranged by category, beginning with the uncategorized messages (None), followed by the categorized messages in alphabetical order by category.
To the right of the Arranged By bar, click A on top.
The sort order reverses to display the categorized messages (in reverse alphabetical order) at the top of the list.


After you've read and responded to messages, you might want to keep some for future reference. You can certainly choose to retain them all in your Inbox if you want, but as the number of messages in your Inbox increases to the hundreds and even into the thousands, it might quickly become overwhelming. To keep your Inbox content low and avoid an accumulation of unrelated messages, you can organize messages into folders. For example, you can keep messages that require action on your part in your Inbox and move messages that you want to retain for future reference into other folders.
Tip
Because the Outlook Search function provides the option of searching within all folders containing items of a particular type, you can easily locate a message that's been moved to a folder without having to remember exactly which folder it's in. For more information, see Quickly Locating Messages later in this chapter.
Popular personal-organization experts advocate various folder structures (for paper folders as well as for e-mail message folders) as an important part of an organizational system. You can apply any of these ideas when you create electronic folders in Outlook, or you can use any other structure that works for you. For example, you might create a folder for each project you're working on and store all messages regarding a particular project in its own folder. Or you might create a folder to store all messages from a particular person, such as your manager, regardless of the message subject.
When you create a folder, you specify the location of the folder within your existing Outlook folder structure and the type of items you want the folder to contain. You can create folders to contain the following types of items:
Calendar items
Contact items
InfoPath Form items
Journal items
Mail and Post items
Note items
Task items
The selection you make governs the folder icon that precedes its name in the folder list, the folder window layout, the ribbon tabs and commands available in the folder, and the content of the Navigation Pane in the folder.
You can move messages to folders manually, or if your organization is running Exchange, you can have Outlook move them for you. You can automatically move messages to another folder by creating a rule—for example, you can instruct Outlook to automatically move all messages received from your manager to a separate folder. You can set up different rules that go into effect when you're away from the office.
Note
See Also For information about automatically moving messages, see Creating Rules to Process Messages in Chapter 11.
In this exercise, you'll create a folder and then use different methods to move messages to the folder.
Note
SET UP You need the SBS First Draft, RE: SBS First Draft, and FW: SBS First Draft messages you worked with in the previous exercise. If you have not already created these messages, you can do so now, or you can substitute any messages in your Inbox. Display your Inbox, and then follow the steps.
 On the Folder tab, in the New group, click the New Folder button.
The Create New Folder dialog box opens.
In the Name box, type SBS Messages. In the Select where to place the folder box, click Inbox. Then, with Mail and Post Items selected in the Folder contains list, click OK.
Tip
The name of this folder begins with SBS so that you can easily differentiate it from other folders in your mailbox.
Because you created this folder from the Inbox, Outlook creates the new folder as a subfolder of the Inbox, and formats it to contain mail items.
In the message list, locate the SBS First Draft, RE: SBS First Draft, and FW: SBS First Draft messages.
Drag the SBS First Draft message from the message list to the SBS Messages folder in the Navigation Pane.
The message moves from the Inbox to the SBS Messages folder.
 Click the RE: SBS
First Draft message to select it. Then on the Home tab, in the Move group, click the Move
button.
Click the RE: SBS
First Draft message to select it. Then on the Home tab, in the Move group, click the Move
button.The Move list expands, displaying a list of folders and other move options.
In the Move list, click SBS Messages.
The selected message moves from the Inbox to the SBS Messages folder.
Right-click the FW: SBS First Draft message, click Move, and then click SBS Messages.
The conversation disappears from the Inbox.
In the Navigation Pane, under the Inbox folder, click the SBS Messages folder.
The messages are visible in the new folder as part of a conversation.
Expand the conversation header once.
All the messages in the conversation are visible in the list.


A convenient new feature of Outlook 2010 is Quick Steps, which allow you to perform multiple tasks on messages by clicking only one button. Quick Steps are available from the Quick Steps gallery on the Home tab of any mail folder.

You can use the built-in Quick Steps or create your own to accomplish as many as 12 tasks at once.
A default Outlook installation includes these five Quick Steps:
Move To Moves the selected message to a folder that you specify the first time you use the Quick Step and marks the message as read. After you specify the folder, the Quick Step name changes to include the folder name.
Team E-mail Creates a message to a person or people you specify the first time you use the Quick Step. You can edit the Quick Step to include Cc and Bcc recipients, a specific message subject, a follow-up flag, a level of importance, and specific message text, and to automatically send the message one minute after you click the Quick Step command.
Reply & Delete Creates a response to the original message sender and immediately deletes the original message.
Note
Troubleshooting The Reply & Delete Quick Step deletes the original message before you send the reply. If you close the response message composition window without sending it, the original message will no longer be in your Inbox. If you want to respond to the original message, you first need to retrieve it from your Deleted Items folder.
To Manager Forwards the selected message to a person or people you specify the first time you use the Quick Step. You can edit the Quick Step to include Cc and Bcc recipients, a specific message subject, a follow-up flag, a level of importance, and specific message text, and to automatically send the message one minute after you click the Quick Step command.
Done Moves the selected message to a folder that you specify the first time you use the Quick Step, marks the message as read, and marks the message as complete so that a check mark is displayed in the follow-up flag location.
For each of the built-in Quick Steps, you can change its name; edit, add, and remove actions; and specify tooltip text that appears when you point to the Quick Step in the Quick Steps gallery. You can assign shortcut keys (Ctrl+Shift+1 through Ctrl+Shift+9) to up to nine Quick Steps.
Tip
You can create new Quick Steps to simplify the performance of many types of message-management actions. For more information, see Creating and Managing Quick Steps in Chapter 13.
In this exercise, you will set up and use a built-in Quick Step.
Note
SET UP Use the SBS Tradeshow Schedule message you worked with earlier in this chapter and the SBS Messages folder you created in the previous exercise. If you did not create these practice files, you can do so now or substitute any message and folder in your Inbox. Display your Inbox, locate the SBS Tradeshow Schedule message, and then follow the steps.
On the Home tab, in the Quick Steps gallery, click Move to: ?.
The First Time Setup dialog box for the selected command opens.
Click the Move to folder arrow and then, in the list, click SBS Messages.
In the Name box, the name of the Quick Step changes from Move To: ? to SBS Messages.
In the First Time Setup dialog box, click Options.
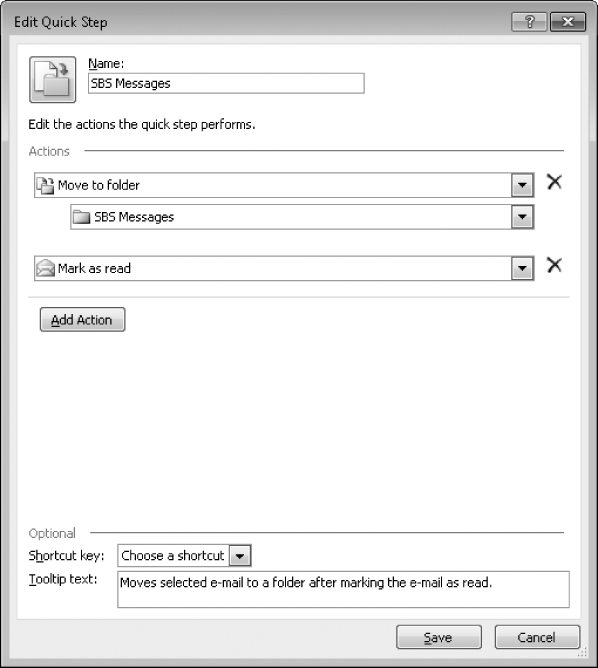
The Edit Quick Step dialog box opens.
Notice that you can change the existing actions (Move To Folder and Mark As Read) and add actions to the standard Quick Step.
In the Tooltip text box, select the existing text and then type Move and mark as read.
In the Edit Quick Step dialog box, click Save.
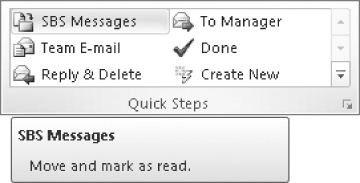
In the Quick Step gallery, the Quick Step name changes from Move To: ? to SBS Messages.
In the message list, click the SBS Tradeshow Schedule message to select it.
In the Quick Steps gallery, point to SBS Messages.
Your custom tooltip appears below the ribbon.
In the Quick Steps gallery, click SBS Messages.
The selected message disappears from the message list.
In the Navigation Pane, under the Inbox folder, click the SBS Messages folder.
The message has been moved to the designated folder.

The Outlook Search feature is based on the Windows Search technology that is built into Windows 7 and Windows Vista Service Pack 2. Using the Windows Search technology, you can find any file on your computer that contains a specified search term—whether in a file or folder name, in document or workbook content, in an e-mail message within Outlook, in a message attachment, in a picture, music, or video file, and so on. (As a matter of fact, if you prefer to do so, you can conduct all of your Outlook searches from the Windows Start menu.)
You can use the Search feature to locate specific terms in any Outlook item. Although you can search for items in the Calendar, Contacts, Tasks, and Notes modules, you most often use it to locate messages in your Inbox and other mail folders. The Search feature can locate search terms in a message or in a file attached to a message. As you enter a search term in the Search box located at the top of the content pane in any module, Outlook filters the items to show only those items in the module that contain the search term and highlights the search term in the list of results.
If the search term you enter produces more than 200 results, only the first 200 are displayed, and an information bar appears in the Search Results pane.

You can display all the results for the current search term by clicking the message bar, or you can narrow the results by expanding the search term or by specifying other search criteria, such as the sender, the recipient (whether the message was addressed or only copied to you), a category assigned to the item, whether the message contains attachments, and so on.
Outlook 2010 features the Search contextual tab. This ribbon tab appears when you activate the Search box in any Outlook module. You can enter search terms into the Search box and refine your search by using the commands on the Search contextual tab.

When searching any folder, you can use the commands on the Search tab to set the scope of the search and to more closely define the search specifications. You can also return to the results of previous searches.
Note
See Also For information about Windows 7 search features, refer to Windows 7 Step by Step by Joan Lambert Preppernau and Joyce Cox (Microsoft Press, 2009).
The buttons available in the Scope and Refine groups vary based on the type of folder you're searching. The Scope group always offers the options of the current folder, all subfolders, all folders of the current type, and all Outlook items. The commands in the Refine group change to reflect common properties of items stored in the current folder type. The most common properties are shown as buttons in the Refine group; additional properties are available for selection from the More list.

When you click a button in the Refine group or a property in the More list, that property appears in the Search box with a placeholder for you to specify the value you're looking for. As you define the criteria for a search, Outlook filters out all messages that don't match, which makes it easy to find exactly what you're looking for. And here's the neat thing: Outlook searches not only the content of the e-mail message header and the message itself, but also the content of message attachments. So if the search term you're looking for is in a Microsoft Word document attached to a message, the message is included in the search results.
Tip
If your organization uses Public Folders (a feature of Exchange) you can use these same tools to search a Public Folder, but the content isn't filtered instantly; you must press Enter or click the Search button to get the same results as you would in a standard account folder.
Using Search Folders
A Search Folder displays all the messages in your mailbox that match a specific set of search criteria, no matter which folders the messages are actually stored in. When you create a Search Folder, it becomes part of your mailbox and is kept up to date. The Search Folder module is located in the Navigation Pane under your top-level mailbox, at the same level as the Inbox.
Outlook 2010 doesn't include any standard Search Folders. If you want quick access to messages that fit a specific set of criteria, you can create a custom Search Folder. To do so, follow these steps:
Display any mail folder.
On the Folder tab, in the New group, click New Search Folder.
In the New Search Folder dialog box, select the type of Search Folder you want to create, and then click OK.
You can choose from the standard options presented or click Create A Custom Search Folder to specify other search options.

You can make changes to the contents of an existing Search Folder by right-clicking the folder and then clicking Customize This Search Folder.
Outlook automatically keeps Search Folder contents up to date. The names of folders containing unread items are bold, followed by the number of unread items in parentheses. The names of folders containing items flagged for follow up are bold, followed by the number of flagged items in square brackets. The names of folders whose contents are not up to date are italic. To update a Search Folder, click the folder name.
Each message in your mailbox is stored in only one folder (such as your Inbox), but it might appear in multiple Search Folders. Changing or deleting a message in a Search Folder changes or deletes the message in the folder in which it is stored.
In this exercise, you'll use the Search feature to locate a specific message in your Inbox.
Note
SET UP Use the SBS First Draft, RE: SBS First Draft, FW: SBS First Draft, and SBS Tradeshow Schedule messages, and the SBS Messages folder, you worked with earlier in this chapter. If you didn't create those practice files, you can do so at this time or substitute messages and a folder of your own. Display your Inbox and the Reading Pane, and then follow the steps.
In the Search box at the top of the message list, type the.
As you type, the Search contextual tab appears on the ribbon, and options for refining your search appear below the Search box.
Outlook filters the messages in your Inbox to include only those that contain the word the, and highlights all occurrences of the word in the message list and in the active message.
In the lower-left corner of the program window, the status bar displays the number of messages included in the search results.
 On the Search tab, in the Refine group, click the Subject button.
Outlook adds the subject criterion to the Search box and prompts you to enter keywords that should appear in the Subject field of all search results.
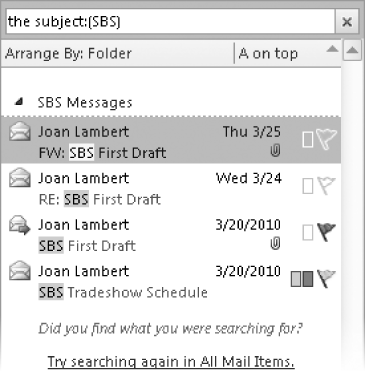
With keywords highlighted, type SBS.
Outlook instantly updates the search results to display only the messages in your Inbox that contain the word the and have SBS somewhere in the Subject field.
 On the Search tab, in the Scope group, click the All Subfolders button.
Note
Keyboard Shortcut Press Ctrl+Alt+Z to expand a search to include subfolders. Press Ctrl+Alt+A to expand a search to include all items of the current type.
The SBS First Draft conversation and SBS Tradeshow Schedule message that you moved to the SBS Messages subfolder in previous exercises appear in the search results.
In the message list header, click the Arrange By bar, and then click Folder.
 In the Options group, click the Recent Searches button.
Your recent searches are saved so that you can use the same search again at another time.
- Experiment with locating information by
specifying criteria. When you finish, click the Close Search button to remove the filter and redisplay the Inbox
message list.


Although electronic communications certainly have less environmental impact than paper-based communications, you might from time to time want or need to print an e-mail message—for example, if you want to take a hard copy of it to a meeting for reference, or if you keep a physical file of important messages or complimentary feedback. You can print the message exactly as it appears in your Inbox or embellish it with page headers and footers. Outlook prints the message as shown on-screen, including font and paragraph formats.
In this exercise, you'll preview a message as it will appear when printed, add a page header, and then print the message.
Important
To fully complete this exercise, you must have a printer installed. If you don't have a printer installed, you can perform all steps of the exercise other than printing.
To install a printer, click the Start button, click Devices And Printers, and then on the toolbar, click Add A Printer. Follow the wizard's instructions to install a local or network printer. Your network administrator can provide the information you need to install a network printer.
Note
SET UP You need the SBS Tradeshow Schedule message you worked with earlier in this chapter. If you did not create that message, you can do so now, or you can substitute any message in your Inbox. Open the SBS Tradeshow Schedule message, and then follow the steps.
In the message window, display the Backstage view, and then click Print.
The Print page of the Backstage view displays the current print settings.
The right pane displays the message as it will appear when printed, if you click the Print button without changing the settings shown in the center pane. If necessary, you can adjust the following settings:
Printer Select an installed printer or add a new one.
Print Options Opens the Print dialog box, where you can change the default printing options before printing. You can also change an existing print style (the way the message is presented on the printed page) or create a new one.
Print Style Choose from the existing print styles available for the selected message or other Outlook item. The default print style is Memo style, which prints your name, the message header information, and then the message content.
Click the Print Options button.
The Print dialog box opens, displaying your default printer settings, which you can change before printing. Clicking OK prints the message with the current settings.
In the Print dialog box, click Page Setup.
The Page Setup: Memo Style dialog box opens. You can change the font, paper size, page margins, header, and footer from this dialog box.
In the Page Setup: Memo Style dialog box, on the Format page, click the Font button.
In the Font list, click Arial. In the Font style list, click Narrow Bold Italic. Then click OK.
In the Page Setup: Memo Style dialog box, click OK, and then click Preview in the Print dialog box.
 In the lower-right corner of the Print page of the Backstage view, click the
Actual Size button to display the message at 100 percent of its
size.
In the lower-right corner of the Print page of the Backstage view, click the
Actual Size button to display the message at 100 percent of its
size.The right pane of the Print page displays the message as it will appear when printed, with the header text in Arial Narrow Bold Italic.
Click Print Options, click Page Setup, and then in the Page Setup: Memo Style dialog box, click the Paper tab to see the available options.
In addition to choosing the paper size, you can select the number of pages that will be printed on each sheet of paper, and set the page margins and the orientation.
Click the Header/Footer tab.
In the Header area, type For Your Information in the center box, and then click the Font button above the box. In the Font dialog box, under Size, click 16, and then click OK.
The text you entered doesn't reflect the font size change, but the Header box to the left of the Font button indicates the current font selection.
 In the Footer section, select the default text
(the page number) that appears in the center box. Then in the
AutoText box that appears near the
bottom of the Page Setup dialog
box, click the User Name
button.
In the Footer section, select the default text
(the page number) that appears in the center box. Then in the
AutoText box that appears near the
bottom of the Page Setup dialog
box, click the User Name
button.Outlook will print the specified text at the top of the page and your name (or user name, if different) at the bottom.
In the Page Setup dialog box, click OK, and then in the Print dialog box, click Print.
Outlook prints the message, including your custom header and footer, to the active printer.


When you delete a message, contact record, or any other item, Outlook temporarily moves it to the Deleted Items folder of your mailbox. You can open the folder from the Navigation Pane, view items that have been deleted but not purged, and restore items (undelete them) by moving them to other folders.
Note
Keyboard Shortcut Press Shift+Delete to permanently delete a message from a message list without first moving it to the Deleted Items folder.
By default, Outlook does not permanently delete items until you purge them from the Deleted Items folder. You can empty the entire Deleted Items folder manually or automatically, or you can permanently delete individual items from it.
To permanently delete an individual item, follow these steps:
In the Navigation Pane, click the Deleted Items folder to display its contents.
In the Deleted Items list, click the item (or select multiple items) you want to delete.
On the Home tab, in the Delete group, click the Delete button (or press the Delete key).
In the Microsoft Outlook message box asking you to confirm that you want to permanently delete the selected item(s), click Yes.
To manually empty the Deleted Items folder, follow these steps:
In the Navigation Pane, right-click the Deleted Items folder, and then click Empty Folder.
To automatically empty the Deleted Items folder each time you exit Outlook, follow these steps:
Display the Backstage view, and then click Options.
On the Advanced page of the Outlook Options dialog box under Outlook Start And Exit, select the Empty Deleted Items Folder When Exiting Outlook check box. Then click OK.
You can filter and locate messages in your mailbox by using the Search feature.
You can group and sort messages by sender, time, subject, size, category, or any other field.
You can assign color-coded categories to messages and then group and sort items by color category. You can use the default Outlook categories or tailor them to fit your needs.
You can record miscellaneous information in electronic notes. You can categorize, search, display, and sort notes, and send notes to other people.
You can create folders to organize your mail, and move items to folders manually or automatically.
You can print a message when you need a paper copy. You can select from several print styles and make modifications to the print styles to suit your needs.
When you delete a message or other Outlook item, it moves to the Deleted Items folder and is not permanently deleted until you empty the folder.