
In this chapter, you will learn how to
If you regularly save contact information for business and personal contacts in Microsoft Outlook, you will quickly accumulate a large collection of contact records. Being able to organize and quickly locate specific contact information is important for efficient communications.
The more people you deal with on a daily basis, the more important it is to keep your contact list organized. You can simplify communications with specific groups of contacts by creating contact groups to which you can address messages as you would an individual contact. You can also create purpose-specific address books and organize contact records within the address books to make it easier to locate specific contact records. You can add contact records to a custom address book either by moving contact records that are already stored in Outlook, or by importing contact records from another program or file.
The Search feature of Outlook 2010 makes it easy to find a specific contact record based on any text within the contact record or any attribute, such as the category assigned to it. Within each contact record, you can make preferred contact information easily discoverable by displaying it on the business card version of the contact record. You can also display images, such as photographs or corporate logos on business cards, to provide additional information when you view contacts in the default Business Card view.
In this chapter, you'll first organize the contact records associated with this book into an individual address book. You'll import a fresh set of contact records into the custom address book, and then export a subset of the records. Then you'll create a contact group and learn how to send a message to a subset of the group. You'll locate specific contact records by using the Search feature and the commands available on the new Search contextual tab. Finally, you'll personalize the content of an electronic business card.
Note
Practice Files Before you can complete the exercises in this chapter, you need to copy the book's practice files to your computer. The practice files you'll use to complete the exercises in this chapter are in the Chapter09 practice file folder. The exercises in this chapter also use Outlook items you created in exercises in previous chapters. If an exercise requires an item that you don't have, you can complete the exercise in which you create the item before beginning the exercise, or you can substitute a similar item of your own. A complete list of practice files is provided in Using the Practice Files at the beginning of this book.
You can track all your contacts—business and personal—within the address book of your default e-mail account. However, you might find it useful to create a separate address book that contains contact records for only a specific group of people. For example, you might want to have an address book that contains only clients, relatives, club members, neighborhood contacts, parents and teachers from your child's school, or sports teammates.
You create an additional address book by creating a folder with a designated purpose of containing contact items (a contacts folder). You can move and copy contact records between address books in your Outlook configuration. As with other folders, you can share the contacts folder with other Outlook users on your network, or you can export it for distribution to other people. Unlike the Calendar module, which allows you to display multiple calendars, the Contacts module can display only one address book at a time. When you have multiple address books, you can switch among them by choosing the address book you want to display from the list in the Navigation Pane of the Contacts module or from the folder list displayed in the Navigation Pane of the Mail module.
Tip
When searching for a specific contact record, you can search a single address book or search all address books within your Outlook configuration, including your organization's Global Address List, if you have one. For more information, see Quickly Locating Contact Information later in this chapter.
In this exercise, you'll create an address book and move existing contact records into it.
Note
SET UP You will need the Nancy Anderson, Andrew Davis, Sara Davis, Andrea Dunker, and Idan Rubin contact records you created in Chapter 4 to complete this exercise. If you didn't create those contact records, you may do so now or substitute any contact records of your own. Display the Contacts module, and then follow the steps.
 On the Folder tab, in the New group, click the New Folder button.
The Create New Folder dialog box opens. Because you opened the dialog box from the Contacts module, the default settings are to create the new folder in your default Contacts folder, and for the folder to contain Contact Items.
Click the Folder contains arrow, and note the types of folders you can create.
Because you are creating this folder from within the Contacts module, Contact Items is selected by default. However, you can create any type of folder from within any module.
In the Folder contains list, click Contact Items to close the list without changing the selected item type.
In the Select where to place the folder list, click your account name (or Mailbox, depending on your account configuration).
The new folder will be at the same level in the folder list structure as your Inbox.
In the Create New Folder dialog box, click OK.
The SBS Contacts address book appears in the My Contacts list at the top of the Contacts module Navigation Pane.
 In the Navigation
Pane, click the Mail
button to display your Inbox.
In the Navigation
Pane, click the Mail
button to display your Inbox.The SBS Contacts folder is not visible in the Navigation Pane, which currently displays the All Mail Items list.
 At the bottom of the Navigation Pane, click the Folder List button.
The Navigation Pane contents expand to display all folders within your Outlook configuration rather than only those containing mail items. The SBS Contacts folder appears above your Search Folders folder.
In the Navigation Pane, click the SBS Contacts folder.
The Navigation Pane components don't change, but the currently empty SBS Contacts address book appears in the content pane and the ribbon changes to display the Contacts module-specific tabs.
 At the bottom of the Navigation Pane, click the Contacts button.
The Contact module opens, still displaying the SBS Contacts address book. The Navigation Pane provides easy access to your other address books.
In the My Contacts list, click Contacts to display your default address book, which currently contains the five contact records you created in Chapter 4.
In the Contacts pane, click the Nancy Anderson contact record once to select it.
Drag the selected contact record from the Contacts pane to the SBS Contacts address book in the Navigation Pane.
The selected contact record disappears from the Contacts pane.
In the Contacts pane, click the Andrew Davis contact record to select it.
 On the Home
tab, in the Actions group, click
the Move button.
On the Home
tab, in the Actions group, click
the Move button.The Move list displays your custom and standard Outlook folders.
In the Move list, click SBS Contacts.
The selected contact record disappears from the Contacts pane.
In the Contacts pane, click the Sara Davis contact record to select it. Press and hold the Ctrl key, and then click the Andrea Dunker and Idan Rubin contact records in turn.
All the contact records you've created for the exercises in this book that remain in your main address book are now selected.
Right-click any one of the selected contact records, click Move, and then click SBS Contacts.
The selected contact records disappear from the Contacts pane.
In the My Contacts list, click SBS Contacts.
The content pane displays the custom address book, which now contains the five records you moved there.


In addition to copying and moving contact records between address books within your Outlook configuration, you can import contact records into an existing address book from external files and programs. Outlook accepts data imported from non–application specific files, files created in other Microsoft programs, and files created in third-party programs.
You can import data into Outlook from the following types of files:
Account-specific data files created in Outlook (.pst files), Outlook Express version 4.x, Outlook Express version 5.x, or 6.x, or Windows Mail
Tip
Software manufacturers frequently release interim builds containing updates to software programs between major releases. A program version number ending in .x indicates any release of that major version of the software. For example, version 1.x covers all versions of a software product from version 1.0 through version 1.9.
Databases created in Microsoft Access 97, Access 2000, Access 2002, or Access 2003 (.mdb files)
Workbooks created in Microsoft Excel 97, Excel 2000, Excel 2002, or Excel 2003 (.xls files)
Plain-text files containing field values separated by commas (.csv files) or by tabs (.txt files)
Data files created in ACT! Contact Manager version 3.x, 4.x, or 2000 (.dbf files)
Data files created in Lotus Organizer version 4.x or 5.x (.org files)
Personal address books created in other contact-management programs
Tip
To import a file containing contact records into its own separate address book, first create the address book, and then import the contact records.
Similarly, you can export contact records from Outlook as an address book that other people can import into Outlook or another program.
In this exercise, you'll import contact records from a tab-separated (also referred to as tab-delimited) text file into an existing address book. Then you'll export a selection of records from the updated address book to a file that other Outlook users can import, and you'll test that you successfully exported only the records you wanted.
Note
SET UP You will need the SBS Contacts address book you created in the previous exercise, and the SBSContacts text file located in the Chapter09 practice file folder to complete this exercise. If you didn't create the address book, you may do so now or substitute any existing address book. Display the SBS Contacts address book, and then follow the steps.
Display the Backstage view, and then click Open.
The Open page of the Backstage view displays options for opening or importing external content.
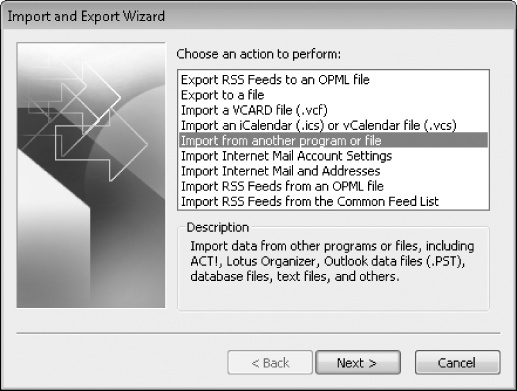
On the Open page of the Backstage view, click Import.
With Import from another program or file selected in the Choose an action to perform list, click Next.
The Import A File section of the wizard displays a list of file types from which you can import content.
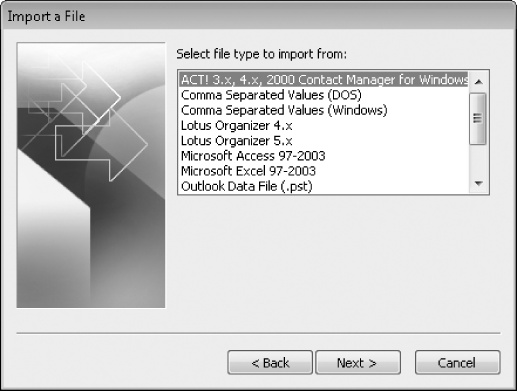
Scroll down the Select file type to import from list, and click Tab Separated Values (Windows). Then click Next.
The wizard prompts you to specify the file you want to import.
Click the Browse button to the right of the File to import box.
In the Browse dialog box, navigate to the Chapter09 practice file folder, click the SBSContacts text file, and then click OK.
The specified folder path and file appear in the File To Import box.
In the Options area, click Replace duplicates with items imported. Then click Next.
The wizard prompts you to select the folder into which you want to import the file content. Because you started the wizard from the SBS Contacts address book, that folder is already selected.
With SBS Contacts selected in the Select destination folder list, click Next.
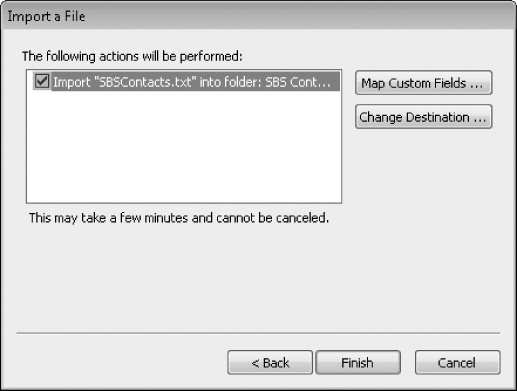
The wizard displays the import operation it will perform and buttons you can click to display additional options.
On the wizard's last page, click Map Custom Fields.
The Map Custom Fields dialog box opens. In this dialog box, you can match named fields from the import source file to named fields in Outlook. You might need this functionality when you import content from a file that was not originally created in Outlook.
Scroll down the From list and note the fields that are present in the source file. Then in the area below the From list, click Next.
The Map Custom Fields dialog box displays the first record in the source file.
 In the To
list, click the Expand button to
the left of Name to display all the
name fields.
In the To
list, click the Expand button to
the left of Name to display all the
name fields.The Mapped From column displays the value from the current source record that maps to each of the Outlook fields.
Click Next a few times to view additional records, and scroll the To list to view the way the records map to the Outlook fields. Then click OK.
On the wizard's last page, click Finish.
Outlook imports the contact records into the SBS Contacts address book, which now contains 11 items.
On the Home tab, in the Current View gallery, click Card.
In Card view, you can see that the five contact records you created earlier in this book now contain additional information. In fact, new versions of these contact records were imported from the SBSContacts file. Because in step 7 you selected the option to replace duplicate records, the new records, which contain additional business contact information for the two Trey Research employees, replaced the records you created.
Now you'll export selected records from the updated address book for distribution to other Outlook users.
Display the Open page of the Backstage view, and then click Import.
The Import And Export wizard starts.
In the Choose an action to perform list, click Export to a file. Then click Next.
The Export To A File section of the wizard prompts you to select the type of file you want to create.
In the Create a file of type list, click Outlook Data File (.pst). Then click Next.
The wizard prompts you to select the folder and records you want to export.
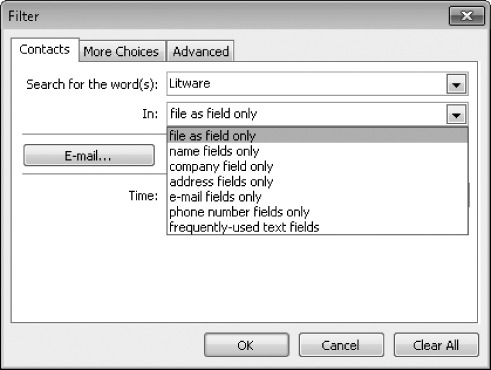
With SBS Contacts selected in the Select the folder to export from list, click Filter.
The Filter dialog box opens. From this dialog box, you can filter the contents of the selected folder so that only items (in this case, contact records) that meet specific criteria are exported.
On the Contacts page of the Filter dialog box, enter Litware in the Search for the word(s) box. Then click the In arrow.
The In list displays the fields on which you can filter contact records.
In the In list, click company field only. Then in the Filter dialog box, click OK.
In the Export Outlook Data File wizard, click Next.
Outlook suggests that you save the exported file in the system-created Outlook Files folder as backup.pst.
To the right of the Save exported file as box, click the Browse button. In the Open Outlook Data Files dialog box, navigate to the Chapter09 practice file folder. In the File name box, enter LitwareInc. Then click OK.
The folder path and file name appear in the Save Exported File As box.
On the wizard's last page, click Finish.
The wizard exports the selected records, and then the Create Outlook Data File dialog box opens.
In the Create Outlook Data File dialog box, click OK to create the file without assigning a password.
To test that you successfully exported the file, use the techniques you learned in this chapter to create a contacts folder named SBS Litware. Display the SBS Litware address book and follow the process you learned earlier in this exercise to import the LitwareInc data file into it.
During the import process, the Import Outlook Data File wizard prompts you to select the folder you want to import and the import location.
In the Select the folder to import from list, click SBS Contacts (the folder from which you exported the data file). Click Import items into the current folder. Then click Finish.
The wizard imports the records from the LitwareInc Outlook data file into the SBS Litware address book.


If you frequently send messages to specific groups of people, such as members of a project team, club, or family, you can create a contact group containing all the e-mail addresses. Then you can send a message to all the group members by addressing it to just the contact group.
Contact groups are like personal versions of distribution lists. A distribution list is available to everyone on your Microsoft Exchange Server network; a contact group is available only from the local address book you store it in. You can, however, distribute a contact group to other people for their own use.

You add a member to a contact group either by selecting an existing contact record from an address book or by entering contact information in the Add New Member dialog box. When you add a member by using the latter method, you have the option to simultaneously create a contact record for him or her.
When you send a message to a contact group, each member of the contact group receives a copy of the message. If you want to send a message to most, but not all, members of a contact group, you can expand the contact group in the address field to a full list of its members, and remove individual people for the specific message at the time you send it.
In this exercise, you'll create a contact group and add new contacts to your address book. Then you'll send a message to all but one member of the contact group.
Note
SET UP You need the contact records you imported into the SBS Contacts address book in the previous exercise. If you didn't import the contact records, you may do so now or substitute contact records of your own. Display the SBS Contacts address book in List view, and then follow the steps.
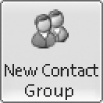 On the Home
tab, in the New group, click the
New Contact Group button.
On the Home
tab, in the New group, click the
New Contact Group button.The Contact Group window opens.
 In the Name
box, type Clients. Then on the
Contact Group tab, in the Members group, click the Add Members button.
In the Name
box, type Clients. Then on the
Contact Group tab, in the Members group, click the Add Members button.The Add Members list displays the locations from which you can add contacts to the contact group.
Note
Troubleshooting The appearance of buttons and groups on the ribbon changes depending on the width of the program window or item window. For information about changing the appearance of the ribbon to match our screen images, see Modifying the Display of the Ribbon at the beginning of this book.
In the Add Members list, click From Outlook Contacts.
The Select Members: Contacts dialog box opens, displaying your organization's Global Address List, your default Contacts address book, or whatever address book you have most recently accessed by using this method.
In the Address Book list, click SBS Contacts.
The Select Members dialog box displays the contact records you imported into the SBS Contacts address book in the previous exercise.
In the Name list, click Andrea Dunker, and then click the Members button.
Andrea Dunker ([email protected]) appears in the Members box at the bottom of the Select Members dialog box. This is the display name stored in Andrea's contact record.
In the Name list, double-click the first Sara Davis entry.
Sara Davis (Work) appears in the Members box.
In the Select Members: SBS Contacts dialog box, click OK.
The Clients contact group now contains the two Wingtip Toys employees.
In the Add New Member dialog box, type Tjeerd Veninga in the Display name box, and then type [email protected] in the E-mail address box.
The Add To Contacts check box is selected by default, so Tjeerd will be added to your default address book as well as to the contact group.
In the Add New Member dialog box, click OK.
The Clients contact group now includes Andrea, Sara, and Tjeerd.
Repeat steps 8 through 10 to add the following people to the Clients contact group and to your default address book:
Display name
E-mail address
Eli Bowen
Liberty Munson
Each new contact group member appears in the contact group in alphabetical order.
 On the Contact
Group tab, in the Actions
group, click the Save &
Close button.
On the Contact
Group tab, in the Actions
group, click the Save &
Close button.The Clients group appears in the SBS Contacts address book.
 In the Contacts pane, click the Clients contact group. Then on the Home tab, in the Communicate group, click the E-mail button.
A message composition window opens. The message is addressed to the Clients contact group.
In the To box, click the Expand button to the left of Clients.
Outlook warns you that you can't collapse a list after you expand it.
In the Expand List message box, click OK.
The Clients contact group is replaced by the individual display names of its members. You can remove any group member from the address box before sending the message.
The individual message recipient names change to a green font, and a MailTip appears above the To box in the message header, notifying you that the message is addressed to recipients outside of your organization.
Note
Troubleshooting MailTips are a feature of Microsoft Office Communications Server and Exchange Server 2010 that displays information in e-mail messages based on centrally stored information about the organization and its individual members. If you are using an e-mail account that doesn't have Exchange and Office Communications Server as part of its infrastructure, the font color of the recipients will not change, and the MailTip will not appear.
You can't actually send this message because the message recipient addresses are fictitious.


You can use the Search feature in any Outlook module to immediately find a specific Outlook item within the current folder, an item of the same type in any folder, or an item of any type in any folder. Finding an item that contains, for example, a specific word is as simple as typing that word in the Search box at the top of the content pane. When you position the cursor in the Search box, the Search contextual tab appears on the ribbon. You can refine your search criteria or expand your search to include additional locations by using the commands available on the Search tab.
In this exercise, you'll locate specific contact records, and work with the contact records from the search results.
Note
SET UP You need the contact records you imported into the SBS Contacts address book earlier in this chapter, and the Eli Bowen, Liberty Munson, and Tjeerd Veninga contact records you created in the previous exercise. If you didn't create those contact records, you may do so now or substitute contact records of your own. Display the SBS Contacts address book in Card view, and then follow the steps.
At the top of the Contacts pane, click to position the cursor in the Search box.
The Search contextual tab appears and becomes active on the ribbon.
As you type, Outlook filters the list to display only those contact records that contain the letters you've entered, and highlights the matches in the contact records. This highlighting appears in any view other than Business Card view.
 On the Search tab, in the Refine
group, click the Has
Address button and then, in the list, click Has Business Address.
On the Search tab, in the Refine
group, click the Has
Address button and then, in the list, click Has Business Address.In the Search box, NOT businessaddress:=□ appears after your original entry, specifying that you want to locate only contact records for which the business address field is not blank.
Each of the current search results does include a business address, so the search results don't change.
 In the Refine group, click the More button and then, in the list, click
Company.
In the Refine group, click the More button and then, in the list, click
Company.In the Company box, enter toys.
In the Search box, company:toys appears after the first two criteria. Outlook filters the list to display only the contact record for Andrea Dunker, who works at Wingtip Toys.
 On the Search tab, in the Close group, click the Close Search button.
The orange Search pane closes, the Search contextual tab disappears, and the Contacts pane displays all 12 records in the SBS Contacts address book.
Click in the Search box.
The orange Search pane reopens, with the Company box still visible. You can add your frequently used search fields to the Search pane so that they are immediately available when you want to use them.
In the Company box, enter Wide World Importers.
As you type, the official syntax for the search criterion appears in the Search box.
The search returns no results; no contact records with Wide World Importers in the Company field exist in this folder. You added the contacts from Wide World Importers to the address book when you created the Clients contact group, so their contact records contain only a first name, last name, and e-mail address.
 Click the Remove button to the right of the Company box.
The Company box closes, the corresponding criterion disappears from the Search box, and the Contacts pane redisplays the 12 original records.
In the Refine group, click the More button and then, in the list, click E-mail.
An E-mail box opens in the Search pane.
In the E-mail box, enter wideworldimporters.
The Search box content updates, but the Contacts pane displays no matching contact records.
 On the Search tab, in the Scope group, click the All Contact
Items button.
On the Search tab, in the Scope group, click the All Contact
Items button.The three contact records you created in the previous exercise appear in the Contacts pane.
 In the Scope group, click the All Outlook
Items button.
In the Scope group, click the All Outlook
Items button.The Contacts pane changes to display the search results listed by folder, and the Reading Pane in which you can see the information available for the selected contact. The text matching the search criterion is highlighted in the Reading Pane.
In the Contacts pane, the Contacts group heading above the three contact records indicates that the records are currently stored in the Contacts address book.
In the Contacts pane, click the Liberty Munson contact record, and then press Ctrl+A to select all three contact records.
Drag the selected contact records from the Contacts pane to the SBS Contacts folder in the Navigation Pane.
The group heading in the Contacts pane changes to indicate the new location of the contact records.
In the Navigation Pane, click the Contacts address book.
The three contact records are not in the Contacts address book.
In the Navigation Pane, click the SBS Contacts address book. Then on the Home tab, in the Current View gallery, click List.
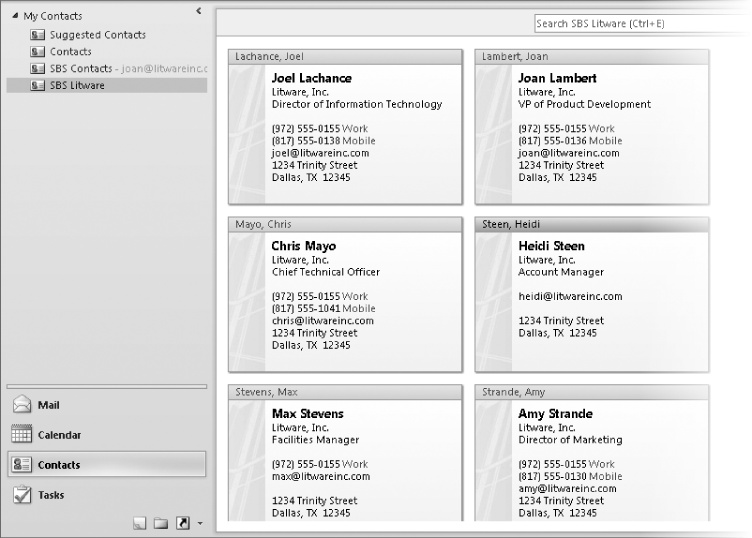
The contact records for Eli Bowen, Liberty Munson, and Tjeerd Veninga are now stored in this address book with the other contact records and the contact group that you have created while working through this book.


Within each contact record window, information appears not only in the fields of the contact record but also in the form of a graphic that resembles a business card. When you enter a person's contact information in a contact record, basic information appears in the business card shown in the upper-right corner of the contact window. This data includes the person's name, company, and job title; work, mobile, and home telephone numbers; and e-mail, postal, Web page, and instant messaging addresses. (Only the first 10 lines of information fit on the card.) If the contact record includes an image, the image appears on the left side. You can change the types of information that appear, rearrange the information fields, format the text and background, and add, change, or remove images, such as a logo or photograph.
Creating a business card for yourself provides you with an attractive way of presenting your contact information to people you correspond with in e-mail. You can attach your business card to an outgoing e-mail message or include it as part (or all) of your e-mail signature. The recipient of your business card can easily create a contact record for you by saving the business card to his or her Outlook address book.
Note
See Also For information about e-mail signatures, see Personalizing the Appearance of Message Text in Chapter 10.
In this exercise, you'll modify the business card associated with a contact record.
Note
SET UP You need the JoanLambert image located in the Chapter09 practice file folder and the SBS Litware address book you created earlier in this chapter to complete this exercise. Display the SBS Litware address book in Business Card view, and then follow the steps.
In the Contacts pane, double-click the Joan Lambert contact record.
The contact record window opens. The business card in the upper-right corner is filled in with information stored in the contact record fields. The image to the left of the business card is a placeholder.
 On the Contact tab,
in the Options group, click the
Picture button. Then click Add Picture.
On the Contact tab,
in the Options group, click the
Picture button. Then click Add Picture.The Add Contact Picture dialog box opens, displaying the contents of your Pictures library. You can add a business logo, your photograph, or any other identifying image to a business card.
In the Add Contact Picture dialog box, navigate to the Chapter09 practice file folder, click the JoanLambert image, and then click OK.
In the contact record window, the photo of Joan replaces the image placeholder and also appears on the business card.
In the Card Design area, click the Layout setting and then, in the list, click Image Right.
The photo moves from the left side of the card to the right side.
In the Image Area box, type or select (by clicking the arrows) 38%.
Click the Image Align setting and then, in the list, click Fit to Edge.
The photo expands to the full height of the business card.
 In the Card
Design area, click the Background
Color button. Then in the Color dialog box, click the brown square
that is the second from the bottom and the second from the left of
the color gallery.
In the Card
Design area, click the Background
Color button. Then in the Color dialog box, click the brown square
that is the second from the bottom and the second from the left of
the color gallery.The selected color will be applied to the card background.
In the Color dialog box, click OK.
The card preview reflects the new background color. The text on the card is difficult to read against the dark background.
 With Full
Name selected in the Fields list, click the Font
Color button at the top of the Edit area (not the button
associated with the Label field).
Then in the Color dialog box, click
the white square (in the lower-right corner of the color gallery),
and then click OK.
With Full
Name selected in the Fields list, click the Font
Color button at the top of the Edit area (not the button
associated with the Label field).
Then in the Color dialog box, click
the white square (in the lower-right corner of the color gallery),
and then click OK.The contact's name is now easy to read.
In the Fields list, click Company, and then change the color of the company name shown on the business card from black to light gray (the third square from the right in the bottom row of the color gallery).
In the Fields list, click Job Title. Then below the Fields list, click Remove.
The job title no longer appears on the business card. It hasn't been removed from the contact record.
 In the Fields list, click the first instance of
Blank Line. Then click the Move Field Up button five times to place a blank line between the
Company and Business Phone fields.
In the Fields list, click the first instance of
Blank Line. Then click the Move Field Up button five times to place a blank line between the
Company and Business Phone fields.Each time you click the button, the position of the blank line is reflected on the business card.
In the Fields list, click E-mail. Then click the Move Field Up button two times to position the e-mail address before the telephone numbers.
Use the techniques you learned in this exercise to do the following:
Remove the Business Address field from the business card.
Insert a blank line between the Mobile Phone and Business Home Page fields.
Change the color of the E-mail, Business Phone, and Mobile Phone information to light gray and the Business Home Page information to white.
After completing these changes, the business card looks very different from the original.
In the Edit Business Card dialog box, click OK.
Tip
You can undo all the changes you've made to a business card by clicking Reset Card in the Edit Business Card dialog box.
The contact window displays the customized business card.
- On the Contact tab, in the Actions group, click the Save & Close button.
The Contacts pane displays the personalized business card along with the standard business cards of the other Litware, Inc. employees.


To more specifically organize contact records, you can create separate address books.
You can import information into an Outlook address book from many external sources, and export information to share with other people who are using other programs.
Creating and making use of contact groups saves time if you frequently send messages to a specific group of people.
The Search feature makes short work of locating a specific contact or item of information in a contact record.
You can customize the information shown in the electronic business card for each contact record, including your own.