
Chapter 14. Work with Mail Merge
Chapter at a Glance
In this chapter, you will learn how to | |
✓ | |
✓ | |
✓ | |
✓ | |
✓ | Sending Personalized E-Mail Messages to Multiple Recipients. |
✓ | |
Many business and other organizations communicate with their customers or members by means of letters, newsletters, and promotional pieces that are sent to everyone on a mailing list. The easiest way to generate a set of documents that are identical except for certain information—such as the name, address, and greeting of a letter—is to use a process called mail merge. If you have a list of potential recipients stored in a consistent format, you can use the mail merge process to easily produce a set of personalized documents and mailing labels.
In this chapter, you’ll use the Mail Merge wizard in Microsoft Word 2010 to guide you through the process of creating a form letter. You’ll select a data source, add a record to it, sort it, and filter it. You’ll then add merge fields for an address and greeting line to an existing form letter, preview the merged data, exclude recipients from the merge, merge the letters into a new document, and save the merged file. You’ll also set up and send a merged e-mail message. Finally, you’ll create and print mailing labels.
Practice Files
Before you can complete the exercises in this chapter, you need to copy the book’s practice files to your computer. The practice files you’ll use to complete the exercises in this chapter are in the Chapter14 practice file folder. A complete list of practice files is provided in Using the Practice Files at the beginning of this book.
Understanding Mail Merge
The mail merge process combines the static information stored in one document with variable information stored in another document, as follows:
Main document. This document contains the static text that will appear in all the merged documents. It also contains placeholders—called merge fields—that tell Word where to insert the variable information.
Data source. This is a structured document, such as a Word table, Microsoft Excel worksheet, Microsoft Access database table, or Microsoft Outlook contacts list, that contains sets of information—called records—in a predictable format. You can use an existing data source, or you can create a new one as part of the mail merge process.
You can use the Mail Merge wizard to merge a main document with a data source in easy steps. The first step is to select the document type, which can be a letter, an e-mail message, envelopes, labels, or a directory. The type you select determines the subsequent steps. When you have some experience with mail merge, you can use the buttons on the Mailings tab to create and merge documents, instead of the Mail Merge wizard. Regardless of the method, the end result is one copy of the merged document for every record in the data source.
You can merge the main document and data source into a new document, with each merged document separated from the next by a page break. You can then personalize the merged documents before printing them, and you can save the document for later use. If you don’t need to edit or save the merged documents, you can merge the main document and data source directly to the printer or to an e-mail message.
Preparing Data Sources
The first step in the mail merge process is to either specify an existing data source or create one. The data source consists of a matrix of rows and columns. Each row contains one record, such as the complete name and address of a customer, and each column contains a particular type of information—called a field—such as the first name of all the customers. In the first row of the data source, each field is identified by its column heading—called a field name.

Tip
Because the field names are also used as the merge fields in the main document, they cannot contain spaces. To make the field names readable with no spaces, capitalize each word, as in PostalCode, or replace the spaces with underscores, as in Last_Name.
If the data source contains many records and it changes frequently, you might want to create it in a program designed for working with large amounts of data, such as Excel or Access. You can also use the contacts list from Outlook. If the data source contains only a few records and it won’t be updated often, you can create it in Word, either as a table or as a list with each field separated by a tab. Or you can create it as part of the mail merge process.
What if you want to create merge documents for only a subset of the data in the data source? For example, you might have mail-order customers from all over the United States but want to send an announcement about a store sale only to customers with addresses in your state. After you specify the data source, you can do the following:
Filter the data source to create merged documents for only some of its data.
Create a query (a set of selection criteria) to extract only the information you’re interested in—for example, all the postal codes for your state.
Sort the data source—for example, in postal code order for a bulk mailing.
When you use a filter or a query, all the data remains in the data source, but only the data that meets your specifications is used for the mail merge.
In this exercise, you’ll open a document that you want to send to multiple people (the main document) and use the Mail Merge wizard to select the list of recipients (the data source). After you add information for a new recipient (a record) to the data source, you’ll sort and filter it.
Important
The mail merge process is discussed in this topic and the two following topics, each with its own exercise. You need to complete the exercises in sequence. Be sure to read the SET UP paragraphs of each exercise closely to ensure that you can successfully complete the exercises.
Set Up
You need the AnniversaryLetter_start document and CustomerList_start workbook located in your Chapter14 practice file folder to complete this exercise. In Windows Explorer, navigate to your Chapter14 folder, double-click the CustomerList_start workbook to open it in Excel, save it as CustomerListLetter, and then close it. (To save the file, click the File tab to display the Backstage view, and click Save As in the usual way.) Open the AnniversaryLetter_start document, save it as AnniversaryLetter, and leave it open. Then display formatting marks, and follow the steps.
On the Mailings tab, in the Start Mail Merge group, click the Start Mail Merge button, and then click Step by Step Mail Merge Wizard.
The Mail Merge task pane opens.
With Letters selected as the document type, at the bottom of the Mail Merge task pane, click Next: Starting document.
With Use the current document selected in the step 2 task pane, click Next: Select recipients.
With Use an existing list selected in the step 3 task pane, click Browse.
The Select Data Source dialog box opens so that you can select the file in which your recipient information is stored.
Navigate to your Chapter14 practice file folder, and double-click the CustomerListLetter workbook.
The Select Table dialog box opens.
With Customers$ selected in the Select Table dialog box, click OK.
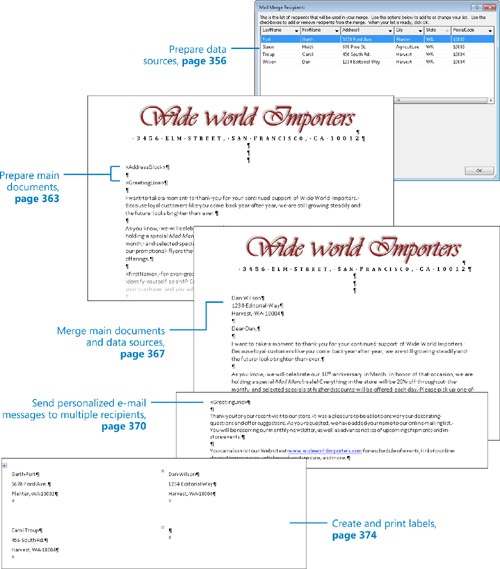
The Mail Merge Recipients dialog box opens.
In the box in the Data Source area, click CustomerListLetter.xlsx, and then click Edit.
The Edit Data Source dialog box opens.
Click New Entry, and then in the cell below John, type the following, pressing Tab to move from field to field:
FirstName
Heidi
LastName
Steen
Address1
678 Pine St.
City
Agriculture
State
WA
PostalCode
10003
Click OK, and then click Yes to update the recipient list.
The new record appears at the bottom of the list of recipients in the Mail Merge Recipients dialog box.
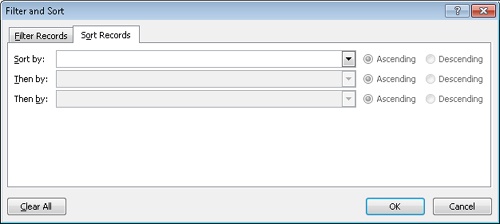
In the Refine recipient list area, click Sort.
The Filter And Sort dialog box opens, with the Sort Records page displayed.
Display the Sort by list, and click PostalCode. Then with Ascending selected, click OK.
Drag the horizontal scroll box to the right, and verify that the records are sorted in ascending order by the PostalCode field. Then in the Refine recipient list area, click Filter.
The Filter And Sort dialog box opens, with the Filter Records page displayed.
Display the Field list, and click State.
The Comparison box displays the default Equal To criterion.
In the Compare to box, type WA, and then click OK.
The Mail Merge Recipients dialog box is updated to show only Washington State residents in ascending PostalCode order.
Click OK to close the Mail Merge Recipients dialog box.


Preparing Main Documents
One common type of main document used in the mail merge process is a form letter. This type of document typically contains merge fields for the name and address of each recipient along with text that is the same in all the letters. In the form letter, each merge field is enclosed in « and » characters, which are called chevrons—for example, «AddressBlock».
If you have already written the letter, you can insert the merge fields during the merge process; if you haven’t written the letter, you can write it as part of the process. Either way, you first enter the text that will be common to all the letters and then insert the merge fields that will be replaced by the variable information from the data source.
Tip
If you need to stop before you finish the merge process, you can save the form letter to retain the work you have done so far. You can then open the form letter and resume from where you left off. Because you have specified a data source for the form letter, you will be asked to confirm that you want to run a command to reattach the same data source.
You can insert merge fields in two ways:
From the Mail Merge task pane in step 4 of the Mail Merge wizard
By clicking buttons in the Write & Insert Fields group on the Mailings tab
Either way, clicking Address Block or Greeting Line opens a dialog box in which you can refine the fields’ settings, whereas clicking individual fields inserts them with their default settings.

Tip
To save the form letter without any mail merge information, click Start Mail Merge in the Start Mail Merge group on the Mailings tab, and then click Normal Word Document.
In this exercise, you’ll modify an existing form letter by adding merge fields for a standard address, an informal greeting line, and the recipient’s first name.
Set Up
This exercise uses the AnniversaryLetter document to which you attached the CustomerListLetter workbook as the data source in the previous exercise. If you didn’t complete that exercise, you should do so now. If you closed the AnniversaryLetter document at the end of the previous exercise, open it, and when a message asks whether you want to run the command that will attach the data source to the document, click Yes. Then open the Mail Merge task pane by clicking the Start Mail Merge button in the Start Mail Merge group on the Mailings tab and clicking Step by Step Mail Merge Wizard. The Mail Merge task pane opens to the step 3 task pane. Then display formatting marks, and follow the steps.
At the bottom of the Mail Merge task pane, click Next: Write your letter.
In the document, position the cursor in the first empty left-aligned paragraph, and then in the Mail Merge task pane, click Address block.
The Insert Address Block dialog box opens.
Click OK to accept the default settings.
Word inserts the «AddressBlock» merge field into the document. When you merge the form letter with the data source, Word will substitute the component name and address information for this merge field.
Press the Enter key twice, and then in the Mail Merge task pane, click Greeting line.
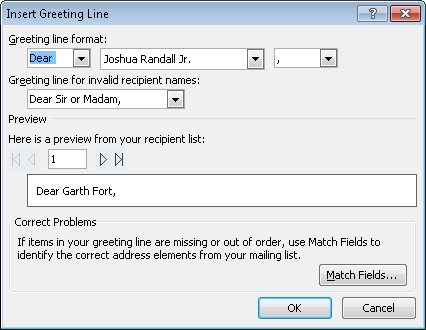
The Insert Greeting Line dialog box opens.
Under Greeting line format, display the list for the second box, and then click Joshua.
In the Preview area, click the Next button three times to view the greeting line for each of the recipients in the linked data source. Then click OK to close the Insert Greeting Line dialog box.
Word inserts the «GreetingLine» merge field into the document. When you merge the form letter with the data source, Word will replace this merge field with the word Dear and a space, followed by the information in the FirstName field, followed by a comma.
Click to the left of the For even greater savings paragraph, and in the Mail Merge task pane, click More items.
The Insert Merge Field dialog box opens.
With Database Fields selected and FirstName highlighted in the Fields box, click Insert, and then click Close.
The «FirstName» merge field appears at the beginning of the third paragraph.
Without moving the cursor, type a comma and press the Spacebar. Then change For to for.
The form letter is now ready for merging.


Merging Main Documents and Data Sources
After you specify the data source you want to use and enter merge fields in the main document, you can preview the merged documents before performing the actual merge. You can exclude recipients during this preview. When you are ready, you can either send the merged documents directly to the printer or you can merge them one after the other into a new document, separated by page breaks. If you merge to a new document, you have another chance to review and, if necessary, edit the merged documents before sending them to the printer.
In this exercise, you’ll preview merged letters, exclude recipients from the merge, merge the letters into a new document, and then save the merged file.
Set Up
This exercise uses the AnniversaryLetter document to which you attached the CustomerListLetter workbook as the data source and in which you inserted merge fields in the previous two exercises. If you didn’t complete those exercises, you should do so now. If you closed the AnniversaryLetter document at the end of the last exercise, open it, and when a message asks whether you want to run the command that will attach the data source to the document, click Yes. Then open the Mail Merge task pane by clicking the Start Mail Merge button in the Start Mail Merge group on the Mailings tab and clicking Step by Step Mail Merge Wizard. The Mail Merge task pane opens to the step 3 task pane. Then display formatting marks, and follow the steps.
At the bottom of the Mail Merge task pane, click Next until the step 5 task pane is displayed.
If necessary, scroll down the letter until you can see the address block, the greeting line, and the third paragraph at the same time.
Word displays a preview of how the personalized letter will look when merged with the data source.
Under Preview your letters in the Mail Merge task pane, click the Previous Record button three times to preview all the letters.
Tip
You can also preview the next or previous documents by clicking the Next Record or Previous Record button in the Preview Results group on the Mailings tab. You can jump to the first merged document by clicking the First Record button or the last merged document by clicking the Last Record button.
To exclude the displayed recipient (Garth Fort) from the merge, under Make changes in the Mail Merge task pane, click Exclude this recipient.
Preview the letters again. Then at the bottom of the Mail Merge task pane, click Next: Complete the merge.
In the Mail Merge task pane, click Edit individual letters.
The Merge To New Document dialog box opens.
With the All option selected, click OK.
Word creates a document called Letters1 that contains a personalized copy of the form letter for each of the selected records.
On the Quick Access Toolbar, click the Save button.
See Also
For more information about keyboard shortcuts, see Appendix A at the end of this book.
The Save As dialog box opens so that you can save the new document with a more specific name.
Navigate to your Chapter14 practice file folder, type My Merged Letters in the File name box, and then click Save.
Word saves the new document in the specified folder with the name My Merged Letters.


Sending Personalized E-Mail Messages to Multiple Recipients
When you want to send the same information to all the people on a list—for example, all your customers, or all the members of a club or your family—you don’t have to print letters and physically mail them. Instead, you can use mail merge to create a personalized e-mail message for each person in a data source. As with a form letter that will be printed, you can either use the Mail Merge wizard or use the buttons on the Mailings tab to insert merge fields into the form message. These merge fields will be replaced with information from the specified data source.
If you are using the wizard, be sure to click E-Mail Messages in step 1. If you are not using the wizard, you can specify the list of e-mail addresses you want to send the message to by clicking the Select Recipients button in the Start Mail Merge group on the Mailings tab. In either case, you have three options:
Type an entirely new list of recipients.
Use an existing list of recipients.
Select recipients from an Outlook contacts list.
You can quickly add merge fields to a form message by using the buttons in the Write & Insert Fields group. Many e-mail messages need only a greeting line. Because e-mail messages tend to be less formal than printed letters, you might want to start the messages with something other than the predefined greeting options (Dear and To:) by typing a custom greeting.
In this exercise, you’ll open an existing form message, use the buttons on the Mailings tab to create a short mailing list, add a custom greeting line merge field, and then complete the merge.
Set Up
You need the ThankYouEmail_start document located in your Chapter14 practice file folder to complete this exercise. Open the ThankYouEmail_start document, and save it as ThankYouEmail. Display formatting marks, and then follow the steps.
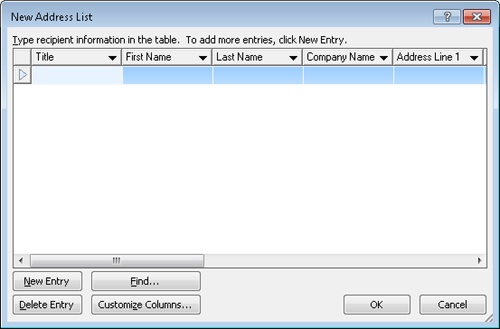
On the Mailings tab, in the Start Mail Merge group, click the Select Recipients button, and then in the list, click Type New List.
The New Address List dialog box opens.
Skipping over the Title field, type Andrea in the First Name field, type Dunker in the Last Name field, press the Tab key until you reach the E-mail Address field (the last field in the table), and then type [email protected].
Click New Entry, and then add Judy Lew, whose e-mail address is [email protected].
Repeat step 3 to add Ben Miller, whose e-mail address is [email protected], and then click OK.
The Save Address List dialog box opens, with the contents of your My Data Sources folder displayed. This dialog box is very similar to the Save As dialog box.
Troubleshooting
If the dialog box doesn’t appear, it might be hidden behind the program window, which will start flashing to indicate that you need to attend to the dialog box before you can proceed. Click the program window title bar to make the dialog box appear, or click the Word button on the Windows Taskbar and then click the dialog box thumbnail.
Navigate to your Chapter14 practice file folder, type My E-Mail Data Source in the File name box, and then click Save.
Word saves the data source in the specified location as a database.
With the cursor at the beginning of the form message, press Enter twice, and then press the Up Arrow key twice.
On the Mailings tab, in the Write & Insert Fields group, click the Greeting Line button.
The Insert Greeting Line dialog box opens.
In the first box under Greeting line format, replace Dear with Hello followed by a comma and a space. Display the list of options for the second box, and click Joshua. Then display the list of options for the third box, and click : (the colon).
In the Preview area, click the Next button twice to preview the greetings as they will appear in the e-mail messages.
Click the First button to return to the first record, and then click OK.
Word inserts the «GreetingLine» merge field at the top of the form message.
On the Mailings tab, in the Preview Results group, click the Preview Results button.
Word shows a preview of the first message. You can click the Next Record button in the Preview Results group to preview the messages for other recipients. Clicking the Preview Results button again turns off the preview.
In the Write & Insert Fields group, click the Highlight Merge Fields button.
Word indicates the merge field with a gray highlight.
In the Finish group, click the Finish & Merge button, and then in the list, click Send E-mail Messages.
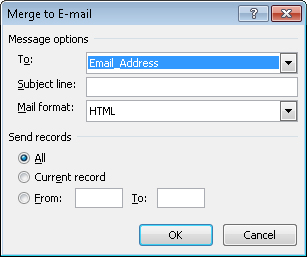
The Merge To E-Mail dialog box opens.
In the Message options area, verify that Email_Address is selected in the To box, type Welcome to Wide World Importers! in the Subject line box, and verify that HTML is selected in the Mail format box.
In this case, click Cancel.
If you click OK, Word converts the form message to an e-mail message and transmits it to your default e-mail program, which then sends the message to each of the selected addresses in the data source.
Tip
Your e-mail program might require that you log in or manually send the messages (they will be held in the outbox until sent). If you are using Outlook, a copy of each sent message appears in your Outlook Sent Items folder. If you plan to send a large number of messages, you might want to turn off the saving of sent messages.


Creating and Printing Labels
Most organizations keep information about their customers or clients in a worksheet or database that can be used for several purposes. For example, the address information might be used to send billing statements, form letters, and brochures. It might also be used to print sheets of mailing labels that can be attached to items such as packages and catalogs.
To create sheets of mailing labels, you first prepare the data source and then prepare the main document by selecting the brand and style of labels you plan to use. Word creates a table with cells the size of the labels on a page the size of the label sheet, so that each record will print on one label on the sheet. You insert merge fields into the first cell as a template for all the other cells. When you merge the main document and the data source, you can print the labels or create a new label document that you can use whenever you want to send something to the same set of recipients.
In this exercise, you’ll use the Mail Merge wizard to create mailing labels. You’ll then print the labels on standard paper to proofread them.
Set Up
You need the CustomerList_start workbook located in your Chapter14 practice file folder to complete this exercise. Open the CustomerList_start workbook, save it as CustomerListLabels, and then close it. Display formatting marks, and be sure to turn on your printer. (If you don’t want to print the labels, you can proof them on-screen.) Then with the Word program window active, follow the steps.
Display the Backstage view, click New, and then double-click Blank document.
A new blank document opens.
On the Mailings tab, in the Start Mail Merge group, click the Start Mail Merge button, and then click Step by Step Mail Merge Wizard.
In the Mail Merge task pane, click Labels, and then click Next: Starting document.
With Change document layout selected in the step 2 task pane, click Label options.
The Label Options dialog box opens.
In the Label information area, ensure that the Label vendors setting is Avery US Letter.
In the Product number box, ensure that the setting is 5159 Mailing Labels, and then click OK.
Word inserts a table that fills the first page of the main document.
At the bottom of the Mail Merge task pane, click Next: Select recipients.
With Use an existing list selected, click Browse, navigate to your Chapter14 practice file folder, double-click the CustomerListLabels workbook, and then in the Select Table dialog box, click OK.
In the Mail Merge Recipients dialog box, clear the check boxes of the two recipients whose addresses are not in Washington State (WA), and then click OK.
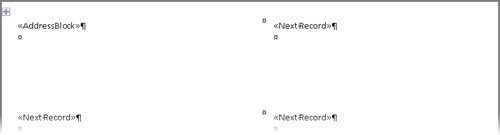
Word inserts a «Next Record» merge field in all the cells in the main document except the first.
At the bottom of the Mail Merge task pane, click Next: Arrange your labels, and then ensure that you can see the left edge of the main document.
With the cursor positioned in the first cell, in the Mail Merge task pane, click Address block.
In the Insert Address Block dialog box, click OK to accept the default settings.
Word inserts an «AddressBlock» merge field into the first cell.
In the Mail Merge task pane, click Update all labels.
The «AddressBlock» merge field is copied to the other cells, after the «Next Record» merge field.
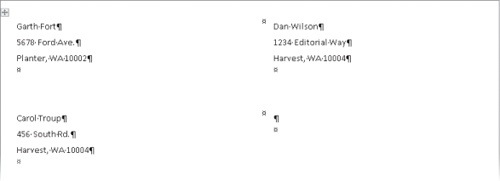
At the bottom of the Mail Merge task pane, click Next: Preview your labels. Then in the Preview Results group, click the First Record button.
The merge fields are replaced by the specified information from the data source.
At the bottom of the Mail Merge task pane, click Next: Complete the merge. Then in the Mail Merge task pane, click Print.
With the All option selected, click OK.
In the Print dialog box, verify that the name of the printer you want to use to print the labels appears in the Name box, and then click OK to print the labels.
The labels are printed on regular paper on the printer you selected. If you want to print on label sheets, insert the sheets in the printer’s paper tray before clicking OK in the Print dialog box.


Key Points
The mail merge process works by combining static information in a main document with variable information in a data source.
The main document can be any type of document, such as a letter, e-mail message, envelope or label template, or a directory or catalog.
The data source is organized into sets of information, called records, with each record containing the same items, called fields.
You insert placeholders called merge fields into the main document to tell Word where to merge items from the data source.
You don’t have to use all the records in a data source for a mail merge. You can filter the data and exclude specific records.
You can send the mail merged results directly to your printer or to a new document that you can edit and save.