Using postcards is a simple way to send information to customers, club members, family, or friends. Publisher comes with many templates for two-sided postcards. Most are designed to occupy a quarter page, but a few have quarter-page or half-page options. All have a primary side called Side 1 and a secondary side called Side 2, with most of the layout options for the second side including space for an address and postage.
Before you create a two-sided publication such as a postcard, you need to decide how you will print it. Because postcards are designed to be mailed, the paper they are printed on has to be substantial enough to withstand sorting and bagging processes without crumpling or tearing.
If you want to print only a few cards, you can buy postcard paper, also called card stock, at an office supply store and try printing your publication yourself. Costs vary enormously depending on the quality of the paper, its size, its color, and whether it is has a preprinted design. But at the cheap end of the scale, you can figure on about $0.12 per card.
To print on both sides of the paper, either you need a printer that supports duplex printing or you need to print Side 1, flip the paper over, and then print Side 2. Before you take the second route, you should run the Two-Sided Printing Setup Wizard to ensure that you correctly feed the paper; otherwise you might end up with both Side 1 and Side 2 printed on the same side of the card, or printed with different top sides. To run the wizard, click Print on the File menu, and under the Preview box in the Print dialog box, click Show How To Insert Paper. Then click Run The Two-Sided Printing Setup Wizard.
Important
Depending on your printer, you might need to manually feed each sheet of card stock rather than loading up your paper tray with multiple sheets. Some printers handle card stock better than others, and just because your printer successfully prints on one side, you shouldn’t assume it will successfully print both sides. Card stock that has been through a printer once might jam because of curling, or the ink from the first side might be picked up by the printer’s roller and transferred as a shadow to the second side. So be sure to run tests with regular paper and then with one sheet of card stock before printing many postcards.
If you want to print many postcards and printing them yourself is not an option, you can take your publication to a copy or print shop. However, if cost is an issue, be sure to check prices first. A sheet of four double-sided postcards will cost you as much as $2.20 each on regular card stock or $2.40 each on shiny photo paper. Cutting the sheets into four is an additional cost. If you don’t need the postcards within the day, you can upload your publication to an online print shop to save a bit of money.
If you communicate with customers or members of an organization by means of postcards and other marketing pieces that are sent to everyone on a mailing list, you might want to use a process called mail merge. This process combines the static information in a publication with the variable information in a data source (a mailing list or any other type of database) to create one copy of the merged publication for every record in the data source.
The data source is a structured document, such as a Microsoft Office Word table, a Microsoft Office Excel worksheet, a Microsoft Office Access database table, or a Microsoft Office Outlook contacts list. You can use an existing data source, or you can create a new one as part of the mail merge process.
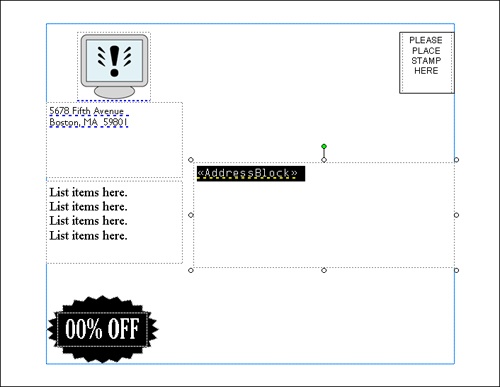
To tell Publisher what information to pull from the data source and where to put it, you insert data fields into the publication. These fields correspond to the field names (usually column headings) in the data source. For example, the address area of a postcard usually contains an address block consisting of fields for the name and address of each recipient. After you enter the data fields in the publication, each field is enclosed in chevrons—for example, «FirstName».
After you specify the data source you want to use and insert the appropriate data fields into the publication, you can either send the merged publications directly to the printer or you can merge them one after the other into a new publication, as separate pages. If you merge to a new publication, you have another chance to review and, if necessary, edit the merged copies before sending them to the printer.
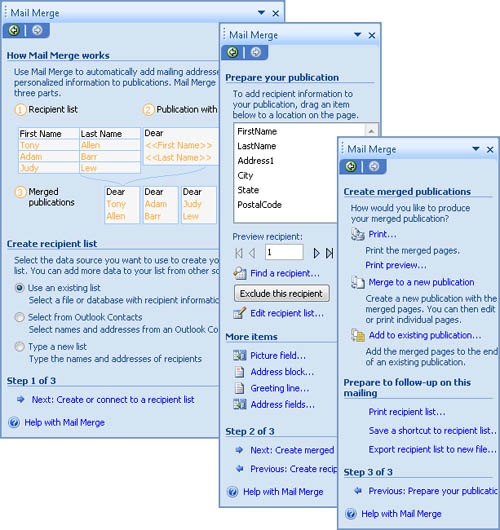
This might sound like a complicated process, but Publisher makes it simple with the Mail Merge Wizard, a three-step wizard that leads you through the mail merge process from start to finish.
In this exercise, you will create a postcard, insert data fields based on an existing data source, and then perform a mail merge operation to create copies with preprinted names and addresses, ready for mailing.
Note
USE the DataSource workbook. This practice file is located in the DocumentsMicrosoft PressSBS_Publisher2007CardsCalendars folder.
BE SURE TO display the Getting Started window before beginning this exercise.
In the Publication Types list, click Postcards, and scroll the center pane to see the available templates. In the category list, click We’ve Moved, and then click the Compass Point thumbnail.
Under Customize in the right pane, change the Color scheme to Sapphire, and under Options, change the Side 2 information to Promotional text. Then click Create.
Publisher creates the postcard. If you have already saved text in an information set as we did in Chapter 1, your organization information appears on both sides of the postcard. You can customize the postcard using the techniques you learned in Creating Folded Cards, earlier in this chapter.
Display page 2. Then on the Tools menu, point to Mailings and Catalogs, and click Mail Merge.
Step 1 of the Mail Merge Wizard appears in the Mail Merge task pane.
With the Use an existing list option selected under Create recipient list, click Next: Create or connect to a recipient list at the bottom of the task pane.
In the Select Data Source dialog box, navigate to the DocumentsMicrosoft PressSBS_Publisher2007CardsCalendars folder, and double-click the DataSource workbook.
The Select Table dialog box opens.
With the Clients$ sheet and the First row of data contains column headers check box selected, click OK.
The Mail Merge Recipients dialog box opens.
If you use mail merge often, you will want to explore this dialog box to see how you can refine the mail merge process. For the purposes of this exercise, we will use the default settings.
In the Mail Merge Recipients dialog box, click OK.
Step 2 of the Mail Merge Wizard appears in the Mail Merge task pane, so that you can add data fields to your publication.
In the postcard, click Type address here to select all the text in the address text box, and press the
 key. Then under More items in the task pane, click Address block.
The Insert Address Block dialog box opens. From this dialog box, you can refine the format of the fields that constitute the name and address.
Click OK to accept the default settings.
Publisher inserts the name and address of the first client in the data source into the text box.
To see the underlying data field, click the client’s name.
Display page 1, and insert a new text box below the We’ve Moved box.
Under More items in the task pane, click Greeting line.
The Insert Greeting Line dialog box opens so that you can specify how the greeting line should appear in the merged postcards.
Under Greeting line format, click the arrow to the right of the first box, and click (none). Then click the arrow to the right of the second box, and toward the bottom of the list, click Joshua.
Under Greeting line for invalid recipient names, click (none). Then click OK.
Publisher inserts the greeting line as it will appear for the first record in the data source file.
Click after the inserted comma (the name changes to display the data field), press
 , and type don’t miss our Open House on July 1. Then click away from the text box.
Troubleshooting
If <<GreetingLine>> is selected when you start to type, it will be overwritten by the first new character. If this happens, undo the change or delete the contents of the text box, and repeat Steps 13 through 15, this time ensuring that the insertion point is after <<GreetingLine>>.
The postcard is now ready for merging.
At the bottom of the Mail Merge task pane, click Next: Create merged publication.
Step 3 of the Mail Merge Wizard appears in the Mail Merge task pane.
In the task pane, click Merge to a new publication. Then on the page sorter, click each page in turn to see the results.
Publisher creates a publication that contains a personalized copy of the postcard for each of the five records in the data source. You can edit each copy as necessary in this publication before printing it. You can also save the publication for future use.