
30 Building a Mailing List Manager
AFTER YOU’VE BUILT UP A BASE OF SUBSCRIBERS to your website, it’s nice to be able to keep in touch with them by sending out a newsletter. In this chapter, you implement a front end for a mailing list manager (MLM). Some MLMs allow each subscriber to send messages to other subscribers. The program you create in this chapter is a newsletter system, in which only the list administrator can send messages. The system is named Pyramid-MLM.
This system is similar to others already in the marketplace. To get some idea of what we are aiming for, look at http://www.topica.com
Your application lets an administrator create multiple mailing lists and send newsletters to each of those lists separately. This application uses file upload to enable administrators to upload text and HTML versions of newsletters that they have created offline. This means administrators can use whatever software they prefer to create newsletters.
Users can subscribe to any of the lists at the site and select whether to receive newsletters in text or HTML.
We discuss the following topics:
![]() File upload with multiple files
File upload with multiple files
![]() Mime-encoded email attachments
Mime-encoded email attachments
![]() Managing user passwords without human interaction
Managing user passwords without human interaction
Solution Components
You want to build an online newsletter composition and sending system. This system should allow various newsletters to be created and sent to users, and allow users to subscribe to one or many of the newsletters.
The solution components fall under these general goals:
![]() Administrators should be able to set up and modify mailing lists.
Administrators should be able to set up and modify mailing lists.
![]() Administrators should be able to send text and HTML newsletters to all the subscribers of a single mailing list.
Administrators should be able to send text and HTML newsletters to all the subscribers of a single mailing list.
![]() Users should be able to register to use the site, and enter and modify their details.
Users should be able to register to use the site, and enter and modify their details.
![]() Users should be able to subscribe to any of the lists on the site.
Users should be able to subscribe to any of the lists on the site.
![]() Users should be able to unsubscribe from lists they are subscribed to.
Users should be able to unsubscribe from lists they are subscribed to.
![]() Users should be able to store their preference for either HTML-formatted or plain-text newsletters.
Users should be able to store their preference for either HTML-formatted or plain-text newsletters.
![]() For security reasons, users should not be able to send mail to the lists or to see each other’s email addresses.
For security reasons, users should not be able to send mail to the lists or to see each other’s email addresses.
![]() Users and administrators should be able to view information about mailing lists.
Users and administrators should be able to view information about mailing lists.
![]() Users and administrators should be able to view past newsletters that have been sent to a list (the archive).
Users and administrators should be able to view past newsletters that have been sent to a list (the archive).
Now that you know the idea behind the project, you can begin designing the solution and its components, such as setting up a database of lists, subscribers, and archived newsletters; uploading newsletters that have been created offline; and sending mail with attachments.
Setting Up a Database of Lists and Subscribers
In this project, you track the usernames and passwords of all system users, as well as a list of the lists they have subscribed to. You also store each user’s preference for receiving text or HTML email so that you can send a user the appropriate version of the newsletter.
An administrator is a specialized user with the ability to create new mailing lists and send newsletters to those lists.
A nice piece of functionality to have for a system like this is an archive of previous newsletters. Subscribers might not keep previous postings but might want to look up something. An archive can also act as a marketing tool for the newsletter because potential subscribers can see what the newsletters are like.
You will find nothing new or difficult in setting up this database in MySQL and an interface to it in PHP.
Uploading Newsletters
You need an interface to allow the administrator to send newsletters, as mentioned previously. What we haven’t discussed is how the administrator will create that newsletter. You could provide him with a form where he could type or paste the newsletter content. However, it increases the user-friendliness of the system to let the administrator create a newsletter in his favorite editor and then upload the file to the web server. This also makes it easy for the administrator to add images to an HTML newsletter. For this, you can use the file upload capability discussed in Chapter 19, “Interacting with the File System and the Server.”
You need to use a slightly more complicated form than you used in previous projects. For this project, you require the administrator to upload both text and HTML versions of the newsletter, along with any inline images that go into the HTML.
After the newsletter has been uploaded, you need to create an interface so that the administrator can preview the newsletter before sending it. This way, he can confirm that all the files were uploaded correctly.
Note that you also store all these files in an archive directory so that users can read back issues of newsletters. This directory needs to be writable by the user your web server runs as. The upload script will try to write the newsletters into ./archive/, so you need to make sure you create that directory and set permissions on it appropriately.
Sending Mail with Attachments
For this project, you want to be able to send users either a plain-text newsletter or a “fancy” HTML version, according to their preference.
To send an HTML file with embedded images, you need to find a way to send attachments. PHP’s simple mail() function doesn’t easily support sending attachments. Instead, you can use the excellent Mail_Mime package from PEAR, originally created by Richard Heyes. It can deal with HTML attachments and can also be used to attach any images that are contained in the HTML file.
Installation instructions for this package are included under “Installing PEAR” in Appendix A, “Installing PHP and MySQL.”
Solution Overview
For this project, you again use an event-driven approach to writing the code, as in Chapter 29, “Building a Web-Based Email Service.”
To help you get started, we again began by drawing a set of system flow diagrams to show the paths users might take through the system. In this case, we drew three diagrams to represent the three different sets of interactions users can have with the system. Users have different allowable actions when they are not logged in, when they are logged in as regular users, and when they are logged in as administrators. These actions are shown in Figures 30.1, 30.2, and 30.3, respectively.
In Figure 30.1, you can see the actions that can be taken by a user who is not logged in. As you can see, he can log in (if he already has an account), create an account (if he doesn’t already have one), or view the mailing lists available for signup (as a marketing tactic).
Figure 30.1 Users can choose only a limited number of actions when they are not logged in.
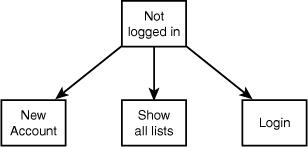
Figure 30.2 shows the actions a user can take after logging in. He can change his account setup (email address and preferences), change his password, and change which lists he is subscribed to.
Figure 30.2 After logging in, users can change their preferences through a variety of options.
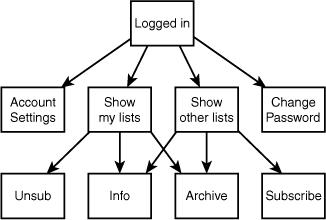
Figure 30.3 shows the actions available if an administrator has logged in. As you can see, an administrator has most of the functionality available to a user and some additional options. She can also create new mailing lists, create new messages for a mailing list by uploading files, and preview messages before sending them.
Because this application uses an event-driven approach again, the backbone of the application is contained in one file, index.php, which calls on a set of function libraries. An overview of the files in this application is shown in Table 30.1.
Figure 30.3 Administrators have additional actions available to them.
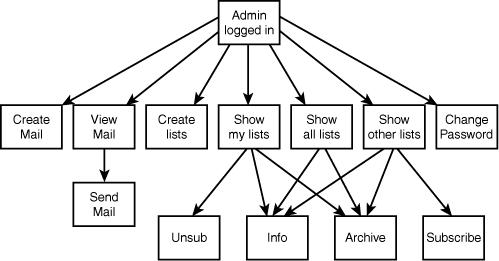
Table 30.1 Files in the Mailing List Manager Application

Now let’s work through the project implementation, beginning with the database in which you will store subscriber and list information.
Setting Up the Database
For this application, you need to store the following details:
![]() Lists—Mailing lists available for subscription
Lists—Mailing lists available for subscription
![]() Subscribers—Users of the system and their preferences
Subscribers—Users of the system and their preferences
![]() Sublists—A record of which users have subscribed to which lists (a many-to-many relationship)
Sublists—A record of which users have subscribed to which lists (a many-to-many relationship)
![]() Mail—A record of email messages that have been sent
Mail—A record of email messages that have been sent
![]() Images—You need to track the text, HTML, and images that go with each email because you want to be able to send email messages that consist of multiple files.
Images—You need to track the text, HTML, and images that go with each email because you want to be able to send email messages that consist of multiple files.
The SQL used to create this database is shown in Listing 30.1.
Listing 30.1 create_database.sql—SQL to Create the mlm Database
create database mlm;
use mlm;
create table lists
(
listid int auto_increment not null primary key,
listname char(20) not null,
blurb varchar(255)
);
create table subscribers
(
email char(100) not null primary key,
realname char(100) not null,
mimetype char(1) not null,
password char(40) not null,
admin tinyint not null
);
# stores a relationship between a subscriber and a list
create table sub_lists
(
email char(100) not null,
listid int not null
);
create table mail
(
mailid int auto_increment not null primary key,
email char(100) not null,
subject char(100) not null,
listid int not null,
status char(10) not null,
sent datetime,
modified timestamp
);
#stores the images that go with a particular mail
create table images
(
mailid int not null,
path char(100) not null,
mimetype char(100) not null
);
grant select, insert, update, delete
on mlm.*
to mlm@localhost identified by 'password';
insert into subscribers values
('admin@localhost', 'Administrative User', 'H', sha1('admin'), 1);
Remember that you can execute this SQL by typing
mysql -u root -p < create_database.sql
You need to supply your root password. (You could, of course, execute this script via any MySQL user with the appropriate privileges; we just used root here for simplicity.) You should change the password for the mlm user and the administrator in your script before running it.
Some of the fields in this database require a little further explanation, so let’s briefly run through them. The lists table contains a listid and listname. It also contains a blurb, which is a description of what the list is about.
The subscribers table contains email addresses (email) and names (realname) of the subscribers. It also stores their password and a flag (admin) to indicate whether a user is an administrator. You also store the type of mail they prefer to receive in mimetype. This can be either H for HTML or T for text.
The sublists table contains email addresses (email) from the subscribers table and listids from the lists table.
The mail table contains information about each email message that is sent through the system. It stores a unique ID (mailid), the address the mail is sent from (email), the subject line of the email (subject), and the listid of the list it has been sent to or will be sent to. The actual text or HTML of the message could be a large file, so you need to store the archive of the actual messages outside the database. You also track some general status information: whether the message has been sent (status), when it was sent (sent), and a timestamp to show when this record was last modified (modified).
Finally, you use the images table to track any images associated with HTML messages. Again, these images can be large, so you store them outside the database for efficiency. You need to keep track of the mailid they are associated with, the path to the location where the image is actually stored, and the MIME type of the image (mimetype)—for example, image/gif.
The SQL shown in Listing 30.1 also sets up a user for PHP to connect as and an administrative user for the system.
Defining the Script Architecture
As in the preceding project, this project uses an event-driven approach. The backbone of the application is in the file index.php. This script has the following four main segments:
1. Perform preprocessing. Do any processing that must be done before headers can be sent.
2. Set up and send headers. Create and send the start of the HTML page.
3. Perform an action. Respond to the event that has been passed in. As in the preceding example, the event is contained in the $action variable.
4. Send footers.
Almost all the application’s processing is done in this file. The application also uses the function libraries listed in Table 30.1, as mentioned previously.
The full listing of the index.php script is shown in Listing 30.2.
Listing 30.2 index.php—Main Application File for Pyramid-MLM
<?php
/**********************************************************************
* Section 1 : pre-processing
*********************************************************************/
include ('include_fns.php'),
session_start();
$action = $_GET['action'];
$buttons = array();
//append to this string if anything processed before header has output
$status = ' ';
// need to process log in or out requests before anything else
if(($_POST['email']) && ($_POST['password'])) {
$login = login($_POST['email'], $_POST['password']);
if($login == 'admin') {
$status .= "<p style="padding-bottom: 50px">
<strong>".get_real_name($_POST['email'])."</strong>
logged in successfully as
<strong>Administrator</strong>.</p>";
$_SESSION['admin_user'] = $_POST['email'];
} else if($login == 'normal') {
$status .= "<p style="padding-bottom: 50px">
<strong>".get_real_name($_POST['email'])."</strong>
logged in successfully.</p>";
$_SESSION['normal_user'] = $_POST['email'];
} else {
$status .= "<p style="padding-bottom: 50px">Sorry, we could
<not log you in with that email address
<and password.</p>";
}
}
if($action == 'log-out') {
unset($action);
$_SESSION=array();
session_destroy();
}
/**********************************************************************
* Section 2: set up and display headers
*********************************************************************/
// set the buttons that will be on the tool bar
if(check_normal_user()) {
// if a normal user
$buttons[0] = 'change-password';
$buttons[1] = 'account-settings';
$buttons[2] = 'show-my-lists';
$buttons[3] = 'show-other-lists';
$buttons[4] = 'log-out';
} else if(check_admin_user()) {
// if an administrator
$buttons[0] = 'change-password';
$buttons[1] = 'create-list';
$buttons[2] = 'create-mail';
$buttons[3] = 'view-mail';
$buttons[4] = 'log-out';
$buttons[5] = 'show-all-lists';
$buttons[6] = 'show-my-lists';
$buttons[7] = 'show-other-lists';
} else {
// if not logged in at all
$buttons[0] = 'new-account';
$buttons[1] = 'show-all-lists';
$buttons[4] = 'log-in';
}
if($action) {
// display header with application name and description of page or action
do_html_header('Pyramid-MLM - '.format_action($action));
} else {
// display header with just application name
do_html_header('Pyramid-MLM'),
}
display_toolbar($buttons);
//display any text generated by functions called before header
echo $status;
/**********************************************************************
* Section 3: perform action
*********************************************************************/
// only these actions can be done if not logged in
switch ($action) {
case 'new-account':
// get rid of session variables
session_destroy();
display_account_form();
break;
case 'store-account':
if (store_account($_SESSION['normal_user'],
$_SESSION['admin_user'], $_POST)) {
$action = ' ';
}
if(!check_logged_in()) {
display_login_form($action);
}
break;
case 'log-in':
case ' ':
if(!check_logged_in()) {
display_login_form($action);
}
break;
case 'show-all-lists':
display_items('All Lists', get_all_lists(), 'information',
'show-archive',' '),
break;
case 'show-archive':
display_items('Archive For '.get_list_name($_GET['id']),
get_archive($_GET['id']), 'view-html',
'view-text', ' '),
break;
case 'information':
display_information($_GET['id']);
break;
}
//all other actions require user to be logged in
if(check_logged_in()) {
switch ($action) {
case 'account-settings':
display_account_form(get_email(),
get_real_name(get_email()), get_mimetype(get_email()));
break;
case 'show-other-lists':
display_items('Unsubscribed Lists',
get_unsubscribed_lists(get_email()), 'information',
'show-archive', 'subscribe'),
break;
case 'subscribe':
subscribe(get_email(), $_GET['id']);
display_items('Subscribed Lists', get_subscribed_lists(get_email()),
'information', 'show-archive', 'unsubscribe'),
break;
case 'unsubscribe':
unsubscribe(get_email(), $_GET['id']);
display_items('Subscribed Lists', get_subscribed_lists(get_email()),
'information', 'show-archive', 'unsubscribe'),
break;
case ' ':
case 'show-my-lists':
display_items('Subscribed Lists', get_subscribed_lists(get_email()),
'information', 'show-archive', 'unsubscribe'),
break;
case 'change-password':
display_password_form();
break;
case 'store-change-password':
if(change_password(get_email(), $_POST['old_passwd'],
$_POST['new_passwd'], $_POST['new_passwd2'])) {
echo "<p style="padding-bottom: 50px">OK: Password
changed.</p>";
} else {
echo "<p style="padding-bottom: 50px">Sorry, your
password could not be changed.</p>";
display_password_form();
}
break;
}
}
// The following actions may only be performed by an admin user
if(check_admin_user()) {
switch ($action) {
case 'create-mail':
display_mail_form(get_email());
break;
case 'create-list':
display_list_form(get_email());
break;
case 'store-list':
if(store_list($_SESSION['admin_user'], $_POST)) {
echo "<p style="padding-bottom: 50px">New list added.</p>";
display_items('All Lists', get_all_lists(), 'information',
'show-archive',' '),
} else {
echo "<p style="padding-bottom: 50px">List could not be
stored. Please try again.</p>";
}
break;
case 'send':
send($_GET['id'], $_SESSION['admin_user']);
break;
case 'view-mail':
display_items('Unsent Mail', get_unsent_mail(get_email()),
'preview-html', 'preview-text', 'send'),
break;
}
}
/**********************************************************************
* Section 4: display footer
*********************************************************************/
do_html_footer();
?>
You can see the four segments of the code clearly marked in this listing. In the preprocessing stage, you set up the session and process any actions that need to be done before headers can be sent. In this case, they include logging in and out.
In the header stage, you set up the menu buttons that the user will see and display the appropriate headers using the do_html_header() function from output_fns.php. This function just displays the header bar and menus, so we don’t discuss it in detail here.
In the main section of the script, you respond to the action the user has chosen. These actions are divided into three subsets: actions that can be taken if not logged in, actions that can be taken by normal users, and actions that can be taken by administrative users. You check to see whether access to the latter two sets of actions is allowed by using the check_logged_in() and check_admin_user() functions. These functions are located in the user_auth_fns.php function library. The code for these functions and the check_normal_user() function are shown in Listing 30.3.
Listing 30.3 Functions from user_auth_fns.php—These Functions Check Whether a User Is Logged In and at What Level
function check_normal_user() {
// see if somebody is logged in and notify them if not
if (isset($_SESSION['normal_user'])) {
return true;
} else {
return false;
}
}
function check_admin_user() {
// see if somebody is logged in and notify them if not
if (isset($_SESSION['admin_user'])) {
return true;
} else {
return false;
}
}
function check_logged_in() {
return ( check_normal_user() || check_admin_user() );
As you can see, these functions use the session variables normal_user and admin_user to check whether a user has logged in. We explain how to set up these session variables shortly.
In the final section of the index.php script, you send an HTML footer using the do_html_footer() function from output_fns.php.
Let’s look briefly at an overview of the possible actions in the system. These actions are shown in Table 30.2.
Table 30.2 Possible Actions in the Mailing List Manager Application
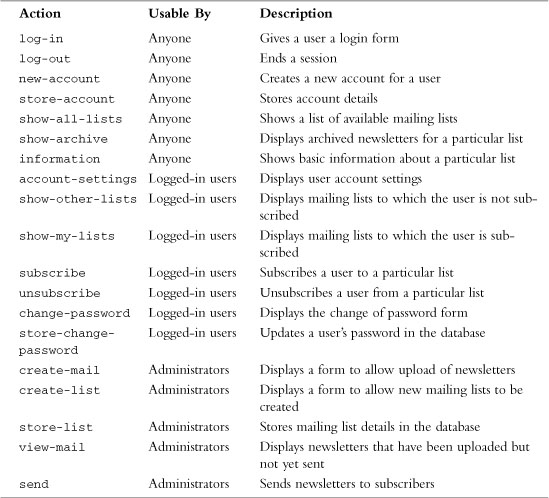
One noticeable omission from Table 30.2 is an option along the lines of store-mail—that is, an action that actually uploads the newsletters entered via create-mail by administrators. This single piece of functionality is actually in a different file, upload.php. We put this functionality in a separate file because it makes keeping track of security issues a little easier on us, the programmers.
Next, we discuss the implementation of the actions in the three groups listed in Table 30.2—that is, actions for people who are not logged in, actions for logged-in users, and actions for administrators.
Implementing Login
When a brand-new user comes to your site, you would like him to do three things. First, you want the user to look at what you have to offer; second, to sign up with you; and third, to log in. We look at each of these tasks in turn.
Figure 30.4 shows the screen presented to users when they first come to the site.
Figure 30.4 On arrival, users can create a new account, view available lists, or just log in.

We look at creating a new account and logging in now and then return to viewing list details in the “Implementing User Functions” and “Implementing Administrative Functions” sections later in this chapter.
Creating a New Account
If a user selects the New Account menu option, this selection activates the new-account action. This action, in turn, activates the following code in index.php:
case 'new-account':
// get rid of session variables
session_destroy();
display_account_form();
break;
This code effectively logs out a user if she is currently logged in and displays the account details form, as shown in Figure 30.5.
Figure 30.5 The new account creation form enables users to enter their details.
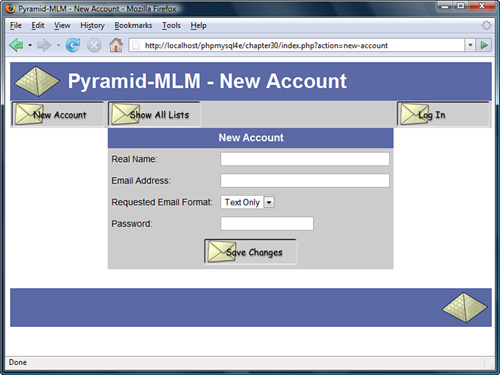
This form is generated by the display_account_form() function from the output_fns.php library. This function is used both here and in the account-settings action to display a form to enable the user to set up an account. If the function is invoked from the account-settings action, the form will be filled with the user’s existing account data. Here, the form is blank, ready for new account details. Because this function outputs only HTML, we do not go through the details here.
The submit button on this form invokes the store-account action. The code for this action is as follows:
case 'store-account':
if (store_account($_SESSION['normal_user'],
$_SESSION['admin_user'], $_POST)) {
$action = ' ';
}
if(!check_logged_in()) {
display_login_form($action);
}
break;
The store_account() function, shown in Listing 30.4, writes the account details to the database.
Listing 30.4 store_account() Function from mlm_fns.php—This Function Adds a New User to the Database or Stores Modified Details About an Existing User
// add a new subscriber to the database, or let a user modify their data
function store_account($normal_user, $admin_user, $details) {
if(!filled_out($details)) {
echo "<p>All fields must be filled in. Try again.</p>";
return false;
} else {
if(subscriber_exists($details['email'])) {
//check logged in as the user they are trying to change
if(get_email()==$details['email']) {
$query = "update subscribers set
realname = ' " .$details[realname]."',
mimetype = ' " .$details[mimetype]."'
where email = ' " .$details[email] . " ' ";
if($conn=db_connect()) {
if ($conn->query($query)) {
return true;
} else {
return false;
}
} else {
echo "<p>Could not store changes.</p>";
return false;
}
} else {
echo "<p>Sorry, that email address is already registered here.</p>
<p>You will need to log in with that address to
change its settings.</p>";
return false;
}
} else {
// new account
$query = "insert into subscribers
values (' " .$details[email]."',
' " .$details[realname]."',
' " .$details[mimetype]."',
sha1(' " .$details[new_password]."'),
0)";
if($conn=db_connect()) {
if ($conn->query($query)) {
return true;
} else {
return false;
}
} else {
echo "<p>Could not store new account.</p>";
return false;
}
}
}
}
This function first checks that the user has filled in the required details. If this is okay, the function will then either create a new user or update the account details if the user already exists. A user can update only the account details of the user he is logged in as.
The logged-in user’s identity is checked using the get_email() function, which retrieves the email address of the user who is currently logged in. We return to this function later because it uses session variables that are set up when the user logs in.
Logging In
If a user fills in the login form you saw in Figure 30.4 and clicks on the Log In button, she will enter the index.php script with the email and password variables set. This activates the login code, which is in the preprocessing stage of the script, as follows:
// need to process log in or out requests before anything else
if(($_POST['email']) && ($_POST['password'])) {
$login = login($_POST['email'], $_POST['password']);
if($login == 'admin') {
$status .= "<p style="padding-bottom: 50px">
<strong>".get_real_name($_POST['email'])."</strong>
logged in successfully as
<strong>Administrator</strong>.</p>";
$_SESSION['admin_user'] = $_POST['email'];
} else if($login == 'normal') {
$status .= "<p style="padding-bottom: 50px">
<strong>".get_real_name($_POST['email'])."</strong>
logged in successfully.</p>";
$_SESSION['normal_user'] = $_POST['email'];
} else {
$status .= "<p style="padding-bottom: 50px">Sorry, we could
not log you in with that email address
and password.</p>";
}
}
if($action == 'log-out') {
unset($action);
$_SESSION=array();
session_destroy();
}
As you can see, you first try to log the user in by using the login() function from the user_auth_fns.php library. This function is slightly different from the login functions used elsewhere, so let’s look at it more closely. The code for this function is shown in Listing 30.5.
Listing 30.5 login() Function from user_auth_fns.php—This Function Checks a User’s Login Details
function login($email, $password) {
// check username and password with db
// if yes, return login type
// else return false
// connect to db
$conn = db_connect();
if (!$conn) {
return 0;
}
$query = "select admin from subscribers
where email=' " .$email."'
and password = sha1(' " .$password."')";
$result = $conn->query($query);
if (!$result) {
return false;
}
if ($result->num_rows<1) {
return false;
}
$row = $result->fetch_array();
if($row[0] == 1) {
return 'admin';
} else {
return 'normal';
}
}
In previous login functions, you returned true if the login was successful and false if it was not. In this case, you still return false if the login failed, but if it was successful, you return the user type, either 'admin' or 'normal'. You check the user type by retrieving the value stored in the admin column in the subscribers table, for a particular combination of email address and password. If no results are returned, you return false. If a user is an administrator, this value will be 1 (true), so you return 'admin'. Otherwise, you return 'normal'.
Returning to the main line of execution, you register a session variable to keep track of who the user is. She is either admin_user if she is an administrator or normal_user if she is a regular user. Whichever one of these variables you set will contain the email address of the user. To simplify checking for the email address of a user, you use the get_email() function mentioned earlier. This function is shown in Listing 30.6.
Listing 30.6 get_email() function from user_auth_fns.php—This Function Returns the Email Address of the Logged-In User
function get_email() {
if (isset($_SESSION['normal_user'])) {
return $_SESSION['normal_user'];
}
if (isset($_SESSION['admin_user'])) {
return $_SESSION['admin_user'];
}
return false;
}
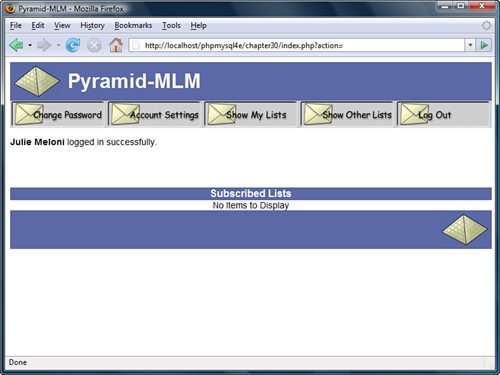
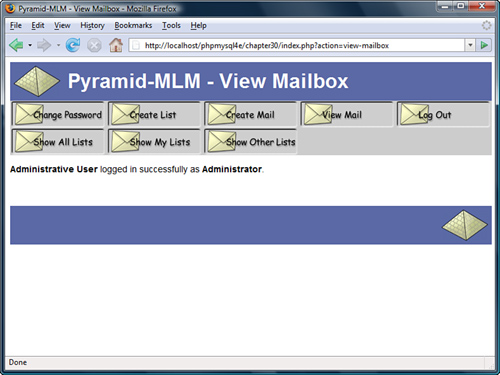
Back in the main program, you report to the user whether she was logged in and at what level.
The output from one login attempt is shown in Figure 30.6.
Now that you have logged in a user, you can proceed to the user functions.
Figure 30.6 The system reports to the user that login was successful.
Implementing User Functions
There are five things you want your users to be able to do after they have logged in:
![]() Look at the lists available for subscription
Look at the lists available for subscription
![]() Subscribe and unsubscribe from lists
Subscribe and unsubscribe from lists
![]() Change the way their accounts are set up
Change the way their accounts are set up
![]() Change their passwords
Change their passwords
![]() Log out
Log out
You can see most of these options in Figure 30.6. Next, let’s look at the implementation of each of these options.
Viewing Lists
In this project, you implement a number of options for viewing available lists and list details. In Figure 30.6, you can see two of these options: Show My Lists, which retrieves the lists this user is subscribed to, and Show Other Lists, which retrieves the lists the user is not subscribed to.
If you look back at Figure 30.4, you will see another option, Show All Lists, which retrieves all the available mailing lists on the system. For the system to be truly scalable, you should add paging functionality (to display, say, 10 results per page). We did not do this here for brevity.
These three menu options activate the show-all-lists, show-other-lists, and show-my-lists actions, respectively. As you have probably realized, all these actions work quite similarly. The code for these three actions is as follows:
case 'show-all-lists':
display_items('All Lists', get_all_lists(), 'information',
'show-archive',' '),
break;
case show-other-lists':
display_items('Unsubscribed Lists',
get_unsubscribed_lists(get_email()), 'information',
'show-archive', 'subscribe'),
break;
case ' ':
case 'show-my-lists':
display_items('Subscribed Lists', get_subscribed_lists(get_email()),
'information', 'show-archive', 'unsubscribe'),
break;
As you can see, all these actions call the display_items() function from the output_fns.php library, but they each call it with different parameters. They all also use the get_email() function mentioned earlier to get the appropriate email address for this user.
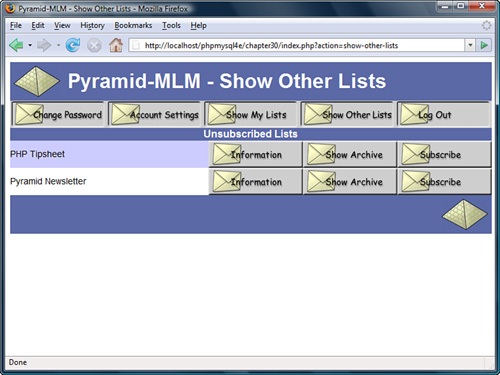
To see what the display_items() function does, look at Figure 30.7, the Show Other Lists page.
Figure 30.7 The display_items() function lays out a list of the lists that the user is not subscribed to.
Let’s look at the code for the display_items() function, shown in Listing 30.7.
Listing 30.7 display_items() Function from output_fns.php—This Function Displays a List of Items with Associated Actions
function display_items($title, $list, $action1=' ', $action2=' ',
$action3=' ') {
global $table_width;
echo "<table width="$table_width" cellspacing="0"
cellpadding="0" border="0">";
// count number of actions
$actions=(($action1!=' ') + ($action2!=' ') + ($action3!=' '));
echo "<tr>
<th colspan="".(1+$actions)."" bgcolor="#5B69A6">"
.$title."</th>
</tr>";
// count number of items
$items=sizeof($list);
if($items == 0) {
echo "<tr>
<td colspan="".(1+$actions)."" align="center">No
Items to Display</td>
</tr>";
} else {
// print each row
for($i=0; $i<$items; $i++) {
if($i%2) {
// background colors alternate
$bgcolor="#ffffff";
} else {
$bgcolor="#ccccff";
}
echo "<tr>
<td bgcolor="".$bgcolor.""
width="".($table_width - ($actions * 149))."">";
echo $list[$i][1];
if ($list[$i][2]) {
echo " - ".$list[$i][2];
}
echo "</td>";
// create buttons for up to three actions per line
for($j=1; $j<=3; $j++) {
$var="action".$j;
if($$var) {
echo "<td bgcolor="".$bgcolor."" width="149">";
// view/preview buttons are a special case as they link to a file
if(($$var == 'preview-html') || ($$var == 'view-html') ||
($$var == 'preview-text') || ($$var == 'view-text')) {
display_preview_button($list[$i][3], $list[$i][0], $$var);
} else {
display_button($$var, '&id=' . $list[$i][0] );
}
echo "</td>";
}
}
echo "</tr>
";
}
echo "</table>";
}
}
This function outputs a table of items, with each item having up to three associated action buttons. The function expects the following five parameters, in order:
![]()
$title is the title that appears at the top of the table. In the case shown in Figure 30.7, the title Unsubscribed Lists is passed in, as shown in the previously discussed code snippet for the action “Show Other Lists.”
![]()
$list is an array of items to display in each row of the table. In this case, it is an array of the lists the user is not currently subscribed to. You build this array (in this case) in the function get_unsubscribed_lists(), which we discuss shortly. This is a multidimensional array, with each row in the array containing up to four pieces of data about each row. In order, again:
![]()
$list[n][0] should contain the item ID, which is usually a row number. This gives the action buttons the ID of the row they are to operate on. In this case, you use IDs from the database; more on this later.
![]()
$list[n][1] should contain the item name. This is the text displayed for a particular item. For example, in the case shown in Figure 30.7, the item name in the first row of the table is PHP Tipsheet.
![]()
$list[n][2] and $list[n][3] are optional. You use them to convey that there is more information. They correspond to the more information text and the more information ID, respectively. We look at an example using these two parameters when we come to the View Mail action in the “Implementing Administrative Functions” section.
![]() The optional third, fourth, and fifth parameters to the function are used to pass in three actions that will be displayed on buttons corresponding to each item. In Figure 30.7, they are the three action buttons shown as Information, Show Archive, and Subscribe.
The optional third, fourth, and fifth parameters to the function are used to pass in three actions that will be displayed on buttons corresponding to each item. In Figure 30.7, they are the three action buttons shown as Information, Show Archive, and Subscribe.
You get these three buttons for the Show All Lists page by passing in the action names information, show-archive, and subscribe. When you use the display_button() function, these actions are turned into buttons with those words on them and the appropriate action assigned to them.
Each of the Show actions calls the display_items() function in a different way, as you can see by looking back at their actions. In addition to having different titles and action buttons, each of the three uses a different function to build the array of items to display. Show All Lists uses the function get_all_lists(), Show Other Lists uses the function get_unsubscribed_lists(), and Show My Lists uses the function get_subscribed_lists(). All these functions work in a similar fashion and are all from the mlm_fns.php function library.
Let’s look at get_unsubscribed_lists() because that’s the example we’ve followed so far. The code for the get_unsubscribed_lists() function is shown in Listing 30.8.
Listing 30.8 get_unsubscribed_lists() Function from mlm_fns.php—This Function Builds an Array of Mailing Lists That a User Is Not Subscribed To
function get_unsubscribed_lists($email) {
$list = array();
$query = "select lists.listid, listname, email from lists
left join sub_lists on lists.listid = sub_lists.listid
and email=' " .$email."' where email is NULL
order by listname";
if($conn=db_connect()) {
$result = $conn->query($query);
if(!$result) {
echo '<p>Unable to get list from database.</p>';
return false;
}
$num = $result->num_rows;
for($i = 0; $i<$num; $i++) {
$row = $result->fetch_array();
array_push($list, array($row[0], $row[1]));
}
}
return $list;
}
As you can see, this function requires an email address passed into it. This should be the email address of the subscriber that you are working with. The get_subscribed_lists() function also requires an email address as a parameter, but the get_all_lists() function does not for obvious reasons.
Given a subscriber’s email address, you connect to the database and fetch all the lists the subscriber is not subscribed to. You use a LEFT JOIN to find unmatched items, and you loop through the result and build the array row by row using the array_push() built-in function.
Now that you know how this list is produced, let’s look at the action buttons associated with these displays.
Viewing List Information
The Information button shown in Figure 30.7 triggers the information action, which is as follows:
case 'information':
display_information($_GET['id']);
break;
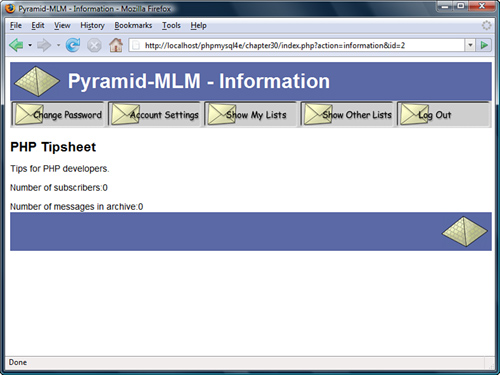
To see what the display_information() function does, look at Figure 30.8.
This function displays some general information about a particular mailing list and lists the number of subscribers and number of newsletters sent out to that list and available in the archive (more on that shortly). The code for this function is shown in Listing 30.9.
Listing 30.9 display_information() Function from output_fns.php—This Function Displays List Information
// diplay stored information about each list
function display_information($listid) {
if(!$listid) {
return false;
}
$info=load_list_info($listid);
if($info) {
echo "<h2>".pretty($info[listname])."</h2>
<p>".pretty($info[blurb])."
</p><p>Number of subscribers:".$info[subscribers]."
</p><p>Number of messages in archive:"
.$info[archive]."</p>";
}
}
Figure 30.8 The display_information() function shows a blurb about a mailing list.
The display_information() function uses two other functions to help it achieve its web task: load_list_info() and pretty(). The load_list_info() function actually retrieves the data from the database. The pretty() function simply formats the data from the database by stripping out slashes, turning newlines into HTML line breaks, and so on.
Let’s look briefly at the load_list_info() function, which is in the mlm_fns.php function library. The code for it is shown in Listing 30.10.
Listing 30.1 load_list_info() Function from mlm_fns.php—This Function Builds an Array of List Information
function load_list_info($listid) {
if(!$listid) {
return false;
}
if(!($conn=db_connect())) {
return false;
}
$query = "select listname, blurb from lists where listid =
' " .$listid . " ' ";
$result = $conn->query($query);
if(!$result) {
echo "<p>Cannot retrieve this list.</p>";
return false;
}
$info = $result->fetch_assoc();
$query = "select count(*) from sub_lists where listid =
' " .$listid . " ' ";
$result = $conn->query($query);
if($result) {
$row = $result->fetch_array();
$info['subscribers'] = $row[0];
}
$query = "select count(*) from mail where listid = ' " .$listid."'
and status = 'SENT'";
$result = $conn->query($query);
if($result) {
$row = $result->fetch_array();
$info['archive'] = $row[0];
}
return $info;
}
This function runs three database queries to collect the name and blurb for a list from the lists table, the number of subscribers from the sub_lists table, and the number of newsletters sent from the mail table.
Viewing List Archives
In addition to viewing the list blurb, users can look at all the mail that has been sent to a mailing list by clicking on the Show Archive button. This activates the show-archive action, which triggers the following code:
case 'show-archive':
display_items('Archive For '.get_list_name($_GET['id']),
get_archive($_GET['id']), 'view-html',
'view-text', ' '),
break;
Again, this function uses the display_items() function to list the various items of mail that have been sent to the list. These items are retrieved using the get_archive() function from mlm_fns.php. This function is shown in Listing 30.11.
Listing 30.11 get_archive() Function from mlm_fns.php—This Function Builds an Array of Archived Newsletters for a Given List
function get_archive($listid) {
//returns an array of the archived mail for this list
//array has rows like (mailid, subject)
$list = array();
$listname = get_list_name($listid);
$query = "select mailid, subject, listid from mail
where listid = ' " .$listid."' and status = 'SENT'
order by sent";
if($conn=db_connect()) {
$result = $conn->query($query);
if(!$result) {
echo "<p>Unable to get list from database.</p>";
return false;
}
$num = $result->num_rows;
for($i = 0; $i<$num; $i++) {
$row = $result->fetch_array();
$arr_row = array($row[0], $row[1],
$listname, $listid);
array_push($list, $arr_row);
}
}
return $list;
}
Again, this function gets the required information—in this case, the details of mail that has been sent—from the database and builds an array suitable for passing to the display_items() function.
Subscribing and Unsubscribing
On the list of mailing lists shown in Figure 30.7, each list has a button that enables users to subscribe to it. Similarly, if users use the Show My Lists option to see the lists to which they are already subscribed, they will see an Unsubscribe button next to each list.
These buttons activate the subscribe and unsubscribe actions, which trigger the following two pieces of code, respectively:
case 'subscribe':
subscribe(get_email(), $_GET['id']);
display_items('Subscribed Lists',
get_subscribed_lists(get_email()),
'information', 'show-archive', 'unsubscribe'),
break;
case 'unsubscribe':
unsubscribe(get_email(), $_GET['id']);
display_items('Subscribed Lists',
get_subscribed_lists(get_email()),
'information', 'show-archive', 'unsubscribe'),
break;
In each case, you call a function (subscribe() or unsubscribe()) and then redisplay a list of mailing lists the user is now subscribed to by using the display_items() function again.
The subscribe() and unsubscribe() functions are shown in Listing 30.12.
Listing 30.12 subscribe() and unsubscribe() Functions from mlm_fns.php—These Functions Add and Remove Subscriptions for a User
// subscribe this email address to this list
function subscribe($email, $listid) {
if((!$email) || (!$listid) || (!list_exists($listid))
|| (!subscriber_exists($email))) {
return false;
}
//if already subscribed exit
if(subscribed($email, $listid)) {
return false;
}
if(!($conn=db_connect())) {
return false;
}
$query = "insert into sub_lists values (' " .$email."', $listid)";
$result = $conn->query($query);
return $result;
}
// unsubscribe this email address from this list
function unsubscribe($email, $listid) {
if ((!$email) || (!$listid)) {
return false;
}
if(!($conn=db_connect())) {
return false;
}
$query = "delete from sub_lists where email = ' " .$email."' and
listid = ' " .$listid . " ' ";
$result = $conn->query($query);
return $result;
}
The subscribe() function adds a row to the sub_lists table corresponding to the subscription; the unsubscribe() function deletes this row.
Changing Account Settings
The Account Settings button, when clicked, activates the account-settings action. The code for this action is as follows:
case 'account-settings':
display_account_form(get_email(),
get_real_name(get_email()), get_mimetype(get_email()));
break;
As you can see, you reuse the display_account_form() function used to create the account in the first place. However, this time you pass in the user’s current details, which will be displayed in the form for easy editing. When the user clicks on the submit button in this form, the store-account action is activated as discussed previously.
Changing Passwords
Clicking on the Change Password button activates the change-password action, which triggers the following code:
case 'change-password':
display_password_form();
break;
The display_password_form() function (from the output_fns.php library) simply displays a form for the user to change his password. This form is shown in Figure 30.9.
Figure 30.9 The display_password_form() function enables users to change their passwords.
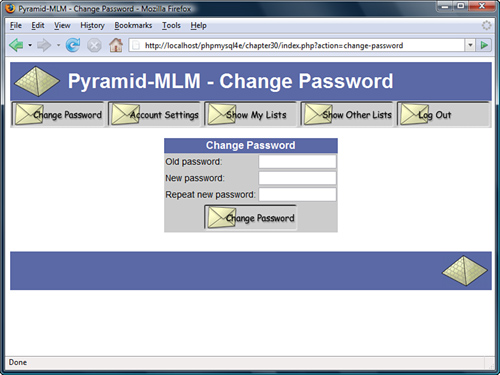
When a user clicks on the Change Password button at the bottom of this form, the store-change-password action is activated. The code for this action is as follows:
case 'store-change-password':
if(change_password(get_email(), $_POST['old_passwd'],
$_POST['new_passwd'], $_POST['new_passwd2'])) {
echo "<p style="padding-bottom: 50px">OK: Password
changed.</p>";
} else {
echo "<p style="padding-bottom: 50px">Sorry, your
password could not be changed.</p>";
display_password_form();
}
break;
As you can see, this code tries to change the password using the change_password() function and reports success or failure to the user. The change_password() function, shown in Listing 30.13, can be found in the user_auth_fns.php function library.
Listing 30.13 change_password() Function from user_auth_fns.php—This Function Validates and Updates a User’s Password
function change_password($email, $old_password, $new_password,
$new_password_conf) {
// change password for email/old_password to new_password
// return true or false
// if the old password is right
// change their password to new_password and return true
// else return false
if (login($email, $old_password)) {
if($new_password==$new_password_conf) {
if (!($conn = db_connect())) {
return false;
}
$query = "update subscribers
set password = sha1(' " .$new_password."')
where email = ' " .$email . " ' ";
$result = $conn->query($query);
return $result;
} else {
echo "<p>Your passwords do not match.</p>";
}
} else {
echo "<p>Your old password is incorrect.</p>";
}
return false; // old password was wrong
}
This function is similar to other password setting and changing functions we have looked at. It compares the two new passwords entered by the user to make sure they are the same and, if they are, tries to update the user’s password in the database.
Logging Out
When a user clicks on the Log Out button, the log-out action is triggered. The code executed by this action in the main script is actually in the preprocessing section of the script, as follows:
if($action == 'log-out') {
unset($action);
$_SESSION=array();
session_destroy();
}
This snippet of code disposes of the session variables and destroys the session. Notice that it also unsets the action variable; this means that you enter the main case statement without an action, triggering the following code:
default:
if(!check_logged_in()) {
display_login_form($action);
}
break;
This code allows another user to log in or allows the user to log in as someone else.
Implementing Administrative Functions
If someone logs in as an administrator, she will get some additional menu options, which can be seen in Figure 30.10.
The extra options are Create List (create a new mailing list), Create Mail (create a new newsletter), and View Mail (view and send created newsletters that have not yet been sent). Now let’s look at each of these options in turn.
Figure 30.10 The administrator menu allows for mailing list creation and maintenance.
Creating a New List
If the administrator chooses to set up a new list by clicking on the Create List button, she will activate the create-list action, which is associated with the following code:
case 'create-list':
display_list_form(get_email());
break;
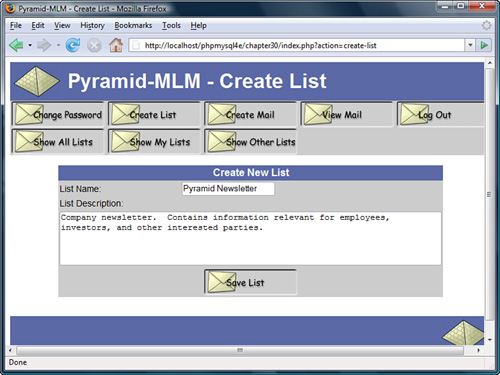
The display_list_form() function, found in the output_fns.php library, displays a form that enables the administrator to enter the details of a new list. It just outputs HTML, so we did not include it here. The output of this function is shown in Figure 30.11.
When the administrator clicks on the Save List button, this activates the store-list action, which triggers the following code in index.php:
case 'store-list':
if(store_list($_SESSION['admin_user'], $_POST)) {
echo "<p style="padding-bottom: 50px">New list added.</p>";
display_items('All Lists', get_all_lists(), 'information',
'show-archive',' '),
} else {
echo "<p style="padding-bottom: 50px">List could not be
stored. Please try again.</p>";
}
break
Figure 30.11 The Create List option requires the administrator to enter a name and description (or blurb) for the new list.
As you can see, the code tries to store the new list details and then displays the new list of lists. The list details are stored with the store_list()function, which is shown in Listing 30.14.
Listing 30.14 store_list() Function from mlm_fns.php—This Function Inserts a New Mailing List into the Database
function store_list($admin_user, $details) {
if (!filled_out($details)) {
echo "<p>All fields must be filled in. Try again.</p>";
return false;
} else {
if(!check_admin_user($admin_user)) {
return false;
// how did this function get called by somebody not logged in as admin?
}
if(!($conn=db_connect())) {
return false;
}
$query = "select count(*) from lists where listname = ' " .$details['name'] . " ' ";
$result = $conn->query($query);
$row = $result->fetch_array();
if($row[0] > 0) {
echo "<p>Sorry, there is already a list with this name.</p>";
return false;
}
$query = "insert into lists values (NULL,
' " .$details['name']."',
' " .$details['blurb']."')";
$result = $conn->query($query);
return $result;
}
}
This function performs a few validation checks before writing to the database: It checks that all the details were supplied, that the current user is an administrator, and that the list name is unique. If all goes well, the list is added to the lists table in the database.
Uploading a New Newsletter
Finally, we come to the main thrust of this application: uploading and sending newsletters to mailing lists.
When an administrator clicks on the Create Mail button, the create-mail action is activated, as follows:
case 'create-mail':
display_mail_form(get_email());
break;
The administrator then sees the form shown in Figure 30.12.
Figure 30.12 The Create Mail option gives the administrator an interface for uploading newsletter files.
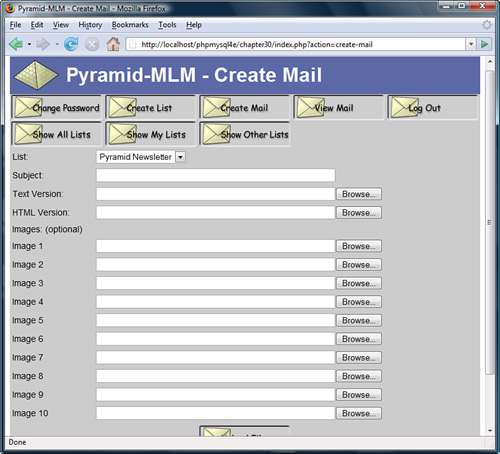
Remember that for this application you are assuming that the administrator has created a newsletter offline in both HTML and text formats and will upload both versions before sending. We chose to implement the application this way so that administrators can use their favorite software to create the newsletters. This makes the application more accessible.
This form has a number of fields for an administrator to fill out. At the top is a drop-down box of mailing lists to choose from. The administrator must also fill in a subject for the newsletter; this is the Subject line for the eventual email.
All the other form fields are file upload fields, which you can see from the Browse buttons next to them. To send a newsletter, an administrator must list both the text and HTML versions of this newsletter (although, obviously, you could change this to suit your needs). There are also a number of optional image fields where an administrator can upload any images that she has embedded in her HTML. Each of these files must be specified and uploaded separately.
The form you see is similar to a regular file upload form except that, in this case, you use it to upload multiple files. This use necessitates some minor differences in the form syntax and in the way you deal with the uploaded files at the other end.
The code for the display_mail_form() function is shown in Listing 30.15.
Listing 30.15 display_mail_form() Function from output_fns.php—This Function Displays the File Upload Form
function display_mail_form($email, $listid=0) {
// display html form for uploading a new message
global $table_width;
$list=get_all_lists();
$lists=sizeof($list);
?>
<table cellpadding="4" cellspacing="0" border="0"
width="<?php echo $table_width; ?>">
<form enctype="multipart/form-data" action="upload.php" method="post">
<tr>
<td bgcolor="#cccccc">List:</td>
<td bgcolor="#cccccc">
<select name="list">
<?php
for($i=0; $i<$lists; $i++) {
echo "<option value="".$list[$i][0].""";
if ($listid== $list[$i][0]) {
echo " selected";
}
echo ">".$list[$i][1]."</option>
";
}
?>
</select>
</td>
</tr>
<tr>
<td bgcolor="#cccccc">Subject:</td>
<td bgcolor="#cccccc">
<input type="text" name="subject"
value="<?php echo $subject; ?>"
size="60" /></td>
</tr>
<tr>
<td bgcolor="#cccccc">Text Version:</td>
<td bgcolor="#cccccc">
<input type="file" name="userfile[0]" size="60"/></td>
</tr>
<tr><td bgcolor="#cccccc">HTML Version:</td>
<td bgcolor="#cccccc">
<input type="file" name="userfile[1]" size="60" /></td>
</tr>
<tr><td bgcolor="#cccccc" colspan="2">Images: (optional)
<?php
$max_images=10;
for($i=0; $i<10; $i++) {
echo "<tr><td bgcolor="#cccccc">Image ".($i+1)." </td>
<td bgcolor="#cccccc"><input type="file"
name="userfile[".($i+2)."]" size="60"/></td>
</tr>";
}
?>
<tr><td colspan="2" bgcolor="#cccccc" align="center">
<input type="hidden" name="max_images"
value="<?php echo $max_images; ?>">
<input type="hidden" name="listid"
value="<?php echo $listid; ?>">
<?php display_form_button('upload-files'), ?>
</td>
</form>
</tr>
lt;/table>
<?php
}
Note that the files you want to upload will have their names entered in a series of inputs, each of type file, and with names that range from userfile[0] to userfile[n]. In essence, you treat these form fields in the same way that you would treat check boxes and name them using an array convention.
If you want to upload an arbitrary number of files through a PHP script and easily handle them as an array, you need to follow this convention.
In the script that processes this form, you actually end up with three arrays. Let’s look at that script next.
Handling Multiple File Upload
You might remember that the file upload code is in a separate file. The complete listing of that file, upload.php, is shown in Listing 30.16.
Listing 30.16 upload.php—This Script Uploads All the Files Needed for a Newsletter
<?php
// this functionality is in a separate file to allow us to be
// more paranoid with it
// if anything goes wrong, we will exit
$max_size = 50000;
include ('include_fns.php'),
session_start();
// only admin users can upload files
if(!check_admin_user()) {
echo "<p>You do not seem to be authorized to use this page.</p>";
exit;
}
// set up the admin toolbar buttons
$buttons = array();
$buttons[0] = 'change-password';
$buttons[1] = 'create-list';
$buttons[2] = 'create-mail';
$buttons[3] = 'view-mail';
$buttons[4] = 'log-out';
$buttons[5] = 'show-all-lists';
$buttons[6] = 'show-my-lists';
$buttons[7] = 'show-other-lists';
do_html_header('Pyramid-MLM - Upload Files'),
display_toolbar($buttons);
// check that the page is being called with the required data
if((!$_FILES['userfile']['name'][0]) ||
(!$_FILES['userfile']['name'][1]) ||
(!$_POST['subject']||!$_POST['list'])) {
echo "<p>Problem: You did not fill out the form fully.
The images are the only optional fields.
Each message needs a subject, text version
and an HTML version.</p>";
do_html_footer();
exit;
}
$list = $_POST['list'];
$subject = $_POST['subject'];
if(!($conn=db_connect())) {
echo "<p>Could not connect to db.</p>";
do_html_footer();
exit;
}
// add mail details to the DB
$query = "insert into mail values (NULL,
' " .$_SESSION['admin_user']."',
' " .$subject."',
' " .$list."',
'STORED', NULL, NULL)";
$result = $conn->query($query);
if(!$result) {
do_html_footer();
exit;
}
//get the id MySQL assigned to this mail
$mailid = $conn->insert_id;
if(!$mailid) {
do_html_footer();
exit;
}
// creating directory will fail if this is not the first message archived
// that’s ok
@mkdir('archive/'.$list, 0700);
// it is a problem if creating the specific directory for this mail fails
if(!mkdir('archive/'.$list.'/'.$mailid, 0700)) {
do_html_footer();
exit;
}
// iterate through the array of uploaded files
$i = 0;
while (($_FILES['userfile']['name'][$i]) &&
($_FILES['userfile']['name'][$i] !='none')) {
echo "<p>Uploading ".$_FILES['userfile']['name'][$i]." - ".
$_FILES['userfile']['size'][$i]." bytes.</p>";
if ($_FILES['userfile']['size'][$i]==0) {
echo "<p>Problem: ".$_FILES['userfile']['name'][$i].
" is zero length";
$i++;
continue;
}
if ($_FILES['userfile']['size'][$i]>$max_size) {
echo "<p>Problem: ".$_FILES['userfile']['name'][$i]." is over "
.$max_size." bytes";
$i++;
continue;
}
// we would like to check that the uploaded image is an image
// if getimagesize() can work out its size, it probably is.
if(($i>1) && (!getimagesize($_FILES['userfile']['tmp_name'][$i]))) {
echo "<p>Problem: ".$_FILES['userfile']['name'][$i].
" is corrupt, or not a gif, jpeg or png.</p>";
$i++;
continue;
}
// file 0 (the text message) and file 1 (the html message) are special cases
if($i==0) {
$destination = "archive/".$list."/".$mailid."/text.txt";
} else if($i == 1) {
$destination = "archive/".$list."/".$mailid."/index.html";
} else {
$destination = "archive/".$list."/".$mailid."/"
.$_FILES['userfile']['name'][$i];
$query = "insert into images values (' " .$mailid."',
' " .$_FILES['userfile']['name'][$i]."',
' " .$_FILES['userfile']['type'][$i]."')";
$result = $conn->query($query);
}
if (!is_uploaded_file($_FILES['userfile']['tmp_name'][$i])) {
// possible file upload attack detected
echo "<p>Something funny happening with "
.$_FILES['userfile']['name'].", not uploading.";
do_html_footer();
exit;
}
move_uploaded_file($_FILES['userfile']['tmp_name'][$i],
$destination);
$i++;
}
display_preview_button($list, $mailid, 'preview-html'),
display_preview_button($list, $mailid, 'preview-text'),
display_button('send', "&id=$mailid");
echo "<p style="padding-bottom: 50px"> </p>";
do_html_footer();
?>
Let’s walk through the steps in Listing 30.16. First, you start a session and check that the user is logged in as an administrator; you don’t want to let anybody else upload files.
Strictly speaking, you should probably also check the list and mailid variables for unwanted characters, but we ignored this for the sake of brevity.
Next, you set up and send the headers for the page and validate that the form was filled in correctly. This step is important here because it’s quite a complex form for the user to fill out.
Then you create an entry for this mail in the database and set up a directory in the archive for the mail to be stored in.
Next comes the main part of the script, which checks and moves each of the uploaded files. This is the part that is different when uploading multiple files. You now have four arrays to deal with; these arrays are called $_FILES['userfile']['name'], $_FILES['userfile']['>tmp_name'], $_FILES['userfile']['size'], and $_FILES['userfile']['type']. They correspond to their similarly named equivalents in a single file upload, except that each of them is an array. The first file in the form is detailed in $_FILES['userfile']['tmp_name'][0], $_FILES['userfile']['name'][0], $_FILES['userfile']['size'][0], and $_FILES['userfile']['type'][0].
Given these three arrays, you perform the usual safety checks and move the files into the archive.
Finally, you give the administrator some buttons that she can use to preview the newsletter she has uploaded before she sends it and a button to send it. You can see the output from upload.php in Figure 30.13.
Figure 30.13 The upload script reports the files uploaded and their sizes.

Previewing the Newsletter
The administrator can preview a newsletter in two ways before sending it. She can access the preview functions from the upload screen if she wants to preview immediately after upload. The alternative is to click on the View Mail button, which will show her all the unsent newsletters in the system, if she wants to preview and send mail later. The View Mail button activates the view-mail action, which triggers the following code:
case 'view-mail':
display_items('Unsent Mail', get_unsent_mail(get_email()),
'preview-html', 'preview-text', 'send'),
break;
As you can see, this code again uses the display_items() function with buttons for the preview-html, preview-text, and send actions.
Note that the Preview buttons do not actually trigger an action but instead link directly to the newsletter in the archive. If you look back at Listings 30.7 and 30.16, you will see that the display_preview_button() function creates these buttons instead of the usual display_button() function.
The display_button() function creates an image link to a script with GET parameters where required; the display_preview_button() function gives a plain link into the archive. This link pops up in a new window, achieved using the target="new" attribute of the HTML anchor tag. You can see the result of previewing the HTML version of a newsletter in Figure 30.14.
Figure 30.14 This preview of an HTML newsletter is shown complete with images.

Sending the Message
Clicking on the Send button for a newsletter activates the send action, which triggers the following code:
case 'send':
send($_GET['id'], $_SESSION['admin_user']);
break;
This code calls the send() function, which you can find in the mlm_fns.php library. This long function, shown in Listing 30.17, is also the point at which you use the Mail_mime class.
Listing 30.17 send() Function from mlm_fns.php—This Function Finally Sends Out a Newsletter
// create the message from the stored DB entries and files
// send test messages to the administrator, or real messages to the whole list
function send($mailid, $admin_user) {
if(!check_admin_user($admin_user)) {
return false;
}
if(!($info = load_mail_info($mailid))) {
echo "<p>Cannot load list information for message ".$mailid."</p>";
return false;
}
$subject = $info['subject'];
$listid = $info['listid'];
$status = $info['status'];
$sent = $info['sent'];
$from_name = 'Pyramid MLM';
$from_address = 'return@address';
$query = "select email from sub_lists where listid = ' " .$listid . " ' ";
$conn = db_connect();
$result = $conn->query($query);
if (!$result) {
echo $query;
return false;
} else if ($result->num_rows==0) {
echo "<p>There is nobody subscribed to list number ".$listid."</p>";
return false;
}
// include PEAR mail classes
include('Mail.php'),
include('Mail/mime.php'),
// instantiate MIME class and pass it the carriage return/line feed
// character used on this system
$message = new Mail_mime("
");
// read in the text version of the newsletter
$textfilename = "archive/".$listid."/".$mailid."/text.txt";
$tfp = fopen($textfilename, "r");
$text = fread($tfp, filesize($textfilename));
fclose($tfp);
// read in the HTML version of the newsletter
$htmlfilename = "archive/".$listid."/".$mailid."/index.html";
$hfp = fopen($htmlfilename, "r");
$html = fread($hfp, filesize($htmlfilename));
fclose($hfp);
// add HTML and text to the mimemail object
$message->setTXTBody($text);
$message->setHTMLBody($html);
// get the list of images that relate to this message
$query = "select path, mimetype from images where
mailid = ' " .$mailid . " ' ";
$result = $conn->query($query);
if(!$result) {
echo "<p>Unable to get image list from database.</p>";
return false;
}
$num = $result->num_rows;
for($i = 0; $i<$num; $i++) {
//load each image from disk
$row = $result->fetch_array();
$imgfilename = "archive/$listid/$mailid/".$row[0];
$imgtype = $row[1];
// add each image to the object
$message->addHTMLImage($imgfilename, $imgtype,
$imgfilename, true);
}
// create message body
$body = $message->get();
// create message headers
$from = '"'.get_real_name($admin_user).'" <'.$admin_user.'>';
$hdrarray = array(
'From' => $from,
'Subject' => $subject);
$hdrs = $message->headers($hdrarray);
// create the actual sending object
$sender =& Mail::factory('mail'),
if($status == 'STORED') {
// send the HTML message to the administrator
$sender->send($admin_user, $hdrs, $body);
// send the plain text version of the message to administrator
mail($admin_user, $subject, $text,
'From: "'.get_real_name($admin_user).'" <'.$admin_user.'>'),
echo "Mail sent to ".$admin_user."";
// mark newsletter as tested
$query = "update mail set status = 'TESTED' where
mailid = ' " .$mailid . " ' ";
$result = $conn->query($query);
echo "<p>Press send again to send mail to whole list.
<div align="center">";
display_button('send', '&id='.$mailid);
echo "</div></p>";
} else if($status == 'TESTED') {
//send to whole list
$query = "select subscribers.realname, sub_lists.email,
subscribers.mimetype
from sub_lists, subscribers
where listid = $listid and
sub_lists.email = subscribers.email";
$result = $conn->query($query);
if(!$result) {
echo "<p>Error getting subscriber list</p>";
}
$count = 0;
// for each subscriber
while ($subscriber = $result->fetch_row()) {
if($subscriber[2]=='H') {
//send HTML version to people who want it
$sender->send($subscriber[1], $hdrs, $body);
} else {
//send text version to people who don’t want HTML mail
mail($subscriber[1], $subject, $text,
'From: "'.get_real_name($admin_user).'"
<'.$admin_user.'>'),
}
$count++;
}
$query = "update mail set status = 'SENT', sent = now()
where mailid = ' " .$mailid . " ' ";
$result = $conn->query($query);
echo "<p>A total of $count messages were sent.</p>";
} else if ($status == 'SENT') {
echo "<p>This mail has already been sent.</p>";
}
}
This function does several different things. It test-mails the newsletter to the administrator before sending it, and it keeps track of this test by tracking the status of a piece of mail in the database. When the upload script uploads a piece of mail, it sets the initial status of that mail to "STORED".
If the send() function finds that a mail has the status "STORED", it will update this status to "TESTED" and send it to the administrator. The status "TESTED" means the newsletter has been test-mailed to the administrator. If the status is "TESTED", it will be changed to "SENT" and sent to the whole list. This means each piece of mail must essentially be sent twice: once in test mode and once in real mode.
The function also sends two different kinds of email: the text version, which it sends using PHP’s mail() function; and the HTML kind, which it sends using the Mail_mime class. We’ve used mail() many times in this book, so let’s look at how to use the Mail_mime class. We do not cover this class comprehensively but instead explain how we used it in this fairly typical application.
You begin by including the class files and creating an instance of the Mail_mime class:
// include PEAR mail classes
include('Mail.php'),
include('Mail/mime.php'),
// instantiate MIME class and pass it the carriage return/line feed
// character used on this system
$message = new Mail_mime("
");
Note that two class files are included here. You use the generic Mail class from PEAR later in this script to actually send the mail. This class comes with your PEAR installation.
The Mail_mime class is used to create the MIME format message that will be sent.
You next read in the text and HTML versions of the mail and add them to the Mail_mime class:
// read in the text version of the newsletter
$textfilename = "archive/".$listid."/".$mailid."/text.txt";
$tfp = fopen($textfilename, "r");
$text = fread($tfp, filesize($textfilename));
fclose($tfp);
// read in the HTML version of the newsletter
$htmlfilename = "archive/".$listid."/".$mailid."/index.html";
$hfp = fopen($htmlfilename, "r");
$html = fread($hfp, filesize($htmlfilename));
fclose($hfp);
// add HTML and text to the mimemail object
$message->setTXTBody($text);
$message->setHTMLBody($html);
You then load the image details from the database and loop through them, adding each image to the piece of mail you want to send:
$num = $result->num_rows;
for($i = 0; $i<$num; $i++) {
//load each image from disk
$row = $result->fetch_array();
$imgfilename = "archive/".$listid."/".$mailid."/".$row[0];
$imgtype = $row[1];
// add each image to the object
$message->addHTMLImage($imgfilename, $imgtype, $imgfilename, true);
}
The parameters you pass to addHTMLImage() are the name of the image file (or you could also pass the image data), the MIME type of the image, the filename again, and true to signify that the first parameter is a filename rather than file data. (If you wanted to pass raw image data, you would pass the data, the MIME type, an empty parameter, and false.) These parameters are a little cumbersome.
At this stage, you need to create the message body before you can set up the message headers. You create the body as follows:
// create message body
$body = $message->get();
You can then create the message headers with a call to the Mail_mime class’s headers() function:
// create message headers
$from = '"'.get_real_name($admin_user).'" <'.$admin_user.'>';
$hdrarray = array(
'From' => $from,
'Subject' => $subject);
Finally, having set up the message, you can send it. To do this, you need to instantiate the PEAR Mail class and pass to it the message you have created. You begin by instantiating the class, as follows:
// create the actual sending object
$sender =& Mail::factory('mail'),
(The parameter 'mail' here just tells the Mail class to use PHP’s mail() function to send messages. You could also use 'sendmail' or 'smtp' as the value for this parameter for the obvious results.)
Next, you send the mail to each of your subscribers. You do this by retrieving and looping through each of the users subscribed to this list and using either the Mail send() or regular mail() depending on the user’s MIME type preference:
if($subscriber[2]=='H') {
//send HTML version to people who want it
$sender->send($subscriber[1], $hdrs, $body);
} else {
//send text version to people who don’t want HTML mail
mail($subscriber[1], $subject, $text,
'From: "'.get_real_name($admin_user).'"
<'.$admin_user.'>'),
}
The first parameter of $sender->send() should be the user’s email address; the second, the headers; and the third, the message body.
That’s it! You have now completed building the mailing list application.
Extending the Project
As usual with these projects, there are many ways you could extend the functionality. You might like to
![]() Confirm membership with subscribers so that people can’t be subscribed without their permission. You typically do this by sending email to their accounts and deleting those who do not reply. This approach also cleans out any incorrect email addresses from the database.
Confirm membership with subscribers so that people can’t be subscribed without their permission. You typically do this by sending email to their accounts and deleting those who do not reply. This approach also cleans out any incorrect email addresses from the database.
![]() Give the administrator powers to approve or reject users who want to subscribe to their lists.
Give the administrator powers to approve or reject users who want to subscribe to their lists.
![]() Add open list functionality that allows any member to send email to the list.
Add open list functionality that allows any member to send email to the list.
![]() Let only registered members see the archive for a particular mailing list.
Let only registered members see the archive for a particular mailing list.
![]() Allow users to search for lists that match specific criteria. For example, users might be interested in golf newsletters. When the number of newsletters grows past a particular size, a search would be useful to find specific ones.
Allow users to search for lists that match specific criteria. For example, users might be interested in golf newsletters. When the number of newsletters grows past a particular size, a search would be useful to find specific ones.
![]() Make the program more efficient to handle a large mailing list. To do this, use a purpose-built mailing list manager such as exmlm that can queue and send messages in a multithreaded way. Calling
Make the program more efficient to handle a large mailing list. To do this, use a purpose-built mailing list manager such as exmlm that can queue and send messages in a multithreaded way. Calling mail() many times in PHP is not very efficient, making a PHP back end unsuitable for large subscriber lists. Of course, you could still build the front end in PHP but have ezmlm handle the grunt work.
Next
In the next chapter, you implement a web forum application that will enable users to have online discussions structured by topic and conversational threads.