
34 Building Web 2.0 Applications with Ajax
THE WORLD WIDE WEB BEGAN AS A SERIES of static pages containing text and links to image, audio, and video files. For the most part, the Web still exists in this state, although many of these pages filled with text and multimedia are dynamically generated through server-side scripting; this is what you have created through the applications in this book. But the advent of Web 2.0 has led developers to attempt to find new methods of user interaction with the web servers and databases that store the information we desire. One increasingly popular method of interaction is through the use of Ajax (Asynchronous JavaScript and XML) programming to enhance interactivity while reducing the time spent retrieving static elements.
In this chapter, we introduce the basics of Ajax programming and provide some sample Ajax elements you can integrate into your applications. This chapter is in no way comprehensive, but it will provide a solid foundation for future work with these technologies. Key topics covered include
![]() The combination of scripting and markup languages used to create Ajax applications.
The combination of scripting and markup languages used to create Ajax applications.
![]() The fundamental parts of an Ajax application, which include issuing a request and interpreting a response from the server.
The fundamental parts of an Ajax application, which include issuing a request and interpreting a response from the server.
![]() How to modify elements of applications from previous chapters to create Ajax-enabled pages.
How to modify elements of applications from previous chapters to create Ajax-enabled pages.
![]() The availability of code libraries and where to find more information.
The availability of code libraries and where to find more information.
What Is Ajax?
Ajax itself is not a programming language or even a single technology. Instead, Ajax programming typically combines client-side JavaScript programming with XML-formatted data transfers and server-side programming via languages such as PHP. Additionally, XHTML and CSS are used for presentation of Ajax-enabled elements.
The result of Ajax programming is typically a cleaner and faster user interface to an interactive application—think of the interfaces to Facebook, Flickr, and other sorts of social networking sites that are at the forefront of Web 2.0. These applications enable the user to perform many tasks without reloading or redrawing entire pages, and this is where Ajax comes into play. Client-side programming invokes a bit of server-side programming, but only in a specific area displayed in the user’s browser, which is then the only area to be redrawn. This action mimics the result of actions in standalone applications, but in a web environment.
A common example is that of working in a spreadsheet application (offline) versus viewing a table full of information on a website. In the offline application, the user could make changes in one cell and have formulas applied to other cells, or the user could sort the data in one column, all without leaving the original interface. In a static web environment, clicking a link to sort a column would require a new request to the server, a new result sent to the browser, and for the page to be redrawn to the user. In an Ajax-enabled web environment, that table could be sorted based on the user’s request, but without reloading the entire page.
In the next few sections, we look at the various technologies that come into play when using Ajax. This information is by no means comprehensive; I provide additional resources throughout.
HTTP Requests and Responses
Hypertext Transfer Protocol, or HTTP, is an Internet standard defining the way web servers and web browsers communicate with each other. When a user requests a web page by typing a URL into the location bar of a web browser, or by following a link, submitting a form, or performing any other task that takes the user to a new destination, the browser makes an HTTP request.
This request is sent to a web server, which returns one of many possible responses. To get an understandable response from the web server, the request has to be properly formed. Knowing the proper formation of requests and responses is critical when using Ajax, because it is the responsibility of the developer to write HTTP requests and expect certain results within the Ajax application.
When making an HTTP request, the client sends information in the following format:
![]() The opening line, which contains the method, the path to the resource, and the HTTP version in use, such as the following:
The opening line, which contains the method, the path to the resource, and the HTTP version in use, such as the following:
GET http://server/phpmysql4e/chapter34/test.html HTTP/1.1
Other common methods include POST and HEAD.
![]() Optional header lines, in the format parameter: value, such as:
Optional header lines, in the format parameter: value, such as:
User-agent: Mozilla/5.0 (Windows; U; Windows NT 6.0; en-US; rv:1.9.0.1)
Gecko/2008070208 Firefox/3.0.1
and/or
Accept: text/plain, text/html
For a list of HTTP headers, see http://www.w3.org/Protocols/rfc2616/.
![]() A blank line
A blank line
![]() An optional message body
An optional message body
After making an HTTP request, the client should receive an HTTP response.
The format of an HTTP response is as follows:
![]() The opening line, or status line, which contains the HTTP version in use and a response code, such as:
The opening line, or status line, which contains the HTTP version in use and a response code, such as:
HTTP/1.1 200 OK
The first digit of the status code (in this case the 2 in 200) offers a clue to the response. Status codes beginning with 1 are informational, 2 represents success, 3 represents redirection, 4 represents a client error such as 404 for a missing item, and 5 represents a server error such as 500 for a malformed script.
For a list of HTTP status codes, see http://www.w3.org/Protocols/rfc2616/.
![]() Optional header lines, in the format parameter: value, such as:
Optional header lines, in the format parameter: value, such as:
Server: Apache/2.2.9
Last-Modified: Fri, 1 Aug 2008 15:34:59 GMT
DHTML and XHTML
Dynamic HTML, or DHTML, is the term used for the combination of static HTML, Cascading Style Sheets (CSS), and JavaScript to work with the Document Object Model (DOM) to alter the appearance of seemingly static web page after all elements have been loaded. At first glance this functionality seems quite similar to an Ajax-enabled site, and in some ways it is. The difference lies in the asynchronous connectivity between the client and server—the “A” in Ajax.
Although a DHTML-driven site may show dynamic movement in navigational drop-downs or in form elements that change depending on the selections previously made, all the data for these elements have already been retrieved. For instance, if you have designed a DHTML site that that shows Section 1 of some text when the user rolls over a link or button, and shows Section 2 of some text when the user rolls over yet another link or button, the text for both Section 1 and Section 2 will already have been loaded by the browser. The developer will have used a bit of JavaScript that sets the CSS attribute for visibility to visible or not, depending on the actions of the user’s mouse. In an Ajax-enabled site, it is likely that the area reserved for Section 1 or Section 2 text will be filled based on the result of a remote scripting call to the server while the rest of the site remains static.
The Extensible Hypertext Markup Language, or XHTML, functions similarly to HTML and DHTML in that all three are used to mark up content for display via a client device (web browser, phone, other handheld device) and allow for the integration of CSS for additional control of the presentation. The differences between XHTML and HTML include the manner in which XHTML conforms to XML syntax and the manner in which XHTML can be interpreted by XML tools in addition to the standard web-browsing tools.
XHTML is written entirely in lowercase for elements (for example, <head></head> instead of <HEAD></HEAD>) and attributes (for example, href instead of HREF). Additionally, all attribute values must be enclosed in either single or double quotation marks, and all elements must be explicitly closed—either by the end tag in a tag pair or in singleton elements such as the <img /> tag or <br/> tag.
For more information on XHTML, see http://www.w3.org/TR/xhtml1/.
Cascading Style Sheets (CSS)
Cascading Style Sheets (CSS) are used to further refine the display of static, dynamic, and Ajax-enabled pages. Using CSS allows the developer to change the definition of a tag, class, or ID within one document (the style sheet) and have the changes take effect immediately in all pages that link to that style sheet. These definitions, or rules, follow a specific format using selectors, declarations, and values.
![]() Selectors are the names of HTML tags, such as
Selectors are the names of HTML tags, such as body or h1 (heading level 1).
![]() Declarations are the style sheet properties themselves, such as
Declarations are the style sheet properties themselves, such as background or font-size.
![]() Values are given to declarations, such as
Values are given to declarations, such as white or 12pt.
Thus, the following is a style sheet entry that defines the body of a document as white, and all text in the document as a normal weight, 12 point, Verdana, or sans-serif font:
body {
background: white [or #fff or #ffffff];
font-family: Verdana, sans-serif;
font-size: 12pt;
font-weight: normal;
}
These values will be in effect for the page until an element is rendered that has its own style defined in the style sheet. For instance, when an h1 is encountered, the client will display the h1 text however it has been defined—probably with a font size greater than 12pt and with a font-weight value of bold.
In addition to defining selectors, you can also define your own classes and IDs within a style sheet. Using classes (which can be used on multiple elements in a page) or IDs (which can be used only once within a page), you can further refine the display and functionality of elements displayed within your website. This refinement is especially important in Ajax-enabled sites because you use predefined areas of your document to display new information retrieved from the remote scripting action.
Classes are defined similarly to selectors—curly braces around the definitions, definitions separated by semicolons. Following is the definition of a class called ajaxarea:
.ajaxarea {
width: 400px;
height: 400px;
background: #fff;
border: 1px solid #000;
}
In this instance, the ajaxarea class, when applied to a div container, produces a 400-pixel wide by 400-pixel high square with a white background and a thin black border. The usage is as follows:
<div class="ajaxarea">some text</div>
The most common method of using style sheets is to create a separate file with all the style definitions in it, and then link to it in the head element of your HTML document, like so:
<head>
<link rel="stylesheet" href="the_style_sheet.css" type="text/css">
</head>
For more information on CSS, see http://www.w3.org/TR/CSS2/.
Client-Side Programming
Client-side programming occurs within your web browser after a page has been entirely retrieved from a web server. All the programming functions are included in the data retrieved from the web server and are waiting to be acted upon. Common actions performed on the client side include showing or hiding sections of text or images, changing the color, size, or location of text or images, performing calculations, and validating user input in a form before sending the form to be processed on the server side.
The most common client-side scripting language is JavaScript—the “J” in Ajax. VBScript is another example of a client-side scripting language, although it is Microsoft-specific and thus not a good choice for an open environment in which all manner of operating systems and web browsers may be in use.
Server-Side Programming
Server-side programming includes all scripts that reside on a web server and are interpreted or compiled before sending a response to the client. Server-side programming typically includes server-side connections to databases; requests and responses to and from a database are thus part of the scripts themselves.
These scripts could be written in any server-side language, such as Perl, JSP, ASP, or PHP—the latter being the language used throughout the examples in this chapter for obvious reasons. Because the response of a server-side script is typically to display data marked up in some variant of standard HTML, the end-user environment is of little concern.
XML and XSLT
You were introduced to XML in Chapter 33, “Connecting to Web Services with XML and SOAP,” which included basic information on the format, structure, and use of XML. In the context of Ajax applications, XML—the “X” in Ajax—is used to exchange data; XSLT is used to manipulate the data. The data itself is either sent through or retrieved from the Ajax application you create.
For more information on XML, see http://www.w3.org/XML/, and for more information on XSL, see http://www.w3.org/TR/xslt20/.
Fundamental Ajax
Now that you’ve learned the possible constituent parts of an Ajax application, this section will put those pieces together to produce a working example of this technology in action. Keep at the forefront of your mind one of the main reasons for using Ajax in the first place: to produce interactive sites that respond to user actions but without the interruption that comes from refreshing an entire page.
To achieve the this goal, an Ajax application includes an extra layer of processing that occurs between the requested web page and the web server responsible for producing that page. This layer is commonly referred to as an Ajax Framework (also an Ajax Engine). The framework exists to handle requests between the user and the web server, and it communicates the requests and responses without additional actions such as redrawing a page and without interruption to whatever actions the user is currently performing, such as scrolling, clicking, or reading a block of text.
In the next few sections, you’ll learn how the different parts of an Ajax application function together to produce a streamlined user experience.
The XMLHTTPRequest Object
Earlier in this chapter, you learned about HTTP requests and responses and also how client-side programming can be used within an Ajax application. The specific JavaScript object called XMLHTTPRequest is crucial when connecting with the web server and making a request without entirely reloading the original page.
The XMLHTTPRequest object is often referred to as the “guts” of any Ajax application given that it is the gateway between the client request and the server response. Although you will soon learn the basics of creating and using an instance of the XMLHTTPRequest object, see http://www.w3.org/TR/XMLHttpRequest/ for a more detailed understanding.
The XMLHTTPRequest object has several attributes, as shown in Table 34.1.
Table 34.1 Attributes of the XMLHTTPRequest Object

The XMLHTTPRequest object has several methods, as shown in Table 34.2.
Table 34.2 Methods of the XMLHTTPRequest Object

Before using the functionality of XMLHTTPRequest, you must first create an instance of it. This necessitates a bit more than simply typing
var request = new XMLHTTPRequest();
Although the preceding snippet of JavaScript would work on non-Internet Explorer browsers, ideally you want your code to work for everyone. Thus, the following JavaScript is a solution for creating a new instance of the XMLHTTPRequest object on all browsers:
function getXMLHTTPRequest() {
var req = false;
try {
/* for Firefox */
req = new XMLHttpRequest();
} catch (err) {
try {
/* for some versions of IE */
req = new ActiveXObject("Msxml2.XMLHTTP");
} catch (err) {
try {
/* for some other versions of IE */
req = new ActiveXObject("Microsoft.XMLHTTP");
} catch (err) {
req = false;
}
}
}
return req;
}
If you place this bit of JavaScript in a file called ajax_functions.js and place it on your web server, you have the beginning of an Ajax library of functions.
When you want to create an instance of XMLHTTPRequest in your Ajax application, you include the file that contains your functions:
<script src="ajax_functions.js" type="text/javascript"></script>
And then invoke the new object and carry on with your coding:
<script type="text/javascript">
var myReq = getXMLHTTPRequest();
</script>
In the next section you’ll add the next piece of the puzzle to your Ajax functions file.
Communicating with the Server
With the example in the preceding section, all you have achieved is the creation of a new XMLHTTPRequest object; you haven’t actually performed a communicative task with it. In the following example, you’ll create a JavaScript function that sends a request to the server, specifically to a PHP script called servertime.php.
function getServerTime() {
var thePage = 'servertime.php';
myRand = parseInt(Math.random()*999999999999999);
var theURL = thePage +"?rand="+myRand;
myReq.open("GET", theURL, true);
myReq.onreadystatechange = theHTTPResponse;
myReq.send(null);
}
The first line in the function creates a variable called thePage with a value of servertime.php. This is the name of the PHP script that will reside on your server.
The next line may seem out of place, as it creates a random number. The obvious question is “What does a random number have to do with getting the server time?” The answer is that it doesn’t have any direct effect on the script itself. The reason the random number is created, and then appended to the URL in the third line of the function, is to avoid any problems with the browser (or a proxy) caching the request. If the URL were simply http://yourserver/yourscript.php, the results might be cached. However, if the URL is http://yourserver/yourscript.php?rand=randval, there isn’t anything to cache because the URL will be different every time, although the functionality of the underlying script will not change.
The final three lines of the function use three methods (open, onreadystatechange, and send) of the instance of the XMLHTTPRequest object created by calling getXMLHTTPRequest() as seen in the previous section.
In the line using the open method, the parameters are the type of request (GET), the URL (theURL), and a value of true indicating that the request is to be asynchronous.
In the line using the onreadystatechange method, the function will invoke a new function, theHTTPResponse, when the state of the object changes.
In the line using the send method, the function sends NULL content to the server-side script.
At this point, create a file called servertime.php containing the code in Listing 34.1.
Listing 34.1 The Contents of servertime.php
<?php
header('Content-Type: text/xml'),
echo "<?xml version="1.0" ?>
<clock>
<timestring>It is ".date('H:i:s')." on ".date('M d, Y').".</ timestring>
</clock>";
?>
This script gets the current server time, through the use of the date() function in PHP, and returns this value within an XML-encoded string. Specifically, the date() function is called twice; once as date('H:i:s'), which returns the hours, minutes, and seconds of the current server time based on the 24-hour clock, and once as date('M d, Y'), which returns the month, date, and year the script was called.
The result string itself will look like the following, with the items in brackets replaced by the actual values:
<?xml version=“1.0” ?>
<clock>
<timestring>
It is [time] on [date].
</timestring>
</clock>
In the next section, you’ll create the remaining function, theHTTPResponse(), and do something with the response from the PHP script on the server.
Working with the Server Response
The getServerTime() function in the preceding section is ready to invoke theHTTPResponse() and do something with the string that is returned. The following example interprets the response and gets a string to display to the end user:
function theHTTPResponse() {
if (myReq.readyState == 4) {
if(myReq.status == 200) {
var timeString =
myReq.responseXML.getElementsByTagName("timestring")[0];
document.getElementById('showtime').innerHTML =
timeString.childNodes[0].nodeValue;
}
} else {
document.getElementById('showtime').innerHTML =
'<img src="ajax-loader.gif"/>';
}
}
The outer ifelse statement checks the state of the object; if the object is in a state other than 4 (completed), an animation is displayed (<img src="ajax-loader.gif"/>). However, if myReq is in a readystate of 4, the next check is if the status from the server is 200 (OK).
If the status is 200, a new variable is created: timeString. This variable is assigned the value stored in the timestring element of the XML data sent from the server-side script, which is retrieved by using the getElementByTagname method of the response from the object:
var timeString = myReq.responseXML.getElementsByTagName("timestring")[0];
The next step is to display that value in some area defined by CSS in the HTML file. In this case, the value is going to be displayed in the document element defined as showtime:
document.getElementById('showtime').innerHTML =
timeString.childNodes[0].nodeValue;
At this point, your ajax_functions.js script is complete; see Listing 34.2.
Listing 34.2 The Contents of ajax_functions.js
function getXMLHTTPRequest() {
var req = false;
try {
/* for Firefox */
req = new XMLHttpRequest();
} catch (err) {
try {
/* for some versions of IE */
req = new ActiveXObject("Msxml2.XMLHTTP");
} catch (err) {
try {
/* for some other versions of IE */
req = new ActiveXObject("Microsoft.XMLHTTP");
} catch (err) {
req = false;
}
}
}
return req;
}
function getServerTime() {
var thePage = 'servertime.php';
myRand = parseInt(Math.random()*999999999999999);
var theURL = thePage +"?rand="+myRand;
myReq.open("GET", theURL, true);
myReq.onreadystatechange = theHTTPResponse;
myReq.send(null);
}
function theHTTPResponse() {
if (myReq.readyState == 4) {
if(myReq.status == 200) {
var timeString =
myReq.responseXML.getElementsByTagName("timestring")[0];
document.getElementById('showtime').innerHTML =
timeString.childNodes[0].nodeValue;
}
} else {
document.getElementById('showtime').innerHTML =
'<img src="ajax-loader.gif"/>';
}
}
In the next section, you will finalize the HTML and put all the pieces together to create a single Ajax application.
Putting It All Together
As you learned earlier in this chapter, Ajax is a combination of technologies. In the preceding sections you have used JavaScript and PHP—client-side and server-side programming—to make an HTTP request and retrieve a response. The missing piece of the technological puzzle is the display portion: using XHTML and CSS to produce the result for the user to see.
Listing 34.3 shows the contents of ajaxServerTime.html, the file that contains the style sheet entries and the calls to the JavaScript that invokes the PHP script and then retrieves the response from the server.
Listing 34.3 The Contents of ajaxServerTime.html
<!DOCTYPE html PUBLIC “-//W3C//DTD XHTML 1.0 Transitional//EN”
"http://www.w3.org/TR/xhtml1/DTD/xhtml1-transitional.dtd">
<html xmlns=""http://www.w3.org/1999/xhtml" xml:lang="en" dir="ltr" lang="en">
<head>
<style>
body {
background: #fff;
font-family: Verdana, sans-serif;
font-size: 12pt;
font-weight: normal;
}
.displaybox {
width: 300px;
height: 50px;
background-color:#ffffff;
border:2px solid #000000;
line-height: 2.5em;
margin-top: 25px;
font-size: 12pt;
font-weight: bold;
}
</style>
<script src="ajax_functions.js" type="text/javascript"></script>
<script type="text/javascript">
var myReq = getXMLHTTPRequest();
</script>
</head>
<body>
<div align="center">
<h1>Ajax Demonstration</h1>
<p align="center">Place your mouse over the box below
to get the current server time.<br/>
The page will not refresh; only the contents of the box
will change.</p>
<div id="showtime" class="displaybox"
onmouseover="javascript:getServerTime();"></div>
</div>
</body>
</html>
The listing begins with the XHTML declaration, followed by the opening <html> and <head> tags. Within the head area of the document, place the style sheet entries within the <style></style> tag pair. Only two are defined here: the format of everything within the body tag, and the format of the element using the displaybox class. The displaybox class is defined as a 300-pixel wide, 50-pixel high white box with a black border. Additionally, everything in it will be in a bold 12-point font.
After the style sheet entries, but still within the head element, is the link to the JavaScript library of functions:
<script src="ajax_functions.js" type="text/javascript"></script>
This is followed by the creation of a new XMLHTTPRequest object called myReq:
<script type="text/javascript">
var myReq = getXMLHTTPRequest();
</script>
The head element is then closed and the body element begins. Within the body element, only XHTML is present. Within a centered div element, you will find the text for the page heading (Ajax Demonstration) as well as the instructions for users to place their mouse over the box below to get the current server time.
It is within the attributes of the div element with the id of showtime that the action really takes place, specifically within the onmouseover event handler:
<div id=""howtime" class="displaybox"
onmouseover="javascript:getServerTime();"></div>
The use of onmouseover means that when the user’s mouse enters the area defined by the div called showtime, the JavaScript function getServerTime() is invoked. Invoking this function initiates the request to the server, the server responds, and the resulting text appears within this div element.
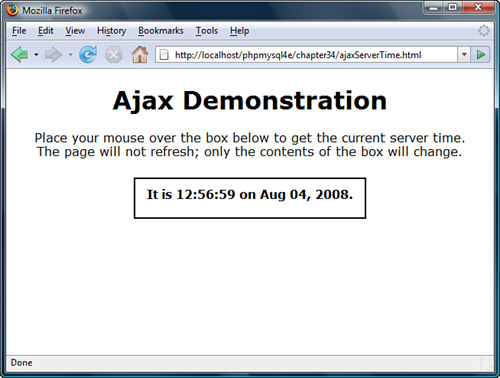
Figures 34.1, 34.2, and 34.3 show the sequence of events when these scripts are in action. At no time does the ajaxServerTime.html reload; only the contents of the div called showtime.
Figure 34.1 Initially loading ajaxServerTime.html shows instructions and a blank box.

Figure 34.2 The user mouses over the area and starts the request; the icon indicates that the object is loading.

Figure 34.3 The result from the server is displayed in the div called show-time; mousing over the area again results in another invocation of the script.
Adding Ajax Elements to Earlier Projects
None of the projects in Part V of this book, “Building Practical PHP and MySQL Projects,” are Ajax-enabled out of the box. Each project consists of a series of form submissions and page reloads. Although the pages contain dynamic elements, none are of the streamlined user experience we expect in the era of Web 2.0.
However, including Ajax elements in these projects would have shifted the focus away from the basics of creating web applications with PHP and MySQL. In other words, you have to learn to walk before you can run. But now that you know how to run—or at least jog a little—you can begin to think about modifying elements of these applications to include Ajax, or you can begin to think about including Ajax elements in new applications you might create.
The thought process of the Ajax developer goes something like this: What are the distinct user actions, and what page events will invoke those actions? For example, do you want your users always to press a button element to submit a form and move on to the next step, or can simply changing the focus on a form element (text field, option button, check box) invoke an asynchronous request to the web server? After you decide the types of actions you want to include, you can begin writing the JavaScript functions that invoke PHP scripts that handle the request to and result from the server.
In the following sections you’ll add some Ajax elements to existing scripts created previously in this book.
Adding Ajax Elements to PHPbookmark
In Chapter 27, “Building User Authentication and Personalization,” you created an application called PHPbookmark. This application requires user registration and login before saving bookmarks and getting recommendations for bookmarks you might like that have been saved by other users.
Because this application is already created and consists of several tightly connected PHP scripts and libraries of functions, the first step is to think of how to add additional files into the mix—whether they are style sheets, JavaScript functions, or PHP to handle actions on the server side. The answer is simple: create a separate file for styles and a separate file for all JavaScript functions. Then add a snippet of code to the existing PHP scripts from Chapter 27 to include these external files, when necessary, and the invocation of the JavaScript functions themselves. Any additional PHP scripts you create will also be kept separate from the existing application files.
After determining how to manage your new files, it’s time to determine which user functions can get the Ajax treatment. Although the user registration and login portion of the application could be a prime candidate for becoming Ajax-enabled, in the interest of space we have selected the functionality surrounding adding and editing the bookmarks stored by the user.
You will also make changes to the existing application files. It’s a good idea to copy the files from Chapter 27 into a new directory for use with this chapter; any changes you make will then be uploaded into this new directory rather than a working version of PHPbookmark you might already have installed.
Creating Additional Files
As mentioned previously, you will add new files into the existing application structure. Although you will fill in these files as you go through the sections that follow, it is a good idea to get your bearings before you continue.
Assume you will have at least two new files: a style sheet and a library of JavaScript functions. Create these two files now; call them new_ss.css and new_ajax.js. The new style sheet (new_ss.css) can be empty, because we haven’t yet defined new styles, but the new_ajax.js file should contain the getXMLHTTPRequest() function you created earlier in the chapter to create a new instance of the XMLHTTPRequest object in all browsers. Although you will be adding to these files, you can upload them as is to your web server at this time.
The next step is to add a link to both these files in one of the existing display functions for the PHPbookmark application. Doing so will ensure that the styles from the style sheet are always available, as are the functions from the JavaScript library. If you recall from Chapter 27, the function that controls the output of the head element of the HTML (among other things) is called do_html_header(), and it resides in the output_fns.php file.
A new version of this function is shown in Listing 34.4.
Listing 34.4 Amended Version of do_html_header() Containing Links to the New Style Sheet and JavaScript Function Libraries
function do_html_header($title) {
// print an HTML header
?>
<html>
<head>
<title><?php echo $title;?></title>
<style>
body { font-family: Arial, Helvetica, sans-serif; font-size: 13px; }
li, td { font-family: Arial, Helvetica, sans-serif; font-size: 13px; }
hr { color: #3333cc; }
a { color: #000000; }
</style>
<link rel="stylesheet" type="text/css" href="new_ss.css"/>
<script src="new_ajax.js" type="text/javascript"></script>
</head>
<body>
<img src="bookmark.gif" alt="PHPbookmark logo" border="0"
align="left" valign="bottom" height="55" width="57" />
<h1>PHPbookmark</h1>
<hr />
<?php
if($title) {
do_html_heading($title);
}
}
If you upload the new style sheet, the JavaScript functions library, the output_fns.php file, and open any page in the PHPbookmark system, the new files should be included without error. Next, you’ll actually put additional styles and scripts into these files and create some Ajax functionality.
Adding Bookmarks the Ajax Way
Currently, adding a bookmark occurs when a user enters the bookmark URL and presses the form submission button. The act of pressing the form submission button invokes another PHP script, which adds the bookmark, returns the user to the list of bookmarks, and shows that the new bookmark has been added. In other words, pages are reloaded.
The Ajax way is to present the form for adding a bookmark, but instead of the form submission button requiring more page loads, it invokes a JavaScript function in the background that calls a PHP script to add the item to the database and return the response to the user—all without leaving the page that has already been loaded. This new functionality first requires a change to the display_add_bm_form() function in output_fns.php.
Listing 34.5 shows the amended function. We have removed the form action, added an id value to the input field, and changed the attributes of the button element. We have also added a call to the getXMLHTTPRequest() JavaScript function.
Listing 34.5 Amended Version of display_add_bm_form()
function display_add_bm_form() {
// display the form for people to enter a new bookmark in
?>
<script type="text/javascript">
var myReq = getXMLHTTPRequest();
</script>
<form>
<table width="250" cellpadding="2" cellspacing="0" bgcolor="#cccccc">
<tr><td>New BM:</td>
<td><input type="text" name="new_url" name="new_url" value="http://"
size="30" maxlength="255"/></td></tr>
<tr><td colspan="2" align="center">
<input type="button" value="Add bookmark"
onClick=" javascript:addNewBookmark();"/></td></tr>
</table>
</form>
<?php
}
Take a closer look at the button element:
<input type="button" value="Add bookmark"
onClick=" javascript:addNewBookmark();"/>
When the button is clicked, the onClick event handler invokes the addNewBookmark() JavaScript function. This function makes a request to the server, specifically to a PHP script that attempts to insert the record into the database. The code for this function is found in Listing 34.6.
Listing 34.6 The JavaScript Function addNewBookmark()
function addNewBookmark() {
var url = "add_bms.php";
var params = "new_url=" + encodeURI(document.getElementById('new_url').value);
myReq.open("POST", url, true);
myReq.setRequestHeader("Content-type", "application/x-www-form-urlencoded");
myReq.setRequestHeader("Content-length", params.length);
myReq.setRequestHeader("Connection", "close");
myReq.onreadystatechange = addBMResponse;
myReq.send(params);
}
This function should look similar to the getServerTime() function used earlier in this chapter. The process is quite similar: create variables, send the data to a PHP script, and invoke a function to handle the response from the server.
The following line creates a name/value pair from the name of the form field and the value entered by the user:
var params = "new_url=" + encodeURI(document.getElementById('new_url').value);
The value of params is then sent to the back-end PHP script in the last line of the function:
myReq.send(params);
Before the values are sent, three request headers are also sent so that the server knows how to handle the data sent in the POST request:
myReq.setRequestHeader("Content-type", "application/x-www-form-urlencoded");
myReq.setRequestHeader("Content-length", params.length);
myReq.setRequestHeader("Connection", "close");
The next step in this process is to create the JavaScript function to handle the server response; we have called this addBMResponse:
myReq.onreadystatechange = addBMResponse;
Again, this code is similar to the theHTTPResponse function created earlier in the chapter. The code for addBMResponse is seen in Listing 34.7.
Listing 34.7 The JavaScript Function addBMResponse()
function addBMResponse() {
if (myReq.readyState == 4) {
if(myReq.status == 200) {
result = myReq.responseText;
document.getElementById('displayresult').innerHTML = result;
} else {
alert('There was a problem with the request.'),
}
}
}
This JavaScript function first checks the state of the object; if it has completed its process, it next checks that the response code from the server was 200 (OK). If the response code is not 200, an alert is shown with the words “There was a problem with the request.” Any other responses will come from the execution of the add_bms.php script and will be displayed in a div with an id value of displayresult. For the moment, the displayresult id is defined in the new_ss.css style sheet as follows (a white background):
#displayresult {
background: #fff;
}
The following line of code has been added after the closing form tag in the PHP function display_add_bm_form(); this is the div in which the result from the server will be displayed to the user.
<div id="displayresult"></div>
Next, you will have to make modifications to the existing add_bms.php code.
Additional Modifications to Existing Code
If you were to attempt to add a bookmark without modifying anything in the add_bms.php script, the actual process of checking user permissions and adding a bookmark would work just fine. However, the result would be the monstrosity seen in Figure 34.4, which includes the duplication of the title, logo, and footer links, as well as other issues with the application display.
Figure 34.4 Adding a bookmark before editing the add_bms.php script.

In the non-Ajax version of the PHPbookmark application, remember that the form is one page, the submission result is another, and all page elements are reloaded at all times. However, in this Ajax-enabled environment, you want to add a new bookmark, get the result from the server, and continue on to add more bookmarks (or not) without reloading any page elements. This new functionality necessitates some changes to the add_bms.php code. The original code is shown in Listing 34.8.
Listing 34.8 The Original PHP Code in add_bms.php
<?php
require_once('bookmark_fns.php'),
session_start();
//create short variable name
$new_url = $_POST['new_url'];
do_html_header('Adding bookmarks'),
try {
check_valid_user();
if (!filled_out($_POST)) {
throw new Exception('Form not completely filled out.'),
}
// check URL format
if (strstr($new_url, 'http://') === false) {
$new_url = 'http://'.$new_url;
}
// check URL is valid
if (!(@fopen($new_url, 'r'))) {
throw new Exception('Not a valid URL.'),
}
// try to add bm
add_bm($new_url);
echo 'Bookmark added.';
// get the bookmarks this user has saved
if ($url_array = get_user_urls($_SESSION['valid_user'])) {
display_user_urls($url_array);
}
}
catch (Exception $e) {
echo $e->getMessage();
}
display_user_menu();
do_html_footer();
?>
The first line of the script brings all the items of the bookmark_fns.php file into play. If you look at the contents of bookmark_fns.php you will notice that it calls yet another series of files:
<?php
// We can include this file in all our files
// this way, every file will contain all our functions and exceptions
require_once('data_valid_fns.php'),
require_once('db_fns.php'),
require_once('user_auth_fns.php'),
require_once('output_fns.php'),
require_once('url_fns.php'),
?>
Although you may or may not need all the items in these files in the Ajax-enabled version of the bookmark addition sequence, the comment at the beginning says it all—every file will contain all our functions and exceptions. In this situation, as you are moving from a series of dynamic pages to all-in-one Ajax-enabled functionality, it is better to have a few extra elements than to remove core functionality before you are sure you don’t need it. Keep the first line of add_bms.php as is.
The second line, which begins or continues a user session, should also remain as is; even in the Ajax-enabled version of this action you will want some sense of security intact. Similarly, the third line can remain as well. This line gives the shortname $new_url to the POST value sent through the request:
$new_url = $_POST['new_url'];
Finally, you are at the point in which you can remove something, namely this line:
do_html_header('Adding bookmarks'),
Because you are already on a page (add_bm_form.php) that contains HTML header information, there is no need to repeat it again—you’re not moving to a different page. This repetition produces the two sets of header graphics and titles that you see in Figure 34.4. For similar reasons, you can eliminate two lines at the end of add_bms.php as well:
display_user_menu();
do_html_footer();
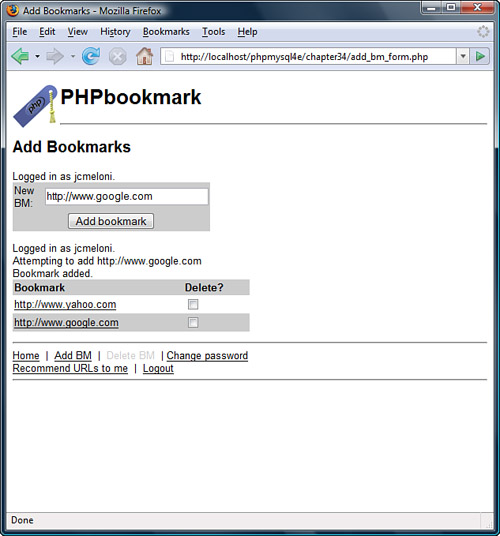
If you remove these elements, upload the file to the server, and attempt to add another bookmark, the results will be closer to what you expect, although there are still some changes to be made. Figure 34.5 shows the application display with changes made in the code to this point.
We still have a duplicate message regarding the status of the user as “logged in,” but the issues are not nearly as unappealing as before. The next step is to remove the duplicate messages and to change some of the other exceptions-related functionality so that it makes sense in an Ajax-environment.
Figure 34.5 Adding a bookmark after the first pass of editing the add_bms.php script.
To remove the duplicate message regarding the user’s login name, delete this line from add_bms.php:
check_valid_user();
The check for valid user will have already been done when the add_bms_form.php page was loaded; you wouldn’t be on the page that invokes Ajax functionality if you weren’t found to be a valid user.
The next step is to remove the outer try block and the exception handling. The reason for this is because you want the script to get to the end in which the list of URLs already stored is displayed for the user. This means some adjustments will be made along the way to reintroduce error text as necessary. Listing 34.9 shows an amended version of add_bms.php.
Listing 34.9 An Amended Version of add_bms.php
<?php
require_once('bookmark_fns.php'),
session_start();
//create short variable name
$new_url = $_POST['new_url'];
//check that form has been completed
if (!filled_out($_POST)) {
//has not
echo "<p class="warn">Form not completely filled out.</p>";
} else {
// has; check and fix URL format if necessary
if (strstr($new_url, 'http://') === false) {
$new_url = 'http://'.$new_url;
}
// continue on to check URL is valid
if (!(@fopen($new_url, 'r'))) {
echo "<p class="warn">Not a valid URL.</p>";
} else {
//it is valid, so continue to add it
add_bm($new_url);
echo "<p>Bookmark added.</p>";
}
}
// regardless of the status of the current request
// get the bookmarks this user has already saved
if ($url_array = get_user_urls($_SESSION['valid_user'])) {
display_user_urls($url_array);
}
?>
This version of the script still follows a logical path through possible events, but displays an appropriate error message without duplicating any other page elements.
The first check is whether the form itself has been filled out. If it has not, an error message is displayed between the addition form and the user’s current list of stored bookmarks. You can see this response in Figure 34.6.
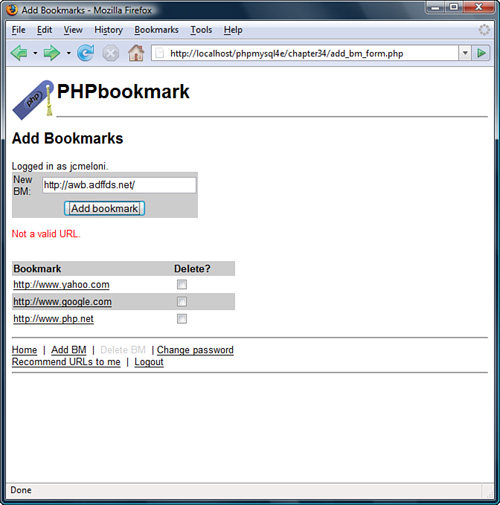
The second check is whether the URL is properly formed; if it is not, the string is transformed into a proper URL and moves on to the next step. In the next step, a socket is opened and the URL is tested for validity. If it fails, an error message is displayed between the addition form and the user’s current list of stored bookmarks. However, if the URL is valid, it is added to the user’s existing list of stored URLs. In Figure 34.7 you can see the response when attempting to add an invalid URL.
Figure 34.6 Attempting to add a blank value.
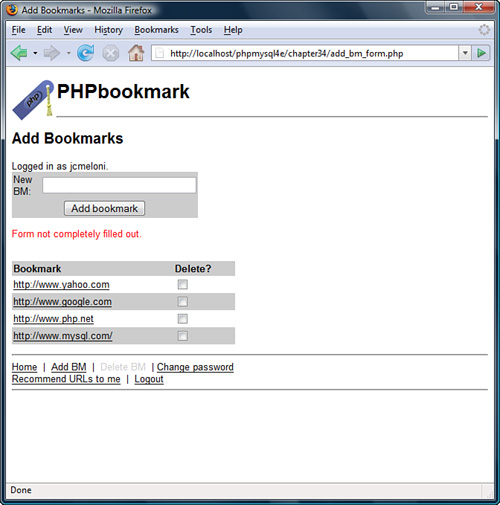
Figure 34.7 Attempting to add an invalid URL.
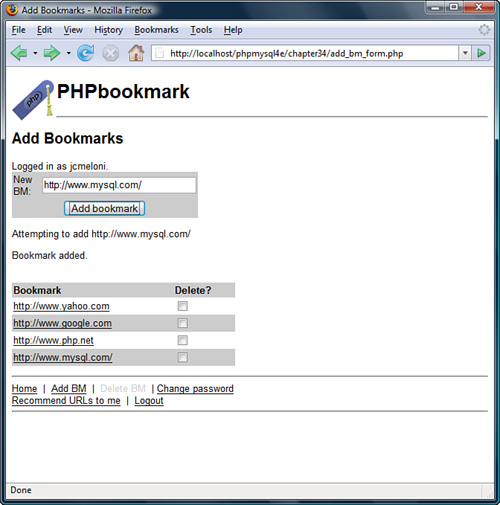
Finally, and regardless of the errors in attempting to add a URL, the user’s existing bookmarks are displayed. You can see this result in Figure 34.8.
Figure 34.8 Success—a valid URL has been added.
Although the core functionality around adding a bookmark has been successfully Ajax-enabled, a few elements still need some work. For instance, the add_bm() function in the url_fns.php file contains some exceptions that could be handled differently to produce an error message in this new system. Listing 34.10 shows the existing add_bm() function.
Listing 34.10 Existing add_bm() Function in url_fns.php
function add_bm($new_url) {
// Add new bookmark to the database
echo "Attempting to add ".htmlspecialchars($new_url)."<br/>";
$valid_user = $_SESSION['valid_user'];
$conn = db_connect();
// check not a repeat bookmark
$result = $conn->query("select * from bookmark
where username='$valid_user'
and bm_URL=' " .$new_url."'");
if ($result && ($result->num_rows>0)) {
throw new Exception('Bookmark already exists.'),
}
// insert the new bookmark
if (!$conn->query("insert into bookmark values
(' " .$valid_user."', ' " .$new_url."')")) {
throw new Exception('Bookmark could not be inserted.'),
}
return true;
}
In this situation, all we want to do is change the exceptions to produce error messages and continue the processing (display). This can be done by changing the two distinct if blocks to the following:
if ($result && ($result->num_rows>0)) {
echo "<p class="warn">Bookmark already exists.</p>";
} else {
//attempt to add
if (!$conn->query("insert into bookmark values
(' " .$valid_user."', ' " .$new_url."')")) {
echo "<p class="warn">Bookmark could not be inserted.</p>";
} else {
echo "<p>Bookmark added.</p>";
}
}
This version of the script still follows a logical path through possible events and displays appropriate error messages. After checking to see whether the bookmark already exists for the user, either an error message is displayed between the addition form and the user’s current list of stored bookmarks, or the script attempts to add the bookmark.
If the bookmark cannot be added, again an error message is displayed between the addition form and the user’s current list of stored bookmarks. However, if the bookmark is successfully added, the message “Bookmark added” is displayed. This echo statement has been removed from the add_bm.php script and put in this position in the add_bm() function because otherwise the user could have seen an error message such as “Bookmark could not be inserted” followed by a success message of “Bookmark added,” even though the outcome was not successful.
Figure 34.9 shows the result of these changes.
Figure 34.9 Attempting to add a bookmark that already exists.

Additional Changes to PHPbookmark
Changing the bookmark addition functionality to an Ajax-enabled user interface is just the first of many changes you could make to this application. The next logical choice might be the bookmark deletion functionality. The process might go something like this:
![]() Remove the Delete BM link from the page footer.
Remove the Delete BM link from the page footer.
![]() Invoke a new JavaScript function when the user checks the Delete? check box next to a bookmark.
Invoke a new JavaScript function when the user checks the Delete? check box next to a bookmark.
![]() Modify the
Modify the delete_bm.php script so that it can be invoked by the new JavaScript function, complete the deletion process, and return a message to the user.
![]() Make any additional modifications to the functionality to ensure that actions occur and messages are displayed appropriately within the new user interface.
Make any additional modifications to the functionality to ensure that actions occur and messages are displayed appropriately within the new user interface.
With the structure already in place for these changes, you should be able to make them just with the information provided in this chapter. However, the following sections provide links to resources containing much more information on creating Ajax-enabled sites.
Remember, Ajax is a set of technologies that work together to create a more fluid user experience; this often necessitates rethinking an application from the ground up now that you know what you can do when all the puzzle pieces fall into place.
For More Information
The information in this chapter barely scratches the surface of creating Ajax-enabled applications. A new book, Sams Teach Yourself Ajax, JavaScript, and PHP All in One, discusses all the information in this chapter (and then some) in much greater detail and would be a logical next step after getting your feet wet in this chapter. There are also numerous websites devoted to all or part of the technologies that make up Ajax applications, as well as third-party code libraries that will enable you to move forward in your development processes without having to reinvent the wheel, so to speak.
Learning More about the Document Object Model (DOM)
Although this book covers server-side programming with PHP, and using MySQL as the relational database that powers dynamic applications, it does not cover anything on the client-side, such as XHTML, CSS, JavaScript, and the Document Object Model (DOM). If you are unfamiliar with the DOM, this would be the primary subject to tackle while increasing your knowledgebase in anticipation of developing full-fledged Ajax applications.
Many, if not all, of your Ajax applications will use JavaScript to manipulate the DOM. Whether you are working with display elements, browser history, or window locations, a thorough understanding of the objects and properties available through the DOM is crucial to producing the streamlined user experience that is the goal of Ajax applications.
The following sites contain a plethora of good information for learning about the DOM:
![]() The W3C technical reports on the Document Object Model, at http://www.w3.org/DOM/DOMTR
The W3C technical reports on the Document Object Model, at http://www.w3.org/DOM/DOMTR
![]() The home of the DOM Scripting Task Force, at http://domscripting.webstandards.org/
The home of the DOM Scripting Task Force, at http://domscripting.webstandards.org/
![]() The Mozilla Project’s Developer Documents on DOM, at http://developer.mozilla.org/en/docs/DOM (also a good resource for JavaScript documents, at http://developer.mozilla.org/en/docs/JavaScript)
The Mozilla Project’s Developer Documents on DOM, at http://developer.mozilla.org/en/docs/DOM (also a good resource for JavaScript documents, at http://developer.mozilla.org/en/docs/JavaScript)
JavaScript Libraries for Ajax Applications
Ajax-enabled applications have been around since 2005, when Jesse James Garrett wrote the essay in which he coined the term Ajax because he “needed something shorter than ‘Asynchronous JavaScript + CSS + DOM + XMLHttpRequest’ to use when discussing this approach with clients.” There has been more than enough time since then for third-party development of JavaScript function libraries to enable developers in their creation of Ajax applications.
Some popular libraries are listed next, although spending some time at any Ajax developer websites will quickly introduce you to many more. Selecting one (or more) to use will decrease your development time because you will not, as previously mentioned, have to reinvent the wheel.
![]() The Prototype JavaScript Framework simplifies DOM manipulation, and the use of the
The Prototype JavaScript Framework simplifies DOM manipulation, and the use of the XMLHTTPRequest object, on the way to creating complex Ajax applications. For more information, visit http://www.prototypejs.org/.
![]() Dojo is an open-source toolkit that includes basic JavaScript functions as well as a widget creation framework and a mechanism for efficiently packaging and delivering code to the end user. For more information, visit http://dojotoolkit.org/.
Dojo is an open-source toolkit that includes basic JavaScript functions as well as a widget creation framework and a mechanism for efficiently packaging and delivering code to the end user. For more information, visit http://dojotoolkit.org/.
![]() MochiKit is a lightweight library that includes functions for working with the DOM and formatting output for the end user. The MochiKit tagline is a bit crude but honest: “MochiKit makes JavaScript suck less.” The functions and solutions in MochiKit, the documentation available for developers, and the sample projects created with the use of MochiKit make this worthy of review. For more information, visit http://mochikit.com/.
MochiKit is a lightweight library that includes functions for working with the DOM and formatting output for the end user. The MochiKit tagline is a bit crude but honest: “MochiKit makes JavaScript suck less.” The functions and solutions in MochiKit, the documentation available for developers, and the sample projects created with the use of MochiKit make this worthy of review. For more information, visit http://mochikit.com/.
Ajax Developer Websites
Finally, the best way to learn about Ajax development is to try it. Gather some code snippets, figure out how to integrate pieces into your existing applications, and learn from those who have been working with the technologies for some time. Following are some resources that will help get you started in Ajax development:
![]() Ajaxian is a developer portal providing news, articles, tutorials, and sample code for new and experienced developers. For more information, visit http://ajaxian.com/.
Ajaxian is a developer portal providing news, articles, tutorials, and sample code for new and experienced developers. For more information, visit http://ajaxian.com/.
![]() Ajax Matters contains in-depth articles on Ajax development. For more information, visit http://www.ajaxmatters.com/.
Ajax Matters contains in-depth articles on Ajax development. For more information, visit http://www.ajaxmatters.com/.
![]() Ajax Lines is another developer portal with links to news and articles on all things Ajax. For more information, visit http://www.ajaxlines.com/.
Ajax Lines is another developer portal with links to news and articles on all things Ajax. For more information, visit http://www.ajaxlines.com/.