
32 Generating Personalized PDF Documents
ON SERVICE-DRIVEN SITES, YOU SOMETIMES NEED TO deliver personalized documents, generated in response to input from your visitors. This input can be used to provide an automatically filled-in form or to generate personalized documents, such as legal documents, letters, or certificates.
The example in this chapter presents a user with an online skill assessment page and generates a certificate. We explain how to
![]() Use a similar approach to generate a Portable Document Format (PDF) document
Use a similar approach to generate a Portable Document Format (PDF) document
![]() Use PHP’s PDFlib functions to generate a similar PDF document
Use PHP’s PDFlib functions to generate a similar PDF document
Project Overview
For this project, you give your visitors an exam consisting of a number of questions. If they answer enough of the questions correctly, you will generate a certificate for them to show that they have passed the exam.
So that a computer can mark the questions easily, they are multiple choice, consisting of a question and a number of potential answers. Only one of the potential answers for each question is correct.
If a user achieves a passing grade on the questions, he will be presented with a certificate.
Ideally, the file format for the certificate should
![]() Be easy to design
Be easy to design
![]() Be able to contain a variety of different elements such as bitmap and vector images
Be able to contain a variety of different elements such as bitmap and vector images
![]() Result in a high-quality printout
Result in a high-quality printout
![]() Require only a small file to be downloaded
Require only a small file to be downloaded
![]() Be generated almost instantly
Be generated almost instantly
![]() Be at a low cost to produce
Be at a low cost to produce
![]() Work on many operating systems
Work on many operating systems
![]() Be difficult to fraudulently duplicate or modify
Be difficult to fraudulently duplicate or modify
![]() Not require any special software to view or print
Not require any special software to view or print
![]() Display and print consistently for all recipients
Display and print consistently for all recipients
Like many decisions you need to make from time to time, you will probably need to compromise when choosing a delivery format to meet as many of these attributes as possible.
Evaluating Document Formats
The most important decision you need to make is what format to deliver the certificate in. Options include paper, ASCII text, HTML, Microsoft Word or another word processor’s format, Rich Text Format, PostScript, and Portable Document Format. Given the attributes listed previously, you can consider and compare some of the options.
Paper
Delivering the certificate on paper has some obvious advantages. You retain complete control over the process. You can see exactly what each certificate output looks like before sending it to the recipient. Plus, you don’t need to worry about software or bandwidth, and the certificate can be printed with anticounterfeiting measures.
Paper would meet all of your needs except for being able to generate instantly and being low cost to produce: The certificate could not be created and delivered quickly. Postal delivery could take days or weeks depending on your and the recipient’s location.
Each certificate would also cost a few cents to a few dollars in printing and postage costs and probably more in handling. Automatic electronic delivery would be cheaper.
ASCII
Delivering documents as ASCII or plain text comes with some advantages. Compatibility is no problem. Bandwidth required would be small, so cost would be very low. The simplicity of the result makes it easy to design and quick for a script to generate.
If you present your visitors with an ASCII file, however, you have very little control over the appearance of their certificates. You cannot control fonts or page breaks. You can only include text and have very little control over formatting. You have no control over a recipient’s duplication or modification of the document. This is the method that makes it easiest for the recipient to fraudulently alter her certificate.
Hypertext Markup Language
An obvious choice for delivering a document on the Web is Hypertext Markup Language (HTML). Hypertext Markup Language is specifically designed for this purpose. As you are no doubt already aware, it includes formatting control, syntax to include objects such as images, and is compatible (with some variation) with a variety of operating systems and software. It is fairly simple, so it is both easy to design and quick for a script to generate and deliver.
Drawbacks to using HTML for this application include limited support for print-related formatting such as page breaks, little consistency in the output on different platforms and programs, and variable quality printing. In addition, although HTML can include any type of external element, the capability of the browser to display or use these elements cannot be guaranteed for unusual types.
Word Processor Formats
Particularly for intranet projects, providing documents as word processor documents makes some sense. However, for an Internet project, using a proprietary word processor format will exclude some visitors, but given its market dominance, Microsoft Word would make sense. Most users will either have access to Word or to a word processor that will try to read Word files such as OpenOffice Writer.
Windows users without Word can download the freeware Word Viewer from
http://office.microsoft.com/en-us/downloads/ha010449811033.aspx.
Generating a document as a Microsoft Word document has some advantages. As long as you have a copy of Word, designing a document is easy. You have very good control over the printed appearance of your documents and a lot of flexibility with its contents. You can also make it relatively difficult for the recipient to modify by telling Word to ask for a password.
Unfortunately, Word files can be large, particularly if they contain images or other complex elements. There is also no easy way to generate them dynamically with PHP. The format is documented but is a binary format, and the format documentation comes with license conditions. It is possible to generate Word documents with a COM object, but it’s definitely not simple.
Another possibility you may now consider is OpenOffice Writer, which has the dual advantages of not being proprietary software and using an XML-based file format. Office 2003 and 2007 also support an XML file format natively. The Document Type Definition (DTD) for Word and other Office products can be downloaded from Microsoft.com. Search for “Office XML Reference Schemas.” This would be a valid option, but not a simple one.
Rich Text Format
Rich Text Format (RTF) gives you most of the power of Word, but the files are easier to generate. You still have flexibility over layout and formatting of the printed page. You can still include elements such as vector or bitmap images. Plus, you can still be fairly sure that the users will see a similar result to yours when they view or print the document.
RTF is Microsoft Word’s text format. It is intended as an interchange format to transfer documents between different programs. In some ways, it is similar to HTML. It uses syntax and key words rather than binary data to convey formatting information. It is therefore relatively human readable.
The format is well documented. The specification is freely available; search the Microsoft.com web site for “RTF specification”.
The easiest way to generate an RTF document is to choose a Save As RTF option in your word processor. Because RTF files contain only text, it is possible to generate them directly, and existing ones can easily be modified.
Because the format is documented and freely available, RTF is readable by more software than Word’s binary format. Be aware, though, that users opening a complex RTF file in older versions of Word or different word processors will often see somewhat different results. Each new version of Word introduces new keywords to RTF, so older implementations usually ignore controls they do not understand or have chosen not to implement.
From the original list, an RTF certificate would be easy to design using Word or another word processor; is able to contain a variety of different elements such as vector and bitmap images; gives a high-quality printout; can be generated easily and quickly; and can be delivered electronically at low cost.
This format works with a variety of applications and operating systems, although with somewhat variable results. On the downside, an RTF document can be easily and freely modified by anybody, which is a problem for a certificate and some other types of documents. The file size might be moderately large for complex documents.
RTF is a good option for many document delivery applications, so you can use it as one option here.
PostScript
PostScript, from Adobe, is a page description language. It is a powerful and complex programming language intended to represent documents in a device-independent way—that is, a description that will produce consistent results across different devices such as printers and screens. It is very well documented. At least three full-length books are available, as well as countless Web sites.
A PostScript document can contain very precise formatting, text, images, embedded fonts, and other elements. You can easily generate a PostScript document from an application by printing it to a PostScript printer driver. If you are interested, you can even learn to program in it directly.
PostScript documents are quite portable. They give consistent high-quality printouts from different devices and different operating systems.
There are a couple of significant downsides to using PostScript to distribute documents: The files can be huge and many people will need to download additional software to use them.
Most Unix users can deal with PostScript files, but Windows users usually need to download a viewer such as GSview, which uses the Ghostscript PostScript interpreter. This software is available for a wide variety of platforms. Although it is available free, we do not really want to force people to download more software.
You can read more about Ghostscript at http://www.ghostscript.com/
and download it from http://www.cs.wisc.edu/~ghost/.
For the current application, PostScript scores very well for consistent high-quality output but falls short on most of the other needs.
Portable Document Format
Fortunately, there is a format with most of the power of PostScript, but with significant advantages. The Portable Document Format (PDF) from Adobe was designed as a way to distribute documents that would behave consistently on different platforms and deliver predictable high-quality output onscreen or on paper.
Adobe describes PDF as “the open de facto standard for electronic document distribution worldwide. Adobe PDF is a universal file format that preserves all of the fonts, formatting, colors, and graphics of any source document, regardless of the application and platform used to create it. PDF files are compact and can be shared, viewed, navigated, and printed exactly as intended by anyone with a free Adobe Acrobat Reader.”
PDF is an open format, and documentation is available from http://partners.adobe.com/asn/tech/pdf/specifications.jsp. It is also available from many other Web sites and an official book.
Judged against the desired attributes, PDF looks very good: PDF documents give consistent, high-quality output; are capable of containing elements such as bitmap and vector images; can use compression to create a small file; can be delivered electronically and cheaply; are usable on the major operating systems; and can include security controls.
Working against PDF is the fact that most of the software used to create PDF documents is commercial. A reader is required to view PDF files, but the Acrobat Reader is available free for Windows, Unix, and Macintosh from Adobe. Many visitors to your site will already be familiar with the .pdf extension and will most likely already have the reader installed.
PDF files are a good way to distribute attractive, printable documents, particularly ones that you do not want recipients to be able to easily modify.
Next, we look at two different ways to generate a PDF certificate.
Solution Components
To get the system working, you need to be able to examine users’ knowledge and (assuming that they pass your test) generate a certificate reporting their performance. For this project, you experiment with generating this certificate in three different ways: using an RTF template, using a PDF template, and creating a new PDF programmatically.
Let’s look at the requirements of each of these components in some detail.
Question and Answer System
Providing a flexible system for online assessment that allows a variety of different question types, various media types for supporting information, useful feedback on wrong answers, and clever statistic gathering and reporting would be a complex task on its own.
In this chapter, we are mainly interested in the challenge of generating customized documents for delivery over the Web, so we explain how to build only a very simple quiz system. The quiz does not rely on any special software. It uses an HTML form to ask questions and a PHP script to process the answers. You have been doing this since Chapter 1, “PHP Crash Course.”
Document Generation Software
No additional software is needed on the Web server to generate RTF or PDF documents from templates, but you need software to create the templates. To use the PHP PDF creation functions, you need to have compiled PDF support into PHP, a topic which is discussed later in this section.
Software to Create RTF Template
You can use the word processor of your choice to generate RTF files. We used Microsoft Word to create our certificate template, which is included on the CD-ROM in the Chapter 32 directory.
If you prefer another word processor, it would still be a good idea to test the output in Word because the majority of your visitors will be using this software.
Software to Create PDF Template
PDF documents are a little more difficult to generate. The easiest way is to purchase Adobe Acrobat. This software allows you to create high-quality PDFs from various applications. We used Acrobat to create the template file for this project.
To create the file, we used Microsoft Word to design a document. One of the tools in the Acrobat package is Adobe Distiller. Within Distiller, we needed to select a few nondefault options. The file must be stored in ASCII format, and compression needs to be turned off. After these options are set, creating a PDF file is as easy as printing.
You can find out more about Acrobat at http://www.adobe.com/products/acrobat/.
You can either buy it online or from a regular software retailer.
Another option to create PDFs is the conversion program ps2pdf, which, as the name suggests, converts PostScript files into PDF files. This option has the advantage of being free but does not always produce good output for documents with images or nonstandard fonts. The ps2pdf converter comes with the Ghostscript package mentioned previously.
Obviously, if you are going to create a PDF file this way, you will need to create a PostScript file first. Unix users typically use either the a2ps or dvips utilities for this purpose.
If you are working in a Windows environment, you can also create PostScript files without Adobe Distiller, albeit via a slightly more complicated process. You need to install a PostScript printer driver. For example, you can use the Apple LaserWriter IINT driver. If you don’t have a PostScript driver installed, you can download one from Adobe at http://www.adobe.com/support/downloads/product.jsp?product=44&platform=Windows.
To create your PostScript file, you need to select this printer and the Print to File option, typically found on the Print dialog box.
Most Windows applications then produce a file with a .prn extension. This should be a PostScript file. You should probably rename it to be a .ps file. You should then be able to view it using GSview or another PostScript viewer, or create a PDF file using the ps2pdf utility.
Be aware that different printer drivers produce PostScript output of varying quality. You might find that some of the PostScript files you produce give errors when run through the ps2pdf utility. We suggest using a different printer driver.
If you intend to create only a small number of PDF files, Adobe’s online service might suit you. For $9.99 a month, you can upload files in a number of formats and download a PDF file. The service worked well for our certificate, but it does not let you select options that are important for this project. The PDF created will be stored as a binary file and compressed. This makes it very difficult to modify.
This service can be found at https://createpdf.adobe.com/.
A free trial option is available for this service if you want to test it. Additionally, you can use the free service at http://www.acrobat.com if you have fewer than five PDFs to create.
You can also check out a free Web-based interface to ps2pdf at the Net Distillery: http://www.babinszki.com/distiller/.
A final option would be to encode the certificate in XML and use XML Style Sheet Transformations (XSLT) to convert it to PDF and any other desired formats. This method requires a good understanding of XSLT and is not covered here.
Software to Create PDF Programmatically
Support for creating PDF documents is available from within PHP. PHP’s PDFlib functions use the PDFlib library, available from http://www.pdflib.com/products/pdflib-family/. PDFlib provides an API of functions to generate a PDF document.
PDFlib is not free; it requires a commercial license. PDFlib Lite is available as open source and free, but only under certain conditions such as noncommercial use.
Some free libraries, such as FPDF, are available. FPDF is not as feature rich as the commercial libraries, however. Also, because FPDF is written in PHP (rather than in C as a PHP extension), it is a little slower than the other two. You can download FPDF from http://www.fpdf.org/.
In this chapter, we use PDFlib because it is probably the most commonly used PDF-creation extension.
You can see whether PDFlib is already installed on your system by checking the output of the function phpinfo(). Under the heading pdf, you can find out whether PDFlib support is enabled, as well as the version of PDFlib used.
If you intend to use TIFF or JPEG images in your PDF documents, you will also need to install the TIFF library, available from http://www.libtiff.org/, and the JPEG library, available from ftp://ftp.uu.net/graphics/jpeg/.
The PDLlib extension is not built into PHP; you must obtain the files from PECL (PHP Extension Community Library) and install the extension manually.
On non-Windows systems, obtain the extension by downloading the files at http://pecl.php.net/package/pdflib and installing using the pecl command. Please see the instructions at http://www.php.net/manual/en/install.pecl.pear.php.
On Windows systems, obtain the precompiled extension (php_pdf.dll) by downloading the file at http://pecl4win.php.net/ext.php/php_pdflib.dll or by downloading the entire library of compiled PECL extensions from the PHP.net downloads page. Once downloaded, place the php_pdflib.dll file in your PHP extensions directory (usually ext within the PHP installation directory) and add the following line to your php.ini file: extension=php_pdf.dll
Solution Overview
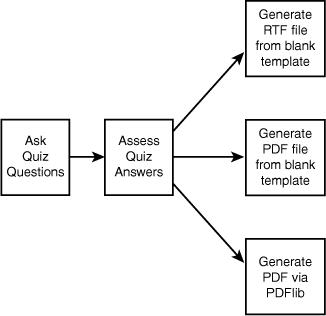
In this project, you produce a system with three possible outcomes. As you can see in Figure 32.1, you ask quiz questions, assess the answers, and then generate a certificate in one of three ways:
![]() An RTF document from a blank template.
An RTF document from a blank template.
![]() A PDF document from a blank template.
A PDF document from a blank template.
![]() A PDF document programmatically via PDFlib.
A PDF document programmatically via PDFlib.
Figure 32.1 The certification system generates one of three different certificates.
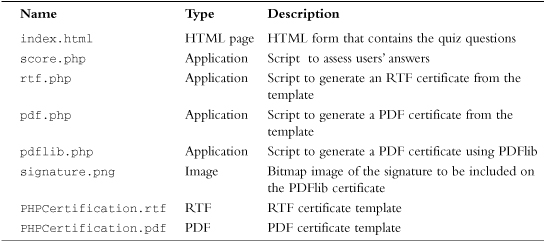
A summary of the files in the certification project is shown in Table 32.1.
Table 32.1. Files in the Certification Application
Now let’s look at the application.
Asking the Questions
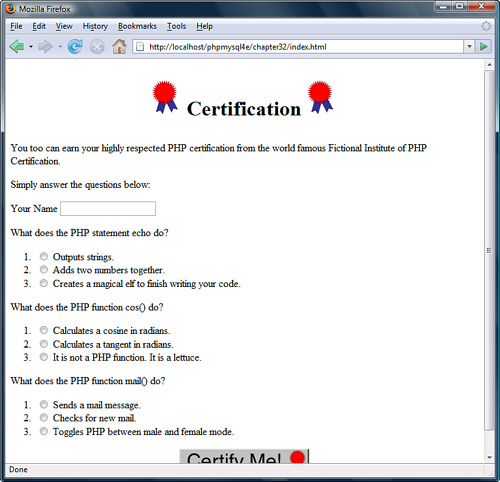
The file index.html is straightforward. It needs to contain an HTML form asking the user for his name and the answers to a number of questions. In a real assessment application, you would most likely retrieve these questions from a database. Here, you focus on producing the certificate, so you just hard-code some questions into the HTML.
The name field is a text input. Each question has three radio buttons to allow the user to indicate his preferred answer. The form has an image button as a submit button.
The code for this page is shown in Listing 32.1.
Listing 32.1 index.html—HTML Page Containing Quiz Questions
<html>
<body>
<h1><p align="center">
<img src="rosette.gif" alt="">
Certification
<img src="rosette.gif" alt=""></p></h1>
<p>You too can earn your highly respected PHP certification
from the world famous Fictional Institute of PHP Certification.</p>
<p>Simply answer the questions below:</p>
<form action="score.php" method="post">
<p>Your Name <input type="text" name="name" /></p>
<p>What does the PHP statement echo do?</p>
<ol>
<li><input type="radio" name="q1" value="1" />
Outputs strings.</li>
<li><input type="radio" name="q1" value="2" />
Adds two numbers together.</li>
<li><input type="radio" name="q1" value="3" />
Creates a magical elf to finish writing your code.</li>
</ol>
<p>What does the PHP function cos() do?</p>
<ol>
<li><input type="radio" name="q2" value="1" />
Calculates a cosine in radians.</li>
<li><input type="radio" name="q2" value="2" />
Calculates a tangent in radians. </li>
<li><input type="radio" name="q2" value="3" />
It is not a PHP function. It is a lettuce. </li>
</ol>
<p>What does the PHP function mail() do?</p>
<ol>
<li><input type="radio" name="q3" value="1" />
Sends a mail message.
<li><input type="radio" name="q3" value="2" />
Checks for new mail.
<li><input type="radio" name="q3" value="3" />
Toggles PHP between male and female mode.
</ol>
<p align="center"><input type="image" src="certify-me.gif" border="0"></p>
</form>
</body>
</html>
The result of loading index.html in a Web browser is shown in Figure 32.2.
Figure 32.2 The index.html page asks the user to answer quiz questions.
Grading the Answers
When the user submits his answers to the questions in index.html, you need to grade him and calculate a score. This is done by the script called score.php, shown in Listing 32.2.
Listing 32.2 score.php—Script to Mark Exams
<?php
//create short variable names
$q1 = $_POST['q1'];
$q2 = $_POST['q2'];
$q3 = $_POST['q3'];
$name = $_POST['name'];
// check that all the data was received
if(($q1==' ') || ($q2==' ') || ($q3==' ') || ($name==' ')) {
echo "<h1>
<p align="center">
<img src="rosette.gif" alt="" />
Sorry:
<img src="rosette.gif" alt="" /></p></h1>
<p>You need to fill in your name and answer all questions.</p>";
} else {
//add up the scores
$score = 0;
if ($q1 == 1) {
// the correct answer for q1 is 1
$score++;
}
if($q2 == 1) {
// the correct answer for q2 is 1
$score++;
}
if($q3 == 1) {
// the correct answer for q3 is 1
$score++;
}
//convert score to a percentage
$score = $score / 3 * 100;
if($score < 50) {
// this person failed
echo "<h1>
<p align="center">
<img src="rosette.gif" alt="" />
Sorry:
<img src="rosette.gif" alt="" /></p></h1>
<p>You need to score at least 50% to pass the exam.</p>";
} else {
//create a string containing the score to one decimal place
$score = number_format($score, 1);
echo "<h1 align="center">
<img src="rosette.gif" alt="" />
Congratulations!
<img src="rosette.gif" alt="" /></h1>
<p>Well done ".$name.", with a score of ".$score."%,
you have passed the exam.</p>";
// provide links to scripts that generate the certificates
echo "<p>Please click here to download your certificate as
a Microsoft Word (RTF) file.</p>
<form action="rtf.php" method="post">
<div align="center">
<input type="image" src="certificate.gif" border="0">
</div>
<input type="hidden" name="score" value="".$score.""/>
<input type="hidden" name="name" value="".$name.""/>
</form>
<p>Please click here to download your certificate as
a Portable Document Format (PDF) file.</p>
<form action="pdf.php" method="post">
<div align="center">
<input type="image" src="certificate.gif" border="0">
</div>
<input type="hidden" name="score"value="".$score.""/>
<input type="hidden" name="name" value="".$name.""/>
</form>
<p>Please click here to download your certificate as
a Portable Document Format (PDF) file generated with PDFLib.</p>
<form action="pdflib.php" method="post">
<div align="center">
<input type="image" src="certificate.gif" border="0">
</div>
<input type="hidden" name="score" value="".$score.""/>
<input type="hidden" name="name" value="".$name.""/>
</form>";
}
}
?>
This script displays a message if the user did not answer all questions or scored less than the chosen pass mark.
If the user successfully answered the questions, he will be allowed to generate a certificate. The output of a successful visit is shown in Figure 32.3.
Figure 32.3 The score.php script presents successful visitors with the option to generate a certificate in one of three ways.
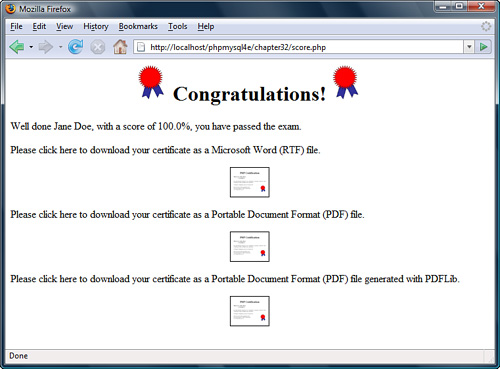
From here, the user has three options: He can have an RTF certificate or one of two PDF certificates. Next, we look at the script responsible for each.
Generating an RTF Certificate
There is nothing to stop you from generating an RTF document by writing ASCII text to a file or a string variable, but doing so would mean learning yet another set of syntax.
Here is a simple RTF document:
{
tf1
{fonttbl {f0 Arial;}{f1 Times New Roman;}}
f0fs28 Headingpar
f1fs20 This is an rtf document.par
}
This document sets up a font table with two fonts: Arial, to be referred to as f0, and Times New Roman, to be referred to as f1. It then writes Heading using f0 (Arial) in size 28 (14 point). The control par indicates a paragraph break. It then writes This is an rtf document using f1 (Times New Roman) at size 20 (10 point).
You could generate a document like this manually, but no labor-saving functions are built into PHP to make the hard parts, such as incorporating graphics, easier. Fortunately, in many documents, the structure, style, and much of the text are static, and only small parts change from person to person. A more efficient way to generate a document is to use a template.
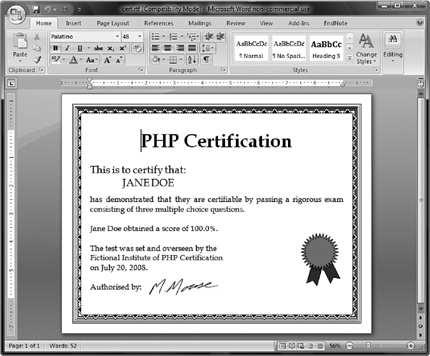
You can build a complex document, such as the one shown in Figure 32.4, easily using a word processor.
Figure 32.4 Using a word processor, you can create a complex, attractive template easily.

The template includes placeholders such as <<NAME>> to mark the places where dynamic data will be inserted. It is not important what these placeholders look like. You use a meaningful description between two sets of angled braces. It is important that you choose placeholders that are highly unlikely to accidentally appear in the rest of the document. It will help you to lay out your template if the placeholders are roughly the same length as the data they will be replaced with.
The placeholders in this document are <<NAME>>, <<Name>>, <<score>>, and <<mm/dd/yyyy>>. Note that you use both NAME and Name because you will use a case-sensitive method to replace them.
Now that you have a template, you need a script to personalize it. This script, called rtf.php, is shown in Listing 32.3.
Listing 32.3 rtf.php—Script to Produce a Personalized RTF Certificate
<?php
//create short variable names
$name = $_POST['name'];
$score = $_POST['score'];
// check we have the parameters we need
if(!$name || !$score) {
echo "<h1>Error:</h1>
<p>This page was called incorrectly</p>";
} else {
//generate the headers to help a browser choose the correct application
header('Content-type: application/msword'),
header('Content-Disposition: inline, filename=cert.rtf'),
$date = date('F d, Y'),
// open our template file
$filename = 'PHPCertification.rtf';
$fp = fopen ($filename, 'r'),
//read our template into a variable
$output = fread( $fp, filesize($filename));
fclose ($fp);
// replace the place holders in the template with our data
$output = str_replace('<<NAME>>', strtoupper($name), $output);
$output = str_replace('<<Name>>', $name, $output);
$output = str_replace('<<score>>', $score, $output);
$output = str_replace('<<mm/dd/yyyy>>', $date, $output);
// send the generated document to the browser
echo $output;
}
?>
This script performs some basic error checking to make sure that all the user details have been passed in and then moves to the business of creating the certificate.
The output of this script will be an RTF file rather than an HTML file, so you need to alert the user’s browser to this fact. This is important so that the browser can attempt to open the file with the correct application or give a Save As… type dialog box if it doesn’t recognize the .rtf extension.
You specify the MIME type of the file you are outputting by using PHP’s header() function to send the appropriate HTTP header as follows:
header('Content-type: application/msword'),
header('Content-Disposition: inline, filename=cert.rtf'),
The first header tells the browser that you are sending a Microsoft Word file (not strictly true, but the most likely helper application for opening the RTF file).
The second header tells the browser to automatically display the contents of the file and that its suggested filename is cert.rtf. This is the default filename the user will see if he tries to save the file from within his browser.
After the headers are sent, you open and read the template RTF file into the $output variable and use the str_replace() function to replace the placeholders with the actual data that you want to appear in the file. For instance, the line
$output = str_replace('<<Name>>', $name, $output);
replaces any occurrences of the placeholder <<Name>> with the contents of the variable $name.
Having made your substitutions, it’s just a matter of echoing the output to the browser. A sample result from the rtf.php script is shown in Figure 32.5.
This approach works very well. The calls to str_replace() run very quickly, even though the template and therefore the contents of $output are fairly long. The main problem from the point of view of this application is that the user will load the certificate in his word processor to print it. This is probably an invitation for people to modify the output. RTF does not allow you to make a read-only document.
Figure 32.5 The rtf.php script generates a certificate from an RTF template.
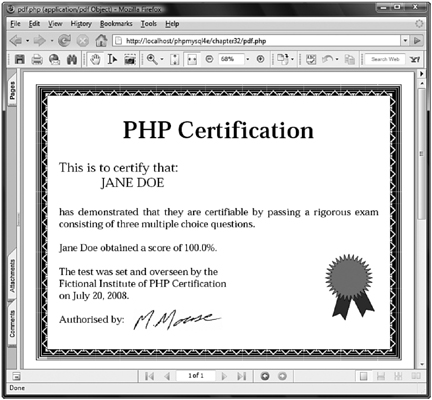
Generating a PDF Certificate from a Template
The process of generating a PDF certificate from a template is similar. The main difference is that when you create the PDF file, some of the placeholders might be interspersed with formatting codes, depending on the version of Acrobat you are using. For example, if you look in the certificate template file you have created (using a text editor), you can see that the placeholders now look like this:
<<N)-13(AME)-10(>)-6(>
<<Na)-9(m)0(e)-18(>>
<)-11(<)1(sc)-17(or)-6(e)-6(>)-11(>
<)-11(<)1(m)-12(m)0(/d)-6(d)-19(/)1(yy)-13(yy)-13(>>
If you look through the file, you will see that, unlike RTF, this is not a format that humans can easily read through.
There are a few different ways you can deal with this situation. You could go through each of these placeholders and delete the formatting codes. Deleting them actually makes little difference to how the document looks in the end because the codes embedded in the previous template indicate how much space should be left between the letters of the placeholders that you are going to replace anyhow. However, if you take this approach, you must go through and hand-edit the PDF file and repeat this each time you change or update the file. Doing all this work is not a big deal when you’re dealing with only four placeholders, but it becomes a nightmare when, for example, you have multiple documents with many placeholders, and you decide to change the letterhead on all the documents.
You can avoid this problem by using a different technique. You can use Adobe Acrobat to create a PDF form—similar to an HTML form with blank, named fields. You can then use a PHP script to create what is called an FDF (Forms Data Format) file, which is basically a set of data to be merged with a template. You can create FDFs using PHP’s FDF function library: specifically, the fdf_create() function to create a file, the fdf_set_value() function to set the field values, and the fdf_set_file() function to set the associated template form file. You can then pass this file back to the browser with the appropriate MIME type—in this case, vnd.fdf—and the browser’s Acrobat Reader plug-in should substitute the data into the form.
This way of doing things is neat, but it has two limitations. First, it assumes that you own a copy of Acrobat Professional (the full version, not the free reader, or even the Standard edition). Second, it is difficult to substitute in text that is inline rather than text that looks like a form field. This might or might not be a problem, depending on what you are trying to do. We largely use PDF generation for generating letters where many things must be substituted inline. FDFs do not work well for this purpose. If you are auto-filling, for example, a tax form online, this will not be a problem.
You can read more about the FDF format at Adobe’s site: http://www.adobe.com/devnet/acrobat/fdftoolkit.html.
You should also look at the FDF documentation in the PHP manual if you decide to use this approach: http://www.php.net/manual/en/ref.fdf.php.
We turn now to the PDF solution to the previous problem.
You can still find and replace the placeholders in the PDF file if you recognize that the additional format codes consist solely of hyphens, digits, and parentheses and can therefore be matched via a regular expression. We wrote a function, pdf_replace(), to automatically generate a matching regular expression for a placeholder and replace that placeholder with the appropriate text.
Note that with some versions of Acrobat, the placeholders are in plain text, and you can replace them with str_replace(), as you did before.
Other than this addition, the code for generating the certificate via a PDF template is similar to the RTF version. This script is shown in Listing 32.4.
Listing 32.4 pdf.php—Script to Produce Personalized PDF Certificate via a Template
<?php
set_time_limit(180); // this script can be slow
//create short variable names
$name = $_POST['name'];
$score = $_POST['score'];
function pdf_replace($pattern, $replacement, $string) {
$len = strlen( $pattern );
$regexp = ' ';
for ($i = 0; $i<$len; $i++) {
$regexp .= $pattern[$i];
if ($i<$len-1) {
$regexp .= "()-{0,1}[0-9]*(){0,1}";
}
}
return ereg_replace ( $regexp, $replacement, $string );
}
if(!$name || !$score) {
echo "<h1>Error:</h1>
<p>This page was called incorrectly</p>";
} else {
//generate the headers to help a browser choose the correct application
header('Content-Disposition: filename=cert.pdf'),
header('Content-type: application/pdf'),
$date = date('F d, Y'),
// open our template file
$filename = 'PHPCertification.pdf';
$fp = fopen ($filename, 'r'),
//read our template into a variable
$output = fread($fp, filesize($filename));
fclose ($fp);
// replace the place holders in the template with our data
$output = pdf_replace('<<NAME>>', strtoupper($name), $output);
$output = pdf_replace('<<Name>>', $name, $output);
$output = pdf_replace('<<score>>', $score, $output);
$output = pdf_replace('<<mm/dd/yyyy>>', $date, $output);
// send the generated document to the browser
echo $output;
}
?>
This script produces a customized version of the PDF document. The document, shown in Figure 32.6, will print reliably on numerous systems, and is harder for the recipient to modify or edit. You can see that the PDF document in Figure 32.6 looks almost exactly like the RTF document in Figure 32.5.
One problem with this approach is that the code runs quite slowly because of the regular expression matching required. Regular expressions run much more slowly than str_replace() that you could use for the RTF version.
If you are going to match a large number of placeholders or try to generate many of these documents on the same server, you might want to look at other approaches. This issue would be less of a problem for a simpler template. Much of the bulk in this file is data representing the images.
Figure 32.6 The pdf.php script generates a certificate from a PDF template.
Generating a PDF Document Using PDFlib
PDFlib is intended for generating dynamic PDF documents via the Web. It is not strictly part of PHP, but rather a separate library, with a large number of functions intended to be called from a wide variety of programming languages. Language bindings are available for C, C++, Java, Perl, Python, Tcl, and ActiveX/COM.
PDFlib is officially supported by PDFlib GmbH. This means that you can refer to either the PHP documentation at http://www.php.net/en/manual/ref.pdf.php.
or download the official documentation from http://www.pdflib.com.
A Hello World Script for PDFlib
After you have PHP and have installed it with PDFlib enabled, you can test it with a simple program such as the Hello World example in Listing 32.5.
Listing 32.5 testpdf.php—Classic Hello World Example Using PDFlib via PHP
<?php
// create a pdf document in memory
$pdf = pdf_new();
pdf_open_file($pdf, "");
pdf_set_info($pdf, "Author", "Luke Welling and Laura Thomson");
pdf_set_info($pdf, "Title", "Hello World (PHP)");
pdf_set_info($pdf, "Creator", "testpdf.php");
pdf_set_info($pdf, "Subject", "Test PDF");
// US letter is 11" x 8.5" and there are 72 points per inch
pdf_begin_page($pdf, 8.5*72, 11*72);
// add a bookmark
pdf_add_bookmark($pdf, 'Page 1', 0, 0);
$font = pdf_findfont($pdf, 'Times-Roman', 'host', 0);
pdf_setfont($pdf, $font, 24);
pdf_set_text_pos($pdf, 50, 700);
// write text
pdf_show($pdf,'Hello, world!'),
pdf_continue_text($pdf,'(says PHP)'),
// end the document
pdf_end_page($pdf);
pdf_close($pdf);
$data = pdf_get_buffer($pdf);
// generate the headers to help a browser choose the correct application
header('Content-Type: application/pdf'),
header('Content-Disposition: inline; filename=testpdf.pdf'),
header('Content-Length: ' . strlen($data));
// output PDF
echo $data;
?>
The most likely error you will see if this script fails is the following:
Fatal error: Call to undefined function pdf_new()
in C:Program FilesApache Software GroupApache2.2htdocsphpmysql4echapter32 estpdf.php on line 4
This message means that you do not have the PDFlib extension compiled or enabled into PHP.
The installation is fairly straightforward, but some details change depending on the exact versions of PHP and PDFlib that you are using. A good place to check for detailed suggestions is the user-contributed notes on the PDFlib page in the annotated PHP manual.
When you have this script up and running on your system, it is time to look at how it works. The lines
$pdf = pdf_new();
pdf_open_file($pdf, "");
initialize a PDF document in memory.
The function pdf_set_info() enables you to tag the document with a subject, title, creator, author, list of keywords, and one custom, user-defined field.
Here, you set an author, title, creator, and subject. Note that all six info fields are optional:
pdf_set_info($pdf, "Author", "Luke Welling and Laura Thomson");
pdf_set_info($pdf, "Title", "Hello World (PHP)");
pdf_set_info($pdf, "Creator", "testpdf.php");
pdf_set_info($pdf, "Subject", "Test PDF");
A PDF document consists of a number of pages. To start a new page, you need to call pdf_begin_page(). As well as the identifier returned by pdf_open(), pdf_begin_page() requires the dimensions of the page. Each page in a document can be a different size, but unless you have a good reason not to, you should use a common paper size.
PDFlib works in points, both for page size and for locating coordinate locations on each page. For reference, A4 is approximately 595 by 842 points, and U.S. letter paper is 612 by 792 points. This means that the line
pdf_begin_page($pdf, 8.5*72, 11*72);
creates a page in the document, sized for U.S. letter paper.
A PDF document does not need to be just a printable document. Many PDF features can be included in the document, such as hyperlinks and bookmarks. The function pdf_add_outline() adds a bookmark to the document outline. The bookmarks in a document appear in a separate pane in Acrobat Reader, allowing you to skip straight to important sections.
The line
pdf_add_bookmark($pdf, 'Page 1', 0, 0);
adds a bookmark labeled Page 1, which refers to the current page.
Fonts available on systems vary from operating system to operating system and even from individual machine to machine. To guarantee consistent results, a set of core fonts works with every PDF reader. The 14 core fonts are
![]() Courier
Courier
![]() Courier-Bold
Courier-Bold
![]() Courier-Oblique
Courier-Oblique
![]() Courier-BoldOblique
Courier-BoldOblique
![]() Helvetica
Helvetica
![]() Helvetica-Bold
Helvetica-Bold
![]() Helvetica-Oblique
Helvetica-Oblique
![]() Helvetica-BoldOblique
Helvetica-BoldOblique
![]() Times-Roman
Times-Roman
![]() Times-Bold
Times-Bold
![]() Times-Italic
Times-Italic
![]() Times-BoldItalic
Times-BoldItalic
![]() Symbol
Symbol
![]() ZapfDingbats
ZapfDingbats
Fonts outside this set can be embedded in documents, but this increases the file size and might not be acceptable under whatever license you own that particular font under. You can choose a font, its size, and character encoding as follows:
$font = pdf_findfont($pdf, 'Times-Roman', 'host', 0);
pdf_setfont($pdf, $font, 24);
Font sizes are specified in points. In this case, we chose host character encoding. The allowable values are winansi, builtin, macroman, ebcdic, or host. The meanings of the different values are as follows:
![]()
winansi—Uses ISO 8859-1 plus special characters added by Microsoft, such as a Euro symbol.
![]()
builtin—Uses the encoding built into the font. Normally used with non-Latin fonts and symbols.
![]()
macroman—Uses Mac Roman encoding. The default Macintosh character set.
![]()
ebcdic—Uses EBCDIC as used on IBM AS/400 systems.
![]()
host—Automatically selects macroman on a Macintosh, ebcdic on an EBCDIC-based system, and winansi on all other systems.
If you do not need to include special characters, the choice of encoding is not important.
A PDF document is not like an HTML document or a word processor document. Text does not by default start at the top left and flow onto other lines as required. You need to choose where to place each line of text. As already mentioned, PDF uses points to specify locations. The origin (the x,y coordinate [0, 0]) is at the bottom-left corner of the page.
Given that the page is 612 by 792 points, the point (50, 700) is about two-thirds of an inch from the left of the page and about one-and-one-third inches from the top. To set the text position at this point, you use
pdf_set_text_pos($pdf, 50, 700);
Finally, having set up the page, you can write some text on it. To add text at the current position using the current font, you use pdf_show().
The line
pdf_show($pdf, 'Hello, world!'),
adds the text Hello World! to the document.
To move to the next line and write more text, you use pdf_continue_text(). To add the string (says PHP), you use
pdf_continue_text($pdf,'(says PHP)'),
The exact location where this text will appear depends on the font and size selected.
If, rather than lines or phrases, you are using contiguous paragraphs, you might find the function pdf_show_boxed() more useful. It allows you to declare a text box and flow text into it.
After you have finished adding elements to a page, you need to call pdf_end_page() as follows:
pdf_end_page($pdf);
After you have finished the whole PDF document, you need to close it by using pdf_close(). When you are generating a file, you also need to close the file.
The line
pdf_close($pdf);
completes the generation of the Hello World document.
Now you can send the completed PDF to the browser:
$data = pdf_get_buffer($pdf);
// generate the headers to help a browser choose the correct application
header('Content-Type: application/pdf'),
header('Content-Disposition: inline; filename=testpdf.pdf'),
header('Content-Length:' . strlen($data));
// output PDF
echo $data;
You could also write this data to disk if you preferred. PDFlib allows you to do this by passing a filename as the second parameter to pdf_open_file().
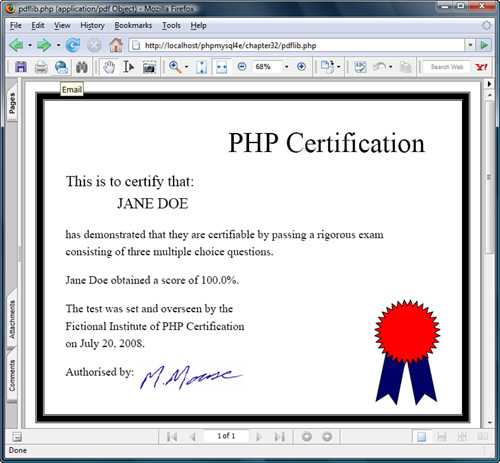
Note that some PDFlib function parameters that are documented in the PHP manual as being optional are required in some versions of PDFlib. The document for the certificate is more complicated, including a border, a vector image, and a bitmap image. With the other two techniques, you can add these features using a word processor. With PDFlib, you must add them manually.
Generating a Certificate with PDFlib
To use PDFlib, we chose to make some compromises for this project. Although it is almost certainly possible to exactly duplicate the certificate used previously, a lot more effort would be required to generate and position each element manually rather than use a tool such as Microsoft Word to help lay out the document.
We want to use the same text as before, including the red rosette and the bitmap signature, but we are not going to try to duplicate the complex border. The complete code for this script is shown in Listing 32.6.
Listing 32.6 pdflib.php—Generating a Certificate Using PDFlib
<?php
// create short variable names
$name = $_POST['name'];
$score = $_POST['score'];
if(!$name || !$score) {
echo "<h1>Error:</h1>
<p>This page was called incorrectly</p>";
} else {
$date = date( 'F d, Y' );
// create a pdf document in memory
$pdf = pdf_new();
pdf_open_file($pdf, "");
// set up name of font for later use
$fontname = 'Times-Roman';
// set up the page size in points and create page
// US letter is 11" x 8.5" and there are approximately
// 72 points per inch
$width = 11*72;
$height = 8.5*72;
pdf_begin_page($pdf, $width, $height);
// draw our borders
$inset = 20; // space between border and page edge
$border = 10; // width of main border line
$inner = 2; // gap within the border
//draw outer border
pdf_rect($pdf, $inset-$inner,
$inset-$inner,
$width-2*($inset-$inner),
$height-2*($inset-$inner));
pdf_stroke($pdf);
//draw main border $border points wide
pdf_setlinewidth($pdf, $border);
pdf_rect($pdf, $inset+$border/2,
$inset+$border/2,
$width-2*($inset+$border/2),
$height-2*($inset+$border/2));
pdf_stroke($pdf);
pdf_setlinewidth($pdf, 1.0);
// draw inner border
pdf_rect($pdf, $inset+$border+$inner,
$inset+$border+$inner,
$width-2*($inset+$border+$inner),
$height-2*($inset+$border+$inner));
pdf_stroke($pdf);
// add heading
$font = pdf_findfont($pdf, $fontname, 'host', 0);
if ($font) {
pdf_setfont($pdf, $font, 48);
}
$startx = ($width - pdf_stringwidth($pdf, 'PHP Certification',
$font, '12'))/2;
pdf_show_xy($pdf, 'PHP Certification', $startx, 490);
// add text
$font = pdf_findfont($pdf, $fontname, 'host', 0);
if ($font) {
pdf_setfont($pdf, $font, 26);
}
$startx = 70;
pdf_show_xy($pdf, 'This is to certify that:', $startx, 430);
pdf_show_xy($pdf, strtoupper($name), $startx+90, 391);
$font = pdf_findfont($pdf, $fontname, 'host', 0);
if ($font)
pdf_setfont($pdf, $font, 20);
pdf_show_xy($pdf, 'has demonstrated that they are certifiable '.
'by passing a rigorous exam', $startx, 340);
pdf_show_xy($pdf, 'consisting of three multiple choice questions.',
$startx, 310);
pdf_show_xy($pdf, "$name obtained a score of $score".'%.', $startx, 260);
pdf_show_xy($pdf, 'The test was set and overseen by the ', $startx, 210);
pdf_show_xy($pdf, 'Fictional Institute of PHP Certification',
$startx, 180);
pdf_show_xy($pdf, "on $date.", $startx, 150);
pdf_show_xy($pdf, 'Authorised by:', $startx, 100);
// add bitmap signature image
$signature = pdf_load_image($pdf, 'png', '/Program Files/Apache Software
Foundation/Apache2.2/htdocs/phpmysql4e/chapter32/signature.png', ' '),
pdf_fit_image($pdf, $signature, 200, 75, ' '),
pdf_close_image($pdf, $signature);
// set up colors for rosette
pdf_setcolor ($pdf, 'both', 'cmyk', 43/255, 49/255, 1/255, 67/255); // dark
blue
pdf_setcolor ($pdf, 'both', 'cmyk', 1/255, 1/255, 1/255, 1/255); // black
// draw ribbon 1
pdf_moveto($pdf, 630, 150);
pdf_lineto($pdf, 610, 55);
pdf_lineto($pdf, 632, 69);
pdf_lineto($pdf, 646, 49);
pdf_lineto($pdf, 666, 150);
pdf_closepath($pdf);
pdf_fill($pdf);
// outline ribbon 1
pdf_moveto($pdf, 630, 150);
pdf_lineto($pdf, 610, 55);
pdf_lineto($pdf, 632, 69);
pdf_lineto($pdf, 646, 49);
pdf_lineto($pdf, 666, 150);
pdf_closepath($pdf);
pdf_stroke($pdf);
// draw ribbon 2
pdf_moveto($pdf, 660, 150);
pdf_lineto($pdf, 680, 49);
pdf_lineto($pdf, 695, 69);
pdf_lineto($pdf, 716, 55);
pdf_lineto($pdf, 696, 150);
pdf_closepath($pdf);
pdf_fill($pdf);
// outline ribbon 2
pdf_moveto($pdf, 660, 150);
pdf_lineto($pdf, 680, 49);
pdf_lineto($pdf, 695, 69);
pdf_lineto($pdf, 716, 55);
pdf_lineto($pdf, 696, 150);
pdf_closepath($pdf);
pdf_stroke($pdf);
pdf_setcolor ($pdf, 'both', 'cmyk', 1/255, 81/255, 81/255, 20/255); // red
//draw rosette
draw_star(665, 175, 32, 57, 10, $pdf, true);
//outline rosette
draw_star(665, 175, 32, 57, 10, $pdf, false);
// finish up the page and prepare to output
pdf_end_page($pdf);
pdf_close($pdf);
$data = pdf_get_buffer($pdf);
// generate the headers to help a browser choose the correct application
header('Content-type: application/pdf'),
header('Content-disposition: inline; filename=test.pdf'),
header('Content-length: ' . strlen($data));
// output PDF
echo $data;
}
function draw_star($centerx, $centery, $points, $radius,
$point_size, $pdf, $filled) {
$inner_radius = $radius-$point_size;
for ($i = 0; $i<=$points*2; $i++) {
$angle= ($i*2*pi())/($points*2);
if($i%2) {
$x = $radius*cos($angle) + $centerx;
$y = $radius*sin($angle) + $centery;
} else {
$x = $inner_radius*cos($angle) + $centerx;
$y = $inner_radius*sin($angle) + $centery;
}
if($i==0) {
pdf_moveto($pdf, $x, $y);
} else if ($i==$points*2) {
pdf_closepath($pdf);
} else {
pdf_lineto($pdf, $x, $y);
}
}
if($filled) {
pdf_fill_stroke($pdf);
} else {
pdf_stroke($pdf);
}
}
?>
The certificate produced using this script is shown in Figure 32.7. As you can see, it is quite similar to the others, except that the border is simpler and the star looks a little different. The reason is that they are drawn into the document rather than taken from an existing clip art file.
Figure 32.7 The pdflib.php script draws the certificate into a PDF document.
Now let’s look at some of the parts of this script that are different from the previous examples.
Visitors need to get their own details on a certificate, so you create the document in memory rather than in a file. If you wrote it to a file, you would need to worry about mechanisms to create unique filenames, stop people from snooping into others’ certificates, and determine a way to delete older certificate files to free hard drive space on the server. To create a document in memory, you call pdf_new() without parameters followed by a call to pdf_open_file(), as follows:
$pdf = pdf_new();
pdf_open_file($pdf, "");
The simplified border consists of three stripes: a fat border and two thin borders, one inside the main border and one outside. You draw all of them as rectangles.
To position the borders in such a way that you can easily alter the page size or the appearance of the borders, you base all the border positions on the variables that you already have, $width and $height and a few new ones: $inset, $border, and $inner. You use $inset to specify how many points wide the border at the edge of the page is, $border to specify the thickness of the main border, and $inner to specify how wide the gap between the main border and the thin borders is.
If you have drawn with another graphics API, drawing with PDFlib will present few surprises. If you haven’t read Chapter 22, “Generating Images,” you might find it helpful to do so, because drawing images with the gd library is similar to drawing them with PDFlib.
The thin borders are easy. To create a rectangle, you use pdf_rect(), which requires as parameters the PDF document identifier, the x and y coordinates of the rectangle’s lower-left corner, and the width and height of the rectangle. Because you want the layout to be flexible, you calculate these from the variables you have set:
pdf_rect($pdf, $inset-$inner,
$inset-$inner,
$width-2*($inset-$inner),
$height-2*($inset-$inner));
The call to pdf_rect() sets up a path in the shape of a rectangle. To draw that shape, you need to call the pdf_stroke() function as follows:
pdf_stroke($pdf);
To draw the main border, you need to specify the line width. The default line width is 1 point. The following call to pdf_setlinewidth() sets it to $border (in this case, 10) points:
pdf_setlinewidth($pdf, $border);
With the width set, you again create a rectangle with pdf_rect() and call pdf_stroke() to draw it:
pdf_rect($pdf, $inset+$border/2,
$inset+$border/2,
$width-2*($inset+$border/2),
$height-2*($inset+$border/2));
pdf_stroke($pdf);
After you have drawn the one wide line, you need to remember to set the line width back to 1 with this code:
pdf_setlinewidth($pdf, 1.0);
You use pdf_show_xy() to position each line of text on the certificate. For most lines of text, you use a configurable left margin ($startx) as the x coordinate and a value chosen by eye as the y coordinate. Because you want the heading centered on the page, you need to know its width so that you can position the left side of it. You can get the width by using pdf_stringwidth(). The call
pdf_stringwidth($pdf, 'PHP Certification', $font, '12')
returns the width of the string PHP Certification in the current font and font size.
As with the other versions of the certificate, you include a signature as a scanned bitmap. The three statements
$signature = pdf_load_image($pdf, 'png', '/Program Files/Apache Software
Foundation/Apache2.2/htdocs/phpmysql4e/chapter32/signature.png', ' '),
pdf_fit_image($pdf, $signature, 200, 75, ' '),
pdf_close_image($pdf, $signature);
open a PNG file containing the signature, add the image to the page at the specified location, and close the PNG file. Other file types can also be used.
The hardest item to add to the certificate using PDFlib is the rosette. You cannot automatically open and include a Windows meta file containing the rosette used previously, but you are free to draw any shapes you like.
To draw a filled shape such as one of the ribbons, you can write the following code. Here, you set the stroke or line color to be black and the fill or interior color to be dark blue:
pdf_setcolor($pdf, 'fill', 'rgb', 0, 0, .4, 0); // dark blue
pdf_setcolor($pdf, 'stroke', 'rgb', 0, 0, 0, 0); // black
Here, you set up a five-sided polygon to be one of the ribbons and then fill it:
pdf_moveto($pdf, 630, 150);
pdf_lineto($pdf, 610, 55);
pdf_lineto($pdf, 632, 69);
pdf_lineto($pdf, 646, 49);
pdf_lineto($pdf, 666, 150);
pdf_closepath($pdf);
pdf_fill($pdf);
Because you want the polygon outlined as well, you need to set up the same path a second time but call pdf_stroke() instead of pdf_fill().
Because the multipointed star is a complex repetitive shape, we wrote a function to calculate the locations in the path. Our function is called draw_star() and requires x and y coordinates for the center, the number of points required, the radius, the length of the points, a PDF document identifier, and a Boolean value to indicate whether the star shape should be filled in or just an outline.
The draw_star() function uses some basic trigonometry to calculate locations for a series of points to lay out a star. For each point you request your star to have, you find a point on the radius of the star and a point on a smaller circle $point_size within the outer circle and draw a line between them. One point worth noting is that PHP’s trigonometric functions such as cos() and sin() work in radians rather than degrees.
Using a function and some mathematics, you can accurately generate a complex repetitive shape. Had you wanted a complicated pattern for the page border, you could have used a similar approach.
When all your page elements are generated, you need to end the page and the document.
Handling Problems with Headers
One minor issue to note in all these scripts is that you need to tell the browser what type of data you are going to send it. You do this by sending a content-type HTTP header, as in these examples:
header('Content-type: application/msword);
or
header('Content-type: application/pdf'),
One point to be aware of is that browsers deal with these headers inconsistently. In particular, Internet Explorer often chooses to ignore the MIME type and attempt to automatically detect the type of file. (This particular problem seems to have improved in recent versions of Internet Explorer, so if you experience this issue, the easiest solution may be to upgrade your browser.)
Some of the headers seem to cause problems with session control headers. There are a few ways around this problem. We found that using GET parameters rather than POST or session variable parameters avoids the problem.
Another solution is not to use an inline PDF but to get the user to download it instead, as shown in the Hello World PDFlib example.
You can also avoid problems if you are willing to write two slightly different versions of your code, one for Netscape and one for Internet Explorer.
Extending the Project
Adding some more realistic assessment tasks to the examination obviously could extend this chapter’s project, but we really intended it as an example of ways to deliver your own documents.
Customized documents that you might want to deliver online could include legal documents, partially filled-in order or application forms, or forms needed by government departments.
Next
In the next chapter, we examine PHP’s XML capabilities and use PHP to connect to Amazon’s Web Services API using REST and SOAP.