
31 Building Web Forums
ONE GOOD WAY TO GET USERS TO RETURN TO your site is to offer web forums. They can be used for purposes as varied as philosophical discussion groups and product technical support. In this chapter, you implement a web forum in PHP. An alternative is to use an existing package, such as Phorum, to set up your forums.
Web forums are sometimes also called discussion boards or threaded discussion groups. The idea of a forum is that people can post articles or questions to it, and others can read and reply to their questions. Each topic of discussion in a forum is called a thread.
For this project, you implement a web forum called blah-blah. Users will be able to
![]() Start new threads of discussion by posting articles
Start new threads of discussion by posting articles
![]() Post articles in reply to existing articles
Post articles in reply to existing articles
![]() View articles that have been posted
View articles that have been posted
![]() View the threads of conversation in the forum
View the threads of conversation in the forum
![]() View the relationship between articles—that is, see which articles are replies to other articles
View the relationship between articles—that is, see which articles are replies to other articles
Understanding the Process
Setting up a forum is actually quite an interesting process. You need some way of storing the articles in a database with author, title, date, and content information. At first glance, this database might not seem much different from the Book-O-Rama database.
The way most threaded discussion software works, however, is that, along with showing you the available articles, it shows you the relationship between articles. That is, you are able to see which articles are replies to other articles (and which article they’re following up) and which articles are new topics of discussion.
You can see examples of discussion boards that implement this format in many places, including Slashdot: http://slashdot.org
Deciding how to display these relationships requires some careful thought. For this system, users should be able to view an individual message, a thread of conversation with the relationships shown, or all the threads on the system.
Users must also be able to post new topics or replies. This is the easy part.
Solution Components
As we mentioned previously, the process of storing and retrieving the author and text of a message is easy. The most difficult part of this application is finding a database structure that will store the information you want and a way of navigating that structure efficiently.
The structure of articles in a discussion might look like the one shown in Figure 31.1.
Figure 31.1 An article in a threaded discussion might be the first article in a new topic, but more commonly it is a response to another article.

In this diagram, you can see that the initial posting starts off a topic, with three replies. Some of the replies have replies. These replies could also have replies, and so on.
Looking at the diagram gives you a clue as to how you can store and retrieve the article data and the links between articles. This diagram shows a tree structure. If you’ve done much programming, you’ll know that this is one of the staple data structures used. In the diagram, there are nodes—or articles—and links—or relationships between articles—just as in any tree structure. (If you are not familiar with trees as a data structure, don’t worry; we cover the basics as we go.)
The tricks to getting this all to work are
![]() Finding a way to map this tree structure into storage—in this case, into a MySQL database
Finding a way to map this tree structure into storage—in this case, into a MySQL database
![]() Finding a way to reconstruct the data as required
Finding a way to reconstruct the data as required
For this project, you begin by implementing a MySQL database that enables you to store articles between each use. You then build simple interfaces to enable saving of articles.
When you load the list of articles for viewing, you will load the headers of each article into a tree_node PHP class. Each tree_node will contain an article’s headers and a set of the replies to that article.
The replies will be stored in an array. Each reply will itself be a tree_node that can contain an array of replies to that article, which are themselves tree_nodes, and so on. This process continues until you reach the so-called leaf nodes of the tree, the nodes that do not have any replies. You then have a tree structure that looks like the one in Figure 31.1.
Some terminology: The message that you are replying to can be called the parent node of the current node. Any replies to the message can be called the children of the current node. If you imagine that this tree structure is like a family tree, this terminology will be easy to remember.
The first article in this tree structure—the one with no parent—is sometimes called the root node.
To build and display the tree structure for this project, you will write recursive functions. (We discussed recursion in Chapter 5, “Reusing Code and Writing Functions.”)
We decided to use a class for this structure because it’s the easiest way to build a complex, dynamically expanding data structure for this application. It also means you have quite simple, elegant code to do something quite complex.
Solution Overview
To really understand this project, it’s probably a good idea to work through the code, which we do in a moment. This application has less bulk than some of the others, but the code is a bit more complex.
This application contains only three real pages. It has a main index page that shows all the articles in the forum as links to the articles. From here, you can add a new article, view a listed article, or change the way the articles are viewed by expanding and collapsing branches of the tree. (More on this shortly.) From the article view page, you can post a reply to that article or view the existing replies to that article. The new article page enables you to enter a new post, either a reply to an existing message or a new, unrelated message.
The system flow diagram is shown in Figure 31.2.
Figure 31.2 The blah-blah forum system has three main parts.

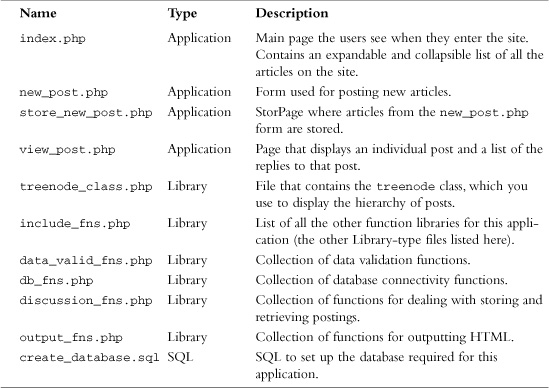
A summary of the files in this application is shown in Table 31.1.
Table 31.1 Files in the Web Forum Application
Now let’s look at the implementation.
Designing the Database
There are a few attributes you need to store about each article posted to the forum: the name of the person who wrote it, called the poster; the title of the article; the time it was posted; and the article body. You therefore need a table of articles, and you need to create a unique ID for each article, called the postid.
Each article needs to have some information about where it belongs in the hierarchy. You could store information about an article’s children with the article. However, each article can have many replies, so storing all this information can lead to some problems in database construction. Because each article can be a reply to only one other, it is easier to store a reference to the parent article—that is, the article that this article is replying to.
You therefore need to store the following data for each article:
![]()
postid—A unique ID for each article
![]()
parent—The postid of the parent article
![]()
poster—The author of this article
![]()
title—The title of this article
![]()
posted—The date and time that the article was posted
![]()
message—The body of the article
You will also add a couple of optimizations to this information.
When you are trying to determine whether an article has any replies, you have to run a query to see whether any other articles have this article as a parent. You need this information for every post that you list. The fewer queries you have to run, the faster the code will run. You can remove the need for these queries by adding a field to show whether there are any replies. You can call this field children and make it effectively Boolean: The value will be 1 if the node has children and 0 (zero) if it does not.
There is always a price to pay for optimizations. Here, you store redundant data. Because you are storing the data in two ways, you must be careful to make sure that the two representations agree with each other. When you add children, you must update the parent. If you allow the deletion of children, you need to update the parent node to make sure the database is consistent. In this project, you are not going to build a facility for deleting articles, so you avoid half of this problem. If you decide to extend this code, bear this issue in mind.
You will make one other optimization in this project: You will separate the message bodies from the other data and store them in a separate table. The reason for this is that this attribute will have the MySQL type text. Having this type in a table can slow down queries on that table. Because you will do many small queries to build the tree structure, using this type would slow it down quite a lot. With the message bodies in a separate table, you can just retrieve them when a user wants to look at a particular message.
MySQL can search fixed-sized records faster than variable-sized records. If you need to use variable-sized data, you can help by creating indexes on the fields that will be used to search the database. For some projects, you would be best served by leaving the text field in the same record as everything else and specifying indexes on all the columns that you will search on. Indexes take time to generate, though, and the data in the forums is likely to be changing all the time, so you would need to regenerate your indexes frequently.
You will also add an area attribute in case you later decide to implement multiple forums with the one application. You won’t implement this capability here, but this way it is reserved for future use.
Given all these considerations, the SQL to create the database for the forum database is shown in Listing 31.1.
create database discussion;
use discussion;
create table header
(
parent int not null,
poster char(20) not null,
title char(20) not null,
children int default 0 not null,
area int default 1 not null,
posted datetime not null,
postid int unsigned not null auto_increment primary key
);
create table body
(
postid int unsigned not null primary key,
message text
);
grant select, insert, update, delete
on discussion.*
to discussion@localhost identified by 'password';
You can create this database structure by running this script through MySQL as follows:
mysql -u root -p < create_database.sql
You need to supply your root password. You should probably also change the password we set up for the discussion user to something better.
To understand how this structure will hold articles and their relationship to each other, look at Figure 31.3.
Figure 31.3 The database holds the tree structure in a flattened relational form.

As you can see in the figure, the parent field for each article in the database holds the postid of the article above it in the tree. The parent article is the article that is being replied to.
You can also see that the root node, postid 1, has no parent. All new topics of discussion will be in this position. For articles of this type, you store their parent as a 0 (zero) in the database.
Viewing the Tree of Articles
Next, you need a way of getting information out of the database and representing it back in the tree structure. You do this with the main page, index.php. For the purposes of this explanation, we input some sample posts via the article posting scripts new_post.php and store_new_post.php. We look at them in the next section.
We cover the article list first because it is the backbone of the site. After this, everything else will be easy.
Figure 31.4 shows the initial view of the articles in the site that a user would see.
This figure shows all the initiating articles. None of them are replies; each one is the first article on a particular topic.
Figure 31.4 The initial view of the article list shows the articles in “collapsed” form.

In this case, you have a number of options. The menu bar lets you add a new post and expand or collapse your view of the articles.
To understand what these options mean, look at the posts. Some of them have plus symbols next to them. This means that these articles have been replied to. To see the replies to a particular article, you can click the plus symbol. The result of clicking one of these symbols is shown in Figure 31.5.
Figure 31.5 The thread of discussion about persistence has been expanded.
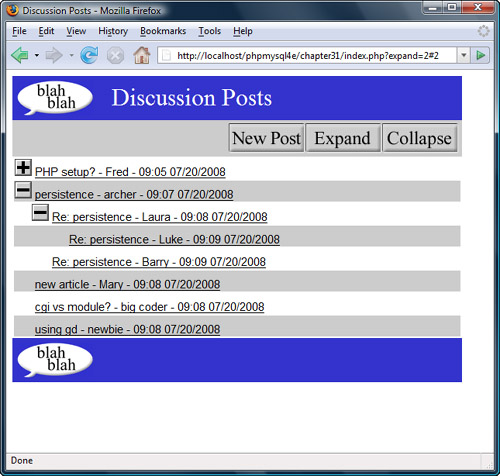
As you can see, clicking the plus symbol displays the replies to that first article. The plus symbol then turns into a minus symbol. If you click this symbol, all the articles in this thread will be collapsed, returning you to the initial view.
You might also notice that one of the replies in Figure 31.5 has a plus symbol next to it. This means that there are replies to this reply. The level of replies can continue to an arbitrary depth, and you can view each reply set by clicking on the appropriate plus symbol.
The two menu bar options Expand and Collapse expand all possible threads and collapse all possible threads, respectively. The result of clicking the Expand button is shown in Figure 31.6.
Figure 31.6 All the threads have now been expanded.

If you look closely at Figures 31.5 and 31.6, you can see that some parameters are passed back to index.php in the command line. In Figure 31.5, the URL looks as follows:
http://localhost/phpmysql4e/chapter31/index.php?expand=2#2
The script reads this line as “Expand the item with postid 10.” The # is just an HTML anchor that scrolls the page down to the part that has just been expanded.
In Figure 31.6, the URL reads
http://localhost/phpmysql4e/chapter31/index.php?expand=all
Clicking the Expand button passes the parameter expand with the value all.
Expanding and Collapsing
To see how to create the article view, look at the index.php script, shown in Listing 31.2.
Listing 31.2 index.php—Script to Create the Article View on the Main Page of the Application
?php
include ('include_fns.php'),
session_start();
// check if we have created our session variable
if(!isset($_SESSION['expanded'])) {
$_SESSION['expanded'] = array();
}
// check if an expand button was pressed
// expand might equal 'all' or a postid or not be set
if(isset($_GET['expand'])) {
if($_GET['expand'] == 'all') {
expand_all($_SESSION['expanded']);
} else {
$_SESSION['expanded'][$_GET['expand']] = true;
}
}
// check if a collapse button was pressed
// collapse might equal all or a postid or not be set
if(isset($_GET['collapse'])) {
if($_GET['collapse']=='all') {
$_SESSION['expanded'] = array();
} else {
unset($_SESSION['expanded'][$_GET['collapse']]);
}
}
do_html_header('Discussion Posts'),
display_index_toolbar();
// display the tree view of conversations
display_tree($_SESSION['expanded']);
do_html_footer();
?>
This script uses the following three variables to do its job:
![]() The session variable
The session variable expanded, which keeps track of which threads are expanded. This variable can be maintained from view to view, so you can have multiple threads expanded. The expanded variable is an associative array that contains the postid of articles that will have their replies expanded.
![]() The parameter
The parameter expand, which tells the script which new threads to expand.
![]() The parameter
The parameter collapse, which tells the script which threads to collapse.
When you click a plus or minus symbol or the Expand or Collapse button, this action recalls the index.php script with new parameters for expand or collapse. You use expanded from page to page to track which threads should be expanded in any given view.
The index.php script begins by starting a session and adding the expanded variable as a session variable if this has not already been done. After that, the script checks whether it has been passed an expand or collapse parameter and modifies the expanded array accordingly. Look at the code for the expand parameter:
if(isset($_GET['expand'])) {
if($_GET['expand'] == 'all') {
expand_all($_SESSION['expanded']);
} else {
$_SESSION['expanded'][$_GET['expand']] = true;
}
}
If you click on the Expand button, the function expand_all() is called to add all the threads that have replies into the expanded array. (We look at this in a moment.)
If you try to expand a particular thread, you will be passed a postid via expand. You therefore add a new entry to the expanded array to reflect this.
The expand_all() function is shown in Listing 31.3.
Listing 31.3 expand_all() Function from discussion_fns.php—Processes the $expanded Array to Expand All the Threads in the Forum
function expand_all(&$expanded) {
// mark all threads with children as to be shown expanded
$conn = db_connect();
$query = "select postid from header where children = 1";
$result = $conn->query($query);
$num = $result->num_rows;
for($i = 0; $i<$num; $i++) {
$this_row = $result->fetch_row();
$expanded[$this_row[0]]=true;
}
}
This function runs a database query to work out which of the threads in the forum have replies, as follows:
select postid from header where children = 1
Each of the articles returned is then added to the expanded array. You run this query to save time later. You could simply add all articles to the expanded list, but it would be wasteful to try processing replies that do not exist.
Collapsing the articles works in the opposite way, as follows:
if(isset($_GET['collapse'])){
if($_GET['collapse']=='all') {
$_SESSION['expanded'] = array();
} else {
unset($_SESSION['expanded'][$_GET['collapse']]);
}
}
You can remove items from the expanded array by unsetting them. You remove the thread that is to be collapsed or unset the entire array if the entire page is to be collapsed.
All this is preprocessing, so you know which articles should be displayed and which should not. The key part of the script is the call to display_tree($_SESSION['expanded']); which actually generates the tree of displayed articles.
Displaying the Articles
Let’s look at the display_tree() function, shown in Listing 31.4.
Listing 31.4 display_tree() Function from output_fns.php—Creates the Root Node of the Tree Structure
function display_tree($expanded, $row = 0, $start = 0)
// display the tree view of conversations
global $table_width;
echo "<table width="".$table_width."">";
// see if we are displaying the whole list or a sublist
if($start>0) {
$sublist = true;
} else {
$sublist = false;
}
// construct tree structure to represent conversation summary
$tree = new treenode($start, ' ', ' ', ' ', 1, true, -1, $expanded,
$sublist);
// tell tree to display itself
$tree->display($row, $sublist);
echo "</table>";
}
The main role of the display_tree() function is to create the root node of the tree structure. You use it to display the whole index and to create subtrees of replies on the view_post.php page. As you can see, it takes three parameters. The first, $expanded, is the list of article postids to display in an expanded fashion. The second, $row, is an indicator of the row number that will be used to work out the alternating colors of the rows in the list.
The third parameter, $start, tells the function where to start displaying articles. This is the postid of the root node for the tree to be created and displayed. If you are displaying the whole thing, as you are on the main page, this will be 0 (zero), meaning display all the articles with no parent. If this parameter is 0, you set $sublist to false and display the whole tree.
If the parameter is greater than 0, you use it as the root node of the tree to display, set $sublist to true, and build and display only part of the tree. (You use sublists in the view_post.php script.)
The most important task this function performs is instantiating an instance of the treenode class that represents the root of the tree. This is not actually an article, but it acts as the parent of all the first-level articles, which have no parent. After the tree has been constructed, you simply call its display function to actually display the list of articles.
Using the treenode Class
The code for the treenode class is shown in Listing 31.5. (You might find it useful at this stage to look over Chapter 6, “Object-Oriented PHP,” to remind yourself how classes work.)
Listing 31.1 treenode Class from treenode_class.php—The Backbone of the Application
<?php
// functions for loading, constructing and
// displaying the tree are in this file
class treenode {
// each node in the tree has member variables containing
// all the data for a post except the body of the message
public $m_postid;
public $m_title;
public $m_poster;
public $m_posted;
public $m_children;
public $m_childlist;
public $m_depth;
public function __construct($postid, $title, $poster, $posted,
$children, $expand, $depth, $expanded, $sublist) {
// the constructor sets up the member variables, but more
// importantly recursively creates lower parts of the tree
$this->m_postid = $postid;
$this->m_title = $title;
$this->m_poster = $poster;
$this->m_posted = $posted;
$this->m_children =$children;
$this->m_childlist = array();
$this->m_depth = $depth;
// we only care what is below this node if it
// has children and is marked to be expanded
// sublists are always expanded
if(($sublist || $expand) && $children) {
$conn = db_connect();
$query = "select * from header where
parent = ' " .$postid."' order by posted";
$result = $conn->query($query);
for ($count=0; $row = @$result->fetch_assoc(); $count++) {
if($sublist || $expanded[$row['postid']] == true) {
$expand = true;
} else {
$expand = false;
}
$this->m_childlist[$count]= new treenode($row['postid'],
$row['title'], $row['poster'],$row['posted'],
$row['children'], $expand, $depth+1, $expanded,
$sublist);
}
}
}
function display($row, $sublist = false) {
// as this is an object, it is responsible for displaying itself
// $row tells us what row of the display we are up to
// so we know what color it should be
// $sublist tells us whether we are on the main page
// or the message page. Message pages should have
// $sublist = true.
// On a sublist, all messages are expanded and there are
// no "+" or "-" symbols.
// if this is the empty root node skip displaying
if($this->m_depth>-1) {
//color alternate rows
echo "<tr><td bgcolor="";
if ($row%2) {
echo "#cccccc">";
} else {
echo "#ffffff">";
}
// indent replies to the depth of nesting
for($i = 0; $i < $this->m_depth; $i++) {
echo "<img src="images/spacer.gif" height="22"
width="22" alt="" valign="bottom" />";
}
// display + or - or a spacer
if ((!$sublist) && ($this->m_children) &&
(sizeof($this->m_childlist)))
// we’re on the main page, have some children, and they’re expanded
// we are expanded - offer button to collapse
echo "<a href="index.php?collapse=".
$this->m_postid."#".$this->m_postid.""><img
src="images/minus.gif" valign="bottom"
height="22" width="22" alt="Collapse Thread"
border="0" /></a>
";
} else if(!$sublist && $this->m_children) {
// we are collapsed - offer button to expand
echo "<a href="index.php?expand=".
$this->m_postid."#".$this->m_postid.""><img
src="images/plus.gif" valign="bottom"
height="22" width="22" alt="Expand Thread"
border="0"/></a>
";
} else {
// we have no children, or are in a sublist, do not give button
echo "<img src="images/spacer.gif" height="22"
width="22" alt="" valign="bottom"/>
";
}
echo "<a name="".$this->m_postid.""><a href=
"view_post.php?postid=".$this->m_postid."">".
$this->m_title." - ".$this->m_poster." - ".
reformat_date($this->m_posted)."</a></td></tr>";
// increment row counter to alternate colors
$row++;
}
// call display on each of this node’s children
// note a node will only have children in its list if expanded
$num_children = sizeof($this->m_childlist);
for($i = 0; $i<$num_children; $i++) {
$row = $this->m_childlist[$i]->display($row, $sublist);
}
return $row;
}
}
?>
This class contains the functionality that drives the tree view in this application.
One instance of the treenode class contains details about a single posting and links to all the reply postings of that class. This gives you the following member variables:
public $m_postid;
public $m_title;
public $m_poster;
public $m_posted;
public $m_children;
public $m_childlist;
public $m_depth;
Notice that the treenode does not contain the body of the article. There is no need to load the body until a user goes to the view_post.php script. You need to try to make this process relatively fast because you are doing a lot of data manipulation to display the tree list and need to recalculate when the page is refreshed or a button is pressed.
These variables follow a naming scheme commonly used in object-oriented applications—starting variables with m_ to indicate that they are member variables of the class.
Most of these variables correspond directly to rows from the header table in the database. The exceptions are $m_childlist and $m_depth. You use the variable $m_childlist to hold the replies to this article. The variable $m_depth will hold the number of tree levels that you are down; this information will be used for creating the display.
The constructor function sets up the values of all the variables, as follows:
public function __construct($postid, $title, $poster, $posted, $children,
$expand, $depth, $expanded, $sublist){
// the constructor sets up the member variables, but more
// importantly recursively creates lower parts of the tree
$this->m_postid = $postid;
$this->m_title = $title;
$this->m_poster = $poster;
$this->m_posted = $posted;
$this->m_children =$children;
$this->m_childlist = array();
$this->m_depth = $depth;
When you construct the root treenode from display_tree() from the main page, you actually create a dummy node with no article associated with it. You pass in some initial values as follows:
$tree = new treenode($start, ' ', ' ', ' ', 1, true, -1, $expanded, $sublist);
This line creates a root node with a $postid of 0 (zero). It can be used to find all the first-level postings because they have a parent of 0. You set the depth to -1 because this node isn’t actually part of the display. All the first-level postings have a depth of 0 and are located at the far left of the screen. Subsequent depths step toward the right.
The most important thing that happens in this constructor is that the child nodes of this node are instantiated. You begin this process by checking whether you need to expand the child nodes. You perform this process only if a node has some children, and you have elected to display them:
if(($sublist||$expand) && $children){
$conn = db_connect();
You then connect to the database and retrieve all the child posts, as follows:
$query = "select * from header where parent = ' " .$postid."' order by posted";
$result = $conn->query($query);
Next, you fill the array $m_childlist with instances of the treenode class, containing the replies to the post stored in this treenode, as follows:
for ($count=0; $row = @$result->fetch_assoc(); $count++) {
if($sublist || $expanded[$row['postid']] == true) {
$expand = true;
} else {
$expand = false;
}
$this->m_childlist[$count]= new treenode($row['postid'],$row['title'],
$row['poster'],$row['posted'], $row['children'], $expand,
$depth+1, $expanded, $sublist);
}
This last line creates the new treenodes, following exactly the same process we just walked through, but for the next level down the tree. This is the recursive part: A parent tree node calls the treenode constructor, passes its own postid as parent, and adds one to its own depth before passing it.
Each treenode, in turn, is created and then creates its own children until you run out of replies or levels that you want to expand to.
After all that’s done, you call the root treenode’s display function (back in display_tree()), as follows:
$tree->display($row, $sublist);
The display() function begins by checking whether this is the dummy root node:
if($this->m_depth > -1)
In this way, the dummy can be left out of the display. You don’t want to completely skip the root node, though. You do not want it to appear, but it needs to notify its children that they need to display themselves.
The display() function then starts drawing the table containing the articles. It uses the modulus operator (%) to decide what color background this row should have (hence they alternate):
//color alternate rows
echo "<tr><td bgcolor="";
if ($row%2) {
echo "#cccccc">";
} else {
echo "#ffffff">";
}
It then uses the $m_depth member variable to work out how much to indent the current item. If you look back at the figures, you will see that the deeper the level a reply is on, the further it is indented. You code this as follows:
// indent replies to the depth of nesting
for($i = 0; $i < $this->m_depth; $i++) {
echo "<img src="images/spacer.gif" height="22"
width="22" alt="" valign="bottom" />";
}
The next part of the function works out whether to supply a plus or minus button or nothing at all:
// display + or - or a spacer
if ( !$sublist && $this->m_children && sizeof($this->m_childlist)) {
// we’re on the main page, have some children, and they’re expanded
// we are expanded - offer button to collapse
echo "<a href="index.php?collapse=".
$this->m_postid."#".$this->m_postid.""><img
src="images/minus.gif" valign="bottom" height="22"
width="22" alt="Collapse Thread" border="0" /></a>
";
} else if(!$sublist && $this->m_children) {
// we are collapsed - offer button to expand
echo "<a href="index.php?expand=".
$this->m_postid."#".$this->m_postid.""><img
src="images/plus.gif" valign="bottom" height="22"
width="22" alt="Expand Thread" border="0" /></a>
";
} else {
// we have no children, or are in a sublist, do not give button
echo "<img src="images/spacer.gif" height="22" width="22"
alt="" valign="bottom"/>
";
}
Next, you display the actual details of this node:
echo "<a name="".$this->m_postid.""><a href=
"view_post.php?postid=".$this->m_postid."">".
$this->m_title." - ".$this->m_poster." - ".
reformat_date($this->m_posted)."</a></td></tr>";
You then change the color for the next row:
// increment row counter to alternate colors
$row++;
After that, you add some code that will be executed by all treenodes, including the root one, as follows:
// call display on each of this node’s children
// note a node will only have children in its list if expanded
$num_children = sizeof($this->m_childlist);
for($i = 0; $i<$num_children; $i++) {
$row = $this->m_childlist[$i]->display($row, $sublist);
}
return $row;
Again, this is a recursive function call, which calls on each of this node’s children to display themselves. You pass them the current row color and get them to pass it back when they are finished with it so that you can keep track of the alternating color.
That’s it for this class. The code is fairly complex. You might like to experiment with running the application and then come back to look at it again when you are comfortable with what it does.
Viewing Individual Articles
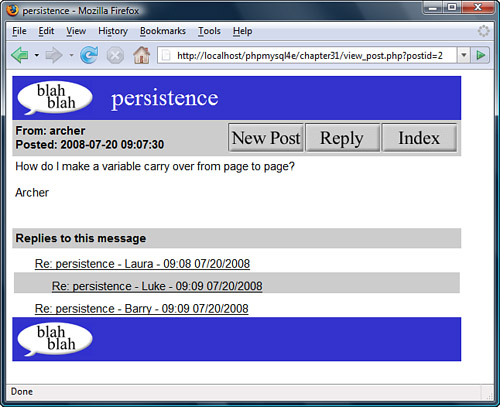
The display_tree() call gives you links to a set of articles. If you click one of these articles, you will go to the view_post.php script, with a parameter of the postid of the article to be viewed. Sample output from this script is shown in Figure 31.7.
The view_post.php script, shown in Listing 31.6, shows the message body, as well as the replies to this message. The replies are again displayed as a tree but completely expanded this time, and without any plus or minus buttons. This is the effect of the $sublist switch coming into action.
Listing 31.6 view_post.php—Displays a Single Message Body
<?php
// include function libraries
include ('include_fns.php'),
$postid = $_GET['postid'];
// get post details
$post = get_post($postid);
do_html_header($post['title']);
// display post
display_post($post);
// if post has any replies, show the tree view of them
if($post['children'])
echo "<br /><br />";
display_replies_line();
display_tree($_SESSION['expanded'], 0, $postid);
}
do_html_footer();
?>
Figure 31.7 You can now see the message body for this posting.
This script uses three main function calls to do its job: get_post(), display_post(), and display_tree(). The get_post() function, shown in Listing 31.7, pulls the function details out of the database.
Listing 31.7 get_post() Function from discussion_fns.php—Retrieves a Message from the Database
function get_post($postid) {
// extract one post from the database and return as an array
if(!$postid) {
return false;
}
$conn = db_connect();
//get all header information from 'header'
$query = "select * from header where postid = ' " .$postid . " ' ";
$result = $conn->query($query);
if($result->num_rows!=1) {
return false;
}
$post = $result->fetch_assoc();
// get message from body and add it to the previous result
$query = "select * from body where postid = ' " .$postid . " ' ";
$result2 = $conn->query($query);
if($result2->num_rows>0) {
$body = $result2->fetch_assoc();
if($body) {
$post['message'] = $body['message'];
}
}
return $post;
}
This function, given a postid, performs the two queries required to retrieve the message header and body for that posting and puts them together into a single array, which it then returns.
The results of the get_post() function are then passed to the display_post() function from output_fns.php. This function just prints out the array with some HTML formatting, so we did not include it here.
Finally, the view_post.php script checks whether there are any replies to this article and calls display_tree() to show them in the sublist format—that is, fully expanded with no plusses or minuses.
Adding New Articles
After all that, we can now look at how a new post is added to the forum. A user can add a post in two ways: first, by clicking on the New Post button in the index page, and second, by clicking on the Reply button on the view_post.php page.
These actions both activate the same script, new_post.php, just with different parameters. Figure 31.8 shows the output from new_post.php after it is reached by clicking the Reply button.
Figure 31.8 In replies, the text of the original message is automatically inserted and marked.

First, look at the URL shown in the figure:
http://localhost/phpmysql4e/chapter31/new_post.php?parent=5
The parameter passed in as parent will be the parent postid of the new posting. If you click New Post instead of Reply, you will get parent=0 in the URL.
Second, you can see that, in a reply, the text of the original message is inserted and marked with a > character, as is the case in most mail and news-reading programs.
Third, you can see that the title of this message defaults to the title of the original message prefixed with Re:.
Let’s look at the code that produces this output; it is shown in Listing 31.8.
Listing 31.8 new_post.php—Allows a User to Type a New Post or Reply to an Existing Post
<?php
include ('include_fns.php'),
$title = $_POST['title'];
$poster = $_POST['poster'];
$message = $_POST['message'];
if(isset($_GET['parent'])) {
$parent = $_GET['parent'];
} else {
$parent = $_POST['parent'];
}
if(!$area) {
$area = 1;
}
if(!$error){
if(!$parent){
$parent = 0;
if(!$title) {
$title = 'New Post';
}
} else {
// get post name
$title = get_post_title($parent);
// append Re:
if(strstr($title, 'Re: ') == false) {
$title = 'Re: '.$title;
}
//make sure title will still fit in db
$title = substr($title, 0, 20);
//prepend a quoting pattern to the post you are replying to
$message = add_quoting(get_post_message($parent));
}
}
do_html_header($title);
display_new_post_form($parent, $area, $title, $message, $poster);
if($error) {
echo "<p>Your message was not stored.</p>
<p>Make sure you have filled in all fields and
try again.</p>";
}
do_html_footer();
?>
After some initial setup, the new_post.php script checks whether the parent is 0 (zero) or otherwise. If it is 0, this topic is new, and little further work is needed.
If this message is a reply ($parent is the postid of an existing article), the script goes ahead and sets up the title and text of the original message, as follows:
// get post name
$title = get_post_title($parent);
// append Re:
if(strstr($title, 'Re: ') == false) {
$title = 'Re: '.$title;
}
//make sure title will still fit in db
$title = substr($title, 0, 20);
//prepend a quoting pattern to the post you are replying to
$message = add_quoting(get_post_message($parent));
The functions used here are get_post_title(), get_post_message(), and add_quoting(). These functions, all from the discussion_fns.php library, are shown in Listings 31.9, 31.10, and 31.11, respectively.
Listing 31.9 get_post_title() Function from discussion_fns.php—Retrieves a Message’s Title from the Database
function get_post_title($postid) {
// extract one post’s name from the database
if(!$postid) {
return ' ';
}
$conn = db_connect();
//get all header information from 'header'
$query = "select title from header where postid = ' " .$postid . " ' ";
$result = $conn->query($query);
if($result->num_rows!=1) {
return ' ';
}
$this_row = $result->fetch_array();
return $this_row[0];
}
Listing 31.10 get_post_message() Function from discussion_fns.php—Retrieves a Message—s Body from the Database
function get_post_message($postid) {
// extract one post’s message from the database
if(!$postid){
return' ';
}
$conn = db_connect();
$query = "select message from body where postid = ' " .$postid . " ' ";
$result = $conn->query($query);
if($result->num_rows>0) {
$this_row = $result->fetch_array();
return $this_row[0];
}
}
These first two functions retrieve an article’s header and body, respectively, from the database.
Listing 31.11 add_quoting() Function from discussion_fns.php—Indents a Message Text with > Symbols
function add_quoting($string, $pattern = '> ') {
// add a quoting pattern to mark text quoted in your reply
return $pattern.str_replace("
", "
$pattern",$string);
}
The add_quoting() function reformats the string to begin each line of the original text with a symbol, which defaults to >.
After the user types in his reply and clicks the Post button, he is taken to the store_new_post.php script. Sample output from this script is shown in Figure 31.9.
Figure 31.9 The new post is now visible in the tree.

The new post is shown in the figure, under Re: using gd - Julie - 09:36 07/20/2008. Other than that, this page looks like the regular index.php page.
Let’s look at the code for store_new_post.php, shown in Listing 31.12.
Listing 31.12 store_new_post.php—Puts the New Post in the Database
<?php
include ('include_fns.php'),
if($id = store_new_post($_POST)) {
include ('index.php'),
} else {
$error = true;
include ('new_post.php'),
}
?>
As you can see, this script is short. Its main task is to call the store_new_post() function, which is shown in Listing 31.13. This page has no visual content of its own. If storing succeeds, you see the index page. Otherwise, you go back to the new_post.php page so that the user can try again.
Listing 31.13 store_new_post() Function from discussion_fns.php—Validates and Stores the New Post in the Database
function store_new_post($post) {
//validate clean and store a new post
$conn = db_connect();
// check no fields are blank
if(!filled_out($post)) {
return false;
}
$post = clean_all($post);
//check parent exists
if($post['parent']!=0) {
$query = "select postid from header where
postid = ' " .$post['parent'] . " ' ";
$result = $conn->query($query);
if($result->num_rows!=1) {
return false;
}
}
// check not a duplicate
$query = "select header.postid from header, body where
header.postid = body.postid and
header.parent = ".$post['parent']." and
header.poster = ' " .$post['poster']."' and
header.title = ' " .$post['title']."' and
header.area = ".$post['area']." and
body.message = ' " .$post['message'] . " ' ";
$result = $conn->query($query);
if (!$result) {
return false;
}
if($result->num_rows>0) {
$this_row = $result->fetch_array();
return $this_row[0];
}
$query = "insert into header values
(' " .$post['parent']."',
' " .$post['poster']."',
' " .$post['title']."',
0,
' " .$post['area']."',
now(),
NULL
)";
$result = $conn->query($query);
if (!$result) {
return false;
}
// note that our parent now has a child
$query = "update header set children = 1 where postid = ' " .$post['parent'] . " ' ";
$result = $conn->query($query);
if (!$result) {
return false;
}
// find our post id, note that there could be multiple headers
// that are the same except for id and probably posted time
$query = "select header.postid from header left join body
on header.postid = body.postid
where parent = ' " .$post['parent']."'
and poster = ' " .$post['poster']."'
and title = ' " .$post['title']."'
and body.postid is NULL";
$result = $conn->query($query);
if (!$result) {
return false;
}
if($result->num_rows>0) {
$this_row = $result->fetch_array();
$id = $this_row[0];
}
if($id) {
$query = "insert into body values
($id, ' " .$post['message']."')";
$result = $conn->query($query);
if (!$result) {
return false;
}
return $id;
}
}
This function is long but not overly complex. It is only long because inserting a posting means inserting entries in the header and body tables and updating the parent article’s row in the header table to show that it now has children.
That is the end of the code for the web forum application.
Adding Extensions
There are many extensions you could add to this project:
![]() You could add navigation to the view options so that from a post, you could navigate to the next message, the previous message, the next-in-thread message, or the previous-in-thread message.
You could add navigation to the view options so that from a post, you could navigate to the next message, the previous message, the next-in-thread message, or the previous-in-thread message.
![]() You could add an administration interface for setting up new forums and deleting old posts.
You could add an administration interface for setting up new forums and deleting old posts.
![]() You could add user authentication so that only registered users could post.
You could add user authentication so that only registered users could post.
![]() You could add some kind of moderation or censorship mechanism.
You could add some kind of moderation or censorship mechanism.
Look at existing systems for ideas.
Using an Existing System
One noteworthy existing system is Phorum, an open source web forums project. It has different navigation and semantics from the one we created here, but its structure is relatively easily customized to fit into your own site. A notable feature of Phorum is that it can be configured by the actual user to display in either a threaded or flat view. You can find out more about it at http://www.phorum.org
Next
In Chapter 32, “Generating Personalized PDF Documents,” you use the PDF format to deliver documents that are attractive, print consistently, and are somewhat tamperproof. This capability is useful for a range of service-based applications, such as generating contracts online.