
9 Creating Your Web Database
IN THIS CHAPTER, WE EXPLAIN HOW TO set up a MySQL database for use on a website.
Key topics covered in this chapter include
![]() Setting up users and privileges
Setting up users and privileges
![]() Introducing the privilege system
Introducing the privilege system
![]() Choosing column types in MySQL
Choosing column types in MySQL
In this chapter, we follow through with the Book-O-Rama online bookstore application discussed in the preceding chapter. As a reminder, here is the schema for the Book-O-Rama application:
Customers(CustomerID, Name, Address, City)
Orders(OrderID, CustomerID, Amount, Date)
Books(ISBN, Author, Title, Price)
Order_Items(OrderID, ISBN, Quantity)
Book_Reviews(ISBN, Reviews)
Remember that each primary key is underlined and each foreign key is italic.
To use the material in this section, you must have access to MySQL. This usually means that you have completed the basic install of MySQL on your web server. This step includes
![]() Installing the files
Installing the files
![]() Setting up a user for MySQL to run as
Setting up a user for MySQL to run as
![]() Running
Running mysql_install_db, if required
![]() Setting the root password
Setting the root password
![]() Deleting the anonymous user and test database
Deleting the anonymous user and test database
![]() Starting the MySQL server for the first time and setting it up to run automatically
Starting the MySQL server for the first time and setting it up to run automatically
If you’ve completed all these tasks, you can go right ahead and read this chapter. If you haven’t, you can find instructions on how to do these things in Appendix A, “Installing PHP and MySQL.”
If you have problems at any point in this chapter, your MySQL system might not be set up correctly. If that is the case, refer to this list and Appendix A to make sure that your setup is correct.
You should also have access to MySQL on a machine that you do not administer, such as a web hosting service, a machine at your workplace, and so on.
If this is the case, to work through the examples or to create your own database, you need to have your administrator set up a user and database for you to work with and tell you the username, password, and database name she has assigned to you.
You can either skip the sections of this chapter that explain how to set up users and databases or read them to better explain what you need to your system administrator. As a typical user, you cannot execute the commands to create users and databases.
The examples in this chapter were built and tested with the latest MySQL 5.1 version at the time of writing. Some earlier versions of MySQL have less functionality. You should install or upgrade to the most current stable release at the time of reading. You can download the current release from the MySQL site at http://www.mysql.com.
In this book, we interact with MySQL using a command-line client called the MySQL monitor, which comes with every MySQL installation. However, you can use other clients. If you are using MySQL in a hosted web environment, for example, system administrators will often provide the phpMyAdmin browser-based interface for you to use. Different GUI clients obviously involve slightly different procedures from what we describe here, but you should be able to adapt these instructions fairly easily.
Using the MySQL Monitor
In the MySQL examples in this chapter and the next, each command ends with a semicolon (;). It tells MySQL to execute the command. If you leave off the semicolon, nothing will happen. This is a common problem for new users.
As a result of leaving off the semicolon, you can have new lines in the middle of a command. We used this scheme to make the examples easier to read. You can see where we have used this approach because MySQL provides a continuation symbol; it’s an arrow that looks like this:
mysql> grant select
->
This symbol means MySQL expects more input. Until you type the semicolon, you get these characters each time you press Enter.
Another point to note is that SQL statements are not case sensitive, but database and table names can be (more on this topic later).
Logging In to MySQL
To log in to MySQL, go to a command-line interface on your machine and type the following:
mysql -h hostname -u username -p
The mysql command invokes the MySQL monitor, which is a command-line client that connects you to the MySQL server.
The -h switch specifies the host to which you want to connect—that is, the machine on which the MySQL server is running. If you’re running this command on the same machine as the MySQL server, you can leave out this switch and the hostname parameter. If not, you should replace the hostname parameter with the name of the machine where the MySQL server is running.
The -u switch specifies the username you want to connect as. If you do not specify, the default will be the username you are logged in to the operating system as.
If you have installed MySQL on your own machine or server, you need to log in as root and create the database we’ll use in this section. Assuming that you have a clean install, root is the only user you’ll have to begin with. If you are using MySQL on a machine administered by somebody else, use the username that person gave you.
The -p switch tells the server you want to connect using a password. You can leave it out if a password has not been set for the user you are logging in as.
If you are logging in as root and have not set a password for root, we strongly recommend that you visit Appendix A right now. Without a root password, your system is insecure.
You don’t need to include the password on this line. The MySQL server will ask you for it. In fact, it’s better if you don’t include it here. If you enter the password on the command line, it will appear as plain text on the screen and will be quite simple for other users to discover.
After you enter the previous command, you should get a response something like this:
Enter password:
(If this command doesn’t work, verify that the MySQL server is running and the mysql command is somewhere in your path.)
You should then enter your password. If all goes well, you should see a response something like this:
Welcome to the MySQL monitor. Commands end with ; or g.
Your MySQL connection id is 1 to server version: 5.1.25-rc-community MySQL
Community Server (GPL)
Type 'help;' or 'h' for help. Type 'c' to clear the buffer.
mysql>
On your own machine, if you don’t get a response similar to this, make sure that you have run mysql_install_db if required, you have set the root password, and you’ve typed it in correctly. If it isn’t your machine, make sure that you typed in the password correctly.
You should now be at a MySQL command prompt, ready to create the database. If you are using your own machine, follow the guidelines in the next section. If you are using somebody else’s machine, these steps should already have been done for you. You can jump ahead to the “Using the Right Database” section. You might want to read the intervening sections for general background, but you cannot run the commands specified there. (Or at least you shouldn’t be able to!)
Creating Databases and Users
The MySQL database system can support many different databases. You will generally have one database per application. In the Book-o-Rama example, the database will be called books.
Creating the database is the easiest part. At the MySQL command prompt, type
mysql> create database dbname;
You should substitute the name of the database you want to create for dbname. To begin creating the Book-O-Rama example, create a database called books.
That’s it. You should see a response like this (the time to execute will likely be different):
Query OK, 1 row affected (0.0 sec)
This means everything has worked. If you don’t get this response, make sure that you typed the semicolon at the end of the line. A semicolon tells MySQL that you are finished, and it should actually execute the command.
Setting Up Users and Privileges
A MySQL system can have many users. The root user should generally be used for administration purposes only, for security reasons. For each user who needs to use the system, you need to set up an account and password. They do not need to be the same as usernames and passwords outside MySQL (for example, Unix or NT usernames and passwords). The same principle applies to root. Having different passwords for the system and for MySQL is a good idea, especially when it comes to the root password.
Setting up passwords for users isn’t compulsory, but we strongly recommend that you set up passwords for all the users you create. For the purposes of setting up a web database, it’s a good idea to set up at least one user per web application. You might ask, “Why would I want to do this?” The answer lies in privileges.
Introducing MySQL’s Privilege System
One of the best features of MySQL is that it supports a sophisticated privilege system. A privilege is the right to perform a particular action on a particular object and is associated with a particular user. The concept is similar to file permissions. When you create a user within MySQL, you grant her a set of privileges to specify what she can and cannot do within the system.
Principle of Least Privilege
The principle of least privilege can be used to improve the security of any computer system. It’s a basic but important principle that is often overlooked. The principle is as follows:
A user (or process) should have the lowest level of privilege required to perform his assigned task.
It applies in MySQL as it does elsewhere. For example, to run queries from the Web, a user does not need all the privileges to which root has access. You should therefore create another user who has only the necessary privileges to access the database you just created.
User Setup: The GRANT Command
The GRANT and REVOKE commands enable you to give rights to and take them away from MySQL users at these four levels of privilege:
![]() Global
Global
![]() Database
Database
![]() Table
Table
![]() Column
Column
We see shortly how each can be applied.
The GRANT command creates users and gives them privileges. The general form of the GRANT command is
GRANT privileges [columns]
ON item
TO user_name [IDENTIFIED BY password]
[REQUIRE ssl_options]
[WITH [GRANT OPTION | limit_options] ]
The clauses in square brackets are optional. There are a number of placeholders in this syntax. The first, privileges, should be a comma-separated list of privileges. MySQL has a defined set of such privileges, which are described in the next section.
The columns placeholder is optional. You can use it to specify privileges on a column-by-column basis. You can use a single column name or a comma-separated list of column names.
The item placeholder is the database or table to which the new privileges apply. You can grant privileges on all the databases by specifying *.* as the item. This is called granting global privileges. You can also do this by specifying * alone if you are not using any particular database. More commonly, you can specify all tables in a database as dbname.*, on a single table as dbname.tablename, or on specific columns by specifying dbname.tablename and some specific columns in the columns placeholder. These examples represent the three other levels of privilege available: database, table, and column, respectively. If you are using a specific database when you issue this command, tablename on its own will be interpreted as a table in the current database.
The user_name should be the name you want the user to log in as in MySQL. Remember that it does not have to be the same as a system login name. The user_name in MySQL can also contain a hostname. You can use this to differentiate between, say, laura (interpreted as laura@localhost) and [email protected]. This capability is quite useful because users from different domains often have the same name. It also increases security because you can specify where users can connect from, and even which tables or databases they can access from a particular location.
The password placeholder should be the password you want the user to log in with. The usual rules for selecting passwords apply. We discuss security more later, but a password should not be easily guessable. This means that a password should not be a dictionary word or the same as the username. Ideally, it should contain a mixture of upper- and lowercase and nonalphabetic characters.
The REQUIRE clause allows you to specify that the user must connect via Secure Sockets Layer (SSL) and specify other SSL options. For more information on SSL connections to MySQL, refer to the MySQL manual.
The WITH GRANT OPTION option, if specified, allows the specified user to grant her own privileges to others.
You can instead specify the WITH clause as
MAX_QUERIES_PER_HOUR n
MAX_UPDATES_PER_HOUR n
or
MAX_CONNECTIONS_PER_HOUR n
These clauses allow you to limit the number of queries, updates, or connections per hour a user may make. They can be useful for limiting individual user load on shared systems.
Privileges are stored in five system tables, in the database called mysql. These five tables are called mysql.user, mysql.db, mysql.host, mysql.tables_priv, and mysql.columns_priv. As an alternative to GRANT, you can alter these tables directly. We discuss exactly how these tables work and how you can alter them directly in Chapter 12, “Advanced MySQL Administration.”
Types and Levels of Privileges
Three basic types of privileges exist in MySQL: privileges suitable for granting to regular users, privileges suitable for administrators, and a couple of special privileges. Any user can be granted any of these privileges, but it’s usually sensible to restrict the administrator type privileges to administrators, according to the principle of least privilege.
You should grant privileges to users only for the databases and tables they need to use. You should not grant access to the mysql database to anyone except an administrator. This is the place where all the users, passwords, and so on are stored. (We look at this database in Chapter 12.)
Privileges for regular users directly relate to specific types of SQL commands and whether a user is allowed to run them. We discuss these SQL commands in detail in the next chapter. For now, let’s look at a conceptual description of what they do. The basic user privileges are shown in Table 9.1. The items under the Applies To column are the objects to which privileges of this type can be granted.
Table 9.1 Privileges for Users

Most of the privileges for regular users are relatively harmless in terms of system security. The ALTER privilege can be used to work around the privilege system by renaming tables, but it is widely needed by users. Security is always a trade-off between usability and safety. You should make your own decision when it comes to ALTER, but it is often granted to users.
In addition to the privileges listed in Table 9.1, the REFERENCES and EXECUTE privileges are currently unused, and a GRANT privilege is granted with WITH GRANT OPTION rather than in the privileges list.
Table 9.2 shows the privileges suitable for use by administrative users.
Table 9.2 Privileges for Administrators

You are able to grant these privileges to nonadministrators, but you should use extreme caution if you are considering doing so.
The FILE privilege is a bit different. It is useful for users because loading data from files can save a lot of time re-entering data each time to get it into the database. However, file loading can be used to load any file that the MySQL server can see, including databases belonging to other users and, potentially, password files. Grant this privilege with caution or offer to load the data for the user.
Two special privileges also exist, and they are shown in Table 9.3.
Table 9.3 Special Privileges

The REVOKE Command
The opposite of GRANT is REVOKE. You use it to take privileges away from a user. It is similar to GRANT in syntax:
REVOKE privileges [(columns)]
ON item
FROM user_name
If you have given the WITH GRANT OPTION clause, you can revoke this (along with all other privileges) by adding
REVOKE All PRIVILEGES, GRANT
FROM user_name
Examples Using GRANT and REVOKE
To set up an administrator, you can type
mysql> grant all
-> on *
-> to fred identified by Ômnb123Õ
-> with grant option;
This command grants all privileges on all databases to a user called Fred with the password mnb123 and allows him to pass on those privileges.
Chances are you don’t want this user in your system, so go ahead and revoke him:
mysql> revoke all privileges, grant
-> from fred;
Now you can set up a regular user with no privileges:
mysql> grant usage
-> on books.*
-> to sally identified by 'magic123';
After talking to Sally, you know a bit more about what she wants to do, so you can give her the appropriate privileges:
mysql> grant select, insert, update, delete, index, alter, create, drop
-> on books.*
-> to sally;
Note that you don’t need to specify Sally’s password to give her privileges.
If you decide that Sally has been up to something in the database, you might decide to reduce her privileges:
mysql> revoke alter, create, drop
-> on books.*
-> from sally;
And later, when she doesn’t need to use the database any more, you can revoke her privileges altogether:
mysql> revoke all
-> on books.*
-> from sally;
Setting Up a User for the Web
You need to set up a user for your PHP scripts to connect to MySQL. Again, you can apply the privilege of least principle: What should the scripts be able to do?
In most cases, they only need to run SELECT, INSERT, DELETE, and UPDATE queries. You can set up these privileges as follows:
mysql> grant select, insert, delete, update
-> on books.*
-> to bookorama identified by 'bookorama123';
Obviously, for security reasons, you should choose a better password than the one shown here.
If you use a web hosting service, you usually get access to the other user-type privileges on a database the service creates for you. It typically gives you the same user_name and password for command-line use (setting up tables and so on) and for web script connections (querying the database). Using the same username and password for both is marginally less secure. You can set up a user with this level of privilege as follows:
mysql> grant select, insert, update, delete, index, alter, create, drop
-> on books.*
-> to bookorama identified by 'bookorama123';
Go ahead and set up this second version of the user because you need to use it in the next section.
You can log out of the MySQL monitor by typing quit. You should log back in as your web user to test that everything is working correctly. If the GRANT statement that you ran was executed, but you are denied access when trying to log in, this usually means you have not deleted the anonymous users as part of the installation process. Log back in as root and consult Appendix A for instructions on how to delete the anonymous accounts. You should then be able to log in as the web user.
Using the Right Database
If you’ve reached this stage, you should be logged in to a user-level MySQL account ready to test the sample code, either because you’ve just set it up or because your web server administrator has set it up for you.
The first step you need to take when you log in is to specify which database you want to use. You can do this by typing
mysql> use dbname;
where dbname is the name of your database.
Alternatively, you can avoid the use command by specifying the database when you log in, as follows:
mysql -D dbname -h hostname -u username -p
In this example, you can use the books database:
mysql> use books;
When you type this command, MySQL should give you a response such as
Database changed
If you don’t select a database before starting work, MySQL will give you an error message such as
ERROR 1046 (3D000): No Database Selected
Creating Database Tables
The next step in setting up the database is to actually create the tables. You can do this using the SQL command CREATE TABLE. The general form of a CREATE TABLE statement is
CREATE TABLE tablename (columns)
You should replace the tablename placeholder with the name of the table you want to create and the columns placeholder with a comma-separated list of the columns in your table. Each column will have a name followed by a data type.
Here’s the Book-O-Rama schema again:
Customers(CustomerID, Name, Address, City)
Orders(OrderID, CustomerID, Amount, Date)
Books(ISBN, Author, Title, Price)
Order_Items(OrderID, ISBN, Quantity)
Book_Reviews(ISBN, Reviews)
Listing 9.1 shows the SQL to create these tables, assuming you have already created the database called books. You can find this SQL in the file chapter9/bookorama.sql on the CD-ROM accompanying this book.
You can run an existing SQL file, such as one loaded from the CD-ROM, through MySQL by typing
> mysql -h host -u bookorama -D books -p < bookorama.sql
(Remember to replace host with the name of your host and to specify the full path to the bookorama.sql file.)
Using file redirection is handy for this task because it means that you can edit your SQL in the text editor of your choice before executing it.
Listing 9.1 bookorama.sql—SQL to Create the Tables for Book-O-Rama
create table customers
(customerid int unsigned not null auto_increment primary key,
name char(50) not null,
address char(100) not null,
city char(30) not null
);
create table orders
(orderid int unsigned not null auto_increment primary key,
customerid int unsigned not null,
amount float(6,2),
date date not null
);
create table books
(isbn char(13) not null primary key,
author char(50),
title char(100),
price float(4,2)
);
create table order_items
(orderid int unsigned not null,
isbn char(13) not null,
quantity tinyint unsigned,
primary key (orderid, isbn)
);
create table book_reviews
(
isbn char(13) not null primary key,
review text
);
Each table is created by a separate CREATE TABLE statement. You can see that each table in the schema is created with the columns designed in the preceding chapter. Each column has a data type listed after its name, and some of the columns have other specifiers, too.
Understanding What the Other Keywords Mean
NOT NULL means that all the rows in the table must have a value in this attribute. If it isn’t specified, the field can be blank (NULL).
AUTO_INCREMENT is a special MySQL feature you can use on integer columns. It means if you leave that field blank when inserting rows into the table, MySQL will automatically generate a unique identifier value. The value will be one greater than the maximum value in the column already. You can have only one of these in each table. Columns that specify AUTO_INCREMENT must be indexed.
PRIMARY KEY after a column name specifies that this column is the primary key for the table. Entries in this column have to be unique. MySQL automatically indexes this column. Where it is used with customerid in the customers table in Listing 9.1, it appears with AUTO_INCREMENT. The automatic index on the primary key takes care of the index required by AUTO_INCREMENT.
You can specify PRIMARY KEY after a column name only for single column primary keys. The PRIMARY KEY clause at the end of the order_items statement is an alternative form. We used it here because the primary key for this table consists of the two columns together. (This also creates an index based on the two columns together.)
UNSIGNED after an integer type means that it can have only a zero or positive value.
Understanding the Column Types
Let’s consider the first table as an example:
create table customers
(customerid int unsigned not null auto_increment primary key,
name char(50) not null,
address char(100) not null,
city char(30) not null
);
When creating any table, you need to make decisions about column types.
The customers table has four columns as specified in the schema. The first one, customerid, is the primary key, which is specified directly. We decided this will be an integer (data type int) and that these IDs should be unsigned. We’ve also taken advantage of the auto_increment facility so that MySQL can manage them for us; it’s one less thing to worry about.
The other columns are all going to hold string type data. We chose the char type for them. This type specifies fixed-width fields. The width is specified in the brackets, so, for example, name can have up to 50 characters.
This data type will always allocate 50 characters of storage for the name, even if they’re not all used. MySQL will pad the data with spaces to make it the right size. The alternative is varchar, which uses only the amount of storage required (plus one byte). There is a small trade-off: varchars use less space on average, but chars are faster.
Note that all the columns are declared as NOT NULL. This is a minor optimization you can make wherever possible that also will make things run a bit faster. We address optimization in more detail in Chapter 12.
Some of the other CREATE statements have variations in syntax. Let’s look at the orders table:
create table orders
( orderid int unsigned not null auto_increment primary key,
customerid int unsigned not null,
amount float(6,2) ,
date date not null
);
The amount column is specified as a floating-point number of type float. With most floating-point data types, you can specify the display width and the number of decimal places. In this case, the order amount will be in dollars, so we allowed a reasonably large order total (width 6) and two decimal places for the cents.
The date column has the data type date.
This particular table specifies that all columns bar the amount as NOT NULL. Why? When an order is entered into the database, you need to create it in orders, add the items to order_items, and then work out the amount. You might not know the amount when the order is created, so you can allow for it to be NULL.
The books table has some similar characteristics:
create table books
(isbn char(13) not null primary key,
author char(50),
title char(100),
price float(4,2)
);
In this case, you don’t need to generate the primary key because ISBNs are generated elsewhere. The other fields are left as NULL because a bookstore might know the ISBN of a book before it knows the title, author, or price.
The order_items table demonstrates how to create multicolumn primary keys:
create table order_items
(orderid int unsigned not null,
isbn char(13) not null,
quantity tinyint unsigned,
primary key (orderid, isbn)
);
This table specifies the quantity of a particular book as a TINYINT UNSIGNED, which holds an integer between 0 and 255.
As mentioned previously, multicolumn primary keys need to be specified with a special primary key clause. This clause is used here.
Lastly, consider the book_reviews table:
create table book_reviews
(
isbn char(13) not null primary key,
review text
);
This table uses a new data type, text, which we have not yet discussed. It is used for longer text, such as an article. There are a few variants on this, which we discuss later in this chapter.
To understand creating tables in more detail, let’s discuss column names and identifiers in general and then the data types we can choose for columns. First, though, let’s look at the database we’ve created.
Looking at the Database with SHOW and DESCRIBE
Log in to the MySQL monitor and use the books database. You can view the tables in the database by typing
mysql> show tables;
MySQL then displays a list of all the tables in the database:
+-----------------+
| Tables in books |
+-----------------+
| book_reviews |
| books |
| customers |
| order_items |
| orders |
+-----------------+
5 rows in set (0.06 sec)
You can also use show to see a list of databases by typing
mysql> show databases;
If you do not have the SHOW DATABASES privilege, you will see listed only the databases on which you have privileges.
You can see more information about a particular table, for example, books, using DESCRIBE:
mysql> describe books;
MySQL then displays the information you supplied when creating the database:
+--------+------------+------+-----+---------+-------+
| Field | Type | Null | Key | Default | Extra |
+--------+------------+------+-----+---------+-------+
| isbn | char(13) | NO | PRI | NULL | |
| author | char(50) | YES | | NULL | |
| title | char(100) | YES | | NULL | |
| price | float(4,2) | YES | | NULL | |
+--------+------------+------+-----+---------+-------+
4 rows in set (0.00 sec)
These commands are useful to remind yourself of a column type or to navigate a database that you didn’t create.
Creating Indexes
We briefly mentioned indexes already, because designating primary keys creates indexes on those columns.
One common problem faced by new MySQL users is that they complain about poor performance from this database they have heard is lightning fast. This performance problem occurs because they have not created any indexes on their database. (It is possible to create tables with no primary keys or indexes.)
To begin with, the indexes that were created automatically for you will do. If you find that you are running many queries on a column that is not a key, you may want to add an index on that column to improve performance. You can do this with the CREATE INDEX statement. The general form of this statement is
CREATE [UNIQUE|FULLTEXT] INDEX index_name
ON table_name (index_column_name [(length)] [ASC|DESC], …])
(FULLTEXT indexes are for indexing text fields; we discuss their use in Chapter 13.)
The optional length field allows you to specify that only the first length characters of the field will be indexed. You can also specify that an index should be ascending (ASC) or descending (DESC); the default is ascending.
Understanding MySQL Identifiers
Five kinds of identifiers are used in MySQL: databases, tables, columns, and indexes, which you’re already familiar with; and aliases, which we cover in the next chapter.
Databases in MySQL map to directories in the underlying file structure, and tables map to files. This mapping has a direct effect on the names you can give them. It also affects the case sensitivity of these names: If directory and filenames are case sensitive in your operating system, database and table names will be case sensitive (for example, in Unix); otherwise, they won’t (for example, under Windows). Column names and alias names are not case sensitive, but you can’t use versions of different cases in the same SQL statement.
As a side note, the location of the directory and files containing the data is wherever it was set in configuration. You can check the location on your system by using the mysqladmin facility as follows:
> mysqladmin -h host -u root -p variables
Then look for the datadir variable.
A summary of possible identifiers is shown in Table 9.4. The only additional exception is that you cannot use ASCII(0), ASCII(255), or the quoting character in identifiers (and to be honest, we’re not sure why you would want to).
Table 9.4 MySQL Identifiers

These rules are extremely open. You can even have reserved words and special characters of all kinds in identifiers. The only limitation is that if you use anything unusual like this, you have to put it in backticks (located under the tilde key on the top left of most keyboards). For example,
create database 'create database';
Of course, you should apply common sense to all this freedom. Just because you can call a database `create database` doesn’t that mean that you should. The same principle applies here as in any other kind of programming: Use meaningful identifiers.
Choosing Column Data Types
The three basic column types in MySQL are numeric, date and time, and string. Within each of these categories are a large number of types. We summarize them here and go into more detail about the strengths and weaknesses of each in Chapter 12.
Each of the three types comes in various storage sizes. When you are choosing a column type, the principle is generally to choose the smallest type that your data will fit into.
For many data types, when you are creating a column of that type, you can specify the maximum display length. This is shown in the following tables of data types as M. If it’s optional for that type, it is shown in square brackets. The maximum value you can specify for M is 255.
Optional values throughout these descriptions are shown in square brackets.
Numeric Types
The numeric types are either integers or floating-point numbers. For the floating-point numbers, you can specify the number of digits after the decimal place. This value is shown in this book as D. The maximum value you can specify for D is 30 or M-2 (that is, the maximum display length minus two—one character for a decimal point and one for the integral part of the number), whichever is lower.
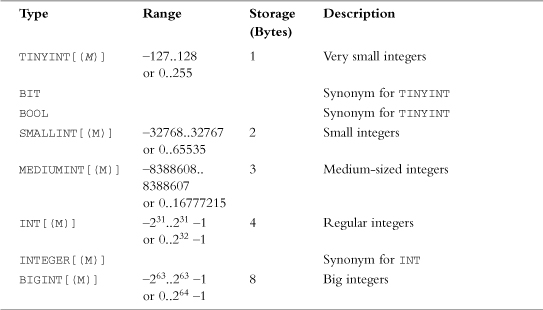
For integer types, you can also specify whether you want them to be UNSIGNED, as shown in Listing 9.1.
For all numeric types, you can also specify the ZEROFILL attribute. When values from a ZEROFILL column are displayed, they are padded with leading zeros. If you specify a column as ZEROFILL, it will automatically also be UNSIGNED.
The integral types are shown in Table 9.5. Note that the ranges listed in this table show the signed range on one line and the unsigned range on the next.
Table 9.5 Integral Data Types
The floating-point types are shown in Table 9.6.
Table 9.6 Floating-Point Data Types

Date and Time Types
MySQL supports a number of date and time types; they are shown in Table 9.7. With all these types, you can input data in either a string or numerical format. It is worth noting that a TIMESTAMP column in a particular row will be set to the date and time of the most recent operation on that row if you don’t set it manually. This feature is useful for transaction recording.
Table 9.7 Date and Time Data Types
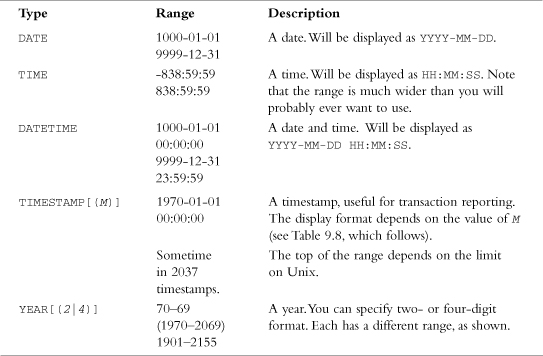
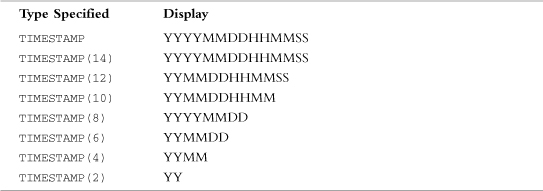
Table 9.8 shows the possible different display types for TIMESTAMP.
Table 9.8 TIMESTAMP Display Types
String Types
String types fall into three groups. First, there are plain old strings—that is, short pieces of text. These are the CHAR (fixed-length character) and VARCHAR (variable-length character) types. You can specify the width of each. Columns of type CHAR are padded with spaces to the maximum width regardless of the size of the data, whereas VARCHAR columns vary in width with the data. (Note that MySQL strips the trailing spaces from CHARs when they are retrieved and from VARCHARs when they are stored.) There is a space versus speed trade-off with these two types, which we discuss in more detail in Chapter 12.
Second, there are TEXT and BLOB types. These types, which come in various sizes, are for longer text or binary data, respectively. BLOBs, or binary large objects, can hold anything you like—for example, image or sound data.
In practice, BLOB and TEXT columns are the same except that BLOB is case sensitive and TEXT is not. Because these column types can hold large amounts of data, they require some special considerations. We discuss this issue in Chapter 12.
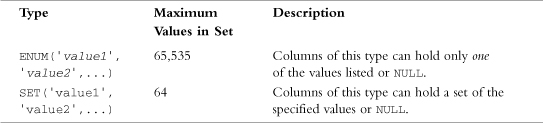
The third group has two special types: SET and ENUM. The SET type specifies that values in this column must come from a particular set of specified values. Column values can contain more than one value from the set. You can have a maximum of 64 things in the specified set.
ENUM is an enumeration. It is very similar to SET, except that columns of this type can have only one of the specified values or NULL, and you can have a maximum of 65,535 things in the enumeration.
We summarized the string data types in Tables 9.9, 9.10, and 9.11. Table 9.9 shows the plain string types.
Table 9.9 Regular String Types
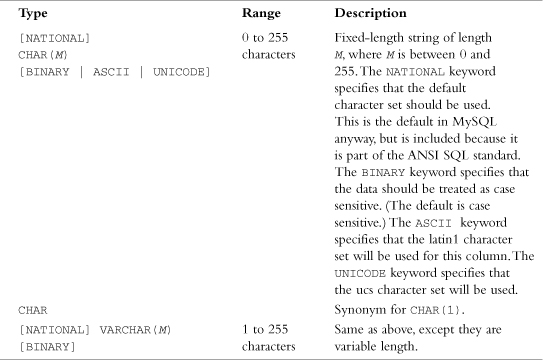
Table 9.10 shows the TEXT and BLOB types. The maximum length of a TEXT field in characters is the maximum size in bytes of files that could be stored in that field.
Table 9.10 TEXT and BLOB Types
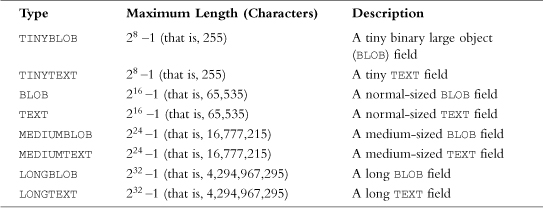
Table 9.11 shows the ENUM and SET types.
Table 9.11 ENUM and SET Types
Further Reading
For more information, you can read about setting up a database in the MySQL online manual at http://www.mysql.com/.
Next
Now that you know how to create users, databases, and tables, you can concentrate on interacting with the database. In the next chapter, we look at how to put data in the tables, how to update and delete it, and how to query the database.