
12 Advanced MySQL Administration
IN THIS CHAPTER, WE COVER SOME MORE ADVANCED MySQL topics, including advanced privileges, security, and optimization.
Key topics covered in this chapter include
![]() Understanding the privilege system in detail
Understanding the privilege system in detail
![]() Making your MySQL database secure
Making your MySQL database secure
![]() Getting more information about databases
Getting more information about databases
![]() Speeding things up with indexes
Speeding things up with indexes
Understanding the Privilege System in Detail
Chapter 9, “Creating Your Web Database,” described the process of setting up users and granting them privileges. You saw how to do this with the GRANT command. If you’re going to administer a MySQL database, understanding exactly what GRANT does and how it works can be useful.
When you issue a GRANT statement, it affects tables in the special database called mysql. Privilege information is stored in six tables in this database. Given this fact, when granting privileges on databases, you should be cautious about granting access to the mysql database.
You can look at what’s in the mysql database by logging in as an administrator and typing
use mysql;
If you do this, you can then view the tables in this database as usual by typing
show tables;
Your results look something like this:
+---------------------------+
| Tables_in_mysql |
+---------------------------+
| columns_priv |
| db |
| event |
| func |
| general_log |
| help_category |
| help_keyword |
| help_relation |
| help_topic |
| host |
| ndb_binlog_index |
| plugin |
| proc |
| procs_priv |
| servers |
| slow_log |
| tables_priv |
| time_zone |
| time_zone_leap_second |
| time_zone_name |
| time_zone_transition |
| time_zone_transition_type |
| user |
+---------------------------+
Each of these tables stores system information. Six of them—user, host, db, tables_priv, columns_priv, and procs priv—store privilege information. They are sometimes called grant tables. These tables vary in their specific function but all serve the same general function, which is to determine what users are and are not allowed to do. Each of them contains two types of fields: scope fields, which identify the user, host, and part of a database that the privilege refers to; and privilege fields, which identify which actions can be performed by that user in that scope.
The user and host tables are used to decide whether a user can connect to the MySQL server at all and whether she has any administrator privileges. The db and host tables determine which databases the user can access. The tables_priv table determines which tables within a database a user can use, the columns_priv table determines which columns within tables she has access to, and the procs priv table determines which routines a user can execute.
The user Table
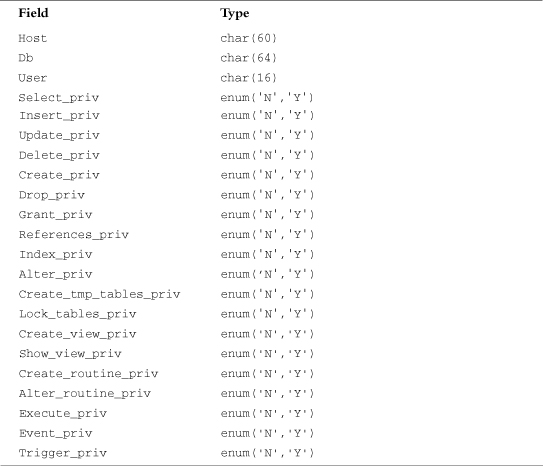
The user table contains details of global user privileges. It determines whether a user is allowed to connect to the MySQL server at all and whether she has any global-level privileges—that is, privileges that apply to every database in the system.
You can see the structure of this table by issuing a describe user; statement. The schema for the user table is shown in Table 12.1.
Table 12.1 Schema of the user Table in the mysql Database

Each row in this table corresponds to a set of privileges for a User coming from a Host and logging in with the password Password. These are the scope fields for this table because they describe the scope of the other fields, called privilege fields.
The privileges listed in this table (and the others to follow) correspond to the privileges granted using GRANT in Chapter 9. For example, Select_priv corresponds to the privilege to run a SELECT command.
If a user has a particular privilege, the value in that column will be Y. Conversely, if a user has not been granted that privilege, the value will be N.
All the privileges listed in the user table are global; that is, they apply to all the databases in the system (including the mysql database). Administrators will therefore have some Ys in there, but the majority of users should have all Ns. Normal users should have rights to appropriate databases, not all tables.
The db and host Tables
Most of your average users’ privileges are stored in the tables db and host.
The db table determines which users can access which databases from which hosts. The privileges listed in this table apply to whichever database is named in a particular row.
The host table supplements the user and db tables. If a user is to connect from multiple hosts, no host will be listed for that user in the user or db table. Instead, he will have a set of entries in the host table, one to specify the privileges for each user-host combination.
The schemas of these two tables are shown in Tables 12.2 and 12.3, respectively.
Table 12.2 Schema of the db Table in the mysql Database

Table 12.3 Schema of the host Table in the mysql Database
The tables_priv, columns_priv, and procs priv Tables
The tables_priv, columns_priv, and procs_priv tables are used to store table-level privileges, column-level privileges, and privileges regarding stores routines, respectively.
These tables have a slightly different structure than the user, db, and host tables have. The schemas for the tables_priv table, columns_priv table, and procs_priv table are shown in Tables 12.4, 12.5, and 12.6, respectively.
Table 12.4 Schema of the tables_priv Table in the mysql Database

Table 12.5 Schema of the columns_priv Table in the mysql Database

Table 12.6 Schema of the procs_priv Table in the mysql Database
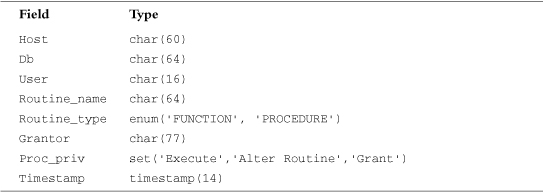
The Grantor column in the tables_priv and procs priv tables stores the name of the user who granted this privilege to this user. The Timestamp column in each of these tables stores the date and time when the privilege was granted.
Access Control: How MySQL Uses the Grant Tables
MySQL uses the grant tables to determine what a user is allowed to do in a two-stage process:
1. Connection verification. Here, MySQL checks whether you are allowed to connect at all, based on information from the user table, as shown previously. This authentication is based on username, hostname, and password. If a username is blank, it matches all users. Hostnames can be specified with a wildcard character (%). This character can be used as the entire field (that is, % matches all hosts) or as part of a hostname (for example, %.tangledweb.com.au matches all hosts ending in .tangledweb.com.au). If the password field is blank, no password is required. Your system is more secure if you avoid having blank users, wildcards in hosts, and users without passwords. If the hostname is blank, MySQL refers to the host table for a matching user and host entry.
2. Request verification. Each time you enter a request, after you have established a connection, MySQL checks whether you have the appropriate level of privileges to perform that request. The system begins by checking your global privileges (in the user table) and, if they are not sufficient, checks the db and host tables. If you still don’t have sufficient privileges, MySQL will check the tables_priv table, and, if this is not enough, finally it will check the columns_priv table. If the operation uses stored routines, MySQL checks the procs_priv table instead of the tables_priv and columns_priv tables.
Updating Privileges: When Do Changes Take Effect?
The MySQL server automatically reads the grant tables when it is started and when you issue GRANT and REVOKE statements. However, now that you know where and how those privileges are stored, you can alter them manually. When you update them manually, the MySQL server will not notice that they have changed.
You need to point out to the server that a change has occurred, and you can do this in three ways. You can type
flush privileges;
at the MySQL prompt (you need to be logged in as an administrator to use this command). This is the most commonly used way of updating the privileges.
Alternatively, you can run either
mysqladmin flush-privileges
or
mysqladmin reload
from your operating system.
After this, global-level privileges will be checked the next time a user connects; database privileges will be checked when the next use statement is issued; and table- and column-level privileges will be checked on a user’s next request.
Making Your MySQL Database Secure
Security is important, especially when you begin connecting your MySQL database to your website. The following sections explain the precautions you ought to take to protect your database.
MySQL from the Operating System’s Point of View
Running the MySQL server (mysqld) as root is a bad idea if you are running a Unix-like operating system. Doing this gives a MySQL user with a full set of privileges the right to read and write files anywhere in the operating system. This is an important point, easily overlooked, which was famously used to hack Apache’s website. (Fortunately, the crackers were “white hats” [good guys], and their only action was to tighten up security.)
Setting up a MySQL user specifically for the purpose of running mysqld is a good idea. In addition, you can then make the directories (where the physical data is stored) accessible only by the MySQL user. In many installations, the server is set up to run as userid mysql, in the mysql group.
You should also ideally set up your MySQL server behind your firewall. This way, you can stop connections from unauthorized machines. Check to see whether you can connect from outside to your server on port number 3306. This is the default port MySQL runs on and should be closed on your firewall.
Passwords
Make sure that all your users have passwords (especially root!) and that they are well chosen and regularly changed, as with operating system passwords. The basic rule to remember here is that passwords that are or contain words from a dictionary are a bad idea. Combinations of letters and numbers are best.
If you are going to store passwords in script files, make sure only the user whose password is stored can see that script.
PHP scripts that are used to connect to the database need access to the password for that user. This can be done reasonably securely by putting the login and password in a file called, for example, dbconnect.php, that you then include when needed. This script can be carefully stored outside the web document tree and made accessible only to the appropriate user.
Remember that if you put these details in a file with .inc or some other extension in the web tree, you must be careful to check that your web server knows these files must be interpreted as PHP so that the details will not be viewed in plain text via a web browser.
Don’t store passwords in plain text in your database. MySQL passwords are not stored that way, but commonly in web applications, you additionally want to store website members’ login names and passwords. You can encrypt passwords (one way) using MySQL’s password() function. Remember that if you insert a password in this format when you run SELECT (to log in a user), you will need to use the same function again to check the password a user has typed.
You will use this functionality when you implement the projects in Part V, “Building Practical PHP and MySQL Projects.”
User Privileges
Knowledge is power. Make sure that you understand MySQL’s privilege system and the consequences of granting particular privileges. Don’t grant more privileges to any user than she needs. You should check them by looking at the grant tables.
In particular, don’t grant the PROCESS, FILE, SHUTDOWN, and RELOAD privileges to any user other than an administrator unless absolutely necessary. The PROCESS privilege can be used to see what other users are doing and typing, including their passwords. The FILE privilege can be used to read and write files to and from the operating system (including, say, /etc/password on a Unix system).
The GRANT privilege should also be granted with caution because it allows users to share their privileges with others.
Make sure that when you set up users, you grant them access only from the hosts that they will be connecting from. If you have jane@localhost as a user, that’s fine, but plain jane is pretty common and could log in from anywhere—and she might not be the jane you think she is. Avoid using wildcards in hostnames for similar reasons.
You can further increase security by using IPs rather than domain names in your host table. This way, you can avoid problems with errors or crackers at your DNS. You can enforce this by starting the MySQL daemon with the --skip-name-resolve option, which means that all host column values must be either IP addresses or localhost.
You should also prevent nonadministrative users from having access to the mysqladmin program on your web server. Because this program runs from the command line, access to it is an issue of operating system privilege.
Web Issues
Connecting your MySQL database to the Web raises some special security issues.
It’s not a bad idea to start by setting up a special user just for the purpose of web connections. This way, you can give him the minimum privilege necessary and not grant, for example, DROP, ALTER, or CREATE privileges to that user. You might grant SELECT only on catalog tables and INSERT only on order tables. Again, this is an illustration of how to use the principle of least privilege.
You should always check all data coming in from a user. Even if your HTML form consists of select boxes and radio buttons, someone might alter the URL to try to crack your script. Checking the size of the incoming data is also worthwhile.
If users are typing in passwords or confidential data to be stored in your database, remember that it will be transmitted from the browser to the server in plain text unless you use Secure Sockets Layer (SSL). We discuss using SSL in more detail later in this book.
Getting More Information About Databases
So far, we’ve used SHOW and DESCRIBE to find out what tables are in the database and what columns are in them. In the following sections, we briefly look at other ways they can be used and at the use of the EXPLAIN statement to get more information about how a SELECT operation is performed.
Getting Information with SHOW
Previously, you used
show tables;
to get a list of tables in the database.
The statement
show databases;
displays a list of available databases. You can then use the SHOW TABLES statement to see a list of tables in one of those databases:
show tables from books;
When you use SHOW TABLES without specifying a database, it defaults to the one in use.
When you know what the tables are, you can get a list of the columns:
show columns from orders from books;
If you leave off the database name, the SHOW COLUMNS statement will default to the database currently in use. You can also use the table. column notation:
show columns from books.orders;
One other useful variation of the SHOW statement can be used to see what privileges a user has. For example, if you run
show grants for bookorama;
you get the following output:
+-----------------------------------------------------------------------+
| Grants for bookorama@% |
+-----------------------------------------------------------------------+
| GRANT USAGE ON *.* TO bookorama@%' |
| IDENTIFIED BY PASSWORD *1ECE648641438A28E1910D0D7403C5EE9E8B0A85' |
| GRANT SELECT, INSERT, UPDATE, DELETE, CREATE, DROP, INDEX, ALTER |
| ON `books`.* TO bookorama@%' |
+-----------------------------------------------------------------------+
The GRANT statements shown are not necessarily the ones that were executed to give privileges to a particular user, but rather summary equivalent statements that would produce the user’s current level of privilege.
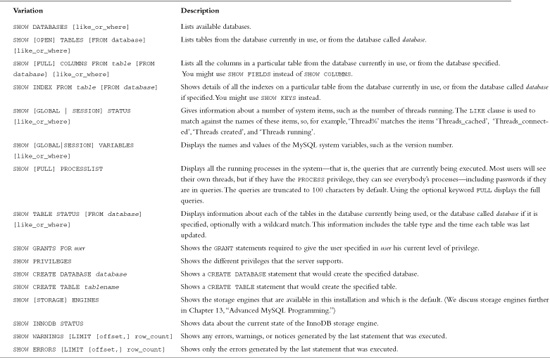
Many other variations of the SHOW statement can be used as well. In fact, there are over 30 variations of the SHOW statement. Some of the more popular variations are shown in Table 12.7. For a complete list, see the MySQL Manual entry at http://dev.mysql.com/doc/refman/5.1/en/show.html. In all instances of [like_or_where] in the examples below, you can attempt to match a pattern using LIKE or an expression using WHERE.
Table 12.7 SHOW Statement Syntax
Getting Information About Columns with DESCRIBE
As an alternative to the SHOW COLUMNS statement, you can use the DESCRIBE statement, which is similar to the DESCRIBE statement in Oracle (another RDBMS). The basic syntax for it is
DESCRIBE table [column];
This command gives information about all the columns in the table or a specific column if column is specified. You can use wildcards in the column name if you like.
Understanding How Queries Work with EXPLAIN
The EXPLAIN statement can be used in two ways. First, you can use
EXPLAIN table;
This command gives similar output to DESCRIBE table or SHOW COLUMNS FROM table.
The second and more interesting way you can use EXPLAIN allows you to see exactly how MySQL evaluates a SELECT query. To use it this way, just put the word EXPLAIN in front of a SELECT statement.
You can use the EXPLAIN statement when you are trying to get a complex query to work and clearly haven’t got it quite right, or when a query is taking a lot longer to process than it should. If you are writing a complex query, you can check this in advance by running the EXPLAIN command before you actually run the query. With the output from this statement, you can rework your SQL to optimize it if necessary. It’s also a handy learning tool.
For example, try running the following query on the Book-O-Rama database:
explain
select customers.name
from customers, orders, order_items, books
where customers.customerid = orders.customerid
and orders.orderid = order_items.orderid
and order_items.isbn = books.isbn
and books.title like '%Java%';
This query produces the following output. (Note that we are displaying this output vertically because the table rows are too wide to fit in this book. You can get this format by ending your query with G instead of the semicolon.)
*************************** 1. row ***************************
id: 1
select_type: SIMPLE
table: orders
type: ALL
possible_keys: PRIMARY
key: NULL
key_len: NULL
ref: NULL
rows: 4
Extra:
*************************** 2. row ***************************
id: 1
select_type: SIMPLE
table: order_items
type: ref
possible_keys: PRIMARY
key: PRIMARY
key_len: 4
ref: books.orders.orderid
rows: 1
Extra: Using index
*************************** 3. row ***************************
id: 1
select_type: SIMPLE
table: customers
type: ALL
possible_keys: PRIMARY
key: NULL
key_len: NULL
ref: NULL
rows: 3
Extra: Using where; Using join buffer
*************************** 4. row ***************************
id: 1
select_type: SIMPLE
table: books
type: eq_ref
possible_keys: PRIMARY
key: PRIMARY
key_len: 13
ref: books.order_items.isbn
rows: 1
Extra: Using where
This output might look confusing at first, but it can be very useful. Let’s look at the columns in this table one by one.
The first column, id, gives the ID number of the SELECT statement within the query that this row refers to.
The column select_type explains the type of query being used. The set of values this column can have is shown in Table 12.8.
Table 12.8 Possible Select Types as Shown in Output from EXPLAIN

The column table just lists the tables used to answer the query. Each row in the result gives more information about how that particular table is used in this query. In this case, you can see that the tables used are orders, order_items, customers, and books. (You know this already by looking at the query.)
The type column explains how the table is being used in joins in the query. The set of values this column can have is shown in Table 12.9. These values are listed in order from fastest to slowest in terms of query execution. The table gives you an idea of how many rows need to be read from each table to execute a query.
Table 12.9 Possible Join Types as Shown in Output from EXPLAIN

In the previous example, you can see that one of the tables is joined using eq_ref (books), one is joined using ref (order_items), and the other two (orders and customers) are joined using ALL—that is, by looking at every single row in the table.
The rows column backs this up: It lists (roughly) the number of rows of each table that has to be scanned to perform the join. You can multiply these numbers together to get the total number of rows examined when a query is performed. You multiply these numbers because a join is like a product of rows in different tables. Check out Chapter 10, “Working with Your MySQL Database,” for details. Remember that this is the number of rows examined, not the number of rows returned, and that it is only an estimate; MySQL can’t know the exact number without performing the query.
Obviously, the smaller you can make this number, the better. At present, you have a negligible amount of data in the database, but when the database starts to increase in size, this query would increase in execution time. We return to this matter shortly.
The possible_keys column lists, as you might expect, the keys that MySQL might use to join the table. In this case, you can see that the possible keys are all PRIMARY keys.
The key column is either the key from the table MySQL actually used or NULL if no key was used. Notice that, although there are possible PRIMARY keys for the customers and orders table, none were used in this query.
The key_len column indicates the length of the key used. You can use this number to tell whether only part of a key was used. The key length is relevant when you have keys that consist of more than one column. In this case, where the keys were used, the full key was used.
The ref column shows the columns used with the key to select rows from the table.
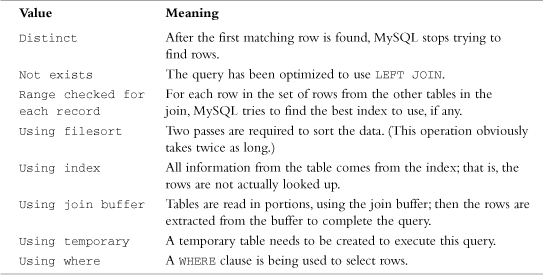
Finally, the Extra column tells you any other information about the way the join was performed. Some possible values you might see in this column are shown in Table 12.10. For a complete list of the more than 15 different possibilities, see the MySQL Manual at http://dev.mysql.com/doc/refman/5.1/en/using-explain.html.
Table 12.10 Some Possible Values for Extra Column as Shown in Output fromEXPLAIN
You can fix problems you spot in the output from EXPLAIN in several ways. First, you can check column types and make sure they are the same. This applies particularly to column widths. Indexes can’t be used to match columns if they have different widths. You can fix this problem by changing the types of columns to match or by building this in to your design from the start.
Second, you can tell the join optimizer to examine key distributions and therefore optimize joins more efficiently using the myisamchk utility or the ANALYZE TABLE statement, which are equivalent. You can invoke this utility by typing
myisamchk --analyze pathtomysqldatabase/table
You can check multiple tables by listing them all on the command line or by using
myisamchk --analyze pathtomysqldatabase/*.MYI
You can check all tables in all databases by running the following:
myisamchk --analyze pathtomysqldatadirectory/*/*.MYI
Alternatively, you can list the tables in an ANALYZE TABLE statement within the MySQL monitor:
analyze table customers, orders, order_items, books;
Third, you might want to consider adding a new index to the table. If this query is a) slow and b) common, you should seriously consider this fix. If it’s a one-off query that you’ll never use again, such as an obscure report requested once, this technique won’t be worth the effort because it will slow down other things.
If the possible_keys column from an EXPLAIN contains some NULL values, you might be able to improve the performance of your query by adding an index to the table in question. If the column you are using in your WHERE clause is suitable for indexing, you can create a new index for it using ALTER TABLE like this:
ALTER TABLE table ADD INDEX (column);
Optimizing Your Database
In addition to using the previous query optimization tips, you can do quite a few things to generally increase the performance of your MySQL database.
Design Optimization
Basically, you want everything in your database to be as small as possible. You can achieve this result, in part, with a decent design that minimizes redundancy. You can also achieve it by using the smallest possible data type for columns. You should also minimize NULLs wherever possible and make your primary key as short as possible.
Avoid variable length columns if at all possible (such as VARCHAR, TEXT, and BLOB). If your tables have fixed-length fields, they will be faster to use but might take up a little more space.
Permissions
In addition to using the suggestions mentioned in the previous section on EXPLAIN, you can improve the speed of queries by simplifying your permissions. Earlier, we discussed the way that queries are checked with the permission system before being executed. The simpler this process is, the faster your query will run.
Table Optimization
If a table has been in use for a period of time, data can become fragmented as updates and deletions are processed. This fragmentation increases the time taken to find things in this table. You can fix this problem by using the statement
OPTIMIZE TABLE tablename;
or by typing
myisamchk -r table
at the command prompt.
You can also use the myisamchk utility to sort a table index and the data according to that index, like this:
myisamchk --sort-index --sort-records=1 pathtomysqldatadirectory/*/*.MYI
Using Indexes
You should use indexes where required to speed up your queries. Keep them simple and don’t create indexes that are not being used by your queries. You can check which indexes are being used by running EXPLAIN, as shown previously.
Using Default Values
Wherever possible, you should use default values for columns and insert data only if it differs from the default. This way, you reduce the time taken to execute the INSERT statement.
Other Tips
You can make many other minor tweaks to improve performance in particular situations and address particular needs. The MySQL website offers a good set of additional tips. You can find it at http://www.mysql.com.
Backing Up Your MySQL Database
In MySQL, there are several ways to do a backup. The first way is to lock the tables while you copy the physical files, using a LOCK TABLES command with the following syntax:
LOCK TABLES table lock_type [, table lock_type…]
Each table should be the name of a table, and the lock type should be either READ or WRITE. For a backup, you only need a read lock. You need to execute a FLUSH TABLES; command to make sure any changes to your indexes have been written to disk before performing a backup.
Users and scripts can still run read-only queries while you make your backup. If you have a reasonable volume of queries that alter the database, such as customer orders, this solution is not practical.
The second, and superior, method is using the mysql_dump command. Usage is from the operating system command line, and is typically something such as
mysqldump --opt --all-databases > all.sql
This command dumps a set of all the SQL required to reconstruct the database to the file called all.sql.
You should then stop the mysqld process for a moment and restart it with the --log-bin[=logfile] option. The updates stored in the log file give you the changes made since your dump. (Obviously, you should back up the log files in any normal file backup.)
A third method is using the mysqlhotcopy script. You can invoke it with
mysqlhotcopy database /path/for/backup
You should then follow the process of starting and stopping the database as described earlier.
A final method of backup (and failover) is to maintain a replicated copy of the database. Replication is discussed later in this chapter.
Restoring Your MySQL Database
If you need to restore your MySQL database, there are, again, a couple of approaches. If the problem is a corrupted table, you can run myisamchk with the -r (repair) option.
If you used the first method from the preceding section for backup, you can copy the data files back into the same locations in a new MySQL installation.
If you used the second method for backup, there are a couple of steps. First, you need to run the queries in your dump file. This step reconstructs the database up to the point where you dumped that file. Second, you need to update the database to the point stored in the binary log. You can do this by running the command
mysqlbinlog hostname-bin.[0-9]* | mysql
More information about the process of MySQL backup and recovery can be found at the MySQL website at http://www.mysql.com.
Implementing Replication
Replication is a technology that allows you to have multiple database servers serving the same data. This way, you can load share and improve system reliability; if one server goes down, the others can still be queried. Once set up, it can also be used for making backups.
The basic idea is to have a master server and add to it a number of slaves. Each of the slaves mirrors the master. When you initially set up the slaves, you copy over a snapshot of all the data on the master at that time. After that, slaves request updates from the master. The master transmits details of the queries that have been executed from its binary log, and the slaves reapply them to the data.
The usual way of using this setup is to apply write queries to the master and read queries to the slaves. This is enforced by your application logic. More complex architectures are possible, such as having multiple masters, but we will only consider the setup for the typical example.
You need to realize that slaves usually do not have data that is as up to date as on the master. This occurs in any distributed database.
To begin setting up a master and slave architecture, you need to make sure binary logging is enabled on the master. Enabling binary logging is discussed in Appendix A, “Installing PHP and MySQL.”
You need to edit your my.ini or my.cnf file on both the master and slave servers. On the master, you need the following settings:
[mysqld]
log-bin
server-id=1
The first setting turns on binary logging (so you should already have this one; if not, add it in now). The second setting gives your master server a unique ID. Each of the slaves also needs an ID, so you need to add a similar line to the my.ini/my.cnf files on each of the slaves. Make sure the numbers are unique! For example, your first slave could have server-id=2; the next, server-id=3; and so on.
Setting Up the Master
On the master, you need to create a user for slaves to connect as. There is a special privilege level for slaves called replication slave. Depending on how you plan to do the initial data transfer, you may need to temporarily grant some additional privileges.
In most cases, you will use a database snapshot to transfer the data, and in this case, only the special replication slave privilege is needed. If you decide to use the LOAD DATA FROM MASTER command to transfer data (you learn about it in the next section), this user will also need the RELOAD, SUPER, and SELECT privileges, but only for initial setup. As per the principle of least privilege, discussed in Chapter 9, you should revoke these other privileges after the system is up and running.
Create a user on the master. You can call it anything you like and give it any password you like, but you should make a note of the username and password you choose. In our example, we call this user rep_slave:
grant replication slave
on *.*
to rep_slave'@%' identified by 'password';
Obviously, you should change the password to something else.
Performing the Initial Data Transfer
You can transfer the data from master to slave in several ways. The simplest is to set up the slaves (described in the next section) and then run a LOAD DATA FROM MASTER statement. The problem with this approach is that it will lock the tables on the master while the data is being transferred, and this can take some time, so we do not recommend it. (You can use this option only if you are using MyISAM tables.)
Generally, it is better to take a snapshot of the database at the current time. You can do this by using the procedures described for taking backups elsewhere in this chapter. You should first flush the tables with the following statement:
flush tables with read lock;
The reason for the read lock is that you need to record the place the server is up to in its binary log when the snapshot was taken. You can do this by executing this statement:
show master status;
You should see output similar to the following from this statement:
+----------------------+----------+--------------+------------------+
| File | Position | Binlog_Do_DB | Binlog_Ignore_DB |
+----------------------+----------+--------------+------------------+
|laura-ltc-bin.000001 | 95 | | |
+----------------------+----------+--------------+------------------+
Note the File and Position; you will need this information to set up the slaves.
Now take your snapshot and unlock the tables with the following statement:
unlock tables;
If you are using InnoDB tables, the easiest way is to use the InnoDB Hot Backup tool, available from Innobase Oy at http://www.innodb.com. This is not Free Software, so there is a license cost involved. Alternatively, you can follow the procedure described here and, before unlocking the tables, shut down the MySQL server and copy the entire directory for the database you want to replicate before restarting the server and unlocking the tables.
Setting Up the Slave or Slaves
You have two optionsfor setting up the slave or slaves. If you have taken a snapshot of your database, begin by installing it on the slave server.
Next, run the following queries on your slave:
change master to
master-host='server',
master-user='user',
master-password='password',
master-log-file='logfile',
master-log-pos='logpos';
start slave;
You need to fill in the data shown in italics. The server is the name of the master server. The user and password come from the GRANT statement you ran on the master server. The logfile and logpos come from the output of the SHOW MASTER STATUS statement you ran on the master server.
You should now be up and running.
If you did not take a snapshot, you can load the data from the master after running the preceding query by executing the following statement:
load data from master;
Further Reading
In these chapters on MySQL, we have focused on the uses and parts of the system most relevant to web development and to linking MySQL with PHP. If you want to know more about MySQL administration, you can visit the MySQL website at http://www.mysql.com.
You might also want to consult the MySQL Press book MySQL Administrator’s Guide and Language Reference, or Paul Dubois’ book MySQL, Fourth Edition, available from Addison-Wesley.
Next
In the next chapter, “Advanced MySQL Programming,” we look at some advanced features of MySQL that are useful when writing web applications, such as how to use the different storage engines, transactions, and stored procedures.