
29 Building a Web-Based Email Service
MORE AND MORE OFTEN THESE DAYS, SITES WANT to offer web-based email to their users. This chapter explains how to implement a web interface to an existing mail server using the PHP IMAP library. You can use it to check your own existing mailbox through a web page or perhaps extend it to support many users for mass web-based email such as GMail, Yahoo! Mail, and Hotmail.
In this project, you build an email client, Warm Mail, that will enable users to
![]() Connect to their accounts on POP3 or IMAP mail servers
Connect to their accounts on POP3 or IMAP mail servers
![]() Delete mail from their accounts
Delete mail from their accounts
Solution Components
For a user to be able to read his mail, you need to find a way to connect to his mail server. This generally isn’t the same machine as the web server. You need a way to interact with the user’s mailbox to see what messages have been received and to deal with each message individually.
Mail Protocols: POP3 Versus IMAP
Two main protocols are supported by mail servers for reading user mailboxes: Post Office Protocol version 3 (POP3) and Internet Message Access Protocol (IMAP). If possible, you should support both of them.
The main difference between these two is that POP3 is intended for, and usually used by, people who connect to a network for a short time to download and delete their mail from a server. IMAP is intended for online use, to interact with mail permanently kept on the remote server. IMAP has some more advanced features that we won’t use here.
If you are interested in the differences between these protocols, you can consult the RFCs for them (RFC 1939 for POP version 3 and RFC 3501 for IMAP version 4 rev1). An excellent article comparing the two can be found at http://www.imap.org/papers/imap.vs.pop.brief.html.
Neither of these protocols is designed for sending mail; for that, you must use the Simple Mail Transfer Protocol (SMTP), which you used previously from PHP via the mail() function. This protocol is described in RFC 821.
POP3 and IMAP Support in PHP
PHP has excellent IMAP and POP3 support, and both are provided via the IMAP function library. To use the code presented in this chapter, you need to have installed the IMAP library. You can tell whether you already have it installed by looking at the output of the phpinfo() function.
If you are using Linux or Unix and do not have the IMAP library installed, you will need to download the required libraries. You can get the latest version via FTP from ftp://ftp.cac.washington.edu/imap/.
Under Unix, download the source and compile it for your operating system.
You should then create a directory for the IMAP files inside your system include directory, called, say imap. (Do not just copy the files across into the basic include directory because doing so may cause conflicts.) Inside your new directory, create two subdirectories called imap/lib/ and imap/include/. Copy all the *.h files from your install to imap/include/. When you performed the compilation, a file called c-client.a was created. Rename it libc-client.a and copy it into your imap/lib/ directory.
You then need to run PHP’s configure script, adding the --with-imap=dirname directive (where dirname is the name of the directory you created) to any other parameters you use, and recompile PHP.
To use the IMAP extension with Windows, open your php.ini file and uncomment this line:
extension=php_imap.dll
Then restart the web server.
You can confirm that the IMAP extension is installed by running the phpinfo() function. A section for IMAP should be shown.
One interesting point to note is that, although they are called IMAP functions, they also work equally well with Post Office Protocol version 3 (POP3) and Network News Transfer Protocol (NNTP). For this example, you use them for IMAP and POP3, but you could easily extend the Warm Mail application to use NNTP and to be a newsreader as well as a mail client.
This library has several functions, but to implement the functionality in this application, you need to use only a few. We explain these functions as we use them, but you need to be aware that many more are available. See the documentation if your needs are different from ours or if you want to add extra features to the application.
You can build a fairly useful mail application with only a fraction of the built-in functions. This means that you need to plow through only a fraction of the documentation. The IMAP functions used in this chapter are
![]()
imap_open()
![]()
imap_close()
![]()
imap_headers()
![]()
imap_header()
![]()
imap_fetchheader()
![]()
imap_body()
![]()
imap_delete()
![]()
imap_expunge()
For a user to read his mail, you need to get his server and account details. Instead of getting these details from the user every time, you can set up a username and password database for the user so that you can store his details.
Often people have more than one email account (one for home and another for work, for example), and you should allow them to connect to any of their accounts. You should therefore allow them to have multiple sets of account information in the database.
You should enable users to read, reply to, forward, and delete existing emails, as well as send new ones. You can do all the reading parts using IMAP or POP3 and all the sending parts using SMTP with mail().
Now let’s look at how to put all the pieces together.
Solution Overview
The general flow through this web-based system isn’t much different from other email clients. Figure 29.1 shows a diagram illustrating the system flow and modules.
Figure 29.1 The interface for Warm Mail gives the user mailbox-level functionality and message-level functionality.
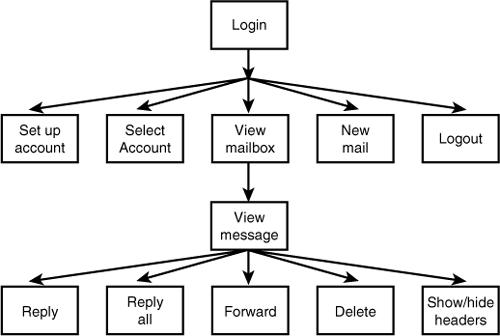
As you can see, you first require a user to log in and then give him a choice of options. He can set up a new mail account or select one of his existing accounts for use. He also can view his incoming mail—responding to, forwarding, or deleting it—and send new mail.
You also give the user the option of viewing detailed headers for a particular message. Viewing the complete headers can tell you a lot about a message. You can see which machine the mail came from—a useful tool for tracking down spam. You can see which machine forwarded it and at what time it reached each host—useful for assigning blame for delayed messages. You might also be able to see which email client the sender used if the application adds optional information to the headers.
This project uses a slightly different application architecture. Instead of having a set of scripts, one for each module, this project has a slightly longer script, index.php, that works like the event loop of a GUI-driven program. Each action taken on the site by clicking a button brings you back to index.php, but with a different parameter. Depending on the parameter, different functions are called to show the appropriate output to the user. The functions are in function libraries, as usual.
This architecture is suitable for small applications such as this. It suits applications that are very event driven, where user actions trigger functionality. Using a single event handler is not suitable for larger architectures or projects being worked on by a team.
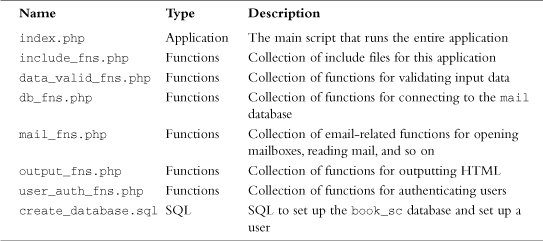
A summary of the files in the Warm Mail project is shown in Table 29.1.
Table 29.1 Files in the Warm Mail Application
Let’s look at the application now.
Setting Up the Database
The database for Warm Mail is fairly simple because it doesn’t actually store any of the emails.
You need to store users of the system. For each user, you need to store the following fields:
![]()
username—The user’s preferred username for Warm Mail
![]()
password—The user’s preferred password for Warm Mail
![]()
address—The user’s preferred email address, which will appear in the From field of emails he sends from the system
![]()
displayname—The “human-readable” name that the user would like displayed in emails from him to others
You also need to store each account that users would like to check with the system. For each account, you need to store the following information:
![]()
username—The Warm Mail user who this account belongs to.
![]()
server—The machine on which the account resides; for example, localhost, mail.tangledweb.com.au, or another domain.
![]()
port—The port to connect to when using this account. Usually, it is 110 for POP3 servers and 143 for IMAP servers.
![]()
type—The protocol used to connect to this server, either POP3 or IMAP.
![]()
remoteuser—The username for connecting to the mail server.
![]()
remotepassword—The password for connecting to the mail server.
![]()
accountid—A unique key for identifying accounts.
You can set up the database for this application by running the SQL shown in Listing 29.1.
Listing 29.1 create_database.sql—SQL to Create the Mail Database
create database mail;
use mail;
create table users
(
username char(16) not null primary key,
password char(40) not null,
address char(100) not null,
displayname char(100) not null
);
create table accounts
(
username char(16) not null,
server char(100) not null,
port int not null,
type char(4) not null,
remoteuser char(50) not null,
remotepassword char(50) not null,
accountid int unsigned not null auto_increment primary key
);
grant select, insert, update, delete
on mail.*
to mail@localhost identified by 'password';
Remember that you can execute this SQL by typing
mysql -u root -p < create_database.sql
You need to supply your root password. You also should change the password for the mail user in create_database.sql and in db_fns.php before running it.
On the CD-ROM, we provided an SQL file called populate.sql. In this application, we do not create a user registration or administration process. You can add one yourself if you want to use this software on a larger scale, but if you want it for personal use, you will just need to insert yourself into the database. The populate.sql script provides a template for doing this, so you can insert your details into it and run it to set yourself up as a user.
Examining the Script Architecture
As mentioned previously, the Warm Mail application uses one script to control everything. This script, called index.php, is shown in Listing 29.2. Although this script is quite long, we go through it section by section.
Listing 29.2 index.php—The Backbone of the Warm Mail System
<?php
// This file is the main body of the Warm Mail application.
// It works basically as a state machine and shows users the
// output for the action they have chosen.
//*****************************************************************************
// Stage 1: pre-processing
// Do any required processing before page header is sent
// and decide what details to show on page headers
//*****************************************************************************
include ('include_fns.php'),
session_start();
//create short variable names
$username = $_POST['username'];
$passwd = $_POST['passwd'];
$action = $_REQUEST['action'];
$account = $_REQUEST['account'];
$messageid = $_GET['messageid'];
$to = $_POST['to'];
$cc = $_POST['cc'];
$subject = $_POST['subject'];
$message = $_POST['message'];
$buttons = array();
//append to this string if anything processed before header has output
$status = ' ';
// need to process log in or out requests before anything else
if ($username || $password) {
if(login($username, $passwd)) {
$status .= "<p style="padding-bottom: 100px">Logged in
successfully.</p>";
$_SESSION['auth_user'] = $username;
if(number_of_accounts($_SESSION['auth_user'])==1) {
$accounts = get_account_list($_SESSION['auth_user']);
$_SESSION['selected_account'] = $accounts[0];
}
} else {
$status .= "<p style="padding-bottom: 100px">Sorry, we could
not log you in with that username and password.</p>";
}
}
if($action == 'log-out') {
session_destroy();
unset($action);
$_SESSION=array();
}
//need to process choose, delete or store account before drawing header
switch ($action) {
case 'delete-account':
delete_account($_SESSION['auth_user'], $account);
break;
case 'store-settings':
store_account_settings($_SESSION['auth_user'], $_POST);
break;
case 'select-account':
// if have chosen a valid account, store it as a session variable
if(($account) && (account_exists($_SESSION['auth_user'], $account))) {
$_SESSION['selected_account'] = $account;
}
break;
}
// set the buttons that will be on the tool bar
$buttons[0] = 'view-mailbox';
$buttons[1] = 'new-message';
$buttons[2] = 'account-setup';
//only offer a log out button if logged in
if(check_auth_user()) {
$buttons[4] = 'log-out';
}
//*****************************************************************************
// Stage 2: headers
// Send the HTML headers and menu bar appropriate to current action
//*****************************************************************************
if($action) {
// display header with application name and description of page or action
do_html_header($_SESSION['auth_user'], "Warm Mail - ".
format_action($action),
$_SESSION['selected_account']);
} else {
// display header with just application name
do_html_header($_SESSION['auth_user'], "Warm Mail",
$_SESSION['selected_account']);
}
display_toolbar($buttons);
//*****************************************************************************
// Stage 3: body
// Depending on action, show appropriate main body content
//*****************************************************************************
//display any text generated by functions called before header
echo $status;
if(!check_auth_user()) {
echo "<p>You need to log in";
if(($action) && ($action!='log-out')) {
echo " to go to ".format_action($action);
}
echo ".</p>";
display_login_form($action);
} else {
switch ($action) {
// if we have chosen to setup a new account, or have just added or
// deleted an account, show account setup page
case 'store-settings':
case 'account-setup':
case 'delete-account':
display_account_setup($_SESSION['auth_user']);
break;
case 'send-message':
if(send_message($to, $cc, $subject, $message)) {
echo "<p style="padding-bottom: 100px">Message sent.</p>";
} else {
echo "<p style="padding-bottom: 100px">Could not send message.</p>";
}
break;
case 'delete':
delete_message($_SESSION['auth_user'],
$_SESSION['selected_account'], $messageid);
//note deliberately no 'break' - we will continue to the next case
case 'select-account':
case 'view-mailbox':
// if mailbox just chosen, or view mailbox chosen, show mailbox
display_list($_SESSION['auth_user'],
$_SESSION['selected_account']);
break;
case 'show-headers':
case 'hide-headers':
case 'view-message':
// if we have just picked a message from the list, or were looking at
// a message and chose to hide or view headers, load a message
$fullheaders = ($action == 'show-headers'),
display_message($_SESSION['auth_user'],
$_SESSION['selected_account'],
$messageid, $fullheaders);
break;
case 'reply-all':
//set cc as old cc line
if(!$imap) {
$imap = open_mailbox($_SESSION['auth_user'],
$_SESSION['selected_account']);
}
if($imap) {
$header = imap_header($imap, $messageid);
if($header->reply_toaddress) {
$to = $header->reply_toaddress;
} else {
$to = $header->fromaddress;
}
$cc = $header->ccaddress;
$subject = "Re: ".$header->subject;
$body = add_quoting(stripslashes(imap_body($imap, $messageid)));
imap_close($imap);
display_new_message_form($_SESSION['auth_user'],
$to, $cc, $subject, $body);
}
break;
case 'reply':
//set to address as reply-to or from of the current message
if(!$imap) {
$imap = open_mailbox($_SESSION['auth_user'],
$_SESSION['selected_account']);
}
if($imap) {
$header = imap_header($imap, $messageid);
if($header->reply_toaddress) {
$to = $header->reply_toaddress;
} else {
$to = $header->fromaddress;
}
$subject = "Re: ".$header->subject;
$body = add_quoting(stripslashes(imap_body($imap, $messageid)));
imap_close($imap);
display_new_message_form($_SESSION['auth_user'],
$to, $cc, $subject, $body);
}
break;
case 'forward':
//set message as quoted body of current message
if(!$imap) {
$imap = open_mailbox($_SESSION['auth_user'],
$_SESSION['selected_account']);
}
if($imap) {
$header = imap_header($imap, $messageid);
$body = add_quoting(stripslashes(imap_body($imap, $messageid)));
$subject = "Fwd: ".$header->subject;
imap_close($imap);
display_new_message_form($_SESSION['auth_user'],
$to, $cc, $subject, $body);
}
break;
case 'new-message':
display_new_message_form($_SESSION['auth_user'],
$to, $cc, $subject, $body);
break;
}
}
//*****************************************************************************
// Stage 4: footer
//*****************************************************************************
do_html_footer();
?>
The index.php script uses an event handling approach. It contains the knowledge or logic about which function needs to be called for each event. The events in this case are triggered by the user clicking the various buttons in the site, each of which selects an action. Most buttons are produced by the display_button() function, but the display_form_button() function is used if it’s a submit button. These functions are both in output_fns.php. They all jump to URLs of the form
index.php?action=log-out
The value of the action variable when index.php is called determines which event handler to activate.
The four main sections of the script are as follows:
1. You do some processing that must take place before you send the page header to the browser, such as starting the session, executing any preprocessing for the action the user has selected, and deciding what the headers will look like.
2. You process and send the appropriate headers and menu bar for the action the user has selected.
3. You choose which body of the script to execute, depending on the selected action. The different actions trigger different function calls.
4. You send the page footers.
If you look briefly through the code for the script, you will see that these four sections are marked with comments.
To understand this script fully, let’s walk through actually using the site action by action.
Logging In and Out
When a user loads the page index.php, he will see the output shown in Figure 29.2.
Figure 29.2 The login screen for Warm Mail asks for a username and password.
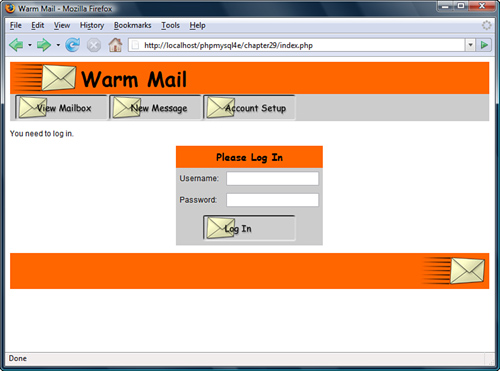
Showing the login screen is the default behavior for the application. With no $action chosen yet, and no login details supplied, PHP will then execute the following parts of the code.
In the preprocessing stage, PHP first executes the following code:
include ('include_fns.php'),
session_start();
These lines start the session that will be used to keep track of the $auth_user and $selected_account session variables, which we come to later.
As in the other applications, you create short variable names. You have done this in every form-related script since Chapter 1, “PHP Crash Course,” so it barely needs mention except for the variable action. Depending on where in the application this variable comes from, it might be either a GET or POST variable. You therefore extract it from the $_REQUEST array. You have to do the same thing with the account variable because it is usually accessed via GET but is accessed via POST when deleting an account.
To save work when customizing the user interface, you use an array to control the buttons that appear on the toolbar. You declare an empty array as follows:
$buttons = array();
Then you set the buttons that you want on the page:
$buttons[0] = 'view-mailbox';
$buttons[1] = 'new-message';
$buttons[2] = 'account-setup';
If the user later logs in as an administrator, you will add more buttons to this array.
For the header stage, you print a plain vanilla header:
do_html_header($_SESSION['auth_user'], "Warm Mail",
$_SESSION['selected_account']);
…
display_toolbar($buttons);
This code prints the title and header bar and then the toolbar of buttons you can see in Figure 29.2. These functions are located in the output_fns.php function library, but because you can easily see their effect in the figure, we don’t go through them here.
Next comes the body of the code:
if(!check_auth_user()) {
echo "<p>You need to log in";
if(($action) && ($action!='log-out')) {
echo " to go to ".format_action($action);
}
echo ".</p>";
display_login_form($action);
}
The check_auth_user() function is from the user_auth_fns.php library. You used similar code in some of the previous projects; it checks whether the user is logged in. If he is not, which is the case here, you show him a login form, which you can see in Figure 29.2. You draw this form in the display_login_form() function from output_fns.php.
If the user fills in the form correctly and clicks the Log In button, he will see the output shown in Figure 29.3.
Figure 29.3 After successful login, the user can begin using the application.
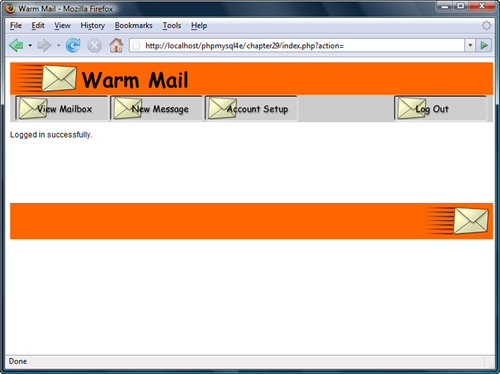
On this execution of the script, you activate different sections of code. The login form has two fields: $username and $password. If they have been filled in, the following segment of preprocessing code will be activated:
if ($username || $password) {
if(login($username, $passwd)) {
$status .= "<p style="padding-bottom: 100px">Logged in successfully.</p>";
$_SESSION['auth_user'] = $username;
if(number_of_accounts($_SESSION['auth_user'])==1) {
$accounts = get_account_list($_SESSION['auth_user']);
$_SESSION['selected_account'] = $accounts[0];
}
} else {
$status .= "<p style="padding-bottom: 100px">Sorry, we could not log you
in with that username and password.</p>";
}
}
As you can see, the code calls the login() function, which is similar to the one used in Chapters 27, “Building User Authentication and Personalization,” and 28, “Building a Shopping Cart.” If all goes well, you register the username in the session variable auth_user.
In addition to setting up the buttons you saw while not logged in, you add another button to allow the user to log out again, as follows:
if(check_auth_user()) {
$buttons[4] = 'log-out';
}
You can see this Log Out button in Figure 29.3.
In the header stage, you again display the header and the buttons. In the body, you display the status message you set up earlier:
echo $status;
After that, you just need to print the footer and wait to see what the user will do next.
Setting Up Accounts
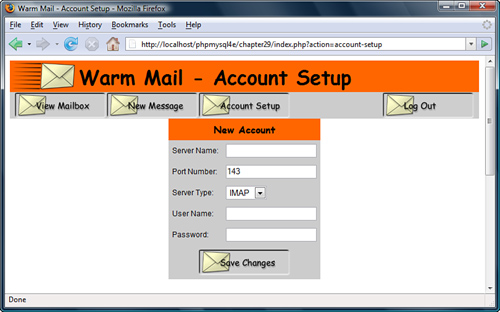
When a user first starts using the Warm Mail system, he will need to set up some email accounts. If the user clicks on the Account Setup button, this will set the action variable to account-setup and recall the index.php script. The user will then see the output shown in Figure 29.4.
Figure 29.4 A user needs to set up his email account details before he can read his email.
Look back at the script in Listing 29.2. This time around because of the value of $action, you get different behavior. You get a slightly different header, as follows:
do_html_header($_SESSION['auth_user'], "Warm Mail - ".
format_action($action),
$_SESSION['selected_account']);
More importantly, you get a different body, as follows:
case 'store-settings':
case 'account-setup':
case 'delete-account':
display_account_setup($_SESSION['auth_user']);
break;
This is the typical pattern: Each command calls a function. In this case, you call the display_account_setup() function. The code for this function is shown in Listing 29.3.
Listing 29.3 display_account_setup() Function from output_fns.php—Function to Get and Display Account Details
function display_account_setup($auth_user) {
//display empty 'new account' form
display_account_form($auth_user);
$list = get_accounts($auth_user);
$accounts = sizeof($list);
// display each stored account
foreach($list as $key => $account) {
// display form for each accounts details.
// note that we are going to send the password for all accounts in the HTML
// this is not really a very good idea
display_account_form($auth_user, $account['accountid'], $account['server'],
$account['remoteuser'], $account['remotepassword'],
$account['type'], $account['port']);
}
}
When you call the display_account_setup() function, it displays a blank form to add a new account, followed by editable forms containing each of the user’s current email accounts. The display_account_form() function displays the form shown in Figure 29.4. You use it in two different ways here: You use it with no parameters to display an empty form, and you use it with a full set of parameters to display an existing record. This function is in the output_fns.php library; it simply outputs HTML, so we do not go through it here.
The function that retrieves any existing accounts is get_accounts(), from the mail_fns.php library. This function is shown in Listing 29.4.
Listing 29.4 get_accounts() Function from mail_fns.php—Function to Retrieve All the Account Details for a Particular User
function get_accounts($auth_user) {
$list = array();
if($conn=db_connect()) {
$query = "select * from accounts where username = ' " .$auth_user . " ' ";
$result = $conn->query($query);
if($result) {
while($settings = $result->fetch_assoc()) {
array_push($list, $settings);
}
} else {
return false;
}
}
return $list;
}
As you can see, the get_accounts() function connects to the database, retrieves all the accounts for a particular user, and returns them as an array.
Creating a New Account
If a user fills out the account form and clicks the Save Changes button, the store-settings action will be activated. Let’s look at the event handling code for this from index.php. In the preprocessing stage, you execute the following code:
case 'store-settings':
store_account_settings($_SESSION['auth_user'], $_POST);
break;
The store_account_settings() function writes the new account details into the database. The code for this function is shown in Listing 29.5.
Listing 29.5 store_account_settings() Function from mail_fns.php—Function to Save New Account Details for a User
function store_account_settings($auth_user, $settings) {
if(!filled_out($settings)) {
echo "<p>All fields must be filled in. Try again.</p>";
return false;
} else {
if($settings['account']>0) {
$query = "update accounts set server = ' " .$settings[server]."',
port = ".$settings[port].", type = ' " .$settings[type]."',
remoteuser = ' " .$settings[remoteuser]."',
remotepassword = ' " .$settings[remotepassword]."'
where accountid = ' " .$settings[account]."'
and username = ' " .$auth_user . " ' ";
} else {
$query = "insert into accounts values (' " .$auth_user."',
' " .$settings[server]."', ' " .$settings[port]."',
' " .$settings[type]."', ' " .$settings[remoteuser]."',
' " .$settings[remotepassword]."', NULL)";
}
if($conn=db_connect()) {
$result=$conn->query($query);
if ($result) {
return true;
} else {
return false;
}
} else {
echo "<p>Could not store changes.</p>";
return false;
}
}
}
As you can see, two choices within the store_account_settings() function correspond to inserting a new account or updating an existing account. The function executes the appropriate query to save the account details.
After storing the account details, you go back to index.php, to the main body stage:
case 'store-settings':
case 'account-setup':
case 'delete-account':
display_account_setup($_SESSION['auth_user']);
break;
As you can see, you then execute the display_account_setup() function as before to list the user’s account details. The newly added account will now be included.
Modifying an Existing Account
The process for modifying an existing account is similar. The user can change the account details and click the Save Changes button. Again, this activity triggers the store-settings action, but this time it updates the account details instead of inserting them.
Deleting an Account
To delete an account, the user can click the Delete Account button shown under each account listing. Doing so activates the delete-account action.
In the preprocessing section of the index.php script, you execute the following code:
case 'delete-account':
delete_account($_SESSION['auth_user'], $account);
break;
This code calls the delete_account() function. The code for this function is shown in Listing 29.6. Account deletion needs to be handled before the header because a choice of which account to use is located inside the header. The account list needs to be updated before it can be correctly drawn.
Listing 29.6 delete_account() Function from mail_fns.php—Function to Delete a Single Account’s Details
function delete_account($auth_user, $accountid) {
//delete one of this user’s accounts from the DB
$query = "delete from accounts where accountid = ' " .$accountid."'
and username = ' " .$auth_user . " ' ";
if($conn=db_connect()) {
$result = $conn->query($query);
}
return $result;
}
After execution returns to index.php, the body stage runs the following code:
case 'store-settings':
case 'account-setup':
case 'delete-account':
display_account_setup($_SESSION['auth_user']);
break;
Notice that this is the same code you ran before; it just displays the list of the user’s accounts.
Reading Mail
After the user has set up some accounts, you can move on to the main game: connecting to these accounts and reading mail.
Selecting an Account
The user needs to select one of his accounts to read mail from. The currently selected account is stored in the $selected_account session variable.
If the user has a single account registered in the system, it will be automatically selected when he logs in, as follows:
if(number_of_accounts($_SESSION['auth_user'])==1) {
$accounts = get_account_list($_SESSION['auth_user']);
$_SESSION['selected_account'] = $accounts[0];
}
The number_of_accounts() function, from mail_fns.php, works out whether the user has more than one account; this function is shown in Listing 29.7. The get_account_list() function retrieves an array of the user’s account IDs. In this case, there is exactly one, so you can access it as the array’s 0 value.
Listing 29.7 number_of_accounts() Function from mail_fns.php—Function to Work Out How Many Accounts a User Has Registered
function number_of_accounts($auth_user) {
// get the number of accounts that belong to this user
$query = "select count(*) from accounts where
username = ' " .$auth_user . " ' ";
if($conn=db_connect()) {
$result = $conn->query($query);
if($result) {
$row = $result->fetch_array();
return $row[0];
}
}
return 0;
}
The get_account_list() function is similar to the get_accounts() function you looked at before except that it retrieves only the account names.
If a user has multiple accounts registered, he will need to select one to use. In this case, the headers contain a SELECT option that lists the available mailboxes. Choosing the appropriate one automatically displays the mailbox for that account. You can see this in Figure 29.5.
Figure 29.5 After the account is selected from the SELECT box, the mail from that account is downloaded and displayed.

This SELECT option is generated in the do_html_header() function from output_fns.php, as shown in the following code fragment:
// include the account select box only if the user has more than one account
if(number_of_accounts($auth_user)>1) {
echo "<form action="index.php?action=open-mailbox" method="post">
<td bgcolor="#ff6600" align="right" valign="middle">";
display_account_select($auth_user, $selected_account);
echo "</td>
</form>";
}
We have generally avoided discussing the HTML used in the examples in this book, but the HTML generated by the function display_account_select() bears a visit.
Depending on the accounts the current user has, display_account_select() generates HTML like this:
<select
onchange="window.location=this.options[selectedIndex].value
name=account">
<option
value="index.php?action=select-account&account=4" selected >
thickbook.com
</option>
<option
value="index.php?action=select-account&account=3">
localhost
</option>
</select>
Most of this code is just an HTML select element, but it also includes a little JavaScript. In the same way that PHP can generate HTML, it can also be used to generate client-side scripts.
Whenever a change event happens to this element, JavaScript sets window.location to the value of the option. If your user selects the first option in the select, window.location will be set to 'index.php?action=select-account&account=10'. This results in this URL being loaded. Obviously, if the user has a browser that does not support JavaScript or has JavaScript disabled, this code will have no effect.
The display_account_select() function, from output_fns.php, gets the available account list and displays the SELECT. It also uses the get_account_list() function discussed previously.
Choosing one of the options in the SELECT activates the select_account event. If you look at the URL in Figure 29.5, you can see this event appended to the end of the URL, along with the account ID of the chosen account.
Appending these GET variables has two effects. First, in the preprocessing stage of index.php, the chosen account is stored in the session variable $selected_account, as follows:
case 'select-account':
// if have chosen a valid account, store it as a session variable
if(($account) && (account_exists($_SESSION['auth_user'],
$account))) {
$_SESSION['selected_account'] = $account;
}
break;
Second, when the body stage of the script is executed, the following code is executed:
case 'select-account':
case 'view-mailbox':
// if mailbox just chosen, or view mailbox chosen, show mailbox
display_list($_SESSION['auth_user'],
$_SESSION['selected_account']);
break;
As you can see, you take the same action here as if the user had chosen the View Mailbox option. We look at that action next.
Viewing Mailbox Contents
Mailbox contents can be viewed with the display_list() function. This function displays a list of all the messages in the mailbox. The code for this function is shown in Listing 29.8.
Listing 29.8 display_list() Function from output_fns.php—Function to Display All Mailbox Messages
function display_list($auth_user, $accountid) {
// show the list of messages in this mailbox
global $table_width;
if(!$accountid) {
echo "<p style="padding-bottom: 100px">No mailbox selected.</p>";
} else {
$imap = open_mailbox($auth_user, $accountid);
if($imap) {
echo "<table width="".$table_width."" cellspacing="0"
cellpadding="6" border="0">";
$headers = imap_headers($imap);
// we could reformat this data, or get other details using
// imap_fetchheaders, but this is not a bad summary so we
// just echo each
$messages = sizeof($headers);
for($i = 0; $i<$messages; $i++) {
echo "<tr><td bgcolor="";
if($i%2) {
echo "#ffffff";
} else {
echo "#ffffcc";
}
echo ""><a href="index.php?action=view-message&messageid="
.($i+1)."">";
echo $headers[$i];
echo "</a></td></tr>
";
}
echo "</table>";
} else {
$account = get_account_settings($auth_user, $accountid);
echo "<p style="padding-bottom: 100px">Could not open mail
box ".$account['server'].".</p>";
}
}
}
In the display_list() function, you actually begin to use PHP’s IMAP functions. The two key parts of this function are opening the mailbox and reading the message headers.
You open the mailbox for a user account with a call to the open_mailbox() function written in mail_fns.php. This function is shown in Listing 29.9.
Listing 29.9 open_mailbox() Function from mail_fns.php—This Function Connects to a User Mailbox
function open_mailbox($auth_user, $accountid) {
// select mailbox if there is only one
if(number_of_accounts($auth_user)==1) {
$accounts = get_account_list($auth_user);
$_SESSION['selected_account'] = $accounts[0];
$accountid = $accounts[0];
}
// connect to the POP3 or IMAP server the user has selected
$settings = get_account_settings($auth_user, $accountid);
if(!sizeof($settings)) {
return 0;
}
$mailbox = '{'.$settings[server];
if($settings[type]=='POP3') {
$mailbox .= '/pop3';
}
$mailbox .= ':'.$settings[port].'}INBOX';
// suppress warning, remember to check return value
@$imap = imap_open($mailbox, $settings['remoteuser'],
$settings['remotepassword']);
return $imap;
}
You actually open the mailbox with the imap_open() function, which has the following prototype:
int imap_open (string mailbox, string username, string password [, int options])
The parameters you need to pass to it are as follows:
![]()
mailbox—This string should contain the server name and mailbox name, and optionally a port number and protocol. The format of this string is
{hostname/protocol:port}boxname
If the protocol is not specified, it defaults to IMAP. In the code we wrote, you can see that we specify POP3 if the user has specified that protocol for a particular account.
For example, to read mail from the local machine using the default ports, you would use the following mailbox name for IMAP:
{localhost:143}INBOX
And you would use this one for POP3:
{localhost/pop3:110}INBOX
![]()
username—The username for the account.
![]()
password—The password for the account.
You can also pass it optional flags to specify options such as "open mailbox in read-only mode".
Note that we constructed the mailbox string piece by piece with the concatenation operator before passing it to imap_open(). You need to be careful how you construct this string because strings containing {$ can cause problems in PHP.
This function call returns an IMAP stream if the mailbox can be opened and false if it cannot.
When you are finished with an IMAP stream, you can close it by using imap_close(imap_stream). In this function, the IMAP stream is passed back to the main program. You then use the imap_headers() function to get the email headers for display:
$headers = imap_headers($imap);
This function returns header information for all mail messages in the mailbox you have connected to. The information is returned as an array, one line per message. This information has not been formatted. The function just outputs one line per message, so you can see from looking at Figure 29.5 what the output looks like.
You can get more information about email headers using the confusing, similarly named imap_header() function. In this case, though, the imap_headers() function gives you enough detail for the purposes of this project.
Reading a Mail Message
Each message in the previous display_list() function is set up to link to specific email messages. Each link is of the form
index.php?action=view-message&messageid=6
The messageid is the sequence number used in the headers retrieved earlier. Note that IMAP messages are numbered from 1, not 0.
If the user clicks one of these links, he will see output like that shown in Figure 29.6.
Figure 29.6 Using the view-message action shows a particular message.

When you enter these parameters into the index.php script, you execute the following code:
case 'show-headers':
case 'hide-headers':
case 'view-message':
// if we have just picked a message from the list, or were looking at
// a message and chose to hide or view headers, load a message
$fullheaders = ($action == 'show-headers'),
display_message($_SESSION['auth_user'],
$_SESSION['selected_account'],
$messageid, $fullheaders);
break;
Here, you check the value of the $action being equal to 'show-headers'. In this case, it is false, and $fullheaders is set equal to false. We look at the 'show-headers' action in a moment.
The line
$fullheaders = ($action == 'show-headers'),
could have been more verbosely—but perhaps more clearly—written as
if ($action == 'show-headers') {
$fullheaders = true;
} else {
$fullheaders = false;
}
Next, you call the display_message() function. Most of this function outputs plain HTML, so we do not go through it here. It calls the retrieve_message() function to get the appropriate message from the mailbox:
$message = retrieve_message($auth_user, $accountid, $messageid, $fullheaders);
The retrieve_message() function is in the mail_fns.php library. You can see the code for it in Listing 29.10.
Listing 29.10 retrieve_message() Function from mail_fns.php—This Function Retrieves One Specific Message from a Mailbox
function retrieve_message($auth_user, $accountid, $messageid,
$fullheaders) {
$message = array();
if(!($auth_user && $messageid && $accountid)) {
return false;
}
$imap = open_mailbox($auth_user, $accountid);
if(!$imap) {
return false;
}
$header = imap_header($imap, $messageid);
if(!$header) {
return false;
}
$message['body'] = imap_body($imap, $messageid);
if(!$message['body']) {
$message['body'] = "[This message has no body]
";
}
if($fullheaders) {
$message['fullheaders'] = imap_fetchheader($imap, $messageid);
} else {
$message['fullheaders'] = ' ';
}
$message['subject'] = $header->subject;
$message['fromaddress'] = $header->fromaddress;
$message['toaddress'] = $header->toaddress;
$message['ccaddress'] = $header->ccaddress;
$message['date'] = $header->date;
// note we can get more detailed information by using from and to
// rather than fromaddress and toaddress, but these are easier
imap_close($imap);
return $message;
}
Again, you use open_mailbox() to open the user’s mailbox. This time, however, you are after a specific message. Using this function library, you download the message headers and message body separately.
The three IMAP functions used here are imap_header(), imap_fetchheader(), and imap_body(). Note that the two header functions are distinct from imap_headers(), the one used previously. They are somewhat confusingly named. To summarize
![]()
imap_headers()—Returns a summary of the headers for all the messages in a mailbox. It returns them as an array with one element per message.
![]()
imap_header()—Returns the headers for one specific message in the form of an object.
![]()
imap_fetchheader()—Returns the headers for one specific message in the form of a string.
In this case, you use imap_header() to fill out specific header fields and imap_fetchheader() to show the user the full headers if requested. (We come back to this topic later.)
You use imap_header() and imap_body() to build an array containing all the elements of a message that you are interested in. You call imap_header() as follows:
$header = imap_header($imap, $messageid);
You can then extract each of the fields you require from the object:
$message['subject'] = $header->subject;
You call imap_body() to add the message body to the array as follows:
$message['body'] = imap_body($imap, $messageid);
Finally, you close the mailbox with imap_close() and return the array you have built. The display_message() function can then display the message’s fields in the form shown in Figure 29.6.
Viewing Message Headers
As you can see in Figure 29.6, the message contains a Show Headers button. It activates the show-headers option, which adds the full message headers to the message display. If the user clicks this button, he will see output similar to that shown in Figure 29.7.
Figure 29.7 Using show-headers to see the full headers for this message will help a user track down the source of the spam.

As you probably noticed, the event handling for view-message covers show-headers (and its counterpart hide-headers), too. If this option is selected, you do the same things as before. But in retrieve_message(), you also grab the full text of the headers, as follows:
if($fullheaders) {
$message['fullheaders'] = imap_fetchheader($imap, $messageid);
}
You can then display these headers for the user.
Deleting Mail
If a user clicks the Delete button on a particular email, he will activate the 'delete' action. Doing so executes the following code from index.php:
case 'delete':
delete_message($_SESSION['auth_user'],
$_SESSION['selected_account'], $messageid);
//note deliberately no 'break' - we will continue to the next case
case 'select-account':
case 'view-mailbox':
// if mailbox just chosen, or view mailbox chosen, show mailbox
display_list($_SESSION['auth_user'],
$_SESSION['selected_account']);
break;
As you can see, the message is deleted using the delete_message() function, and then the resulting mailbox is displayed as discussed previously. The code for the delete_message() function is shown in Listing 29.11.
Listing 29.11 delete_message() Function from mail_fns.php—This Function Deletes One Specific Message from a Mailbox
function delete_message($auth_user, $accountid, $message_id) {
// delete a single message from the server
$imap = open_mailbox($auth_user, $accountid);
if($imap) {
imap_delete($imap, $message_id);
imap_expunge($imap);
imap_close($imap);
return true;
}
return false;
}
As you can see, this function uses a number of the IMAP functions. The new ones are imap_delete() and imap_expunge(). Note that imap_delete() only marks messages for deletion. You can mark as many messages as you like. The call to imap_expunge() actually deletes the messages.
Sending Mail
Finally, we come to sending mail. You can do this in a few ways from this script: The user can send a new message, reply to, or forward mail. Let’s see how these actions work.
Sending a New Message
The user can choose to send a new message by clicking the New Message button. Doing so activates the 'new-message' action, which executes the following code in index.php/case 'new-message':
display_new_message_form($_SESSION['auth_user'],
$to, $cc, $subject, $body);
break;
The new message form is just a form for sending mail. You can see what it looks like in Figure 29.8. This figure actually shows a mail reply rather than new mail, but the form is the same. We look at forwarding and replies next.
Figure 29.8 You can reply to the message or forward it on to someone else.

Clicking the Send Message button invokes the 'send-message' action, which executes the following code:
case 'send-message':
if(send_message($to, $cc, $subject, $message)) {
echo "<p style="padding-bottom: 100px">Message sent.</p>";
} else {
echo "<p style="padding-bottom: 100px">Could not send message.</p>";
}
This code calls the send_message() function, which actually sends the mail. This function is shown in Listing 29.12.
Listing 29.12 send_message() Function from mail_fns.php—This Function Sends the Message That the User Has Typed In
function send_message($to, $cc, $subject, $message) {
// send one email via PHP
if (!$conn=db_connect()) {
return false;
}
$query = "select address from users where
username=' " .$_SESSION['auth_user'] . " ' ";
$result = $conn->query($query);
if (!$result) {
return false;
} else if ($result->num_rows==0) {
return false;
} else {
$row = $result->fetch_object();
$other = 'From: '.$row->address;
if (!empty($cc)) {
$other.="
Cc: $cc";
}
if (mail($to, $subject, $message, $other)) {
return true;
} else {
return false;
}
}
}
As you can see, this function uses mail() to send the email. First, however, it loads the user’s email address out of the database to use in the From field of the email.
Replying To or Forwarding Mail
The Reply, Reply All, and Forward functions all send mail in the same way that New Message does. The difference in how they work is that they fill in parts of the new message form before showing it to the user. Look back at Figure 29.8. The content of the message being replied to has been indented with the > symbol, and the Subject line prefaced with Re:. Similarly, the Forward and Reply All options fill in the recipients, subject line, and indented message.
The code to reply to or forward mail is activated in the body section of index.php, as follows:
case 'reply-all':
//set cc as old cc line
if(!$imap) {
$imap = open_mailbox($_SESSION['auth_user'],
$_SESSION['selected_account']);
}
if($imap) {
$header = imap_header($imap, $messageid);
if($header->reply_toaddress) {
$to = $header->reply_toaddress;
} else {
$to = $header->fromaddress;
}
$cc = $header->ccaddress;
$subject = "Re: ".$header->subject;
$body = add_quoting(stripslashes(imap_body($imap, $messageid)));
imap_close($imap);
display_new_message_form($_SESSION['auth_user'],
$to, $cc, $subject, $body);
}
break;
case 'reply':
//set to address as reply-to or from of the current message
if(!$imap) {
$imap = open_mailbox($_SESSION['auth_user'],
$_SESSION['selected_account']);
}
if($imap) {
$header = imap_header($imap, $messageid);
if($header->reply_toaddress) {
$to = $header->reply_toaddress;
} else {
$to = $header->fromaddress;
}
$subject = "Re: ".$header->subject;
$body = add_quoting(stripslashes(imap_body($imap, $messageid)));
imap_close($imap);
display_new_message_form($_SESSION['auth_user'],
$to, $cc, $subject, $body);
}
break;
case 'forward':
//set message as quoted body of current message
if(!$imap) {
$imap = open_mailbox($_SESSION['auth_user'],
$_SESSION['selected_account']);
}
if($imap) {
$header = imap_header($imap, $messageid);
$body = add_quoting(stripslashes(imap_body($imap, $messageid)));
$subject = "Fwd: ".$header->subject;
imap_close($imap);
display_new_message_form($_SESSION['auth_user'],
$to, $cc, $subject, $body);
}
break;
You can see that each of these options sets up the appropriate headers, applies formatting as necessary, and calls the display_new_message_form() function to set up the form.
Now you’ve seen the full set of functionality for the web mail reader.
Extending the Project
There are many extensions or improvements you could make to this project. You can look to the mail reader you normally use for inspiration, but some useful additions are the following:
![]() Add the ability for users to register with this site. (You could reuse some of the code from Chapter 27, “Building User Authentication and Personalization,” for this purpose.)
Add the ability for users to register with this site. (You could reuse some of the code from Chapter 27, “Building User Authentication and Personalization,” for this purpose.)
![]() Add the ability for users to have many addresses. Many users have more than one email address—perhaps a personal address and a work address. By moving their stored email address from the users table to the accounts table, you could allow them to use many addresses. You would need to change a limited amount of other code, too. The send mail form would need a drop-down box to select which address to use.
Add the ability for users to have many addresses. Many users have more than one email address—perhaps a personal address and a work address. By moving their stored email address from the users table to the accounts table, you could allow them to use many addresses. You would need to change a limited amount of other code, too. The send mail form would need a drop-down box to select which address to use.
![]() Add the ability to send, receive, and view mail with attachments. If users are to be able to send attachments, you will need to build in file upload capabilities as discussed in Chapter 19, “Interacting with the File System and the Server.” Sending mail with attachments is covered in Chapter 30, “Building a Mailing List Manager.”
Add the ability to send, receive, and view mail with attachments. If users are to be able to send attachments, you will need to build in file upload capabilities as discussed in Chapter 19, “Interacting with the File System and the Server.” Sending mail with attachments is covered in Chapter 30, “Building a Mailing List Manager.”
![]() Add address book capabilities.
Add address book capabilities.
![]() Add network newsreading capabilities. Reading from an NNTP server using the IMAP functions is almost identical to reading from a mailbox. You just need to specify a different port number and protocol in the
Add network newsreading capabilities. Reading from an NNTP server using the IMAP functions is almost identical to reading from a mailbox. You just need to specify a different port number and protocol in the imap_open() call. Instead of naming a mailbox such as INBOX, you name a newsgroup to read from instead. You could combine this with the thread-building capabilities from the project in Chapter 31, “Building Web Forums,” to build a threaded web-based newsreader.
Next
In the next chapter, you build another email-related project. In this one, you build an application to support sending newsletters on multiple topics to people who subscribe through your site.