In This Chapter
Playing with particles
Simulating physics with soft body and rigid body dynamics
Working with cloth simulation
Creating fluid animations with Blender's fluid simulator
When animating, some actions are difficult or very time-consuming to get right, such as explosions, fire, hair, cloth, and physics-related actions like moving fluids and bouncing objects. In order to get these things to look right, one solution is to let the computer do the work and create a simulation of that action taking place. You use variables like gravity and mass to define the environment and the computer calculates how the objects in the scene behave based on the values you set. It's a great way to get nearly accurate motion without the need to key everything by hand. That said, don't make the mistake of thinking simulations give you a huge time savings in animation. This isn't necessarily true, as some highly detailed simulations can take hours, or even days, to complete. Instead, think of it as a way to more reliably animate detailed, physically accurate motion better than you might be able to do by hand alone.
Note
This chapter only scratches the surface of what can be done with the simulation tools in Blender, so you should certainly look at additional resources, such as Blender's official online documentation, as well as Tony Mullen's Bounce, Tumble, and Splash! (published by Wiley) book on physics simulation in Blender to get a full understanding of how each feature works. But hopefully, this chapter gives you an idea of the possibilities you have at hand.
Blender has had an integrated particle system from its early beginnings. Over the years, though, it has grown and matured into a much more powerful system for creating particle-based effects like hair, flocks, and explosions. And the particle system gets more and more powerful with every release.
The controls for Blender's particle systems live in the Object buttons (F7). Figure 13-1 shows the header for the Object buttons window. You can get to the Particle buttons by left-clicking the button in the header that looks like a small explosion. Alternatively, you can keep pressing F7 until the particle panels appear. Initially, this buttons window looks pretty barren, with just a single panel that says Particle System. However, if you have a Mesh object selected and press Add New in this panel, five more panels for controlling particle behavior appear in the window.
Particle systems have a handful of good uses. Each of these uses involves large numbers of individual objects that share some general behavior. This means that particle systems are ideal for groups of objects that move according to physics, such as fireworks or tennis balls being continuously shot at a wall. It also makes particle systems good for simulating hair and fur. If the path that an individual particle travels along were to be considered a strand, you could use groups of these particle strands to make hair. This is exactly what Blender does. There's also one other use for particle systems, and that is simple flocking or crowd simulation. Say you want to have a swarm of gnats constantly buzzing around your character's head. A particle system is a great way to pull off that effect. Figure 13-2 shows the panels you have available when you add a new particle system.

The Particle System panel offers you three types of particle systems to choose from: Emitter, Reactor, and Hair. In most instances, you will probably use the Emitter type. Reactor particle systems create particles based on the behavior of another particle system. And Hair particle systems are the way to create manageable hair and fur in Blender.
If you choose Emitter, the five values on the lower left of the Particle System panel are important for controlling how many particles you have and how long they exist in your scene. Here is a brief explanation for each value:
Amount: As the name implies, this is the total number of particles created by the mesh. After the mesh generates this number of particles, it stops. There are a couple ways to get more particles, but the most straightforward way is to increase this number.
Sta: Short for "Start," this is the frame where particles start being emitted from the source object. By default, this is set to frame 1, but if you don't want to have your particles start until later in your animation, you can increase the value in this field.
End: This is the frame where Blender stops emitting particles from the source object. By default, this is set to frame 100. This means that with the default values for Amount and Sta (1000 and 1.0, respectively), Blender creates ten particles in each new frame in the animation up to frame 100.
Life: The Life value controls how long an individual particle exists in your scene. With the default value of 50.0, this means that a particle born on frame 7 disappears from the scene when you reach frame 57. If you find that your particles aren't lasting as long as you need them to, increase this value.
Rand: This is a value that pertains specifically to the Life of the particle. At its default of 0.0, it doesn't change anything. However, if you increase this value, it introduces a random variation to the life of your particles. This way, not all of the particles born on one frame disappear at the same time, so you end up with a more natural effect.
Any of these types can be associated with one of four varieties of physics simulation models: None, Newtonian, Keyed, and Boids. Very rarely do you have a need to use None as an option, but it's good to have. Typically, the default Newtonian setting is the most useful option because it tends to simulate real-world physical attributes such as gravity, mass, and velocity. Occasionally, though, you may want to have more explicit control over your particles, such as when you are shaping the hair on a character. This is where Keyed physics come to play. You can use the Emitter object of one particle system to control the angle and direction of another one.
To create a basic particle system, use the following steps:
Add a mesh to work as your particle Emitter (spacebar

In this example, I'm using a simple grid, but really any mesh works. In fact, depending on what you're trying to do, different mesh types work better than others. The key thing to remember is that particles tend to be emitted from the faces of your mesh. They move away from the face in the direction of that face's normal.
Navigate to the Particle Buttons (F7
After you press the Add New button, all of the options available to particles become visible. Of course, trying to play back the animation now won't be all that interesting. You need to set a few options first.
Choose the type of particle system you wish to use from the Particle System panel.
In this example, I'm choosing the default setting of Emitter. Feel free to try using one of the other types, but be aware that Reactor particle systems require that you have more than one particle system set up. Also, a button I usually click in this panel is the Random button that appears under Emit From.
Note
Left-clicking this button changes the timing on the birth of your particles, making it look more natural and less mechanical.
Decide what type of physics you would like to have controlling your particles.
As I mentioned before, Newtonian physics are usually the most common type of particle system used, but I'm also pretty fond of Boids physics for Emitter particle systems. It just looks cool, and they're a lot of fun!
Adjust the physics settings to control particle behavior.
For Newtonian physics, you have to give your particles some sort of initial velocity. I tend to adjust the Normal velocity first because it gives the most immediate results. Values above zero go along each face's normals, whereas values below zero go in the opposite direction. Boid particles don't require an initial velocity, but the settings do adjust how each Boid particle interacts with its neighboring particles.
Play back the animation to watch the particles move (Alt+A).
When you playback, it would be a good idea to make sure you're at frame 1 when you start. Otherwise, you might not see the proper particle simulation. Watch how your particles move and behave. If you don't like how they're working, press Esc to stop the playback and go adjust your settings. Then play the animation again. This back-and-forth tweaking is how you refine your particle system's behavior.
Figure 13-3 shows the above process being done. Bear in mind that this is a very basic particle system setup and you're just barely scratching the surface of what's possible. I definitely recommend that you take some time to play with each of the settings and figure out what they do, as well as read some of the more in-depth documentation on particles in Blender's online documentation.

After you've created a basic particle system, you can have a little bit of fun with it, controlling the behavior of your particles. You control this by using forces and deflectors. A force is a controlling influence on the overall behavior of the particles, such as wind, vortices, and magnetism. In contrast, in Blender terms a deflector is basically something that a particle collides with and impedes its progress. Generally speaking, forces are defined using Empties, whereas deflectors are created with Meshes.
All of the controls for forces and deflectors live in the Physics buttons. Referring back to Figure 13-1, the Physics buttons are accessed by left-clicking the button to the left of the Particle buttons icon. You can also reveal these buttons by pressing F7 repeatedly, cycling through the Object buttons until they appear. For particle forces, use the Fields panel on the far left. In a separate tab on that panel are the Collision settings. This is specifically for particle collisions, or deflectors.
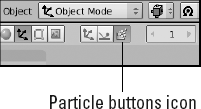
Now, I could go through each and every option available here exhaustively, but things usually make more sense if you have an example to work with. That being the case, use the following steps to create a particle system that creates particles that are influenced by a wind force that causes them to collide with a wall and then bounce off of it:
Create a simple particle system.
If you need a refresher, use the steps in the last section to create a basic Emitter particle system with Newtonian physics.
Add an Empty (spacebar
This Empty is the source of your wind force. The wind moves along the Empty's local Z-axis, so keep that in mind as you position and orient it in space.
Make the Empty a Wind force.
Navigate to the Physics buttons (F7
Add a Plane (spacebar
This Plane is your deflector. Grab the plane (G) and move it so that it's in the path of the wind that is pushing your particles. Rotate (R) the plane to make sure the particles actually run into it head-on.
Make the Plane a Collision object.
In the Physics buttons, left-click the Collision tab in the Field panel and left-click the Collision button in this panel. Whammo! You've made a deflector! If you set your time at frame 1 and play back the animation (Alt+A), your particles should be blown by your wind force into your plane, which they should bounce off of rather than shoot straight through.
Figure 13-4 shows this results of this step-by-step process. And like the section before this one, you're just seeing the tip of the iceberg in terms of what's possible with forces and deflectors. There are all sorts of cool forces and settings that you can use to get some very unique behavior out of your particle systems.
It would be remiss of me to cover particles and not say anything about Blender's hair and fur system. Blender uses particles to create hair and fur for your characters. As you may have guessed, this is done when you choose Hair as the type of particle system you want from the Particle System panel in the Particle buttons. From there, the setup is roughly the same as using a regular Emitter system with Newtonian physics, but there are two notable differences. The first difference is the Set Editable button that appears to the right of the particle system type menu. By left-clicking this button, you freeze the particle settings that you've already set and, by doing so, you make it so you can specially customize the hair in Blender's Particle Edit mode. Figure 13-5 shows a screenshot of an object with particle hair being combed in Particle Edit mode.

You switch to Particle mode using the Mode menu in the 3D View window's header. With your Emitter object selected, left-click the menu and choose Particle Mode. When you're in Particle mode, you have the ability to directly edit particle hair, including combing, cutting, growing, and smoothing it out. To see these controls, enable the Particle Edit Properties floating window by pressing N or choosing Particles
The other thing that differs in the setup of hair particles is the use of child particles. Creating and displaying hair particles can take up a lot of computing power, and when animating, you don't necessarily want to be waiting on Blender to draw your character's fur in the 3D window. To deal with this, there are two solutions, and the results are best when they're used together. The first thing is to reduce the number of viewable particles in the 3D view. This is done with the Disp value in the Visualization panel of the Particle buttons. Disp changes the percentage of particles being displayed in the 3D view. When you make this change, fewer particles show up in the 3D View, but all of them appear when you render. That gives you the best of both worlds.
Of course, for characters with a lot of hair, just reducing the displayable particles might not be enough. This is where child particles are useful. In the last panel of the Particle buttons, left-click the Children tab and choose Faces from the menu in this panel. This causes additional particle strands to grow from the faces of your emitter, with their locations determined by the particles around them. The Children panel has two Amount settings on the left column. The first Amount dictates how many particles are seen in the 3D View. For speed while animating, I often set this value to zero. The second value is the Render Amount. This is the number of child particles that each parent particle has at render time.
With the particle system properly generating your hairs, the only thing you have to worry about now is controlling how Blender renders this hair. Here's a quick-and-dirty rundown of the steps I go through to get the hair to render nicely (a reference file for this is included on the CD-ROM that comes with this book):
Enable Strand render in the Visualization panel of the Particle buttons.
This tells Blender's rendering engine to render the particles as strands. Another helpful option in this panel is the Emitter button on the left side under the Render label. Enabling this option makes the emitter visible, which is helpful if you're using your actual character mesh to generate the hair.
In the Material buttons (F5), turn on ZTransp in the Links and Pipeline panel and set your Alpha value to zero in the Material panel.
If you're using the Hair strands preview type in the Preview panel (I recommend doing this), you may notice that your hair is virtually non-existent because of the zero Alpha value. Don't worry: This will all make sense in the next couple of steps.
In the Texture buttons (F6), add a new Blend texture and use the Colorband in the Colors panel to control the color and transparency along the length of the hair.
The most important thing here is that the right hand side of the colorband should be completely transparent. All other color positions in it should be opaque.
Back in the Material buttons (F5), under the Map Input panel, enable the Strand button. In the Map To panel, enable Col and Alpha.
Now the Preview panel should show hair strands that use your colorband gradient along the length each strand, feathered out to semi-transparent tips.
Still in the Material buttons, go to the Links and Pipeline panel and left-click the Strands button near the bottom of the panel.
There are a couple fields here worth mentioning:
Make sure Use Tangent Shading is enabled. This gives the hair a nice shiny effect.
Enable the Use Blender Units button. By default, Blender's hair strands are measured in pixels. This works fine except in situations where you have a hairy object move toward or away from the camera. Enabling this button makes the hair size relative to your scene rather than the size of your final render.
Because you're using Blender Units for hair size, you need to reduce the sizes for the Start and End of the hair strands. I usually use something like 0.02 and 0.01, respectively. You may need a few test renders to get it just right for your object.
The other sliders control the shape of the strands; you can adjust these to taste with a few test renders.
Have you ever sat and watched what happens when a beach ball gets hit or bounces off of the ground? Or seen what happens when someone places a plate of Jell-O on a table? Or observed how a person's hair moves when they shake their head? When these things move and collide with other objects, they have a bit of internal jiggle that can be difficult to reproduce correctly with regular animation tools. This is the basis for what we refer to as soft body dynamics. That effect can be simulated in Blender using the second set of panels in the Physics buttons (F7
Select the cube with a right-click and grab it up in the Z-axis so it floats above the 3D grid (G
You want to give the cube some height to fall from. It doesn't have to be very high; 3 to 5 Blender units should be enough.
Create a Plane mesh as a ground plane (Spacebar
This is the surface for your jiggly cube to bounce off of. It may be helpful to put your 3D cursor at the origin (Shift+C) before adding the plane.
In the first Collision panel of the Physics buttons (F7
Doing so makes Blender understand that the plane is an obstacle for our falling cube.
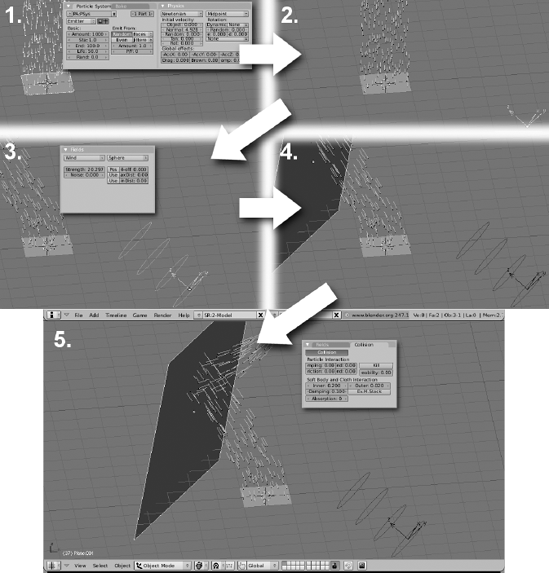
Right-click the cube to select it and then left-click the Soft Body button in the Soft Body panel.
That's all you really have to do to enable soft body physics on your 3D objects. However, in order to get the cube to properly act according to gravity, there's one more step.
Left-click the Use Goal button in the Soft Body panel.
This disables the default Use Goal behavior of soft bodies. This means that when Use Goal is enabled, you can define a group of vertices in the object to be unaffected by the soft body simulation. A scenario where you may want to do this would be a character with loose skin, like the jowls of a large dog. You may want the dog's snout to be completely controlled by your armature animation, but have the jowls that hang off to be influenced by soft body simulation. Because in this case we want the entire object to be affected by the simulation, it's best just to turn it off.
Play back the animation (Alt+A) to watch the cube fall, hit the ground plane, and jiggle as it lands again.
Pretty cool, huh? Figure 13-6 shows this process being completed. As with particles, it's a good practice to make sure you're at frame 1 before playing back your simulation.
Now, I have to admit that I cheated a bit in the example above by using a cube. If you were to try those steps with another type of mesh, like a UV Sphere or Suzanne, the mesh would collapse and look like it instantly deflated when it hit the ground plane. In order to get around this, you need to adjust one more setting. In the Soft Body panel on the last row of buttons is a button that says Be: with a default value of 0.00. This value sets the Bending Stiffness of your object. With a setting of zero, there is no stiffness, so the mesh collapses. However, if you set this to a higher value such as 3.0 or 5.0, the falling mesh retains its shape better when it collides with the ground plane.
Not everything that reacts to physics has the internal jiggle and bounce that soft bodies have. Say, for example, you have to animate a stack of heavy steel girders falling down at a construction site. For that, you don't want to have a soft body simulation. You'd much prefer to have what's called rigid body dynamics. As their name implies, rigid bodies don't get warped by collisions the way that soft bodies do. They either hold their form when they collide, or they break.
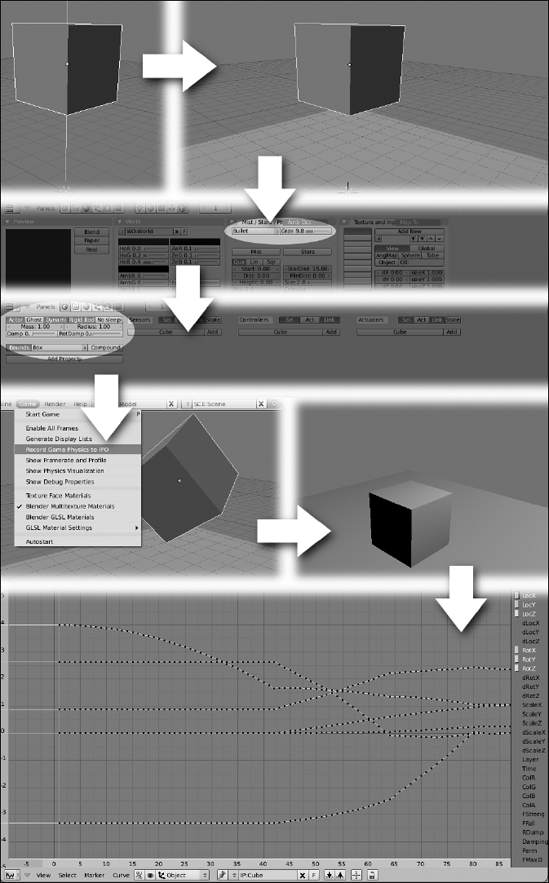
Unlike the other physical simulation, the controls for rigid bodies are not in the Physics buttons. Not yet, at least; there are plans to integrate the rigid body simulation tools with the other physics tools in a future release of Blender. In the meantime, however, the way to get rigid body dynamics in Blender is to use the integrated game engine. Use the following steps to get a simple rigid body simulation with the default cube:
Select the cube by right-clicking and Grab it up in the Z-axis by a few Blender units (G
Like the soft body simulation, 3 to 5 Blender units should be fine.
Create a mesh Plane to act as the ground (spacebar
In the World buttons (F8), make sure the physics engine is set to Bullet and the gravity is set at 9.80.
You can find these settings at the top of the Mist/Stars/Physics panel. Bullet is the name for the main physics suite built into Blender's game engine.
Right-click the cube to select it and bring up the Logic buttons (F4).
The Logic buttons house the controls for Blender's integrated game engine. There's a lot that goes on here, but you're really only interested in the left-most column.
Left-click the Actor button and enable the Dynamic and Rigid Body buttons.
Left-clicking the Actor button makes the cube recognized as a moving object in the game engine. By turning on the Dynamic and Rigid Body attributes, you tell the game engine that the cube is going to have simulated movement, and that motion will be controlled by the rigid body dynamics simulator.
Activating the Bounds button enables the game engine to understand that the cube has boundaries that need to be recognized for collisions. Because you're using a cube, the default setting of Box will work fine in this example. For more complex meshes, you may prefer to use the Convex Hull or Triangle Mesh settings.
Test the simulation by pressing P to start the game engine.
At this point, you have a valid rigid body simulation. You can stop the game engine at any time by pressing Esc. If you'd like, you can rotate (R) the cube to an odd angle and rerun the simulation to see how that affects the cube's motion. However, even though you have a valid simulation now, at this point, you can't see the simulation when you play back using Alt+A. This is because the simulation is only happening in the game engine. To get it to play back in regular Blender, you have to feed the simulation data to Blender's animation system. That is done with the next steps, called baking the simulation.
Enable recording game physics to Blender's animation system.
To do this, go to the main header and enable the Record Game Physics to IPO option (Game
Start the game engine (P) to run the simulation.
When the simulation is complete, press Esc to get back into the regular interface.
The simulation is now baked to Ipo curves.
You can see this by selecting the cube (right-click) and bringing up an Ipo Curve Editor window (Shift+F6). Now when you play back the animation (Alt+A), the results of the simulation should appear just fine. Figure 13-7 shows a breakdown of these steps.
Cloth simulation and soft body simulation are very similar in Blender. There are a few key differences, though. Both soft bodies and cloth work on open as well as closed meshes. (That is, the mesh could be flat like a plane or more of a shell like a cube or sphere.) However, soft bodies tend to work better on closed meshes, whereas cloth is better suited for open ones. Also, the cloth simulator tends to work better with self collisions. Think about the fabric of a flowing dress. In the real world, if you bunch up part of a dress, it's technically colliding with itself. In computer simulations, you want to re-create that effect; otherwise, the fold of one part of the dress breaks through the fold of another part, giving you a completely unrealistic result. The cloth simulator handles situations like this much better than the soft body simulator.
Revisiting the simple default cube, here's a quick walk-through on getting some cloth to drape across it:
Create a mesh Grid (Spacebar
It doesn't have to be too high over the cube; just a couple of Blender units should be plenty.
It would also probably be a good idea to Set Smooth these vertices (Tab
Apply a Subdivision Surfaces modifier to the plane (Ctrl+1).
This just gives the simulator even more vertices to work with. Of course, adding too many vertices causes the simulation to take a long amount of time, but this should be fine for this example.
In the Cloth panel of the Physics buttons (F7
The default material preset for the cloth simulator is Cotton. That should work fine here, but feel free to play with the values and change them to something else.
In the Collision tab of this same panel, left-click the Enable Self-Collisions button.
This ensures that the simulator does everything it can to prevent the cloth from intersecting with itself. At this point, your cloth simulation is all set up for the plane. However, if you were to play the animation with Alt+A right now, the plane would drop right through the cube. You want the cube to behave as an obstacle, so follow the next steps.
Select the cube object (right-click) and navigate to the Collision tab on the left-most panel in the Physics buttons and left-click the Collision button.
This is where things can be a little confusing. You may have noticed that there are actually three different Collision panels in the Physics buttons. Well, think of the left-most Collision panel as the controls for general collisions, whereas the other panels are specific to soft body and cloth objects, respectively. Because the cube is not a cloth or soft body object, you use this panel to control how those other objects collide with it.
Your simulation is set up. Press Alt+A to watch the cloth simulate.
Figure 13-8 shows what the results of this process should look like. Make sure that you're at frame 1 before playing back the simulation.

In my opinion, one of the most remarkable features in Blender is its integrated fluid simulator. This thing is just really cool and a ton of fun to play with, to boot. Before running head-long into fluid simulation-land, however, you should know a few things that are different about the fluid simulator. Like most of the other physics simulation controls, the main controls for the fluid simulator are in the Physics buttons (F7
Tip
Another difference is that the fluid simulator actually creates a separate mesh for each and every frame of animation that it simulates. Because of the detail involved in a fluid, these meshes can get to be quite large and take up a lot of memory. To account for that, the fluid simulator actually saves these meshes to your hard drive in .bobj.gz files. The other simulation systems also save data to your hard drive, but because fluid simulation data can take up an enormous amount of hard drive space, you need to tell Blender where to save these files. And because these files can get pretty large, it's a good idea to make sure you have plenty of hard drive space available for storing your simulation meshes.
The fluid simulator has all of the other features of the other physics simulators. It recognizes gravity, understands static and animated collisions, and has a wide array of available controls. Use the steps below to create a simple fluid simulation:
Right-click the default cube and Scale (S) it larger.
This cube serves as your simulation's domain. The domain can actually be any size, but I definitely recommend that you use a cube or box shape as the domain. Other meshes are turned into a box shape just based on their width and height. In this example, I scaled the default cube by 5 units.
In the Fluid panel of the Physics button, left-click the Enable button and choose Domain from the block of buttons to the right.
Now the fluid simulator recognizes your cube as the domain for the simulation. Figure 13-9 shows the Fluid panel with the Domain button enabled.
Set the location where simulation meshes are saved.
This is in the bottom input box of the panel. By default, Blender sends the .bobj.gz files to the /tmp directory, but I recommend you create your own folder somewhere else on your hard drive, especially if you're on Windows and don't have a /tmp directory. Left-click the folder icon to navigate to that location with the File Browser window.
Decide at which resolution you would like to bake the simulation.
These values are set in the same panel as Resolution and Preview-Res. The Resolution setting is the value that is used when you render. Typically, it's a higher number than the Preview-Res, which is usually used in the 3D view, so you want a smaller number for this so you can get your timing correct. The defaults should work fine for this example, although higher values would look better. Be careful, though, depending on the type of machine you're using: Values greater than 150 may try to use more RAM than your computer has, bringing the simulation time to a crawl.
Determine the time that you want to simulate the fluid's behavior.
The Start Time and End Time values in the Fluid panel are the time of the simulation, measured in seconds. By default, the simulator starts at 0.0 and runs until 0.3 seconds. An important thing to realize here is that this time is scaled across the full number of frames in your animation, as noted in the Anim panel of the Render buttons. This means that if you're using Blender's default frame rate of 25 fps and length of 250 frames, you're simulation will be in slow motion, showing three-tenths of a second of fluid simulation over a span of 10 seconds. For this test, I set the End time in the Fluid simulator to 3.0 seconds and the duration of the animation to be 75 frames long.
Create a mesh to act as the fluid in your simulation (spacebar
For this, I typically like to use an Icosphere, but any mesh will work. To give yourself some more room, you may also want to move this mesh up the Z-axis (G
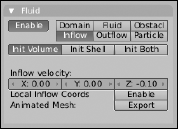
In the Fluid panel of the Physics button, left-click the Enable button and choose Inflow from the block of buttons to the right.
This sets your source mesh as the source for the fluids entering the domain. Choosing Inflow means that the mesh constantly produces more and more fluid as the simulation goes on. If you would prefer to have a single fluid object with a fixed volume, choose Fluid instead of Inflow. Figure 13-10 shows the Fluid panel with the Inflow fluid type chosen.
Give the Inflow object an initial velocity in the negative Z direction.
This value doesn't have to be large: –0.10 should work just fine. You want to make this value negative so that it pushes the fluid down. This initial velocity is added to the force already set by gravity. At this point, your simulation is configured.
Select the domain cube (right-click) and bake the simulation.
Do this by clicking the large Bake button in the Fluid panel. I know that this sounds odd — "Baking fluids? Really?" — but that's the terminology used. You are running the simulation for each frame and "baking" that frame's simulation result to a mesh that's saved on your hard drive. If you look at it like that, it kind of makes sense.
Watch the progress of the fluid simulation.
Depending on how powerful your computer is, this baking process can be pretty time-consuming. I once had a four-second fluid simulation that took 36 hours to bake. (Granted, it was at a high resolution and I had a lot of crazy Inflow objects and complex moving obstacles, so it was entirely my own fault.) Just know that the more complexity you add to your simulation and the higher the resolution, the more time it's going to take. Along with watching the actual simulation, you can keep an eye on a progress bar at the top of the screen that shows which frames the simulator is processing.
Play back the finished simulation with Alt+A.
One thing to note here is that your mesh looks faceted. This is easily fixed by pressing the Set Smooth button in the Link and Materials panel of the Editing buttons (F9).

And, POW: You have water pouring into your scene! Using these same basic steps, you can add obstacles to the scene that can move the water around as you see fit. Check out the color insert for an awesome still image created with the fluid simulator by Blender artist, Mike Pan.