Understanding coordinate system orientations
Speeding up the process with hotkeys
Making changes to 3D objects
Blender is built for speed, and its design heavily emphasizes working as quickly and efficiently as possible for extended periods of time. On more than one occasion, I've found myself working in Blender for 10–15 hours straight. Although, admittedly, part of this has to do with my own minor lunacy, the fact that I'm able to be that productive for that long is a testament to Blender's design. This chapter gets you started in taking full advantage of that power. This chapter covers the meat and potatoes of interacting with three-dimensional (3D) space in Blender, such as moving objects and editing polygons. If you've worked in other 3D programs, chances are good that a number of Blender concepts will seem particularly alien to you. To quote Yoda, "You must unlearn what you have learned" in your journey to become a Blender Jedi. If you've never worked in 3D, you probably have an advantage over a trained professional who's used to a different workflow. Hooray for starting fresh!
Note
In addition to having an emphasis on efficiency, Blender is designed to allow you to work for as long as possible while incurring the least amount of repetitive stress. For this reason, relatively few operations in Blender require you to hold down a key. Typically, you press a key to begin the operation and confirm its completion by left-clicking with your mouse or pressing Enter. To cancel the operation, right-click, or press Esc.
The three basic object operations in a 3D scene are the transformations known (by mathematicians) as translation, scale, and orientation. People who speak Blenderese use the terms grab, scale, and rotate, respectively. Other programs might also use the term move in place of grab or size in place of scale. You can use these three operations to place any object in 3D space at any arbitrary size and with any arbitrary orientation. Also, because Blender tries to maintain consistency throughout its interface, you can use these transform operations in more than just the 3D view. For instance, the same grab and scale operations work when you want to edit keyframes and motion curves in the IPO, short for interpolation, window! How's that for convenient?
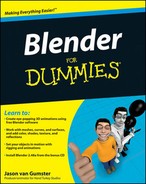
Before you bound headlong into applying transformations, such as rotation and scaling, to your objects, you need to understand how coordinate systems work in 3D space. All coordinate systems in Blender are based on a grid consisting of three axes: X, Y, and Z. The X-axis typically represents side-to-side movement, whereas the Y-axis represent front-to-back and the Z-axis goes from top to bottom. This is referred to as the Cartesian grid. The origin, or center, of this grid is at the (0,0,0) coordinate. The difference in the systems lies in the way this grid is oriented relative to a selected 3D object. Figure 3-1 shows the Coordinate System Orientation menu in the 3D view header when you left-click it.
As the figure shows, there are four orientations to choose from: View, Normal, Local, and Global. Working in of these coordinate systems gives you absolute control of how your object lives in 3D space. Depending on how you would like to transform your object, one orientation might be more appropriate than the others.
View: The orientation from the perspective of the window. The View orientation appears relative to how you're looking at the 3D View window. Regardless of how you move around in a scene, you're always looking down the Z-axis of the View coordinate system. The Y-axis is always vertical, and the X-axis is always horizontal in this orientation.
Normal: The orientation that's perpendicular to some arbitrary plane. When working with just objects, this description doesn't really apply, so the Normal axis is exactly the same as the Local axis. When you begin editing meshes, though, it makes more sense because you have normals to work with. Blender also uses the Normal orientation for the local coordinate system of bones when working with Armatures for animation. Chapter 4 covers editing meshes in more detail and Chapter 11 covers working with Armatures depth.
Local: The orientation of the object relative to its initial location and orientation. In addition to the Global orientation, each 3D object in Blender has a local coordinate system. The origin of this system isn't the same as the Global origin. Instead, this coordinate system is relative to the center point of your object. The center point is represented by the pink dot that's usually located at the center of your 3D object.
Global: The orientation of Blender's base grid that you see in the 3D View. In many ways, this is the primary orientation to which everything else relates. When you first start Blender, you're in Top view, looking down the Z-axis. The Y-axis is marked in green, moving along the front-to-back line, and the X-axis is in red, along the side-to-side line. The origin is located directly at the center of the grid. For example, moving in the negative X direction moves the object to the left, if you're looking from Top view.
Note
All these coordinate system explanations can be (please forgive the pun) disorienting. An easy way to visualize this concept is to imagine that your body represents the Global coordinate system and this book is a 3D object oriented in space. If you hold the book out in front of you and straighten your arms, you move the book away from you. It's moving in the positive Y direction, both globally and locally. Now, if you twist the book to the right a few degrees and do the same thing, it still moves in the positive Y direction globally. However, in its local axis, the book is moving in both a positive Y direction and a negative X direction. To move it in just the positive local Y direction, you move the book in the direction in which its spine is pointing.
To relate this concept to the View orientation, assume that your eyes are the View axis. If you look straight ahead and move the book up and down, you're translating it along the View orientation's Y-axis. For a clear reference, Figure 3-2 shows the difference between the coordinate systems.

Note
The last object you select is the active object. If you're using the Local or Normal orientations and select multiple objects, the transform operations happen relative to the active object's orientation. (In Chapter 2, I show you how to select multiple objects at the same time.)
In Blender's default configuration, the 3D manipulator is activated and viewable at the center of your selected object. You can use the manipulator to transform any object in a 3D scene. When Blender first starts, the manipulator is in Translate (Grab) mode, which you can determine in two ways:
The manipulator itself looks like a set of colored axes located at the center of the selected object.
The button with the red triangle on it (refer to Figure 3-1) is depressed to indicate that the manipulator is in Translate mode. By default, the manipulator is oriented to align with the Global axis.
Note
In all coordinate system orientations under Blender, blue represents the Z-axis, green the Y, and red the X.
As you might expect, translation isn't the only transform operation available to you with the manipulator. Refer to Figure 3-1. The button with the green circle on it activates Rotation manipulator mode, and the button with the blue square activates Scale mode. Press the Rotation Mode button to see the change in the look of the 3D manipulator. In this mode, the manipulator is a set of circles around the object's center, with the proper color representing each axis. Pressing the Scale Mode button for the manipulator changes it to look much like it does in Translate mode, except that you see a small cube, rather than an arrow, at the end of each axis.
Tip
The 3D manipulator should be familiar to you if you've used other programs, where the corresponding tool might be called a widget or a gizmo. However, the Blender manipulator also does something else: It lets you activate multiple modes at the same time. Hold down Shift while pressing the appropriate button to activate a manipulator. You can then make any combination of transform modes active simultaneously. Many Blender users find this capability particularly helpful for animation, where there are situations that require quick access to translation and rotation but not necessarily to adjust the object's scale. Figure 3-3 shows the three separate modes of the manipulator as well as the "combo" manipulator.

To translate a selected object with the manipulator, follow these steps:
Make sure that Translate mode is active by left-clicking the Translate manipulator mode button in the 3D View's header.
Left-click the manipulator arrow that points in the direction you want to move the object.
For instance, to move an object along the X-axis, left-click the red arrow on the manipulator.
To confirm the placement of the object, left-click again or press Enter.
To cancel the operation, right-click or press Esc.
Tip
For quick adjustments, left-click-and-drag an arrow. When you release the mouse button, the placement is confirmed.
In all transform operations, the same controls listed above are available in the Blender multifunction buttons. Move in fixed increments by holding down the Ctrl key. Hold down the Shift key while transforming an object to make adjustments on a finer scale. Hold down the Ctrl+Shift key combo while transforming to make adjustments in smaller fixed increments.
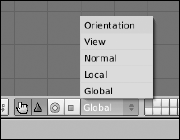
This fixed-increment control is similar to the basic snapping to the grid found in other 2D and 3D applications. Blender also offers the ability to snap your selected object to other objects in your scene. To turn this on, press the icon shaped like a magnet in the 3D View's header, as shown in Figure 3-4. After it's activated, you have a choice of snap modes: Closest, Center, Median, and Active. The way snapping works, you first select what you want to transform. Then you activate one of the various transform operations (Grab, Scale, Rotate). While transforming, hold down Ctrl. As your mouse cursor comes near a vertex in another mesh, a small circle appears around that vertex. When this happens, your selection snaps according to the behavior dictated by the snap mode you've chosen.
The different available types of Snap Target Modes that Blender provides you are as follows:
Active: In Object mode, the last thing that you select is considered the active object. In Blender's default theme, it's a bit difficult to distinguish from your other selected items, but active selections are a lighter color than your other selected objects. When using Active snap mode, your active selection is what snaps to your target vertex.
Median: Median snap mode operates similar to Center snapping. In fact, for two-dimensional meshes such as planes and symmetrical objects, Median snapping is almost always identical to the results of Center snap mode. However, when working in three dimensions and asymmetric meshes, the calculated median and calculated center are not always the same.
Center: In Center snap mode, Blender calculates the true center of your selection and snaps that to your target vertex.
Closest: In this snap mode, the vertex in your selection that is nearest to your target vertex is the one that snaps to it.
Tip
Snapping modes work in both Object mode as well as Edit mode. For more information on Edit mode, see Chapter 4.
Tip
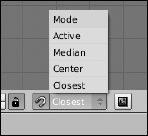
You can observe the changes made to your object in real time by looking in the 3D View window's header as you transform it. Figure 3-5 shows how the header explicitly indicates how much you're changing the object in each axis.
Notice also the white circle around the origin of the Translate manipulator in Figure 3-3. To translate a selected object in the X and Y axis of the View orientation, left-click this circle. This convenient shortcut prevents you from having to continually switch orientation modes for the manipulator.
Tip
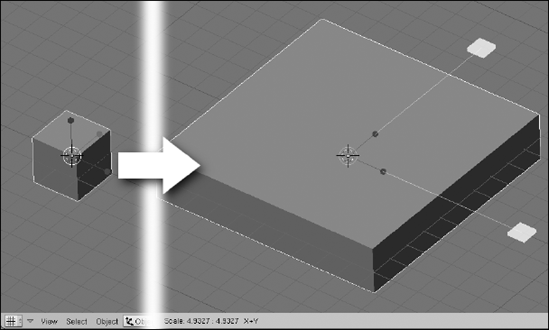
Suppose that you don't want to move the object in the direction of just one axis. Instead, you prefer the freedom to move the object in the plane created by two axes, such as the XY, XZ, or YZ planes. Just Shift+left-click on the axis that's perpendicular to the plane in which you want to move. This is the axis that's "normal to the plane," as defined earlier in the chapter. For example, assuming that you want to scale the object in the XY plane, Shift+left-click the Z-axis cube of the Scale manipulator.
I use this technique a lot when modeling furniture and buildings. I can quickly scale along a plane a cube that has the proper depth, to create a tabletop or a wall. Figure 3-6 illustrates this concept.
Note
Transform operations are consistent across all manipulator modes in Blender, so you can apply any of these methods of interacting with the Translate manipulator in the Rotate and Scale manipulator modes. The only exception is that Shift+left-clicking an axis on the Rotate manipulator operates just like simply left-clicking the axis: It doesn't make sense to try to simultaneously rotate around two axes with any form of control. And don't forget that you aren't limited to working in just the Global coordinate system. You can choose any of the other three orientations from the Coordinate System Orientation menu and the 3D manipulator adjusts to fit that axis.
Now, many professional Blender users find that the manipulator obstructs their view too much when working, so they disable it outright. To do this, go to the 3D View's header near the manipulator mode buttons and press the button with the white pointing hand on it (refer to Figure 3-1 if you need to refresh your memory). You can also do this by pressing Ctrl+spacebar and selecting Enable/Disable. But wait, with the manipulator gone, how do I transform my objects? I'm glad you asked. It is time to introduce you to one of the most powerful features of Blender: hotkeys.
Part of the beauty of Blender's hotkeys are that they take a lot of pressure off of your mouse hand and shorten the distance of mouse-based operations. For example, the Ctrl+spacebar combination that you used to disable the manipulator also gives you the option to directly select which mode you want to enable for the manipulator. Because the menu pops up right beneath your mouse, you don't have to travel all the way to the 3D View window's header each time you want to switch modes. It's especially helpful if you've removed the header from your 3D view or the manipulator mode buttons are somehow obstructed. The accumulation of little time-saving actions like these makes using hotkeys so powerful.
Nearly every piece of major functionality in Blender can be accessed with hotkeys. Transforms are no exception. Remember that I said translate in Blenderese is called grab? Use the following steps to Grab/Translate your object:
Note
To rotate your object, press R. Scale it by pressing S. See a pattern here? The majority of Blender hotkeys are easy to remember. Most of them just use the first letter from the operation in question. And just like when using the manipulator, the familiar Ctrl, Shift, and Ctrl+Shift keypresses for fixed increments and fine adjustments still apply here.
By default, your transformations all happen in the View coordinate system. This means that no matter how you're viewing the scene, you're working in the XY-plane of the window. Suppose, however, you want to grab your object and move it in the Global Z-axis. You use a sequence of keypresses to do this action. Use the following steps to grab an object and move it to the Global Z-axis:
With your object selected, press G.
This puts you in Grab/Translate mode.
Now, without canceling this operation, press Z.
A blue line should appear that indicates the Global Z-axis. Your object is locked to move only along that line. If you press Y, your object moves only along the Global Y-axis and pressing X locks it to the Global X-axis.
Pretty neat, huh? This works with rotating and scaling as well (for example, R
What about the Local axis? That's just one more keypress in the sequence. Follow these steps to grab an object and move it along its Local Y-axis:
Act like you are going to translate the object in the Global Y-axis by pressing G

Then press Y a second time.
This gets you translating in the Local Y-axis. Pressing Y a third time brings you back into moving in the default View coordinate system.
Tip
Again, this works with scaling and rotation as well. Keying the sequence R
One of the more powerful features of the 3D manipulator is the ability to work in a plane rather than just one axis. This, too, can be done with hotkeys using the same logic used in the manipulator. Use Shift plus the letter of the axis that's perpendicular to the plane you want to move in. For instance, to scale your object in the Global XY-plane, press S
Table 3-1. Useful Hotkey Sequences for Transformations
Grab | Scale | Rotate | Orientation |
|---|---|---|---|
G | S | R | View |
G | S | R | Global Z-axis |
G | S | R | Global Y-axis |
G | S | R | Global X-axis |
G | S | R | Local Z-axis |
G | S | R | Local Y-axis |
G | S | R | Local X-axis |
G | S | N/A | Global XY-plane |
G | S | N/A | Global XZ-plane |
G | S | N/A | Global YZ-plane |
G | S | N/A | Local XY-plane |
G | S | N/A | Local XZ-plane |
G | S | N/A | Local YZ-plane |
There is one other, potentially faster, way to lock your transformations to a particular axis: using the middle mouse button. Assume you want to grab your object and translate it along the global X-axis. Select the object and press G, as if you would do any translation. Now use your mouse to move the object in the general direction of the X-axis. As you do this, middle-click and release. Your object should automatically lock to the global X-axis. Blender makes a guess based on the direction you're moving the object in and, when you middle-click, it locks your object to that axis. And of course, this also works with the other transform operations on any of the global axes.
Tip
An even faster way to constrain to axes involves using the middle mouse button. As an example, select an object and Grab (G) it. Now move your mouse in roughly the direction of the X-axis and then middle-click. A red line should appear through your object's centerpoint and the object should be locked to moving along that line, constraining you to that axis. The same thing works in both the Y- and Z-axes. For an even more interactive way of doing this, hold down your middle mouse button while you're Grabbing. All three axes will appear and your object will lock to one of them as you bring your mouse closer to them. I absolutely love this feature.
Tip
To get a good idea of just how much Blender makes use of the keyboard, have a look at the HotKey and MouseAction Reference in the Help menu (Help
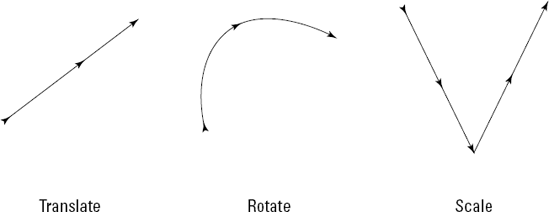
In the previous section, you saw how Blender uses your mouse movement to work with you and work faster by guessing your intent. This isn't the only way Blender uses mouse movement to enhance your workflow. Blender also supports gestures. If you've used the Opera Web browser or Apple's iPhone, you may already be familiar with some of the power of gestures. In essence, gestures rely on your making a movement with your mouse that Blender interprets as a command. To perform a gesture, left-click and drag your mouse, drawing a line. Blender's primary gestures are for transformations, and Figure 3-7 illustrates them. They're also listed as follows:
Grab/Translate: Draw a straight line.
Rotate: Draw a curved line.
Scale: Draw a V-shaped line.
Tip
Gestures are particularly useful for Blender users who work with a drawing tablet, PDA, or tablet PC. The pen-like interface of these devices makes it very convenient to draw these shapes and work very quickly. Of course, even for those of us who work with a mouse or trackball, gestures can be quite handy.
Not only can you use hotkeys to activate the various transform modes, but you can also use the keyboard to explicitly input exactly how much you would like your object to be transformed. You do this by simply typing in the number of units you want to change after you activate the transform mode. As an example, suppose you want to rotate your object 32 degrees around the Global X-axis. To do this, press R
One other way to explicitly translate, scale, and rotate your object is through the Transform Properties floating window. Although Blender's interface is primarily designed to be non-blocking, it does allow a few floating windows. Transform Properties is one of them. To activate this window, go to Object
Note
One thing to be careful of here is to note that, when in Object mode, the values in the Transform Properties window do not change depending on which coordinate system you've selected. Location is always in the Global orientation, whereas Rotation and Scale are always in Local.