Familiarizing yourself with Blender's windows
Customizing Blender to fit the way you work
Working in three-dimensional space
It's time to get intimate with Blender. No, I don't mean you need to start placing scented candles around your computer. I mean this chapter's focus is a detailed introduction to Blender's interface and how you can start finding your way around in it. First of all, it's pretty important to have an understanding of the various types of windows that Blender has, and how to access them. These windows are the gateways and tools for creating whatever you want. And with the knowledge of what you can do with these windows, the next thing is actually building those creations. To do that, you need to understand how to work in a virtual three-dimensional space, and specifically, you need to understand how Blender handles that space. These topics are also covered in this chapter.
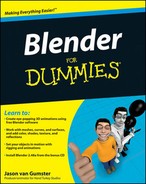
Each Blender window can be changed to any window type. You can see what window types are available by left-clicking the button on the far left of that window's header. Figure 2-1 shows the menu that appears when you press this button.
The window types available through this menu are as follows. Next to each of these types is the hotkey sequence to bring up the window type quickly:
Scripts Window: Blender has a built-in scripting engine that uses the Python programming language. Scripts give Blender additional functionality and automate tedious tasks. This window is where you load these scripts, and in the case of some scripts, it's also where you interact with them.
File Browser: This window allows you to look through the files on your computer.
Image Browser: This window is much like the File Browser window, except it shows icons for folders and files, including thumbnails, or smaller-sized versions, of image files.
Node Editor (Shift+F3): Blender has a Node Editor for materials as well as for compositing. This window is where you modify these node structures. See Chapters 7 and 15 for more on this.
Buttons Window (Shift+F7): Nearly all of the different buttons for working on your scene reside in the panels of the Buttons Window. This window is covered in-depth later in this chapter in the section, "Understanding the Buttons Window."
Outliner (Shift+F9): The Outliner gives a hierarchical view of all the objects in your scene and the ability to see how they are related to one another. It's also a quick way to select objects in a complex scene.
User Preferences: Through the User Preferences window, you can customize how you interact with Blender.
Text Editor (Shift+F11): Blender's integrated Text Editor is not only handy for keeping notes about your scenes and models, but it's also a convenient place to write and test your own Python scripts in Blender.
Audio Window: The Audio Window displays the waveform for any audio file you load and relate it to the time and frame rate you specify for your project.
Timeline: The Timeline window offers you a convenient way to quickly jump from one part of your animation to another.
Video Sequence Editor (Shift+F8): Blender's Video Sequence Editor (VSE) is a lightweight video editor. It isn't as powerful as some of the programs created specifically for editing video, but it's quite effective for stringing a sequence of scenes together and doing basic effects, overlays, and transitions.
UV/Image Editor (Shift+F10): With the UV/Image Editor, you can do basic image editing as well as edit the texture coordinates for your models. More on this in Chapter 7.
NLA Editor (Ctrl+Shift+F12): NLA stands for non-linear animation. The editor in this window allows you to mix pre-animated actions on a single character (such as mixing a waving hand animation with a walking animation to have your character walk and wave her hand).
Action Editor (Shift+F12): The Action Editor is where you create and adjust actions. Actions can be used to animate all of a character's movement in a scene, or they can be mixed together in the NLA Editor.
IPO Curve Editor (Shift+F6): IPO is short for InterPOlation. Blender's IPO Curve Editor shows a graphical representation of an object's animatable attributes as they change over time.
3D View (Shift+F5): This is arguably the most-used window in Blender. The 3D View shows you the three-dimensional view of your model or scene and allows you to modify it.
Tip
The only window type that is not available through this menu is the Data Browse window. You can access it by pressing Shift+F4. This window gives you a view of the raw database-like structure of all of the objects in your project file, called a .blend file (pronounced "dot-blend file"), because Blender project files all end with ".blend". It looks very similar to the File Browser window except it shows only the data in the file you're currently working on. Most Blender artists never need to use this window, but it's helpful for discovering what exactly is going on in your saved project file and for doing some technical maintenance on it. This window is more useful for Technical Directors than it is for regular 3D artists and animators.
The Buttons window is probably the second-most used window in Blender. In it are a series of sub-windows, each with panels containing buttons dedicated to modifying specific parts of your scene. Below is a list of each type of sub-window:
Logic (F4): This window is dedicated to Blender's integrated game engine. Chapter 12 touches on this topic briefly.
Script: Some Blender scripts require you to enable options in this window. In particular, the left-clicking Enable Script Links button allows .blend files to use integrated scripts when first loaded.
Shading (F5): The buttons in the Shading window allow you dramatically change the appearance of objects in your scene. Chapters 7 and 8 go into this window in much more detail.
Object (F7): The Object sub-window allows you to make changes that affect an object as a whole. This is also where physics and particles buttons live. See Chapter 13 for more on these topics.
Editing (F9): Buttons in the Editing sub-window change slightly depending on what sort of object you have selected, but their primary purpose is to make fundamental changes to the structure of an object.
Scene (F10): Scene buttons determine what the final output of your scene will look like when you decide to render it to an image or video. The Scene buttons get covered more in-depth in Chapters 14 and 15.
If you have a background in another software package like 3DS Max or Maya, you may be more comfortable with a screen layout that lines the buttons panels vertically along one side of the screen. Fortunately, Blender and the Buttons window allows for this. To get a vertical Buttons view, follow these steps:
Join the 3D view and the Buttons window by right-clicking the seam between the windows and choosing Join Areas. Left-click in the Buttons window to confirm the join.
Split a new area on the right of the screen by moving your mouse to the seam between the 3D view and the top header; right-click

Move the line until you like the position. Don't worry too much about location; you can always adjust it later.
Change your new side window to the Buttons Window type by pressing Shift+F7 with your mouse in that window, or by selecting it from the Window type list.
Your buttons panels are still horizontally aligned. Fix this by right-clicking anywhere in the Buttons window except for its header and choosing Vertical from the Panel Alignment menu that pops up.
Figure 2-2 shows this process.
Tip
One thing that may concern you is that this vertical Buttons window layout might obscure some of the available buttons in the header. In this case, there are two things you can do. The first thing you can do is left-click the downward-pointing triangle at the left of the header. This collapses the text menus from view so they're out of the way when you don't need them. If that still doesn't give you enough space, Blender has another trick up its sleeve: Middle-click the header and drag your mouse left and right. This moves the contents of the header left and right so you can bring those obscured buttons into view. This feature is very handy for people who work on small monitors.
"Cool!" you say, "I like this vertical layout. Is there a way for me save it so I don't have to change Blender's layout each time I load it?" As a matter of fact, there is! Actually, you can make a variety of layouts depending on the sort of work you're doing. In Blender, these workspace layouts are called screens, and, by default, Blender comes with five: Animation, Model, Material, Sequence, and Scripting. When you first load Blender, it puts you in the Model screen layout. You can cycle through these screens by pressing Ctrl+← and Ctrl+→. If you prefer to use a menu, you can use the one at the top of the window, as shown in Figure 2-3, and left-click the up/down arrows next to the name of the current screen.


Note
One thing worth mentioning here is that the "SR:" that appears before the screen name is not actually part of the name. It's just there to remind you that this menu is for screens. Any screen can be renamed by switching to that screen and left-clicking the screen's name. From here, you can rename it to anything.
Note
Something to note, however, is that the default screens have numbers as part of their names (such as "1-Animation" and "3-Material"). This is done to keep those screens in that specific order. The screens, and therefore the order that they're cycled through when you press Ctrl+← or →, are arranged in alphabetical and numerical order, for fast and logical organization. Keep this in mind if you're creating a screen that you would like to appear in a specific place on the list.
To create a new screen, left-click the up/down arrow next to the current screen name in the header and choose Add New. This produces a new menu where you can choose to duplicate an existing screen or start with an empty one. From here, you can make the changes to your workspace layout, creating a vertical Button Window layout or a traditional "four-panel" layout with a separate 3D View window for top, front, side, and perspective views. When you are happy with changes you've made and you want to have these screens available each time you start Blender, save your settings by choosing File
Tip
Before creating a new screen that you want to keep around for future use, first return to your default setup by selecting File
This section on user preferences is by no means comprehensive. The number of options available in Blender's User Preferences is mind-bogglingly large. My intent here is to introduce you to the most helpful and relevant options to get you working effectively. For specific details on every single button, see the online documentation available at www.blender.org.
Of course, the first question is, "Where exactly are the buttons for user preferences?" If you've used other programs, you might expect an Edit
Tip
Actually, though, there's an easier way. Left-click the seam between the 3D view and the topmost header and drag it down. The user preferences are conveniently tucked above the main menu. This is the fastest way to get to the preferences.
The first set of available options in Blender's user preferences relate to views and controls within the 3D window (shown in Figure 2-4). Moving from left to right, some of the more useful options are as follows:

Object Info: This option is on by default and toggles whether the name of the current frame number and active object are displayed in the lower left corner of a 3D View window.
View name: Off by default, turning this option on places text in the upper left corner of a 3D View window to indicate the perspective from which you're viewing the scene (such as Top Perspective or Camera Perspective).
View rotation: By default, Blender uses the Trackball setting. However, users who are familiar with other 3D programs might prefer the Turntable setting. The difference may seem subtle to a new user, but it can be very disorienting for people from other software packages who may be used to turntable orbit style.
Select with: This option is somewhat mislabeled because it does more than change what you select with. It actually completely swaps what the left mouse button and right mouse button do in Blender. Default is Right Mouse. I cover this more later in this chapter in the section called "Selecting objects".
Emulate 3-Button Mouse: Blender was designed to be used with a three-button mouse. However, not all computers have three-button mice, particularly Macintosh machines and some tablet PCs. Enabling this option helps these users compensate by using Alt+left-click to do what is normally done with the middle-click.
Invert Zoom: Similar to the Trackball/Turntable option, some people are more comfortable scrolling forward to zoom out and back to zoom in. This gives users that option.
Smooth View: Smooth View is probably one of the coolest "convenience options" added to Blender in recent history. By default, it's disabled by being set to zero. However, change that value to its maximum of 1000, go to your 3D View window, and choose View
The next set of options is related to the act of editing objects. As shown in Figure 2-5, the most relevant options are as follows:

Add New Objects: The two options for adding new options are new to Blender as of version 2.46. Both are disabled by default. In this configuration, Blender behaves much like any other 3D program when adding new objects. New objects are added in Object mode and aligned with the global axis. Enabling both of these options makes Blender behave like it did prior to version 2.46.
Undo: The options related to undo are pretty important. Here you can adjust how many steps of undo you have when working in Blender (default is 32), as well as toggle Global Undo on and off. Now, you may be wondering why in the world anyone would ever want to disable the ability to undo a mistake. The most common answer to this question is performance. Having undo enabled requires more memory from your computer and each level of undo requires a little bit more. Sometimes, when working with very complex scenes or models, an artist might disable undo so that all of the memory is dedicated to their current scene rather than the steps used to create it. This occurs most when artists work with Blender's multi-resolution sculpt tools (see Chapter 5).
The first time you load this set of options, you see only a single button that says International Fonts. However, when you click that button, you get a set of options like the ones in Figure 2-6. This section is most useful to non-English-speaking Blender users as it allows most menu items to be translated to their native language. However, there is one additional benefit for all Blender users. By turning on International Fonts, all text in the Blender interface can be displayed in any TrueType font you choose. Simply left-click the Select Font button and use the File Browser to track down the font you would like to use. Even if you just use the default font that's built into Blender, you should notice that the text is much cleaner and less jagged looking with this option enabled. Enabling this function causes your machine to take a slight performance hit, but it's usually barely noticeable on even the slowest of machines.

Blender has quite a bit of flexibility in adjusting how it looks. This is all done through the Themes options, shown in Figure 2-7. By default, Blender ships with two themes: Default and Rounded. Almost all of the screenshots taken for this book are done using the Default theme. However, when I work in Blender, I use my own theme that I derived from the Rounded theme. It's a bit darker and easier on the eyes. This is particularly important if, like me, you're known for sitting behind the computer and working in Blender for 10-15 hour stretches. In situations like that, the less stress you can put on your eyes, the better. A copy of the theme I use is included on the DVD that comes with this book. Feel free to use it for your Blender sessions, or make your own! Everyone has their own tastes. In fact, one of the more popular Blender users, Pablo Vazquez (known as VenomGFX) uses a theme that's completely purple and pink!

Before Blender had undo functionality, users relied heavily on its Auto Save features. These options, as shown in Figure 2-8, are a life-saver, even in the age of undo.
Save Versions: Each time you manually save a file in Blender, it takes your last save and stores it as an earlier version. You may have created work in Blender before and noticed some .blend1 files in the same place you saved your .blend files. Those .blend1 files are the earlier version. This option allows you to determine how many of these earlier versions you'd like Blender to retain for you.
Auto Save Temp Files: Enabled by default, this is Blender's auto save functionality. It saves a "hot backup" in your Temp directory (adjustable in the File Paths options; see below) every few minutes, as dictated by the Minutes field below this button. The Open Recent button closes the current file you're working on without saving and opens your most recent backup in the Temp directory.
Recent Files: The number in this field tells Blender how many of your past files to remember when you go to File
Save Preview Images: This option is turned off by default, but when enabled, it saves a small preview image of each texture and material in your project and embeds it into your .blend file. This way, you can use Blender's Image Browser to see materials and textures when you append or link from other files.

Whereas the View & Controls options dictate how you interact with Blender, the options in the System & OpenGL section, shown in Figure 2-9, tend to dictate more how Blender interacts with you. Many of the options here are geared toward optimizing for performance, and generally the defaults work well. Some of the more interesting options follow:
Solid OpenGL lights: With these settings, you can adjust the standard lighting used in your 3D View window. Some Blender users set these colors to drastically different settings so they can have a good sense of each side of their model and more easily see some of the contours. You have the ability to turn on up to three lights. On each one, you can adjust the direction of the light by left-clicking and dragging on the sphere. You can adjust either of the two colors below (main color and highlight or specularity color, respectively) by left-clicking them and using the color picker that pops up.
Emulate Numpad: This is a very handy option for laptop users. As you see in the next section, Blender makes use of the numeric keypad for quick access to top, front, side, and camera views in the 3D window. Unfortunately, most laptop users do not have an easily accessible numeric keypad on their keyboards. As a workaround for this, the Emulate Numpad option uses the number keys at the top of the keyboard to have the functionality that the corresponding numpad numbers have. This disables the normal layer-switching functionality that the number keys at the top of the keyboard have, but the ability to quickly change views tends to be more valuable to users than the ability to quickly change layers anyway.

The File Paths options shown in Figure 2-10 show the default locations where Blender looks for or places certain files. Here you can indicate where your fonts are located, where you want to save your renders by default, and where to look for textures and sounds. However, probably the most important path in this section is the one for Temp. This is the location where Blender stores Auto Save files and it is also where it stores the notorious quit.blend file, which is great for recovering your last blender session. The default location for temporary files is /tmp/. Unfortunately for users of Microsoft's Windows operating system, this location does not make any sense and actually doesn't even exist. If you're using Windows, I strongly advise that you change this to "C:WindowsTemp" or create a folder called tmp on your C: drive. Linux users may also want to change this location because some Linux distributions like Ubuntu automatically clear the /tmp directory on each boot.

As I mentioned earlier in this chapter, the 3D view is probably the most used window type in all of Blender. It also has some of the most unique interface decisions of any 3D software program. The purpose of this section is to guide you to understanding how to wield this part of Blender like a virtual 3D ninja!
Alright, so perhaps I was a little over the top with the whole ninja thing, but hopefully this section will take you at least one or two steps closer to that goal.
When trying to navigate a three-dimensional space through a two-dimensional screen like a computer monitor, you can't interact with that virtual 3D space exactly like you would in the real world, or as I like to call it, meatspace. The best way to visualize this is to imagine the 3D view as your eyes to this 3D world. But rather than think of yourself as moving through this environment, imagine that you have the ability to move this entire world around in front of you.
The most basic way of navigating this space is called orbiting. This is the rough equivalent of rotating the 3D world around a fixed point in space. In order to orbit in Blender, middle-click anywhere in the 3D view and drag your mouse cursor around.
Tip
Occasionally, you have the need to keep your orientation to the world, but you'll want to move it around so you can see a different part of the scene from the same angle. In Blender, this is called panning, and you do it by holding Shift while middle-clicking in the 3D View. Now when you drag your mouse cursor around, the world shifts around without changing the angle that you're viewing from.
The third way of navigating 3D space is when you want get closer to an object in your scene. Similar to working with a camera, this is called zooming the view. In Blender, there are two ways to zoom. The easiest method is by using your mouse's scroll wheel. By default, scrolling forward zooms in and scrolling back zooms out. However, this method doesn't always give you fine control and some people don't have a mouse with a scroll wheel. In these cases, you can zoom by holding Ctrl while middle-clicking in the 3D view. Now, when you drag your mouse cursor up or left, you zoom in, and when you drag your mouse cursor right or down, you zoom out.
Of course, if you happen to be working with a mouse that does not have a middle mouse button, Blender's default behavior is to emulate the middle mouse button by pressing Alt+left-click. So orbiting is Alt+left-click, panning is Shift+Alt+left-click, and zooming is done with Ctrl+Alt+left-click. Table 2-1 has a more organized way of showing this.
Although using the mouse to work your way around the 3D space is the most common way to adjust how you view things, Blender has some menu items and hotkey sequences that help give you specific views much faster and more accurately than you can do alone with your mouse.
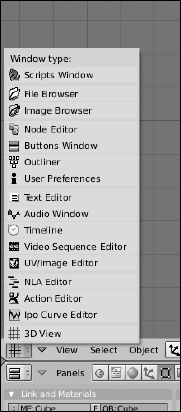
On occasion, you want to know what a model looks like when it's viewed head-on from the front, side, or top. Blender has some convenient shortcuts for quickly switching to these views. The most obvious way is to use the View menu in the 3D view's header, as shown in Figure 2-11. This menu lets you choose the top, front, side, and user view, as well the view from any of the cameras you may have in your scene. You can also use this menu to switch between orthographic and perspective views. The orthographic view of a 3D scene is similar to how technical drawings and blueprints are done. If two objects are the same size, they always appear to be the same size, regardless of how far away from you they are. This view is ideal for getting sizes and proportions correct in your models, especially if they are based on blueprints or technical drawings. The perspective view is more akin to how we actually see things. That is, objects in the distance look smaller than objects that are near you.
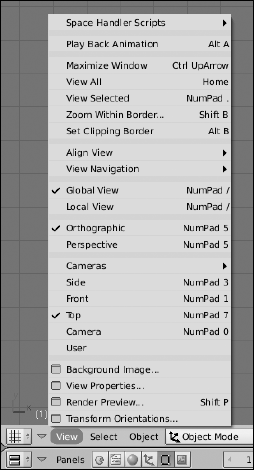
The View menu is certainly helpful, but there's an even faster way to change your view: the numeric keypad. Each of the buttons on your keyboard's numeric keypad has an extremely fast way of changing your view in the 3D window. It also has some options that aren't available to you in the View menu. Figure 2-12 is an image of the numeric keypad with an indication of what each key does.
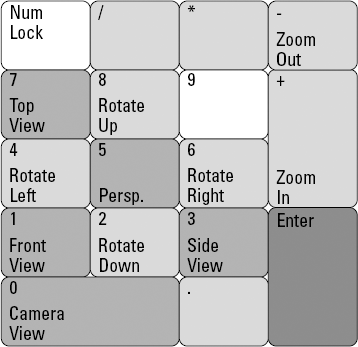
Notice that the hotkeys are arranged in a way that corresponds with how you would expect them to be. Top view is at the top of the keypad at Numpad 7. The front view is accessed at Numpad 1, and if you move to the right on the keypad, you can see the side view by pressing Numpad 3. Because it's the view you render from, the active camera is the most important and therefore gets the largest key at Numpad 0. Pressing Numpad 5 is a quick way to toggle between orthographic and perspective views. If you have View Name turned on in the Views & Controls section of the user preferences, it actively informs you about which view you are using. And having the very cool Smooth View option enabled definitely helps you keep from getting disoriented while working.
Here is where the numeric keypad shows its real power. You may have noticed that the View menu doesn't appear to give you the ability to see the bottom, back, or left-side view of your scene. With the numeric keypad, it's easy. To see the opposite side of the standard views, press Ctrl while hitting the corresponding Numpad key. For example, if you want to see the bottom view, press Ctrl+Numpad 7. Of course, say you really like the View menu, or you're one of the unfortunate souls who doesn't have a numeric keypad on your keyboard. Well, the good news is that Blender's developers thought ahead and actually did add this functionality to the View menu, and it works about the same way: Just hold Ctrl while picking your view, and you'll get the opposite side. Ctrl+View
Now, maybe you got a little bit excited and hit Ctrl+Numpad 0 to see what the opposite of the camera view is and had some unexpected results. This is because Ctrl+Numpad 0 does something slightly different. It actually allows you to treat any selectable object in Blender as a camera, with the view looking down the object's local Z-axis. If this doesn't make any sense to you, take a quick look at the beginning of Chapter 3 for more explanation on local and global coordinate systems. It may seem like a strange feature to have, but it can be really helpful for doing things like aiming lights and checking the line of sight of an object or a character.
Tip
Another cool thing you can do with Numpad 0 is to quickly snap the camera to your user view. For example, say you've been working on 3D model for a while from a certain angle and you want to see what the model looks like in a render from that specific angle. Rather than try to grab and rotate your camera to get close to this same angle, you can simply press Shift+Numpad 0 and the camera jumps directly to where you are viewing your model from. I find myself using this hotkey sequence quite a bit when I'm creating my models. Sometimes it's just easier to change your user view and snap your camera to it than it is to aim the camera how you want it.
The numeric keypad also gives the ability to navigate your scene like you might normally do with your mouse. This is done with the 8, 4, 6, and 2 keys on the keypad. Numpad 8 and Numpad 2 orbit the view forward and back, respectively, whereas Numpad 4 and Numpad 6 orbit it left and right. By default, Blender does these rotations in 15-degree increments, but you adjust this to be more fine or coarse in your user preferences under Views & Controls
There are two more very useful hotkeys on the numeric keypad: Numpad-slash (/) and Numpad-dot (.). They are somewhat more esoteric than the other keys, but they definitely come in handy. Of the three, I tend to use Numpad-slash the most. It toggles what Blender calls Local View. Basically, it hides everything in your scene except for the object or objects you have selected. It's really useful for temporarily isolating a single object or set of objects in a complex scene so that you can work on it without anything else getting in your way. The Numpad-dot hotkey also comes in handy when you want to focus on a specific part of your scene. It centers the objects you've selected in the 3D View for you. This is particularly useful if you've rotated or panned everything out of sight and you want to bring your selected objects back into view. If the image in Figure 2-12 doesn't quite work for you as a reference, Table 2-2 shows what each key does in a table-based format.
Table 2-2. Hotkeys on the Numeric Keypad
Hotkey | Result | Hotkey | Result | Hotkey | Result |
|---|---|---|---|---|---|
1 | Front | Ctrl+1 | Back | + | Zoom in |
2 | Orbit back | Ctrl+2 | Pan down | − | Zoom out |
3 | Right side | Ctrl+3 | Left side | / | Toggle local view |
4 | Orbit left | Ctrl+4 | Pan left | . | View selected |
5 | Ortho/Persp | ||||
6 | Orbit right | Ctrl+6 | Pan right | ||
7 | Top | Ctrl+7 | Bottom | ||
8 | Orbit forward | Ctrl+8 | Pan up | ||
0 | Camera view | Ctrl+0 | Set active object as camera | Shift+0 | Set user view as camera |
One other key worth mentioning, although it's not exactly on the numeric keypad, is the Home key. Whereas using Numpad-dot brings your selected objects into view, pressing Home zooms your view back until all objects in your scene are visible in the 3D View. This is a very convenient key for getting an overall idea of what's going on in your scene.
Aside from changing the angle from which you view your 3D world, you may also want to change how the world is shown in the 3D view. This is called the draw type or draw mode for the view. By default, Blender starts in the Solid draw type. This shows your models as solid 3D objects, lit by the OpenGL lights you can set in Blender's user preferences under System & OpenGL. You can change the draw type by going to the 3D View's header and left-clicking the button that looks like a cube with little protrusions coming from its faces, as seen in Figure 2-13.

Clicking this button reveals the following possible draw types:
Textured: The Textured draw type attempts to faithfully show you what your object will look like when textured and lit for the final render. It may differ a bit from what the final looks like, but it should give you a good idea to work from. Pressing Alt+Z quickly toggles between this draw type and the Solid draw type. If you have the a modern accelerated video card, you can enable GLSL shaders (Game
Shaded: The Shaded draw type is similar to the default Solid draw type, except it uses the lights you actually have in the scene for lighting, rather than the OpenGL lights set in the user preferences. This setting is helpful for tweaking your lighting rig without constantly needing to rerender. Press Shift+Z to quickly toggle between the Shaded and Wireframe draw types.
Solid: The default draw type that Blender starts with. Press Z to toggle between this draw type and Wireframe. This is usually the standard work mode for working in Blender. If you have an older video card, the Shaded and Textured draw types will perform much slower than this one.
Wireframe: This draw type shows the objects in your scene as transparent line-drawings. This is a good quick way to get an idea of the structure of your models. And because it's a bunch of lines, Blender doesn't have to worry about shading and therefore doesn't tax your computer's processor as much. On older computers, Blender is a lot more responsive using the Wireframe draw type than the Solid, Shaded, or Textured draw types.
Bounding Box: The Bounding Box draw type replaces your 3D object with a wireframe cube that shows how much space your object takes up in the 3D world. It's not as commonly used as the other draw types, but it does come in handy for quickly placing objects in a scene or detecting when two objects might collide.
Besides the menu in the 3D View's header and the various combinations of Z, Shift+Z, and Alt+Z for switching views, you can also press D anywhere in the 3D view to bring up a menu under your mouse that allows you to choose a draw type. You may also notice that if you have more than one 3D View window, they don't all have to have the same draw type. You can see the wireframe of your model in one window while adjusting the lighting in the Shaded draw type in another window.
How you select objects is one of the most controversial design decisions in Blender's interface: In nearly every other program, you select things — be they text, 3D objects, files, or whatever — by left-clicking them. This is not the case in Blender. When you left-click in the 3D view, all it seems to do is move around some strange crosshair thing. That is Blender's 3D cursor. I talk more about that later, but in the meantime, you're probably thinking, "How in the world do I select anything?"
The answer is simple: You select objects in Blender by right-clicking them. Multiple objects are selected by Shift+right-clicking them.
Although this certainly seems strange, there is actually a reason for doing it this way. This design decision was not made at random or just to be different for the sake of being different. There are actually two reasons: one is philosophical and the other is practical. The first comes from how the mouse is used in Blender. In Blender, the left mouse button is intended to be used to perform or confirm an action. You left-click on buttons or menus and left-click to confirm the completion of an operation like moving, rotating, or scaling an object, and you use it to place the 3D cursor. Selecting an object doesn't really act upon it or change it. So right-click is used to select objects as well as cancel an operation before it's completed. It's a bit abstract, but as you work this way, it does actually begin to make sense.
The second reason is more practical: 3D modelers and animators are known for working at a computer for insanely long stretches of time. Repetitive stress injuries, or RSI, is a real concern. The more you can spread the work across the hand, the lower the chance of RSI. By making it so you're not doing every single operation with the left mouse button, Blender helps in this regard. Also, many 3D artists like to use a drawing tablet, rather than a mouse. Having right-click to select is actually really helpful for this type of interface.
Note
Bottom line, the "right-click to select" paradigm really is a nice, efficient way of working in 3D space after you get used to it. However, if you try it out and still don't like it, Blender offers you the ability to swap left and right mouse button usage in the View & Controls section of the user preferences window. Do note, however, that this book is written with the default right-click behavior in mind, so remember that as you read other chapters.
"Okay," you say, "I can handle the right-click-to-select thing. But what's with these crosshairs that move to where ever I left-click? It seems pretty useless."
That's the 3D cursor. It's a unique concept that I've only seen in Blender and it's anything but useless. The best way to understand it is to think about a word processor or text editor. When you add text or want to change something, it's usually done with or relative to the blinking cursor on the screen. Blender's 3D cursor serves pretty much the same purpose, but in three dimensions. When you add a new object, it's placed wherever the 3D cursor is located. When you rotate or scale an object, you can do it relative to the 3D cursor's location. And when you want to snap an object to a specific location, you do it with the 3D cursor.
In terms of adjusting your 3D View, you can use the 3D cursor as a quick way to recenter your view. To try this, place the 3D cursor anywhere in the 3D view by left-clicking. Now press C and watch as the View pans to put the cursor at the center of the window. This is similar to pressing Numpad-dot, except you don't have to select any objects. Another convenient hotkey sequence is Shift+C. This relocates the 3D cursor to the origin coordinates of the 3D environment and then brings all objects into view. This is like pressing Home with the added benefit of moving the cursor to the origin.
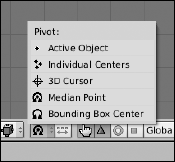
In Chapter 3, the topic of grabbing, scaling, and rotating objects is covered. Usually, you want to use Blender's default behavior of doing these operations relative to the median point of the selected objects. However, you can also perform any of these operations relative to the 3D cursor by pressing the period (.) key on your keyboard or selecting 3D Cursor from the Pivot menu in the 3D View's header, as shown in Figure 2-14. You can use this menu to switch back to the default behavior or press Shift+comma.
The 3D cursor is also very useful for snapping, or moving to a specific point in space. For a better idea of what this means, hover your mouse over the 3D View window and press Shift+S. A menu like the one in Figure 2-15 appears.

Through this menu, you can snap your selected object to a fixed coordinate on the grid in the 3D View, the location of the cursor, or to the center of the grid, also known as the origin of the scene. You also have the ability to snap the 3D cursor to the middle of multiple selected objects, a fixed location on the grid, or to the active object in the scene. This is a very effective way to move an object to a specific point in 3D space, and it's all thanks to the little 3D cursor.