Looking at the title of this chapter, you may find yourself wondering how this chapter is different from Chapter 10. Both chapters cover animation, but this chapter covers the cool things you can do in Blender if you're animating with a fully rigged mesh. Chapter 10 covers what is often referred to as object animation: that is, animating the attributes of a single object. You can actually squeeze quite a bit of personality out of object animation. However, the level of control and detail that you can get when your object has an animation rig is exponentially greater. There are simply way more possibilities for expression and communication. And at the same time, the process of animating is a little bit more complex. With an animation rig, there are more bits and pieces to manage, keep track of, and control.
Trying to manage all of that additional complexity can be daunting if all you have to work with is the Outliner and the Ipo Curve Editor. Fortunately, Blender offers a few more features that help make rigged character animation easier to wrap your head around.
Of course, this doesn't change anything that's covered in Chapter 10. In fact, if you're not familiar with the Ipo Curve Editor and the process of setting keyframes in Blender, you probably ought to go back and review that chapter.
So you have a rigged character that you want to animate. Awesome! Change your screen layout to the Animation layout (Ctrl+left arrow). After that, the first thing that you're probably going to want to do is change the 3D View to the Shaded draw type (Z), change the Translate widget to the Rotate widget (Ctrl+spacebar
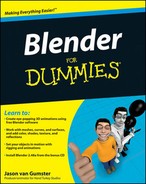
The next thing you need to do is go to the Ipo Curve Editor and change the Ipo Type to Pose. This gives you the channels necessary for animating bones. Of course, as nice as seeing those channels may be, the Ipo Curve Editor only shows the keyframes for a single selected object or bone. The Timeline window shows multiple keys, but you don't have a good way to see which key belongs to which object, and the Timeline provides no tools for actually editing these keyframes, aside from inserting and deleting them. You need a different window: one that lets you see the keyframes for multiple bones and edit their timing individually. What you're looking for is the Action Editor window (Shift+F12), shown in Figure 12-1.
As Figure 12-1 shows, when you have an armature selected, the Action Editor shows a channel for each of the keyed bones in the rig. Furthermore, if you've got a rig that has bone groups, the Action Editor actually breaks up the channels according to those bone groups.
The Action Editor's ability to understand bone groups really makes it easy to see if any bone in a group gets animated. Now, the Action Editor doesn't give you full control over the Ipo curves for each animatable channel in a single bone. You do have the ability to "drill down" to the individual location, rotation, and scale keys per axis on each channel by left-clicking the triangle icon to the left of each one. But to edit curves, you still need the Ipo Curve Editor. The Action Editor shows a diamond-shaped dot to indicate that a key has been created. This way, you can get a sense for the "big picture" in your character animation. When it comes to editing the overall timing of a character's performance, the Action Editor is really the tool for the job.
Like other parts of Blender, you can select individual keyframes by right-clicking the diamond-shaped keyframe indicator. Multiple keyframes can be selected in a variety of ways. You can use the familiar Shift+right-click or Border Select (B) functions. However, there's another way to select that's incredibly helpful. If you have an Action Editor open and a few keyframes set, right-click any keyframe to select it. Now, with that key selected, press K. Doing this selects any other key in the armature that's on the same frame as your selected key. This is called a column key selection. You can get similar functionality with the time cursor. If you place your time cursor on a column of keys and press Ctrl+K, that column of keys is selected, rather than the column with your original selected keys.
Note
Initially, you might not think that column key selection would be all that useful. However, if you think about the process used for animating – especially cartoon-style animation – it starts making more sense. The workflow for animation is usually to go from pose to pose. This means that at each pose that you key, multiple bones are all keyed at the same time, forming a column in the Action Editor. In fact, unless you're doing some kind of frantic, shaky animations, it's a pretty good practice to make sure you have nice columns in your Action Editor. Uneven columns tend to indicate that your timing may be off on a specific part of the rig. Of course, this is a guideline more than a hard-and-fast rule.
After they're selected, keys can be manipulated with Grabbing (G) and Scaling (S). When performing these actions, there are two things to pay attention to. First of all, when you scale selected keyframes, the scale is relative to the position of the time cursor in the Action Editor window. So if you want to increase the length of your animation by stretching out the keyframes, put your time cursor at frame 1 before scaling. If you place it in the middle or at the end, the keys at the beginning of your animation are arranged so that they take place before your animation starts. This is typically exactly what you don't want, so be careful.
The other thing to take into account is that even though the time cursor snaps to frames, the individual keyframes do not. When Grabbing (G), you can get around this by holding down Ctrl while you're moving the keys around. This snaps the keys to even increments of 1 frame length. When Scaling keyframes, however, the same trick doesn't work. Instead, you need to use snapping. With your mouse in the Action Editor window press Shift+S. You should get a menu that looks like the one in Figure 12-2.

You have three options in this menu:
Nearest Frame: Choosing this option takes the selected keys and shifts them to the even frame number that's closest to them.
Current Frame: This option snaps selected keys to the location of the time cursor in the Action Editor.
Nearest Marker: Blender's Action Editor allows you to place reminders on the timeline referred to as markers. You can add a new marker at the location of the timeline cursor by pressing M in the Action Editor window. If you have one or more of these markers on you timeline, choosing this option snaps selected keyframes to the marker that's nearest to it.
Alternatively, you can use Blender's autosnapping feature. Enable it by left-clicking the button in the Action Editor's header that says "No Snap." That's the default snapping type. It has almost all the same options mentioned above. The only difference is the Frame Step option, which behaves like pressing Ctrl while moving keys.
Note
If you're familiar with other animation software or traditional hand-drawn animation, you might recognize Blender's Action Editor as being similar to a dope sheet. In traditional animation, the dope sheet was the entire animation planned out, frame by frame, on paper prior to a single pencil line being drawn by the animator. In computer animation, it's taken on a slightly different meaning and purpose. Some software has a dope sheet editor that allows the animator to see the keyframes and timing for all of the animatable channels in a character, and in some packages, a whole scene. Blender doesn't quite have that right now as the Action Editor is limited to showing multiple bones in the same armature at the same time, but not other animatable channels or objects. Hopefully, however, this will change in the future and Blender will have an even more powerful Action Editor. In the meantime, what Blender does have certainly isn't anything to turn your nose up to.
Tip
Although the Action Editor is optimized to be used with armature objects, it still has some other tricks up its sleeves. You can use it as a more intuitive way of animating shape keys. Take a gander back at Figure 12-1 and notice that the header of the window has a drop-down menu that says Action Editor. This button controls the editing modes that the Action Editor can take on. If you left-click the button, you see that there are three modes to choose from:
Action Editor: This is the default mode described in the last section. It can handle objects, but it's optimized for working with armatures.
ShapeKey Editor: An Action Editor mode for tweaking shape keys. For a refresher on shape keys, have a look at Chapter 11.
Grease Pencil: This is for a very new feature in Blender that allows you to draw and write notes on the 3D View. The cool thing about this feature is that it actually allows you to animate those drawings. This Action Editor mode is how you can edit the timing of those drawn animations.
If you have a mesh with shape keys, each shape has a channel on the left of the Action Editor. Figure 12-3 shows the shape key Action Editor for the bug-eyed screaming Suzanne example from Chapter 11.
Although it's nice to be able to tweak the Ipo curves for the transition from one shape to the next, the simpler Action Editor interface is certainly a lot better and less cluttered for characters that have many, many shape keys. But you get another really sweet bonus by using the Action Editor. Notice the word Sliders above the shape channels. If you left-click the triangle icon to the right of that, Blender makes the shape key sliders from the Shapes panel available to you. Now you can animate multiple shape keys without having to cycle through them in that panel. And what's more, if you left-click on one of the channel names, a little box pops up that allows you to set the custom minimum and maximum values for the sliders. You can even rename the shape key through this box.
To make a long story short, the ability to use sliders to edit your shape keys in the Action Editor is pretty sweet and an extremely powerful feature.

Alright, so now it's time to get to animating. If you're already used to object animation, using armatures to animate using the Action Editor extends naturally from that base. When I animate, I like to use the following process:
Pre-plan the animation.
This can't be emphasized enough: There's nothing worse than sitting down to animate without a plan. You end up doing two or three times the amount of work you would've done if you'd just done a little planning, and the results are usually worse for the effort. Know what you're going to animate and have an idea about the timing of the motion. If you can, sketch out a few quick thumbnail drawings of the sequence. Even if the drawings are stick figures, they can be really helpful for determining poses and figuring out how things are going to look.
Set your timeline at frame 1 and create the starting pose for your character by manipulating its rig.
Select all visible bones (A) and Insert a LocRot keyframe for everything (I

Granted, there's a good chance that most of the bones can't be Grabbed, so setting a location keyframe for them is kind of moot. However, setting a keyframe for all the bones is faster than going through and figuring out which bones can be keyed for just rotation and which bones can be keyed for both rotation and location.
Move the timeline cursor forward to roughly when you think the next major pose should happen.
Create your character's second pose.
If the next pose is a hold, or a pose where the character doesn't change position, you can duplicate the keys of the previous pose by selecting them and pressing Shift+D.
Select all visible bones (A) and Insert an Available keyframe (I
Continue with steps 4-6 until you complete the last major pose for your character.
Using the Action Editor, play back the animation, paying close attention to timing.
In fact, pay even more attention to timing than the accuracy of the poses.
Go through the keys set in the Action Editor and tweak the timing of the poses so they look natural.
Continuing to tweak, go back and start adding secondary poses and keyframes for secondary motion between your major poses.
Continue on this course, refining the timing and detail more and more with each pass.
Tip
You should notice that in the last set of steps, a pattern is beginning to emerge. One of the luxuries we have in computer animation is the ability to continually go back and tweak things, make changes, and improve the animation. You can take advantage of this process by training yourself to work in passes. Animate your character's biggest, most pronounced motion first. Make sure you have the timing for that down right. Then move to the next pass, working on slightly more detailed parts of the performance. The biggest reason to work this way is time. It's much easier to go in and fix the timing on a big action if you do it earlier. Otherwise, you run into situations where you find yourself shuffling around a bunch of detail keys after you find out that your character doesn't get from Point A to Point B in the right amount of time.
Tip
Don't be afraid to break out a stopwatch and act out the action to find out exactly how long it takes to perform and what the action feels like. If you're fortunate enough to have friends, have them act out the action for you while you time it. Animation is all about timing. One of the things that I like to tell people is, "If you can tell a joke that people genuinely laugh at, you can animate." This is because both animating and telling jokes both rely almost entirely on good timing. You can tell a bad joke, or even speak a completely unfunny sentence and make people laugh if you do it with the right timing. Animation is the same way. It may be the most mundane of actions, but if you nail the timing on it, naturally it becomes a lot more interesting.
As you create your animations, draw on a variety of sources to really capture the essence of some action, motion, or character expression. My first and most emphatic recommendation is to keep your eyes open. Watch everything around you that moves. Study it and try to get an idea of how its structure facilitates motion. Then think about how you would recreate that.
Of course, merely gawking at everything in the world isn't the only thing you should do (and you should be prepared for the fact that people might look at you funny). Studying early animation is also a good idea. Most of the principles that those wonderfully talented pioneers developed for animation are still relevant and applicable to computer animation. In fact, you should remember the classic 12 basic principles of animation that were established by some of the original Disney animators. This is a bit of divergence, but if your aim is to create good animation, you should know about these principles and try to use them in even the most simple of animations:
Squash and stretch: This is all about deformation. Because of weight, anything that moves gets deformed somehow. A tennis ball squashes to an oval shape when it's hit. Rope under tension gets stretched. Cartoon characters hit all believable and unbelievable ranges of this when they're animated, but it's valuable, albeit toned-down, even in realistic animation.
Anticipation: The basic idea here is that before every action in one direction, there's a build-up in the opposite direction first. A character that's going to jump bends her knees and moves down first to build up the energy to jump up.
Staging: The idea of staging is to keep the frame simple. The purpose of animation is to communicate an idea or a movement or an emotion with moving images. You want to convey this as clearly as possible with the way you arrange your shots and the characters in those shots.
Straight-ahead action versus pose-to-pose action: These are the two primary methods of animating. The process that I discussed near the beginning of this chapter is more of a pose-to-pose technique. Pose-to-pose can be more clear, but it may be a bit cartoony. Straight-ahead action is generally more fluid and realistic, but the action may be less clear.
Follow through and overlapping action: The idea here is to make sure your animations adhere – or seem to adhere – to the laws of physics. If there is movement in one direction, the inertia of that motion requires you to animate the follow-through even if you're changing direction.
Ease in and ease out: Ease in and ease out, sometimes known as "slow in, slow out" means that natural movement does not stop and start abruptly. It flows smoothly, accelerating and decelerating. By using Bézier curves in the Ipo Curve Editor, you actually get this principle for free.
Arcs: Along the same lines as the previous two principles, most natural movement happens in arcs. So if your character is changing direction or moving something, you typically want that to happen in some sort of curved, arc motion. Straight lines are generally stiff and robotic.
Secondary action: These actions are those additional touches that make characters more real to the audience. Clothing that shifts with character movement, jiggling fat or loose skin, and blinking eyes are just a few actions that can breathe life into an otherwise stiff robot.
Timing: This is, in my opinion, one of the most important of the 12 principles. Everything happens according to time. If the timing is off, it throws off the effect for the whole animation. This doesn't just mean controlling the timing of actions to appear believable. It also means story-based timing: knowing exactly the right time to make a character give a sad facial expression that impacts the audience the most.
Exaggeration: Exaggeration is one of the things that makes animation fun. You can do anything with animation and you're nearly duty-bound to take advantage of that fact. Otherwise, you may as well just work in video or film with for-real people.
Solid drawing: Solid drawing refers to the actual skill of being able to draw. Computer animators can get away with not being experts at drawing, but it's to your benefit to make the effort. This is because drawing is an extension of seeing. When you draw, you turn on a part of your brain that studies how things look relative to each another. Being able to see the world with these eyes can make all the difference in recreating believable motion.
Appeal: This one is easy. Make things that are awesome. If you're going to animate something that is boring, what's the point? It needs to be interesting for you to make and it's nice if it's also interesting for other people to watch.
Note
Those are the basic principles of animation, but not a single one of them is carved in stone. You can effectively break every one of them and still pull off some incredible animation. That said, more often than not, it's in the best interest of your work and your sanity that you at least start within these principles and then find ways where you can break them in the best way possible.
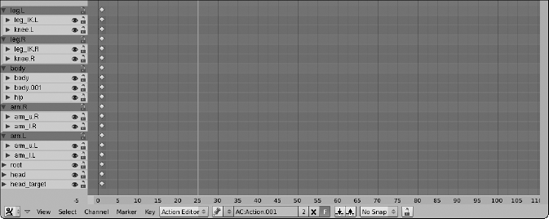
Even though the bulk of your time animating with armature is spent working with the Action Editor, you still may frequently need to tweak things in the Ipo Curve Editor. If you do go to the Ipo Curve Editor and view the Pose Ipo type with the intention of tweaking rotation, you may run into a particularly jarring shock. The RotX, RotY, and RotZ channels that you would expect for rotation aren't there: They've been replaced with four channels to control rotation, called quaternions. Figure 12-4 shows a set of quaternions in the Ipo Curve Editor, describing the rotation of some bone.
Note
Quaternions are a different way of defining rotations in 3D space and they're quite a bit different from the standard X, Y, and Z or Euler (pronounced "oiler") rotations. They're used in the rotation of bones because Euler rotations can get into a nasty situation referred to as gimbal lock, which involves being mathematically unable to compensate for or adjust a rotation because you only have three axes to define it. Having that happen in an armature is unacceptable. Fortunately, quaternions don't suffer from gimbal lock. However, they do suffer from another affliction: They have virtually no intuitive relationship to rotation that non-mathematicians can understand.
To make a long story short, it may be easier for you to tweak a rotation by adding additional keyframes to the rotation. If you're not fond of mathematics, you may very well go crazy trying to figure out how they relate to your bone's rotation.
One of the beauties of working in computer animation is the ability to take advantage of the computer's ability to calculate and process things so that we don't have to. In the animation world, we love to find ways that the computer can do more work. Granted, we can (and should) always temper the computer's work with our own artistic eye, but there's nothing wrong with doing half the work and letting the computer do the other half. To that end, let me introduce three incredible little buttons to you in Figure 12-5.

These three buttons are located at the far right end of the 3D View's header and are only visible when you have an armature in Pose mode. "What do they do," you ask? Why, these buttons are designed for copying and pasting poses from the armature. From left to right, the buttons are Pose Copy, Pose Paste, and Pose Mirror Paste. Here's how to use them:
Select all bones (A).
You can actually get away with just selecting a few bones, but this actually illustrates my point a little better.
Left-click the Copy Pose button.
Doing this loads the armature's pose into the computer's memory.
Move to a different location in the timeline where you would like your character to resume this pose.
Paste the pose back to the character.
In pasting, you have two options:
Paste Pose: This takes the coordinates of all the bones you selected when copying the pose and applies those poses back to your character exactly as you copied them.
Mirror Paste: This option does the same thing as the regular Paste Pose, except it takes advantage of Blender's built-in left/right naming convention (see Chapter 11 for more details) and pastes the mirrored version of the pose to your character. This is really handy if you're doing something like creating a walk cycle. You can create a left-foot-forward pose and then use Mirror Paste to instantly create a right-food-forward pose. Figure 12-6 shows a character posed one way and then mirror pasted to pose the other.

Note
Note that after you paste the pose, you need to insert a keyframe for that pose at that location. Otherwise, the next time you scrub the timeline, the pose won't be there and you'll have to copy and paste it all over again.
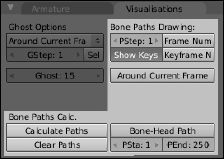
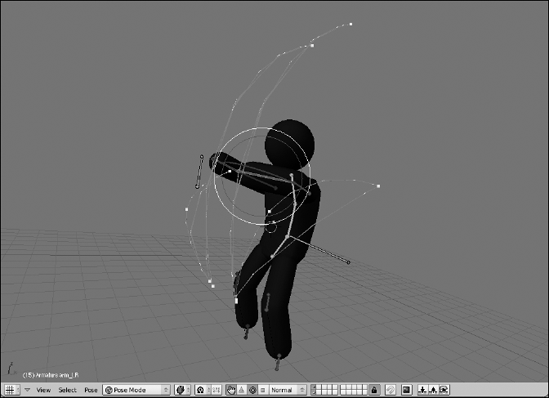
Traditional animation has a process called onionskinning, which consists of drawing on relatively thin paper and working on a table with a light in it. With this setup, the animator can stack his drawings on top of each other and get an overall sense of the motion in the animation. In Chapter 10, I introduce the Show Keys feature (press K while doing object animation) to display the object's keyframes in the 3D View. Unfortunately, when working with armatures, the Show Keys feature doesn't work in the 3D View. However, another feature works in a similar way and is, in some ways, even nicer than the Show Keys feature. It's for your rig, and it's called Ghosting. The controls for it are in the Editing buttons (F9) on the left side of the Visualizations panel, as shown in Figure 12-7.

To get the best sense of what the Ghost feature does, increase the Ghost value in this panel to its maximum value of 30 ghosts. Now, for short animations or non-complicated movement, having this enabled might not be all that useful. However, it's great for the more common forms of animation that are a bit longer and more complex. Having Ghost turned on is a great way to get a sense of where your character's coming from and where she's going. Granted, it's not like the Show Key feature of object animation, where you can actually select and edit the real keyframe from the 3D View, but as a way of having three-dimensional onionskinning, it's certainly useful. Figure 12-8 shows a character jumping up and down, visualized with armature ghosting.

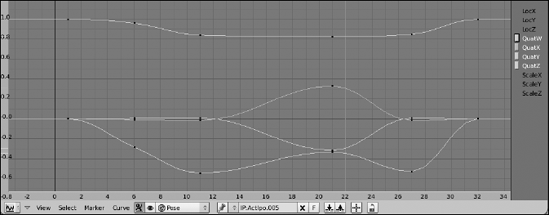
One of the fundamental principles of animation is having arcs for movement. Smooth arcs are favorable for believable, natural-looking animated movement. To that end, Blender has a nice feature that makes it easier to analyze your animation and figure out if you have acceptable arcs in your character's movement. This feature is called Bone Paths and it's also available from the Visualizations panel in the Editing buttons, highlighted in Figure 12-9.
This feature isn't like Ghosts, where you just turn them on and they display instantly. They may take a second to generate. In order to generate them, first select the bone or bones that you want to visualize, and then left-click the Calculate Path button on the bottom left side of the Visualizations panel. This uses the settings along the right side of the panel to create the Bone Path visualization. An added bonus to this feature is the ability to show the location of the keys along the path as a bright dot by left-clicking the Show Keys button in the Visualizations panel. If you want, you can also show the numerical frame numbers along the curves by enabling the Frame Nums feature in the same panel. Figure 12-10 shows the same jump animation as before, but this time with Bone Paths enabled.
One thing to note is that, although it might be nice, you can't actually change or edit the Bone Path directly. It can only reflect the motion created by your keyframes. So if you notice that the curve isn't as smooth as you might like, you need to go back into the Action Editor and Ipo Curve Editor and tweak the motion a bit there. Then when you re-calculate the Bone Paths, hopefully you should have a cleaner result.
Animation is hard work, really hard work. So any time you can cut down the amount of work you have to do without detracting from the quality of the final animation, it's a good thing. Computer animation has given us another cool way to effectively and efficiently cut corners: non-linear animation. Non-linear animation, or NLA, is a way of animating that can only really be done with computers. In the previous section of this chapter, the process of animating is very linear and straightforward. You may animate in passes, but you're still generally working forward in time with the full start-to-finish of your animation already planned out.
What if you didn't have to work this way? What if you could animate little chunks of your character's motion and then mix and match as you like? Like mixing a simple hand-waving motion with a jumping animation so your character is sometimes just jumping and sometimes jumping and waving his arms? This is the basic concept behind non-linear animation. It's applying many of the same principles used in non-linear video editing and applying them to 3D computer animation.
The idea is that you create a library of simple motions or poses and then combine them any way you like to create much more complex animated sequences. This is useful for background characters in larger productions and it's also very handy for video game developers. Instead of trying to pull a specific set of frames from a single unified timeline, they can now just make a call to one or more of these library animations and let the computer do the rest of the work. In Blender, the basic building blocks for this library are Actions. Earlier in this chapter, I explained that Actions are really cool for visualizing the complete animation of an armature. Well, it turns out that they're even cooler than that. You can create multiple actions within a single .blend file.
Tip
To create a new action, use the Action datablock in the header of the Action Editor window, as highlighted in Figure 12-11. This datablock widget is just like the one used for materials, textures, Ipos, and even objects in other parts of Blender's interface. Create a new action by left-clicking the up/down arrow on the left side of the datablock and choosing Add New. And you can give your Action a custom name by left-clicking on the name field and typing in its new name.

Figure 12-11. Using the Action datablock in the Action Editor to create a new action for your armature.
With the new action created, you can create another core animation and start building up your character's Action library. Animate waving each arm, a walk cycle, various facial expressions, a standing idle animation, and any other simple action that comes to mind. Ultimately, your library will be populated enough that you'll want to start mixing and matching them together. To do this, you're going to want to use the NLA Editor (Ctrl+Shift+F12) window. Add the NLA Editor to the Animation screen layout with the following steps:
Left-click the seam at the top of the Timeline window and drag it up, making more room for that window.
Because the NLA Editor is covering the entire animation, it makes sense to forsake the timeline and use the NLA Editor exclusively. But if you still would like to use the Timeline, you can split if off of another window.
Change the Timeline window to the NLA Editor (Ctrl+Shift+F12).
In doing this, you should have a screen layout that looks something like Figure 12-12.
Warning
The NLA is a very cool feature of Blender, but don't rely on it too much for animation. Blender has had the NLA Editor for a long time, but it could still use some refinement to be a truly effective tool. There was some heavy discussion about it at the last Blender Conference and hopefully there will be improvements to it in future versions of Blender. The good news is that most of what I explain here should still apply.
To add one of your actions to the NLA Editor, bring your mouse into the NLA Editor window and press Shift+A. This brings up a menu of all the Actions you've created so you can choose one to add to the NLA Editor. After you choose the Action you would like to add, it's placed in the NLA Editor as a strip and is positioned wherever the time cursor is located. And now you can continue to keep adding Actions to the NLA. Of course, unless you make the last frame of one Action strip match the pose at the head of the next frame, the animation looks pretty erratic.

The way to smooth things out is to bring up the Transform Properties floating panel in the NLA Editor. Figure 12-13 shows a full-screen NLA Editor window with the Transform Properties floating panel visible. To make the transition from one strip to the next smoother, either enable the Auto-Blending button for each strip and let them overlap a bit, or manually set the blend-in and blend-out values in this panel. This is how you create complex animations from a library of simple Actions.
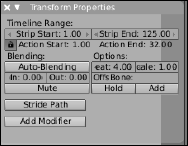
Another benefit of using the NLA is the ability to easily loop any Action strip and rescale its timing. This is done also in the NLA Editor with the Transform Properties floating panel. On the right side of the panel are some buttons under the heading of Options. The very first of these options is Repeat. By default, this is set to 1.0. However, you can increase this value as much as you like. As you do, you should see the strip increase in length proportional to the increase of the Repeat value. Now, to have an effective looping animation, it's definitely in your best interest to make the first pose in the action and the last pose in the action identical. The easiest way to do this is to use the copy and paste pose buttons in the 3D View:
In the NLA Editor, select the Action strip you want to loop (right-click).
In the Action Editor, move the time cursor to the first pose in the Action (left-click and drag).
In the 3D View, select all bones (A) and left-click the Copy Pose button in the header.
Back in the Action Editor, move the time cursor to some place after the last keyframe.
In the 3D View, left-click the Paste Pose button in the header.
Insert a new keyframe (I
When you get to this step, all of the bones should still be selected, so there's no need to reselect anything.
Now when you return to the NLA Editor, the Action strip should automatically be longer to account for the addition frame at the end.
Additionally, it should also loop seamlessly upon playback (Alt+A).
The Transform Properties floating panel also gives you the opportunity to rescale Actions. If you want an action to play faster or slower, you can adjust the Scale value in this panel. Values greater than 1.0 increase the length of the strip, slowing down the action, and values lower than 1.0 decrease the length of the strip, speeding up the action. Figure 12-14 shows the NLA Editor with looped strips that have varied scales.
Warning
Be careful when changing the scale of Action strips. More often than not, changing the scale results in a keyframe being placed at what's called a fractional frame, or a spot on the timeline that isn't a nicely rounded frame number. This isn't necessarily a bad thing, but animations do tend to look a little bit better if the keyframes fall on full frames so the audience has the chance to "read" the pose.

Tip
Many of these animation concepts, especially ones involving the NLA, are much easier to grasp if you can see them in motion. After all, this is animation, the art of motion. Have a look at the .blend files that accompany this book to get a stronger notion of how these things work together.