1. Getting to Know Adobe Flash Catalyst CS5
Using Adobe Flash Catalyst CS5, you can produce beautifully designed and highly interactive content for the web or desktop without authoring any code. This lesson introduces you to some of the key features and benefits of Flash Catalyst. You will explore the basic layout of the Flash Catalyst Design workspace, open a new project file, and preview a completed project.
You’ll learn how to do the following:
• Open a new Flash Catalyst project
• Set dimensions and background color
• Switch between the Design and Code workspaces
• Find your way around the Design workspace
• Show and hide workspace panels
• Zoom and pan the artboard
• Open an existing project file
• Preview a project in a browser
• Find additional help documents, demos, and tutorials online
This lesson will take about 50 minutes to complete. Copy the Lesson01 folder into the lessons folder that you created on your hard drive for these projects (or create it now), if you haven’t already done so. As you work on this lesson, you won’t be preserving the start files; if you need to restore the start files, copy them from the Adobe Flash Catalyst CS5 Classroom in a Book CD.
![]()

Throughout this course, you will learn the skills needed to build a wide range of rich Internet applications. Two examples used in this course include an online restaurant guide, and its companion interactive banner ad, both shown above.
About Flash Catalyst
Flash Catalyst empowers designers with complete control over the integrity of their artwork and design when producing interactive content. A common challenge for many designers is handing off static artwork and describing the user experience to developers. Much of their original vision is left to interpretation and sometimes lost to the limitations of data-centric development tools.
Using Flash Catalyst, designers can quickly transform their original artwork created in Adobe Photoshop, Adobe Illustrator, and Adobe Fireworks into fully functioning interactive applications, without writing a single line of code.
Is Flash Catalyst the right tool for you?
Flash Catalyst is intended for any designer who produces interactive content for the web or desktop. These designers include:
Interactive web designers and interaction designers are responsible for the visual design of interactive experiences.
Information architects create high-level interaction models for various media. Sometimes this task involves the need to quickly produce rough wireframes for the creative process.
Graphic designers and creative directors generate original artwork and interactive elements for a wide range of applications.
Rich Internet application developers work with Flash Catalyst project files to add advanced data-centric functionality.
Key features
Flash Catalyst offers tremendous power, including some key features.
• Design using your favorite Adobe Creative Suite applications. Flash Catalyst offers a fast learning curve by leveraging what you already know in Photoshop, Illustrator, and Fireworks.
• Import and store images, video, sound, and Adobe Flash (SWF) content in the project library.
• Place objects in the exact location you want them to appear with pixel-level accuracy consistently across operating systems and devices.
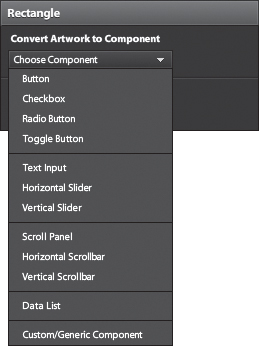
• Quickly transform artwork into interactive components, such as buttons, check boxes, lists, and scroll bars.
• Create interactive forms using built-in components like text input and check boxes.
• Add interactions that define the behavior of components, such as what happens when someone clicks a button, or when predefined conditions are met.
• Add smooth animated transitions between pages or the different states (views) of a component with the click of a button.
• Round-trip edit graphics using Photoshop and Illustrator right from within the Flash Catalyst workspace.
• Create vector artwork directly in Flash Catalyst using the built-in drawing tools.
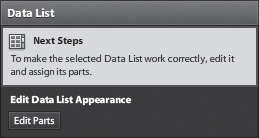
• Convert artwork into a data list that has a variable number of items or rows. The records in your data list can include images, text, or both.
• Use built-in wireframe components to create interactive prototypes.
• Publish accessible projects that are ready to deploy to the web or desktop.
Additional benefits for designers
Designers enjoy some additional benefits.
• Sell your ideas by showing functional designs rather than static screens.
• Ensure that your creative vision is accurately expressed.
• Work more efficiently when collaborating with developers to build rich Internet applications.
Flash Catalyst design workflow
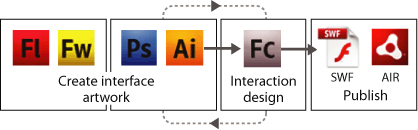
There are two main types of Flash Catalyst applications. These applications include microsites and data-centric applications. You can think of a microsite as an application that is complete when published in Flash Catalyst. No additional development is required. A data-centric application requires additional development, such as integrating components with external data or web services. A Flex developer completes the development using Adobe Flash Builder. You’ll learn more about data-centric applications later in this course. As when creating any project, following a consistent workflow helps in project management. The workflows for designing microsites and data-centric applications are similar. Both include these general steps.
Plan the application
Begin with a detailed project specification. This specification describes each page or screen, including user navigation, the artwork on each page, interactive components, and the different states of each component.
Create or acquire assets, such as artwork, video, and sound
Create the artwork, video, and sound for the application. You can create a layered design document in Photoshop, Illustrator, or Fireworks.
Bring assets into Flash Catalyst
Import the design document you created in Photoshop, Illustrator, or Fireworks. Bring additional graphic files and assets, such as video, sound, and animated content published in the SWF file format. SWF files can be used to deliver static and animated vector graphics, text, video, and sound. For data-centric components, such as a data list, import a representative sample of the data (text or images).
Note
If you import an Illustrator file with multiple artboards, each artboard is added to a different page state in Flash Catalyst. You can also import individual Photoshop Layer Comps directly to separate page states in Flash Catalyst.
Create and modify pages
A Flash Catalyst project typically begins with one page state. Duplicate this page or add pages according to the project specification. Show and hide the artwork in each page state to create the different pages or screens of your application. You can also use other assets that you’ve imported, such as video.
Create interactive components
Convert your original artwork to interactive components, such as buttons, scroll bars, panels, and lists. Or use Flash Catalyst wireframe components to quickly add common elements with a generic appearance. You can design custom components for behaviors that you can’t capture with the built-in components. Some designers prefer to create components before adding new page states. Adding pages and creating components are interchangeable steps.
Define component states
Components can have multiple states, such as the up, over, down, and disabled states of a button. Create or modify the different states of each interactive component, according to your project specification.
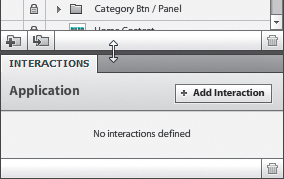
Define interactions and transitions
Add interactions that define what happens as users interact with the application. For example, you can add interactions that transition from one page or component state to another when a user clicks a button. You can also add interactions that play animation, control video playback, or open another web page. Using the Flash Catalyst Timelines panel, you can quickly change the timing and appearance of the animated transitions between pages and component states.
Test and publish the project
Run the application in a browser, and then publish the project as a web or desktop application. Or, save the project file (FXP) for further development in Adobe Flash Builder.
The Adobe Flash Platform includes a collection of integrated Adobe technologies for designing, creating, deploying, and viewing rich Internet applications, content, and video to the widest possible audience.
![]() Adobe Flash Catalyst CS5 is an interaction design tool used to rapidly create expressive interfaces and interactive content without writing code.
Adobe Flash Catalyst CS5 is an interaction design tool used to rapidly create expressive interfaces and interactive content without writing code.
![]() Adobe Flash Builder is an integrated development environment (IDE) for developing cross-platform data-centric content. Developers create entire applications using Flash Builder, or import a project created using Flash Catalyst and then use Flash Builder to connect the application to data and web services.
Adobe Flash Builder is an integrated development environment (IDE) for developing cross-platform data-centric content. Developers create entire applications using Flash Builder, or import a project created using Flash Catalyst and then use Flash Builder to connect the application to data and web services.
![]() Adobe Flex is the open-source framework for both Flash Catalyst and Flash Builder.
Adobe Flex is the open-source framework for both Flash Catalyst and Flash Builder.
![]() Adobe Flash Professional CS5 is an interactive multimedia content authoring environment for designers and developers who want pixel-perfect typographic fidelity and layout, more realistic animation effects, and code authoring. Content created in Flash Professional can be imported into Flash Catalyst projects as SWF files.
Adobe Flash Professional CS5 is an interactive multimedia content authoring environment for designers and developers who want pixel-perfect typographic fidelity and layout, more realistic animation effects, and code authoring. Content created in Flash Professional can be imported into Flash Catalyst projects as SWF files.
![]() Adobe Flash Player is a cross-platform browser plug-in that delivers rich web experiences. Flash Player must be installed to view content created in Flash Catalyst, Flash Builder, and Flash Professional.
Adobe Flash Player is a cross-platform browser plug-in that delivers rich web experiences. Flash Player must be installed to view content created in Flash Catalyst, Flash Builder, and Flash Professional.
![]() The Adobe AIR runtime lets developers build rich Internet applications that run on the desktop, without a browser or Internet connection. You can publish a Flash Catalyst project as an Adobe AIR application.
The Adobe AIR runtime lets developers build rich Internet applications that run on the desktop, without a browser or Internet connection. You can publish a Flash Catalyst project as an Adobe AIR application.
Opening a new Flash Catalyst project
When you first start Flash Catalyst, you are presented with the Welcome screen.
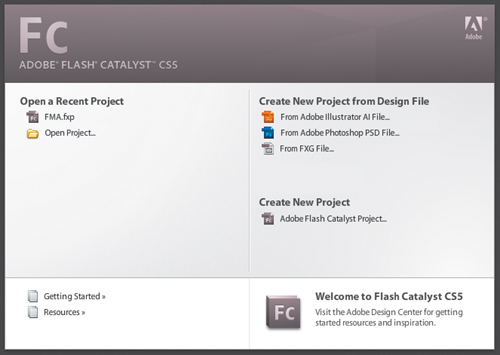
From the Welcome screen, you can open an existing project, create a new blank project, or create a new project from a design file.
- Start Flash Catalyst.
- In the Create New Project section of the Welcome screen, choose Adobe Flash Catalyst Project.
The New Project dialog box opens and is where you name the project and enter values for the size and color of the artboard.
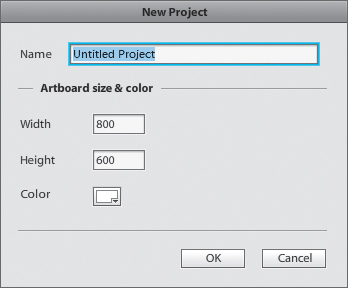
- Enter a name for the project.
- Set the width, height, and color, and click OK.
A new blank project opens. By default, the Design workspace is open.
Finding your way around
The Flash Catalyst user interface has two workspaces. These workspaces include Design and Code. Each workspace contains its own set of panels and tools.
Design workspace
The Design workspace shows a graphical representation of your application. This workspace includes the panels and tools used to create and edit projects.
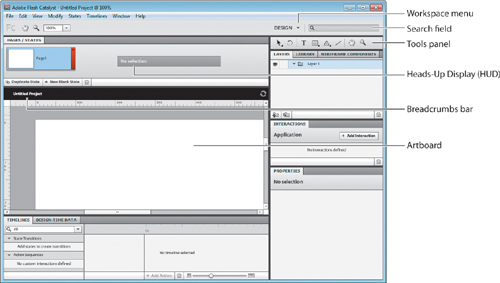
Workspace menu
Use the Workspace menu to toggle between the Design and Code workspaces.
Artboard
The artboard represents what users see when they view the published application. The artboard is where you place artwork, interactive components, and other objects that make up the application interface.
Pages/States panel
The Pages/States panel displays a thumbnail for each page in the application. If a component is selected, it shows the different states for the selected component. You can duplicate, remove, add, and rename pages and component states according to your project specification.
Tools panel
The Tools panel includes tools for creating, selecting, and transforming objects, including simple lines, shapes, and text.
Layers panel
The Layers panel is an organized collection of the objects in the application (artwork, components, video, and so on). If you import a design document created in Illustrator, Photoshop, or Fireworks, the original layer structure is preserved. As you add pages and component states to the application, you use the Layers panel to show or hide objects in each state.
Library panel
The Library panel displays the entire list of reusable assets (components, images, media, and optimized graphics) available in the project, including objects that do not appear in any page or state.
Wireframe Components panel
The Wireframe Components panel includes ready-to-use interactive components with a simple default appearance. You can drag these components to the artboard and use them “as is” or modify them to fit the appearance of your application.
Interactions panel
You can use the Interactions panel to add interactions that define what happens as users interact with the application.
Timelines panel
The Timelines panel provides controls for creating and editing transitions and action sequences. You can also use the Timelines panel to control the playback of video and SWF content, and to add sound effects.
Design-Time Data panel
After creating a Data List component, use the Design-Time Data panel to populate the list with sample design-time data. Design-time data demonstrates the appearance and behavior of the list. A developer can use Flash Builder to replace the sample design-time data with real data stored outside the application.
Properties panel
Use the Properties panel to edit the properties for selected objects, such as graphics, text, and components. The available properties change as you select different object types in the artboard, Layers panel, or Timelines panel.
Breadcrumbs bar
As you edit components, or parts within a component, Flash Catalyst keeps track of where you are in the project using breadcrumbs. You can use the Breadcrumbs bar to close an object that you are editing and return to the project artboard.
Search field
Entering a term in the Search field opens the Adobe Community Help Client and displays access to online Help and best practices.
Heads-Up Display
The Heads-Up Display (HUD) provides access to commands related to the current action or currently selected object. It appears automatically when Flash Catalyst detects that you must carry out some action. For example, the HUD appears when you select artwork on the artboard, giving you the choice of converting the artwork to a component. You can use the HUD to quickly create components.
When converting objects to components, the HUD displays a message if further steps are required to complete the component. The instructions in the HUD message explain what you need to do next to finish creating the new component.
Code workspace
To view the Code workspace, choose Code from the Workspace menu.

The Code workspace shows the underlying MXML code. This code is generated automatically as you work in Flash Catalyst. Viewing the MXML code gives you the opportunity to understand how the application is programmed. The Code workspace contains several panels to help identify code issues.

Code panel
The Code panel shows the underlying MXML code that Flash Catalyst creates automatically as you design your application. The Code workspace is read-only, which means that you can only view the code. To edit the code, open the project in Adobe Flash Builder.
Problems panel
The Problems panel shows any errors in the current MXML code. You can double-click an error in the Problems panel to locate the error in the Code panel.
Project Navigator panel
The Project Navigator panel shows the Flex project directory structure and files being created as you design your project. All of these files are wrapped within a single Flash Catalyst project file (.fxp), until you publish the project.
Tip
You can also change workspaces by choosing Window > Design Workspace or Window > Code Workspace.
Opening an existing Flash Catalyst project
To help you understand the structure and layout of a typical Flash Catalyst project, here’s a sample application file that includes multiple page states and various interactive components.
The example used here is an interactive restaurant guide.
- Choose File > Open Project and browse to the Lesson01 folder from the CD.
- Select the RIA.fxp file, and click Open.
This project includes three main page states named Start, Home, and SubPages.

Exploring the Design workspace
As you build your application in Flash Catalyst, you’ll need to navigate the Design workspace. You’ll find it helpful to rearrange the workspace as you perform various tasks. For example, you may want to close or resize one panel to see more of another one. You can also view the entire artboard to get the big picture, and then quickly zoom in extremely close for precise editing.
You should still have the RIA.fxp file open.
Moving around the workspace
Most projects include more than one page. You can move from one page to another by using the Pages/States panel. Some panels share the same screen space. To use a panel, click its tab to bring it to the foreground.
- Click the Wireframe Components panel tab to bring it to the foreground.
- Click the Layers panel tab to bring it to the foreground.
- In the Pages/States panel, click the picture (not the name) for the Home page.
The contents of the Home page are shown in the artboard.
- Click through each of the three pages in the Pages/States panel to view the various images, components, text, and video. As you move from page to page, pay attention to the Layers panel and to how the assets on each page are organized. Notice that some layers are hidden, while others are visible.
Adjusting panels
Many panels share the same location in the workspace, and sometimes a panel needs to be stretched to see more of its contents. You can resize a panel by dragging its borders. You can also double-click a panel tab to collapse or expand the entire panel or panel group.
- Click the Layers panel to select it.
The project includes several layers, but some of these layers may not be visible.

- Position the pointer along the gray border between the Interactions panel and the Layers panel.
The pointer changes to a two-headed arrow.
- Drag the border down to make more room for the Layers panel above it.
You can also drag the border between the artboard and the panels on the right, or the Timelines and Design-Time Data panels below.
- Double-click the Timelines panel tab.
The Timelines and Design-Time Data panels collapse (or expand if they were already collapsed).
Double-clicking an open panel collapses the entire panel, along with any other panels that share the same location in the workspace.
- Double-click the Timelines panel tab again to reopen it.
- Choose Window > Hide All Panels (or press the F4 key).
Hiding all panels is helpful when you need more space to view the artboard.
- Choose Window > Show All Panels (F4) to unhide the panels.
- Choose Window > Reset Workspace and click OK to return the workspace to its default settings.
Zooming the artboard
Depending on the size of your computer monitor and the dimensions of your application, you may need to zoom or pan the artboard as you work. You can use the Zoom Magnification menu, located above the artboard, to view the artboard at between 25% and 800% of actual size. You can also use the Zoom tool, located above the artboard in the Tools panel, to zoom in to a specific part of the artboard.
- Select SubPages in the Pages/States panel.
This page includes several components and artwork. You may need to zoom in and out as you work with this page.
- Click the arrow to the right of the Zoom Magnification field (
 ) to open the Zoom Magnification menu, and choose 50%.
 - Use the horizontal and vertical scroll bars beside the artboard to center the application in the workspace.
You can now see more of the artboard at one time. You are not limited to the percent settings in the Zoom Magnification menu. You can also type your own setting directly in the Zoom Magnification field.
- Double-click 50% in the Zoom Magnification field, type 30, and press Enter/Return.
The artboard zooms to 30% of actual size.
- Select the Zoom tool (
 ).
). - Position the Zoom tool over the artboard and click several times to zoom in to 800% of actual size.
Zooming in is helpful for precise editing and placement of artwork in your application.
- Hold down the Alt/Option key, and notice the Zoom tool now has a minus sign on it (
 ). Click twice to zoom back out to 200% of actual size.
- Choose View > Fit Artboard In Window.
The artboard adjusts to fit within the workspace window.
Panning the artboard
You may find it helpful to pan (move right and left) the artboard, as an alternative to scrolling. This is especially helpful when zoomed in close. You can pan the artboard using the Hand tool, which is located above the artboard and in the Tools panel.
- Select the Hand tool (
 ).
). - Using the Hand tool, drag to view a different part of the artboard.
You can also pan the artboard by moving the scroll bars, but by using the Hand tool you can do this in one step.
Previewing a project in a browser
Before publishing a project, you can run and test the application in a web browser. This is something you will do often when creating projects in Flash Catalyst.
You should still have the RIA.fxp file open.
- Choose File > Run Project, or press Ctrl+Enter/Command+Return.
Flash Catalyst compiles the project and the project opens in your default web browser. The first page state of this project begins with a video and then presents the main navigation elements. This application includes an animated SWF movie, buttons, data lists, and several custom interactive components.

- Explore and test the application by doing the following:
- Mouse over the interactive components to view their behavior.
- Click the right and left navigation buttons to browse additional items in the list of restaurants.
- Click any item in the list (any restaurant) to view more information.
- Click Gallery and Build Your Order.
- Click Main Menu to return to the first page of the application.
- Open and close the Category menu.
Note
Even though this application has only three main page states, there are several different views. This was accomplished by creating custom components. By nesting components inside other components you can add to the structure and depth of the application without adding pages. You’ll learn more about components later in this course.
- Choose File > Open Project.
A message prompts you to save your change. You cannot have more than one Flash Catalyst project open at the same time.
- Click No to close the project without saving.
- In the Open dialog box, browse to the Lesson01 folder and open the Banner.fxp file.
This is another project that you’ll work on during this course. It’s an interactive advertisement banner.
- Choose File > Run Project to preview the application in a browser.
Click through each of the five pages using the numbered navigation buttons at the top of the banner.

Getting Flash Catalyst Help
You can gain quick access to online help right from within the Flash Catalyst application workspace. Flash Catalyst Community Help is a new integrated online help environment of instruction, inspiration, and support using a custom search to get the most relevant results.
- Choose Help > Flash Catalyst Help.
If you are prompted to install the Community Help application or the Adobe AIR application, follow the prompts to install these programs.
Your default web browser is started and you are taken to the Flash Catalyst Community Help page.
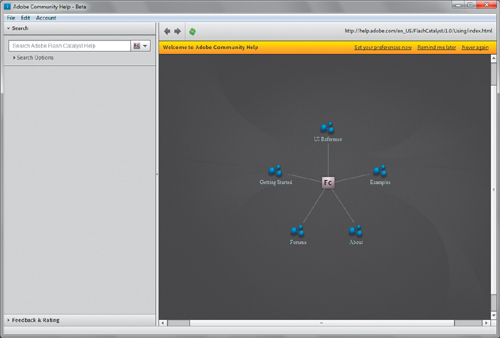
You can use the navigation links on the right to select from common help topics, such as “Getting Started,” or “UI Reference.” You can also use the Search field in the left pane to perform a key word search.
- Select a topic and browse the Community Help topics.
- Close the browser window and return to Flash Catalyst.
- In the Flash Catalyst Design workspace, click in the Community Help Search field, type a search term or phrase, and press Enter/Return.

Your default web browser is started and you are taken to the Flash Catalyst Community Help search results. The results include links to matching content provided by Adobe and by the Flash Catalyst community at large.

- Close the browser window and return to Flash Catalyst.
- Choose File > Close Project. If you are prompted to save changes, click No.
The project closes and you return to the Welcome screen.
Review questions
1 Which Adobe Creative Suite applications are used to produce layered design documents for import into a new Flash Catalyst project?
2 How does Flash Catalyst benefit designers who want to create interactive content without writing code?
3 When you first start Flash Catalyst, what are two things you can do from the Welcome screen?
4 Where in the Design workspace do you place and manipulate artwork?
5 What Flash Catalyst feature is used to organize the different screens or main areas within the application interface?
6 In addition to using the Flash Catalyst menus, which part of the Design workspace can you use to convert artwork into components?
7 What part of the Design workspace is used to show or hide artwork in a selected page or component state?
Review answers
1 You can use Adobe Photoshop, Adobe Illustrator, and Adobe Fireworks to create your layered design and artwork.
2 Flash Catalyst helps designers sell their ideas by showing functional designs rather than static screens. Flash Catalyst ensures that each design is accurately expressed, and it allows more efficient collaboration between designers and developers who build rich Internet applications.
3 From the Welcome screen, you can begin a blank Flash Catalyst project or open an existing project.
4 The artboard is where you place and work with artwork, interactive components, and other objects that make up the application interface.
5 The Pages/States panel displays a thumbnail for each page in the application. You can duplicate, remove, add, and rename pages and component states according to your project specification.
6 The Heads-Up Display (HUD) appears automatically when Flash Catalyst detects that you must carry out some action. The HUD appears when you select artwork on the artboard, giving you the choice to convert the artwork to a component.
7 The Layers panel is an organized collection of the objects in the application. As you add pages and component states to the application, you use the Layers panel to show or hide objects in each state.