3. Managing the Library
The Flash Catalyst project library is a storage area for the reusable content that you add to a Flash Catalyst project. This content includes the bitmap images and other media (video, sound, Adobe Flash movies, and more) that you import. You can import assets individually, as a group, or as a library package. The library also stores the components that you create—things like navigation buttons, scrolling panels, and lists of data.
In this lesson, you’ll learn how to do the following:
• Identify project assets in the Library panel
• Preview images, video, and sound
• Rename assets
• Delete assets from the project
• Use and swap assets in the library
• Compress all instances of a bitmap image
• View the source of library files in the Code workspace
• Import and export a library package
This lesson will take about 40 minutes to complete. Copy the Lesson03 folder into the lessons folder that you created on your hard drive for these projects (or create it now), if you haven’t already done so. As you work on this lesson, you won’t be preserving the start files; if you need to restore the start files, copy them from the Adobe Flash Catalyst CS5 Classroom in a Book CD.
![]()

You can use the Flash Catalyst Library panel to store, locate, manage, and apply reusable components, images, Flash movies, videos, and sounds. Quickly apply global changes across your entire application. Swap images with a single click. Share your entire collection of project assets with other designers and Flex developers by using Flash Catalyst Library Packages.
Viewing the Library panel
The reusable assets that you add to a project are organized into one of four groups in the Library panel.
Images are bitmap (raster) files (PNG, GIF, JPG, JPE, JPEG) and SWF content.
Media refers to video and sound files (FLV/F4V files, mp3).
Components are the building blocks of your project. Examples of components include buttons, scroll bars, sliders, check boxes, panels, and scrolling lists.
Optimized graphics are added to the Library panel when you choose Optimize Vector Graphics in the Heads-Up Display (HUD). This is true when you optimize an image that you’ve imported and when you optimize an object that you’ve drawn using the Flash Catalyst drawing tools.
How do assets get into the Library panel?
Assets get into the Library panel in the following ways:
• When you import a design document, the bitmap images in the document are grouped together in a folder within the Images category of the Library panel. If the design document includes Illustrator symbols, the symbols are converted to optimized graphics and stored in the Optimized Graphics category.
• When you import or copy and paste a single bitmap image, SWF file, or video file, the file is added to the artboard and to the Library panel.
• When you import multiple assets at the same time, the assets are added to the Library panel, but not the artboard.
• When you import a sound file, it’s added to the Library panel.
• When you import a Flash Catalyst Library Package (FXPL) that was exported from another project, the entire collection of assets is added to the Library panel.
• When you optimize an image in the artboard, an optimized copy of the image is added to the Library panel.
• If you compress an image in the Library panel or in the artboard, a compressed copy of the image is added to the Library panel.
• When you convert vector drawings into a component, optimized graphic, raster image, or compressed image, an object is added to the Library panel.
• If you add a wireframe component to the artboard and then modify it, the modified component is added to the Library panel.
Add assets to the Library panel
In this exercise, you will add a few more assets to the Library panel. When you import a single bitmap image, it’s added to the artboard and the Library panel. But when you import a series of bitmaps or media files (sound and video), they’re added directly to the Library panel, but not the artboard.
- Start Flash Catalyst.
- In the Welcome screen, choose Open Project. Browse to the Lesson03 folder on your hard drive, select the Lesson03_Banner.fxp file, and click Open.
This is a copy of the file you created in Lesson 2, “Preparing, Importing, and Placing Artwork.” It includes the images you imported from Adobe Illustrator and a single bitmap image you imported separately.
Note
At first, the Library panel only displays categories for the types of assets that exist in the project. For example, if your project has no media, the Media category does not exist. After adding media, such as a video file, the Media category appears. Once added, the category remains in the Library panel, even after deleting all its contents.
- Select the Library panel to bring it into view.
Library assets are divided into categories, such as Components, Images, Media, and Optimized Graphics. These categories can be expanded or collapsed by clicking the small triangle to the left of the category name.
The Images category includes bitmap images that were imported to the project. This includes images that were imported individually or as part of a design document (AI, PSD, FXG). This also includes Adobe Flash movies (SWF files), if there are any.

When you import a design document, its images are grouped together in a subfolder. The folder inherits the name of the original design document, which in this case is the Banner_artwork (Adobe Illustrator) document you imported in Lesson 2.
- Expand the Banner_artwork folder.
- Collapse the Banner_artwork folder.
- Choose File > Import > Video/Sound File.
- Browse to the Lesson03 folder, Shift-click to select the interlude.mp3 and restaurants.flv files, and click Open.
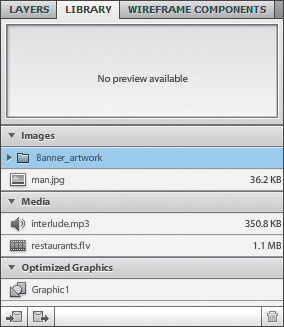
The sound and video files are added to the Media category in the Library panel. This project now includes three types of assets: Images, Media, and Optimized graphics.
- Choose File > Import > Image.
- Browse to the Lesson03 folder, Shift-click to select the 2wheels.jpg, design.jpg, future.jpg, map.jpg, and restaurants.jpg files. Click Open.
The images are added to the Library panel, but not the artboard.
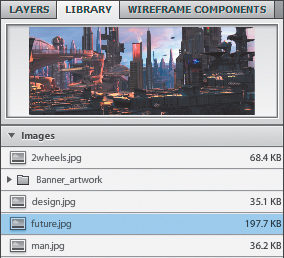
- Click to select the picture of the man in the lower-right corner of the artboard (you may need to scroll).
This was the single bitmap image that you imported in Lesson 2. In the Common category of the Properties panel, notice that the source of this image is man.jpg. There is a direct link between instances in the artboard and the source assets in the library.

- In the HUD, open the Optimize Artwork menu, and choose Optimize Vector Graphics.

The source in the Properties panel (below) changes to Graphic2.

Note
Vector shapes that you draw in Flash Catalyst or import from Adobe Illustrator are not added to the Library panel until you convert this artwork to an optimized graphic, raster image, compressed file, or component.
In the Library panel (shown at right), the new optimized version of this image appears in the Optimized Graphics category.

Preview files in the Library panel
As your project grows, it can be hard to identify assets by name alone. You’ll want to preview files before adding them to your application. An easy way to do this is to view the file in the preview area at the top of the Library panel.
- Select future.jpg in the Images category of the Library panel.
A preview of the image appears at the top of the Library panel.
Tip
When previewing interactive components in the Library panel, you only see a preview of the initial component state. To preview a component’s behavior, you need to add it to the application and then run the project in a browser or publish the application.
- In the Media category, select interlude.mp3 (a sound file) and click the Play button at the top of the Library panel.
Tip
You cannot preview SWF files in the Library panel. To view a SWF animation, you must add it to the application and run the project in a browser or publish the application.

As the audio file plays, the Play button changes to the Rewind and Pause buttons.
- In the Media category, select restaurants.flv (a video file) and click the small Play button in the lower-right corner of the preview area.

As the video plays, the Play button changes to the Rewind and Pause buttons.
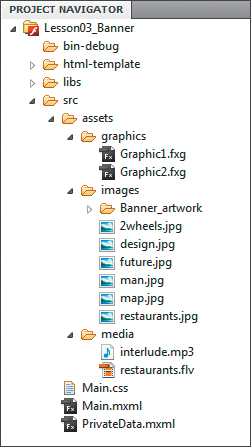
- Change to the Code workspace.
- In the Project Navigator panel, expand the main project folder, Lesson03_Banner. Expand the src and assets folders. Expand the graphics, images, and media folders.
These folders store the files represented in the Library panel. For each optimized graphic, all MXML information (vector, stroke, path, fill, and so on) is kept separately in an FXG file. Project components, if there are any, are stored in an src/components directory.
- Change back to the Design workspace.
Deleting assets from the project
Every project entails a little trial and error. As your project evolves, you’ll end up with assets in the library that you no longer need in the finished application.
Eliminating outdated or unused assets from the library reduces the size of the project file, and makes the entire project more manageable. Removing unwanted assets is easy. Just delete them in the Library panel.
- In the Images category of the Library panel, select man.jpg.
- Click the Delete icon (
 ) in the bottom-right corner of the Library panel.
A message informs you that you can’t delete the image because it’s being used by the optimized graphic called Graphic2. You cannot delete an optimized graphic’s source file. However, you can delete the optimized graphic or compressed copy of the image.
- Click OK to close the message.
- In the Optimized Graphics category, select Graphic2 and click the Delete icon ().
A message informs you that removing this asset will remove the asset and all references to it. Deleting an object in the Library panel is a fast way to remove every instance of an object from the application.

- Choose OK to delete every instance of the image.
The image vanishes from the Library panel, and from the artboard. Deleting the image left a hole in the artboard, but you’ll fix that in a minute.
Tip
You cannot delete library assets by pressing the Delete key. However, pressing Delete removes objects that are selected in the artboard. If you have an object selected and you accidentally press the Delete key, you will remove the selected object from the current state only.
Compressing images in the Library panel
One of the advantages of a project library is that you can use the same assets throughout your application, and then make global changes to the project by modifying the source file in the library.
For example, you can quickly compress all instances of a bitmap (raster) image to reduce the overall file size of your application.
- In the Images category of the Library panel, right-click man.jpg and choose Compression Options.
The Compress Image dialog box appears.

- Leave the Quality setting at 70% and click OK.
A compressed copy of the image named man1.jpg is added to the Images category. You can tell by the reduced file size that the image is compressed.

Renaming project assets
Just imagine if everyone you worked with were named Bob. Things could get a little confusing around the office. I suppose you could start calling people Bob1, Bob2, and so on. But that’s not much better. If you’re not careful, your Flash Catalyst project can end up looking like a room full of Bobs. In the world of Flash Catalyst, it’s Graphic1, Graphic2, Graphic3, and so on. An easy way to avoid this is to assign descriptive names to project assets in the Library panel.
- In the Images category of the Library panel, right-click the man1.jpg (the compressed copy of the image) and choose Rename.
The image name is highlighted.
- Type man_compressed, and press Enter/Return.
The file is renamed in the Library panel. When you rename a file, any links to the file are updated automatically.
Using assets in the Library panel
After adding assets to the project library, you can use them over and over in different parts of your application. You simply drag the item from the Library panel and position it in the artboard.
After placing an item in the artboard, the Properties panel shows a link to the source file in the project library. You can quickly swap an object in your application with a different asset through the source link in the Properties panel.
Tip
When you drag a library item to the artboard, a new layer is created (in the target layer folder). Best practice is to give a descriptive name to each object in the Layers panel. Renaming an instance of an item in the Layers panel does not affect the original item definition name in the Library panel.
Let’s give it a try by placing the original man.jpg file in the artboard, and then swapping it for the compressed version of the same image.
- In the Images category of the Library panel, drag man.jpg from the Library panel to the artboard.
- Position the image in the lower-right corner of the artboard.
- With the image still selected in the artboard, look in the Common category of the Properties panel.
The source of this image is the man.jpg file in the Library panel. The image in the artboard is an instance of this asset and is linked to the source file in the Library panel.

- Click the source link, man.jpg, in the Properties panel.
The Select Asset dialog box opens with a list of assets in the Library panel. You can replace this image with another image in the library. You can also use the Import button to replace the object with a new image that you import now.
Note
If you copy and paste a bitmap, the image is added in the Layers panel and a new asset is placed in the project library. If you copy and paste a vector graphic into the artboard, a new object is added to the Layers panel but not the Library panel. That’s because vector drawings are not stored in the library until you optimize them or convert them to a component.

In the Images category of the Select Asset dialog box, select man_compressed.jpg and click OK.
You have just replaced the image with the smaller, compressed copy of the same picture, as indicated in the Properties panel.

- Choose File > Close Project, and click No when prompted to save the file.
Sharing project libraries
If you create multiple projects that leverage the same assets, or you collaborate with other designers and developers, you’ll be happy to know that you can quickly share the entire contents of a Flash Catalyst project library.
Exporting a library package creates a single file containing every library item in the project. The package is saved as a Flash Catalyst Library Package (FXPL) file.
Export a library package
- In the Welcome screen, choose Open Project. In the Lesson03 folder on your hard drive, select the Banner_completed.fxp file and click Open.
This opens a copy of the completed Banner project.
- Open the Library panel and view the assets for this project.
The project includes over 90 assets. To recreate these in another project would be a huge task. But exporting the entire library is easy.
- Click the Export Library Package icon at the bottom of the Library panel.
The Export Library Package dialog box appears. Flash Catalyst Library Package files use the .fxpl filename extension. By default, the library package uses the same name as the project from which it’s exported.
- If necessary, browse to the Lesson03 folder on your hard drive and click Save.
The entire project library is exported and stored in a file named Banner_completed.fxpl.
- Close the project without saving changes.
By default, the images you add in Flash Catalyst are embedded in the SWF file when you publish the application. You can also tell Flash Catalyst to store images outside the published application and establish a link to these files. The images are loaded by the application at runtime. Linking to large images is one way to reduce the size of the published application. It can also make updating or replacing images easier without needing to republish the application.
To convert an image from embedded to linked, right-click the image in the Library panel and choose Convert to Linked Image. The Linked Image icon appears, to show which images are linked.

To embed a linked image, right-click the image in the Library panel and choose Embed Image.
Import a library package
- In the Welcome screen, choose Adobe Flash Catalyst Project to create a new project.
The New Project dialog box appears. Normally you would match the project dimensions to the artwork, but for now just accept the default project settings.
- Click OK to accept the default settings and open a new blank project.
A new project opens. Notice the Library panel is empty.
- Click the Import Library Package icon.
- In the Import Library Project dialog box, select the Banner_completed.fxpl file you created in the last task, and choose Open.
Note
When you add a library package to a project with existing library assets, the new assets are added to the existing library. No files are deleted.
The entire library package is added to the project. The assets appear in the Library panel.
Tip
A Flash Catalyst Library Package (FXPL) can be imported by a developer into Adobe Flash Builder as a Flex library project. These objects will maintain any behaviors, transitions, and so on, that you’ve added to them in Flash Catalyst.
Review questions
1 What types of assets appear in the Library panel?
2 How does a vector drawing that you create in Flash Catalyst end up in the Library panel as a reusable asset?
3 What are some different ways that you can add files to the Library panel?
4 When you select an image in the artboard, how can you tell which asset the image refers to in the Library panel?
5 What types of assets can you preview in the Library panel (list at least three)?
6 What happens to images in the application if you delete an image in the Library panel?
7 Why would you choose to include a linked image in your project?
Review answers
1 Assets in the Library panel include bitmap (raster) images, optimized graphics, components that you create from artwork, wireframe components that have been modified, SWF files, and media (video and sound).
2 You must convert a vector drawing into a component or optimized graphic before it becomes a reusable asset in the Library panel. To optimize the drawing, select it in the artboard. Then, in the HUD, open the Optimize Artwork menu and choose Optimize Vector Graphics, Rasterize, or Compress.
3 To add files to the Library panel, you can import bitmaps, SWF files, video, and sound. You can also create components and optimize artwork. Wireframe components must be modified before they appear in the Library panel.
4 The Common category in the Properties panel shows the source asset for the selected image. You can use this link to swap the image for another image.
5 You can preview images, video, sound, and components in the Library panel. However, to see the behavior of a component or SWF file, you must run the application in a browser.
6 When you delete an image from the Library panel, all instances of the image, along with any references to the image, are removed from the application.
7 Linked images are stored outside the published SWF file. Linking to large image files can reduce the published file size of the application. Linking to images allows you to update the images later without republishing the application.