2. Preparing, Importing, and Placing Artwork
It’s a common complaint. You’ve spent hours perfecting artwork and layout—positioning images to the exact pixel, choosing a perfect stroke, tweaking fades and filters, and organizing layers to clearly show the relationship between various states of interactive objects. But still, you worry that the finished product won’t look or behave the way you want. Your vision is often compromised by limitations in development tools, or simply lost in translation—but not anymore. With Flash Catalyst, you can preserve the integrity of your artwork, from vision to publishing.
In this lesson, you’ll learn how to do the following:
• Prepare a design document for import
• Export an FXG file from Adobe Fireworks
• Import a layered design document into Flash Catalyst
• Select fidelity options when importing a design document
• Import artwork into Flash Catalyst
• Position artwork in the Flash Catalyst artboard
• Optimize artwork
This lesson will take about 45 minutes to complete. Copy the Lesson02 folder into the lessons folder that you created on your hard drive for these projects (or create it now), if you haven’t already done so. As you work on this lesson, you won’t be preserving the start files; if you need to restore the start files, copy them from the Adobe Flash Catalyst CS5 Classroom in a Book CD.
![]()
Flash Catalyst is tightly integrated with leading design tools from Adobe, including Adobe Illustrator and Adobe Photoshop. You can create and edit artwork using your favorite design tools, and then use Flash Catalyst to turn static objects into fully functioning rich Internet applications.
Preparing a design document
Knowing that you can turn your static artwork into working applications is pretty exciting. But before you get started, take a moment to review these best practices for preparing your design document. The way you approach the design and organization of your artwork has a significant impact on the structure of the project in Flash Catalyst and the underlying code. The following ideas will help protect the integrity of your design and minimize re-working or re-structuring assets after bringing them into Flash Catalyst.
Choose your design application
Flash Catalyst imports files saved in the Flash XML Graphics format (FXG). You can generate the FXG file from any document created in Adobe Fireworks, Adobe Illustrator, or Adobe Photoshop.
In fact, if you create your design using Photoshop or Illustrator, you can save yourself the step of exporting the FXG file. Flash Catalyst has an import feature that makes opening PSD and AI files a cinch! We’ll get to that in a moment.
Tip
When choosing Adobe Illustrator as your design application for Flash Catalyst artwork, use the Illustrator Flash Catalyst document preset. In the Create New section of the Adobe Illustrator Welcome screen, choose Create Flash Catalyst Document.
Tip
In Photoshop and Fireworks, set your design document color mode to RGB. Spot and process colors are not supported in Flash Catalyst. Set an image resolution of 72 pixels per inch.
Plan the structure of your application
There are different approaches to structuring your application. The two most common ways to structure the application are:
• Import all artwork in the design document to a single page state. Distribute artwork to pages in Flash Catalyst using the Flash Catalyst Pages/States and Layers panels.
• Define the main pages of the application in your design document using Layer Comps in Photoshop or multiple artboards in Illustrator.
In both approaches your design document includes a hierarchy of clearly named layers and groups to define the pages and functional component of the application. Any layers and groups that you define in Illustrator, Photoshop, or Fireworks are maintained when you import the project into Flash Catalyst.
Importing all artwork to a single page state
When you create a new Flash Catalyst document by importing an FXG file, Photoshop document, or Illustrator document with a single artboard, your artwork appears on one new page state in Flash Catalyst. You can then duplicate or add pages and use the Flash Catalyst Layers panel to define which artwork appears on each page. This is a common workflow for structuring your application in Flash Catalyst, and that’s what we’ll be doing in this course.
Using Photoshop Layer Comps and multiple Illustrator artboards
A Photoshop Layer Comp (composition) provides a snapshot of which layers are turned on and off in your Photoshop document. When preparing a document for import to Flash Catalyst, you can use Layer Comps to represent each page state in your Flash Catalyst application. You can then import each Layer Comp to a different state in Flash Catalyst. To do this, you need to import each Layer Comp separately using the advanced options in the Photoshop Import Options dialog box. When you import artwork in a Photoshop Layer Comp, the artwork is centered in the Flash Catalyst artboard. To preserve the layout and positioning of your Layer Comps, include a background layer that is the same size as the Flash Catalyst artboard.
When you import an Illustrator document with multiple artboards, each artboard appears on a separate page state in Flash Catalyst.

The organization of your content is extremely important. You’ll need to identify and select these objects when separating artwork onto different pages and states or converting artwork into functional components in Flash Catalyst.
Here are some tips for organizing your artwork using layers:
• Use top-level layers (or Layer Groups in Photoshop) to represent the main pages or screens of the application.
• Add a layer for common objects that appear on every page. For example, you may want a layer named “background” or a layer named “navigation.”
• Use sublayers (or layers within a Layer Group in Photoshop) to represent the elements on each page.
• Use sublayers to organize the building blocks or parts of individual Flash Catalyst components such as scroll bars, menus, and buttons.
Group complex objects
Much of the artwork you create is made from a collection of complex parts, including images, shapes, lines, text, symbols, and so on. Grouping complex objects before bringing them into Flash Catalyst makes them easier to manage.
Flatten artwork with filters and effects
In Illustrator, Photoshop, and Fireworks, you can use layers to apply a large selection of filters and effects to artwork and text. Some examples include drop shadows, opacity masks, and blends. In Photoshop these are called Adjustment layers. By placing the effect or filter in a separate layer, you preserve the original artwork or text. Unfortunately, not all filters and effects import correctly into Flash Catalyst.
Tip
Flash Catalyst includes a small collection of filters, including blurs, shadows, bevels, and glows. You can apply these to objects by using the Properties panel in Flash Catalyst.
When you import a Photoshop file, Flash Catalyst rasterizes all Layer Effects for image, shape, and text layers. Use the following settings to help preserve the appearance of artwork created in Photoshop:
• For text layers with effects or masks, use Vector Outlines or Flatten Bitmap Image.
• For masks applied at the Layer Group level, use Flatten Bitmap Image.
• For opacity changes at the Layer Group level, use Flatten Bitmap Image.
The following Illustrator filters are supported in Flash Catalyst. All other filters and effects are rasterized or expanded during import.
• Drop Shadow
• Inner Glow
• Outer Glow
• Gaussian Blur
Name everything
The layer names you use in the original design document are brought into Flash Catalyst. These names are also reflected in the Flex code that gets generated by Flash Catalyst. This is the same code that will be used by Flex developers if the Flash Catalyst project file is imported into Flash Builder for additional development.
Use a consistent naming strategy throughout your design. For example, you could use “name_btn_up” and “name_btn_down” to specify artwork that will be turned into button components. It’s a good idea to agree on a naming convention with other designers and developers before beginning a project.
Embed images in the design document
Most rich Internet application projects involve a team of designers and developers working together in an iterative process. By placing images within your design file, rather than linking to them, you can share a single file and you’ll know that everyone has the assets they need to continue working on the project. Images and other assets appear in the Library panel within Flash Catalyst.

Manage fonts when sharing files
When collaborating with teams, make sure that everyone has the necessary fonts installed. This is essential if you plan to keep your text editable, for example if the design includes body copy that needs to change over time. Even with the necessary fonts installed, editable text doesn’t always look the same when brought into Flash Catalyst. Things like kerning or leading may differ. For text objects that need to look exactly as you’ve designed them (a logo is a good example), you can:
• Convert text to a shape or bitmap (raster) image.
• Convert text to vector outlines in Illustrator.
Identify duplicate component assets
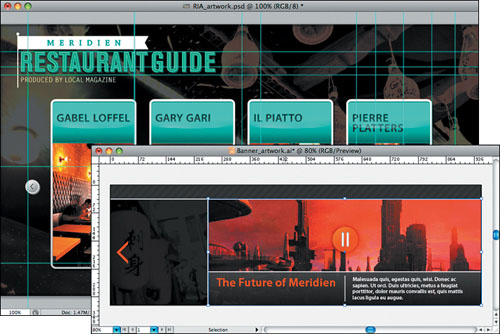
It’s often necessary to include repeated buttons, text input areas, and other visual elements to represent the overall visual design of the application. In Flash Catalyst, you want to define a single object for each unique piece of artwork, but avoid defining objects where the artwork is the same. To make your work easier in Flash Catalyst, you can identify any duplicate items in your design document.
There are several ways to do this. You can use a unique naming convention for duplicate components, such as inputText (for the master) and _inputText (for a duplicate). Another option is to identify them visually using color or opacity.
Set component properties in Flash Catalyst
Before you begin a design, take a few minutes to explore the available properties for formatting text, shapes, and components in Flash Catalyst. This will help you determine which objects and states to define in the design document, and which to save for Flash Catalyst.

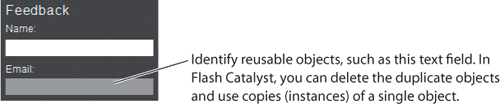
Create sample artwork for a list of images or text
When browsing the web, you may notice that lots of applications include scrolling lists of data (images and text). In Flash Catalyst, a Data List component is used to display a collection of data that is stored outside the application. When designing artwork for a Data List component that will be bound to an external data source, you don’t need to include every item in the list, just a representative model. A best practice when preparing your design document is to include the first item and a separate group that serves as a guide for alignment and spacing.
Hide, show, and lock layers
When you import a layered design document into Flash Catalyst, the layer structure is preserved. This includes which layers are locked or hidden. You can save yourself a few steps by locking layers that you don’t need to edit, such as background or border graphics. You can also hide layers that are hidden in their initial state, such as the over and down states for an interactive button.
Exporting an FXG file from Adobe Fireworks
Adobe Fireworks users may feel a little left out when they first launch Flash Catalyst. One of the first things they’ll notice is the absence of a direct Fireworks import option in the Welcome screen. In reality, Flash Catalyst imports only FXG documents regardless of where they originated—in Photoshop, Illustrator, or Fireworks. Flash Catalyst just happens to have the ability to convert your PSD and AI files into the FXG format automatically. Following are the general steps for exporting an FXG file from Fireworks to import into Flash Catalyst. The steps to export an FXG file from Fireworks CS4 and CS5 are different. Refer to the appropriate steps below for instructions on exporting FXG files from your version of Fireworks.
Fireworks CS4
- Start Adobe Fireworks CS4 and open the design document you want to import into Flash Catalyst.
- Choose Commands > Export To FXG.
The Select Folder dialog box appears.
- Locate and select a destination folder for the FXG file.
- Enter a name for the file and click OK.
You can now import the FXG file into Flash Catalyst.
Fireworks CS5
- Start Adobe Fireworks CS5 and open the design document you want to import into Flash Catalyst.
- Choose File > Export.
The Export dialog box appears.
- Open the Export pop-up menu and choose FXG And Images.
- Open the Pages pop-up menu and select which pages to include in the FXG.
- Click Save.
You can now import the FXG file into Flash Catalyst.
Importing artwork
Fantastic! You’ve followed the recommended best practices. Now your design document is ready to go from static art to a living application—complete with motion graphics, animated transitions, and interactive controls.
There are four ways to get your artwork into Flash Catalyst.
• Import a layered design document created in Adobe Photoshop, Adobe Illustrator, or Adobe Fireworks. This is the preferred method for beginning a new project in Flash Catalyst.
• Import images using the File > Import > Image command in Flash Catalyst.
• Copy and paste graphics into the Flash Catalyst artboard.
• Import a Flash Catalyst library package. You will learn how to create a library package later in this course.
Import a design document
You can import a design document from the Flash Catalyst Welcome screen.
- Start Flash Catalyst.
The Welcome screen includes three options for importing a design file: From Adobe Illustrator AI File, From Adobe Photoshop PSD File, and From FXG File. For this task, you will import an Adobe Illustrator file.
- In the Create New Project from Design File section of the Welcome screen, choose From Adobe Illustrator AI File.
The Import dialog box appears.
- Browse to the Lesson02 folder on your hard drive. Select the Banner_artwork.ai file and click Open.
Note
Objects placed outside the Illustrator artboard or Photoshop canvas are clipped. Before importing, make sure that all artwork appears inside the artboard or canvas. You can reposition these items after importing them into Flash Catalyst.
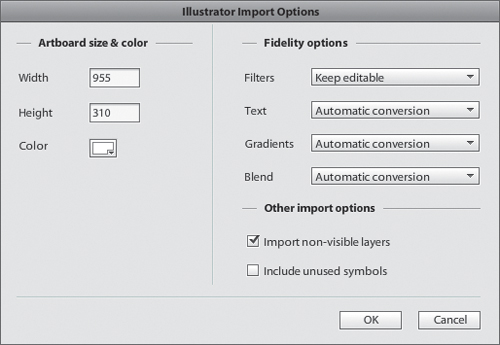
The Illustrator Import Options dialog box appears. The artboard size and color match the document you’re importing. The fidelity options include settings that determine how Flash Catalyst imports objects with filters, gradients, text, and blends. Fidelity refers to how well the imported artwork matches the original. See the “Import fidelity options” sidebar for more information on each setting.
Tip
When creating symbols in Illustrator (that you plan to import into Flash Catalyst) select the Align To Pixel Grid option in the Adobe Illustrator Symbol Options dialog box. 9-slice Scaling is not currently supported in Flash Catalyst, so leave that option deselected.
The Import Non-Visible Layers option is selected by default. Typically, you want this selected so that every layer, including those you’ve temporarily hidden, are imported. Illustrator includes a built-in collection of graphics, called symbols. You can also create new symbols and add them to the collection. If you select Include Unused Symbols, every Illustrator symbol in the file is added to the Flash Catalyst project library. Some people think that Illustrator symbols import to Flash Catalyst as reusable components in the library. Illustrator symbols import as Optimized Graphics.
- Click OK.
Tip
Illustrator symbols import as Optimized Graphics. If your Illustrator file includes multiple instances of the same symbol, then your Flash Catalyst document will include multiple instances of the same optimized graphic. In Flash Catalyst, it is a best practice to use one instance of an object and then share that object to other states. You can remove all but one instance of the optimized graphic, share the same instance to other states, and then apply different properties in each state.
The Illustrator file is converted to the FXG format automatically and then imported directly into a new Flash Catalyst project. Flash Catalyst informs you if the document includes a large number of bitmap images, large bitmaps, or a large number of vector paths. To improve performance, you can optimize these items.
After the document imports, you should save the file.
- Choose File > Save. Enter a name for the project in the File Name field (or accept the suggested name). Click Save.
The project is saved. Flash Catalyst project files have the .fxp filename extension. In the next task, you will import an image that was missing in the design document. You will then place that image in the artboard.
The Illustrator import fidelity options control how Flash Catalyst handles filters, gradients, text, and blends. The Photoshop import fidelity options control how Flash Catalyst imports image, shape, and text layers.

In the Fidelity Options section of the dialog box, you can open the pop-up menus and choose import fidelity options. The options in the menus are similar for Photoshop and Illustrator. They include:
Keep editable (AI & PSD): Keeps the item in an editable form, even if it might lose fidelity (lose some quality or look different from the original). For example, if you choose “Keep editable” for text, then the text will import as an actual text item in Flash Catalyst. Editable text may not look exactly the same in Flash Catalyst as it did in Photoshop or Illustrator.
Expand (AI only): Converts an object with a filter into a set of vectors or bitmaps that approximate the original appearance in Illustrator. For example, expanding a drop shadow filter on a rectangle might create an image of the drop shadow behind the original rectangle.
Flatten (AI & PSD): Converts objects into a single bitmap (raster) image.
Vector outlines (AI & PSD): Converts text into a vector path that approximates the rendered appearance of the text.
Crop (PSD Shape layers only): The vector mask that defines a shape in Photoshop Shape layers is imported as a mask into Flash Catalyst. However, instead of applying that mask to a bitmap that inherits the same dimensions as the original Photoshop file, this option crops the resulting bitmap to the boundary of the mask.
Automatic conversion (AI only): Flash Catalyst chooses whether to keep a given item editable, rasterize it, or convert it to vectors. The result is based on various heuristics such as the complexity of the item. For example, a simple blend might be expanded to vectors, whereas a complex blend (that would produce a lot of paths) would be rasterized.
Advanced (PSD only): Click the Advanced button in the Photoshop Import Options dialog box to specify exactly which layers to import. You can select and deselect layers to import, regardless of their visibility in Photoshop. You can also choose to import specific Photoshop Layer Comps, if they exist in the document. The selected layers import to the current page state in Flash Catalyst.
Note
In Photoshop, you can also use the advanced import options to set import fidelity options for each layer separately.
Import additional images
You’ve spent days, maybe even weeks, getting your design perfect and you’ve finally imported your design document into Flash Catalyst. You’ve started separating artwork into meaningful pages and component states, only to realize that you’re missing key images that won’t be available for another week. No problem. Just leave a placeholder and import those images separately. Flash Catalyst accepts bitmap images with the filename extensions: PNG, GIF, JPG, JPEG, and JPE.
Tip
You’re not limited to importing a single design document. You can import other layered Photoshop, Illustrator, or FXG files into an existing Flash Catalyst project by choosing File > Import, and then choosing the type of document you want to import.
Your Flash Catalyst project should still be open from the previous task.
- In the Flash Catalyst Layers panel, select the page1:Feature layer.
The layer highlights in light blue, indicating that it’s the target layer for new content.
- Choose File > Import > Image.
Note
If you import a large image, a message appears reminding you to reduce the size of the image before importing.
The Import dialog box appears.
- Browse to the Lesson02 folder on your hard drive. Select man.jpg and click Open.
Tip
You can also copy artwork in Illustrator or Fireworks and paste it directly into the Flash Catalyst artboard.
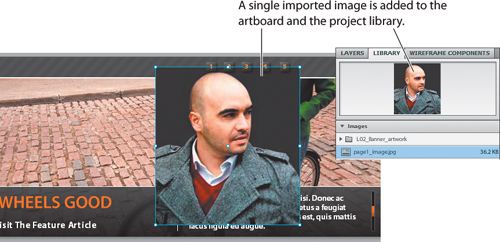
When you import a single image, it appears in the artboard and a master copy is added to the project library. In the next task, you’ll position this image in the artboard.
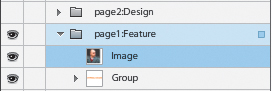
- In the Layers panel, click the small triangle to expand the page1:Feature layer.
The image was added as a new object in the target layer.
Position images in the artboard
When you import objects to the artboard, they’re placed in the artboard of the target layer. You can position objects by dragging, nudging (using the Arrow keys), or by choosing alignment commands in the Modify menu.
- Make sure the Select tool (
 ) is selected in the Tools panel.
 - Drag the image you imported to the blank white space on the right side of the artboard. The positioning doesn’t need to be perfect. You’ll fix that next.
For more precise positioning, you can use the arrow keys on your keyboard to nudge the image up, down, left, or right.
This image is supposed to be aligned in the bottom-right corner of the artboard. To do this, you can use the Align commands in the Modify menu.
- Make sure the image is still selected. Choose Modify > Align > Right. Then, choose Modify > Align > Bottom.
The image is now perfectly aligned in the bottom-right corner of the artboard.
Optimizing artwork
In Flash Catalyst, graphic optimization options include converting vector graphics to bitmaps, compressing images, and converting embedded images to linked files. When you import a design document, you can choose fidelity options that do some of the graphic optimization for you. But even after importing graphics into your Flash Catalyst project, you can use the optimization options in the Heads-Up Display (HUD) or the Modify menu to apply settings to individual images.
When you select artwork, the optimization options appear in the HUD. The options include:

Tip
When you select an optimized vector graphic, the Optimize Vector Graphics option changes to Break Apart Graphic. To edit the parts of a complex vector graphic that has been optimized, you must first break it apart.
Optimize Vector Graphics compiles a selected graphic into a low-level Flash object that displays more quickly in Flash Catalyst and at runtime. Once you optimize a vector drawing in Flash Catalyst, you can no longer edit its stroke and fill. In an optimized vector graphic file, all MXML information (vector, stroke, path, fill, and so on) is kept separately in an FXG file. When you optimize a vector graphic, a new optimized graphic is added to the Library panel in the Optimized Graphics category. The new optimized graphic replaces your original graphic in the artboard.
Rasterize converts a static vector graphic or text into a bitmap image. It replaces the image in the artboard with a PNG file and places a copy of the PNG in the Library panel. Use this option to optimize static vector graphics or text.
Compress adds compression to a bitmap image. It places a smaller (lower-quality) copy of the bitmap image in the Library panel. When you compress an image with transparency, the transparency is lost.
Convert To Linked Image converts an embedded image to a linked image. By default the images you add to your application are embedded and will be published as part of the SWF file. To reduce the size of your application, you can link images. Linking an image stores it outside the SWF file and loads the image when you run the application.
Optimize artwork
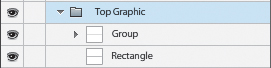
When you imported the Illustrator file, Flash Catalyst suggested you optimize graphics to improve the performance of your application. The gray border at the top of the artboard is made up of a rectangle shape and several small paths used to create the horizontal stripes. You don’t need to work with these items separately, so you can optimize the Top Graphic.
- In the Layers panel, click the small triangle to expand the Top Graphic layer.
The Top Graphic layer includes two objects: Group and Rectangle.
- Click the small triangle to expand the Group row.
Every stripe in the graphic is a separate path.

- Click the small triangle again to collapse the Group row.
- In the Layers panel, click the Top Graphic layer to select all its contents.
- In the Optimize Artwork section of the HUD, choose Optimize Vector Graphics.
The parts of the Top Graphic are combined into a single optimized graphic named Graphic1.

- Save your changes, and then choose File > Close Project.
The project closes and you return to the Flash Catalyst Welcome screen.
Bitmap and vector graphics: What’s the difference?
Flash Catalyst supports both vector and bitmap graphics, making it a very powerful design tool. For example, the artwork you import may include both vector and bitmap graphics.
Vector graphics are mathematical equations describing the distance and angle between two points. Additional information, such as the color and thickness of a line (stroke) and the contents of a path (fill) can also be set. Vectors can be sized up or down without losing image quality.
Bitmap (raster) images are made of a specific number of pixels mapped to a grid. Each pixel has a specific location and color value. An image with more pixels has a higher resolution and a larger file size.
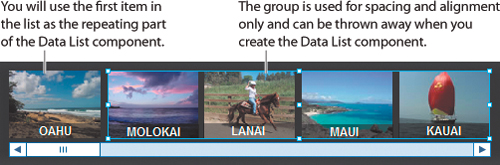
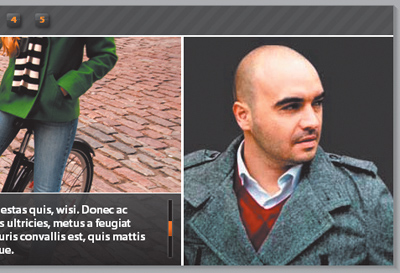
Another example of the difference between vector and bitmap is that a photograph can accurately depict a physical scene in a single image layer. To produce similar realism in a vector illustration could require hundreds of vector shapes stacked upon each other.
This is not to suggest that bitmaps are better than vectors, or vice versa; both of these main graphic types are integral to visual communication and designing in Flash Catalyst.

The illustrations at right are examples of vector and bitmap graphics. On the left is an image created with many paths. The image on the right is a bitmap photograph.
Review questions
1 When creating a new project from a layered design document, which file types will Flash Catalyst import?
2 How does importing a layered design document created in Adobe Photoshop differ from importing a document created in Adobe Fireworks?
3 Why would you consider flattening layers before opening a design document in Flash Catalyst?
4 What can you do if you don’t want text in your design document to be editable in Flash Catalyst, or if you want to ensure the text looks exactly as designed?
5 What does the Filter: Expand fidelity option do when opening an Adobe Illustrator document in Flash Catalyst?
6 What happens when you import a range of bitmap images (File > Import > Image) versus importing a single image?
7 Which type of graphic can be sized up or down without losing image quality?
Review answers
1 You can create a new Flash Catalyst project by importing Adobe Photoshop (PSD), Adobe Illustrator (AI), or FXG files.
2 You must first export an FXG file from Fireworks before the design can be opened in Flash Catalyst. There is no direct import option for layered Fireworks PNG documents. However, you can import a Photoshop document (PSD) directly from the Flash Catalyst Welcome screen, or by choosing File > Import > Adobe Photoshop File.
3 Some filters and effects are not supported in Flash Catalyst. One solution is to flatten or rasterize these objects before bringing them into Flash Catalyst.
4 If you create vector outlines or rasterize text in the original design document, it will not be editable in Flash Catalyst. You can also choose the Vector Outlines or Flatten fidelity options when importing the document in Flash Catalyst.
5 The Filter: Expand fidelity option converts an object that has a filter applied to it into a set of vectors or bitmaps that approximate the original appearance in Illustrator. For example, expanding a drop shadow filter on a rectangle might create an image of the drop shadow behind the original rectangle.
6 When you import a range of bitmap images, the images appear in the project library, but are not placed in the artboard. When you import a single image, it’s placed in the library and an instance of that image is added to the target layer in the artboard.
7 Vectors can be sized up or down without losing image quality.