Chapter 4. Working with Shape Layers
Lesson overview
In this lesson, you’ll learn how to do the following:
• Create custom shapes.
• Customize a shape’s fill and stroke.
• Use path operations to transform shapes.
• Animate shapes.
• Repeat shapes.
• Explore design options with the Brainstorm feature.
• Add a Cartoon effect to a video layer for a distinctive look.
• Use Adobe After Effects in a DVD interface workflow.
This lesson will take approximately an hour to complete. Copy the Lesson04 folder into the Lessons folder that you created on your hard drive for these projects (or create it now), if you haven’t already done so. As you work on this lesson, you’ll preserve the start files. If you need to restore the start files, copy them from the Adobe After Effects CS5 Classroom in a Book DVD.
![]()

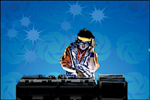
Shape layers make it easy to create expressive backgrounds and intriguing results. You can animate shapes, apply animation presets, and add Repeaters to intensify their impact.
Getting started
Shape layers are created automatically when you draw a shape with any of the drawing tools. You can customize and transform an individual shape or its entire layer to create interesting results. In this lesson, you will use shape layers to build a dynamic background for the introduction of a reality series called DJ Quad Master. You’ll also use the Cartoon effect to change the overall look of the video. This effect performs best with video cards that support OpenGL. You may choose to skip the Cartoon effect exercise; if you do, you’ll be able to finish the project, but it won’t match the sample movie.
First, you’ll preview the final movie and set up the project.
- Make sure the following files are in the AECS5_CIB/Lessons/Lesson04 folder on your hard disk, or copy them from the Adobe After Effects CS5 Classroom in a Book DVD now:
• In the Assets folder: DJ.mov, gc_adobe_dj.mp3
• In the Sample_Movie folder: Lesson04.mov
- Open and play the Lesson04.mov sample movie to see what you will create in this lesson. When you are done, quit QuickTime Player. You may delete this sample movie from your hard disk if you have limited storage space.
As you start After Effects, restore the default application settings. See “Restoring default preferences” on page 3.
- Press Ctrl+Alt+Shift (Windows) or Command+Option+Shift (Mac OS) while starting After Effects. When asked whether you want to delete your preferences file, click OK.
- Click Close to close the Welcome screen.
After Effects opens to display a blank, untitled project.
- Choose File > Save As, and then navigate to the AECS5_CIB/Lessons/Lesson04/Finished_Project folder.
- Name the project Lesson04_Finished.aep, and then click Save.
Creating the composition
Next, you’ll import the files you need and create the composition.
- Double-click an empty area of the Project panel to open the Import File dialog box.
- Navigate to the AECS5_CIB/Lessons/Lesson04/Assets folder on your hard disk, Shift-click to select the DJ.mov and gc_adobe_dj.mp3 files, and then click Open.
- Choose File > New > New Folder to create a new folder in the Project panel.
- Name the folder Assets, press Enter or Return to accept the name, and then drag the footage items you imported into the Assets folder.

- Press Ctrl+N (Windows) or Command+N (Mac OS) to create a new composition.
- In the Composition Settings dialog box, name the composition Shapes Background, select the NTSC DV preset, and set the Duration to 10:00. Then click OK.

After Effects opens the new composition in the Timeline and Composition panels.
Adding a shape layer
One advantage of using a shape layer, rather than a solid layer, is that you can use the Fill option to create a linear or radial gradient. You’ll use the Rectangle tool to create a gradient background for the composition.
About shapes
After Effects includes five shape tools: Rectangle, Rounded Rectangle, Ellipse, Polygon, and Star. When you draw a shape directly in the Composition panel, After Effects adds a new shape layer to the composition. You can apply stroke and fill settings to a shape, modify its path, and apply animation presets. Shape attributes are all represented in the Timeline panel, and you can animate each setting over time.
The same drawing tools can create both shapes and masks. Masks are applied to layers to hide or reveal areas of an image, while shapes have their own layers. When you select a drawing tool, you can specify whether the tool draws a shape or a mask.
Drawing a shape
You’ll begin by drawing the rectangle that will contain the gradient fill.
- Select the Rectangle tool (
 ).
).

- Choose 50% from the Magnification Ratio pop-up menu at the bottom of the Composition panel so that you can see the entire composition.
- Click just outside the upper-left corner of the composition, and drag the tool to the area just outside the bottom-right corner, so that a rectangle covers the entire composition.

The shape appears in the Composition panel, and After Effects adds a shape layer named Shape Layer 1 to the Timeline panel.

Applying a gradient fill
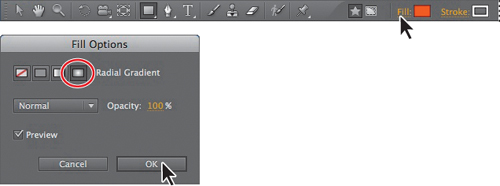
You can change the color of a shape by modifying its Fill settings in the Tools panel. Clicking the word Fill opens the Fill Options dialog box, where you can select the kind of fill, its blending mode, and its opacity. Clicking the Fill Color box opens the Adobe Color Picker if the fill is solid, or the Gradient Editor if the fill is a gradient.
- Click the word Fill to open the Fill Options dialog box.
- Select the Radial Gradient option (
 ), and click OK.
- Click the Fill Color box (next to the word Fill) to open the Gradient Editor.
- Select the white color stop (the left color stop below the gradient ramp), and select a light blue color. (We used R=100, G=185, B=240.)
- Select the black color stop (the right color stop below the gradient ramp), and select a dark blue color. (We used R=10, G=25, B=150.)
- Click OK to apply the new gradient colors.

Modifying gradient settings
The gradient is a little small, and it falls off quickly. You’ll adjust the settings for the shape layer to expand the gradient.
- In the Timeline panel, expand Shape Layer 1 > Contents > Rectangle 1 > Gradient Fill 1.
- Change the Start Point to 0, 225, and the End Point to 0, 740.

Now the gradient originates at the bottom of the screen and falls off near the top and edges of the composition.
- Hide the Shape Layer 1 properties.
- Select the layer name (Shape Layer 1), press Enter or Return, and type Background. Press Enter or Return to accept the new layer name.
- Click the Lock column (
 ) for the Background layer so that you don’t accidentally select it.

Creating custom shapes
Though there are only five shape tools, you can modify the paths you draw to create a wide variety of shapes. The Polygon tool, in particular, gives you great flexibility. You’ll use it to create rotating sun shapes in the background.
Drawing a polygon
By default, the Polygon tool draws a shape using the settings of the last shape drawn with that tool. However, by adjusting the points, position, rotation, outer radius, outer roundness, and other values, you can dramatically alter the initial shape. You’ll modify a simple polygon to create a much more interesting shape.
- Select the Polygon tool (
 ), which is hidden behind the Rectangle tool ().

- Drag a polygon shape in the Composition area.
- In the Timeline panel, expand Shape Layer 1 > Polystar 1 > Polystar Path 1.
- Change the Points to 6, the Rotation to 0 degrees, and the Outer Radius to 150.
- Change the Outer Roundness to -500%.

- Hide the Polystar Path 1 properties.
- Click the word Fill in the Tools panel to open the Fill Options dialog box. Select the Solid Color icon (), and then click OK.

- Click the Fill Color box, and select a bright yellow. (We used R= 250, G=250, B=0.) Click OK.
- Click the Stroke Color box, and select a bright gray. (We used R=230, G=230, B=230.) Click OK.
- Change the Stroke Width in the Tools panel to 5 pixels to emphasize the stroke.

Twisting a shape
The Twist path operation rotates a path more sharply in the center than at the edges. Positive values twist clockwise; negative values twist counterclockwise. You’ll use the Twist path operation to give the shape a little more definition.
- In the Timeline panel, open the Add pop-up menu next to Contents in the Shape Layer 1 layer, and choose Twist.

- Expand Twist 1.
- Change the Angle to 160.

- Hide the Polystar 1 properties.
- Choose File > Save to save your work so far.
Repeating a shape
You’ve created the basic shape that you want to use in the background, but you need many more copies of it to fill the composition. You could duplicate the shape manually, but instead, you’ll use the Repeater path operation to create multiple rows of suns.
- Select Shape Layer 1. You’re selecting the layer because you want to add the Repeater to the entire shape group, not just an individual shape.
- Open the Add pop-up menu, and then choose Repeater.
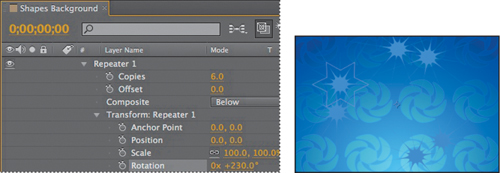
- Expand Repeater 1.
- Change the number of copies to 5.

The Repeater creates four copies of the shape, overlapping each other. You’ll separate them next.
- Expand Transform: Repeater 1.
- Change the Position to 345,0. The first value represents the x axis. To move the shapes closer together, use a smaller value for the x axis; to move them farther apart, use a larger value.

Now the shapes are farther apart. But you can’t see them all at the same time. To move all of the shapes, you need to move the entire shape layer.
- Hide the Transform: Repeater 1 properties.
- Select Shape Layer 1, and then press P to display the Position property for the layer. Change the Position to -50, 65.
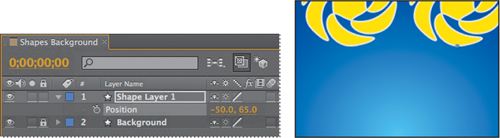
The shape layer is now in the upper-left corner of the composition. You’ll scale the layer and then add more rows.
- Select Shape Layer 1, and then press S to display the Scale property for the layer. Change the Scale to 50%.
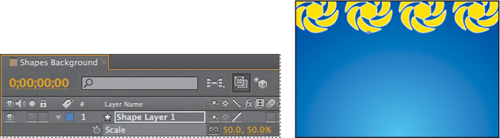
- Press S to hide the Scale property for the layer.
- Expand Shape Layer 1 > Contents.
- Select Shape Layer 1, and then choose Repeater from the Add pop-up menu.
- Expand Repeater 2 > Transform: Repeater 2.
- Change the Position to 0, 385 so that there is vertical space between the rows.

- Hide the Repeater 2 properties.
Rotating shapes
The suns should rotate on the background. You’ll animate the Rotation property for the original shape, and the changes will automatically apply to the duplicated shapes.
- In the Timeline panel, expand Shape Layer 1 > Contents > Polystar 1 > Transform: Polystar 1.
- Press the Home key, or drag the current-time indicator to the beginning of the timeline.
- Click the stopwatch (
 ) next to the Rotation property to create an initial keyframe for the layer.
 - Press the End key, or drag the current-time indicator to the end of the timeline.
- Change the Rotation to 3x+0 degrees. This setting causes the shape to rotate three times in 10 seconds.

- Hide the properties for Shape Layer 1.
- Drag the current-time indicator across the timeline to preview the rotation.
Blending shapes with the background
The rotating suns look good, but they contrast with the background too much. You want the character in the main video file to be the focus of attention. You’ll change the blending mode and opacity for the shape layer to make the background more subtle.
- Click Toggle Switches/Modes at the bottom of the Timeline panel.
- Choose Overlay from the Mode pop-up menu for the Shape Layer 1 layer.

- Select Shape Layer 1, and then press T to display the Opacity property for the layer.
- Change the Opacity to 25%.
- Press T to hide the Opacity property.
- Select Shape Layer 1, press Enter or Return, and type Suns for the layer name. Press Enter or Return again to accept the new name.
- Lock the layer to prevent accidental changes to it.

Creating stars
The Star tool is similar to the Polygon tool. A polygon is simply a star without an Inner Radius or Inner Roundness property; both tools create shapes called polystars. You’ll use the Star tool to draw a star for the background, and then use the Pucker & Bloat operation to change the star’s shape. Then you’ll duplicate the star and rotate the stars around the layer’s anchor point.
Drawing a star
The Star tool is grouped with the other shape tools. To draw a star, drag the Star tool in the Composition panel.
- Select the Star tool (
 ), which is hidden beneath the Polygon tool ().
 - Change the fill and stroke settings for the shape before you draw the star:
• Click the Fill Color box, and select a medium blue. (We used R=75, G=120, B=200.) Then click OK.
• Click the word Stroke, and click None (
 ) in the Stroke Options dialog box. Click OK.
 - Draw a star near the center of the composition. After Effects adds a shape layer named Shape Layer 1 to the Timeline panel.
- In the Timeline panel, expand Shape Layer 1 > Polystar 1 > Polystar Path 1.
- Change the Points to 6 and the Rotation to 150 degrees.
- Change the Inner Radius to 50 and the Outer Radius to 90. The radius values change the shape of the star.

- Expand the Transform: Polystar 1 properties.
- Change the Position to -180, -70.
- Collapse the Polystar 1 properties to hide them.
Applying Pucker & Bloat
After Effects includes a powerful path operation called Pucker & Bloat. You can pucker a shape by pulling the path’s vertices outward while curving segments inward, or bloat a shape by pulling the vertices inward while curving segments outward. Negative values pucker a shape; positive values bloat it. You’ll pucker the star to give it a distinctive look.
- Select Shape Layer 1.
- Choose Pucker & Bloat from the Add pop-up menu.
- Expand Pucker & Bloat 1.
- Change the Amount to -125 to pucker the star.

This star shape will go well in the background. Now you can duplicate and animate it.
Duplicating shapes
You want to have multiple stars in slightly different sizes rotating around the screen. You’ll use the Repeater path operation again, but this time you’ll modify the Transform properties for the Repeater to get different results.
- Select Shape Layer 1, and choose Repeater from the Add pop-up menu.
- Expand Repeater 1, and change the number of copies to 6.
Now there are six stars on the screen.
- Expand Transform: Repeater 1.
- Change the Position to 0, 0, and the Rotation to 230 degrees.
Because you applied the rotation to the Repeater, rather than the shape, each star rotated around the layer’s anchor point to a different degree. When you change the Transform properties for the Repeater, the change is multiplied by the number of copies created. For example, if there are 10 copies of a shape and you change the Rotation value to 10 degrees, the first shape retains the original value of 0, the second shape rotates 10 degrees, the third shape rotates 20 degrees, and so on. The same concept applies to each of the Transform properties.
In this project, the anchor point for the layer differs from the position of the shapes, so the chain of stars begins to wrap in on itself.
- Change the End Opacity to 65%. Each star is more transparent than the one before it.
- Hide the Repeater 1 properties.
- Select the Shape Layer 1 layer, and choose Repeater from the Add pop-up menu again to add another Repeater.
- Expand Repeater 2 > Transform: Repeater 2.
- Change the Position to -140, 0 and the Rotation to 40 degrees.
- Change the Scale to 80%.
Each duplicate star will be smaller than the one before it. Because there are three duplicates of the first group of stars, some will be 64% the size of the original.
- Change the End Opacity to 0%.

- Collapse the Repeater 2 properties to hide them.
- Choose File > Save.
Rotating shapes
You’ve rotated the stars around the anchor point for the layer. Now you want to animate each star to rotate around its own axis. To achieve this, you’ll animate the Rotation property for the polystar shape itself, not the layer or the Repeater.
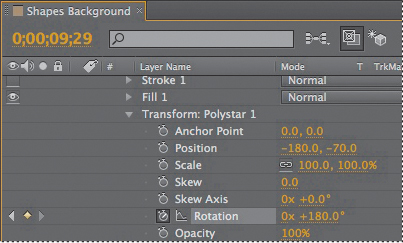
- Expand Polystar 1 > Transform: Polystar 1.
- Press the Home key, or drag the current-time indicator to the beginning of the timeline.
- Click the stopwatch icon () for the Rotation property to create an initial keyframe.
- Press the End key, or drag the current-time indicator to the end of the timeline.
- Change the Rotation to 180 degrees.
- Manually preview the composition by dragging the current-time indicator along the timeline. After you confirm that everything is rotating, collapse the layer.
- Rename the Shape Layer 1 layer Stars, and press Enter or Return to accept the layer name.
- Lock the Stars layer.
Incorporating video and audio layers
The background is in place. Now you can add the video of the DJ and the audio track that accompanies it.
Adding audio and video files
You imported files at the beginning of the lesson. Now you’ll add them to the composition. The DJ.mov clip has no background and was rendered with a premultiplied alpha channel, so the underlying layers are visible. You’ll learn about keying footage in Lesson 9, “Using the Roto Brush Tool”
- Press Home, or drag the current-time indicator to the beginning of the composition.
- Open the Assets folder in the Project panel.
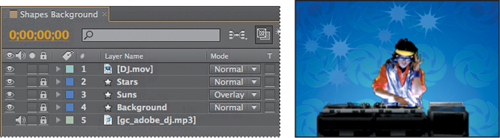
- Drag the DJ.mov footage item to the Timeline panel, placing it above the other layers.
- Drag the gc_adobe_dj.mp3 item from the Project panel to the Timeline panel, placing it beneath the other layers.
- Lock the audio layer that you just added to the Timeline panel so that you can’t accidentally select and move it later. Then choose File > Save.
Trimming the work area
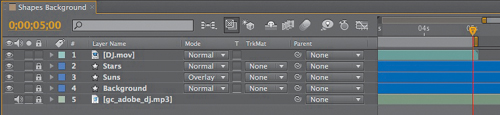
The DJ.mov clip is only 5 seconds long, but the composition is 10 seconds. If you rendered this movie now, the DJ would disappear halfway through the movie. To fix the problem, you’ll move the work area end point to the 5-second mark. Then only the first 5 seconds will render.
- Move the current-time indicator to the 5-second mark. You can drag the current-time indicator in the Timeline panel, or click the Current Time box and then type 500.
- Press N to move the work area end point to the current time.
Applying a Cartoon effect
After Effects includes a Cartoon effect, which makes it easy to create a stylized look for your video. Since this intro for the DJ Quad Master reality series is very different from other reality series, the Cartoon effect will work perfectly here.
The Cartoon effect performs best on systems with video cards that support OpenGL. If you’re not using OpenGL, you can choose to skip this exercise and continue with “Adding a title bar.”
- Select the DJ.mov layer in the Timeline panel.
- Choose Effect > Stylize > Cartoon.
The Cartoon effect performs three operations on a layer. First, it smooths the layer, removing a great deal of detail. Therefore, it works best on video footage rather than a graphic layer, such as the background in this project. Next, the Cartoon effect emphasizes the edges of shapes, based on their brightness values. Finally, it simplifies the color in the layer.
Tip
For interesting results, try changing the Cartoon Render options from Fill & Edges to Fill (for a color-only effect) or Edges (for black-and-white line art).
The default settings do a pretty good job, but you’ll fine-tune them in the Effect Controls panel.
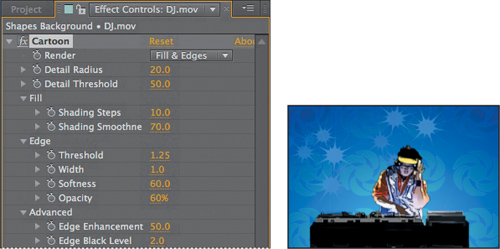
- In the Effect Controls panel, choose Fill from the Render pop-up menu.
For this project, you’re selecting Fill only temporarily so that you can more easily see the results of the Fill settings as you make adjustments.
- Change the Detail Radius amount to 20 and the Detail Threshold amount to 50.
These settings control how much detail is removed and how it is smoothed. Higher values remove more detail.
- In the Fill area, change the Shading Steps value to 10, and make sure the Shading Smoothness value is 70.

These settings determine how color is reduced and how gradients are preserved. In this project, changing these values reduces the number of colors in the DJ’s shirt, creating a simpler design.
- Choose Edges from the Render pop-up menu so you can focus on the edge controls. The layer becomes black and white temporarily.
- In the Edge area, change the Threshold to 1.25 and the Width to 1.
These settings reduce the number of black lines on the subject.
- Leave the Softness value at its current setting (60), but lower the Opacity to 60% to make the lines more subtle.

- Choose Fill & Edges from the Render pop-up menu to restore the color.
- Expand Advanced to see the advanced controls, which give you precise control over the edges.
- Change the Edge Enhancement value to 50 to sharpen the edges of the layer.
- Change the Edge Black Level to 2 to fill in more areas of the image with solid black. This makes the image even more cartoonish.
- Lock the DJ.mov layer to ensure you don’t accidentally make changes to it as you continue the project.
Adding a title bar
You’ve created an exciting background and added the video of the DJ and the audio track. The only thing missing is the title to identify the program. You’ll use the Rectangle tool and path operations to create a dynamic shape, and then you’ll add the text.
Creating a self-animating shape
Wiggle Paths turns a standard rectangle into a series of jagged peaks and valleys. You’ll use it to create a shape that looks like a soundwave. Because the operation is self-animating, you only need to change a few properties for the entire shape to move on its own.
- Select the Rectangle tool (), which is hidden under the Star tool ().
- Click the Fill Color box, and select a light yellow. (We used R=255, G=255, B=130.) Click OK.
- Click the word Stroke. In the Stroke Options dialog box, select Solid Color, and click OK.
- Click the Stroke Color box, and select a light gray. (We used R=200, G=200, B=200.) Click OK.
- Change the Stroke Width to 10 pixels.
- Draw a rectangle across the composition—near the bottom and approximately 50 pixels high.
- In the Timeline panel, expand Rectangle 1 > Rectangle Path 1.
- Unlink the Size values, and then change them to 680, 50.
- Expand Stroke 1, and then change the Stroke Opacity to 30%.

- Hide the Rectangle 1 properties.
- Select Shape Layer 1, and choose Wiggle Paths from the Add pop-up menu.
- Expand Wiggle Paths 1. Then change the Size to 150 and the Detail to 80.
- Select Smooth from the Points menu to make the path less jagged.
- Change Wiggles/Second to 5 to speed up the movement.
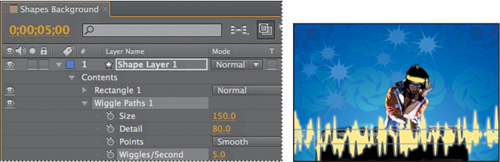
- Move the current-time indicator across the timeline to see the shape move. It’s not exactly an audio waveform, but it’s a stylistic version of one.
- Hide all the properties for the layer.
- Rename the layer Lower Third, and then lock the layer.
Adding text
All you need to do now is add the title of the program. You’ll use an animation preset to make the text stand out.
- Press Home, or move the current-time indicator to the beginning of the composition.
- Select the Horizontal Type tool (
 ). In the Character panel, select a sans serif font, such as Arial Black, and specify a size of 60 pixels.
 - Click the Fill Color box in the Character panel, and select black (R=0, G=0, B=0). Then click the Stroke Color box, and select white (R=255, G=255, B=255).
- Change the Stroke Width to 2 pixels.
- Click an insertion point in the Composition panel, and type DJ Quad Master.
- Select the Selection tool (
 ), and then reposition the text over the waveform shape.

- Select the text in the Composition panel, and choose Animation > Browse Presets. Adobe Bridge opens, displaying the available animation presets.
- Navigate to the Text/3D Text folder, and then double-click the 3D Rotate In By Character thumbnail. After Effects applies the preset to the selected text.

- Make a RAM preview to see your movie! Press the spacebar to stop the preview.

Using Brainstorm to experiment
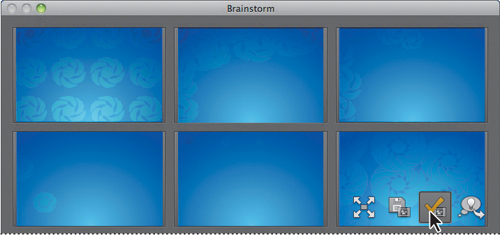
The Brainstorm feature makes it easy to try different settings for effects, and to quickly apply the one you like. To use the Brainstorm feature, select the layer or properties you want to include, and then click the Brainstorm icon. The Brainstorm dialog box displays multiple variations of your image, based on randomized settings. You can save one or more of the variants, apply one to a composition, or redo the Brainstorm operation.
The Brainstorm feature works especially well with animation presets. You’ll use it to explore possibilities for the Suns layer you created for this project.
- Save the project, and then choose File > Save As. Name the new copy of the project Brainstorm, and save it in the Lesson04/Finished_Project folder.
- Unlock the Suns layer in the Timeline panel.
- Click the Solo switches (
 ) for the Suns and Background layers, so that you see only these two layers in the Composition panel.

You can isolate one or more layers for animating, previewing, or rendering by soloing. Soloing excludes all other layers of the same type from the Composition panel.
- Expand the Suns layer, and then select Contents.
- Click the Brainstorm icon (
 ) at the top of the Timeline panel to open the Brainstorm dialog box.
 - Select the level of randomness Brainstorm should apply to the layer properties. The default value is 25%; for drastic changes, try 100%.
- Click the Brainstorm button. The feature randomizes the properties and displays variants. You can click the Brainstorm button multiple times; each time, it randomizes the settings by the percentage you’ve selected.

- When you find a variation you like, move the pointer over the variant, and then click the check mark icon to apply it to the composition.
Review questions
1 What is a shape layer, and how do you create one?
2 How can you quickly create multiple copies of a shape?
3 What is the advantage of using the Brainstorm feature?
4 What does the Pucker & Bloat path operation do?
5 How does the Cartoon effect work?
Review answers
1 A shape layer is simply a layer that contains a vector graphic called a shape. To create a shape layer, draw a shape directly in the Composition panel using any of the drawing tools or the Pen tool.
2 To quickly duplicate a shape multiple times, apply a Repeater operation to the shape layer. The Repeater path operation creates copies of all paths, strokes, and fills included in the layer.
3 The Brainstorm feature creates variants of your composition based on randomized settings in the properties you selected. The feature makes it possible to explore numerous possibilities quickly and easily, and to save or apply them with a single click.
4 The Pucker & Bloat operation pulls the path’s vertices outward while curving segments inward (puckering), or pulls the vertices inward while curving segments outward (bloating). Negative values pucker a shape; positive values bloat it.
5 The Cartoon effect stylizes a layer by removing some details and emphasizing others, and by simplifying color. You can change settings in the Effect Controls panel to fine-tune the effect’s behavior.