Chapter 14. Rendering and Outputting
Lesson overview
In this lesson, you’ll learn how to do the following:
• Create render-settings templates.
• Create output-module templates.
• Process multiple output modules.
• Select the appropriate compressor for your delivery format.
• Use pixel aspect ratio correction.
• Output the final animation for NTSC broadcast video.
• Produce a test version of a composition.
• Render and output a web version of the final animation.
The total amount of time required to complete this lesson depends in part on the speed of your processor and on the amount of RAM available for rendering. The amount of hands-on time required is less than an hour. Copy the Lesson14 folder into the Lessons folder that you created on your hard drive for these projects (or create it now), if you haven’t already done so. As you work on this lesson, you’ll preserve the start files. If you need to restore the start files, copy them from the Adobe After Effects CS5 Classroom in a Book DVD.
![]()

The success of any project depends on your ability to deliver it in the format you need, whether it’s for the web or broadcast output. Using Adobe After Effects, you can create timesaving templates, and then render and export a final composition in a variety of formats and resolutions.
Getting started
This lesson continues from the point at which all preceding lessons end: when you’re ready to output the final composition. In order to produce several versions of the animation for this lesson, you’ll explore options available within the Render Queue panel. After creating render-settings and output-module templates, you’ll produce both a broadcast version and a web version of the final movie. For this lesson, we provide you with a starting project file that is essentially the final composition from Lesson 5 of this book.
- Make sure the following files are in the AECS5_CIB/Lessons/Lesson14 folder on your hard disk, or copy them from the Adobe After Effects CS5 Classroom in a Book DVD now:
• In the Assets folder: CarRide.psd, GordonsHead.mov, HeadShape.ffx, piano.wav, studer_Comcast.jpg, studer_Map.jpg, studer_music.jpg, studer_Puzzle.jpg, and studer_Real_Guys.jpg
• In the Start_Project_File folder: Lesson14_Start.aep
• In the Sample_Movies folder: Lesson14_JPEG2000_Final.mov, Lesson14_MPEG4_Final.mov, Lesson14_NTSC_Final.mov
- Open and play the sample movies for Lesson 14, which represent different final versions of the animation that you created in Lesson 5. When you’re done viewing the sample movies, quit QuickTime Player. You may delete the sample movies from your hard disk if you have limited storage space.
As always, when you begin the lesson, restore the default application settings for After Effects. See “Restoring default preferences” on page 3.
- Press Ctrl+Alt+Shift (Windows) or Command+Option+Shift (Mac OS) while starting After Effects. When asked whether you want to delete your preferences file, click OK. Click Close to close the Welcome screen.
- Choose File > Open Project.
- Navigate to the AECS5_CIB/Lessons/Lesson14/Start_Project_File folder, select the Lesson14_Start.aep file, and click Open.
- Choose File > Save As.
- In the Save As dialog box, navigate to the AECS5_CIB/Lessons/Lesson14/Finished_Project folder.
- Name the project Lesson14_Finished.aep, and then click Save.
- Choose Window > Render Queue to open the Render Queue panel.

Creating templates for the rendering process
In previous lessons, you selected individual render and output-module settings on those occasions when you output your compositions. In this lesson, you’ll create templates for both render settings and output-module settings. These templates are presets that you can use to streamline the setup process when you render items for the same type of delivery format. After you define these templates, they appear in the Render Queue panel on the appropriate pop-up menu (Render Settings or Output Module). Then, when you’re ready to process a job, you can simply select the template that is appropriate for the delivery format that your job requires, and the template applies all the settings.
Creating a render-settings template for full resolution
The first template you’ll create is for full-resolution output.
- Choose Edit > Templates > Render Settings to open the Render Settings Templates dialog box.
- In the Settings area, click New to open the Render Settings dialog box.

- In the Render Settings area, confirm that Best is selected for Quality and Full for Resolution.
- In the Time Sampling area, do the following:
• For Frame Blending, make sure On For Checked Layers is selected.
• For Motion Blur, make sure On For Checked Layers is selected.
• For Time Span, choose Length Of Comp.
• In the Frame Rate area, make sure Use Comp’s Frame Rate is selected.

- Click OK to return to the Render Settings Templates dialog box. All the settings you selected appear in the lower half of the dialog box. If you need to make any changes, click Edit, and then adjust your settings.
- For Settings Name, type Final Render_Fullres (for full resolution).

- At the top of the dialog box, in the Defaults area, choose Final Render_Fullres for Movie Default. Then click OK to close the dialog box.

Tip
If you want to save a render-settings template for use on another system, click Save All in the Render Settings Templates dialog box before you close it in step 7. Save the file with an .ars extension, and copy it to the other system. There, choose Edit > Templates > Render Settings, click Load, and select the .ars file to load the settings you saved.
Final Render_Fullres is now the default Render Settings option, and will appear (instead of Current Settings) when you add a composition to the Render Queue panel to make a movie, which you’ll do later in this lesson.
Creating a render-settings template for test renderings
Next, you’ll create a second render-settings template, selecting settings appropriate for rendering a test version of your final movie. A test version is smaller—and therefore renders faster—than a full-resolution movie. When you work with complex compositions that take relatively long times to render, it is a good practice to render a small test version first. This helps you find any final tweaks or blunders that you want to adjust before you take the time to render the final movie.
- Choose Edit > Templates > Render Settings. The Render Settings Templates dialog box appears.
- In the Settings area, click New to create a new template.
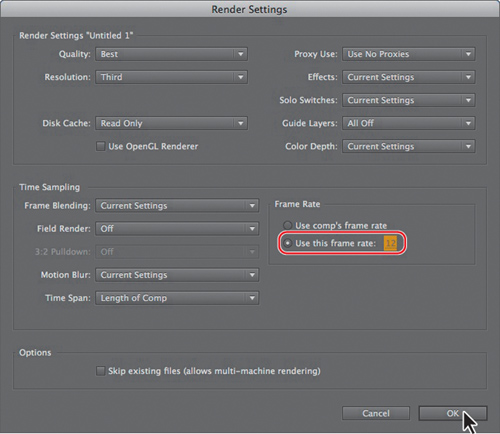
- In the Render Settings area of the Render Settings dialog box, do the following:
• Leave Quality at Best.
• For Resolution, choose Third, which reduces the linear dimension of the composition to one-third.
- In the Time Sampling area, do the following:
• For Frame Blending, choose Current Settings.
• For Motion Blur, choose Current Settings.
• For Time Span, choose Length Of Comp.
- In the Frame Rate area, select Use This Frame Rate, and type 12 (fps). Then click OK to return to the Render Settings Templates dialog box.
- For Settings Name, type Test_lowres (for low resolution).
- Examine your settings, which now appear in the lower half of the dialog box. If you need to make any changes, click Edit to adjust the settings. Then click OK.

The Test_lowres option will be available on the Render Settings pop-up menu in the Render Queue panel.
You have created two render-settings templates. One is for a full-resolution final version, and one is for a low-resolution test version of your final composite.
Creating templates for output modules
Using processes similar to those in the previous section, you’ll create templates to use for output-module settings. Each will include unique combinations of settings that are appropriate for a specific type of output.
Creating an output-module template for broadcast renderings
The first template you’ll create for output-module settings is appropriate for an NTSC broadcast-resolution version of your final movie.
- Choose Edit > Templates > Output Module.
- In the Settings area, click New to open the Output Module Settings dialog box.
- In the Output Module area, do the following:
• For Format, choose QuickTime.
• For Post-Render Action, choose Import.
- In the Video Output area, click Format Options.

- In the QuickTime Options dialog box, choose Animation from the Video Codec menu. Click OK to close the dialog box.

- Review the settings in the Output Module Settings dialog box to make sure that the Channels pop-up menu is set to RGB and Depth is set to Millions Of Colors.

- Select the Audio Output option, and make sure that the pop-up menus are set (from left to right) to 44.100 kHz, 16 Bit, Stereo.

- Click OK to return to the Output Module Templates dialog box. Review the settings in the lower half of the dialog box; click Edit if you need to adjust your settings.
- For Settings Name, type Final Render_QT_audio (to remind you that this template for QuickTime includes audio).
- In the Defaults area, choose Final Render_QT_audio from the Movie Default menu. Then click OK.

Tip
As with the render-settings templates, you can save output-module templates for use on other systems. Click Save All in the Output Module Templates dialog box. Save the file with an .aom extension, and copy it to another system. There, choose Edit > Templates > Output Module, click Load, and select the .aom file to load the settings.
The Final Render_QT_audio template is now the default selection for the Output Module pop-up menu and will appear (instead of Lossless) each time you add a composition to the Render Queue panel.
Creating a low-resolution output-module template
Next, you’ll create a second output-module template with settings appropriate for producing a low-resolution test version of the movie. In this case, the settings that you’ll select are also appropriate for a web version of the movie.
- Choose Edit > Templates > Output Module to open the Output Module Templates dialog box.
- In the Settings area, click New to create a new template.
- In the Output Module Settings dialog box, for Format, choose QuickTime.
- For Post-Render Action, choose Import.
- In the Video Output area, click Format Options, and then select the following settings in the QuickTime Options dialog box:
• For Video Codec, choose MPEG-4 Video. This compressor automatically determines the color depth.

• Set the Quality slider to 80.
• In the Advanced Settings area, select Key Frame Every, and then type 30 (frames).
• In the Bitrate Settings area, select Limit Data Rate To, and type 150 (kbps).
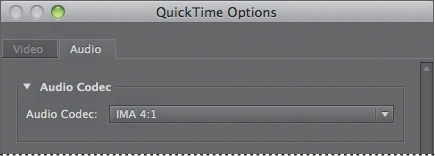
- Select the Audio tab, and choose IMA 4:1 from the Audio Codec menu.
- Click OK to close the QuickTime Options dialog box and return to the Output Module Settings dialog box.
- Select Audio Output at the bottom of the dialog box, if it’s not already selected. Then choose the following audio settings, from left to right:
• For Rate, choose 22.050 khz.
• For Use, select Stereo.

- Click OK to close the Output Module Settings dialog box.
- In the lower half of the Output Module Templates dialog box, examine your settings, and click Edit if you need to make any changes.
- For Settings Name, type Test_MPEG4, and then click OK. Now this output template will be available on the Output Module pop-up menu in the Render Queue panel.
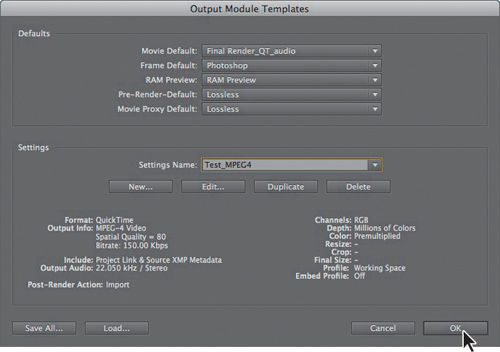
As you might expect, greater compression and lower audio sample rates create smaller file sizes, but they also reduce the quality of the output. However, this low-resolution template is fine for creating test movies or movies for the web.
Exporting to different output media
Now that you have created templates for your render settings and output modules, you can use them to export different versions of the movie.
Preparing to output a test movie
First, you’ll produce the test version, selecting the Test_lowres render-settings template and the Test_MPEG4 output-module template that you created.
Tip
Alternatively, you can select the Lesson05 composition in the Project panel and choose Composition > Add To Render Queue.
- Drag the Lesson05 composition from the Project panel to the Render Queue panel.

In the Render Queue panel, note the default settings in the Render Settings and Output Module pop-up menus. You’ll change those settings to your low-resolution templates.
- Choose Test_lowres from the Render Settings menu.
- Choose Test_MPEG4 from the Output Module menu.
- Click the orange, underlined words next to Output To.

- In the Output Movie To dialog box, locate the AECS5_CIB/Lessons/Lesson14 folder, and create a new folder called Final_Movies:
• In Windows, click the Create New Folder icon, and then type a name for the folder.
• In Mac OS, click the New Folder button, name the folder, and click Create.
- Open the Final_Movies folder.
- Name the file Final_MPEG4.mov, and then click Save to return to the Render Queue panel.

- Choose File > Save to save your work.
You’ll do a few more things before you render the movie. Leave the Render Queue panel open for the next exercise.
Working with multiple output modules
Next, you’ll add another output module to this render queue item so that you can compare the results of two compressors. You’ll set this one for JPEG 2000 compression.
- With the Lesson05 composition still selected in the Render Queue panel, choose Composition > Add Output Module. A second set of Output Module and Output To options appears directly beneath the first.

- From the lower Output Module pop-up menu, choose Test_MPEG4.
- Click the orange, underlined words Test_MPEG4 to open the Output Module Settings dialog box, and then click Format Options in the Video Output area.
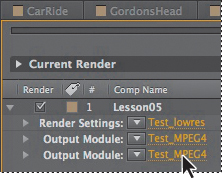
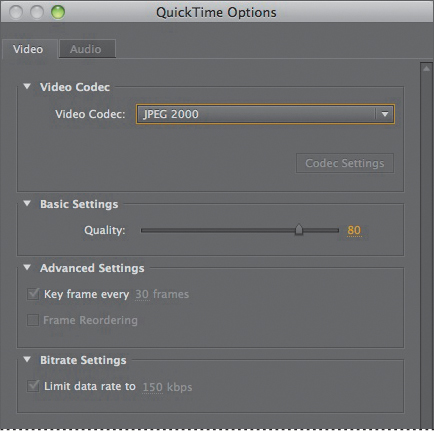
- In the QuickTime Options dialog box, choose JPEG 2000 from the Video Codec menu.
The other settings should remain the same from the Test_MPEG4 template, as shown here.
- Click OK to close the QuickTime Options dialog box.
- Click OK again to close the Output Module Settings dialog box.
- Next to Output To, click the orange, underlined words Lesson05.mov to open the Output Movie To dialog box.
- Name the movie Final_JPEG2000.mov, and save it in the AECS5_CIB/Lessons/Lesson14/Final_Movies folder.

- Choose File > Save to save the project, and then click the Render button in the Render Queue panel. After Effects renders the movie and processes both of these formats simultaneously.

When the processing is complete, both the Final_MPEG4 and Final_JPEG2000 movies appear in the Project panel.

Note
You may find it helpful to further reduce the size of the movie before posting it to a website. You may want to create streaming video, or simply reduce the size based on the majority of the audience’s available bandwidth. You can do this with a media-compression or media-cleaner application specifically designed for this purpose.
You can double-click each movie to preview it in the Project panel and compare the results. Then, in Explorer or the Finder, select the movie that looks better to you, and rename it Final_Web.mov (do not rename it within After Effects). This version is ready for Gordon Studer’s prospective clients to view on the web.
If you need to make any final changes to the animation, reopen the composition and make those adjustments now. Remember to save your work when you finish, and then output the test movie again using the appropriate settings. After examining the test movie and making any necessary changes, you’ll proceed with outputting the movie for full-resolution broadcast.
Preparing the composition for full-resolution output
Next, you’ll prepare to render and output the final composition at full resolution. This animation is intended primarily for NTSC video output. You’ll begin by creating a new composition at the appropriate size for your final delivery format.
- Choose Composition > New Composition.
- In the Composition Settings dialog box, do the following:
• For Name, type Final Comp NTSC.
• For Preset, choose NTSC D1. This automatically sets the dimensions (720 x 486), pixel aspect ratio (D1/DV NTSC), and frame rate (29.97).
• For Resolution, choose Full.
• For Duration, type 2000 to specify 20 seconds, and then click OK.

The new, empty composition opens in the Composition and Timeline panels.
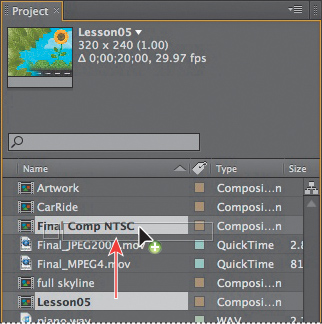
- In the Project panel, drag the Lesson05 composition onto the Final Comp NTSC composition icon.
Using pixel aspect ratio correction
As you preview the animation, you may notice that the items in the Composition panel now appear a bit wider than before. That’s because this D1 NTSC composition has a nonsquare pixel aspect ratio. However, your computer monitor displays images using square pixels. Therefore, the images that you see in the Composition panel appear stretched unless you enable a feature called pixel aspect ratio correction. Pixel aspect ratio correction squeezes the view of the composition slightly to display the image as it will appear on a video monitor. By default, this feature is turned off, but you can easily turn it on.
- Go to 3:00, where there are a few elements, including Gordon Studer’s masked head, in the Composition panel.
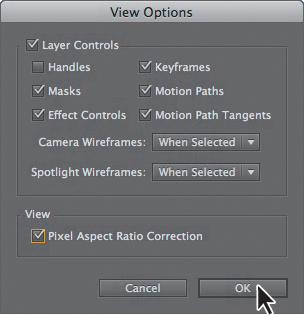
- Choose View Options from the Composition panel menu.
- In the View Options dialog box, select Pixel Aspect Ratio Correction (in the View area). Then click OK to close the dialog box.
The image in the Composition panel is squeezed, appearing (at a modified pixel aspect ratio) as it will when this item is rendered, laid off to tape, and viewed on a video monitor. The layers in the Composition panel may appear a bit jagged while you have this view turned on. You’ll want to turn it off to see your images with full anti-aliasing. This view does not affect rendering for final output.
- Turn pixel aspect ratio correction off and on a couple of times by clicking the Toggle Pixel Aspect Ratio Correction button (
 ) at the bottom of the Composition panel.

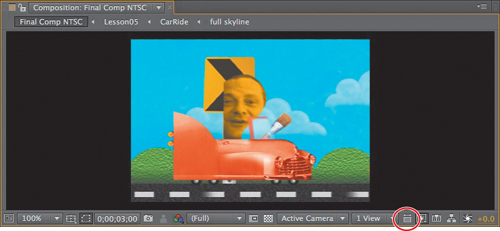
Using pixel aspect ratio correction, you can work in a composition with a nonsquare pixel aspect ratio but still view your images as they would appear on a video monitor.
Rendering the final movie for broadcast
Now, you’ll render and output the NTSC broadcast version of your final animation. This may take half an hour or more, depending on your system.
- Click the Render Queue panel tab to bring the panel forward, and hide the Lesson05 render details so you can focus on your next renders.
- Drag the Final Comp NTSC composition from the Project panel to the Render Queue panel below the Lesson05 composition.
- Next to Output To, click the orange, underlined words Final Comp NTSC.mov to open the Output Movie To dialog box.
- Name the movie Final_NTSC.mov (indicating that this item will be rendered at NTSC D1 resolution), and specify the AECS5_CIB/Lessons/Lesson14/Final_Movies folder. Then click Save to return to the Render Queue panel.

The Final Render_Fullres setting is selected in the Render Settings menu and the Final Render_QT_audio setting is selected in the Output Module menu because you set these as the defaults when you created the templates.
- Save the project one more time, and then click the Render button.
- When After Effects has finished rendering and outputting the file, close the Render Queue panel.
- In the Project panel, double-click the Final_NTSC.mov file to open it in the Footage panel, and then make a RAM preview. Or, you can play the movie from the Explorer or Finder.
Note
Because this movie is so large, it may not play back in real time in QuickTime Player. If you have a video playback card installed on your system, output the movie after choosing the appropriate compressor and frame size for that card in the QuickTime Options dialog box. Import the movie into your editing software, and play it back using your hardware for real-time playback.
As you play the movie, compare your final rendered output to the NTSC sample movie you watched at the beginning of this lesson. If necessary, reopen the composition and make changes. Then save the project and render the movie again.
You have created both a web version and a broadcast version of the final animation.
Congratulations! You have completed all the lessons in Adobe After Effects CS5 Classroom in a Book.
While this book is intended to give you a good foundation for working with After Effects, it can’t cover everything. To continue learning about After Effects, check out the resources described in the Getting Started section at the beginning of the book.
Review questions
1 Name two types of templates, and explain when and why to use them.
2 What is compression, and what are some issues associated with it?
Review answers
1 In After Effects, you can create templates for both render settings and output-module settings. These templates are presets that you can use to streamline the setup process when you render items for the same type of delivery format. After you define these templates, they appear in the Render Queue panel on the appropriate pop-up menu (Render Settings or Output Module). Then, when you’re ready to render a job, you can simply select the template that is appropriate for the delivery format that your job requires, and the template applies all the settings.
2 Compression is essential to reduce the size of movies so that they can be stored, transmitted, and played back effectively. When exporting or rendering a movie file for playback on a specific type of device at a certain bandwidth, you choose a compressor/decompressor, or codec, to compress the information and generate a file readable by that type of device at that bandwidth. A wide range of codecs is available; no single codec is the best for all situations. For example, the best codec for compressing cartoon animation is generally not efficient for compressing live-action video. When compressing a movie file, you can fine-tune it for the best-quality playback on a computer, video playback device, the web, or from a DVD player. Depending on which encoder you use, you may be able to reduce the size of compressed files by removing artifacts that interfere with compression, such as random camera motion and excessive film grain.
