Chapter 12. Using 3D Features
Lesson overview
In this lesson, you’ll learn how to do the following:
• Animate 3D objects.
• Add reflections to 3D objects.
• Use an adjustment layer to blur multiple layers.
• Animate a camera layer.
• Create and position light layers.
• Add a Linear Wipe effect to reveal objects in the composition.
This lesson will take approximately an hour to complete. Copy the Lesson12 folder into the Lessons folder that you created on your hard drive for these projects (or create it now), if you haven’t already done so. As you work on this lesson, you’ll preserve the start files. If you need to restore the start files, copy them from the Adobe After Effects CS5 Classroom in a Book DVD.
![]()

In Lesson 11, you created 3D objects and positioned them in a virtual world. Animation, lights, adjustment layers, and animated cameras complete the composition.
Getting started
This lesson picks up where the previous lesson left off. In Lesson 11, “Building 3D Objects,” you created the first half of an animation promoting a book. So far, a 3D representation of the book and 3D text are positioned in 3D space. In this lesson, you will complete the project by adding lights, effects, reflections, and other elements to the composition. In doing so, you’ll learn how to use additional 3D features available in Adobe After Effects.
Begin with the Lesson12_Start.aep project file provided with this book, or, if you completed Lesson 11, you can use the project file that you saved at the end of that lesson. The two files should be equivalent.
- Make sure the following files are in the AECS5_CIB/Lessons/Lesson12 folder on your hard disk, or copy them from the Adobe After Effects CS5 Classroom in a Book DVD now:
• In the Assets folder: AEBack.jpg, AEFront.jpg, AESpine.jpg, brush.psd
• In the Sample_Movie folder: Lesson12.mov
• In the Start_Project folder: Lesson12_Start.aep
- Open and play the Lesson12.mov file to see what you will create in this lesson. When you are done, quit QuickTime Player. You may delete this sample movie from your hard disk if you have limited storage space.
When you begin this lesson, restore the default application settings for After Effects. See “Restoring default preferences” on page 3.
- Press Ctrl+Alt+Shift (Windows) or Command+Option+Shift (Mac OS) while starting After Effects. When asked whether you want to delete your preferences file, click OK. Click Close to close the Welcome screen.
- Choose File > Open Project.
- Do one of the following:
• Navigate to the AECS5_CIB/Lessons/Lesson12/Start_Project folder, select the Lesson12_Start.aep file, and click Open.
• Navigate to the AECS5_CIB/Lessons/Lesson11/Finished_Project folder, select the Lesson11_Finished.aep file, and click Open.
- Choose File > Import > File, and then navigate to the AECS5_CIB/Lessons/Lesson12/Assets folder.
- Select the brush.psd file, and click Open.
- In the Brush.psd dialog box, select Footage from the Import Kind menu, select Merged Layers, and click OK.
- Choose File > Save As.
- Navigate to the AECS5_CIB/Lessons/Lesson12/Finished_Project folder on your hard disk. Name the project Lesson12_Finished.aep, and then click Save.

Animating 3D objects
You’ve animated objects in earlier lessons, but 3D objects can be animated across the x, y, and z axes. You’ll animate the 3D Text layer to make the composition more dynamic.
- Click the Final Comp tab in the Timeline panel if it’s not already active.
- Move the current-time indicator to 0:15.
- Select the 3D Text layer in the Timeline panel, and press the P key to reveal the Position property for the layer.
- Click the stopwatch icon next to the Position property to set an initial keyframe for the layer.

- Press the Home key, or move the current-time indicator to the beginning of the time ruler.
- In the Composition panel, click the x-axis control (the red arrow) on the 3D axis, and drag the 3D Text layer to the right until it is completely out of the frame.

When you select only one axis in the Composition panel, you restrict movement of the 3D layer to that axis.
- Manually move the current-time indicator from 0:00 to 0:15 to see the text come into the frame. It arrives abruptly; you’ll ease that transition.
- Click the Position property name to select all the Position keyframes for the 3D Text layer.
- Choose Animation > Keyframe Assistant > Easy Ease.

- Press the P key to hide the Position property.
Adding reflections to 3D objects
In the real world, objects cast reflections in certain lighting conditions. Those reflections add depth and interest. After Effects can’t cast real reflections on surfaces, but you can add them by duplicating layers and applying a blur effect.
Creating a simple reflection
A reflection is a mirror image of an object, though it’s usually a little distorted, depending on the light source. You’ll duplicate objects to create a simple reflection.
- Go to 0:15, if you’re not there already, so you can see the text.
- Select the 3D Text layer in the Timeline panel, and press Ctrl+D (Windows) or Command+D (Mac OS) to duplicate the layer.
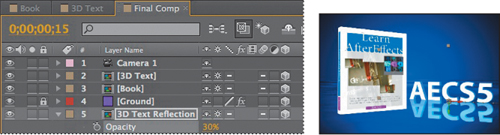
- Select the duplicate layer, press Enter or Return, and rename it 3D Text Reflection. Press Enter or Return again.
- Move the 3D Text Reflection layer below the Ground layer in the Timeline panel.
The duplicate layer is in the same position as the original 3D Text layer. You’ll flip it to create the reflection.
- With the 3D Text Reflection layer selected in the Timeline panel, choose Layer > Transform > Flip Vertical.

- Press the T key to reveal the Opacity property, and change the Opacity value to 30%. Then press the T key again to hide the Opacity property.
You’ve created a reflection for the text. Now, you’ll do the same thing for the book.
- Select the Book layer in the Timeline panel, and press Ctrl+D (Windows) or Command+D (Mac OS) to duplicate the layer.
- Rename the duplicate layer Book Reflection, and move it below the Ground layer in the Timeline panel.
- With the Book Reflection layer selected, press S to reveal the Scale property, click the Constrain Proportions icon to unlink the values, and change the y-axis value to -100%.
- Press the T key to reveal the Opacity property, change the Opacity value to 30%, and press T again to hide the Opacity property.
Adding an adjustment layer
A simple reflection is pretty good, but a blur would make it look more realistic. You’ll use an adjustment layer to apply a blur effect. Effects applied to an adjustment layer affect all the layers beneath it.
- Choose Layer > New > Adjustment Layer. After Effects adds a new adjustment layer at the top of the layer stack.
- Move the Adjustment Layer 1 layer below the Ground layer in the Timeline panel.

Moving the adjustment layer below the Ground layer ensures that it will affect only the reflection and Backdrop layers.
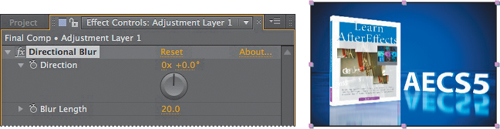
- With the Adjustment Layer 1 layer selected, choose Effect > Blur & Sharpen > Directional Blur.
- In the Effect Controls panel, change the Blur Length to 20. Leave the Direction setting at its default, as the reflections are perpendicular to the floor.
- Lock the Adjustment Layer 1 layer to prevent any accidental changes to it.
- Choose File > Save to save your work so far.
Animating a camera
In Lesson 11, you created a camera layer, Camera 1. So far, that camera has been steady. Now, you’ll animate the camera, so that it begins far from the 3D objects and moves closer to them as the movie progresses.
- Go to 4:00 in the Timeline panel. This is the point where the camera will come to rest, after it’s moved closer to the subject.
- Select the Camera 1 layer in the Timeline panel, and press P to reveal its Position property.
- Press the Shift key as you press A to reveal the Point Of Interest property for the Camera 1 layer as well.
- Click the stopwatch icons for the Position and Point Of Interest properties to create keyframes for each.
You’ve set the keyframes for the end of the camera movement. Rather than starting the camera movement at the beginning of the time ruler, you’ll begin at 0:10, so that viewers have a moment to orient themselves before the camera begins to zoom in.
- Go to 0:10 in the Timeline panel.
- Change the Point Of Interest values to 360, 240, 0, and the Camera 1 Position values to -185, 132, -3000. Now the camera is much farther from the objects and the book is centered in its view.

- Shift-click the Point Of Interest and Position property names to select all the keyframes for the layer, and then choose Animation > Keyframe Assistant > Easy Ease.
- Press the spacebar to preview your work so far. Press the spacebar again to stop the preview.
- Hide the Camera 1 layer properties.
Adjusting layer timing
Earlier, you animated the 3D text and set it to arrive at 0:13. But with the book centered at the beginning of the movie, the animated text will be more effective if it arrives much later. You’ll move it now.
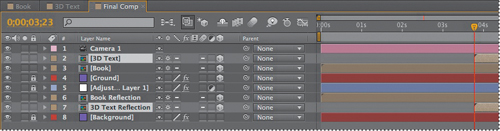
- Go to 3:23 in the time ruler. This is just before the camera reaches its resting point, so there will be some overlap in movement as the text comes in.
- Select the 3D Text layer in the Timeline panel, and then press Ctrl (Windows) or Command (Mac) as you select the 3D Text Reflection layer as well.
- Press the [ (left bracket) key to move the In point for both layers to the current time.
- Press the Home key, or move the current-time indicator to the beginning of the time ruler. Then press the spacebar to preview the animation. When you’ve finished watching the animation, press the spacebar again to stop the preview.
Using 3D lights
The composition is looking good so far. Adding lighting will give the scene depth and make it more dramatic.
Creating a light layer
In After Effects, a light is a type of layer that shines light on other layers. You can choose from among four different types of lights—Parallel, Spot, Point, and Ambient—and modify them with various settings. Lights, by default, point to a point of interest, just as camera layers do.
- Press the Home key, or move the current-time indicator to the beginning of the time ruler.
- Choose Layer > New > Light.
- In the Light Settings dialog box, do the following:
• Name the layer Spotlight.
• Choose Spot from the Light Type menu.
• Set Intensity to 100% and Cone Angle to 90°.
• Set Cone Feather to 50%, and set the Color to a light yellow (255, 255, 230).
• Select the Casts Shadows option.
• Make sure Shadow Darkness is set to 100%, and set Shadow Diffusion to 20 pixels.
• Click OK to create the light layer.

The light layer is represented by a light bulb icon (![]() ) in the Timeline panel, and the point of interest appears in the Composition panel as a cross-hair icon (
) in the Timeline panel, and the point of interest appears in the Composition panel as a cross-hair icon (![]() ).
).
Positioning the spotlight
The point of interest for this light is pointed at the center of the scene, which just happens to be where the 3D book is located, so you don’t need to adjust it. You only need to change the light position. Simply dragging the axes in the Composition panel would cause the light’s point of interest to move, however, so you’ll change the light layer’s position in the Timeline panel instead.
- In the Composition panel, choose 2 Views – Horizontal from the Select View Layout pop-up menu. Then click the left view to make it active, and choose Top from the 3D View pop-up menu. (The right view should be Active Camera.)
- Go to 5:00 in the Timeline panel.
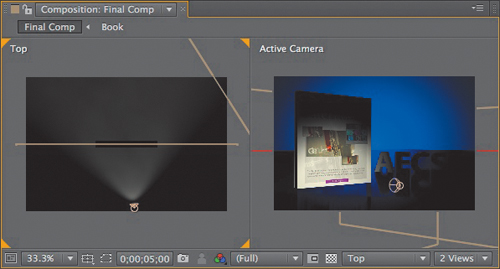
The light will appear throughout the composition, but by working at 5:00, you can see how repositioning the light affects other objects in the scene.
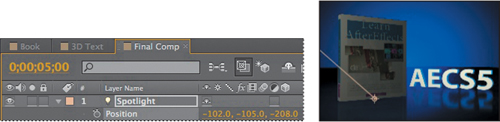
- Select the Spotlight layer in the Timeline panel, and press P to display its Position property.
- While watching the Top and Active Camera views in the Composition panel, drag the Position property y-axis value (the middle value) to the left in the Timeline panel until the light cone is at -105, high above the composition.
- Change the Position property’s x-axis value to -102 and its z-axis value to -208. Moving the light to a negative value on the z axis moves the light back in 3D space.
- Hide the Position property for the Spotlight layer in the Timeline panel.
- Choose 1 View from the Select View Layout pop-up menu at the bottom of the Composition panel, and make sure Active Camera is selected in the 3D View pop-up menu.
- Press F2 to deselect all layers in the Timeline panel, press the Home key, and then press the spacebar to preview the lighted animation. Press the spacebar again to end the preview. Then choose File > Save to save your work.
Adding an ambient light
The shadows are a little harsh, so you’ll add ambient light to lighten the scene.
- Choose Layer > New > Light.
- In the Light Settings dialog box, do the following:
• Name the light Ambient Light.
• Choose Ambient from the Light Type menu.
• Set Intensity to 50%.
• Change the Color to a light blue (174, 195, 254).
• Click OK to create the light layer.

Animating lights
Light doesn’t need to be steady. You’ll animate the spotlight so that it flickers on over a second, and then fade in the ambient light over 15 frames.
- Go to 3:15.
- Select the Ambient Light layer in the Timeline panel, and press the T key to display the Light Intensity property for the layer.
- Click the stopwatch icon next to the Intensity property to set a keyframe.
- Go to 3:00, and change the Intensity to 0%.
- Press T to hide the Intensity property.
- Select the Spotlight layer in the Timeline panel, and press the T key to display the Light Intensity property.
- Go to 3:15, and click the stopwatch icon for the Intensity property to set a keyframe.
- Go to 3:00, and change the Intensity value to 0%.
- Set additional Intensity keyframes for the Spotlight layer as follows:
• At 2:28, 100%
• At 2:26, 0%
• At 2:24, 100%
• At 2:21, 0%
• At 2:18, 100%
• At 2:15, 0%

- Press T to hide the Intensity property.
- Press the Home key, or move the current-time indicator to the beginning of the time ruler. Press F2 to deselect all layers. Then press the spacebar to preview the composition.
With the lights off at the beginning of the composition, the book is backlit by the Ramp effect in the Backdrop layer, making for a dramatic opening shot.
Adding effects
After Effects provides many options for special effects that you can use with either 2D or 3D scenes. You’ll add a few animated brush strokes to this scene to give it more drama and flair.
Adjusting the Material Options properties
The Material Options properties determine how 3D layers interact with lights and shadows. You’ll add a layer that won’t be affected by the lights you added earlier.
- Press the Home key, or move the current-time indicator to the beginning of the time ruler.
- Click the Project tab. Then drag the brush.psd item from the Project panel into the Timeline panel, and place it at the top of the layer stack.
- Select the 3D Layer switch (
 ) for the brush.psd layer to convert it to a 3D layer.
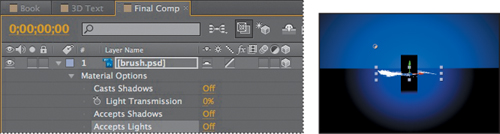
The layer jumps to the center of the composition, but you can no longer see it, because the brush.psd layer is affected by the lights in the scene.
- Select the brush.psd layer in the Timeline panel, and press AA to reveal the Material Options properties for the layer.
- Click the value for the Accepts Shadows property (currently On) to change it to Off.
- Click the value for the Accepts Lights property (currently On) to change it to Off.
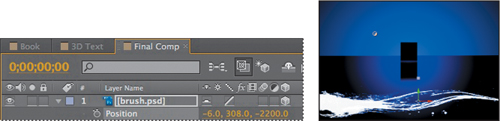
- Press the P key to display the Position property for the brush.psd layer, and then change the Position value to -6, 308, -2200. The layer moves very close to the camera.
Adding a transition effect
Currently, the brush stroke is present throughout the composition. You’ll add a transition effect to change the way the brush stroke arrives on the scene.
- With the brush.psd layer selected, choose Effect > Transition > Linear Wipe.
- In the Effect Controls panel, change Transition Completion to 100%, Wipe Angle to -90 degrees, and Feather to 50.
- In the Effect Controls panel, click the stopwatch icon for the Transition Completion property to create an initial keyframe.
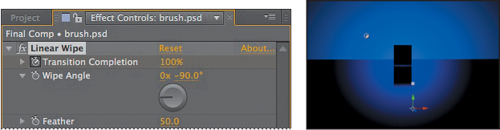
- Go to 0:15.
- Change the Transition Completion value to 0%. The brush stroke will be revealed from left to right on the screen.

- In the Timeline panel, hide all the properties for the brush.psd layer.
- Select the brush.psd layer, and then press Ctrl+D (Windows) or Command+D (Mac OS) to duplicate the layer.
- With the duplicate layer selected, press P to display the Position property, and then enter a new position of -238, 383, -523.
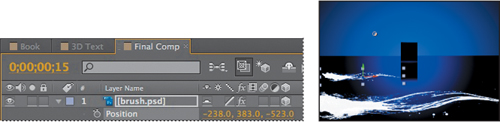
- Press P to hide the Position property.
There are two brush strokes on the screen, one in the foreground and one further back. You’ll create two more brush strokes, flipped so that they arrive from the right.
- Select the lowest brush.psd layer (the original layer) in the Timeline panel, and press Ctrl+D (Windows) or Command+D (Mac OS) to duplicate it.
- With the middle brush.psd layer selected, press the S key to display the Scale property.
- Click the Constrain Proportions icon (
 ) to unlink the values, and then change the x-axis and y-axis values to -100%.

- Press the P key to reveal the Position property for the layer, and change the values to 239, 320, -1680. Press the P key again to hide the Position property.
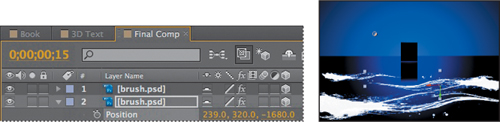
- With the middle brush.psd layer selected, press Ctrl+D (Windows) or Command+D (Mac OS) to duplicate it.
- Move the newest duplicate layer to the top of the layer stack.
- With the top layer selected, press the P key to reveal the Position layer. Then change the position to 840, 360, -400.

- Hide all layer properties, and choose File > Save.
Adjusting the timing of the layers
Currently, the brush strokes all arrive at the same time. You’ll shift them so that they enter at different times.
- Go to 0:10.
- Select the third brush.psd layer from the top of the layer stack. Press the [ (left bracket) key to move the In point for the layer to the current time.
- Go to 0:20.
- Select the second brush.psd layer from the top of the layer stack. Press the [ (left bracket) key to move the In point for the layer to the current time.
- Go to 0:30.
- Select the top brush.psd layer in the layer stack. Press the [ (left bracket) key to move the In point for the layer to the current time.

- Make a RAM preview to see your composition in action. Press the spacebar to stop the preview.
- Choose File > Save.
Adding motion blur
Objects in motion tend to have blur. To make the entire composition more realistic and exciting, you’ll add motion blur to all the layers. However, in order to apply motion blur to the 3D compositions, you must also apply it to their layers separately.
- Click the Enable Motion Blur button (
 ) at the top of the Timeline panel.
 - Select the Motion Blur switch () for each layer in the Timeline panel.

When the Collapse Transformations switch is selected, After Effects uses the settings in the original composition to determine whether to apply motion blur. You’ll need to open the 3D compositions to apply motion blur to them.
- Select the Book tab in the Timeline panel to open the Book composition.
- Select the Motion Blur switch for each of the layers in the Book composition.
- Click the 3D Text tab in the Timeline panel, and select the Motion Blur switch for each of the layers in the 3D Text composition.
Note
To change a setting for all layers in a composition, press Ctrl+A (Windows) or Command+A (Mac OS) to first select all the layers, and then select the setting for the first layer.
Previewing the entire animation
Congratulations! You’ve completed the two-part 3D animation for this Adobe After Effects book. After all that hard work, you should definitely preview the entire animation.
- Click the Final Comp tab in the Timeline panel.
- Press F2, or click any empty area in the Timeline panel, to deselect all layers.
- Press the Home key, or drag the current-time indicator to the beginning of the time ruler.
- Watch a RAM preview of the entire composition.
- Choose File > Save to save your project.
If you’d like to render and output the piece, see Lesson 14, “Rendering and Outputting,” for instructions.
Extra Credit
![]()
The DigiEffects FreeForm plug-in that comes with After Effects lets you deform 3D layers in 3D space. Take it for a spin by creating a computer-generated island from a 3D grid layer.
- Choose File > Open Project, and navigate to the Lessons/Lesson12/Freeform/Start_Project_File folder. Double-click the Freeform_Start.aep file to open the project in After Effects.
The Freeform_Start.aep project file contains two assets: a composition, and a solid layer for which a grid has already been generated. You’ll deform the grid layer to create the island.
- Select the Island layer in the Timeline panel, and then choose Effect > DigiEffects FreeForm > DE_FreeForm AE.
The FreeForm effect settings appear in the Effect Controls panel.
- Expand the 3D Mesh Controls properties, and then change Position Z to 1000. Changing the Z position pushes the layer back in space so you’ll have room to rotate the layer.
- Press the Home key, or move the current-time indicator to the beginning of the time ruler. Then change the Rotation X value to -70 degrees and the Rotation Z value to +40 degrees.
- Click the stopwatch icon next to the Rotation Z property to set an initial keyframe. Then press the End key, or move the current-time indicator to the end of the time ruler. Change the Rotation Z value to 2x+40 degrees.

As the movie plays, the layer will spin in space. In order to displace this layer, you’ll need to add another layer.
- In the Timeline panel, press U, select the Rotation Z property to select both of its keyframes, and then right-click or Control-click one of the keyframes and choose Keyframe Assistant > Easy Ease.
- Drag the Map.tif item from the Project panel into the Timeline panel, placing it at the bottom of the layer stack. Then click the Video switch for the layer to hide it.
- Select the Island layer in the Timeline panel, and bring the Effect Controls panel to the front. Expand the Displacement Controls. Then choose 2. map.tif from the Displace Layer menu.
- Press the Home key, or move the current-time indicator to the beginning of the time ruler, and create an initial keyframe for Displace Height, with a value of 0.
- Go to 1:00. Then change the Displace Height value to 200.
You have an island, but it looks like something from the early days of computer graphics. You can refine the look.
- In the Effect Controls panel, expand the 3D Mesh Quality properties. Change the Mesh Subdivision value to 75, choose High from the Antialiasing menu, and then choose On from the Image Filtering menu.

Because you’re working in three dimensions, you can add lights to cast shadows and create a glow.
- Choose Layer > New > Light to add a light to the scene. In the Light Settings dialog box, choose Parallel from the Light Type menu, select white for the color, and then click OK.
- In the Timeline panel, expand the Light 1 layer Transform properties. Change the Point Of Interest to 380, 210, 45, and change the Position to 690, 85, -170.
- Choose Layer > New > Light to add another light. In the Light Settings dialog box, choose Ambient from the Light Type menu, change the Intensity to 30%, and then click OK.
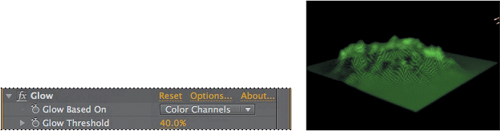
An ambient light softens the shadows. Next, add a hot glow around the layer highlights.
- Select the Island layer, and then choose Effect > Stylize > Glow.
- In the Effect Controls panel, change the Glow Threshold to 40%.
- Drag the HUD.mov file from the Project panel to the bottom of the layer stack in the Timeline panel to add the context for your island.
Review questions
1 How can you animate a 3D layer?
2 How are 3D lights handled in After Effects?
3 What is a point of interest?
Review answers
1 Animating a 3D layer is similar to animating a 2D layer, except that you can move the object on three axes: the x axis, the y axis, and the z axis. You can animate other Transform properties, effects, and other settings just as you would those for a 2D layer.
2 In After Effects, a light is a type of layer that shines light on other layers. You can choose from among four different types of lights—Parallel, Spot, Point, and Ambient—and modify them with various settings.
3 Cameras and lights include a property that specifies the spot in the composition at which the camera or light points. By default, this point of interest is set at the center of the composition, and the camera or light’s view is automatically oriented toward it. You can change this behavior by choosing Layer > Transform > Auto-Orient. Of course, you can move the point of interest at any time.