
Chapter 11. Building 3D Objects
Lesson overview
In this lesson, you’ll learn how to do the following:
• Create a 3D shape from a solid layer.
• Create 3D text with expressions.
• Look at a 3D scene from multiple views.
• Create a guide layer to aid in object placement.
• Control the way a layer animates by moving its anchor point.
• Rotate and position layers along x, y, and z axes.
This lesson will take approximately 1½ hours to complete. Copy the Lesson11 folder into the Lessons folder that you created on your hard drive for these projects (or create it now), if you haven’t already done so. As you work on this lesson, you’ll preserve the start files. If you need to restore the start files, copy them from the Adobe After Effects CS5 Classroom in a Book DVD.
![]()

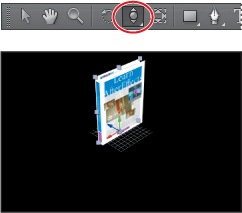
By clicking a single switch in the Timeline panel in After Effects, you can turn a 2D layer into a 3D layer, opening up a whole new world of creative possibilities.
Getting started
Adobe After Effects can work with layers in two dimensions (x, y) or three dimensions (x, y, z). So far in this book, you’ve worked almost exclusively in two dimensions. When you specify a layer as three-dimensional (3D), After Effects adds the z axis, which provides control over the layer’s depth. By combining this depth with a variety of lights and camera angles, you can create animated 3D projects that take advantage of the full range of natural motion, lighting and shadows, perspective, and focusing effects. In this lesson, you’ll explore how to create and control basic 3D layers. Then, in Lesson 12, “Using 3D Features,” you’ll continue working with this project, adding lights, effects, and other elements to animate the 3D objects and complete the composition, a promotional video for a book.
First, you’ll preview the movie you’re creating, and then set up the project.
- Make sure the following files are in the AECS5_CIB/Lessons/Lesson11 folder on your hard disk, or copy them from the Adobe After Effects CS5 Classroom in a Book DVD now:
• In the Assets folder: AEBack.jpg, AEFront.jpg, AESpine.jpg
• In the Sample_Movie folder: Lesson11.mov
- Open and play the Lesson11.mov file to see what you will create in this lesson. When you are done, quit QuickTime Player. You may delete this sample movie from your hard disk if you have limited storage space.
When you begin this lesson, restore the default application settings for After Effects. See “Restoring default preferences” on page 3.
- Press Ctrl+Alt+Shift (Windows) or Command+Option+Shift (Mac OS) while starting After Effects. When asked whether you want to delete your preferences file, click OK. Click Close to close the Welcome screen.
After Effects opens to display an empty, untitled project.
- Choose File > Save As.
- In the Save Project As dialog box, navigate to the AECS5_CIB/Lessons/Lesson11/ Finished_Project folder.
- Name the project Lesson11_Finished.aep, and then click Save.
Creating the composition
The animation you will create in this lesson features a 3D representation of a book about After Effects CS5. First, you’ll set up a composition to model the book.
- Click the Create A New Composition button (
 ) at the bottom of the Project panel.
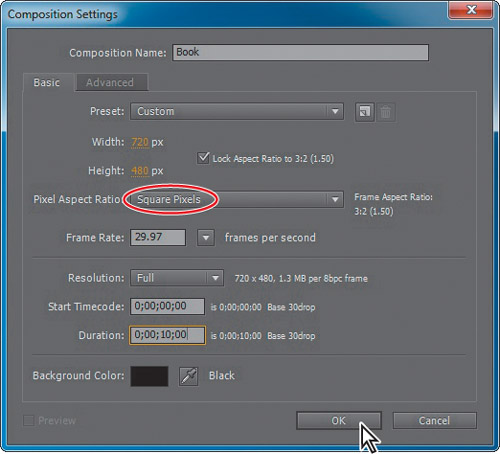
 - In the Composition Settings dialog box, name the composition Book, and choose NTSC DV from the Preset menu.
- Choose Square Pixels from the Pixel Aspect Ratio menu, because you will be working with graphics that have square pixels.
- Enter 10:00 for the Duration, make sure the Background Color is black, and click OK.
Importing assets
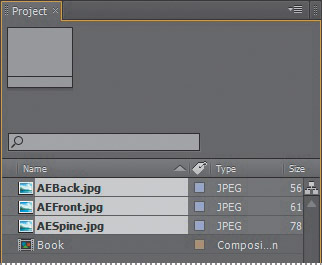
You’ll use three Photoshop files in this project: images of the front cover, back cover, and spine of the book.
- Double-click an empty area of the Project panel.
- In the Import File dialog box, navigate to the AECS5_CIB/Lessons/Lesson11/Assets folder.
- Shift-click to select the AEBack.jpg, AEFront.jpg, and AESpine.jpg files, and then click Open.
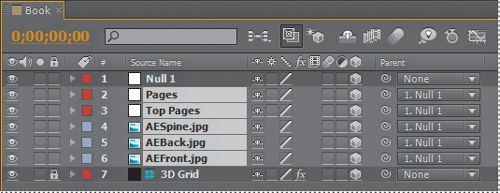
Building a 3D object
In order to move the book in 3D space, you’ll need to create the 3D object. You’ll build it piece by piece. Initially, any layer is flat, with only x (width) and y (height) dimensions and can be moved only along those axes. But all you have to do to move a layer in three dimensions is to turn on its 3D Layer switch. With that switch on, you can also manipulate the object along its z axis (depth).
Before you build the book, you’ll create an environment to help you work in perspective.
Creating the 3D floor
A grid layer, serving as a floor for the 3D space, can help you maintain perspective.
- Click in the Timeline panel to make it active.
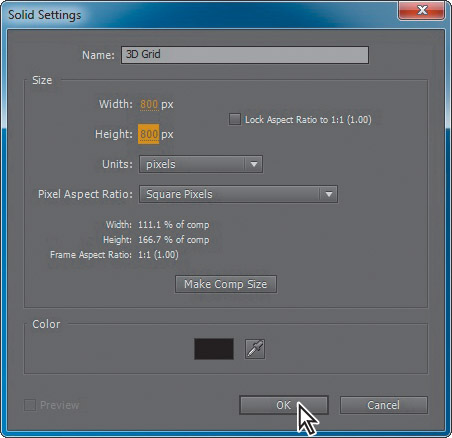
- Choose Layer > New > Solid.
- In the Solid Settings dialog box, name the layer 3D Grid.
- Enter 800 pixels for the Width and the Height, and then click OK to create the layer.
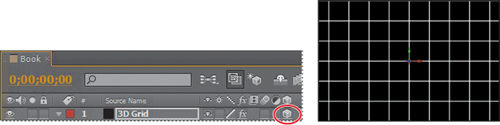
- With the 3D Grid layer selected in the Timeline panel, choose Effect > Generate > Grid.
The Effect Controls panel displays the Grid effect properties. You can customize the grid if you want to, but the default settings will work for this lesson. The grid is simply to help you see objects in perspective as you work.
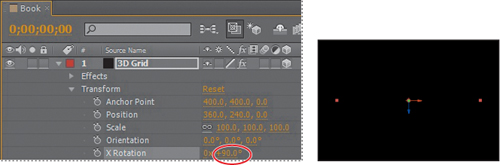
- In the Timeline panel, expand the 3D Grid Transform properties. The Position property is 360, 240, the center of the composition. Whenever you add an element to the Timeline panel, its anchor point will be at this center point.
- In the Timeline panel, select the 3D Layer switch (
 ) for the 3D Grid layer to give the layer three dimensions.
Three 3D Rotation properties appear in the Transform group for the layer, and properties that previously supported only two dimensions now display a third value for the z axis. In addition, a new property group named Material Options appears.
Note
Material Options properties specify how the layer interacts with light. You’ll work with the Material Options property group in Lesson 12, “Using 3D Features.”
A color-coded 3D axis appears over the layer’s anchor point in the Composition window. The red arrow controls the x axis, the green arrow controls the y axis, and the blue arrow controls the z axis. At the moment, the z axis appears at the intersection of the x and y axes. The letters x, y, and z appear when you position the pointer over the corresponding axis. When you move or rotate the layer while the pointer is over a particular axis, the layer’s movement is restricted to that axis.
- In the Timeline panel, change the X Rotation angle to 90 degrees. The grid seems to disappear, but don’t worry—it’s still there!
Using 3D views
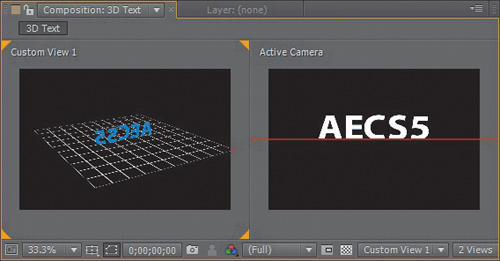
Sometimes the appearance of 3D layers can be deceptive. For example, a layer might appear to be scaling smaller along its x and y axes when it’s actually moving along the z axis. You can’t always tell from the default view in the Composition panel. The Select View Layout pop-up menu at the bottom of the Composition panel lets you divide the panel into different views of a single frame, so you can see your work from multiple angles. You specify the different views using the 3D View pop-up menu.
- At the bottom of the Composition panel, click the Select View Layout pop-up menu, and choose 2 Views – Horizontal. The left side of the Composition panel displays the Top view of the frame, and the right side displays the Active Camera view, which you’ve been viewing.
- Click in the left side of the Composition panel to make the Top view active. Orange corner tabs appear around the active view.
- Choose Custom View 1 from the 3D View pop-up menu at the bottom of the panel.
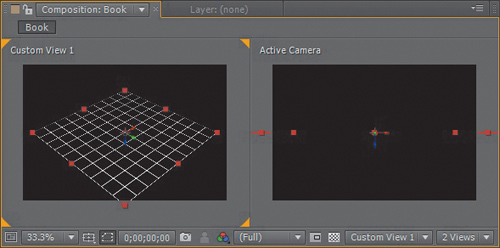
In the Custom View 1 window, you can see that the layer is a grid that can offer true perspective in 3D space.
- Hide the properties for the 3D Grid layer in the Timeline panel.
- Choose File > Save to save your work so far.
Creating a guide layer
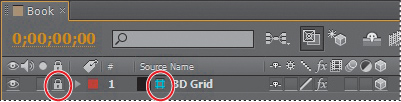
Guide layers help you position and edit elements in the Composition panel. For example, you can use guide layers for visual reference, audio timing, timecode reference, or even to store comments to yourself. In this project, you want to use the 3D Grid layer to help you place objects, but you don’t want to render it in the final artwork. You’ll convert it to a guide layer and lock it to ensure it stays in place.
- Select the 3D Grid layer in the Timeline panel, and choose Layer > Guide Layer. A cyan grid appears next to the layer name in the Timeline panel to indicate that it’s a guide layer.
- Select the Lock switch (
 ) for the 3D Grid layer in the Timeline panel to lock the layer.
Adding the first side of the object
With your grid in place as a guide layer, you’re ready to start building the book. What better place to start than the front cover?
- Click the Project tab to make the panel active. Then drag the AEFront.jpg item into the Timeline panel, placing it at the top of the layer stack, above the 3D Grid layer.
- Select the 3D Layer switch () for the AEFront.jpg layer.

The book cover is much larger than the composition, and it intersects the grid. You’ll scale the AEFront.jpg layer later, after the entire object is built. But you’ll reposition the cover to rest firmly on the floor of the grid now. To do this, you’ll reposition the layer’s anchor point to the bottom of the book cover.
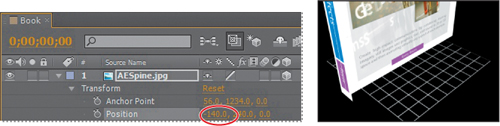
- With the AEFront.jpg layer selected in the Timeline, press the A key to display the layer’s Anchor Point property.
Currently, the anchor point for the AEFront.jpg layer is in the center of the book. You want the anchor point to be at the bottom of the book cover, to match the anchor point at the center of the grid. Because the current y-axis value is at the center, and therefore halfway down the book, you can simply multiply that value by 2 for the new Anchor Point value.
- Click the y-axis value (the middle value), and add *2 to the value, so that it reads 617*2. Press Enter or Return to accept the calculation. The layer moves to sit on the grid.
Note
Positive values on the x axis move an element to the right; positive values on the y axis move an element down; and positive values on the z axis move an element away from the active camera.

Positioning 3D elements
When you build a 3D object, you need to position the 3D layers in relationship to each other. You’ll position the spine of the book by moving its anchor point and then adjusting the front cover as necessary.
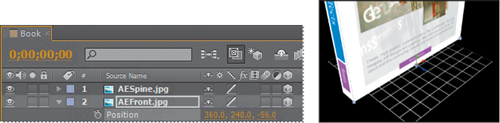
- Drag the AESpine.jpg item from the Project panel into the Timeline panel, placing it at the top of the layer stack.
- Select the 3D Layer switch () for the AESpine.jpg layer.
- Ctrl-click (Windows) or Command-click (Mac OS) the triangle in the Label column for the AESpine.jpg layer to display all of its Transform properties.
- Click the y-axis value (the middle value) for the Anchor Point property, and then add *2, so that its value is 617*2. Press Enter or Return to accept the calculation.
As with the front cover, moving the anchor point for the spine positions it to sit on the floor of the 3D space. However, the spine is facing the same direction as the front cover. You’ll need to rotate it.
- Change the Y Rotation property for the AESpine.jpg layer to +90.

Now the spine is facing the right direction, but it’s in the middle of the front cover. To move it into place, you’ll use the same simple math trick you used to position the book on the floor.
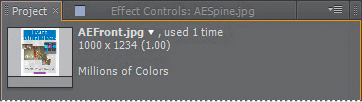
- Select the AEFront.jpg item in the Project panel, and note its width. It’s exactly 1000 pixels wide.
The AESpine.jpg layer currently intersects the middle of the AEFront.jpg layer. Therefore, moving the spine 500 pixels to the left will align it appropriately. To move an object to the left on the x axis, subtract pixels.
- In the Timeline panel, click the x-axis value (the first value) for the Position property, and then append -500 to the value, so the new value is 360.0-500. Press Enter or Return.
The spine moves to the end of the book. It’s close, but it protrudes from the front of the book. You’ll move the AEFront.jpg layer forward to fix that.
- In the Timeline panel, select the AEFront.jpg layer, and then press P to display its Position property.
- Click the z-axis value (the third value) for the Position property of the AEFront.jpg layer, and change the value to -56. A negative value on the z axis moves the layer toward the active camera view (forward).
- Close all properties for the AESpine.jpg and AEFront.jpg layers to keep the Timeline panel neat.
Replacing a 3D element with another
Instead of repeating all the steps to position the back cover, you’ll duplicate the front cover and replace it with the back cover.
- Select the AEFront.jpg layer in the Timeline panel, and press Ctrl+D (Windows) or Command+D (Mac OS) to duplicate the layer.
- With the duplicate layer selected, press P to display its Position property.
- Change the z-axis value to +56 to move the layer away from the active camera view. Because this will be the back cover, you want to position it at the back of the spine, which is 112 pixels wide.
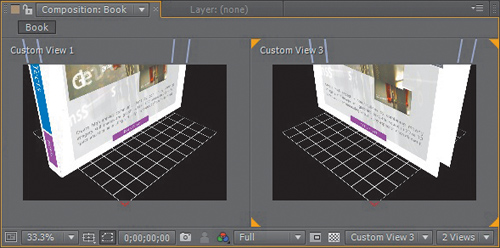
- In the Composition panel, change the right view to Custom View 3 so you can see both ends of the book.
- With the duplicate layer selected in the Timeline panel, press R to display the layer’s Rotation properties, and change its Y Rotation value to 180 degrees. The rotation flips the layer.
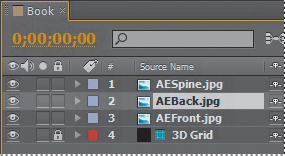
- With the duplicate layer selected in the Timeline panel, press Alt (Windows) or Option (Mac OS) as you drag the AEBack.jpg item from the Project panel onto the duplicate layer. After Effects replaces the front cover with the back cover, and changes the layer name to AEBack.jpg.
Adjusting views with the camera tools
By definition, 3D objects can appear different from different angles. You can adjust the camera view to see the object from other directions so that you can identify gaps, make positioning adjustments, and otherwise evaluate and plan your project.
- Select the Track Z Camera tool (
 ), hidden behind the Unified Camera tool (
 ) in the Tools panel. The Track Z Camera tool lets you zoom in and out of a composition view.
 - Click in the left view (Custom View 1) in the Composition panel to ensure it’s active. Then click and drag to the left or down to zoom out from the scene and see the entire book. You may need to click and drag multiple times.
- Select the Orbit Camera tool (
 ), hidden behind the Track Z Camera tool in the Tools panel. The Orbit Camera tool rotates the current 3D view by moving the camera around the point of interest.
 - Drag the Orbit Camera tool to the left or right in the left view of the Composition window so that you can see the back of the book. Remember, when you’re using the Orbit Camera tool, you’re rotating the view, not the object itself.

- Drag the Orbit Camera tool again so that you are viewing the front of the book.
- Select the Selection tool (
 ) in the Tools panel, and choose File > Save to save your work so far.

Adding solid layers to a 3D object
You’ve assembled the front cover, back cover, and spine of the book. But it’s still lacking a top and right side (opposite the spine). Because these sides don’t require specific content, you can create them using solid layers.
- Click in the Timeline panel. Then press Ctrl+Y (Windows) or Command+Y (Mac OS) to create a new solid layer.
- In the Solid Settings dialog box, name the layer Top Pages, change the width to 1000 pixels (to match the cover width), and the height to 112 pixels (to match the width of the spine).
- Click the eyedropper, and click a white area of the book cover to sample it. Click OK to create the layer.
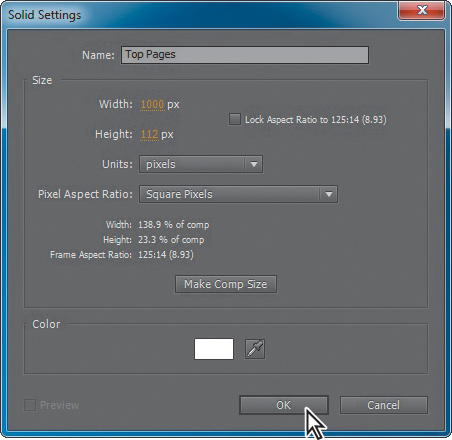
- Select the 3D Layer switch () for the Top Pages layer.
- Press R to display the Rotation properties, and change the X Rotation property to 90 degrees.
- Press P to display the Position property. Click the y-axis value, and type 240-1234. Press Enter or Return to accept the calculation.
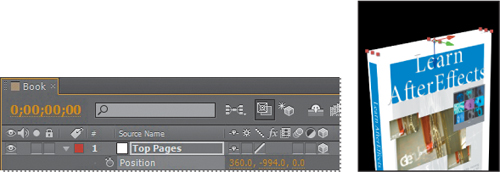
Why those numbers? The current position is 240, and you want to move it up the height of the book, which is 1234 pixels.
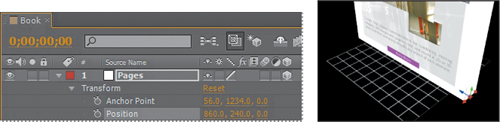
- Press Ctrl+Y (Windows) or Command+Y (Mac OS) to create another solid layer for the right side of the book, representing the edges of the pages that are bound by the spine on the left side.
- In the Solid Settings dialog box, name the layer Pages, change the Width to 112 pixels (the width of the spine) and the Height to 1234 pixels (the height of the covers). Make sure the layer is white, and then click OK.

- Select the 3D Layer switch () for the Pages layer.
The Pages layer needs to be on the right side of the book. You’ll change its Anchor Point, Rotation, and Position properties to get it there.
- Ctrl-click (Windows) or Command-click (Mac OS) the triangle next to the Label column for the Pages layer to display all its Transform properties.
- Change the y-axis value for the Anchor Point property to 1234 (placing the layer on the virtual floor); change the Y Rotation amount to 90° to make it face the right direction; and change the x-axis value for the Position property to 360+500 to move the layer to the right side of the book.
- With the Timeline panel active, press Ctrl+A (Windows) or Command+A (Mac OS) to select all the layers. Then press the U key to close all the properties for the layers.
Working with a null object
A null object is an invisible layer that has all the properties of a visible layer, so that it can be a parent to any layer in the composition. You’ll use a null object to scale the layers of the 3D object down to a more manageable size. If you began to scale each of the individual layers, you’d have to reposition each of them again. This way, you can parent all the layers to a single null layer, and then as you scale the null layer, all the other layers follow, maintaining their relationship to each other.
- With the Timeline panel active, choose Layer > New > Null Object. After Effects names the layer Null 1.
- Select the 3D Layer switch () for the Null 1 layer to make it three-dimensional.
The null object moves to the origin point of the composition, at the center of the grid. Though you can see the null object in the Composition panel, remember that there isn’t really anything there—it’s an invisible layer. The representation of the object is to help you keep track of it as you work with it.
- In the Timeline panel, select the Pages layer, and then Shift-click the AEFront.jpg layer to select all the layers in between. (Only the 3D Grid and Null 1 layers should not be selected.)
- Select 1. Null 1 from the Parent pop-up menu for the Pages layer. The same selection is automatically applied to all selected layers.
Because the 3D object layers are now parented to the Null 1 layer, any changes to the null object also affect them.
- Select the Null 1 layer in the Timeline panel, and press S to reveal its Scale property. Then change the Scale amount to 20, 20, 20%.
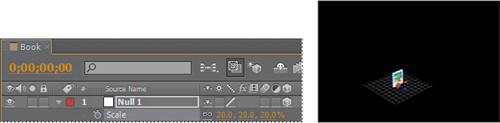
The entire book is smaller, and each of the elements retains its relationship with the others.
- Select the Track Z Camera tool (), hidden behind the Orbit Camera tool () in the Tools panel. Then drag to the right in the left view of the Composition panel to zoom in so you can see the book more clearly.
- Select the right view in the Composition panel to make it active. Then choose Active Camera from the 3D View pop-up menu at the bottom of the Composition panel.
- Choose File > Save to save your work so far.

Working with 3D text
Just as you can create other 3D objects in After Effects, you can create 3D text. Flat text isn’t as interesting, so you’ll give the text more depth.
Creating the composition
You’ll create a new composition for the text, and just as you did before, you’ll create a 3D grid to serve as the floor of the space to help you maintain perspective.
- Click the Create A New Composition button () at the bottom of the Project panel.
- In the Composition Settings dialog box, name the composition 3D Text, and choose NTSC DV from the Preset menu. Then click OK to create the composition.
- Press Ctrl+Y (Windows) or Command+Y (Mac OS) to create a new solid layer.
- In the Solid Settings dialog box, name the layer 3D Grid, set the Width and Height both to 800 pixels, and click OK.
- With the 3D Grid layer selected in the Timeline panel, choose Effect > Generate > Grid.
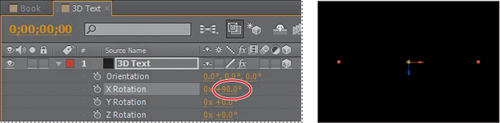
- Select the 3D Layer switch () for the 3D Grid layer.
- With the 3D Grid layer selected in the Timeline panel, press R to reveal its Rotation properties. Then change the X Rotation value to 90 degrees. Press R again to hide the Rotation properties.
- With the 3D Grid layer selected in the Timeline panel, choose Layer > Guide Layer.
Tip
If you plan to work with 3D objects in the future, save the composition to use as a basis for later projects so that you’ll already have a 3D grid in place.
The grid you’ve created will guide you as you work with 3D text, but won’t render with your project.
Creating 3D text
With the grid in place, you’re ready to create the text. You’ll type the words first, and then convert the layer to a 3D layer.
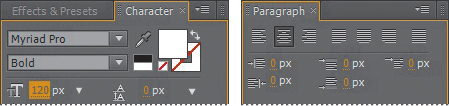
- Select the Horizontal Type tool (
 ) in the Tools panel. After Effects opens the Character and Paragraph panels.
 - In the Character panel, do the following:
• Choose Myriad Pro for the font family.
• Choose Bold for the font style.
• Select white for the text color.
• Set the stroke color to none.
• Change the font size to 120 pixels.
- In the Paragraph panel, select the Center Text alignment option.
- Click anywhere in the Composition panel, in either view, and type AECS5. Then click an empty area of the Timeline panel to deactivate the Horizontal Type tool.
- Select the 3D Layer switch () for the AECS5 layer.
- With the AECS5 layer selected in the Timeline panel, press P to reveal its Position property.
- Right-click (Windows) or Control-click (Mac OS) the Position property name, and choose Reset from the context menu. The text moves to the center of the grid.

Note
This technique gives you the effect of extrusion in some views, but may not provide good results when you rotate the text at some angles. For true extruded text, use Adobe Photoshop Extended.
Adding depth to the text with expressions
The text is three-dimensional, but one of those dimensions—the z axis—is only 1 pixel wide. You’ll duplicate the layer and offset it by 1 pixel to add depth to the text.
- Select the AECS5 layer in the Timeline panel, and choose Edit > Duplicate.
A new layer, named AECS6, is added to the Timeline panel. The duplicate layer is named AECS6 because After Effects continues the layer numbering from AECS5, but the content of the layer has not been changed.
- Double-click the original AECS5 layer in the Timeline panel to select its contents.
- In the Character panel, change the text color to blue (R=19, G=125, B=245), and click an empty area of the Timeline panel to deactivate the Horizontal Type tool.
Text in the Composition window appears white because it’s in front of the blue layer.
- Press Alt (Windows) or Option (Mac OS) as you click the stopwatch icon next to the Position property for the original AECS5 layer.

Note
While you are editing an expression, all previews are suspended; a red bar appears at the bottom of panels until you exit text-editing mode.
After Effects displays the words transform.position in the expression field in the time ruler. With expressions, you can create relationships between layer properties and use one property’s keyframes to dynamically animate another layer. To learn more about expressions, see the sidebar “About expressions” in Lesson 6.
- Type thisComp.layer(index-1).transform.position+[0,0,1] to replace transform.position in the expression field.
- Click an empty area of the Timeline panel to accept the expression.

The expression you typed instructs After Effects to use the layer immediately above it, changing the Position property by 1 pixel on the z axis. Here’s how it breaks down: thisComp.layer refers to this composition, index-1 refers to the layer immediately above the current layer, transform.position means to change the Position property, and +[0,0,1] means add 1 pixel to the z axis.
You don’t have to memorize this expression or learn JavaScript, the language used in expressions. You can adapt simple expressions and modify them to meet your needs. Or you can use a pick whip, as you did in Lesson 6, to create relationships between layer properties.
- Select the Orbit Camera tool (), and drag across the left view in the Composition window to see the back of the text. The back is blue and the front is white. But it’s still only 2 pixels deep.
- Select the original AECS5 layer in the Timeline panel, and press Ctrl+D (Windows) or Command+D (Mac OS) 19 times to create 19 additional layers.
- Use the Orbit Camera tool to move around the object. The text object is much deeper now, as you copied the expression along with each of those 19 layers. The front layer is white, but all the other layers are blue. To see the effect more clearly, change the right view to Custom View 3.

- Choose File > Save to save your work so far.
Creating a backdrop for 3D animation
The book and text are both ready for animation. But they need to be animated against a backdrop. You’ll create a two-dimensional environment for the 3D objects in a new composition.
- Click the Project tab, and then click the Create A New Composition button () in the Project panel.
- In the Composition Settings dialog box, name the composition Final Comp, and choose NTSC DV from the Preset menu. Then click OK.
- In the Composition panel, choose 1 View from the Select View Layout pop-up menu.
- Choose Custom View 1 from the 3D pop-up menu at the bottom of the Composition panel so you can see the backdrop from an angle other than a flat, forward view.
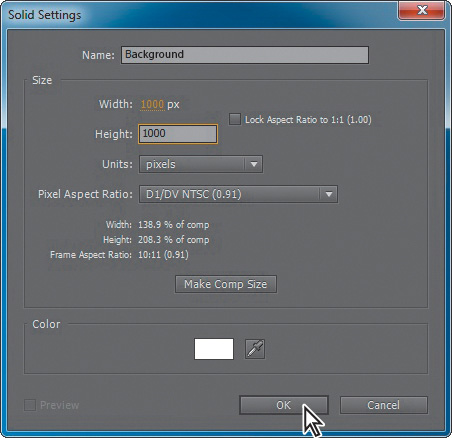
- Choose Layer > New > Solid.
- In the Solid Settings dialog box, name the layer Background, set the Width and Height to 1000 pixels, and click OK.
- With the Background layer selected in the Timeline panel, choose Effect > Generate > Ramp. The layer becomes a gradient.
- In the Effect Controls panel, change the Start Of Ramp value to 500, 500. Then change the Start Color to a dark blue (R=36, G=77, B=254) and the End Color to black (R=0, G=0, B=0). Choose Radial Ramp from the Ramp Shape menu.

- Select the Lock switch for the Background layer to prevent accidental changes to it. There’s no need to convert this layer to a 3D layer, because it will be an infinite distance from the animated 3D objects.
- Press Ctrl+Y (Windows) or Command+Y (Mac OS) to create a new solid layer.
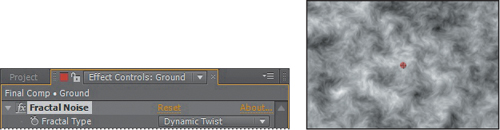
- In the Solid Settings dialog box, name the layer Ground, and confirm that both the Width and Height are 1000 pixels. Then click OK.
- With the Ground layer selected in the Timeline panel, choose Effect > Noise & Grain > Fractal Noise.
- In the Effect Controls panel, choose Dynamic Twist from the Fractal Type menu.
- In the Timeline panel, select the 3D Layer switch () for the Ground layer.
- With the Ground layer selected, press R to reveal the Rotation properties, and change the X Rotation value to 90 degrees.
- Press S to reveal the Scale property. Change the Scale values to 1000, 1000, 1000.
- Click the Toggle Switches/Modes button at the bottom of the Timeline panel to display the Modes column.
- For the Ground layer, choose Overlay from the Mode menu.

- Press S to close the Scale property, and then lock the Ground layer.
Nesting a 3D composition
You’ve set up the environment for the 3D objects that you created earlier: the book and the text. The Book composition contains all the elements of the book. You’ll add that composition to the Final Comp composition, and then select the Collapse Transformations switch so that it behaves as a 3D layer.
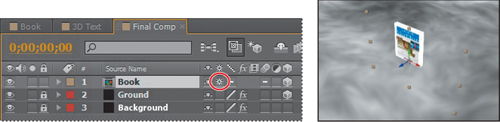
- Click the Project tab to display the panel. Then drag the Book composition from the Project panel to the Final Comp Timeline panel, placing it at the top of the layer stack.
The Book composition doesn’t show up, because it’s not yet a 3D layer.
- Click the Toggle Switches/Modes button at the bottom of the Timeline panel to display switches.
- Select the 3D Layer switch () for the Book layer to convert it to 3D.
The Book composition appears in the Composition window, but only the front cover appears to be included. When you nest a 3D composition in another composition, you need to select the Collapse Transformations switch for the layer. Otherwise, the composition is rendered as a 2D layer, and does not interact with 3D layers.
- Select the Collapse Transformations switch (
 ) for the Book layer.
Now the entire book appears, just as you created it. If you change Rotation property values, the entire object rotates, rather than individual layers. The guide layer is not visible in the nested composition.
Adding a camera
You can view 3D layers from any number of angles and distances using layers called cameras. When you set a camera view for your composition, you look at the layers as though you were looking through that camera. You can choose between viewing a composition through the active camera or through a named, custom camera. If you have not created a custom camera, then the active camera is the same as the default composition view.
So far, you have primarily been viewing this composition from the Custom View 1 angle, which doesn’t take blending modes or 2D layers into account. Switching to the Active Camera view doesn’t let you see your composition from an angle. To see everything you want to see, you’ll create a custom camera.
- Choose Layer > New > Camera.
- In the Camera Settings dialog box, accept all of the defaults, including the name (Camera 1) and the 50mm preset, and then click OK.
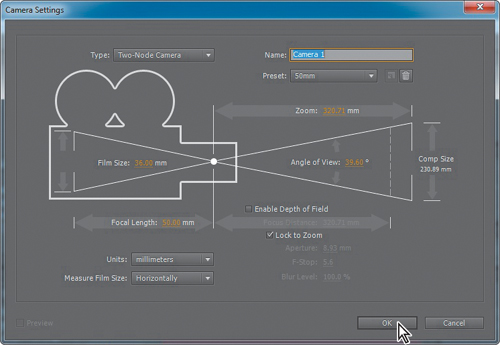
The Camera 1 layer appears at the top of the layer stack in the Timeline panel (with a camera icon next to the layer name), and the Composition panel updates to reflect the new camera layer’s perspective. The view doesn’t appear to change, however, because the 50mm camera preset uses the same settings as the default Active Camera view.
- Choose 2 Views – Horizontal from the Select View Layout pop-up menu at the bottom of the Composition panel. Change the left view to Right and the right view to Active Camera from the 3D View pop-up menu.

Setting the camera’s point of interest
Camera layers have a point of interest that can be used to determine what the camera looks at. By default, the camera’s point of interest is the center of the composition. You’ll set this camera layer to look at the Book and Ground layers from a very specific angle.
- Expand the Camera 1 layer’s Transform property group in the Timeline panel.
- While watching the right view (on the left side) in the Composition panel, drag the Point Of Interest property y-axis value to the left in the Timeline panel until the point of interest icon (
 ) in the Composition panel is in the middle of the book. The final value should be 123; enter it manually if necessary.
 - In the Timeline panel, change the Point Of Interest x-axis value to 602 and the z-axis value to 157.
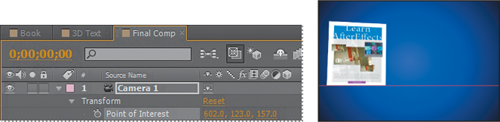
This perspective looks a little more interesting, but the camera is intersecting the Ground layer plane. The Point Of Interest property determines where the camera is looking, but its placement is controlled by its Position property.
- Change the Position property values for the Camera 1 layer to 27, 132, -640.
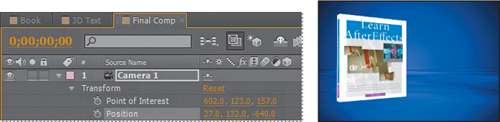
The book in the Active Camera view (on the right) looks a lot better.
- Close all the properties for the Camera 1 layer, and choose File > Save.
Completing the scene
You’re ready to add the 3D Text composition you created earlier. As with the Book composition, you’ll need to select the 3D switch and the Collapse Transformations switch for it to behave as a true 3D object.
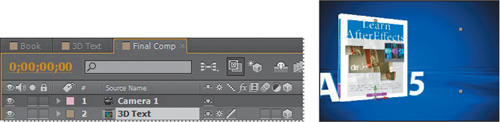
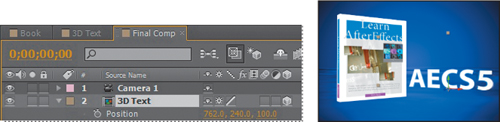
- Drag the 3D Text composition from the Project panel to the Timeline panel, placing it directly below the Camera 1 layer.
- Select the 3D Layer switch () and the Collapse Transformations switch () for the 3D Text layer.
- In the Composition panel, choose 1 View from the Select View Layout menu, and choose Active Camera from the 3D View pop-up menu.
- With the 3D Text layer selected in the Timeline panel, press R to reveal the Rotation properties for the layer. Then change the Y Rotation value to 60 degrees.
- Press the P key to reveal the Position property for the 3D Text layer. Change the Position values to 762, 240, 100.
- Close any open properties in the Timeline panel, and choose File > Save.
You’ve created 3D objects and assembled them in a virtual space. In Lesson 12, “Using 3D Features,” you’ll continue working on this project. For the final movie, you’ll add lights, adjust surface properties, and animate the camera.
Review questions
1 What happens to a layer when you select its 3D Layer switch?
2 Why is it important to look at multiple views of a composition that contains 3D layers?
3 What happens when you move a layer’s Anchor Point values in the Timeline panel?
4 What is a camera layer?
Review answers
1 When you select a layer’s 3D Layer switch in the Timeline panel, After Effects adds a third axis, the z axis, to the layer. You can then move and rotate the layer in three dimensions. In addition, the layer takes on new properties that are unique to 3D layers, such as the Material Options property group.
2 The appearance of 3D layers can be deceptive, depending on the view in the Composition panel. By enabling 3D views, you can see the true position of a layer relative to other layers in the composition.
3 When you adjust the Anchor Point values for a layer in the Timeline panel, the layer moves in the Composition panel even though its Position values remain the same.
4 You can view After Effects 3D layers from any number of angles and distances using layers called cameras. When you set a camera view for your composition, you look at the layers as though you were looking through that camera. You can choose between viewing a composition through the active camera or through a named, custom camera. If you have not created a custom camera, then the active camera is the same as the default composition view.