
Chapter 9. Using the Roto Brush Tool
Lesson overview
In this lesson, you’ll learn how to do the following:
• Extract a foreground object from the background using the Roto Brush tool.
• Correct the segmentation boundary across a span of frames.
• Touch up a matte using the Brush tool.
• Refine a matte’s edges.
• Freeze a frame across the remainder of a layer.
• Animate properties for creative effects.
This lesson will take approximately 90 minutes to complete. Copy the Lesson09 folder into the Lessons folder that you created on your hard drive for these projects (or create it now), if you haven’t already done so. As you work on this lesson, you’ll preserve the start files. If you need to restore the start files, copy them from the Adobe After Effects CS5 Classroom in a Book DVD.
![]()

The new Roto Brush tool makes it much faster to separate a foreground object from a background across many frames. You can achieve professional results in a fraction of the time you’d spend with traditional rotoscoping.
About rotoscoping
When you draw or paint on the frames of a movie, you’re rotoscoping. For example, a common use of rotoscoping is to trace an object, using the path as a mask to separate it from the background so you can work with it separately. Traditionally in After Effects, you drew masks, animated the mask path, and then used the masks to define a matte. (A matte is a mask used to hide part of an image so that another image can be superimposed.) While effective, this is a time-intensive, tedious process, especially if the object moves a great deal or the background is complex.
If a background or foreground object is a consistent, distinct color, you could use color keying to separate the object from the background. If the subject was shot against a green or blue background (green screen or blue screen), keying is usually much easier than rotoscoping.
The new Roto Brush tool in After Effects CS5 is much faster than conventional rotoscoping, and for movies with complex backgrounds, it’s much easier than keying. You use the Roto Brush tool to define the foreground and background elements; then, After Effects creates a matte and tracks the movement of the matte over time. The Roto Brush tool does much of the work for you, leaving only a little clean-up work to be done.
Getting started
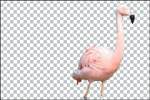
In this lesson, you’ll create an end credit logo treatment for the Casa Luna Wildlife Sanctuary. You will use the Roto Brush tool to remove the flamingo from the background, animate the layers and text, and add an audio file to the animation.
Before you begin, preview the movie you’re creating.
- Make sure the following files are in the AECS5_CIB/Lessons/Lesson09 folder on your hard disk, or copy them from the Adobe After Effects CS5 Classroom in a Book DVD now:
• In the Assets folder: Flamingo.mov, Peacock.jpeg, VO.mp3
• In the Sample_Movie folder: Lesson09.mov
- Open and play the Lesson09.mov sample movie to see the animated bumper you will create in this lesson. When you are done, quit QuickTime Player. You may delete this sample movie from your hard disk if you have limited storage space.
When you begin the lesson, restore the default application settings for After Effects. See “Restoring default preferences” on page 3.
- Press Ctrl+Alt+Shift (Windows) or Command+Option+Shift (Mac OS) while starting After Effects CS5 to restore default preference settings. When asked whether you want to delete your preferences file, click OK. Click Close to close the Welcome screen.
After Effects opens to display a new, untitled project.
- Choose File > Save As.
- In the Save As dialog box, navigate to the AECS5_CIB/Lessons/Lesson09/Finished_Project folder.
- Name the project Lesson09_Finished.aep, and then click Save.
Creating the composition
You need to import three footage items for this exercise, and then create a composition.
- Double-click an empty area of the Project panel to open the Import File dialog box.
- Navigate to the AECS5_CIB/Lessons/Lesson09/Assets folder. Shift-click to select the Flamingo.mov, Peacock.jpeg, and VO.mp3 files, and then click Open.
- Drag the Flamingo.mov item onto the Create a New Composition button (
 ) at the bottom of the Project panel.
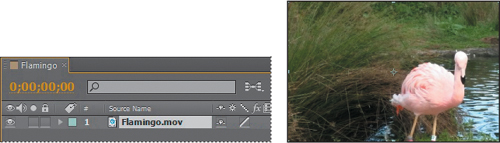
After Effects creates a composition named Flamingo, based on settings in the Flamingo.mov file. The composition is five seconds long and uses the NTSC DV preset. The Flamingo composition has one layer: Flamingo.mov.
- Choose File > Save to save your work.
Creating a segmentation boundary
You use the Roto Brush tool to add foreground and background strokes to a base frame, so that After Effects can identify the foreground and background areas in the image. It creates a segmentation boundary between the foreground and background.
Creating a base frame
To use the Roto Brush tool to isolate a foreground object, you start by adding strokes to a base frame to identify foreground and background areas. You’ll use the first frame as the base frame, and then add the strokes that identify the flamingo as the foreground object.
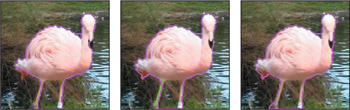
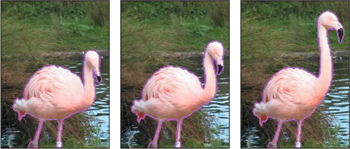
- Move the current-time indicator across the time ruler to preview the footage. At about 1:20, the flamingo’s head rises up to a striking pose. You’ll use the final pose in the clip to create a logo for the Casa Luna Wildlife Sanctuary.
- Press the Home key to move the current-time indicator to the beginning of the time ruler.
- Select the Roto Brush tool (
 ) in the Tools Panel.
 - Double-click the Flamingo layer in the Timeline panel to open the clip in the Layer panel. This is where you will do all your Roto Brush work.
By default the Roto Brush tool creates green foreground strokes, so you’ll start by adding strokes to the foreground—the flamingo.
- Choose Window > Brushes to open the Brushes panel. Then select a Hard Round 9-pixel brush, which is slightly smaller than the flamingo’s neck.
When you’re drawing strokes to define the foreground object, start in the center of the object. Unlike traditional rotoscoping, you don’t need to define a precise boundary around the object. After Effects extrapolates from the foreground stroke to determine where the boundary is supposed to be.
- Draw a green stroke from the flamingo’s head, down its neck, and through the midsection of the body to the tail.

A pink outline identifies the boundary After Effects created for the foreground object. It’s pretty good, though it may be missing the tip of the beak, the legs, and some tail feathers. You’ll help After Effects find the boundary by adding some more foreground strokes.
- Select a hard 3-pixel brush in the Brushes panel, and then draw additional strokes over the beak, tail, and legs to include them in the foreground.
Tip
To increase or decrease the brush size quickly, press Ctrl (Windows) or Command (Mac OS) as you drag right to increase the brush size, or left to decrease the brush size.
It can be tricky to get the legs and beak included without accidentally adding background as well. Adding background strokes will let you remove any extraneous areas in the matte.
- Press Alt (Windows) or Option (Mac OS) to switch to the red background-stroke brush.
- Add red strokes to background areas you want to exclude from the matte. Switch back and forth between the foreground and background brushes to fine-tune the boundary.
You don’t have to follow the edge of the foreground element exactly to remove any errors in the selection. Getting close to the area to be removed and painting a background stroke may be all that is needed. Don’t worry about being exact with your brush strokes. Just make sure the mask is within 2 to 3 pixels of the edge of the foreground object. You will refine the matte later.

- Click the Toggle Alpha button (
 ) at the bottom of the Layer panel. The masked area is white against a black background, so you can see the matte clearly.
 - Click the Toggle Alpha Overlay button (
 ) at the bottom of the Layer panel. The foreground area appears in color, and the background has a red overlay.

- Click the Toggle Alpha Boundary button (
 ) at the bottom of the Layer panel to see the outline around the flamingo again.
As you use the Roto Brush tool, the Alpha Boundary is the best way to see how accurate your boundary is, because you can see everything in the frame. However, the Alpha and Alpha Overlay options can be useful when you want to see the foreground without the distraction of the background.
Refining the boundary across the initial span
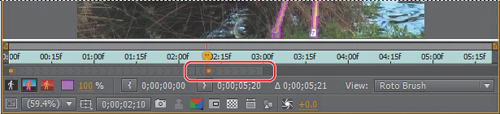
You used the Roto Brush tool to create a base frame, which includes a segmentation boundary that divides the foreground from the background. After Effects applied the segmentation boundary across a span of frames. The Roto Brush span appears below the time ruler at the bottom of the Layer panel. As you move forward and backward through the footage, the segmentation boundary moves with the foreground object (in this case, the flamingo).
Tip
To move forward one frame, press the 2 key on your keyboard; to move back one frame, press the 1 key.
You’ll step through the frames in the span and adjust the segmentation boundary as necessary.
- Press the 2 key to move forward one frame.
Note
As it propagates the segmentation boundary for a frame, After Effects caches that frame. Cached frames have a green bar in the time ruler. If you jump ahead to a frame further along the span, After Effects may take longer to process it.
Based on the base frame, After Effects tracks the edge of the object and attempts to follow its movement. Depending on how complex your foreground and background elements are, the boundary may or may not conform exactly to the area you hoped it would. In this case, you may notice changes to the segmentation boundary along the breast of the bird, near the feet, the tail feathers, or where the neck and body meet. This is normal, but it means you need to refine the segmentation.
- Using the Roto Brush tool, paint foreground and background strokes to refine the matte for this frame. If the matte is accurate, you needn’t paint any strokes.
As you move through the span, each change you make affects the frames after it. The more you refine your selection, the better the overall results will be.
- Press the 2 key again to move forward to the next frame.
- Use the Roto Brush tool to add foreground and background strokes as necessary to refine the segmentation boundary.
- Repeat steps 3 and 4 until you reach 1:20. If the span doesn’t increase automatically, drag it forward to extend it beyond the initial 20 frames.
Adding new base frames
After Effects creates an initial Roto Brush span of 20 frames. As you move through the frames, the span range may increase automatically, or you can drag it to extend the span. However, the further you move from the base frame, the longer After Effects requires to propagate, or calculate, the segmentation for each frame. If the scene changes significantly, it may be better to create multiple base frames for your footage than to have one really long span. The scene in this project remains fairly consistent, so you could extend the span and make additional adjustments as needed. However, you’ll create additional base frames to gain experience using the tools, learn to connect spans, and see how the segmentation shifts as you move further from a base frame.
After you have reached 1:20 (1 second, 20 frames) in the refining process, add a new base frame to the project.
- Go to 2:10 in the Layer panel. This frame isn’t included in the initial span, so the segmentation boundary disappears.
- Use the Roto Brush tool to add foreground and background strokes, defining the segmentation boundary.
A new base frame (represented by a gold rectangle) is added to the time ruler, and the Roto Brush Span extends twenty frames behind and ahead of the new base frame.
- If there is a gap between the initial span and the new span, click the left edge of the new span, and drag it back to the edge of the previous one.
- Press 1 to move backward one frame (from the base frame) and refine the segmentation boundary.
- Continue to move backward through the span, refining the segmentation boundary until you reach the beginning of the new span.
- Move back to the base frame, and then press 2 to move forward, correcting the segmentation boundary in each frame as necessary.
- When you reach 3:00, create a new base frame at 3:20, and repeat the process. Create an additional base frame at 5:00, refining the segmentation boundary in each frame in the footage.
- Move the time marker to the beginning of the time ruler in the Layer panel, and then press 2 repeatedly to progress through the clip. If you notice any errors, correct them with the Roto Brush tool.
- Choose File > Save to save your work so far.
Freezing your Roto Brush tool results
You’ve put a fair amount of time into creating the segmentation boundary across all the frames in this clip. After Effects has cached the segmentation boundary, so it can recall it without having to make the calculations again. To keep that data easily accessible, you’ll freeze it. This reduces the processing demands on your system so you can work faster in After Effects.
Once the segmentation is frozen, you cannot edit it unless you unfreeze. Refreezing the segmentation is time-consuming, so it’s best to refine the segmentation boundary as much as possible before freezing.
- Click the Freeze button in the lower-right area of the Layer panel. The Freezing Roto Brush dialog box displays a progress bar as it freezes the Roto Brush tool results. Freezing may take a few minutes. As it freezes the information for each frame, the cache line turns from green to blue. When it has finished freezing, a blue warning bar appears above the time ruler in the Layer panel, reminding you that the segmentation is frozen.

- Click the Toggle Alpha Boundary button () in the Layer panel to see the matte. Then click the Toggle Transparency Grid button (
 ). Move the time marker across the time ruler to see the flamingo move without the distraction of the background.
- Choose File > Save. After Effects saves the frozen segmentation information with the project.
Fine-tuning the matte
Roto Brush does a pretty good job, but there may be stray bits of background in the matte, or foreground areas that didn’t make it into the matte. You’ll clean those up, and then refine the edge.
Touching up the matte
Depending on your clip, there may be some areas of the foreground subject that the Roto Brush tool cannot separate from the background. You can touch up your matte by painting directly on the alpha channel.
- Select the Brush tool (
 ) in the Tools panel.
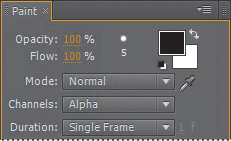
- In the Paint panel, select the following settings:
• Opacity: 100%
• Channels: Alpha
• Duration: Single Frame
- In the Brushes panel, select a brush size appropriate for the area you’re touching up. For a defined edge, a Hardness value of 100% is usually best.
- Step through each frame of the animation, and remove any areas of the background that remain. If you need to add to the foreground, switch the foreground and background colors. Painting in black adds to the matte; painting in white removes from it.
Refining the matte
When you use the Roto Brush tool, After Effects applies the Roto Brush effect to the layer. You can modify the effect using settings in the Effect Controls panel. You’ll use those settings to further refine the edge of the matte.
Tip
You can access the Refine Matte settings when you’ve created a matte without using the Roto Brush tool, too. Simply choose Effect > Matte > Refine Matte.
As you’ve moved through the clip, you’ve probably noticed that the segmentation boundary seems a bit jittery. You’ll use the Reduce Chatter setting to make it smoother.
- Click the Effect Controls tab, if the Effect Controls panel isn’t active.
- Click the box next to Refine Matte to select it.
- Increase the Reduce Chatter amount to 75%.
The Reduce Chatter value determines how much influence the current frame has when performing a weighted average across adjacent frames.
- Increase the Smooth value to 3.0.

- Increase the Feather amount to 40% and the Choke amount to 30%.
Feathering the edge of a matte helps to blend it with the rest of the composition.
- Save your work so far.
Creating a transition from the full clip to the foreground
You’ve separated the flamingo from the background. Now you’ll add other elements to the composition. First, you’ll create a transition from the full clip to the isolated flamingo.
- Close the Layer panel, revealing the Composition panel.
- Select the Project tab to bring the Project panel forward. Then drag the Flamingo.mov file from the Project panel to the Timeline panel, adding it to the bottom of the layer stack.
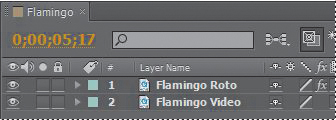
There are two Flamingo.mov layers in the Timeline panel. You’ll rename them to reduce confusion.
- Select the second Flamingo.mov layer, and press Enter or Return. Rename the layer Flamingo Video, and press Enter or Return again. Rename the Flamingo.mov layer (the top layer) Flamingo Roto.
You want the full clip (the Flamingo Video layer) to be fully visible for the first 20 frames. Then you want it to dissolve over 15 frames.
- Go to 0:20 in the time ruler.
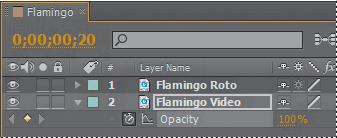
- Select the Flamingo Video layer, and then press the T key to reveal the Opacity property for the layer.
- Click the stopwatch icon next to the Opacity property to create an initial keyframe.
- Go to 1:05, and change the Opacity value to 0. After Effects creates another keyframe.

- Move the current-time indicator from 0:15 to 1:05 to manually preview the background video fading.
You don’t need to run the Flamingo Video clip after it fades, so you’ll trim the layer.
- Go to 1:10. Press Alt+] (Windows) or Option+](Mac OS) to trim the layer.
You want the isolated flamingo to move to the left side of the frame so that you can place text to its right. You’ll use Position keyframes to move the flamingo.
- Select the Flamingo Roto layer, and then press the P key to reveal the Position property for the layer.
- Go to 1:05, and click the stopwatch icon next to the Position property to create an initial keyframe.

- Go to 2:05, and change the Position value to 43.2, 240.
- Click the Position property name to select all keyframes for the layer, and then choose Animation > Keyframe Assistant > Easy Ease.
- Hide the properties for the Flamingo Roto and Flamingo Video layers, and save the file.
Creating the logo
Now you’ll use the isolated flamingo to create the Casa Luna Wildlife Sanctuary logo. You’ll create a border for the logo, and then mask the part of the flamingo you don’t want to include in the logo.
Adding a border
You’ll create a rectangle and give it some depth with a layer style.
- Click an empty area of the Timeline panel to deselect all layers.
- Go to 2:20.
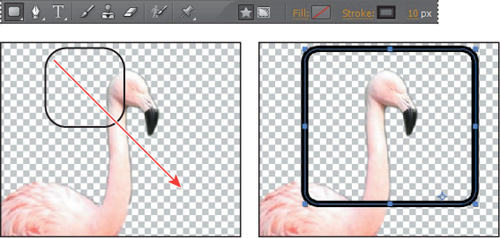
- Select the Rounded Rectangle tool, hidden behind the Rectangle tool in the Tools panel.
- Click the word Fill in the Tools panel to open the Fill Options dialog box. Select None, and click OK.
- Click the word Stroke in the Tools panel to open the Stroke Options dialog box. Select Solid Color, and click OK.
- Click the Stroke color box, select black, and click OK.
- In the Tools panel, change the Stroke Width to 10 px.
- Click the Toggle Transparency Grid button at the bottom of the Composition panel, so you’ll be able to see the black border you’re about to draw.
- In the Composition panel, draw a rounded box around the flamingo’s head, neck, and upper back. Press the Shift key as you draw to create a rounded square. If you need to reposition the shape, use the Selection tool.
- Right-click (Windows) or Control-click (Mac OS) Shape Layer 1 in the Timeline panel, and then choose Layer Styles > Bevel And Emboss. The default values will work for this project.
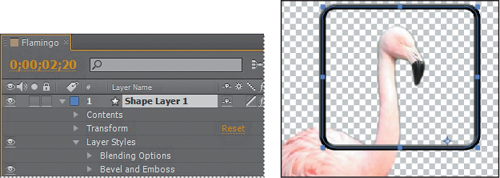
The border now appears to have depth.
- With Shape Layer 1 selected, press Alt+[ (Windows) or Option+[ (Mac OS) to trim the In point of the layer to the current time (2:20).
- Hide the properties for Shape Layer 1, and save the file.
Using Track Matte to create a black silhouette
The logo contains a black silhouette of the flamingo. To create the silhouette, you’ll create a solid black layer and mask the layer to conform to the shape of the Flamingo Roto layer. However, when you do this, the Flamingo Roto layer won’t be visible. You’ll apply the Track Matte to a separate instance of the Flamingo Roto layer.
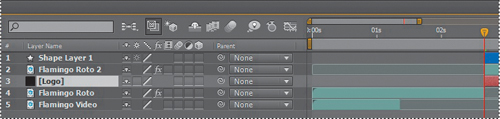
- Select the Flamingo Roto layer, and press Ctrl+Shift+D (Windows) or Command+Shift+D (Mac OS) to split the layer.
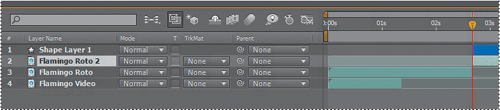
Flamingo Roto 2 appears above Flamingo Roto in the Timeline panel. The current-time indicator was at 2:20 when you split the layer, so 2:20 becomes the Out point for Flamingo Roto and the In Point for Flamingo Roto 2. Splitting a layer is faster than duplicating a layer and then trimming the In and Out points for both layers.
- Choose Layer > New > Solid.
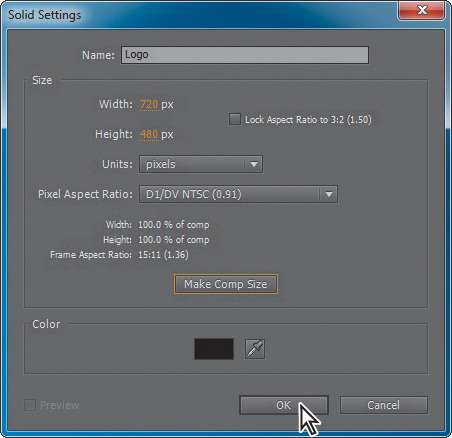
- In the Solid Settings dialog box, name the solid Logo, click the Make Comp Size button, set the color to black, and click OK.
The Logo layer is added to the top of the layer stack in the Timeline panel.
- Move the Logo layer below the Flamingo Roto 2 layer in the Timeline panel.
- With the Logo layer selected, press Alt+[(Windows) or Option+[ (Mac OS) to make 2:20 the In Point for the layer. It becomes active at the same time as the Flamingo Roto 2 layer.
- At the bottom of the Timeline panel, click the Toggle Switches/Modes button to display the Track Matte column.
- On the Logo layer, choose Alpha Matte “Flamingo Roto 2” from the TrkMat pop-up menu. The flamingo becomes solid black.

The solid black is matched with the flamingo matte, but the flamingo extends outside the boundary border. You’ll mask the Logo layer.
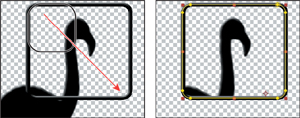
- Select the Rounded Rectangle tool in the Tools panel.
- With the Logo layer selected, draw a mask in the same shape and position as the border.
- Right-click (Windows) or Control-click (Mac OS) the Logo layer, and choose Layer Styles > Bevel And Emboss. Use the default settings to match the bevel of the border.
You’ve created the company logo. Now you’ll precompose the layers you used in the logo so you can freeze the entire logo in the next exercise.
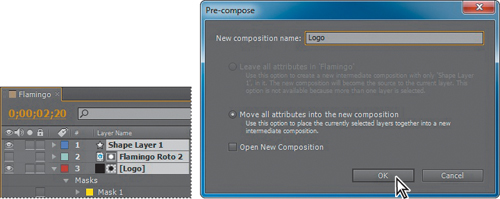
- Select the Shape Layer 1, Flamingo Roto 2, and Logo layers in the Timeline panel. Then choose Layer > Pre-compose. Name the new composition Logo. Make sure Move All Attributes Into The New Composition is selected, and that Open New Composition isn’t selected. Then click OK.
- Save your project.
Freezing a frame’s properties
You’ve created the logo, but the flamingo continues to move within the border as the clip progresses. You’ll freeze the logo so it stays consistent for the rest of the project, and then fade it into the logo.
- Select the Logo layer, and go to 3:00.
At 3:00, the flamingo is in the position you want to use for the static logo.
- Choose Layer > Time > Freeze Frame.
The rest of the time bar disappears in the Timeline panel; all that remains for the Logo layer is the freeze frame icon at 3:00.

Now, you’ll fade the full-color flamingo to the the black logo.
- Move the Logo layer below the Flamingo Roto layer in the Timeline panel.
- Select the Flamingo Roto layer, and drag the layer’s Out point to 3:00.
- With the Flamingo Roto layer selected, press the T key to reveal the Opacity property for the layer.
- Go to 2:20, and click the stopwatch icon (
 ) next to the Opacity property to create an initial keyframe.
 - Go to 3:00, and change the Opacity value to 0. After Effects adds a keyframe.
- Select the Logo layer in the Timeline panel, and press the T key to reveal its Opacity property.
- Click the stopwatch icon to set an initial keyframe. The Opacity should be 100%.
- Move back to 2:20, and change the Opacity value to 0%.
The flamingo transitions from full-color, full-motion video to a solid, still logo.
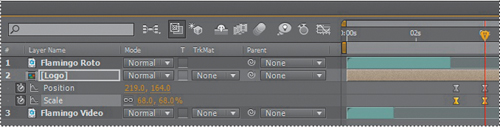
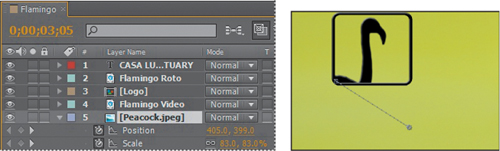
- With the Logo layer still selected, go to 3:05. Press the P key to reveal the Position property for the layer; then hold the Shift key and press the S key to reveal the Scale property as well.
- Set initial keyframes for both the Scale and Position properties.
- Go to 4:00, and change the Position to 219, 164 and the Scale amount to 68%.
- Click the Position property for the Logo layer to select all its keyframes. Choose Animation > Keyframe Assistant > Easy Ease.
- Repeat step 14 to add Easy Ease to the Scale keyframes.
- Save the file.
Animating text
To complete the logo, you’ll add the organization’s name.
- Select the Horizontal Type tool from the Tools panel.
- In the Character panel, select the following settings:
• Font Family: Arial
• Font Style: Bold
• Fill Color: Black
• Font Size: 48 px
- In the Paragraph panel, make sure Left Align Text is selected.
- In the Composition panel, click an insertion point to the right of the flamingo logo, and type the following, pressing Enter or Return between each line:

CASA LUNA
WILDLIFE
SANCTUARY
- Select the Text 1 layer in the Timeline panel, and press the P key to display the Position property. Change the Position value to 365, 97.
- Go to 2:05, and press Alt+[ (Windows) or Option+[ (Mac OS) to trim the In point of the Casa Luna Wildlife Sanctuary layer.
You have the text in position. Now you’ll apply an animation preset to it.
- Click the Effects & Presets tab to bring the panel forward. In the panel’s search box, type Fade Up Lines. Then double-click the Fade Up Lines preset to apply it to the text layer.

The default timing for this preset takes too long for this project. You’ll adjust the Range Selector 1 Start keyframe.
- With the Casa Luna Wildlife Sanctuary layer selected in the Timeline panel, press the U key to reveal the layer’s keyframes.
- Drag the end keyframe for the Range Selector 1 Start property to 3:05. (You may need to scroll to the right to see the end keyframe in the Timeline panel.)
Now you need to ensure that the text layer follows the Logo layer. You’ll use parenting to keep the two in sync.
- Go to 2:00. In the Casa Luna Wildlife Sanctuary layer, choose 3. Logo from the Parent pop-up menu.

- Save your work so far.
Adding a background image
You could dissolve to a transparent background, but for this project, you’ll add a peacock image as the final visual component.
- Drag the Peacock.jpeg element from the Project panel into the Timeline panel, placing it at the bottom of the layer stack.
- Press the P key to reveal the Position property for the layer, and change the Position value to 405, 399.
- Press the Shift key and the S key to reveal the Scale property as well. Change the Scale amount to 83%.
- Go to 3:05. Create initial keyframes for both the Scale and Position properties.
- Move to 4:00. Change the Scale amount to 45% and the Position value to 153, 240.

- Select the Position property to select both keyframes. Right-click (Windows) or Control-click (Mac OS) one of the keyframes, and choose Keyframe Assistant > Easy Ease.
- Select the Scale property to select both keyframes. Right-click (Windows) or Control-click (Mac OS) one of the keyframes, and choose Keyframe Assistant > Easy Ease.
Easy Ease makes movement more natural-looking. So does motion blur, so you’ll add that now.
- Click the Toggle Switches/Modes button at the bottom of the Timeline panel. Then select the Motion Blur switch (
 ) for every layer except the Flamingo Video layer.

The Flamingo Video layer doesn’t need motion blur because it doesn’t move.
- Select the Motion Blur For All Layers button to enable motion blur.
- Hide any properties that are open for any layer.
Adding audio
All that is missing now is the audio file. You imported it earlier, so you just need to add it to the Timeline panel.
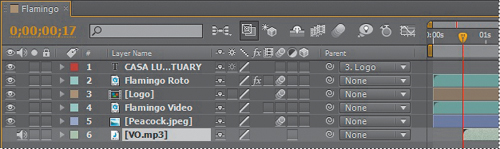
- Drag the VO.mp3 file from the Project panel to the bottom of the layer stack in the Timeline panel.
- Go to 0:17. With the VO.mp3 layer selected, press the [ (left bracket) key to reposition the layer to start at 0:17.
- Choose File > Save to save the finished project.
- Make a RAM preview to view the final project, or render it according to the process described in Lesson 14, “Rendering and Outputting.”
Review questions
1 When would you use the Roto Brush tool?
2 What is the segmentation boundary?
3 How can you refine a matte you created with the Roto Brush tool?
Review answers
1 Use the Roto Brush tool any time you would traditionally use rotoscoping. It’s particularly useful for removing a foreground element from the background.
2 The segmentation boundary is the boundary between the foreground and background. The Roto Brush tool adjusts the segmentation boundary as you progress through the frames in the Roto Brush span.
3 You can touch up a matte using the Brush tool. To refine the edges of a matte, use the settings in the Roto Brush effect section of the Effect Controls panel.