12. Working with Flash
This lesson will take about 30 minutes to complete. Before beginning, make sure you have copied the files for Lesson 12 to your hard drive as described in the “Getting Started” section at the beginning of the book. If you are starting from scratch in this lesson, use the method described in the “Jumpstart” section of “Getting Started.”
![]()

Dreamweaver makes the integration of Flash for animation and video to a web page as simple as 1, 2, 3.
Understanding Flash
The web can provide a variety of experiences to the average user. One second, you are downloading and reading a best-selling novel. Next, you’re listening to your favorite radio station or performing artist. Then, you’re watching live television coverage or a full-length movie. In the past, much of this content was provided in various ways using a hodgepodge of applications, plug-ins, and coder-decoders (codecs) that could transfer data across the Internet to your computer and browser, often with enormous difficulties and incompatibilities. A format that worked in one browser was incompatible with another. Applications that worked in Windows didn’t on the Mac. To this mess, entered Flash.
Adobe Flash is renowned for its multimedia functionality. From its humble beginnings as an animation program, Flash has rapidly expanded its realm to include high-end advertisements, interactive content, user interfaces, games, and even video. As befits this popular and versatile authoring tool, Flash Player—the application required to play Flash’s SWF and FLV files—enjoys the widest distribution of any browser plug-in.
Dreamweaver seamlessly integrates with Flash. SWF files can be easily inserted and previewed in any document window. Moreover, key properties, such as Autoplay and Loop, are quickly modified in the Property inspector. In many cases, if the source file is available, you can even edit the SWF file in Flash and export it to Dreamweaver.
Previewing a completed file
To see what you will work on in this lesson, preview the completed page in the browser. This is the travel page of the travel site you assembled in the previous lesson.
1 Launch Adobe Dreamweaver CS5.
2 If necessary, press Ctrl-Shift-F/Cmd-Shift-F to open the Files panel and choose DW-CIB from the site list.
3 In the Files panel, expand the lesson12 folder.
4 Select the travel_finished.html file and preview it in your primary browser.
The page includes two Flash elements: the banner animation at the top of the MainContent region and the video inserted in the sidebar.
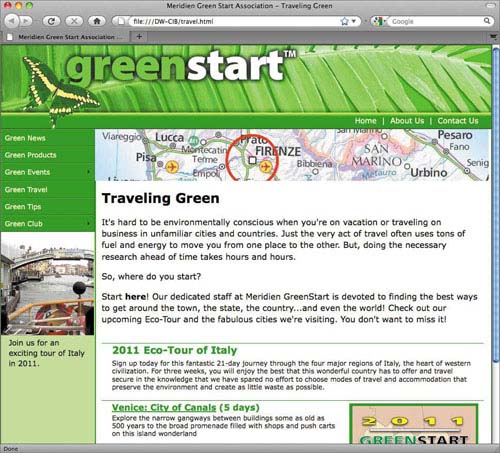
5 Note that the Flash banner ad plays once, immediately when the page loads completely.
6 To view the video, move your pointer over the video in the sidebar and click the Play button that appears.
You’ll notice that if you move your cursor away from the video, the controls fade, but return once your cursor is positioned over the video again.
7 When you’re finished, close your browser and return to Dreamweaver.
Adding Flash animation to a page
As you learned in Lesson 9, “Working with Images,” most web graphics are pixel-based. Flash’s claim to fame and popularity is based on the fact that it enables you to create vector-based animation for web use. Using vector art drastically reduces file size compared to similar pixel-based animation. And best of all, the objects you animate can be programmed with interactivity and intelligence. In this exercise, you’ll insert a vector-based Flash banner animation into the MainContent area of your web page. While creating original Flash animations and videos is beyond the scope of this book, check out the Adobe Flash Professional CS5 Classroom in a Book (Adobe Press, 2010) to learn how to create these types of items and much more.
1 Open travel.html from the site root folder. Or, if you are starting from scratch in this exercise, see the “Jumpstart” instructions in the “Getting Started” section at the beginning of the book.
Note
If you are starting from scratch in this exercise, see the “Jumpstart” instructions in the “Getting Started” section at the beginning of the book.
The banner needs to be inserted outside any text elements.
2 Insert the cursor in the Traveling Green heading text and select the <h1> tag selector. Press the Left Arrow key to move the cursor outside the <h1> element.
3 Select Insert > Media > SWF.
4 When the Select File dialog box appears, navigate to the movie folder in the site root folder and select ecotour.swf. Click OK/Choose.
The Object Tag Accessibility Attributes dialog box appears.
5 In the Title field, type 2011 Eco-tour of Italy and click OK.

Dreamweaver inserts the Flash code, represented in Design view by a placeholder element. You can preview your newly inserted movie right in Dreamweaver.
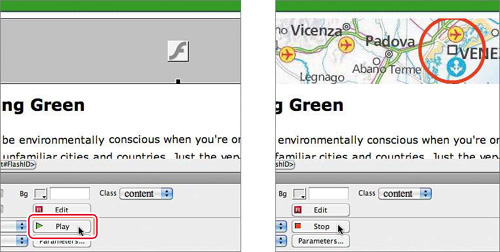
6 If necessary, select Window > Properties to open the Property inspector. In the Property inspector, click Play to preview the movie in Dreamweaver.
Note
This SWF file is not meant to loop and was created to run only once. Some movies will loop, if desired, and can be set to do so using the Loop option in the Property inspector. Loop may be selected by default in your Property inspector. It’s harmless to leave it selected, because it won’t override specific settings built into the file.
Make sure that Autoplay is selected in the Property inspector so that the movie will play automatically when the page loads into the browser.

7 Save the file.
Code inserted in the page can ensure that viewers are using the latest version of Flash Player.
8 Switch to Code view. Find this block of code; it should appear around line 87:
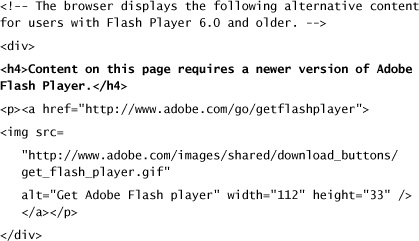
If a visitor browses your site using a Flash Player older than version 6.0, they will see the message set in this block of code instead of viewing the movie. You can customize or personalize the message contained within the <h4> tags, as shown in the figure below. The user will be offered the option to download the latest Flash Player.

9 Return to Design view.
You can use Flash for something large, as in this banner ad, or something quite small, such as a menu button or animated logo. Although the process was handled totally by Dreamweaver, in CS4 some significant changes were made in the way the program now writes the basic code. To learn more about these changes, see the sidebar “Flash embedding?”
Before you move on to the next exercise, there’s a small aesthetic adjustment you need to make in the layout that involves the Flash banner ad. You may have noticed the extra whitespace that appears above the banner. There’s no default margin or padding applied to the Flash object, so the spacing must be the result of some existing rule.

10 Click the Flash banner to select it, if necessary. Examine the tag selectors, and activate Code Navigator by pressing Ctrl-Alt-N/Cmd-Opt-N or by clicking its icon. Examine the rules that affect the banner.
You should quickly identify that the .content rule applies 10 pixels of padding to the top of the <div>. To get rid of the whitespace, you’ll have to delete the top-padding specification.
11 In the CSS Styles panel, select the .content rule and delete the top padding from the Properties section of the panel.

Note
The top padding was a part of the predefined CSS that came with the original layout. Although you did not create it yourself, keep an eye out for any detrimental impact this change may have on your other pages.
The whitespace above the banner disappears. The banner is complete.
Adding an FLV file to a page
Because of the sheer ubiquitousness of Flash Player, the introduction of the FLV file was nothing short of revolutionary. Few technologies have had such a dramatic impact. Overnight, all the hassle and confusion over incompatible video formats and players vanished. With recent releases of Flash Player, video quality has increased, along with its market penetration. The FLV file is now the leading video format on the web.
In some cases, video from cameras, phones, and other portable devices can be converted directly to FLV files or added to a Flash document and then exported using the Adobe Flash CS5 Video Encoder. A native Flash video file has an .f4v file extension and can be played in one of two ways:
• Progressive download—Video begins playing after a brief delay during which the first segment is received by the browser. The video continues to download during playback. Progressive download FLV files can be hosted on any standard web server.
• Streaming—Video starts playing immediately and offers advantages over progressive download such as seekability, which means the video playhead can be moved to any position to instantly begin playing at that point. However, streaming FLV files must be hosted on a web host using Flash Media Server.
In this exercise, you’ll place an FLV file in progressive download format on your page.
1 If necessary, open travel.html.
2 Select the image placeholder Sidebar 180 × 150 and press Delete.
3 Choose Insert > Media > FLV.
4 When the Insert FLV dialog box appears, make sure the Video Type pop-up menu is set to Progressive Download Video.
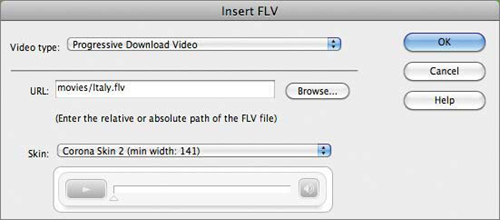
5 Click Browse and navigate to the movie folder in the site root. Choose italy.flv, and click OK/Choose.
6 From the Skin pop-up menu, choose Corona Skin 2.
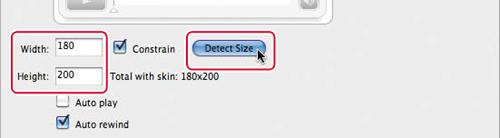
7 Click the Detect Size button to enter the Width and Height of the video automatically. Select the Constrain and Auto Rewind options. Click OK.
The Corona Skin 2 will easily fit the limited width of the sidebar, and it interactively appears and disappears when the visitor moves his cursor over the video.
As with the SWF file, Dreamweaver inserts a placeholder, which can be customized somewhat with the Property inspector. Unlike SWF files, however, FLV files cannot be previewed within Design view and must be viewed in Live view or a browser.
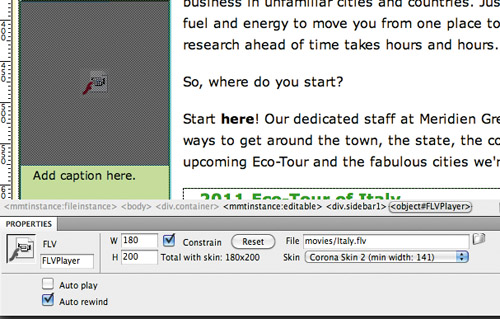
8 Select the caption placeholder and type Join us for an exciting tour of Italy in 2011. Click here to sign up.
Note
The Travel page now contains two notices prompting users to sign up for the Eco-Tour. In Lesson 13, “Working with Forms,” you will create a new page with the sign-up form and link this text to it.
9 Save the file.
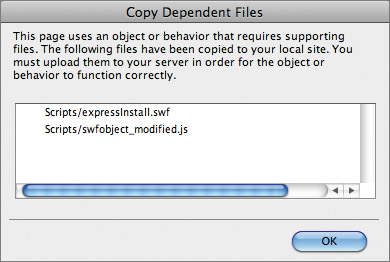
When you save the file, the Copy Dependent Files dialog box may appear displaying a message explaining that the dependent files expressInstall.swf and swfobject_modified.js will be placed into a new Scripts folder. These files are essential for running an FLV file in the browser and must be uploaded to your web server to support Flash functionality. If and when this dialog box appears, click OK.
Note
The Copy Dependent Files dialog box may not appear for users following the jumpstart method in this lesson. The files already exist in your site folder and Dreamweaver doesn’t need to copy them.
10 Preview the page in Live view, or preview the page in the browser. If the video controls are not visible, move your cursor over the still image to display them. Click the Play button to view the movie.
Note
Some versions of Microsoft Internet Explorer may block active content until you give the browser permission to run it. If you don’t have Flash Player, or if it’s not the latest version, you may be asked to download the new version.
There is no sound in this movie, but the controls include a speaker button to turn the sound off and on.

11 When you’re finished, switch back to Design view.
You’ve added an FLV file and controls that allow the user to start and stop the video, and to turn the sound off and on. You also detected the size of the video automatically.
Review questions
1 What is the difference between Flash animation and other types of web-compatible animation?
2 What is the advantage of using FLV files?
3 Identify two methods for delivering an FLV file. Which format does not require a specialized web server?
4 What is alternative content?
5 What role do “dependent files” play in the operation of an FLV file?
Review answers
1 Flash animation can be built with vector-based graphics, which dramatically reduces file size and allows for intelligence and interactivity.
2 FLV files allow you to play video directly through Flash Player, eliminating the worry about incompatible codecs and plug-ins.
3 The two FLV file playback methods are “progressive download” and “streaming.” Progressive download files do not require a specialized server, while streaming files require the Flash Media Server.
4 Alternative content is text or other data that displays automatically if the user does not have Flash Player, or if his or her version of Flash Player is outdated.
5 Dependent files provide essential functionality on the Internet for playing Flash components and must be uploaded to your server along with the relevant HTML and video.