
8. Working with Text, Lists, and Tables
This lesson will take about 2 hours and 10 minutes to complete. Before beginning, make sure you have copied the files for Lesson 8 to your hard drive as described in the “Getting Started” section at the beginning of the book. If you are starting from scratch in this lesson, use the method described in the “Jumpstart” section of “Getting Started.”
![]()

Dreamweaver provides numerous tools for creating, editing and formatting web content, whether it’s created within the program or imported from other applications.
Previewing a completed file
To get a sense of the file you will work on in the first part of this lesson, let’s preview the completed pages in the browser.
1 Launch Adobe Dreamweaver CS5, if necessary. Close any files currently open if Dreamweaver is running.
2 If necessary, press Ctrl-Shift-F/Cmd-Shift-F to open the Files panel, and select DW-CIB from the site list.
3 In the Files panel, expand the lesson08 folder.
Dreamweaver allows you to open one or more files at the same time.
4 Select contactus_finished.html. Press Ctrl/Cmd and select events_finished.html, news_finished.html, and tips_finished.html.
By pressing Ctrl/Cmd before you click, you can select multiple non-consecutive files.
5 Right-click any of the selected files. Choose Open from the context menu.
All four files open. Tabs at the top of the document window identify each file.
6 Click the news_finished.html tab to bring it to the top.

Note the headings and text elements used.
7 Click the tips_finished.html tab to bring it to the top.
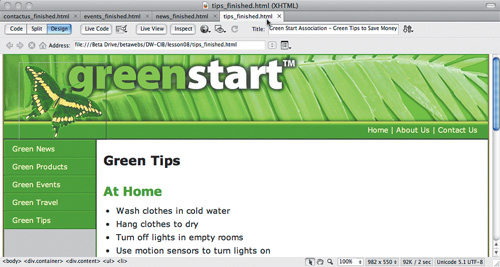
Note the bulleted list elements used.
8 Click the contactus_finished.html tab to bring it to the top.
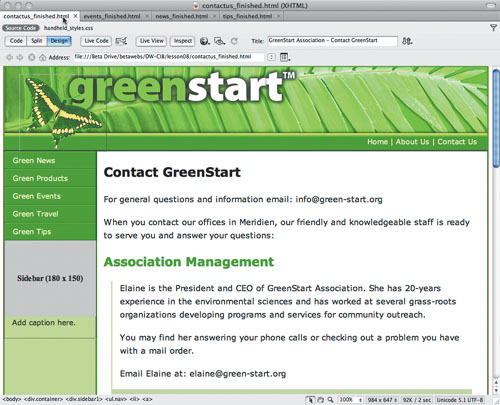
Note that text elements are indented and formatted.
9 Click the events_finished.html tab to bring it to the top.
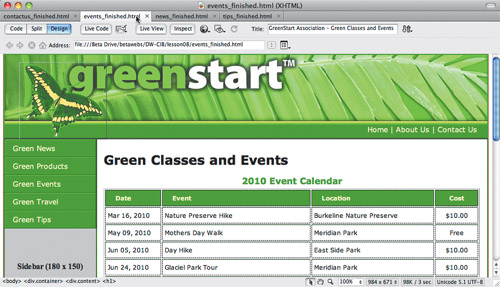
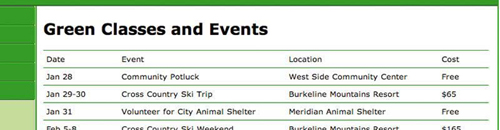
Note the two table elements used. In each of the pages, there are a variety of elements used, including headings, paragraphs, lists, bullets, indented text, and tables. In the following exercises, you will create these pages and learn how to format each of these elements.
10 Choose File > Close All.
Importing text
In this exercise, you’ll create a new page from the site template and then insert heading and paragraph text from a text document.
1 Choose Window > Assets to display the Assets panel. In the Template category, right-click mygreen_temp and choose New From Template from the context menu.

A new page is created based on the site template.
2 Save the file as news.html in the site root folder.
3 In the Files panel, double-click green_news.rtf in the lesson08 > resources folder.
The file opens in a compatible program. The text is unformatted and features extra lines between each paragraph, as described in Lesson 4, “Getting a Quick Start.”
4 In the text editor or word processing program, press Ctrl-A/Cmd-A to select all the text. Press Ctrl-C/Cmd-C to copy the text.
5 Switch back to Dreamweaver. Select the placeholder heading Add main heading here in <div.content> and type Green News to replace it.
6 Select the placeholder paragraph text Add content here. Press Ctrl-V/Cmd-V to paste the text from the clipboard.
The clipboard text replaces the placeholder. The text contains news items separated by headings.
7 Save the file.
Creating headings
In HTML, the tags—<h1>, <h2>, <h3>, <h4>, <h5>, and <h6>—create headings. Any browsing device, whether it is a computer, a Braille reader, or a cell phone, interprets text formatted with any of these tags as a heading. Headings organize HTML pages into meaningful sections with helpful titles, just as they do in books. Following the semantic meaning of HTML tags, the news content begins with a heading “Green News” formatted as an <h1>. To be semantically correct, only one such heading should be used per page. All other headings should descend in order from this one. Since each news story has equal importance, they all can begin with a second-level heading, or <h2>. At the moment, all the pasted text is formatted as <p> elements. Let’s format the news headings as <h2> elements.
1 Select the text Green Buildings earn more Green and choose Heading 2 from the Format menu in the Property inspector.
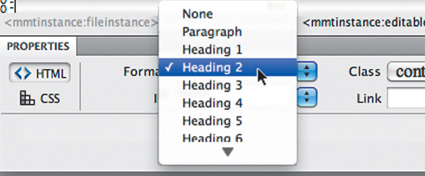
The text will be formatted as an <h2> element.
Tip
If the Format menu is not visible, you need to select the HTML mode of the Property inspector.
2 Repeat step 1 with the text Shopping green saves energy, Recycling isn’t always Green, and Fireplace: Fun or Folly?
All the selected text should now be formatted as <h2> elements. Let’s create a custom rule for this element to set it off from the other headings.
3 Insert the cursor in any of the newly formatted <h2> elements. Choose Window > CSS Styles to open the CSS Styles panel, if necessary.
4 Select the .content h1 rule in mygreen_styles.css in the CSS Styles panel before you click the New CSS Rule icon.
Tip
A good designer carefully manages the naming and order of CSS rules. By selecting a rule in the panel before clicking the New CSS Rule icon, Dreamweaver inserts the new rule immediately after the selection. If the new rule doesn’t appear in the proper location, just drag it to the desired position.
5 Choose Compound from the Selector Type menu. Click the Less Specific button once. Click OK.
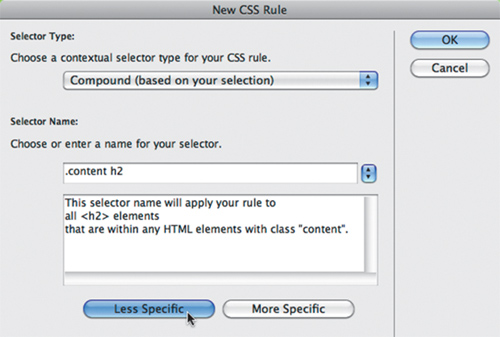
The “New CSS Rule Definition For .content h2” dialog box appears.
6 In the Type category, enter 140% for the Font-size field and #090 in the Color field.
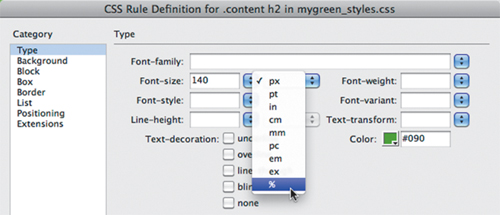
7 In the Box category, enter 5px only in the Bottom margin field. Click OK.
Note
By default, each heading tag—<h1>, <h2>, <h3> and so on—is formatted smaller than the preceding tag. This formatting reinforces the semantic importance of each tag. Although size is an obvious method of indicating hierarchy it’s not a requirement; feel free to experiment with other styling techniques, such as color, indenting, borders and background shading to create your own hierarchical structure.
8 In the document Title field, select the placeholder text Add Title Here. Type Green News to replace the text. Press Enter/Return to complete the title.
9 Save the file.
Creating lists
Text should be formatted to add meaning, organization, and clarity to the content. In the same way, list and blockquote elements carry with them additional semantic meaning.
Lists are the workhorses of the web because they are easier to read than blocks of dense text and also help users find answers quickly. In this exercise, you will make an unordered list.
1 Choose Window > Assets to bring the Assets panel to the front. In the Template category, right-click mygreen_temp and choose New From Template from the context menu.
A new page is created based on the template.
2 Save the file as tips.html in the site root folder.
3 In the document Title field, select the placeholder text Add Title Here. Type Green Tips to Save Money and Energy to replace the text. Press Enter/Return to complete the title.
4 In the Files panel, double-click green_tips.rtf in the lesson08 > resources folder.
5 In the text editor or word processing program, press Ctrl-A/Cmd-A to select all the text. Press Ctrl-C/Cmd-C to copy the text.
6 Switch back to Dreamweaver. Select the placeholder heading Add main heading here in <div.content> and type Green Tips to replace it.
7 Select the placeholder paragraph text Add content here. Press Ctrl-V/Cmd-V to paste the text from the clipboard.
The text consists of three individual lists of tips to save energy and money at home, at work, and in the community. First, let’s format the headings that identify the tip categories.
8 Select the text At Home and format it as a Heading 2.
9 Repeat step 8 with the text At Work and In the Community.
The remaining text is currently formatted entirely as <p> elements. Dreamweaver makes it easy to convert this text into an HTML list. Lists come in two flavors: ordered and unordered.
10 Select all the <p> formatted text between the headings At Home and At Work. In the Property inspector, click the Ordered List (![]() ) icon.
) icon.
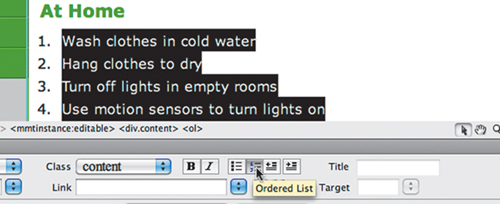
An ordered list adds numbers automatically to the entire selection. Semantically, it prioritizes each item, giving them an intrinsic value relative to one another. As you may see, this list doesn’t seem to be in any particular order. Each item is more or less equal to the next one. An unordered list is another method of formatting a list when the items are in no particular order. Before you change the formatting, let’s take a look at the markup.
11 Switch to Split view. Observe the list markup in the Code section of the document window.
The markup consists of two elements: <ol> and <li>. Note how each line is formatted as an <li> list item. The <ol> parent element begins and ends the list and designates it as an ordered list. Changing the formatting from numbers to bullets is simple and can be done in Code or Design view.
Tip
The easiest way to select the entire list is to use the <ol> tag selector.
Before changing the format, ensure that the formatted list is still entirely selected.
12 In the Property inspector, click the Unordered List (![]() ) icon.
) icon.
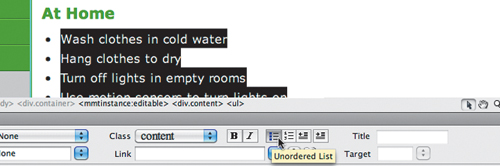
All the items are now formatted as bullets. Observe the list markup. The only thing that has changed is the parent element. It now says <ul> for unordered list.
Tip
You could also change the formatting by editing the markup manually in the Code view window. But, don’t forget to change both the opening and closing parent elements.
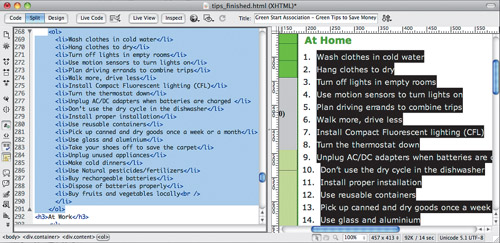
13 Select all the <p> formatted text between the headings At Work and In the Community. In the Property inspector, click the Unordered List (![]() ) icon.
) icon.
14 Repeat step 13 with all the text following the heading Around the Community.
All three lists are now formatted with bullets.
15 Select File > Save.
Creating text indents
Today, many designers use the <blockquote> element as an easy way to indent headings and paragraph text. Semantically, the <blockquote> element is intended to identify long sections of text quoted from other sources. Visually, text formatted thusly will appear indented and set off from the regular paragraph text and headings. But, if you want to comply with web standards, you should leave this element for it intended purpose, and instead use custom CSS classes when you want to indent text, as you will in this exercise.
1 Create a new page from the template mygreen_temp. Save the file as contact_us.html in the site root folder.
2 In the document Title field, select the placeholder text Add Title Here.
Type Contact GreenStart to replace the text.
Press Enter/Return to complete the title.
3 Switch to the Files panel and double-click contact_us.rtf in the lesson08 folder.
4 In the text editor or word processing program, press Ctrl-A/Cmd-A to select all the text. Press Ctrl-C/Cmd-C to copy the text.
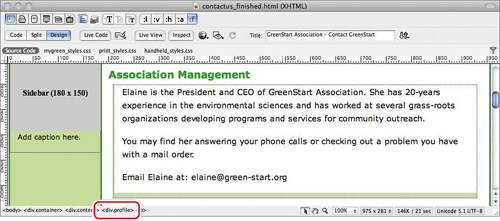
5 Switch back to Dreamweaver. Select the placeholder heading Add main heading here in <div.content> and type Contact GreenStart Association to replace it.
6 Select the placeholder paragraph text Add content here. Press Ctrl-V/Cmd-V to paste the text from the clipboard.
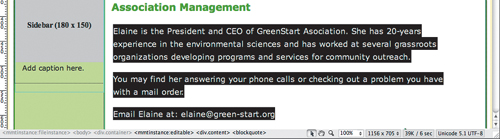
The text consists of five department sections, including headings, descriptions, and email addresses for the managing staff of GreenStart.
7 Select the text Association Management and format it as a Heading 2.
8 Repeat step 7 for the text Education and Events, Transportation Analysis, Research and Development, and Information Systems.
To indent a single paragraph, you can create and apply a custom class. In this case, you’ll insert the paragraphs into a <div> element to help better organize the information graphically.
9 Select the three subsequent descriptive paragraphs ending with Elaine’s email address after the heading Association Management. Don’t include the heading in this selection.
10 If necessary, select Window > Insert to open the Insert panel. Choose the Layout category in the Insert panel. Click the Insert Div Tag button.
The Insert Div Tag dialog box appears. The Insert menu displays Wrap Around Selection.
11 Insert the cursor in the Class field. Type profile and click OK.
The selected text is inserted into a new <div> element. The tag selector displays <div.profile>. Before inserting the other sections into a similar <div> element, let’s create the CSS formatting.
12 Insert the cursor anywhere in <div.profile>. Select .content h2 in the CSS Styles panel. Click the New CSS Rule icon.
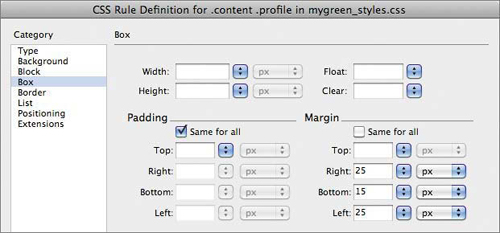
13 In the New CSS Rule dialog box, click Less Specific once to remove .container from the Selector Name field. The selector name field should display .content .profile. Click OK.
Enter 25px in the Right and Left Margins only. In the Bottom margin only, enter 15px.
15 In the Border category, enter the following specifications for the Bottom border only: solid, 10px, #CADAAF.
16 Enter the following specifications for the Left border only: solid, 2px, #CADAAF. Click OK.
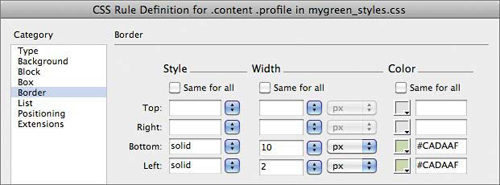
The border helps to visually group the indented text under its heading.
17 Select the descriptive paragraphs after the heading: Education and Events, Transportation Analysis. Click the Insert Div Tag button.
The Insert Div Tag dialog box appears. The Insert field displays: Wrap Around Selection.
18 Choose profile from the Class field menu. Click OK.
The paragraphs are inserted in a new <div.profile>.
19 Repeat steps 17 and 18 for the text after each department heading: Research and Development, and Information Systems.
Each section is indented and displays the custom border.
20 Save all files.
Creating and styling tables
Before the advent of CSS, HTML offered few tools to execute effective page designs. Instead, web designers resorted to using images and tables used to create page layouts. Today, tables are eschewed for page design and layout purposes for a few reasons. Tables are hard to create, format, and modify. They can’t adapt easily to different screen sizes or types. And, certain browsing devices and screen readers don’t see the comprehensive page layouts, they only see tables for what they actually are—rows and columns of data.
When CSS debuted and was promoted as the preferred method for page design, some designers came to believe that tables were bad altogether. That was a bit of an overreaction. Although tables are not good for page layout, they are very good, and necessary, for displaying many types of data, such as product lists, personnel directories, and time schedules to a name a few.
1 Create a new page from the template mygreen_temp. Save the file as events.html in the site root folder.
2 In the document Title field, select the placeholder text Add Title Here. Type Green Events and Classes to replace the text. Press Enter/Return to complete the title.
Dreamweaver enables you to create tables from scratch, to copy and paste them from other applications, or to create them instantly from data supplied by database or spreadsheet programs.
Creating tables from scratch
Dreamweaver makes it easy to create tables from scratch.
1 Select the placeholder heading Add main heading here in <div.content> and type Green Events and Classes to replace it.
2 Select the placeholder paragraph text Add content here. Press Delete.
3 Choose Insert > Table.
The Table dialog box appears. The size and specifications of tables, like most HTML elements, can be controlled by HTML attributes or CSS. Although best practices lean heavily toward using CSS for its power and flexibility, nothing beats the down-and-dirty convenience of HTML. When you enter values in this dialog box, Dreamweaver applies them via HTML attributes.
4 Enter 2 in the Rows field and 4 in the Columns field. Enter 90 in the Table Width field. Choose percent from the Table Width menu. Enter 0 in the Border thickness field. Click OK.

A four-column, two-row table appears below the heading. The table is ready to accept input.
5 Insert the cursor in the first cell of the table. Type Date and press Tab to move into the next cell in the first row.
6 In the second cell, type Event and press Tab. Type Location and press Tab. Type Cost and press Tab to move the cursor to the first cell of the second row.
7 In the second row, type May 1 (in cell 1), May Day Parade (in cell 2), City Hall (in cell 3), and Free (in cell 4).
Inserting additional rows in the table is easy.
8 Press Tab to insert a new blank row in the table.
If this is too slow, Dreamweaver allows you to insert multiple new rows at once.
9 Select the <table> tag selector at the bottom of the document window.
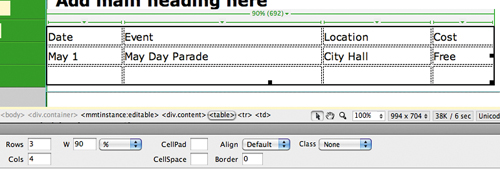
The Property inspector displays the properties of the current table, including the total number of rows and columns.
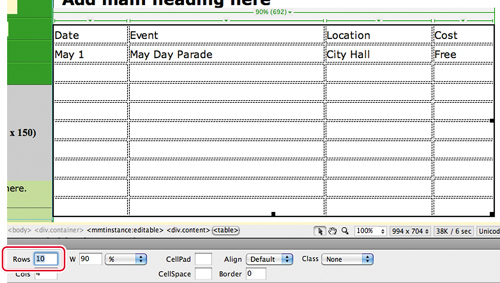
10 Select the number 3 in the Rows field. Type 10 and press Enter/Return to complete the change.
Dreamweaver adds seven new rows to the table.
Copying and pasting tables
Dreamweaver also allows you to move tables from other HTML files or even other programs, using copy and paste.
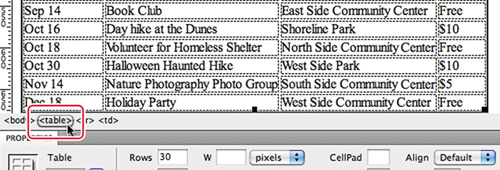
1 Open the Files panel and double-click calendar.html in the lesson08 folder to open it.

Note
Dreamweaver allows you to copy and paste tables from other programs, although you’ll find that this function doesn’t work with every program.
This HTML file will open in its own tab in Dreamweaver. Note the table structure; it has four columns and numerous rows.
2 Insert the cursor in the table. Click the <table> tag selector. Press Ctrl-C/Cmd-C to copy the text.
3 Click the events.html tab to bring the file to the front.
4 Insert the cursor in the table. Select the <table> tag selector. Press Ctrl-V/Cmd-V to paste the table.
The new table element completely replaces the existing table.
5 Save the file.
Styling tables with CSS
Right now, your table aligns to the left, touching the edge of <div.content>, and may or may not stretch all the way across the element. Tables can be formatted by HTML attributes or by CSS rules. Using CSS enables you to control table formatting across the entire site using only a handful of rules.
1 Select the <table> tag selector. Select the .content .profile rule in the CSS Styles panel, and then click the New CSS Rule icon.
The New CSS Rule dialog box appears.
2 Choose Compound from the Selector Type menu, if necessary. Click Less Specific once to remove .container from the Selector Name field. Click OK.
Before you apply formatting to the table, you should know what other settings are already affecting the element and what ramifications new settings could have to your overall design and structure. For example, the .content rule sets the width of the element to 770 pixels. Other elements such as <h1> and <p> feature left padding of 15 pixels. If you apply widths, margins, and/or padding that total up to a number larger than 770 pixels, you could inadvertently break the careful structure of your page design.
3 In the Type category, enter 80% in the Type-size field.
4 In the Box category, enter 740px in the Width field. Enter 15px only in the Left Margin field.
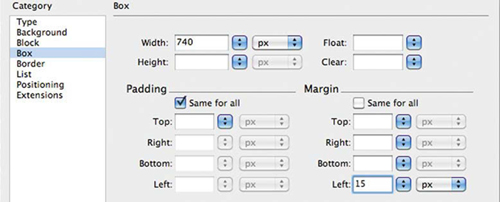
Note
Adding the width to the margin totals 760 pixels, 10 pixels less than the current width of <div.content>. Keep this in mind going forward in case other settings conflict with the table specifications.
5 In the Border category, enter the following specifications only in the Bottom border fields: solid, 3px, and #060. Click OK.

The table resizes, moves away from the left edge of <div.content>, and display a dark green border at the bottom. You have applied the desired styling to specific table properties, but you can’t stop there. The default formatting of the tags that make up table markup is a hodgepodge of different settings that are honored haphazardly in various browsers. You’ll find that the same table can be displayed differently in every browser.
One setting that may cause trouble is the HTML-based cellspacing attribute that functions with a margin-like quality between individual cells. If you leave this attribute blank, some browsers will insert a small space between cells and actually split any cell borders in two. In CSS, this attribute is handled by the border-collapse property. If you don’t want the table borders to be split inadvertently, you need to include this setting in the styling. Unfortunately, this is one of the few specifications you can’t access within the CSS Rule Definition dialog box.
6 Choose Window > CSS Styles to reveal the CSS Styles panel, if necessary. Select the .content table rule and observe the Properties section of the panel.
The Properties section displays the current settings for the .content table rule.
7 Click the Add Property link at the bottom of the list of properties. Type border-collapse and press Tab to move the cursor to the Value column field. Type collapse and press Enter/Return to complete the property.
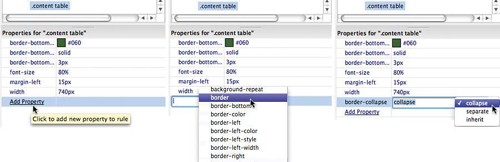
Note
You won’t find the border-collapse property in the pop-up menu, so you have to type it yourself. Once you type the property name, the value menu will then populate properly with the available options.
In Design view you may not see any difference in how the tables are displayed, but don’t let that dissuade you from the need for this attribute.
8 Save all files.
The .content table rule you just created will format the overall structure of every table inserted into <div.content> on any page using this style sheet throughout the site. But the formatting isn’t complete, yet. The widths of the individual columns are not controlled by the <table> element. To control the column widths you need to look elsewhere.
Styling table cells
Just as for tables, specifications for columns can be applied by HTML attributes or CSS, with similar advantages and disadvantages. Formatting for columns is applied through two elements that create the individual cells: <th> for table header and <td> for table data. The table header is a handy element that you can use to differentiate titles and header content from regular data.
It’s a good idea to create a generic rule to reset the default formats of the <th> and <td> elements. Later, you will create custom rules to apply to specific columns and cells.
1 Insert the cursor into any cell of the table. Select the .content table rule before you click the New CSS Rule icon.
2 Choose Compound from the Selector Type menu, if necessary. Click Less Specific once to remove .container from the Selector Name field. Edit the Selector Name to say .content td, .content th and click OK.

The simplified selector will work fine.
3 In the Block category, choose left from the Text-align field menu.
4 In the Box category, enter 5px in all Padding fields.
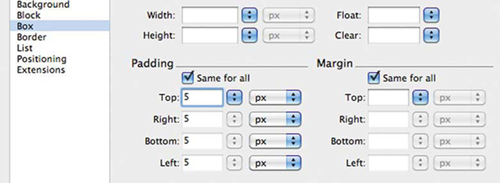
5 In the Border category, enter the following specifications only in the Top Border fields: solid, 1px, and #090. Click OK.

A thin green border appears above each row of the table, making the data easier to read. To see the border properly, you may need to preview the page in Live view first. Headers are usually formatted in bold to help them stand out from the normal cells. You can make them stand out even more by giving them a touch of color.
6 Select .content td, .content th in the CSS Styles panel. Click the New CSS Rule icon. Choose Compound from the Selector Type menu, if necessary. Type .content th in the Selector Name field. Click OK.
Note
Remember that the order of the rules affects the style cascade and how and what formats are inherited.
7 In the Type category, enter #FFC in the Color field.
8 In the Background category, enter #090 in the Background-color field. Click OK.
The rule is created, but it still needs to be applied. Dreamweaver makes it easy to convert the existing <td> elements into <th> elements.
9 Insert the cursor into the first cell of the first row of the table. In the Property inspector, select the Header option. Note the tag selector.

The cell is filled with green. When you click the check box, Dreamweaver automatically rewrites the markup converting the existing <td> to <th> and thereby applies the CSS formatting. This functionality will save you lots of time over editing the code manually. You can also convert multiple cells at one time.
10 Insert the cursor into the second cell of the first row. Drag to select the remaining cells in the first row. Or, you can select an entire row at once by positioning the cursor at the left edge of the table row and clicking when you see the black selection arrow appear.

11 In the Property inspector, select the Header option to convert the table cells to header cells.
The whole first row is filled with green as the table cells are converted to header cells.
12 Save all files.
Controlling column width
Unless otherwise specified, empty table columns will divide the available space between them equally. But once you start adding content to the cells, all bets are off—the table seems to get a mind of it own and divvies up the space in a different way. It usually gives columns that contain more data more space.
This behavior may or may not be your intention or achieve an acceptable balance, so to control the width of table columns you could use HTML attributes or custom CSS classes. When you create custom styles to format column widths, one idea is to base the rule names either on the width value itself or on the content, or subject, of the column.
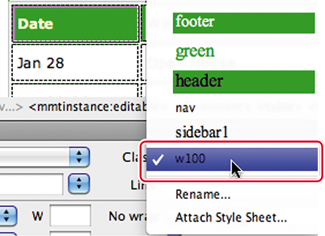
1 Select the .content th rule in the CSS Styles panel and then click the New CSS Rule icon. Choose Compound from the Selector Type menu. Delete any text in the Selector Name field, type .content .w100, and click OK.

In the new value for the Selector Name, the w stands for width and 100 indicates the value.
Note
Rule names can’t start with numerals or punctuation characters, except for a period, which indicates a class or hash (#), which indicates an id.
2 In the Box category, enter 100px in the Width field. Click OK.
Controlling the width of a column is quite simple. Since the entire column must be the same width, you have to apply a width specification only to one cell. If cells in a column have conflicting specifications, typically the largest width wins. Let’s apply a class to control the width of the Date column.
3 Insert the cursor into the first cell of the first row of the table. Select the <th> tag selector. In the Property inspector, choose w100 from the Class menu.
Tip
Be sure to click the tag selector, otherwise Dreamweaver may apply the class to the cell content instead of the <th> element.
The first column resizes to a width of 100 pixels. The remaining columns automatically divvy up the available space. Column styling can also specify text alignment as well as width. Let’s create a rule for the content in the Cost column.
Note
If you apply a narrow width, remember that the cell can’t be any smaller than the largest word or graphic element contained within it.
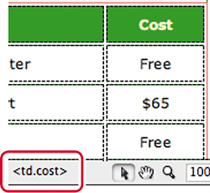
4 Select the .content .w100 rule in the CSS Styles panel and click New CSS Rule. Choose Compound from the Selector Type menu. Delete any text in the Selector Name field and type .content .cost. Click OK.
Obviously, this rule is intended for the Cost column. But don’t add the width value to the name as you did before; that way you can change the value in the future without worrying about changing the name (and the markup), as well.
5 In the Block category, choose center from the Text-align field menu.
6 In the Box category, enter 75px in the Width field. Click OK.
Unlike with the previous example, to apply text alignment to the contents of the entire column, you must apply the class to every cell.
7 Click in the first cell of the Cost column and drag down to the last cell of the column to select all the cells. Or, position the cursor over the top of the column and click using the black arrow to select the entire column at once. Choose .cost from the Class menu in the Property inspector.
The Cost column resizes to a width of 75 pixels, and the text aligns to the center. Now if you want to change only the Cost column, you have the ability to do so.
8 Save all files.
Inserting tables from other sources
Tables can also be created from data exported from databases, spreadsheets, and delimited files. In this exercise, you will create a table from data exported from MS Excel to a comma-separated values (CSV) file.
1 Insert the cursor anywhere in the table. Select the <table> tag selector. Press the right Arrow key to move the cursor after the closing </table> tag in the code.
2 Choose Insert > Table Objects > Import Tabular Data.
The Import Tabular Data dialog box appears.
3 Click the Browse button and select classes.csv from the lesson08 > resources folder. Click Open.
Comma should be automatically selected in the Delimiter menu.
4 In the Table Width option, select Fit to Data. Delete any values appearing in the other fields not mentioned already, some of these fields will apply HTML attributes instead of CSS styling. Click OK.

A new table—containing a class schedule—appears below the first. The new table consists of five columns with multiple rows. The first row contains header information but is still formatted as normal table cells.
5 Select the first row of the class schedule. In the Property inspector, select the Header option.
The first row appears in green with reversed text. You’ll notice that the text is wrapping awkwardly in the last three columns. You will use the class .cost for the Cost column in the new table, but the other two will need custom classes of their own.
6 Select the Cost column as you did in the previous exercise. In the Property inspector, choose .cost from the Class menu.
7 In the CSS Styles panel, right-click the .content .cost rule and choose Duplicate from the context menu.
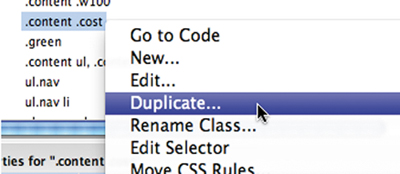
8 Change the Selector Name to .content .day and click OK.
9 Apply .content .day to the Day column in the Classes table, as in step 6.
10 Duplicate .content .day and name the new .content .length rule and click OK. Apply it to the Length column in the Classes table.
By creating custom classes for each column, you have the means to modify each column individually. One more rule is needed to format the Class column. This column requires only a generic rule to apply a more appealing width.
11 Right-click the .content .w100 rule and duplicate it. Name the new rule .content .w150 and click OK. Edit the new rule and change the Width to 150px in the Box category. Apply the new rule only to the Class header cell.
Tip
When applying a width value, only one cell needs to be formatted.
12 Save all files.
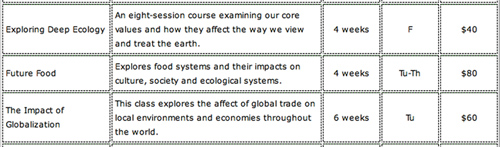
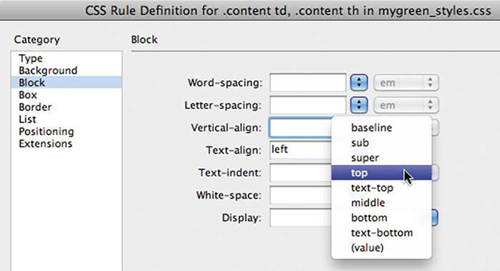
Adjusting vertical alignment
If you study the content of the Class table, you will notice that many of the cells contain paragraphs that wrap to multiple lines. When cells in a row have differing amounts of text in them, the shorter content is aligned vertically to the middle of the cell. Many designers find this behavior unattractive and prefer to have the text all align to the tops of the cells. As with most of the other attributes, vertical alignment can be applied by HTML attributes or CSS. To control the vertical alignment with CSS, you can add the specification to an existing rule.
1 Double-click the .content th, .content td rule to edit it.
The <th> and <td> elements style the text stored in the table cells.
2 In the Block category, choose top from the Vertical-align field menu. Click OK.
All the text in both tables now aligns to the top of the cells.
Tip
Some designers like to leave the text in <th> cells aligned to the middle or even the bottom. If this was the case, you’d need to create separate rules for each element.
3 Save all files.
Adding and formatting <caption> elements
The two tables you inserted on the page contain different information but run into each other on the screen in a confusing manner. To help users differentiate between the two sets of data, let’s add a title to each and a bit of extra spacing. To create this title, you could use an HTML heading to introduce each table, or an element devised especially for this purpose. The <caption> element was especially designed to identify the content of HTML tables. To use it, you’ll insert it as a child of the <table> element.
1 Insert the cursor in the first table. Select the <table> tag selector. Switch to Code view.
By selecting the table in Design view, Dreamweaver automatically highlights the code in Code view, making it easier to find.
2 Locate the opening <table> tag. Insert the cursor directly after this tag. Type <caption> or select it from the code-hinting menu when it appears.
3 Type 2010 Event Calendar, and then type </ to close the element.

The caption is complete and inserted as a child element of the table.
5 Repeat steps 1 and 2 for the second table. Type 2010 Class Schedule, and then type </ to close the element.
6 Switch to Design view.
The captions are relatively small, and they’re lost against the color and formatting of the table. Let’s beef them up a bit with a custom CSS rule.
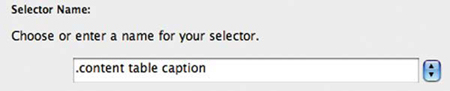
7 Insert the cursor in either caption. Click the New CSS Rule icon.
8 Choose Compound from the Selector Type menu, if necessary. Click Less Specific once to remove .container from the Selector Name field. Click OK.
9 In the Type category, enter 140% in the Font-size field. Enter 1.2em in the Line-height field. Choose bold from the Font-weight field menu. Enter #090 in the Color field.
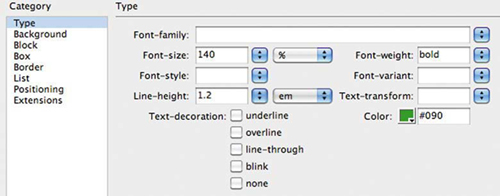
10 In the Box category, enter 20px only in the Top margin field. Click OK.
11 Save all files.
12 Examine your work using Live view or a browser.
Formatting the tables and the captions with CSS has made them much easier to read and understand. Feel free to experiment with the size and placement of the caption and specification settings that affect the tables. In Lesson 14, “Working with Online Data,” you will learn how to use tables to create dynamic web pages.
Spell checking web pages
It’s important to ensure that the content you post to the web is error free. Dreamweaver includes a robust spell checker capable of identifying commonly misspelled words and creating a custom dictionary for nonstandard terms.
1 Click the contact_us.html tab to bring the document to the front, or open it from the site root folder.
2 Insert the cursor in the main heading Contact GreenStart Association in <div.content>. Choose Commands > Check Spelling.
Spell-checking starts wherever the cursor has been inserted. If the cursor is located lower on the page, you will have to restart the spell check at least once to examine the entire page.
3 The Check Spelling dialog box highlights the word GreenStart, which is the name of the association. You could click Add To Personal to insert the word into your custom dictionary, but for now click Ignore All, which will skip over other occurrences of the name during this check

4 Next, Dreamweaver highlights the word email, which is listed in the dictionary spelled as e-mail. If your company uses the hyphenated spelling, go ahead and click Change, otherwise click the Ignore All again.
5 Dreamweaver highlights the domain for the email address [email protected]. Click Ignore All. Click Ignore All again when it stops on the name of the town (Meridien).
6 Dreamweaver highlights the word Asociation, which is missing an s. To correct the spelling, locate the correctly spelled word (Association) in the Suggestions list and double-click it.
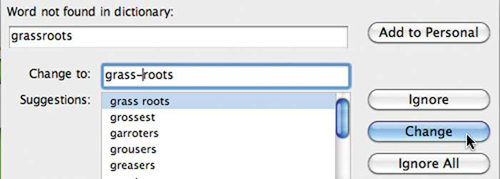
7 The next word the spell check stops on is grassroots, which is in the dictionary as two words. The word is a compound noun made from two separate words. If you look it up, many dictionaries will show it with a hyphen between the two words. To make this type of change, add the hyphen in the Change To field so that the correction reads grass-roots and click Change.
8 Continue the spell check to the end. Correct any misspelled words and ignore proper names, as necessary. If a dialog prompts you to start the check from the beginning, click Yes.
9 Save the file.
Finding and replacing text
The ability to find and replace text is one of Dreamweaver’s most powerful features. Unlike other programs, Dreamweaver can find almost anything, anywhere in your site, including text, code, and any type of white space that can be created in the program. You can limit the search to just the rendered text in Design view, the underlying tags, or the entire markup. Advanced users can enlist powerful pattern-matching algorithms called regular expressions to perform the most sophisticated find-and-replace operations. And, then Dreamweaver takes it one step further, by allowing you to replace the targeted text or code, with similar amounts of text, code, and white space.
In this exercise, you’ll learn some important techniques for using the find and replace feature.
1 Click the events.html tab to bring it to the front, or open the file from the site root folder.
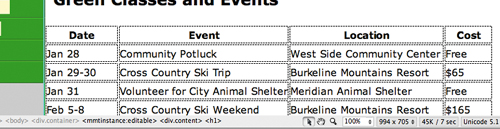
There are several ways to identify the text or code you want to find. One way is simply to type it in the field manually. In the events table, the name Meridien was spelled incorrectly as Meridian. Since Meridian is an actual word, the spell checker won’t flag it as an error and give you the opportunity to correct it. So, you’ll use find and replace to make the change instead.
2 Switch to Design view, if necessary. Insert the cursor in the heading Green Events and Classes. Choose Edit > Find And Replace.
The Find And Replace dialog box appears. The Find field is empty.
3 Type Meridian in the Find field. Type Meridien in the Replace field. Choose Current Document from the Find In menu and choose Text from the Search menu.
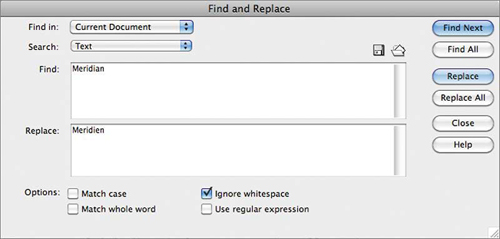
4 Click Find Next.
Dreamweaver finds the first occurrence of Meridian.
5 Click Replace.
Dreamweaver replaces the first instance of Meridian and immediately searches for the next instance. You can continue to replace the words one at a time, or choose to replace all occurrences.
Superpowerfindelicious!
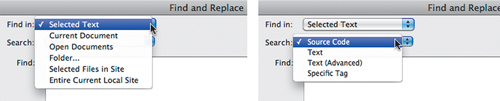
Note the options in the Find In and Search menus. The power and flexibility of Dreamweaver shines brightest here. The Find And Replace command can search in selected text, the current document, all open documents, in a specific folder, in selected files of the site, or the entire current local site. But as if those options aren’t enough, Dreamweaver also allows you to target the search to the source code, text, advanced text, or even to a specific tag.
If you replace the words one at a time, Dreamweaver inserts a one-line notice at the bottom of the dialog box that tells you how many items were found and how many were replaced. When you click Replace All, Dreamweaver closes the Find and Replace dialog box and opens the Search report panel and lists all the changes made.
7 Right-click on the Search report tab and select Close Tab Group from the Context menu.
Another method for targeting text and code is to select it before activating the command. This method can be used in either Design or Code view.
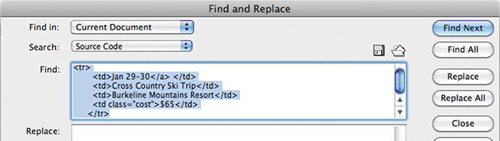
8 In Design view, locate and select the first occurrence of the text Burkeline Mountains Resort in the Location column of the Events table. Choose Edit > Find And Replace.
The Find And Replace dialog box appears. The selected text is automatically entered into the Find field by Dreamweaver. This technique is even more powerful when used in Code view.
9 Close the Find And Replace dialog box. Switch to Code view.
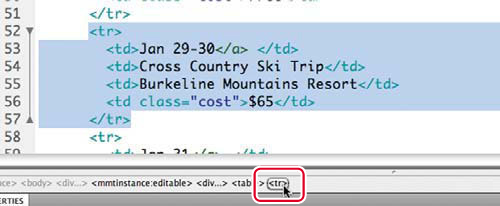
10 With the cursor still inserted in the text Burkeline Mountains Resort, click the <tr> tag selector at the bottom of the document window.
11 Choose Edit > Find And Replace. Observe the Find field.
The Find And Replace dialog box appears. The selected code is automatically entered into the Find field by Dreamweaver, including the line breaks and white space. The reason this is so amazing is because there’s no way to enter this type of markup in the dialog manually.
12 Select the code in the Find field. Press Delete to remove it. Type <tr> and press Enter/Return to insert the line break. Observe what happens.
Pressing Enter/Return did not insert a line break; instead it activated the Find command and finds the first occurrence of the <tr> element. In fact, you can’t manually insert any type of line break within the dialog.
You probably don’t think this is much of a problem, since you’ve already seen how Dreamweaver inserts text/code when it’s selected first. Unfortunately, the method used in step 8 doesn’t work with large amounts of text or code.
13 Close the Find And Replace dialog box. Click the <table> tag selector.
The entire markup for the table is selected.
14 Choose Edit > Find And Replace. Observe the Find field.
This time Dreamweaver did not transfer the selected code into the Find field. To get larger amounts of text or code into the Find field, and to enter large amounts of replacement text and code, you need to use copy and paste.
15 Close the Find And Replace dialog box. Select the table, if necessary. Press Ctrl-C/Cmd-C to copy the markup.
16 Press Ctrl-F/Cmd-F to activate the Find And Replace command. Insert the cursor in the Find field, press Ctrl-V/Cmd-V to paste the markup.
The entire <table> selection is pasted into the Find field.
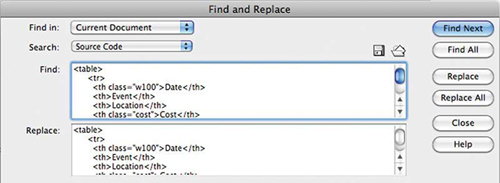
17 Insert the cursor into the Replace field and press Ctrl-V/Cmd-V.
The entire selection is pasted into the Replace field. Obviously, the two fields contain identical markup, but it illustrates how easy it would be to change or replace large amounts of code.
18 Close the Find And Replace dialog box. Save all files.
In this lesson you created four new pages and learned how to import text from other sources. You formatted text as headings and lists, and then styled it using CSS. You inserted and formatted tables and added captions to each. And, you reviewed and corrected text using Dreamweaver’s spell check and find and replace tools.
Review questions
1 How do you format text to be an HTML heading?
2 Explain how to turn paragraph text into a ordered list and then an unordered list.
3 Describe two methods for inserting HTML tables into a web page.
4 What element controls the width of a table column?
5 Describe three ways to insert content in the Find field.
Review answers
1 Use the Format field menu in the Property inspector to apply HTML heading formatting.
2 Highlight the text with the cursor and click the Ordered List button in the Property inspector. Then click the Unordered List button to change the formatting to bullets.
3 You can copy and paste a table from another HTML file or a compatible program. And, you can insert a table by importing the data from a delimited file.
4 The width of a table column is controlled by the <td> element that creates the individual table cell.
5 You can type text into the field, select it before you open the dialog box and allow Dreamweaver to insert the selected text, and you can copy and paste the text or code into the field.