
2. HTML Basics
This lesson will take about 45 minutes to complete. There are no support files for this lesson.
![]()

HTML is the backbone of the web, the skeleton of your web page. Like the bones in your body, it is the structure and substance of the Internet, although it is usually unseen except by the web designer. Without it, the web would not exist. Dreamweaver has many features that help you access, create, and edit HTML code quickly and effectively.
What is HTML?
“What other programs can open a Dreamweaver file?”
This question was asked by a student in a recent class; although it might seem obvious to an experienced developer, it illustrates a basic problem in teaching and learning web design. Most people confuse the program with the technology. They assume that the extension .htm or .html belongs to Dreamweaver or Adobe. For example, designers are used to working with files ending with .ai, .psd, .indd, and so on. These are proprietary file formats created by programs that have specific capabilities and limitations. The goal in most cases is to create a final printed piece. The program in which the file was created provides the power to interpret the code that produces the printed page. Designers have learned over time that opening these file formats in a different program may produce unacceptable results.
On the other hand, the goal of the web designer is to create a web page for display in a browser. The power and/or functionality of the originating program has little bearing on the resulting browser display, because the display is all contingent on the HTML code and how the browser interprets it. Although a program may write good or bad code, it’s the browser that does all the hard work.
The web is based on Hypertext Markup Language (HTML). The language and the file format don’t belong to any individual program or company. In fact, it is a non-proprietary, plain-text language that can be edited in any text editor, in any operating system, on any computer. Dreamweaver is an HTML editor at its core, although it is much more than this. But to maximize the potential of Dreamweaver, you first need to have a good understanding of what HTML is and what it can and can’t do. This chapter is intended as a concise primer for HTML and its capabilities and as a foundation for understanding Dreamweaver.
Where did HTML begin?
HTML and the first browser were invented in the early 1990s by Tim Berners-Lee, a scientist working at the CERN (Conseil Européen pour la Recherche Nucléaire, which is French for European Council for Nuclear Research) particle physics laboratory in Geneva, Switzerland. He intended the technology as a means for sharing technical papers and information via the fledgling Internet that existed at the time. He shared his HTML and browser inventions openly as an attempt to get the scientific community at large and others to adopt it and engage in the development themselves. The fact that he did not copyright or try to sell his work started a trend for openness and camaraderie on the web that continues today.
The language that Berners-Lee created almost 20 years ago was a much simpler construct of what we use now, but HTML is still surprisingly easy to learn and master. Basically, HTML consists of less than 100 code elements, such as html, head, body, h1, p and so on. These elements are used to enclose, or mark up, text and graphics to enable a browser to display them in a specified way. Some elements are used to create page structures, others to format text, and yet others enable interactivity and programmability. Even though Dreamweaver obviates the need for manually writing most of the code for any particular web page or project, the ability to read and interpret HTML code is still a recommended skill for any burgeoning web designer.
Basic HTML Code Structure
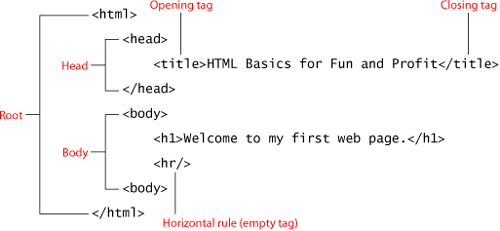
Properly structured, or balanced, HTML markup consists of an opening and a closing tag. Tags are enclosed within the lesser-than (<) and greater-than (>) brackets. You create a closing tag by repeating the original tag and typing a slash (/) after the opening bracket. Empty tags, like the horizontal rule, can be written in an abbreviated fashion, as shown.
Writing your own HTML code
Note
In TextEdit, you may need to choose Format > Format As Plain Text before you can save the file as .html.
The idea of writing code may sound difficult, but creating a web page is actually much easier than you think. In the next few exercises, you will learn how HTML works by creating a basic web page and adding and formatting some simple text content:
1 Launch Notepad (Windows) or TextEdit (Mac).
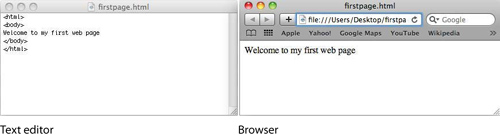
2 Enter the following code in the empty document window:

Note
Some text editors may try to change the .html extension or prompt you to confirm the choice.
3 Save the file to the desktop as firstpage.html.
4 Launch Internet Explorer, Safari, Firefox, or another installed web browser.
5 Choose File > Open. Navigate to the desktop and select firstpage.html, and then click OK/Open.
Congratulations, you just created your first web page. It doesn’t take much code to create a serviceable web page.
Understanding HTML syntax
By adding content to your new web page, you will learn some important aspects of HTML code syntax:
1 Switch back to the text editor without closing the browser.
2 Insert your cursor at the end of the text “Welcome to my first page” and press Enter/Return to insert a paragraph return.
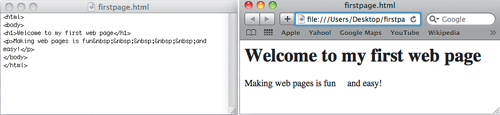
3 Type Making web pages is fun, and then press the spacebar five times to insert five spaces. Finish by typing and easy! on the same line.
4 Save the file.
5 Switch to the browser and refresh the window to load the updated page.
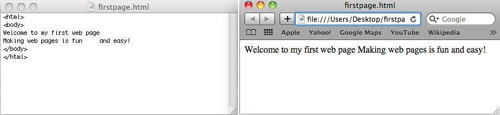
As you can see, the browser is displaying the new text, but it’s ignoring the paragraph return between the two lines and the extra spaces. In fact, you could add hundreds of paragraph returns between the lines and dozens of spaces between each word and the browser display would be no different. That’s because the browser is programmed to ignore extra white space and honor only HTML code elements. By inserting a tag here and there, you can easily correct the text display.
Inserting HTML code
In this exercise you will insert HTML tags to correct the text display:
1 Switch back to the text editor.
2 Add the bold tags to the text as follows:
<p>Making web pages is fun and easy!</p>
To add letter spacing, or other special characters, within a line of text, HTML provides code elements called entities. Entities are entered into the code differently than tags. For example, the method for inserting a nonbreaking space is by typing the entity:
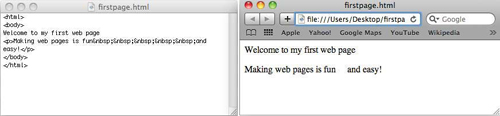
3 Replace the five spaces in the text with nonbreaking spaces, so that the text looks like the following sample:
<p>Making web pages is fun and
easy!</p>
4 Save the file. Switch to the browser and reload or refresh the page display.
The browser is now showing the paragraph return and desired spacing.
Formatting text with HTML
Tags often serve multiple purposes. Besides creating paragraph structures as demonstrated earlier, they can impart basic text formatting, as well as identify the relative importance of the page content. For example, HTML provides six heading tags (<h1> to <h6>) you can use to set off headings from normal paragraphs. The <h1> tag identifies the heading as being the highest in importance but also automatically formats the enclosed text in bold and at the largest relative size. In this exercise, you will add a heading tag to the first line:
1 Switch back to the text editor.
2 Add the bold tags to the text as follows:
<h1>Welcome to my first web page</h1>
3 Save the file. Switch to the browser and reload or refresh the page display.
Note how the text changed. It is now larger and bold in format.
Web designers use the heading tags to identify the importance of specific content to improve their site rankings on Google, Yahoo, and other search engines.
Applying inline formatting
So far, all the tags you have used work as paragraph or stand-alone elements. These are referred to as block elements. HTML also provides the ability to apply formatting and structure to content that’s contained within another tag, or inline. A typical use of inline code would be to apply bold or italic styling to a portion of a paragraph. In this exercise, you will apply inline formatting:
1 Switch back to the text editor.
2 Add the bold tags to the text as follows:
<p>Making web pages is fun <strong>
<em>and easy!</em></strong></p>
3 Save the file. Switch to the browser and reload or refresh the page display.
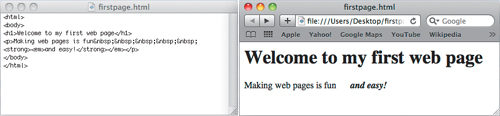
Most formatting, both inline and otherwise, is properly applied using cascading style sheets (CSS). The <strong> and <em> tags are among the few still acceptable ways to apply inline formatting using strictly HTML code elements. Overall there is an industry-supported move to separate the content and its presentation, or formatting. See Chapter 3, “CSS Basics,” for a full explanation of the strategy and application of CSS in standards-based web design.
Adding structure
Most web pages feature at least three fundamental elements: a root (typically <html>), body, and head. These elements create the essential underlying structure of the web page. The root element contains all the code and content for the web page. It is used to declare to the browser, and any browser applications, what types of code elements to expect within the page. The <body> element holds all the visible content, such as text, tables, images, movies, and so on. The <head> element holds code that performs vital background tasks, including styling, links, and other information.
The sample page you created doesn’t have a <head> element. A web page can exist without this section, but adding any advanced functionality to this page without one would be difficult. In this exercise, you will add <head> and <title> elements to your web page:
1 Switch back to the text editor.
2 Add the bold tags and content to the text as follows:

3 Save the file. Switch to the browser and reload or refresh the page display.
Did you notice what changed? It may not be obvious at first. Look at the title bar of the browser window. The words “HTML Basics for Fun and Profit” now magically appear above your web page. By adding the <title> element, you have created this display. But, it’s not just a cool trick; it’s good for your business, too. Google, Yahoo, and the other search engines catalog the <title> element of each page and use it, among other criteria, to rank web pages. The content of the title is one of the items typically displayed within the results of a search. A well-titled page could be ranked higher than one with a bad title or one with none at all.

Writing HTML in Dreamweaver
So, the inevitable question is “If I can write HTML in any text editor, why do I need to use Dreamweaver?” Although a complete answer awaits you in the following 15 chapters, the question begs for a quick demonstration. In this exercise, you will re-create the same web page using Dreamweaver:
1 Launch Dreamweaver CS5.
2 Choose File > New.
3 In the New Document window, select Blank Page from the first column.
4 Select HTML from the Page Type column and <none> from the Layout column. Click Create.
A new document window opens in Dreamweaver. The window may default to one of three displays: Code view, Design view, or Split view.
5 If it’s not already selected, click the Code view button in the upper left of the document window.

The first thing you should notice in the Code view window is that Dreamweaver has provided a huge head start over using the text editor. The basic structure of the page is already in place, including the root, head, body, and even title tags, among others. The only thing Dreamweaver makes you do is add the content itself.
6 Insert the cursor after the opening <body> tag and type Welcome to my second page following the tag.
Dreamweaver makes it a simple matter to format the first line as a heading 1.
7 Move the cursor to the beginning of the text “Welcome to my second page.” Type < to open the code hinting feature.
Note how Dreamweaver automatically opens a drop-down list of compatible code elements. This is Dreamweaver’s code hinting feature. When activated, code hinting provides a drop-down list of applicable HTML, CSS, and JavaScript elements.
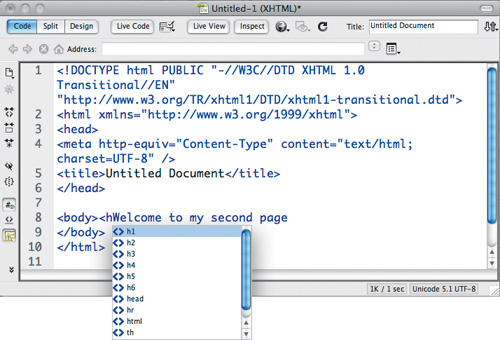
8 Double-click h1 from the list to insert it in the code. Type > to close the element.
9 Move the cursor to the end of the text. Type </ at the end of the sentence.
Note how Dreamweaver closes the <h1> tag automatically. But most coders add the tags as they write, in the following way:
10 Press Enter/Return to insert a line break. Type <.
11 Type p and press Enter/Return to insert the element. Type > to close the element.
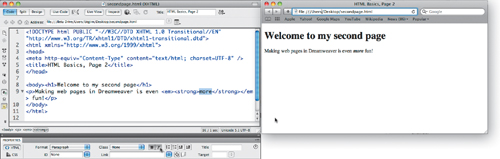
12 Type Making web pages in Dreamweaver is even more fun!, and then type </ to close the <p> element.
Tired of hand-coding yet? Dreamweaver offers multiple ways for formatting your content.
13 Select the word “more.” In the Property inspector, click the B and the I buttons to apply the <strong> and <em> tags to the text. These tags produce the appearance of bold and italic formatting on the selected text.
Something missing?
When you reached for the B and I buttons in step 13 were they missing? When you make changes in Code view, the Property inspector occasionally needs to be refreshed before you can access the formatting commands featured there. Simply click the Refresh button and the formatting commands will reappear.
![]()
Only two more tasks remain before your new page is complete. Note that Dreamweaver created the <title> element and inserted the text “Untitled Document” within it. You could select the text within the code window and enter a new title, or you could change it using another built-in feature.
14 Locate the Title field at the top of the document window and select the “Untitled Document” text.
15 Type HTML Basics, Page 2 in the Title field.
16 Press Enter/Return to complete the title.

The Title field enables you to change the content of the <title> element without having to work in the HTML code.
Note that the new title text appears in the code replacing the original content. It’s time to save the file and preview it in the browser.
17 Choose File > Save. Navigate to the desktop. Name the file secondpage. Click Save.
Dreamweaver adds the proper extension (html) automatically.
18 Choose File > Preview in Browser.
The completed page appears in the browser window.
Using Dreamweaver you completed the task in a fraction of the time it took you to do it manually.
You have just completed two web pages—one by hand and the other using Dreamweaver. In both cases, you can see how HTML played a central role in the whole process. To learn more about this technology, go to the website of the W3 Consortium at www.w3.org, or check out any of the books in the following section.
Recommended books on HTML
HTML, XHTML, and CSS: Visual QuickStart Guide, 6th Edition, Elizabeth Castro, (Peachpit Press, 2006), ISBN: 0-321-43084-0
HTML and XHTML Pocket Reference, Jennifer Niederst Robbins, (O’Reilly, 2006), ISBN: 978-0-596-52727-3
Head First HTML with CSS & XHTML, Elizabeth and Eric Freeman, (O’Reilly, 2005), ISBN: 978-0-596-10197-8
Frequently used HTML 4 codes
HTML code elements serve specific purposes. Tags can create structures, apply formatting, identify logical content, or generate interactivity. Tags that create stand-alone structures are called block elements; the ones that perform their work within the body of another tag are called inline elements.
HTML tags
The following table shows some of the most frequently used HTML tags. To get the most out of Dreamweaver and your web pages, it helps to understand the nature of these elements and how they are used. Remember, some tags can serve multiple purposes.
Table 2.1 Frequently used HTML tags


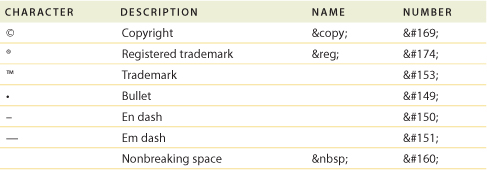
HTML character entities
Entities exist for every letter and character. If a symbol can’t be entered directly from the keyboard, it can be inserted by typing the name or numeric value listed in the following table:
Table 2.2 HTML character entries
Where Is HTML Going?
The current version of HTML has been around for over 10 years and has not kept pace with many of the advances in technology, such as the iPhone. The World Wide Web Consortium (W3C), the standards organization responsible for maintaining and updating HTML and other web standards, has been working diligently on updating the language and released a working draft of HTML 5 in October, 2009. A final version is not scheduled to be ready for several years, so what does that mean for current or up-and-coming web designers? Not much—yet.
Websites and their developers change and adapt to current technologies and market realities quickly, but the underlying technologies progress at a more glacial pace. Browser manufacturers are certain to add support for HTML 5 in the next few years. Early adopters will attract developers and users interested in the latest and greatest. Some say the full transition won’t happen until 2020 or later. In any case, backward-compatibility to HTML 4.01 will be certain well into the future, so your old pages and sites won’t suddenly explode or disappear.
To learn more about HTML 5, check out www.w3.org/TR/2009/WD-html5-20090825.
To learn more about W3C, check out www.w3.org.
Review questions
1 What programs can open HTML files?
2 What does a markup language do?
3 HTML is comprised of how many code elements?
4 What are the three main parts of most web pages?
5 What’s the difference between a block and inline element?
Review answers
1 HTML is a plain-text language that can be opened and edited in any text editor and viewed in any web browser.
2 It places tags contained within brackets < > around plain-text content to pass information concerning structure and formatting from one application to another.
3 Less than 100 codes are defined in the HTML specifications.
4 Most web pages are composed of three sections: a root, head, and body.
5 A block element creates a stand-alone element. An inline element can exist within another element.