
15. Building Dynamic Pages with Data
This lesson will take about 90 minutes to complete. Before beginning, make sure you have copied the files for Lesson 15 to your hard drive as described in the “Getting Started” section at the beginning of the book. If you are starting from scratch in this lesson, use the method described in the “Jumpstart” section of “Getting Started.”
![]()
Dreamweaver has built in features to help you build rich, dynamic, data-driven web pages, using simple point-and-click tools.
Building pages with ASP, ColdFusion, or PHP
In Lesson 14, “Working with Online Data,” you learned how to select a server model, set up a testing server, and connect to an online database. Once connected, Dreamweaver makes it easy to access this data to create dynamic content.
Note
Developing dynamic applications is an exacting chore that can fail for the simplest reasons. Read and follow every step in this lesson carefully.
Creating a recordset
The next step in the process of generating dynamic content is to create a recordset. A recordset is an array of information pulled from one or more tables in your database in response to a question posed by code in the web page written in Structured Query Language (SQL).
The question, or query, can be as simple as “Show me all the events in the Events table,” or as complex as “Show me the events in the table that occur after May 1st that cost less than $10 and list them in descending alphabetical order.” Frequently, the query is also dynamic—created by the user by clicking on checkboxes or radio buttons, choosing from menus, or typing into a text field (as you do on Google and Yahoo).
Warning
This exercise can only be completed if you have successfully configured a testing server and connected to the greendata database as you were instructed in Lesson 14, “Working with Online Data.”
Like ASP, ColdFusion, and PHP, SQL is a robust language with its own terms, structure, and syntax. Dreamweaver can help you write most of the statements you’ll ever need, but to perform complex data routines you may need to hire a professional or learn some SQL yourself. Adobe provides a good SQL primer at tinyurl.com/yk5xnag, or you can check out tinyurl.com/6l43z for the SQL tutorial offered by W3Schools.
Note
If you were using the jumpstart method in Lesson 14, you may continue to use the same site setup, files, and folder for Lesson 15.
In this exercise, you’ll create the 2010 event calendar dynamically by using a table from your current database connection.
1 Open events.html from the site root folder. Examine the Databases panel.
The database connection you created earlier is not visible and the plus icon is grayed out, indicating that you can’t create a database connection even if you wanted to. The Events page uses the extension .html, which is not compatible with any dynamic server model other than Ajax.
2 Select File > Save As.
Change the name to events.php.
For ASP you should use the extension .asp and for ColdFusion you should use the extension .cfm, or as appropriate for your server model.
The database connection should appear in the Databases panel. Dreamweaver provides the database connection automatically (if you made one already) as soon as you open or save a page with a compatible extension.
Tip
If the database connection doesn’t appear, check the Databases panel to see what steps need to be completed before you can connect. In most cases, you will only have to click the link to select a document type, as described in Lesson 14.
The Bindings panel appears or comes to the front in its panel group. It is typically grouped with the Databases and Server Behaviors panels.
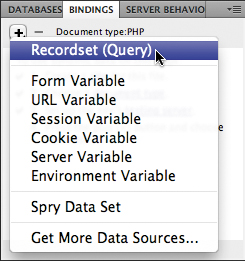
4 Click the plus (![]() ) icon at the top of the Bindings panel.
) icon at the top of the Bindings panel.
Choose Recordset (Query) from the pop-up menu.
The Recordset dialog box appears. The current database connection should appear in the Connection menu, by default. If you have more than one database connection, the dialog box may not display the one you desire.
5 Select the desired database connection from the Connection menu and click the Simple button, if necessary.
By selecting options within this dialog box, Dreamweaver enables you to write sophisticated SQL statements without having to know a single line of the SQL language. The Advanced version of the Recordset dialog box allows you to create more complex SQL statements.
6 In the Name field, enter rs_events.
This field creates the name of the recordset that will be referenced in the query.
7 From the Table menu, choose events.
This selection identifies the table from which the data will be retrieved.
Tip
If the greendata database doesn’t appear in the Databases panel, you may need to click the Define button and enter your login information again.
8 If necessary, click the All option for the Columns radio button.
This option indicates that you want to retrieve data from all columns in the table.
9 In the Filter section, choose event_date from the first menu.
Choose >= from the drop-down beside the first menu.
Choose Entered Value from the second menu.
Then in the subsequent field, enter the current date in the yyyy/m/d format.
Note
In the MySQL database, the year is entered first.
The Filter section refines the search by targeting specific data and excluding others. These selections are requesting a list of events from the table that take place today or in the future. Events scheduled prior to today’s date will be ignored and should not appear in the results.
Note
The table contains dates up to 4/30/2011. If the date you enter in the dialog box is after 4/30/2011, your recordset will be empty.
10 In the Sort menu, choose event_date.
In the subsequent menu, choose Ascending.

The Sort section allows you to display the data in ascending or descending alphanumeric order.
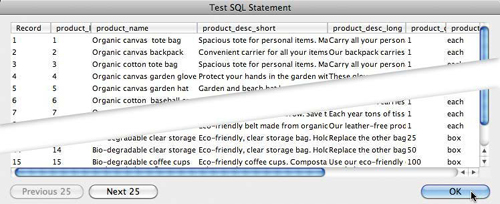
11 Click the Test button.
If everything works properly, the Test SQL Statement dialog box will appear displaying the results from the query you just constructed. If you don’t see any data or if an error message appears, it could mean that the table has no records that meet your search criteria or that you have to troubleshoot your database, database connection, or testing server configuration.
12 Click OK to return to the Recordset dialog box.
Click the Advanced button.
The Recordset dialog box provides advanced options for creating an SQL statement. You should notice that the SQL statement you created is displayed in the SQL field of the dialog box. If you already know how to write SQL statements, you can enter them directly into this field. Note the sections in the dialog box that are devoted to variables and database items. These built-in point-and-click productivity enhancements help to speed up the process of writing statements by hand by giving you quick access to your data resources and specific SQL commands.

Note the date text displayed in the SQL window. This is the date you entered in step 9. Entering a date in this fashion is fine if the date doesn’t change. The problem here is that you want the table to show only current and future events. By tomorrow, the filter you created will be out of date. Instead, you need to enter a special SQL function that will always remain valid.
Note
Many times you can copy and paste SQL statements from other programs, like Microsoft Access, into this dialog and they will work just fine.
13 Select and delete the date.
14 Type now() in the field.
The now() function obtains the current time and date from the server to use for the data filter. The manually entered date is no longer needed.
15 Click the Test button.
The Test SQL Statement dialog box appears displaying the query result. It should look identical to the test you performed in step 11.
Note
The table contains dates up to 12/31/2011. If the date you enter in the dialog box is after 12/31/2011, your recordset will be empty.
16 Click OK to complete the recordset.
Recordset (rs_events) appears in the Bindings panel.
17 Expand Recordset (rs_events) and examine the items displayed.
The recordset contains items for all five data columns in the Events table.

18 Save all files.
You are now ready to create a dynamic web page. In the next exercise, you will learn how to display data generated by a recordset.
Displaying data from a database
Now that you have all the cogs installed, the only thing left to do is put the machinery into action. As with most of the other steps, displaying data in Dreamweaver is a simple point-and-click process.
1 If necessary, open events.php or the file you created in the previous exercise.
The file’s extension should be compatible with your server model now, and it should feature the database connection and recordset you created previously. But the page also displays two Spry-based recordsets. You’re not going to use the Spry data, but that doesn’t mean you have to start completely from scratch. You will discard the Spry data sets and support code, but reuse the table placeholder.
2 Insert the cursor in the Events table placeholder. Select the tag selector for the <table> placeholder. Press Ctrl-X/Cmd-X to cut the table.
The Spry table was contained in a <div> element that contains a reference to the Spry data set and is no longer needed. If you haven’t moved your cursor, the <div> element is still displayed in the tag selectors.
3 Select the <div> tag selector. Press Delete.
Although they probably won’t cause any trouble, you should also delete the unneeded Spry code references.
4 Switch to Code view. In the <head> section you will find approximately
12 lines of code specific to the Spry data tables within the<!—InstanceBeginEditable name="head" -->... tags.
<!InstanceEndEditable -->
5 Select the code between these tags and delete it.

You won’t be able to delete the tags themselves because they are part of the template markup and locked.
Note
Deleting this code will also disable the Spry features of the Class table.
6 Switch to Design view.
7 Insert the cursor at the end of the Green Events and Classes heading. Press Ctrl-V/Cmd-V to paste the table placeholder.
The table placeholder appears below the heading. It contains Spry code residue that should also be deleted.
8 Insert the cursor in the table header row. Switch to Code view and examine the header row elements.
Each of the <th> elements contains a spry:sort="..." attribute.
9 Delete the spry:sort="..." attributes from each of the <th> elements.
Be careful not to delete any class="..." attributes.
Note the other Spry attributes in the data row.

10 Delete all Spry references in the data row.
All Spry references in the Events table are gone.
11 Switch to Design view and save all files.
Converting the Spry data placeholders for the current workflow is a simple process.
12 In the table, select the {Date} placeholder.
13 Open the Bindings panel, if necessary.
Expand the rs_events recordset.
14 In the Bindings panel, select the event_date field.
Click the Insert button at the bottom of the Bindings panel.
A new {rs_events.event_date} placeholder appears in the table cell, replacing the Spry placeholder.
15 Select the {Event} placeholder.
Replace it with the event_name field.
16 Select the {Location} placeholder.
Replace it with the event_location field.
17 Select the {Cost} placeholder.
Replace it with the event_cost field.
![]()
18 Save all files.
When working on dynamic pages, it’s essential to test the functionality frequently. But unlike the Spry data structure, certain files must be uploaded to the testing server before you can preview the current dynamic layout.
Staging files on the testing server
You won’t be able to test this file in Live view or in a browser until you upload specific files that connect the page to the database to the local testing server. So, what files need to be uploaded? Luckily, Dreamweaver will handle the logistics for you.
1 Select Live view.
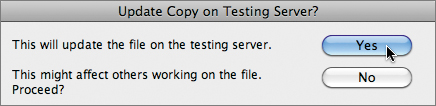
Dreamweaver prompts you to update the file on the testing server.
Note
You won’t be able to test this page until you have successfully installed and configured a local testing server for PHP and MySQL. See Lesson 14 for more details.
2 Click Yes to update the file on the testing server.
Dreamweaver should prompt you to upload dependent files. If this is the first time you have tested this file, click Yes. This will upload whatever files are needed to display this page properly. Once the dependent files are uploaded, there’s probably no need to upload the dependent files again unless you make significant changes to this page.

Note
The proposed workflow for this exercise includes a local web server. The MySQL database is currently loaded on your own hard drive and hosted by this server. You may also configure this site to use an Internet-based PHP/MySQL web server. In that case, you will have to upload and configure the included MySQL database before proceeding.
If Dreamweaver didn’t prompt you to upload dependent files, you probably have to modify a setting in Dreamweaver Preferences. Under the Site category, select the Dependent Files option for both the Get and Put operations.
Note
For the dynamic content to work properly, you’ll need to upload the dependent files to the testing server at least once for this exercise.
3 Click Yes to upload dependent files.
The table displays one row of data. To display more data, you have to add a repeat region behavior.
![]()
Note
When you preview a file in Live view, Dreamweaver uploads any needed files to the testing server before displaying the content.
Adding a repeat region
Data placeholders can only display one record at a time. To see more than one record, you have to wrap the placeholders in a server behavior called a repeat region.
1 Position the cursor at the beginning of the data row of the table and select the entire row. Select the <tr> tag selector.
2 Select Window > Server Behaviors.
In the Server Behaviors panel, click the plus (![]() ) icon, and choose Repeat Region from the pop-up menu.
) icon, and choose Repeat Region from the pop-up menu.
The Repeat Region dialog box appears. The Recordset menu displays rs_events as the current recordset. By default, the behavior will display ten records at a time. You can specify a different number or display all the records at once.
When you choose to display fewer than all the records, you will also have to insert a record paging behavior to permit the user to view the remaining data. For this table, let’s keep things simple and display all the records.
3 Select the radio button for All Records. Click OK.
A gray tab displaying the word Repeat appears above the data row of the table.
![]()
4 Save all files. Preview the page in Live view.
The table displays all the upcoming events from today’s date into the future. As you may have guessed, you have only scratched the surface of the possibilities you can achieve with dynamic web pages. In the next exercise, you will build one of the most common dynamic applications: a master/detail set. In the next exercise, you will build one of the most common dynamic applications: a master/detail set.
Note
Except for the date filtering, the steps needed to replace the remaining Spry Class table with a PHP equivalent are identical to the ones described in this exercise. If you have the time, put your new skills to the test and try replacing the remaining Spry widget on your own.
Bonus Exercise: Creating a dynamic table for classes and seminars
Before you move on to the next exercise, use the skills and understanding you have learned so far to rebuild the Spry table for the classes and seminars. The steps to recreate this table are simple and straightforward:
1 Create a recordset that returns data from all fields of the classes table in the database. Unlike the events recordset, there’s no need to filter or sort the class data by date.

Note
You may need to click the Simple button to return to the simple recordset dialog box.
2 Select the Spry table and cut it into memory. Delete the Spry <div> element and paste the table back into the layout at the same position.
3 Clean up any residual Spry code left in the table.
4 Insert data placeholders from the new recordset into the appropriate data row cells.
5 Apply a repeat region server behavior on the data row.
6 Test the results.
7 Save all files.
Displaying data dynamically is a huge improvement over static lists and tables. Allowing users to interact with data engages them in the process in a way that can’t be done otherwise. That’s where the concept of the master/detail page set comes from.
It’s a common scenario on many websites: a page displays a list of several products or events and you click on the one that interests you most; then the website loads a new page with specific details about the item you clicked. But what you didn’t see, or notice, is how the first, or master, page, passed your request to the second, or detail, page. In the next exercise, you’ll learn how to create a master/detail page set.
Creating a master/detail page set
The master/detail page set is used frequently on data-driven websites. By adding a hyperlink to the displayed data, you allow visitors to navigate to a new page that will display information specific to the selected item. Master/detail page sets can be created using ASP, ColdFusion, PHP, or Spry. The steps and procedures are similar for each server model. ASP provides a built-in server behavior to link to the detail page, while ColdFusion and PHP require you to build the dynamic link by hand.
Creating the master page
In this exercise, you will create a master/detail page set using your existing database connection.
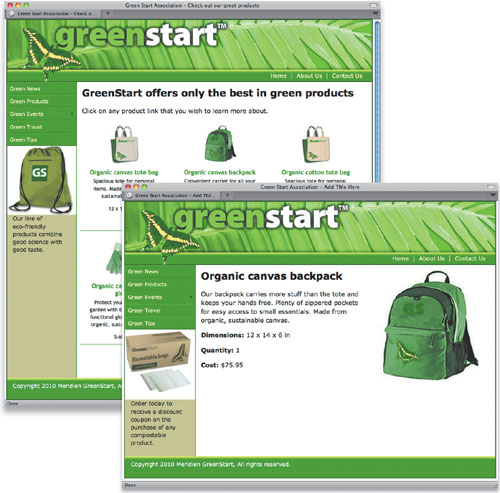
1 Launch Dreamweaver, if necessary, and open the products.php page you created in Lesson 14.
You’ll use this page as the master.
Note
You created the products.php page in Lesson 14. If you skipped that lesson, you will need to create the file now and connect it to your database. See Lesson 14 for more details.
2 Select the text Add main heading here.
Type GreenStart offers only the best in green products to replace the text.
3 Select the text Add content here.
Type Click on any product link you wish to learn more about to replace the text.
4 Press Enter/Return to insert a new paragraph.
5 Open the Databases panel to ensure that the connection is still available.
6 Click the Bindings tab to bring the panel to the front, or select Window > Bindings. Click the plus (![]() ) icon and choose New Recordset from the Bindings panel pop-up menu.
) icon and choose New Recordset from the Bindings panel pop-up menu.
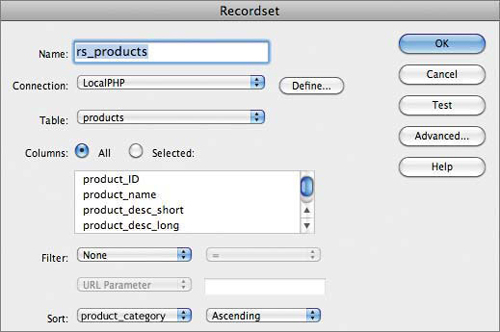
7 Name the recordset rs_products.
From the Connection menu, choose LocalPHP.
From the Table menu, choose products.
In the Sort menus, select product_category and Ascending.
Click Test.
The Test SQL Statement dialog box displays a list of product data from the greendata database.
8 Click OK in all dialog boxes to return to the document window.
The rs_products recordset appears in the Bindings panel. There’s no restriction on how you use the data fields in the recordset. You can insert them once, multiple times, or not at all. They can also be displayed in any order on the page.
9 If necessary, insert the cursor in the empty paragraph you created in step 4.
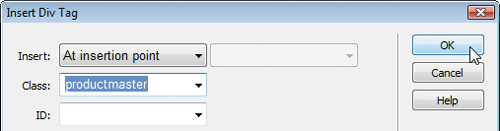
10 Open the Insert panel.
Click Insert Div Tag.
If necessary, choose At Insertion Point.
In the Class field, type productmaster.
Click OK.
The new <div> element appears with the placeholder text selected. If you insert a field from the recordset, it will automatically replace the placeholder text.
11 In the Bindings panel, select the product_name field.
Click Insert.
The text {rs_products:product_name} replaces the placeholder text in <div.productmaster>.
12 Format {rs_products:product_name} as a Heading 3.
Insert a new paragraph after the placeholder.
13 In the next line, insert the product_desc_short field.
Create a new paragraph and insert the product_size field.

14 Save all files. Preview the page in Live view. If prompted to Put Dependent Files, choose Yes.
Note
If you try to preview the page in a browser, it will show you only the raw HTML page unless you upload all the dependent files to the testing server. But Live view should work fine.
If your testing server is properly configured, Dreamweaver will display the selected three fields of the first record of the database in the document window. But dynamic content isn’t limited to text; you can display images dynamically, too.
Displaying images dynamically
What would a product page be without pictures of the products? Adding images to the product description is no more difficult than inserting text. In this exercise, you’ll learn how to insert dynamic images into your layout.
1 Switch back to Design view.
2 Create a new paragraph before the <h3> element in <div.productmaster>.
3 Insert the cursor in the new paragraph. In the HTML mode of the Property inspector, select Paragraph from the Format menu, if necessary.
4 Select Insert > Image.
The Select Image Source dialog box appears. Normally, you would select the desired image and simply click OK. But to insert a dynamic image, you have a few extra steps.
5 Click the Data Sources button.
The dialog box changes from a file browser to a display of the data fields from the rs_products recordset.
6 Select the product_pix_sm field.
The URL field in the dialog box displays a complex piece of code that will insert a picture based on the filename stored in the database field—in this case, product_pix_sm. But the field contains only the filename of the picture.
Since folder names and locations can change over time, it doesn’t make sense to insert path information into a database field. Instead, you can simply build the image path statement in the dynamic code at the time you need it. That way, if you move pictures from one folder to another on the site, you only have to make one small edit in the code to adapt to the change.
7 Insert the cursor at the beginning of the Code field.
In the field, type products/.
Click OK.
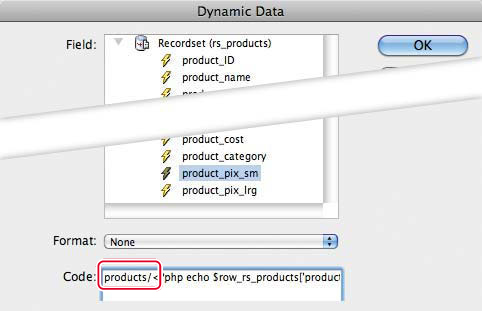
By inserting the folder name into the URL field, Dreamweaver will append the text products/ to the image name to pull the desired image from that subfolder of your site, like this: products/1-lrg.jpg.
8 In the Image Tag Accessibility Attributes dialog box, select <empty> from the Alternate Text field menu. Click OK.
9 Save all files and preview the page in Live view.

The small image of the sample product now appears on the screen. Now that you have one product displayed successfully, it’s a simple matter to show multiple products as you did with the Event and Class tables earlier.
Displaying multiple items
To display more than one record, you need to add a repeat region as you did before. Although there’s no table row as in the previous example, you can assign the behavior to the element <div.productmaster> instead.
1 Switch back to Design view and select the <div.productmaster> tag selector.
2 Click the Server Behaviors tab to bring the panel to the front, or select Window > Server Behaviors.
3 In the Server Behaviors panel, click the plus (![]() ) icon, and choose Repeat Region.
) icon, and choose Repeat Region.
4 If necessary, choose rs_products from the Recordset menu.
Select the radio button beside the Show field.
In the Show field, enter 6.
Click OK.

A gray tab displaying the word Repeat appears above <div.productmaster>.
5 Save all files. Preview the page in Live view.
Click Yes to update the page on the testing server.
Click Yes to upload dependent files.

Dreamweaver now displays six records from the products table. Since <div.productmaster> defaults to 100 percent of the width of the main content area, the records stack one atop the other. To display the next set of six records, you have to add a paging behavior.
Creating a record paging behavior
Paging controls are usually inserted outside the repeat region so that they appear only once per page. In this exercise, you will create a record paging behavior for the rs_products recordset.
1 Click the Repeat tab to select the repeat region. Press the Right Arrow key to move the cursor outside the code for the <div> element and the repeat region.
The paging controls can be inserted as text or graphical elements on the page. Frequently, tables are used to control their presentation.
2 Insert a table with 2 rows and 4 columns.
Delete all other field entries.

3 In the Table ID field, enter master_paging.
4 Enter the following text in the first row of the table:
Cell 1: << First
Cell 2: < Previous
Cell 3: Next >
Cell 4: Last >>
![]()
The angle brackets provide a visual cue to the user for the results of the paging behavior.
5 Select the text << First.
Select Insert > Data Objects > Recordset Paging > Move To First Page.
The Move To First Page dialog box appears. The Link field displays the item Selection: "<< First" and the Recordset field menu displays rs_products.
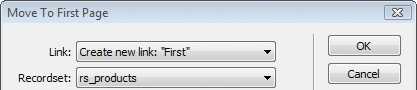
6 In the Move To First Page dialog box, click OK.
A hyperlink behavior is applied to the text that will load the first record of the products table.
7 Apply the following paging behaviors to the other words:

8 Save all files. Preview the page in Live view.
The first six records appear. If you click the paging controls nothing happens. To invoke the paging controls, you have to use a modifier key.
9 Hold down the Ctrl/Cmd key and click the Next paging link.
The Live view loads the next six records.
10 Hold down the Ctrl/Cmd key and click the Last paging link.
Live view loads the last set of records.
11 Test the Previous and First paging links.
All the paging controls work as desired, but there’s a small problem. When you are on the first set of records, the First and Previous paging links are still visible although they don’t do anything. This is potentially confusing to a user and is just poor interface design. Luckily, there’s a server behavior intended just for this situation.
Hiding unneeded paging controls
Visibility is a common property that can be controlled by HTML and CSS. It’s relatively easy to set an element’s visibility and then invoke a behavior or scripted action to change it for a specific purpose. In this exercise, you will apply a dynamic server behavior that will modify the paging link’s visibility based on the results of the recordset. In effect, it will hide certain controls when they are invalid.
1 Insert the cursor in the First link and select the <a> tag selector.
To hide all traces of the link, you have to select all the markup for the record paging element. The Show behavior can be accessed from the Insert menu or from the Server Behaviors panel.
Note
Make sure you don’t select the <td> element. Hiding the entire cell will cause the remaining cells to expand across the content area.
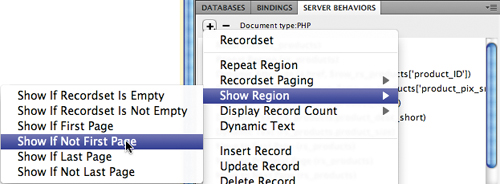
2 In the Server Behaviors panel, click the plus (![]() ) icon and select Show Region > Show Region If Not First Page.
) icon and select Show Region > Show Region If Not First Page.
The Show Region If Not First Page dialog box appears displaying rs_products in the Recordset menu.
3 Click OK.
A gray tab displaying the words Show If appears above the First link.
4 Select the Previous link, as in step 1.
Apply the Show Region If Not First Page server behavior.
5 Select the Next link and then the Last link, and apply to each the Show Region If Not Last Page server behavior.
6 Save all files and preview the page in Live view.
The first six records are displayed. Examine the paging links. The Last and First links don’t appear.
7 Hold down the Ctrl/Cmd key and click the Last link.
The last set of records is displayed. Note that the Next and Last links are no longer displayed. The Show Region behaviors will automatically hide and display the paging links based on whether the page shows the first or last set of records, or somewhere in between. Dreamweaver offers over two dozen pre-built server behaviors that allow you to customize all aspects of the records display.
Displaying the record count
When you have lots of records to view, it’s easy to lose track of what record you’re looking at. It’s a good idea to give the user a status report. In this exercise, you’ll insert a behavior that will display the total number of records and pages in the set.
1 Switch to Design view.
Select all four cells in the second row.
Right-click the selection and choose Table > Merge Cells from the context menu.
2 Select Insert > Data Objects > Display Record Count > Recordset Navigation Status.
The Recordset Navigation Status dialog box appears.
3 If necessary, select the rs_products recordset. Click OK.
A complete block of code and placeholder text is inserted into the second row.
![]()
4 Save all files and preview the page in Live view.
The status report displays the text Records 1 to 6 of 28.
![]()
5 Hold down the Ctrl/Cmd key and click the Next link.
Examine the status report.
The status report displays the text Records 7 to 12 of 28.
6 Switch back to Design view.
The page is nearly complete, but before you create the detail page and the behaviors that are needed to connect the two pages together, let’s add a bit of style to the product display.
Styling dynamic data
Adding style and flair to dynamic data is no different than styling static pages. In this exercise, you will create CSS rules to format the text and structure of your dynamic data. Let’s start by changing the way the products are arranged on the page.
1 Open the Products page you created in the previous exercises and switch to Design view, if necessary.
2 Open the CSS Styles panel.
Select the last rule in the mygreen_styles.css style sheet.
3 Create a new compound CSS class named .content .productmaster and apply the following styling:

4 Create a rule named .content .productmaster h3 and apply the following styling:

5 Create a rule named .content .productmaster p and apply the following styling:
![]()
6 Create a rule named .content #master-paging and apply the following styling:

Note
Remember that the border-collapse option has to be entered manually. See Lesson 6, “Working with Cascading Style Sheets,” for details.
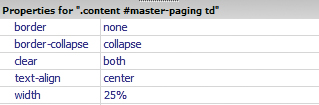
7 Create a rule named .content #master-paging td and apply the following styling:
8 Create a rule named .content #master-paging a and apply the following styling:

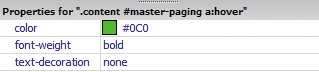
9 Create a rule named .content #master-paging a:hover and apply the following styling:
10 Save all files. Preview the page in Live view.

The new styling displays the products side by side in two convenient rows—taking up less space and permitting the user to see more products without scrolling. The paging controls enable the user to flip through the whole catalog simply by clicking. In the next exercise, you will learn how to add a special hyperlink to the master elements that will load a detailed view of a specific product.
Inserting a go-to-detail-page behavior
By keeping the product picture and descriptions small on the master page, you allow the customer to browse quickly through your entire catalog. The more products you can show comfortably in one place, the more likely it is that the customer will find something that interests them. Then, usually they want to learn more about one product. That’s where the detail page comes in. In this exercise, you’ll insert a special behavior in the dynamic placeholders that will load a detail page for any item clicked on the master page.
1 Open products.php and switch to Design view, if necessary.
A dynamic link can be added to text or pictures to take the user to a detail page. Although ASP provides a custom behavior for this purpose, you have to create this link yourself in ColdFusion and PHP.
2 Select the image placeholder in <div.productmaster>.
A dynamic link is added using the Link dialog box.
3 Click the Browse icon next to the Link field in the Property inspector.
4 When the Select File dialog box opens, click the Data Sources button.
5 Select the product_ID field.
When you select product_ID, the following code is inserted in the URL field.
<?php echo $row_rs_products['product_ID']; ?>
6 Insert the cursor at the beginning of the text in the URL field.
7 Type product_detail.php?product_ID= and click OK.
The code you entered will pass the product_ID of the selected element to the detail page, where it should then be displayed.
8 Save all files.
Before you can test the functionality, you first need to create the detail page.
Creating a detail page
The detail page is almost identical to the master page in construction. Both create a recordset and display placeholders for specific fields. The major difference lies in that the master page can display all the records, while the detail page will show only one. In this exercise, you will create a detail page so that it will show information about only the product selected by the user.
1 Create a new page based on the site template.
Save it as product_detail.php.
Tip
If you’re not using PHP, add the extension appropriate for your server model.
2 If the Databases panel doesn’t display your current data connection, click the document type link and choose PHP or the appropriate server model for your workflow.
3 In the Bindings panel, create a new recordset named rs_product_detail.
The Recordset dialog box appears. The previous recordsets you have created have shown all the records in a table. For a detail page, you have to add a filter to show only the record selected by the user on the master page.
4 Enter the following specifications in the Recordset dialog box:

5 Click Test.
A dialog box appears requesting a test value. You have to enter a value that would be pertinent to the specific field, such as the SKU or ISBN number of the product. The values in the current products table are simple digits from 1 to 28.
6 Enter 1 and click OK.

The Test SQL Statement dialog box appears displaying one record.
7 Click OK in all dialog boxes to return to Design view.
Now you’re ready to build the detail page data display.
8 Select the text Add main heading here.
In the Bindings panel, select the product_name field.
Click the Insert button.
9 Select the text Add content here.
Insert the product_desc_long field.
10 Create a new paragraph.
Type Dimensions: in the new paragraph.
Insert the product_size field.
11 Create a new paragraph.
Type Quantity: in the new paragraph.
Insert the product_quantity field.
Press Ctrl-Shift-Spacebar/Cmd-Shift-Spacebar to insert a non-breaking space.
Insert the product_unit field.
12 Create a new paragraph.
Type Cost: $ in the new paragraph.
Insert the product_cost field.
13 Insert the cursor at the beginning of the placeholder{rs_products.product_name}.
Select Insert > Image.
14 Select the Data Sources button.
Select the product_pix_lrg field.
Type products/ at the beginning of the Code field.
Click OK.

15 In the Image Tag Accessibility Attributes dialog box, select <empty> from the Alternate Text field menu. Click OK.
16 Select the new image placeholder.
From the Class menu, choose fltrt.
In the Width and Height fields, enter 300.
Before you upload the pages to the remote site, you should test the go-to-detail-page behavior locally.
18 Open the products page. Preview the page in Live view. Hold down Ctrl/Cmd and click one of the product names or pictures.
Live view loads the selected product data into product_detail.php.

You have completed the rudimentary steps for building a full-fledged online store. The design and construction of an online store, shopping cart, and payment gateway is complex and well beyond the scope of this book.
Prebuilt shopping cart and store solutions are available for all server models supported by Dreamweaver. They vary in cost and complexity to suit any need and budget. Some of the most economical solutions are offered by Google, Yahoo, and PayPal, among others, and they even simplify the method of receiving electronic payments by credit card and bank transfer.
In this lesson, you have created dynamic pages using live data. You’ve generated page content from an online database and built a complete master/detail page set. But, after all that, you’ve barely looked under the hood of what Dreamweaver can do with dynamic data.
Review questions
1 What is a recordset?
2 Why would you need to use a repeat region?
3 What is a master/detail page set?
4 For what purpose would you use record paging behavior?
5 How can you hide paging controls when there are no more records to display?
Review answers
1 A recordset is an array of information pulled from one or more tables in a database by a query created in Dreamweaver.
2 A repeat region allows the data application to display more than one record at a time.
3 The master/detail page set is a common feature of data-driven websites. The master page displays multiple records and provides dynamic links within each record, which allows you to load specific information about the selected item on the detail page.
4 A record paging behavior is used to load the results of a recordset, when only a limited number of records are displayed at one time.
5 Select the paging control link and apply a “Show” behavior pertinent to the recordset.