16. Working with Code
This lesson will take about 1 hour to complete. Before beginning, make sure you have copied the files for Lesson 16 to your hard drive as described in the “Getting Started” section at the beginning of the book. If you are starting from scratch in this lesson, use the method described in the “Jumpstart” section of “Getting Started.”
![]()

Dreamweaver’s claim to fame is as a visually based HTML editor, but its code-editing features don’t take a back seat to its graphical interface and offer no compromises to professional coders and developers.
Code tools overview
As the leading WYSIWYG HTML editor, Dreamweaver allows users to create elaborate web pages and applications without touching or even seeing the code that does all the work behind the scenes. But for many designers, working with the code is not only a desire but a necessity.
That’s why it’s important to know that Dreamweaver makes it as easy to work with a page in Code view as in Design view. While the program is geared toward visual designers, Dreamweaver offers significant productivity tools for coders and developers, too. In fact, it helps to unify the entire web development team by providing a single platform that can handle almost any needed task.
You’ll find that often a specific task is actually easier to accomplish in Code view than in Design view alone. In this exercise, you’ll learn more about how Dreamweaver makes working with the code an effortless task.
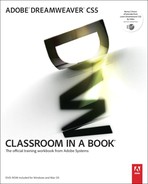
1 In Dreamweaver, open tips.html from the site root folder.
2 Switch to Code view.
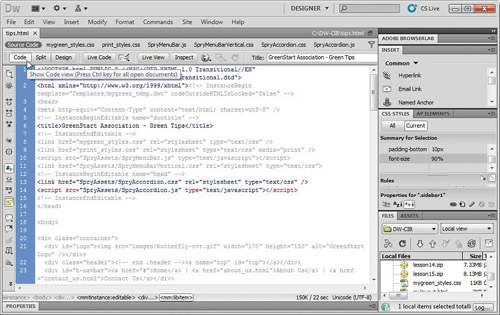
3 Choose View > Code View Options, and examine the options available.
Note
The Code view options are only selectable when Code view is active.
These seven options help to simplify code editing and improve productivity when working in the code. Note any check marks appearing beside the options, indicating that they are already selected.
4 Select Word Wrap, Line Numbers, Syntax Coloring, and Syntax Error Alerts in Info Bar, if necessary.
For most purposes, these options should always be selected.
Code view and Design view are closely integrated, and many of Dreamweaver’s features work identically in both. For example, you can use tag selectors in Code view to help quickly and easily select entire code elements.
Selecting code
Dreamweaver provides several methods for selecting code elements in Code view. One of the easiest ways is to use the tag selectors, as you have frequently done in previous lessons.
1 Scroll down the code and locate <h1>Green Tips</h1>.
2 Insert the cursor anywhere in the <h1> element. Examine the tag selectors at the bottom of the document window.
The tag selectors in Code view display the <h1> tag and all its parent elements, the same way as they do in Design view. Note how some elements are grayed out, indicating that they are part of the template and therefore locked.
3 Select the <h1> tag selector.
The entire <h1> element, including its content, is highlighted in Code view. It can now be copied, cut, moved, or collapsed. The <h1> element is a child of <div.content>. It would be difficult to manually select the entire <div> element within the Code view window, but the tag selectors make the chore simple. To select the parent element, you can click the <div.content> tag selector.
4 Select the <div.content> tag selector.
The entire <div> element is selected. But you’ll notice that tag selectors for <div.content> are grayed out and unselectable. This is where Code view shines with a few of its own tricks.
5 Select View > Toolbars > Coding to display the Coding toolbar, if necessary.
6 Insert the cursor anywhere in the text Green Tips in the <h1> element.
7 Click the Select Parent Tag (![]() ) icon in the Coding toolbar.
) icon in the Coding toolbar.
The <h1> element is highlighted.

8 Click the Select Parent Tag icon again.
The entire <div.content> element is selected.
9 Click the Select Parent Tag icon again.
The entire <div.container> element is selected. It doesn’t matter whether the elements are locked or not. Each time you click the button, Dreamweaver selects the parent element of the current selection.
Working with long sections of code can be unwieldy. But Code view offers a handy option to collapse long sections and make them easier to work with.
Collapsing code
Collapsing code is a productivity tool that makes it a simple process to copy or move large sections of code. Code sections are also collapsed when developers are looking for a particular element or section of a page and they want to temporarily hide unneeded code sections from view. Code can be collapsed either by selection or by logical element. Use the collapse and expand icons on the toolbar to the left to collapse or expand sections of code.
1 Select the first three items in the unordered list starting with: <li>Wash clothes in cold water.</li>.
These items are part of a long list of tips that are within an unordered list within a panel of the Spry Accordion. Note the selection markers near the line numbers on the left. The minus/vertical arrow icons indicate that the selection is currently expanded.
2 Click one of the minus/vertical arrow icons on the left or the Collapse Selection (![]() ) icon in the Coding toolbar to collapse the selection.
) icon in the Coding toolbar to collapse the selection.
The selection collapses, showing only the <li> code element and a snippet of text from the collapsed code.
![]()
You can also collapse code based on logical elements, like <ul> or <div>.
3 Insert the cursor in the <ul> tag. Click the Collapse Full Tag (![]() ) icon.
) icon.
The entire <ul> element collapses in the Code window, showing only the <ul> element and a portion of the next element. In either case, the code hasn’t been deleted or damaged in any way. It still functions and operates as expected. Also, the collapse functionality only appears in Dreamweaver Code view; on the web or in another application, the code will appear normally. To expand the code, just reverse the process.
Expanding code
When the code is collapsed, you can copy, cut, or move it like you would any other selected element. You can expand elements one at a time, or all at once.
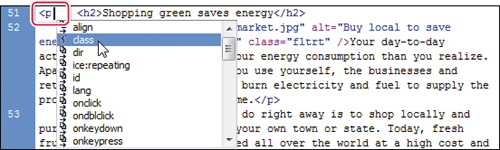
1 If necessary, insert the cursor in the collapsed <ul> element. Note the icon displayed on the left edge of the Code view window.
A plus/horizontal arrow is displayed, indicating that the code has been collapsed. To expand the code, you can click the plus/horizontal arrow icon.
2 Click the plus/horizontal arrow icon to expand the code.
The <ul> element expands, but the three <li> elements that were collapsed earlier are still collapsed. Dreamweaver provides a method to expand all elements at once.
3 Click the Expand All button in the Coding toolbar.
All collapsed elements are now expanded. Code can be added, edited, or deleted in Code view.
Adding new code
Code view isn’t just for tweaking or troubleshooting the code, it’s a fully functioning code-writing environment with numerous productivity enhancements for code writers. Besides the fact that Code view can color-code the tags and markup to make them easier to read, Dreamweaver offers code hinting for 10 different web development languages, including but not limited to HTML, CSS, JavaScript, ColdFusion, and PHP.
Code hinting for HTML markup is extensive and includes support for CSS. In this exercise, you will create a hyperlink to jump to the top of the page, as in Lesson 10, “Working with Navigation.”
1 Open news.html. Switch to Code view, if necessary.
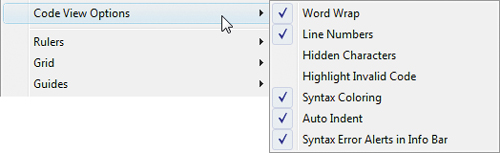
2 Scroll down and insert the cursor before <h2>Shopping green saves energy</h2>.
3 Type < at the cursor position.
The code-hints menu appears, showing you a list of HTML-compatible codes that you can select from.

4 Type or select p.
Press the spacebar to insert a space.
The code-hints menu opens again; this time it displays compatible HTML attributes for the <p> element.
Tip
You may also use the keyboard arrow keys to select the desired menu option and press the Tab key to insert it.
5 Double-click the class attribute.
The code-hints menu now shows a list of available CSS classes.
6 Double-click the CSS ctr class.

Dreamweaver inserts the ctr class within the quote ("...") marks and moves the insertion point outside the closing quote mark.
7 Type > at the cursor position.
The opening <p> tag is complete. Now you can build the hyperlink.
8 Type <a at the cursor position.
Press the spacebar to insert a space.
Code hinting offers a list of compatible attributes for the anchor element.
9 Double-click the href attribute.
Dreamweaver automatically creates the attribute and adds the proper structure, moving the insertion point between two quotation marks. A Browse link appears, enabling you to navigate to a file on the hard drive, if desired. In this case, the link is an internal reference to the named anchor top that you created in Lesson 10 and added to the template.
10 Type #top at the cursor position.
When you enter code manually, you have to move the cursor manually outside the element before you can continue.
11 Press the Right Arrow key to move the cursor outside the closing quote (") mark.
12 Type >Return to top at the cursor position.
This closes the opening <a> tag and creates the link text.
![]()
13 Type </ to close the <a> tag.
Dreamweaver automatically closes the appropriate tag, in this case using the closing </a> tag. You can now close the <p> element, too.
14 Type </ to close the <p> tag.
Press Enter/Return to insert a new paragraph.
The </p> is closed automatically by Dreamweaver, and the element and link are complete.
![]()
15 Copy the entire <p> element, with the hyperlink, and paste copies after each of the news items.
16 Save all files.
As you can see, Dreamweaver simplifies the task of writing code by providing a variety of productivity enhancements including code hinting and automatic code completion. These features work in a similar fashion for all the supported languages.
Some tools work in Code view the same way they work in Design view. Code Navigator is a good example of one.
Using Code Navigator
Code Navigator is an essential tool for troubleshooting CSS problems and identifying pertinent CSS rules for specific markup. It works identically in Design, Code, or Live view.
1 Click the document tab for tips.html to bring it to the front, or open it from the site root folder. Switch to Split view.
This document window splits, showing both Code and Design view. The document features a Spry Accordion containing the three sections for green tips.
2 In the Design view side, right-click the text Green Tips and select Code Navigator. Note the names and order of the CSS rules displayed in the pop-up Code Navigator window.
3 Repeat step 2 in the Code view side with the <h1>Green Tips</h1> code.
The names and order of the rules in Design and Code view are identical. But there is a limit to what Code Navigator can do by itself.
4 Click the Live View button. Test the functionality of the Accordion panels on the Design view side of the split.
The Accordion panels open and close interactively. Note how each panel displays a hover effect when the cursor passes over the panel tab. You can use Code Navigator to identify the CSS rules that format the Accordion structure.
Code Navigator can be accessed in any view of Dreamweaver.
5 Position the cursor over the At Home tab. Right-click the tab and choose Code Navigator from the context menu.
Note how the tab changes color when the cursor passes over it. Examine the CSS rules in the Code Navigator window and try to locate the rules creating the hover effect. Give up? Code Navigator can’t identify the hover effect because it doesn’t exist. The effect is generated by JavaScript live in the browser only when you interact with the Spry Accordion, otherwise the element is a static piece of HTML code. To help you identify the pertinent rules, Code Navigator will need the help of the Live Code feature and Inspect mode.
Accessing Live Code
Live Code is a feature that permits you to view how the code actually functions in the browser. This is especially helpful for all interactive processes or web applications that can alter the code, such as the Spry Accordion.
1 Click the Live Code button.
The Code view side of the document changes color, indicating that Live Code is active. The HTML code can’t be edited when Live Code is active.
2 Position the cursor over the At Home Accordion tab. Examine the code display carefully and note any changes. You may need to move the cursor over the tab several times to see the changes.
Tip
If the pertinent code isn’t displayed, you can click the At Home tab to focus the Code view split on the proper section.
Note how the class of the <div> element containing the text At Home is changing interactively from <div class="AccordionPanelTab"> to <div class="AccordionPanelTab AccordionPanelTabHover"> and thereby invoking the hover state of the tab. You could write down the pertinent class names to edit them manually later, but there’s a better way.

3 Position the cursor over the At Home tab. When the tab displays the hover effect, right-click the tab and choose Freeze JavaScript from the context menu.

The hover effect freezes in state. A notice appears at the top of the document window indicating that JavaScript is frozen.

4 In the Code or Design view split, right-click the At Home text and choose Code Navigator from the context menu.
The Code Navigator window appears. This time it displays the rules that format the hover effect, as well as the ones that govern the PanelOpen behavior. By freezing the JavaScript while you were activating the hover effect, you were able to identify the pertinent CSS styling.
5 Press the F6 key or click the Resume link in the notice at the top of the screen to unfreeze JavaScript.
Using Inspect mode
A new tool has been added to Dreamweaver CS5 to help you to identify specific HTML elements and their associated CSS formatting: Inspect mode.
Inspect mode is a new feature in Dreamweaver CS5 that works together with Live view to survey your page content and connect HTML elements to the pertinent CSS styling, visually. Inspect mode can work with Live view alone, or combined with Live view and Live Code.
1 If necessary, open tips.html, switch to Split view, and select View > Split Vertically.
2 If necessary, open the CSS Styles panel. Click the Current button.
The CSS Styles panel will display styling for any selected element.
3 If necessary, select Live view and Live Code.
4 Click the Inspect button.
A notice appears at the top of the document window reporting that Inspect mode is most useful with certain workspace settings and offers to make the changes for you.

5 Click the Switch Now link to make the workspace modifications.
When Inspect mode is invoked, Dreamweaver highlights elements in color within Design view as the cursor passes over them. At the same time, the selected element is highlighted in Code view and the CSS Styles panel displays the pertinent styling information.
Tip
If you click an element in the document window, Inspect mode is disengaged automatically.
6 Pass the cursor over the text items within the bulleted list.
Dreamweaver highlights the <li> element in Code view and displays the appropriate formatting in the CSS Styles panel.
7 Position the cursor over any of the bullets in the list.
Dreamweaver now highlights the <ul> element and its formatting. Once the element or formatting is identified, you can also use Code view to edit the HTML or any of the files.

Working in related files
The Related Files interface is practically black magic for coders and developers. It provides access to most of the attached files without having to look for them on the hard drive or server, or even to open them. Each of the related files is displayed at the top of the document window and is basically only a click away. For example, you can use the Related Files interface to access the CSS formatting right inside Code view.
1 Click mygreen_styles.css in the Related Files display.
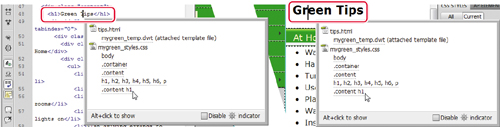
The mygreen_styles.css file appears in the Code view split. You can edit the CSS rules directly in this window. Code Navigator can also help to locate specific rules. For instance, the rule that formats the <h1> element is stored in mygreen_styles.css. Using Code Navigator, you can locate the appropriate rule with a single click.
2 Right-click the Green Tips heading and choose Code Navigator from the context menu. Select .content h1 from the Code Navigator window.
The Split view Code window focuses on the .content h1 rule in mygreen_styles.css. Code Navigator will focus on the pertinent rule no matter what file it is stored within.
3 Right-click the At Home heading. Using Code Navigator, select the .AccordionPanelTab rule.
Tip
Changes made in any related file are not saved when you save the HTML document itself. When you close the document, Dreamweaver will prompt you to save these files. Be sure to click Yes. Or, select File > Save All at regular intervals to prevent the loss of any changes in a crash.
Dreamweaver loads the SpryAccordion.css style sheet and focuses on the .AccordionPanelTab rule automatically. If desired, you can access CSS formatting and work on the source code in Code view simultaneously.
Accessing Split Code view
Why should coders be denied the ability to work in two windows at the same time? Split Code view enables you to work in two different documents or two different sections of the same document at once. Take your pick.
1 Select View > Split Code.
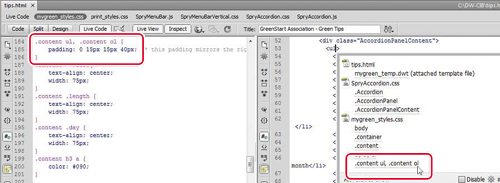
The interface displays two Code view windows: one focusing on the source code and the other on the CSS style sheet. You can use Code Navigator in Code view to access CSS formatting as you did in Design view.
2 Right-click one of the <ul> elements in the Spry Accordion. Choose Code Navigator and select the .content ul, .content ol rule.
The window displaying the CSS file focuses on the selected rule. You can even use Split Code view to display two views of the source code.
3 Exit Live Code view. Insert the cursor in the window displaying the CSS code. In the Related Files interface, select Source Code. Scroll to the bottom of the source code.
The window loads a second version of the source code. Both windows are editable and both can make changes to the selected document, if desired.
Commenting your code
Comments allow you to leave notes within the code—that won’t render in the browser—that can provide important information, say to describe the purpose of certain markup, for example. Dreamweaver has a built-in feature for adding comments.
1 Open tips.html and switch to Code view, if necessary.
2 Insert the cursor before <div id="Accordion1" class="Accordion" tabindex="0">.
An HTML comment block appears with the cursor positioned in the center, where you will type a comment.
4 Type Formatting for the Spry Accordion is applied by SpryAccordion.css located in the SpryAssets folder.
5 Insert a new paragraph after the comment.
![]()
6 Switch to Design view and examine the page content at the top of the Spry Accordion.
7 Preview the page in Live view. Examine the page content at the top of the Spry Accordion.
8 Preview the page in the default browser. Examine the page content at the top of the Spry Accordion.
The HTML comment is visible in Code view, but it doesn’t appear in Design view, Live view, or the browser.
9 Save all files.
You have used a number of techniques to make working with code easier and more efficient. You have learned how to select code and collapse/expand code; used the Code Navigator, Live Code, and Inspect mode to locate and edit CSS formatting; and added an HTML comment. Overall, you have learned that whether you are a visual designer or a hands-on coder you can rely on Dreamweaver to offer vital features and power to create and edit HTML code without compromises.
Review questions
1 What could cause code and the related tag selectors to appear grayed out?
2 True or False: Collapsed code will not appear in Design view or the browser until it is expanded.
3 How does Dreamweaver assist you in creating new code?
4 How can you check what CSS styling is being applied interactively by a dynamic JavaScript action?
5 What Dreamweaver feature provides instant access to most attached files?
Review answers
1 Code that is locked and uneditable—like that supplied by a Dreamweaver template—appears in gray.
2 False. Collapsing code has no effect on the display or operation of the code.
3 Dreamweaver provides code hinting for HTML tags, attributes, and CSS styling as you type, along with support for ColdFusion, JavaScript, and PHP, among other languages.
4 Switch to Split view and activate Live Code. Position the cursor to invoke the dynamic behavior. Right-click the item and choose Freeze JavaScript from the context menu. The behavior will be frozen temporarily so you can use Code Navigator to identify the applicable styling.
5 The Related Files interface appears at the top of the document window and allows users to instantly access and edit CSS, JavaScript, and other compatible file types.