9. Working with Images
This lesson will take about 60 minutes to complete. Before beginning, make sure you have copied the files for Lesson 9 to your hard drive as described in the “Getting Started” section at the beginning of the book. If you are starting from scratch in this lesson, use the method described in the “Jumpstart” section of “Getting Started.”
![]()
Dreamweaver provides many ways to insert and adjust graphics, both within the program and in tandem with other Creative Suite tools such as Adobe Bridge, Adobe Fireworks, and Adobe Photoshop.
Reviewing web image basics
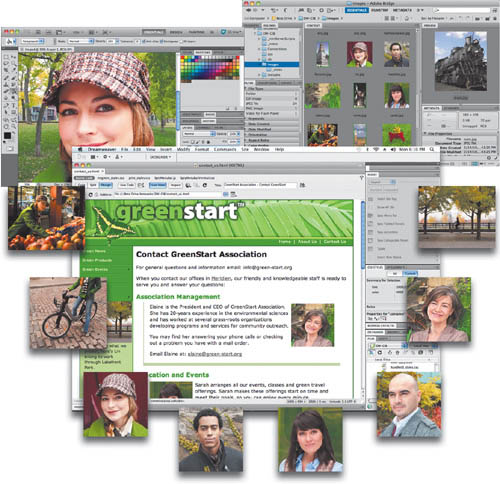
The web is not as much a place as it is an experience. And, essential to that experience are images and graphics—both still and animated—that populate most websites. In the computer world, graphics fall into two main categories: vector and raster.
Vector graphics
Vector graphics are created by math. They act like discrete objects, allowing you to reposition and resize them as many times as you want without affecting or diminishing their output quality. The best application of vector art is wherever geometric shapes and text are used to create artistic effects. For example, most company logos are built from vector shapes.
Vector graphics excel in line art, drawings, and logo art. Raster technology works better for storing photographic images.
Vector graphics are typically stored in AI, EPS, PICT, or WMF file formats. Unfortunately, most web browsers don’t support these formats. The format that is supported is SVG, which stands for Scalable Vector Graphic. The simplest way for you to get started with SVG would be to create a graphic in your favorite vector-drawing program—like Adobe Illustrator or CorelDRAW—and then export it to this format. If you are good at programming, you may want to try creating SVG yourself, using Extensible Markup Language (XML). Check out www.w3schools.com/svg to find out more about creating SVG yourself.
Raster graphics
Although SVG has definite advantages, web designers primarily use raster-based images in their web designs. Raster images are built from pixels, which stands for picture elements. Pixels have three basic characteristics:
• They are perfectly square in shape.
• They are all the same size.
• They display only one color at a time.
Raster-based images are usually composed of thousands, even millions, of different pixels arranged in rows and columns, in patterns that create the illusion of an actual photo or drawing. It’s an illusion, because there is no real photo on the screen, just a bunch of pixels that fool your eyes into seeing an image. And, as the quality of the image increases, the more realistic the illusion becomes. Raster-image quality is based on three factors: resolution, size, and color.
Raster images are built of thousands or even millions of pixels that produce the illusion of a photograph.
Resolution
Resolution is the most well known of the factors affecting raster image quality. It is the expression of image quality measured in the number of pixels that fit in one inch (ppi). The more pixels you can fit in one inch, the more detail you can depict in the image. But better quality comes at a price. An unfortunate byproduct of higher resolution is larger file size. That’s because each pixel must be stored as bytes of information within the image file—information that has real overhead in computer terms. More pixels mean more information, which means larger files.

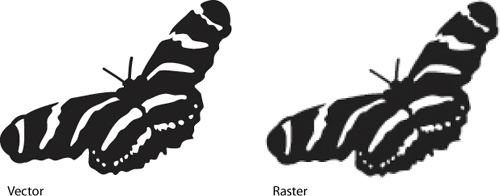
Resolution has a dramatic effect on image output. The web image on the left looks fine in the browser but doesn’t have enough quality for printing.
Luckily, web images only have to be optimized to look best on computer screens, which are mostly based on a resolution of 72 ppi. This is low compared to other applications—like printing—where 300 dpi is considered the lowest acceptable quality. The lower resolution of the computer screen is an important factor keeping most web image files down to a reasonable size for downloading from the Internet. Because web pages are intended for viewing and not printing, the pictures don’t have to have any resolution higher than 72 ppi.
Size
Size refers to the vertical and horizontal dimensions of the image. As image size increases, more pixels are required to create it, and therefore the file becomes larger. Since graphics take more time to download than HTML code, many designers in recent years have replaced graphical components with CSS formatting to speed up the web experience for their visitors. But keeping image size small is one of the best ways to ensure snappy downloads. You won’t find too many websites that depend on full-page graphics, for example.

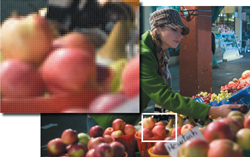
Although these two images share the identical resolution and color depth, you can see how image dimensions can affect file size.
Color
Color refers to the color space or palette that describes each image. Computer screens can display only a fraction of the colors that the human eye can see. And, different computers and applications display varying levels of color, expressed by the term bit depth. Monochrome, or 1-bit, color is the smallest space, displaying only black and white, with no shades of gray. Monochrome is used mostly for line-art illustrations, blueprints, and to reproduce handwriting.
The 4-bit color space describes up to 16 total colors. Additional colors can be simulated by a process called dithering, where the available colors are interspersed and juxtaposed to create an illusion of more color. This color space was created for the first color computer systems and game consoles. Because of its limitations, this palette is seldom used today.
The 8-bit palette offers up to 256 total colors or 256 shades of gray. This is the basic color system of all computers, mobile phones, game systems, and handheld devices. This color space also includes what is called the web-safe color palette. Web-safe refers to a subset of 8-bit colors that are supported on both Macintosh and Windows computers. Most computers, game consoles, and handheld devices now support higher color palettes, but 8-bit is the fallback for all web-compatible devices.
Today, smart phones and handheld games usually support the 16-bit color space. This palette is called high color and sports a grand total of 65,000 colors. Although this sounds like a lot, 16-bit color is not considered good enough for most graphic design purposes or professional printing.
The highest color space is 24-bit color, which is called true color. This system generates up to 16.7 million colors. It is the gold standard for graphic design and professional printing. Several years ago a new color space was added to the mix: 32-bit color. It doesn’t offer any additional colors, but it provides an extra eight bits for an attribute called alpha transparency.

Here you can see a dramatic comparison of three color-spaces and what the total number of available colors means to image quality.
Alpha transparency enables you to designate parts of graphics as fully or partially transparent, which allows you to create graphics that seem to have rounded corners or curves and eliminate the white bounding box typical of raster graphics.
As with dimensions, color-depth can dramatically affect image file size. With all other aspects being equal, an 8-bit image is over 7 times larger than a monochrome image. And, the 24-bit version is over 3 times larger than the 8-bit image. The key to effective use of images on a website is finding the balance of resolution, size, and color to achieve the desired optimal quality.
Raster image file formats
Raster images can be stored in a multitude of file formats, but web designers have to be concerned with only three: GIF, JPEG, and PNG. These three formats are optimized for the Internet and compatible with most browsers. However, they are not equal in capability.
GIF
GIF (graphic interchange format) was one of the first raster image file formats designed specifically for the web. It has changed only a little in the last 20 years. GIF supports a maximum of 256 colors (8-bit palette) and 72 ppi, so it’s used mainly for web interfaces, buttons, graphical borders, and such. But it does have several interesting features that keep it pertinent for today’s web designers: index transparency and animation.
JPEG
JPEG, also written JPG, is named for the Joint Photographic Experts Group that created the image standard back in 1992 as a direct reaction to the limitations of the GIF file format. JPEG is a powerful format that supports unlimited resolution, image dimensions, and color depth. Because of this, most digital cameras use JPEG as their default file type for image storage. It’s also the reason most designers use JPEG on their websites for images that must be displayed in high quality.
But for pixel-based images, high quality—as described earlier—usually means large file size. Large files take longer to download to your browser. So, why is the format so popular on the web? JPEG’s claim to fame comes from its patented user-selectable image compression algorithm that can reduce file size as much as 95 percent. JPEG images are compressed each time they are saved and then decompressed before they are opened and displayed.
Unfortunately, there’s a downside to all this compression. Too much compression damages image quality. This type of compression is called lossy, because it loses quality each time. In fact, it can damage an image so much that the image can be rendered useless. Each time designers save a JPEG image, they face a trade-off between image quality and file size.
PNG
PNG (Portable Network Graphic) was developed in 1995 because of a looming patent dispute involving the GIF format. At the time it looked as if designers and developers would have to pay a royalty for using the .gif file extension. Although that issue blew over, PNG has found many adherents and a home on the Internet because of its capabilities.
PNG combines many of the features of GIF and JPEG and then adds a few of its own. For example, it offers support for unlimited resolution, 32-bit color, and full alpha and index transparency. It also provides lossless compression, which means you can save an image in PNG format and not worry about losing any quality each time you open and save the file. That’s the good news.
The bad news is that although the format has been around for over 10 years, its features—such as alpha transparency—are not fully supported in older browsers.
Previewing the completed file
To get a sense of the files you will work on in this lesson, let’s preview the completed pages in the browser.
1 Launch Adobe Dreamweaver CS5.
2 If necessary, press Ctrl-Shift-F/Cmd-Shift-F to open the Files panel and select DW-CIB from the site list.
3 In the Files panel, expand the lesson09 folder.
4 Open the contactus_finished.html and news_finished.html files from the lesson09 folder and preview the pages in your primary browser.

The page includes several images, as well as a Photoshop Smart Object image.
5 Close your browser and return to Dreamweaver.
Inserting an image
Images are key components of any web page, both for developing visual interest and for telling stories. Dreamweaver provides numerous ways to populate your pages with images, using built-in commands and even using copy and paste. One method is to insert the image using Dreamweaver tools.
1 In the Files panel, open the contact_us.html file from the site root folder, which you completed in Lesson 8, “Working with Text, Lists, and Tables.”
Note
If you are starting from scratch in this chapter, use the Jumpstart instructions in the “Getting Started” section at the beginning of the book.
An image placeholder appears in <div.sidebar1> to indicate where an image should be inserted.
2 Double-click the image placeholder labeled “Sidebar (180 × 150).”
The Select Image Source dialog box appears.
3 Select biking.jpg from the site images folder. Click OK/Choose.

4 In the Image Tag Accessibility Attributes dialog box, in the Alternate Text field, type Bike to work to save gas and click OK. If this dialog box does not appear, you can add this text using the Alt field in the Property inspector. Remember, Alt text appears whenever images can’t be displayed.
5 To give your image a caption, select the placeholder text Insert caption here and type We practice what we preach, here’s Lin biking to work through Lakefront Park.
You’ve successfully inserted an image using one technique, but you have another technique available. Alternatively, you can add an image to the page using the Assets panel.
6 Insert the cursor at the beginning of the first paragraph under the heading Association Management in <div.content>. The cursor should be inserted before the name Elaine.
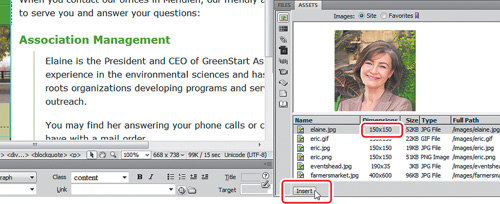
7 Choose Window > Assets to display the Assets panel, if necessary. Click the Images category (![]() ) icon to display a list of all images stored within the site.
) icon to display a list of all images stored within the site.
Note
The Images window shows all images stored in the site, even ones outside the site’s default image folder; so you may see listings for images stored in the lesson subfolders, too.
8 Locate and select elaine.jpg in the list.
A preview of elaine.jpg appears in the Assets panel. The panel lists the image name, dimensions in pixels, and file type, as well as its directory path.
9 Note the dimensions of the image: 150 pixels by 150 pixels.
10 At the bottom of the panel, click the Insert button.
Tip
Dreamweaver also allows you to drag the image icon from the Assets panel to the page.
Note
If more than one file appears with the same name in the Assets panel, make sure you select the image stored in the default images folder.
The image appears at the current cursor location.
11 In the Image Tag Accessibility Attributes dialog box, type Elaine, Meridien GreenStart President and CEO in the Alternate Text field and click OK.

12 Choose File > Save.

You inserted Elaine’s picture in the text, but it doesn’t look very nice at its current position. In the next exercise, you will adjust the image position using a CSS class.
Adjusting image positions with CSS classes
The <img> element is an inline element, by default. That’s why you can insert images into paragraphs and other elements. When the image is taller than the font size, the image will increase the vertical space for the line in which it appears. As with most solutions, there is a way to adjust its position using HTML attributes or CSS.
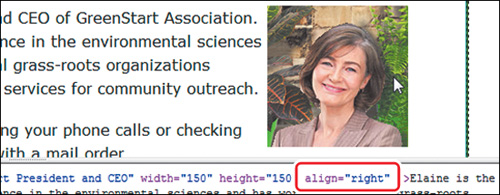
1 In the layout, select elaine.jpg. From the Align menu in the Property inspector, choose Right.

The image shifts to the right side of the paragraph and drops down into the text, with the text wrapping around it to the left.
2 Select the <img> tag selector. Switch to Code view. Observe the attributes within the beginning <img> tag.
The opening tag includes an align="right" attribute. This technique works fine, but it creates a lot more trouble for you if you wish to adjust this formatting later. A better solution uses CSS.
3 Select the image again, if necessary. From the Align menu in the Property inspector, choose Default.
The image returns to its insertion point.
4 From the Class menu in the Property inspector, select fltrt.

The image moves back to the right, as before. The classes fltrt (short for float right) and fltlft (short for float left) are included in each of the Dreamweaver predefined CSS layouts. They apply a CSS property that produces the same effect as the HTML Align attribute, but one that will be easier to modify across the entire site, if necessary.
Working with the Insert panel
The Insert panel duplicates key menu commands and has a number of buttons that make inserting images both quick and easy.
1 Insert the cursor at the beginning of the first paragraph under the heading Education and Events.
2 Choose Window > Insert to display the Insert panel, if necessary.
3 In the Insert panel, choose the Common category.

Note
If you don’t see the Insert panel docked on the right side of the screen, it may open as a toolbar at the top of the document window, as it does in the Classic workspace for example.
Click to open the Images button.
The button offers seven options: Image, Image Placeholder, Rollover Image, Fireworks HTML, Rectangular Hotspot, Oval Hotspot, or Polygon Hotspot. A hotspot is basically a hyperlink enabled by a user-defined area drawn on an image.
4 From the pop-up menu, choose Image.
The Select Image Source dialog box appears.
5 Select sarah.jpg from the default images directory and note the dimensions of the image: 150 pixels by 150 pixels. Click OK/Choose.
6 In the Image Tag Accessibility Attributes dialog box, type Sarah, GreenStart Events Coordinator in the Alternate Text field and click OK.
7 Apply the fltlft class to this image.

The image drops down into the paragraph on the left side with the text wrapping to the right.
8 Save the file.
Another way to insert images in your web page is by using Adobe Bridge.
Using Adobe Bridge
Adobe Bridge CS5 is an essential tool for web designers that can quickly browse directories of images and other supported assets, as well as manage and tag files with keywords and labels. Bridge is fully integrated with Dreamweaver: You can launch it from within Dreamweaver and drag images directly from Bridge into your layouts.
1 Insert the cursor at the beginning of the first paragraph under the heading Transportation Analysis.
2 Choose File > Browse in Bridge.
Adobe Bridge launches. The interface in Bridge can be set up to your liking and saved as a custom workspace.
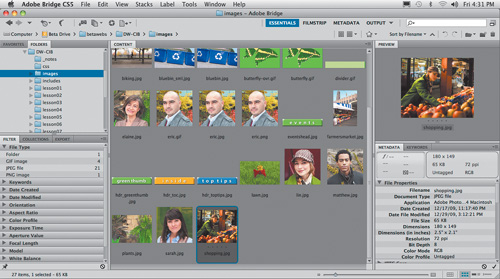
3 Click the Folders tab to bring the Folders panel to the top. If necessary, choose Window > Folders Panel, if the panel isn’t visible. Navigate to the folder designated as your default site images folder on your hard drive. Observe the names and types of files displayed in the folder.
Bridge displays a thumbnail image of each file in the folder. Bridge can display thumbnails for all types of graphic files, including AI, BMP, EPS, GIF, JPG, PDF, PNG, SVG, and TIF, among others.
4 Click eric.png. Observe the Preview and Metadata panels. Note the dimensions, resolution, and color space of the image.
The Preview panel displays a high-quality preview of the selected image.
Bridge also has capabilities for helping you locate and isolate specific types of files.
5 Choose Window > Filter Panel to display the panel, if it’s not visible.
The Filter panel displays a default set of data criteria—such as file type, ratings, keywords, date created, and so forth—that are then populated automatically by the contents of a particular folder. You can filter the contents to these criteria by clicking one or more of these items.
6 In the Filter panel, expand the File Type criteria. Select the JPEG File criterion.
A check mark appears beside the JPEG File criterion. The PNG file you selected earlier is no longer visible. The Content panel displays only JPEG files.
7 In the File Type criterion, select GIF Image.

A check mark appears beside the GIF Image criterion. The Content panel now displays only GIF and JPEG files. Bridge enables you to insert files instantly into other Creative Suite applications.
8 Select eric.jpg in the Content panel. Note the dimensions in the Metadata panel: 150 pixels by 150 pixels. Choose File > Place > In Dreamweaver.

Your computer switches back to Dreamweaver automatically.
9 In the Image Tag Accessibility Attributes dialog box, type Eric, Transportation Research Coordinator in the Alternate Text field and click OK.
The eric.jpg image appears in the Dreamweaver layout at the last position of the cursor.
10 Apply the fltrt class to this image. Save the file.
Dreamweaver is not limited only to the file types GIF, JPEG, and PNG; it can work with other file types, too. In the next exercise you will learn how to insert a Photoshop document (PSD) into a web page.
Inserting incompatible file types
Although most browsers will display only the web-compatible image formats described earlier, Dreamweaver allows you to choose from many different formats to insert into the layout. The program will then automatically convert the file to a compatible format on the fly.
1 Insert the cursor at the beginning of the first paragraph under the heading Research and Development.
2 Choose Insert > Image. Navigate to lesson09 > resources on your hard drive. Select lin.psd and note the image dimensions. Click OK/Choose.
The Image Preview dialog box appears. The Image Preview dialog box acts as an intermediary that will convert the file to the necessary format.
3 Note the image type displayed in the Format menu. Open the Format menu.

The Format drop-down menu offers five options: GIF, JPEG, PNG 8, PNG 24, and PNG 32.
4 Choose JPEG. Note the Quality setting.
The default setting for JPEG is usually at 80 percent. This quality setting produces a high-quality image with a moderate amount of compression. You can raise the compression level to reduce the file size, but as described earlier, this can adversely affect image quality.
5 Before you experiment with the Quality setting, note the text displayed above the image preview.
This information reports valuable statistics about the current state of the image and tells you how big the file is and how long it will take to download using a specified connection speed.
6 Change the Quality value to 50. Press Tab to effect the change.

The change in quality may not be observable in the image preview, but it had a noticeable effect on the file size and download speed. Compression affects images differently based on many factors, including color, contrast, and composition. An amount of compression that is acceptable in one image may ruin another.
7 Change the Quality value to 10. Press Tab to effect the change.
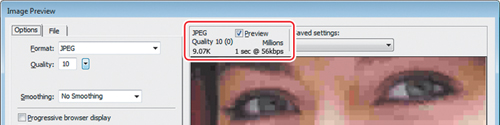
At 10, the compression has severely affected the image quality. Few images would be usable at this compression level. But you can see that the high compression has also reduced the file size and download time dramatically.
8 Change the Quality value to 80.
The image preview returns to its earlier quality. You can adjust the setting up and down as many times as you want as long as the dialog box is open. But once you click OK, this dialog box will effect permanent changes to the image.
9 Click the File tab in the upper left to switch the mode of the dialog box. Note the values in the Scale fields.
As you plainly see, the PSD image is much larger than any of the previously used images. The image is at 100 percent of its original size, 600 pixels by 600 pixels. The width of this image would definitely break the layout of your page if it were inserted at its current size. Fortunately, the Image Preview dialog box has the ability to resample and resize this image. If you recall, the images inserted previously were 150 pixels by 150 pixels.
10 Select the value in the Width field. Type 150 to replace the value and press Tab to move to the Height field.

Note that the Height field changes to 150 if the Constrain option is selected. The image preview changes to reflect the new size.
11 Click OK.
Note
When an image has to be converted this way, Dreamweaver usually saves the converted image into the default site images folder. This is not the case when the images inserted are web-compatible. So, before you insert an image you should be aware of its current location in the site and move it to the proper location, if necessary.
The Save Web Image dialog box appears with the name lin entered in the Save As field. Dreamweaver will add the .jpg extension to the file automatically, too.
12 If necessary, navigate to the default site images folder. Click Save.
The Image Tag Accessibility Attributes dialog box appears.
13 Enter Lin, Research and Development Coordinator in the Alternate Text field. Click OK.
The image appears in Dreamweaver at the cursor position.
14 Apply the fltlft class to this image. Save the file.
The image appears in the layout, but there’s something different about it. An icon appears in the upper-left corner of the image that identifies this image as a Photoshop Smart Object.

Working with Photoshop Smart Objects
Unlike other images, Smart Objects maintain a connection to a Photoshop (PSD) file. If the PSD file is altered in any manner and then saved, Dreamweaver will identify those changes and provide the means to update the web image used in the layout. In fact, a single PSD file can be placed in one or more pages as a Smart Object and then updated in one action.
1 If necessary, open contact_us.html. Scroll down to the image lin.jpg in the Research And Development section. Observe the icon in the upper-left corner of the image.
Note
Dreamweaver and Photoshop can work with the existing quality of an image only. If your initial image quality is unacceptable, you may not be able to fix it in Photoshop. You will have to re-create the image or pick another.
The icon indicates the image is a Smart Object. The circular green arrows indicate that the original image is unchanged. If you want to resize or resample the image, you can simply double-click it to reopen the Image Preview dialog. Because the image is still tied to the original image at its full size and resolution, you will be able to scale the image’s size and quality up or down.
To make substantive changes to the image, you will have to open it in Photoshop. (If you don’t have Photoshop installed, copy lesson09 > resources > smartobject > lin.jpg into the lesson09 > resources folder to replace the original image and then skip to step 6.)
2 Right-click lin.jpg. Choose Edit Original With > Photoshop from the context menu.

Photoshop launches—if it is installed on your computer—and loads the file.
3 In Photoshop, choose Window > Layers to display the Layers panel, if necessary. Observe the names and states of any existing layers.
The image has two layers: Lin and New Background. New Background is turned off.

4 Click the eye (![]() ) icon for the New Background layer to display its contents.
) icon for the New Background layer to display its contents.
The background of the image changes to show a scene from a park.
5 Save the Photoshop file.
6 Switch back to Dreamweaver.
In a moment or two, the Smart Object icon in the upper-left corner changes to indicate that the original image has been changed. You don’t have to update this image at this time. You can leave the out-of-date image in the layout for as long as you want, Dreamweaver will continue to monitor its status as long as it’s in the layout. But for this exercise, you want to update the image.
7 Right-click the image and choose Update From Original from the context menu.
This Smart Object and any other instances of it also change to reflect the new background.

8 Save the file.
As you can see, Smart Objects have advantages over a more typical image workflow. For images that are frequently updated, using a Smart Object can simplify updating the website in the future.
Copying and pasting images from Fireworks and Photoshop
As you build your website, you will need to edit and optimize many images before you use them in your site. Adobe Fireworks and Adobe Photoshop are both excellent programs for performing these tasks. A common workflow is to manually export the finished GIF, JPEG, or PNG to the default images folder in your website when you’re done working on it. But Dreamweaver allows you to copy and paste images from either program directly into your layout. The steps are nearly identical for both; feel free to use the program you are most familiar with in this exercise.
1 Launch Adobe Fireworks or Adobe Photoshop, if necessary. Open matthew.tif from the lesson09 > resources folder. Observe the Layers panel.
The image has only one layer. In Fireworks, you can select multiple layers and copy and paste them into Dreamweaver. In Photoshop, you will have to merge or flatten layers before you copy and paste them.
2 Press Ctrl-A/Cmd-A to select the entire image. Press Ctrl-C/Cmd-C to copy the image.
3 Switch to Dreamweaver. Scroll down to the Information Systems section in contact_us.html. Insert the cursor at the beginning of the first paragraph in this section.
4 Press Ctrl-V/Cmd-V to paste the image from the clipboard.
Note
Raster images can be scaled down in size without losing quality, but the opposite is not true. Unless a graphic has a resolution higher than 72 ppi, it may not be possible to scale it larger without noticeable degradation.
The Image Preview dialog box appears.
5 Click the File button to switch the mode of the dialog box. Change the Width to 150. Click OK.
The height changes automatically to match. The Save Web Image dialog box opens with the name matthew already displayed in the Save As field.
6 In the Save Web Image dialog box, click Save.

Dreamweaver will add the .jpg extension to the file automatically.
The Image Description (Alt Text) dialog box appears.
7 Enter Matthew, Information Systems Manager in the Image Description (Alt Text) field. Click OK.

The image appears in the layout at the cursor location. Although this image came from Fireworks or Photoshop, it’s not “smart” like a Photoshop Smart Object and can’t be updated automatically. It does, however, keep track of the location of the original image if you want to edit it later.
8 In the layout, right-click the image matthew.jpg and choose Edit Original With > Browse from the context menu.
9 Navigate to and select the program file for Fireworks or Photoshop on your hard drive. Click Open.

Tip
The executable program file is usually stored in the Program Files folder in Windows and in the Applications folder on a Mac.
The program launches and displays the original TIF file. You can make changes to the image and copy and paste it into Dreamweaver by repeating steps 2 through 7. Although there’s no way to automatically replace the image, as with Smart Objects, there’s a more efficient way than using copy and paste. Photoshop users should skip to step 11.
10 In Fireworks: Choose File > Image Preview. Switch to File mode in the Image Preview dialog box. Choose JPEG – Better Quality from the Saved Settings menu and change the Width field to 150px. Click Export. Skip to step 12.
The Height field changes to match the width. The Export dialog box appears.
11 In Photoshop: Choose File > Save For Web And Devices. Choose JPEG – High from the Preset menu. Change the Image Size Width field to 150px. Click Save.
The height field changes to match the width. The Save Optimized As dialog box appears.
12 Navigate to the default site images folder and click the file matthew.jpg.
Tip
Clicking the name inserts the existing filename and avoids any spelling or typing errors, which is vital for Unix-based web servers.
The name matthew.jpg appears in the Save As field of the Export/Save Optimized As dialog box.
13 Click Export/Save.
14 Switch back to Dreamweaver. Scroll down to view matthew.jpg in the Information Systems section.
No further action is needed to update the image in the layout because you saved the new image over the original file. As far as Dreamweaver is concerned, the file hasn’t changed at all. This method saves you several steps and avoids any potential typing errors.
15 Apply the fltrt class to this image. Save the file.
Copy and paste is just one of the handy methods for inserting images. Dreamweaver also allows you to drag images into your layout.
Inserting images by drag and drop
Most of the programs in the Creative Suite offer drag-and-drop capabilities, and Dreamweaver is no exception.
1 Open the news.html file you created in the last lesson from the site root folder.
2 Choose Window > Files to display the Files panel, if necessary. For this exercise, the panel should be docked. Click the Collapse button to dock the panel, if necessary.
3 Navigate to and expand the images folder.
4 Drag city.jpg from the panel to the beginning of the first paragraph under the heading Green Buildings earn more Green.
The Image Tag Accessibility Attributes dialog box appears.
5 In the Alternate Text field, enter Green buildings are top earners. Click OK.
6 Apply the class fltlft to the image. Save the file.
It takes a steady hand and a little practice to perfect your drag-and-drop technique, but it’s a good way to get images into your layout quickly.
Optimizing images with the Property inspector
Optimized web images balance dimensions and quality with file size. Sometimes you may need to optimize graphics that have already been placed on the page. Dreamweaver has built-in features that can help you achieve the smallest possible file size while preserving image quality. In this exercise, you’ll use tools in Dreamweaver to scale, optimize, and crop an image for the web:
1 Insert the cursor at the beginning of the first paragraph under the heading Shopping green saves energy. Choose Insert > Image. Select farmersmarket.jpg from the site images folder and click OK/Choose.
2 In the Alternate Text field, enter Buy local to save energy. Click OK.
3 Apply the class fltrt to the image.
The image is large and poorly composed. You can use tools in Dreamweaver to fix the image composition.
4 If necessary, choose Window > Properties to display the Property inspector.
Whenever an image is selected, image-editing options appear in the lower-right corner of the Property inspector. The buttons here allow you to edit the image in Fireworks or Photoshop, or adjust various settings in place. See the sidebar “Dreamweaver’s graphic tools” for an explanation of each button.

There are two ways to reduce the dimensions of an image in Dreamweaver. The first method changes the size of the image temporarily by imposing user-defined dimensions.
5 In the layout, select farmersmarket.jpg. In the Property inspector, change the image width to 200 and the height to 300.
Although the dimensions entered are not correct for this image, it resizes anyway. A circular arrow appears beside the Width and Height fields, indicating that the image dimensions have been modified manually.

6 Click the circular arrow.
The image returns to its original size. You should avoid this method for reducing the image dimensions because it has no beneficial effect on file size or download speed.
The image can also be resized interactively.
7 Hold the Shift key (which constrains the operation to proportional scaling) and drag the lower-right corner to scale the image down to a width of 300.
Tip
As you scale the image, the Property inspector gives a real-time display of the image dimensions.
The circular arrow appears in the Property inspector.
8 In the Property inspector, click the Resample (![]() ) icon. Click OK.
) icon. Click OK.
A dialog box appears, indicating that the change will be permanent.
Dreamweaver can also crop images.
9 Click the Crop (![]() ) icon.
) icon.
Crop handles appear on the image.
10 Crop the image to remove unwanted areas. Press Enter/Return to finalize the change.

11 Save the file.
In this lesson, you learned how to insert images and Smart Objects into a Dreamweaver page, work with Adobe Bridge, copy and paste from Fireworks and Photoshop, and use the Property inspector to edit images.
There are numerous ways to create and edit images for the web. The methods examined in this lesson show but a few of them and are not meant to recommend or endorse one method over another. Feel free to use whatever methods and workflow you desire, based on your own situation and expertise.
Dreamweaver’s graphic tools
All of Dreamweaver’s graphic tools are accessible from the Property inspector when an image is selected. Here are the six tools:
![]() Edit—Sends the selected image to the defined external graphics editor. You can assign a graphics editing program to any given file type in the File Types/Editors category of the Preferences dialog box. The button’s image changes according to the program chosen. For example, if Fireworks is the designated editor for the image type, a Fireworks icon is shown; if Photoshop is the editor, you’ll see a Photoshop icon.
Edit—Sends the selected image to the defined external graphics editor. You can assign a graphics editing program to any given file type in the File Types/Editors category of the Preferences dialog box. The button’s image changes according to the program chosen. For example, if Fireworks is the designated editor for the image type, a Fireworks icon is shown; if Photoshop is the editor, you’ll see a Photoshop icon.
![]() Edit Image Settings—Opens the current image in the Image Preview dialog box. In addition to providing access to the optimization features used in this exercise, the Image Preview dialog box can be used to crop images and modify animated GIF settings.
Edit Image Settings—Opens the current image in the Image Preview dialog box. In addition to providing access to the optimization features used in this exercise, the Image Preview dialog box can be used to crop images and modify animated GIF settings.
![]() Update From Original—Renders a Smart Object to the newly selected size. The underlying Photoshop file is unchanged.
Update From Original—Renders a Smart Object to the newly selected size. The underlying Photoshop file is unchanged.
![]() Crop—Removes the unwanted parts of an image. When the Crop tool is selected, a bounding box with a series of handles appears within the current image. You can adjust the bounding box size by dragging the handles. When the box outlines the desired portion of the image, double-click the graphic to remove those parts of the image that are outside the bounding box.
Crop—Removes the unwanted parts of an image. When the Crop tool is selected, a bounding box with a series of handles appears within the current image. You can adjust the bounding box size by dragging the handles. When the box outlines the desired portion of the image, double-click the graphic to remove those parts of the image that are outside the bounding box.
![]() Resample—Rescales a resized image. The Resample tool is active only when an image has been resized.
Resample—Rescales a resized image. The Resample tool is active only when an image has been resized.
![]() Brightness And Contrast—Adjusts an image that may be too light or too dark. A dialog presents two sliders—for brightness and contrast—that can be adjusted independently. A live preview is available so that you can evaluate adjustments before committing to them.
Brightness And Contrast—Adjusts an image that may be too light or too dark. A dialog presents two sliders—for brightness and contrast—that can be adjusted independently. A live preview is available so that you can evaluate adjustments before committing to them.
![]() Sharpen—Affects the definition of image edges by raising or lowering the contrast of pixels on a scale from 0 to 10. As with the Brightness And Contrast tool, Sharpen offers a real-time preview.
Sharpen—Affects the definition of image edges by raising or lowering the contrast of pixels on a scale from 0 to 10. As with the Brightness And Contrast tool, Sharpen offers a real-time preview.
You can undo all graphics operations by choosing Edit > Undo until the containing document is closed or you quit Dreamweaver.
Review questions
1 What are the three factors that determine raster image quality?
2 What file formats are specifically designed for use on the web?
3 Describe at least two methods for inserting an image into a web page using Dreamweaver.
4 True or false: All graphics have to be optimized outside of Dreamweaver.
5 What is the advantage of using a Photoshop Smart Object over copying and pasting an image from Photoshop?
Review answers
1 Raster image quality is determined by resolution, image dimensions, and color depth.
2 The compatible image formats for the web are GIF, JPEG, and PNG.
3 One method to insert an image into a web page using Dreamweaver is to use the Insert panel. Another method is to drag the graphic file into the layout from the Files panel. Images also can be copied and pasted from Photoshop. Images can be inserted from Adobe Bridge.
4 False. Images can be optimized even after they are inserted into Dreamweaver by using the Image Preview dialog box. Optimization can include rescaling, changing format, or fine-tuning format settings.
5 A Smart Object can be used multiple times in different places on a site, and each instance of the Smart Object can be assigned individual settings. All copies remain connected to the original image. If the original is updated, all the connected images are immediately updated as well. When you copy and paste all or part of a Photoshop file, however, you get a single image that can have only one set of values applied to it.