
Chapter 21. OpenGL on Linux
WHAT YOU’LL LEARN IN THIS CHAPTER:

Now that you have had a chance to learn how to use OpenGL on Windows and Mac OS, it’s time for Linux to get some attention! Just like other platforms, Linux supports 3D rendering through the OpenGL API.
In this chapter we will take a look at how Linux supports OpenGL, what interfaces are available for developers, and how to set up an application. We will also hit GLUT, context management, and how to allocate, render to, and deal with windows on X Windows.
The Basics
OpenGL has long been supported on various versions of Linux, Unix, and so on. On Unix, native hardware support has often been built into the box. For Linux, Mesa3D comes installed with most X Server configurations. Also, most 3D hardware vendors provide some form of 3D acceleration for Linux, usually with proprietary closed-source drivers.
Before there was OpenGL, there was IRIS GL. This was a standard released by SGI. Next came the public interface for 3D graphics, OpenGL. Brian Paul started a project to implement support for OpenGL, called Mesa. At the time there were very few functional implementations. SGI, the founders of OpenGL, had very few computers available that supported OpenGL. In 1995, the first release of Mesa opened the door to wider support that was not tied to a hardware vendor. Because Mesa was a hardware independent software implementation, it was slower than most native implementations.
More recently hardware vendors have provided OpenGL support through both open- and closed-source drivers. Currently, both ATI and NVIDIA provide OpenGL drivers supporting at least OpenGL 2.0. The most recent version of Mesa supports OpenGL 1.5.
The X Window System is a graphical user interface that provides a more pleasing environment for users than a command prompt. This is similar to the interfaces for Microsoft Windows and Mac OS. X Windows are not limited to running only on the system they reside on. For instance, if you are away from your computer, you can connect to your X Server from a different computer as if you were sitting in your own desk chair.
Many different X Window environments or window desktop managers are available, such as KDE and Gnome. Each has a unique look and feel. These environments run on top of a core server. For Linux this is usually XFree86, an open-source implementation of an X Server. We will be running our OpenGL applications inside X Windows on Linux, taking advantage of XFree86
Setup
Let’s take a quick look at making sure OpenGL is supported on your system. Without that, the rest of this chapter is pretty meaningless. Try running the glxinfo command as shown here:
glxinfo |grep rendering
You should get one of two responses:
direct rendering: Yes
direct rendering: No
If the answer is yes, good news! You have hardware support for 3D rendering. If no, you may not have hardware that supports OpenGL, or you may not have drivers installed for OpenGL. If hardware support is not available, try running the following:
glxinfo |grep "OpenGL vendor"
glxinfo |grep "OpenGL version"
This will print out the currently installed OpenGL driver information. Remember to be careful about capitalization! If you do not have hardware drivers but do have Mesa installed, the information for the Mesa driver will be displayed. You will also get the current version of OpenGL that your Mesa implementation supports.
If the glxinfo command fails, or no vendor/version information is available, your distro is not set up for rendering with OpenGL. You have some options. You can install Mesa, or you can procure a video card that does support OpenGL rendering on Linux.
Setting Up Mesa
The latest version of Mesa can be downloaded from the Mesa 3D Web site; http://www.mesa3d.org. From there you can get the download link for SourceForge. Once it’s downloaded, unpack the files (example shown for Mesa 6.5.2):
gunzip MesaLib-6.5.2.tar.gz
tar xf MesaLib-6.5.2.tar
Next, you will need to compile the source that you have just unpacked. Go to the directory that was just created from the tar package and run the following:
make linux-x86
This will take a little while, but will build the Mesa package for your system. After it has finished, a bunch of libraries will have been created. Now you will need to install the libraries and headers to allow the OS to find them when necessary. Installs typically touch files that are locked for administrator modification only. Before running the install, you might want to switch to the root account by using the su command. To do the install, run the following command:
make install
These are usually located in the following directories:
Libraries: usr/X11R6/lib
Includes: usr/include/
You have finished the Mesa install. If you have more questions about the Mesa setup or install, visit the Mesa 3D Web site.
Setting Up Hardware Drivers
Hardware support for OpenGL is a little different to set up than Mesa. Each vendor has its own process. ATI and NVIDIA provide proprietary driver packages that can be downloaded. The install process is usually very simple, just a matter of running the downloaded package.
Some hardware vendors may also provide an open-source version of their display drivers. Although it is nice to have the source for the driver build, these drivers are often slower and have fewer features than their proprietary counterparts. This is usually because of the trade secrets included in proprietary versions. Also the hardware interfaces for proprietary drivers may use a less generic and more optimized path.
More Setup Details
For those who want to dig a little deeper into OpenGL setup, you can look into your X Server configuration. Your config file can be found in /etc/X11. This file is used to set the parameters of the X Server. The “Module” section specifies which modules will be loaded with your X Server. Here, there may be load lines (as shown below) for DRI (Direct Rendering Infrastructure), OpenGL, and GLX.
Load "glx"
Load "dri"
Load "GLcore"
Be careful in this file. Changes here can result in your X Server no longer loading.
Setting Up GLUT
GLUT may not be already installed on your system. If that’s the case, it can be downloaded from the OpenGL SuperBible Web site, http://www.opengl.org/superbible. Copy the glut download to your system. Then go to the GLUT directory and perform the following commands:
./mkmkfiles.imake
make
make install
The first command makes the makefiles you will use to compile the code. This is done because different resources may be located in different places on individual systems. The second command actually compiles the code. And the third installs the result. One note: Make sure you have the correct permissions for the directory and all subcomponents, or running mkmkfiles will fail. You will also need to assume root privileges.
To use GLUT in your applications, you will need to add the GLUT library to your link command in your makefiles:
-lglut
Mesa 3D also supplies a version of GLUT that can be downloaded and installed.
Building OpenGL Apps
Now that we’ve gone through all that setup and our system is prepped for running and compiling OpenGL programs, let’s take a look at how to build these programs. If you have spent time working with Linux, you are probably already familiar with creating makefiles. If so, skip ahead.
Makefiles are used on Linux systems to compile and link source code, creating an executable file. They hold the instructions for the compiler and linker, telling them where to find files and what to do with them. A sample makefile is shown below. It can be modified and expanded to accommodate your own projects.
LIBDIRS = -L/usr/X11R6/lib -L/usr/X11R6/lib64 -L/usr/local/lib
INCDIRS = -I/usr/include -L/usr/local/include -L/usr/X11R6/include
COMPILERFLAGS = -Wall
CC = gcc
CFLAGS = $(COMPILERFLAGS) -g $(INCDIRS)
LIBS = -lX11 -lXi -lXmu -lglut -lGL -lGLU -lm
example : example.o
$(CC) $(CFLAGS) -o example $(LIBDIRS) example.c $(LIBS)
clean:
rm -f *.o
The first line creates a variable that contains the link parameters for libraries to be included. The one used here will look in the standard lib directory for X11 and the location for 64-bit specific libraries.
The second line lists the include paths the compiler should use when trying to find header files. The next line specifies the compile flags to use with this instance. Then LIBS = selects all the libraries that need to be linked into our program.
Finally we compile and link the single source file for the example, called example.c. The last line cleans up intermediate objects that were created during the process. This example can be used while substituting your file in the script. Other files can also be compiled together as well. There are many good resources and tutorials on the Web for more information on makefiles.
GLUT
GLUT has been covered earlier in this book. It is basically a very useful set of functions that help make interfacing with OpenGL and the system much more user friendly, taking care of many of the unsightly details. OpenGL code written with GLUT is also platform agnostic, making the code very portable.
GLUT is available for download and installation on Linux. This helps make any applications that use GLUT very portable since the code can be compiled on Windows, Mac, and Linux. It is also a good way to get applications up and running quickly, since no window management is required. GLUT will be used for the first sample app in this chapter.
On the other hand, GLUT does not allow for very direct interface with the X Server. This means that some things that can be done by directly communicating with the OS or X are more difficult or impossible when using GLUT. That said, GLUT will be used for the first sample program so that we can concentrate on other functionality. You will have to decide what level of control you will need in determining whether GLUT will suffice or if you should directly use GLX.
GLX—Dealing with the X Windows Interface
On X Windows an interface is provided to allow applications to connect OpenGL with X Windows, very similar to WGL on Microsoft Windows and AGL on Mac. There are many different versions of GLX. Version 1.4 is the most recent version but is very similar to GLX version 1.3. GLX 1.2 is currently the most commonly supported version on most Linux distributions. GLX is a much more direct interface that will allow for greater control over your applications system interface. Using GLX will enable you to tweak all the window and surface properties available in X Windows/GLX. Although GLUT can make it easy to get an application running quickly, it does not allow for the options available with a direct interface. In this section we will go through what GLX can do and how to use it. We will focus mainly on version 1.3 and point out what is different between versions 1.2 and 1.3.
To find more information about your installation of GLX, you can use the glxinfo command again. Try the following:
glxinfo |grep "glx vendor"
glxinfo |grep "glx version"
This will display the GLX information for both server and client components of X Windows. The effective version you can use is the older of the server and client versions. So if your client reports 1.3 and your server reports 1.2, you are essentially using version 1.2. This means you can’t pick and choose which version of GLX you want to work with. Instead, your code needs to be able to support the versions of GLX it is likely to encounter.
Displays and X
Now that we have covered how to examine your system, getting it ready for OpenGL execution and development, it’s time to look at actual code. The next sections examine code constructs used to interface with X Windows and GLX. Before we get too far into GLX, there are a few prerequisites. Remember that X Windows supports client and server components running on separate systems, essentially allowing you to run your desktop from somewhere else. Before we can create a window, we need to find out what display the application will be executing on. The display will help the X Server understand where we are rendering. Use the XOpenDisplay() function to get the current display.
Display *dpy = XOpenDisplay(getenv("DISPLAY"));
This will give us a display pointer for the default display we can use later to tell the X Server where we are. After our application is done, it also needs to close the display using the XCloseDisplay() function. This tells the X Server that we are finished and it can close the connection:
XCloseDisplay(Display * display);
Config Management and Visuals
GLX 1.3+
Configs on Linux are very similar to configs on OpenGL ES or pixel formats on Microsoft Windows. Configs can be a little difficult to handle since there are so many factors all tied together. For starters, you can use the glXGetFBConfigs interface to get information on all the configs supported:
GLXFBConfig *glXGetFBConfigs(Display * dpy, int screen, int *nelements);
Use the display handle that you got from calling XOpenDisplay. For our purposes we can use the default screen for the screen parameter. When the call returns, nelements will tell you how many configs were returned.
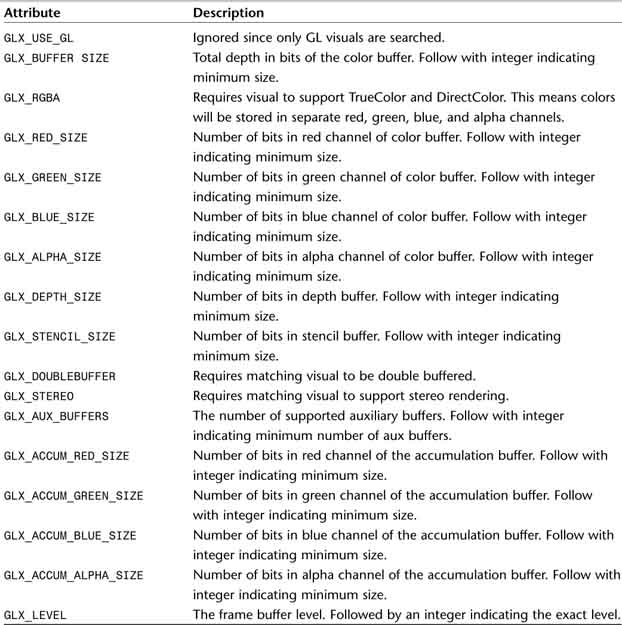
There’s more to each config than its index. Each config has a unique set of attributes that represent the functionality of that config. These attributes and a description of what they do are listed in Table 21.1.
Table 21.1. GLX Config Attribute List


Each of these attributes can be queried for a given format by using the glXGetFBConfigAttrib command:
Glint glXGetFBConfigAttrib(Display * dpy, GLXFBConfig config,
int attribute, int *value);
Set the config parameter to the config number you are interested in querying and the attribute parameter to the attribute you are interested in. The result will be returned in the value parameter. If the glXGetFBConfigAttrib call fails, it may return the error GLX_BAD_ATTRIBUTE if the attribute you are requesting doesn’t exist.
GLX also provides a method for getting a subset of the full config selection that meet a set of criteria. This can help narrow down the total set of configs to just those you care about, making it much easier to find a config that will work for your application. For instance, if you have an application that wants to render in a window, the config you select needs to support rendering to a window:
GLXFBConfig *glXChooseFBConfig(Display * dpy, int screen,
const int *attrib_list, int *nelements);
Pass in the screen you are interested in. Also specify the elements that are required for a config match. This is done with a NULL-terminated list of parameter and value pairs. These attributes are the same config attributes that are listed in Table 21.1.
attrib_list = {attribute1, attribute_value1,
attribute2, attribute_value2,
attribute3, attribute_value3,
0};
Similar to glXGetFBConfigs, the number of elements that matched the attribute list is returned in nelements. A pointer to a list of matching configs is returned by the function. Remember to use XFree to clean up the memory that was returned by the glXChooseFBConfig call. All configs returned will match the minimum criteria you set in the attrib list.
There are a few key attributes you may want to pay attention to when creating a config—for example,GLX_X_RENDERABLE should be GLX_TRUE so that you can use OpenGL to render; GLX_DRAWABLE_TYPE needs to include GLX_WINDOW_BIT if you are rendering to a window; GLX_RENDER_TYPE should be GLX_RGBA_BIT; and GLX_CONFIG_CAVEAT should be set to GLX_NONE or at the very least should not have the GLX_SLOW_CONFIG bit set. After that you may also want to make sure that the color, depth, and stencil channels meet your minimum requirements. The pBuffer, accumulation, and transparency values are less commonly used.
For attributes you don’t specify, the glXChooseFBConfigs command will use the defaults. These are listed in the GLX specification. The sort mechanism orders the configs using relative attribute priorities. The order for the highest priority attributes is GLX_CONFIG_CAVEAT, the color buffer bit depths, GLX_BUFFER_SIZE, and then GLX_DOUBLEBUFFER.
If a config has the GLX_WINDOW_BIT set for the GLX_DRAWABLE_TYPE attribute, the config will have an associated X visual. The visual can be queried using the following command:
XVisualInfo *glXGetVisualFromFBConfig(Display * dpy, GLXFBConfig config);
NULL will be returned if there isn’t an associated X visual. Don’t forget to free the returned memory with XFree.
PBuffers will not be discussed since they are being phased out. They are difficult to implement, difficult to use, and often much slower than normal rendering. Pixmaps fall into the same category. Instead, frame buffer objects replace this functionality. Also, color index mode is not covered here. It also is generally deprecated and not supported on most PC-based implementations.
GLX 1.2
With older versions of GLX, none of the preceding config interfaces is available. Instead of finding a config and then getting the corresponding visual, you can just search for a visual directly:
XVisualInfo *glXChooseVisual (Display * dpy, GLXFBConfig config);
Pass in the screen you will use for your window and a list of visual attributes. The possible attributes are listed in Table 21.2. Some attribute tokens can simply be added to the list, but most must be paired with a corresponding value, just as is done for glXChooseFBConfig in GLX 1.3. These attributes are noted in their descriptions.
Table 21.2. Visual Attribute List
The last item in the list of visual attributes must be NULL. If no matching visuals are found, NULL is returned. Returned visuals will need to be freed with XFree.
GLX 1.2 also provides a method for querying attributes of a visual. glXGetConfig will take a visual and one of the attributes listed in Table 21.2, providing the result:
int glXGetConfig(Display * dpy, XVisualInfo *visual, int attribute, int *value);
Windows and Render Surfaces
Alright, now that we got through the messy stuff, let’s create a window. X provides an interface to create windows, XCreateWindow. This returns a handle for the new X window. The command needs a parent window at creation time; you can also use the main X window for this. You should already be familiar with the display parameter here. Also, you need to tell X how big to make the window and where to put it with the x,y position and width/height parameters.
Window XCreateWindow(Display * dpy, Window parent, int x, int y, unsigned int width,
unsigned int height, unsigned int border_width, int depth, unsigned int class,
Visual *visual, unsigned_long valuemask, XSetWindowAttributes *attributes);
Also tell X what kind of a window you want with the window class. This can be one of three values: InputOnly, InputOutput, or CopyFromParent. CopyFromParent will use the value that the parent window was created with. The attributes and valuemask fields let you tell X what types of characteristics the window should have. The attributes field holds the values and the valuemask tells X which values it should pay attention to. To get more information on attributes, check out X Server documentation.
GLX 1.3+
After the X window has been created and you are on a system supporting GLX 1.3, you can create the GLX window association. The GLX call must be made with a config that is compatible with the visual used when calling XCreateWindow. glXGetVisualFromFBConfig is helpful for that. Use the glXCreateWindow command to create a new onscreen OpenGL rendering area that will be associated with the specified X window:
GLXWindow glXCreateWindow(Display * dpy, GLXFBConfig config, Window win,
const int *attrib_list);
You can use the config as returned from the work in the preceding section. The attrib_list currently does not support any parameters and is for future expansion. Pass in NULL.
glXCreateWindow will throw an error and fail if any of the following conditions is true: if the config is not compatible with the window visual, if the config doesn’t support window rendering, if the window parameter is invalid, if a GLXFBConfig has already been associated with the window, if the GLXFBConfig is invalid, or if there was a general failure creating the GLX window. Also remember that glXCreateWindow is supported only in GLX 1.3 or later. It does not work on older versions. Remember we checked the versions earlier by running glxinfo |grep "glx version" in a terminal.
After you are done rendering, you will also have to clean up the windows you have created. To destroy the GLX window, call glxDestroyWindow with the GLX window handle you got when you called glXCreateWindow:
glXDestroyWindow(Display * dpy, GLXWindow window);
To destroy the X window you also created, you can use the similarly named XDestroyWindow command, and pass back the X window handle:
XDestroyWindow(Display * dpy, Window win);
GLX 1.2
To create a window in GLX1.2, you do not need to use any special GLX commands. Instead, simply call XCreateWindow. The X window will also need to be destroyed as described previously.
Context Management
A context is a set of OpenGL state that is associated with a handle. Once created, the context can then be used to render with. Multiple contexts can be created, but only one can be bound to a render surface at a time. At least one context is necessary to be able to render. The methods for creating contexts and setting the current context are slightly different for GLX 1.3+ and GLX 1.2.
GLX 1.3+
For GLX 1.3+, you can create a new context with the glXCreateNewContext command. When successful, this function returns a context handle you can use when telling GLX which context you want to use when rendering. The config you use to create this context needs to be compatible with the render surface you intend to draw on. For common cases, it is easiest to use the same config that was used to create the GLX window.
GLXContext glXCreateNewContext(Display * dpy, GLXFBConfig config,
int render_type, GLXContext share_list, bool direct);
The render_type parameter will accept GLX_RGBA_TYPE or GLX_COLOR_INDEX_TYPE. GLX_RGBA_TYPE should be used since we are not using color index mode. Normally you should also pass NULL in the share_list parameter. However, if you have multiple contexts for an app and would like to share GL objects such as display lists, VBOs, textures, and so forth, you can pass in the first context’s handle when creating the second. This will cause both contexts to use the same namespace. Specifying TRUE for the direct parameter requests a direct hardware context for a local X Server connection, and FALSE creates a context that renders through the X Server.
If creation fails, the function will return NULL; otherwise, it will initialize the context to default OpenGL state. The function will throw an error if you pass an invalid handle as the share_list parameter, if the config is invalid, or if the system is out of resources.
To use a context you have created, you can call glXMakeContextCurrent:
glXMakeContextCurrent(Display * dpy, GLXDrawable draw, GLXDrawable read,
GLXContext ctx);
It is most common to specify the same drawable for read and draw targets when making a context current. This means that the same context will be used for both read and draw operations. If a different context was bound before you made this call, it will be flushed and marked as no longer current. If the context you pass is not valid or either drawable is no longer valid, the function will throw an error. It will also throw an error if the context’s config is not compatible with the config used to create the drawables. Contexts can be released from a thread by passing None in the read and draw drawable parameters, and NULL as the context. If None is not passed for the drawables when trying to free a context, GLX will throw an error.
GLX will allow you to query certain things from a context as well. Use the glXQueryContext command to query GLX_FBCONFIG_ID, GLX_RENDER_TYPE, or GLX_SCREEN attributes associated with the context:
int glXQueryContext(Display * dpy, GLXContext ctx, int attribute, int *value);
There are a few other context-related commands in GLX, but these are mostly self-descriptive. glXGetCurrentReadDrawable is supported only in GLX 1.3:
GLXDrawable glXGetCurrentReadDrawable(void);
In addition, the following functions are supported by both GLX 1.2 and 1.3.
GLXContext glXGetCurrentContext(void);
GLXDrawable glXGetCurrentDrawable(void);
Display glXGetCurrentDisplay(void);
Once finished with a context, it is important to destroy it so that the implementation can free the related resources. Use the glXDestroyContext command for both GLX 1.2 and 1.3:
glXDestroyContext(Display * dpy, GLXContext ctx);
If the context is currently bound to any thread, the context will not be destroyed until it is no longer current. The function will throw an error if you pass an invalid context handle.
One other handy feature provided by GLX 1.2/1.3 is the capability to copy data from one context to another using glXCopyContext. Just pass in the source and destination context handles. A mask is used to specify the pieces of OpenGL state that you would like to copy. These are the same values that may be passed into glPushAttrib/glPopAttrib. To copy everything, you can pass GL_ALL_ATTRIB_BITS. Client-side state will not be copied.
glXCopyContext(Display * dpy, GLXContext source, GLXContext dest, unsigned long mask);
To find out if a context is a direct context, you can call glXIsDirect for GLX 1.2/1.3. This will return true if the context is a direct rendering context.
glXIsDirect(Display * dpy, GLXContext ctx);
GLX 1.2
Most of the context interfaces provided previously can be used only in GLX 1.3. However, there are some similar methods that can be used on older GLX versions. To create a context in GLX 1.2, call glXCreateContext. This command is very similar to glXCreateNewContext except it takes visual info in place of config info and does not accept a render type parameter.
GLXContext glXCreateContext(Display * dpy, XVisualInfo* visual,
GLXContext share_list, Bool direct);
To make a context current, call glXMakeCurrent with the context to be rendered with. Here, only one parameter is accepted for the drawable. In GLX 1.2 the same drawable will be used for both draw and read operations.
Bool glXMakeCurrent(Display * dpy, GLXDrawable drawable, GLXContext ctx);
To unbind the context from the current thread, pass None as the drawable and NULL as the context.
Synchronization
GLX has several synchronization commands that are similar to those on other OSs. Making a call to glXWaitGL will guarantee that all GL rendering will finish for a window before other native rendering occurring after the call to glXWaitGL is allowed to proceed. These might be window decorations drawn by the window manager like scroll bars and buttons, or 2D drawing. This allows an app to ensure that all rendering happens in the correct order and that rendering is not incorrectly overlapped or overwritten.
void glXWaitGL(void);
Likewise, a call to glXWaitX ensures that all native rendering made before the call to glXWaitX completes before any OpenGL rendering after the call is allowed to happen.
void glXWaitX(void);
When using a double-buffered config, a call to glXSwapBuffers will present the contents of the back buffer to the window. The call also performs a glFlush before the swap occurs. Afterward, the contents of the new back buffer are undefined. GLX will throw an error if the drawable is invalid, the display is invalid, or if the window is no longer valid.
void glXSwapBuffers(Display *dpy, GLXDrawable draw);
GLX Strings
Several different strings can be queried from GLX. First, you can get a string with all the supported extension strings listed by calling glXQueryExtensionsString:
const char *glXQueryExtensionsString(Display *dpy, int screen);
You can also call glXGetClientString or glXQueryServerString to find out information about the client library or the server, respectively. Pass it one of the following enums in the name field: GLX_VENDOR, GLX_VERSION, or GLX_EXTENSIONS.
const char *glXGetClientString(Display *dpy, int name);
const char *glXQueryServerString(Display *dpy, int screen, int name);
The Rest of GLX
There are a few less-common components of GLX we haven’t covered yet. Let’s take a quick look at them. The first is a simple method of querying the current GLX version. This function returns integers, which are easier to parse than the version string returned when the string query functions are used. This is helpful for determining what version of GLX you are dealing with from inside your application. The version is broken down into major and minor components:
bool glXQueryVersion(Display *dpy, int *major, int *minor);
You can query certain state from the current drawable. GLX provides the function glXQueryDrawable to allow applications to get information on how the drawable is set up. Pass in the attribute you are interested in: GLX_WIDTH, GLX_HEIGHT, GLX_PRESERVED_CONTENTS, GLX_LARGEST_PBUFFER, or GLX_FBCONFIG_ID. The result will be returned in the value field. You will also need to specify the drawable you are interested in.
void glXQueryDrawable(Display *dpy, GLXDrawable draw, int attribute, unsigned int *value);
There is also a set of functions for creating, dealing with, and deleting pixmaps and pBuffers. These will not be covered since we are not covering and do not recommend you use pixmaps or pBuffers.
X Fonts
The X environment provides for automatic bitmap font generation. This makes it easier for applications to render text in OpenGL, since each character does not need to be stored in the application as a texture. GLX extends this functionality, making it even easier to use. First, call into X and load the font you want to use, and then create display lists to hold the characters, one for each character. Next, call glXUseFont to load the fonts into the display lists:
void glXUseXFont(Font font, int first, int count, int list_base);
Now you are ready to use the display lists for rendering. Each list will hold a call to glBitmap. You can use glRasterPos to set the screen position and then glCallLists to draw characters. The first sample app demonstrates how to use the display list generation function to simplify writing text to the screen. Figure 21.1 shows the output of this simple demo. Listing 21.1 shows the important steps in this app. First a font is chosen and display list names are generated for the characters. Next glXUseFont is called to populate the display lists. Last, glCallLists is used to render each character.
Figure 21.1. The simple font text example.

Listing 21.1. The font.c Sample Program
char *szString = "GLX Fonts";
// Load a courier font with size 48pix.
XFontStruct *xFont = XLoadQueryFont(dpy,
"-*-courier-bold-r-normal--48-*-*-*-*-*-*-*");
// Generate display list names
uiDListStart = glGenLists(96);
// Have GLX generate the display lists for the characters
glXUseXFont(xFont->fid, ' ', 96, uiDListStart);
// Save the display list bit
glPushAttrib(GL_LIST_BIT);
// Set up the display list offset
glListBase(uiDListStart - ' ' );
// Now call the appropriate lists for the characters
// in the string
glCallLists(strlen(szString), GL_UNSIGNED_BYTE, (GLubyte*)szString);
// Restore the display list bit
glPopAttrib();
Extending GLX
GLX and OpenGL can be extended beyond what is in the core specification. Vendors can write new extensions to that functionality for applications to use. This allows applications to have options that either are vendor-specific or are available before they can become part of the core specification. You can query the list of extensions available for GLX on a system by calling glXQueryExtensionString. An application can also call glGetString(GL_EXTENSIONS) to get the OpenGL extensions available.
After you know which extensions are available, you may have to get new entry points to use them. GLX provides a method to get these. The glXGetProcAddress provides extension function addresses for extensions. This function is available only for GLX versions 1.4 and newer.
void (*glXGetProcAddress(const ubyte *procname))();
There are a large number of extensions registered for OpenGL. You can take a look at what is available by browsing the extension registry on the OpenGL Web page. For GLX versions before 1.4, you can use the ARB extension version, as shown next, but be sure to check that it exists in the extension string first!
void (*glXGetProcAddressARB(const ubyte *procname))();
Putting It All Together
Now, for the fun part! Let’s put all this GLX stuff together and create an app that uses GLX instead of GLUT for window creation and maintenance. GLUT is great for creating quick, simple apps but does not allow very granular control over the GLX environment.
Because many X Servers packaged with Linux do not yet support GLX 1.3, our example uses the GLX 1.2 interfaces. The first step is to open a connection to the X Server:
rcx->dpy = XOpenDisplay(NULL);
Then, let’s check the supported GLX version to make sure that the functionality we will use later is supported:
glXQueryVersion(rcx->dpy, &nMajorVer, &nMinorVer);
printf("Supported GLX version - %d.%d
", nMajorVer, nMinorVer);
if(nMajorVer == 1 && nMinorVer < 2)
{
printf("ERROR: GLX 1.2 or greater is necessary
");
XCloseDisplay(rcx->dpy);
exit(0);
}
Now that we know we are good to go, look for a visual that meets our requirements. We aren’t very picky here since this app doesn’t have any complex interactions with the framebuffer.
static int attributes[] = { GLX_RGBA,
GLX_DOUBLEBUFFER,
GLX_DEPTH_SIZE, 16,
GLX_RED_SIZE, 8,
GLX_BLUE_SIZE, 8,
GLX_GREEN_SIZE, 8,
0 };
visualInfo = glXChooseVisual(rcx->dpy,
DefaultScreen(rcx->dpy), attributes);
After we have a visual, we can use it to create a new X window. Before calling into XCreateWindow, we have to figure out what things we want the window to do. Pick the events that will be of interest and add them to the event mask. Do the same with the window mask. Set the desired border size and gravity. We also have to create a color map for the window to use. While we are at it, map the window to the display:
winAttribs.event_mask = ExposureMask | VisibilityChangeMask |
KeyPressMask | PointerMotionMask |
StructureNotifyMask ;
winAttribs.border_pixel = 0;
winAttribs.bit_gravity = StaticGravity;
winAttribs.colormap = XCreateColormap(rcx->dpy,
RootWindow(rcx->dpy, visualInfo->screen),
visualInfo->visual, AllocNone);
winmask = CWBorderPixel | CWBitGravity | CWEventMask| CWColormap;
rcx->win = XCreateWindow(rcx->dpy, DefaultRootWindow(rcx->dpy), 20, 20,
rcx->nWinWidth, rcx->nWinHeight, 0,
visualInfo->depth, InputOutput,
visualInfo->visual, winmask, &winAttribs);
XMapWindow(rcx->dpy, rcx->win);
Great! We have a window! There are still a few steps that need to be completed before we can render. First let’s create a context and make it the current context. Remember, we will need the visual that we used to create the window to create the context.
rcx->ctx = glXCreateContext(rcx->dpy, visualInfo, 0, True);
glXMakeCurrent(rcx->dpy, rcx->win, rcx->ctx);
After a context is bound, we can make GL calls. So first we need to set the viewport and scissor rectangle:
glViewport(0,0,rcx->nWinWidth,rcx->nWinHeight);
glScissor(0,0,rcx->nWinWidth,rcx->nWinHeight);
Next, clear the color buffer and the matrices we care about. Also set the viewing frustum:
glClearColor(0.0f, 1.0f, 1.0f, 1.0f);
glClear(GL_COLOR_BUFFER_BIT);
glMatrixMode(GL_MODELVIEW);
glLoadIdentity();
glMatrixMode(GL_PROJECTION);
glLoadIdentity();
// Set the frustum
glFrustum(fXLeft, fXRight, fYBottom, fYTop, 0.1f, 100.f);
OpenGL setup now is complete, and we can concentrate on rendering something. This little demo application draws two eyeballs that do their best to follow your mouse pointer around the window. Some math is done to figure out where to put the eyeballs, where the mouse pointer is, and where the eyeballs should be looking. You can take a look at the full source available on the download site to see how all this works together. Only the important snippets will be listed here since this chapter is not introducing new OpenGL functionality. Figure 21.2 shows the output of the GLX demo.
Figure 21.2. Here’s looking at you!
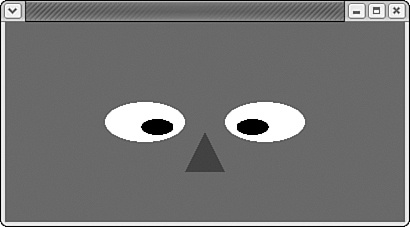
Several events will cause the contents of the OpenGL window to be redrawn, like uncover events, window moves or resizes. Also any mouse pointer movement will send similar events. These mouse motion events are used to update the eyeball positions. Afterward, glXSwapBuffers is called:
glClear(GL_COLOR_BUFFER_BIT);
// Clear matrix stack
glMatrixMode(GL_PROJECTION);
glLoadIdentity();
glMatrixMode(GL_MODELVIEW);
glLoadIdentity();
// Draw left eyeball
glColor3f(1.0, 1.0, 1.0);
glScalef(0.20, 0.20, 1.0);
glTranslatef(-1.5, 0.0, 0.0);
DrawCircle();
// Draw left pupil
glColor3f(0.0, 0.0, 0.0);
glScalef(0.40, 0.40, 1.0);
glTranslatef(fLeftX, fLeftY, 0.0);
DrawCircle();
// Draw right eyeball
glColor3f(1.0, 1.0, 1.0);
glLoadIdentity();
glScalef(0.20, 0.20, 1.0);
glTranslatef(1.5, 0.0, 0.0);
DrawCircle();
// Draw right pupil
glColor3f(0.0, 0.0, 0.0);
glScalef(0.40, 0.40, 1.0);
glTranslatef(fRightX, fRightY, 0.0);
DrawCircle();
// Clear matrix stack
glMatrixMode(GL_MODELVIEW);
glLoadIdentity();
// Draw nose
glColor3f(0.5, 0.0, 0.7);
glScalef(0.20, 0.20, 1.0);
glTranslatef(0.0, -1.5, 0.0);
glBegin(GL_TRIANGLES);
glVertex2f(0.0, 1.0);
glVertex2f(-0.5, -1.0);
glVertex2f(0.5, -1.0);
glEnd();
// Display rendering
glXSwapBuffers(rcx->dpy, rcx->win);
Before the app closes, there is some cleanup that needs to be done. Remember, when we started the application, a connection to the X Server was opened, an X window was created, and a context was created and bound. Now before the app exits these have to be cleaned up. Note that the context will be unbound from the thread before it is destroyed.
glXMakeCurrent(rcx->dpy, None, NULL);
glXDestroyContext(rcx->dpy, rcx->ctx);
rcx->ctx = NULL;
XDestroyWindow(rcx->dpy, rcx->win);
rcx->win = (Window)NULL;
XCloseDisplay(rcx->dpy);
rcx->dpy = 0;
Summary
OpenGL is an important part of Linux because it is the main hardware accelerated 3D interface. Although we have seen how GLUT can be used with Linux, GLX is also very important for defining buffer resources, window management, and other Linux-specific interfaces with OpenGL. There are also other helpful interfaces available on Linux, like XFonts, that can make rendering easier for applications.
GLX 1.3 provides an interface to Linux and OpenGL that allows intricate control of the rendering environment. It has many similarities to its WGL and AGL counterparts. GLX 1.2 also offers a functional interface to Linux for OpenGL applications and is currently more widely supported.