Casulo (2009), directed by Bernardo Uzeda, Brazil, 17 min.
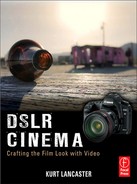
FIGURE 8.1 Still from Bernardo Uzeda’s Casulo

(©2009. Used with permission.)
Technical data: Shot on a Canon 5D Mark II with Sigma 24–70 mm f/2.8 lens. Audio recorded with a Sennheiser MKH-416 microphone on an M-Audio Microtrack 2 digital audio recorder. Files converted to MPEG. Postproduction software: Final Cut Pro, Twister plug-in in After Effects (for 24P pulldown), Color Finesse 2.0 and the Tiffen DFX 2.0 filters, graduated NDs, vignettes, selective saturation, and so forth. Neat Video plug-in for noise reduction (Pro version). Images cropped and conformed to 1.85 aspect ratio for 35 mm film transfer, providing a 1920 × 1037 resolution, direct-to-positive or direct-to-print transfer at Technicolor USA using Cinevator (manufactured by a company from Norway called Cinevation).
Out of all the shorts shot on a HDSLR that I’ve seen online, Casulo is one of the strongest examples of video expressing the film look. Indeed, in 2010, the film earned the top cinematography award from the Brazilian equivalent of the American Society of Cinematographers: Associação Brasileira de Cinematografia. Casulo, reverberating with surreal echoes of David Lynch, tells the story about the complexities of obsession and death as a daughter spies on her mother who becomes obsessed by a male neighbor and a girl he is with. Although the narrative involves intricate levels of visual information and very little dialog, what stands out in the film is how the director and cinematographer captured those images and put them through a heavy postproduction process to shape a strong cinematic quality to the work (which was transferred to 35 mm film). The film was written and directed by Bernardo Uzeda, with cinematography by Guga Millet, and produced by Isadora Sachett. The project was shot on a Canon 5D Mark II in April 2009.
The trailer to Casulo is located at http://www.vimeo.com/5133770.
STORY IDEA
Uzeda’s background is in film music and sound design, and at one point he made a documentary for film school. The doc earned several awards, which helped him raise money and gain the “confidence,” he explains, to put together his first fiction. I thought of something that could be impressive visually and that could be done without a big budget or a big crew.”1
Uzeda and producer Isadora Sachett shared a “certain distaste for the current types of features and shorts that were being made” in Brazil, he says. These stories not only shared similar journalistic style and themes, but also the “aesthetics, especially social/raw images” and most of which relied on dialog. Uzeda, a fan of visual cinema—in contrast to the dialog-heavy films produced in Brazil—wrote a murder obsession story with very little dialog. “Surrealistic images,” Uzeda says, would drive the story, suspending it from realism. However, he admits that the film “can be confusing in a first viewing, but I like to think of it more as a dreamlike experience (this kind of experimentation is part of the fun when you are financing the whole project with your money),” he adds.
So he wrote his screenplay to shoot on a tight budget: “small crew, accessible locations, few actors, and so forth. Eighty percent of the film was shot in the facilities of my building (apartments, garage, swimming pool, emergency stairs, rooftops, balconies). So we only had to scout and pay for a couple of extra locations (which made principal photography considerably faster and cheaper),” Uzeda explains.
However, before he wrote the script, Uzeda looked at a variety of locations where he lived—ones that expressed “potential value for creating the atmosphere that I wanted. A recurring element in the shooting script is the POV shot,” Uzeda says. “It was very important for the story to let the characters see and feel the atmosphere around them, and sometimes, they observe the other without being observed (something that was only possible after heavy location scouting, searching for places and corners that allowed this type of blocking effect)” (see Figures 8.2 and 8.3).
FIGURE 8.2 Still from Casulo, revealing how the production team utilized existing locations to help tell the story: a character peeks out a window, as she spies on a neighbor.
(Still from Casulo ©2009. Used with permission.)
FIGURE 8.3 Looking unobserved conveys one of the principal themes of Casulo, which Uzeda sets up in this shot of a woman looking through a neighbor’s window from her own apartment.

(Still from Casulo ©2009. Used with permission.)
SHOOTING WITH TEXTURE AND COLOR
Because Uzeda focused on a story that would be told with images, he wanted to make sure the “details of its environments, [especially] the textures and the colors, was a key factor,” he explains. His influences were photographers Sally Mann and Gregory Crewdson. “Both of them use extremely high resolution and contrast large format cameras,” he notes. He also explains how his DP, Guga Millet, is “highly fond of John Alton, Conrad Hall, and Greg Tolland.”
Money came from his own personal funds, as well as from producer Isadora Sachett. She also brought in DP Guga Millet and a number of other volunteer crew members. They “agreed to work for free just because they saw some potential in the project,” Uzeda adds.
However, it wasn’t a fast route to get the film made. They spent a year in pre-production and story development, which kept changing with a shrinking budget. But when they started shooting, their work was completed in five days. Postproduction took four months.
They were planning to shoot on Panasonic’s HVX200, the tapeless P2 camera, jury-rigged with a 35 mm lens adapter. Guga Millet, the DP, owns the camera, so they could have used it free—a welcome hurdle to overcome with a low budget. But Millet told Uzeda that there was a better camera out there—the Canon 5D Mark II—that could shoot in 1080P and had the ability to change lenses, in addition to attaining “better definition, contrast, and color response in general,” Uzeda continues, due to its full-frame sensor. Uzeda quickly got excited about the possibility. However, just as fast, he got “highly suspicious” when Millet said that it was a stills camera with a “film mode.” Uzeda wondered if “this type of equipment could be up to the task of shooting the film which I had in mind.” Neither of them had ever used such a camera, and there wasn’t one to be found in Rio De Janeiro at the time.
Millet flew to Sao Paulo to check one out at a “photography tech-fair,” Uzeda confers. “He then sent me some .mov files straight from the camera, and I was immediately impressed. That sharpness and depth of focus [were] exactly what I wanted for this project. We had to spend a large part of the budget buying accessories for the camera, but it was definitely worth it,” Uzeda says. “The portability of the camera itself and especially the larger sensor made possible for us to save significant money in lighting gear and [and allowed us to get] other accessories like waterproof cases.”
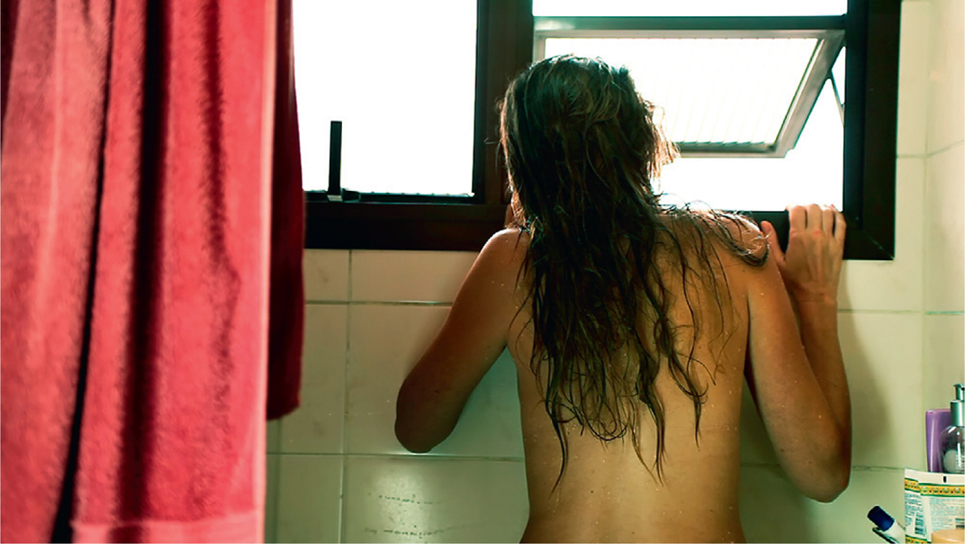
Once they had the evolving budget nailed down, the script finalized, and a camera chosen, they moved on to casting the actors. For Uzeda, “the most important factor [was] their faces,” he says. “They had to portray immediate expressiveness without saying too much or even moving too much. They had to say a lot with only their eyes and subtle body language. I think the shot of the actor on the Laundromat room, with his lost gaze, is really representative of what the film is about” (see Figure 8.4).
FIGURE 8.4 The lost gaze of actor Charles Fricks in Casulo. The emotion expressed in this shot, says director Uzeda, represents what the film is about. Note the shallow depth of field in the shot and how the color grading allows the character to pop out on-screen. Also note that the character has a warm look to him, but the background remains cool, providing the sense of contrast and depth.
(Still from Casulo ©2009. Used with permission.)
Another image Uzeda had for the script was a red-head girl, who would be easily “differentiated from the others ([especially] on distant shots), not to mention the interesting underwater effect of her red hair on the shot when she dies in the pool,” Uzeda notes. “I wanted the audience to be confused for a moment, as if her hair were blood floating on the surface, but in fact, it is just the red color of the hair with a strong backlight” (see Figures 8.5 and 8.6).
FIGURE 8.5 Actress Thaís Inácio becomes the red-headed girl that director Uzeda wanted in order to have her stand out in images.

(Still from Casulo ©2009. Used with permission.)
FIGURE 8.6 The red hair of Thaís Inácio spills over into a pool of water, backlit so as to look like blood—even if only for a moment.

(Still from Casulo ©2009. Used with permission.)
PRODUCTION NOTES
The production process went smoothly due to a tightly planned shooting script. Uzeda says he “spent months timing the movie inside my head with a chronometer. There was no time or budget for errors, so 80% of all the decisions were made during the elaboration of the shooting-script” in order to allow principal photography to “run smoothly and fast.” But he allowed “room for new ideas and spontaneity on the set,” he explains. “Guga usually came up with incredible shots and setups that I couldn’t visualize until 10 minutes before rolling the camera. I spent one year talking to him about references from other movies, still photographers, painters, so our minds were pretty much on sync regarding the framing of the shots, blocking, and use of lights. There was little to no rehearsal with the actors (with the exception of the dialog between the mother and daughter, since it involved the performance of a child).”
Guga would typically begin his day talking to the assistant director to determine the order of the setups for the day’s shoot, creating a map “of the locations and sets,” Uzeda says, “marking where the camera would be and this helped me, Guga, and the art director to preview the setups and think some time ahead.”
Because of the 5D Mark II’s potential shallow depth of field, Uzeda used a focus puller. “Focus is a serious thing and it is not fixable in post,” Uzeda warns. “Keep in mind that monitoring your video with a DSLR (at least in my experience with Canon) is not an easy thing. We tried using a Marshall monitor, but it didn’t respond well to the real resolution of the camera (since we only had the option of using the RCA connector).2 So, that left them with the small display of the camera itself to pull the very subtle focus of an image intended to be projected into the big silver screen—this is not an easy thing to do.”
Another challenge was the limited first firmware build for the 5D Mark II. They were stuck with 30P and an automatic ISO (they shot before the firmware release that fixed this problem). “I was very afraid of losing the film look due to the frame rate,” Uzeda says, “but I noticed that the progressive factor was much more important than the fps [frames per second] factor to attaining the feel I wanted for this project. In fact, I didn’t care so much about emulating 35 mm film, but I also didn’t want the ‘video feel’ due to small color/image resolution, interlaced frames, and so forth.”
LIGHTING THE SCENES
The crew also spent a lot of time getting the lighting right—one of the key aspects of getting a cinematic look. “Sometimes the lighting setups took hours,” Uzeda remembers, “due to our small crew and ambitiousness with the visual aspects of the film. So Guga usually made one basic light scheme that could serve all the camera setups (this took some time), but after that we only needed minimal adjustments from one setup to another.”
Part of the lighting design revolved around using practical lights. “Even though most of the film displays stylized and unnatural colors and lights,” Uzeda says, “the shots ranged from working with very simple practical lighting, like the blue lamp as a fill light for the girl’s face (see Figure 8.7), to completely artificial and extreme setups, like the last underwater night-shot; there we used a strong photoflood outside the water, to create the rays of light through the hair of the dead girl inside the swimming pool” (see Figure 8.6).
FIGURE 8.7 Cinematographer Guga Millet sculpted light and shadow to provide us with this moody scene. He used the blue lamp, screen right, as a practical in lighting the girl’s face. The arrow left points to the bounced light of a practical 3.2 K (tungsten color temperature) lamp on the floor pointed at the wall. Notice that a bit of this floor light hits the edge of the girl’s shoulder and hair. This backlight separates her from the background, providing a sense of depth in the shot. The second arrow points to a blue lava lamp that reflects onto her face, shoulders, and wall. This is a soft key light. Images from the film were inspired by photographer Gregory Crewdson.

(Still from Casulo ©2009. Used with permission.)
As Uzedo notes, he wasn’t trying to emulate 35 mm film. Indeed, there is no formula for creating the film look. Different directors and cinematographers express different visions of how to set up an outdoor day or night shot, for example, based on the mood they’re trying to set for the story. Following are a few case study lighting setups showing how director Uzeda and cinematographer Millet crafted a cinematic look during the production of Casulo with the Canon 5D Mark II.
ATTAINING THE FILM LOOK INDOORS—NIGHT
We can see how cinematographer Guga Millet sculpted light and shadow to provide us with the moody scene in Figure 8.7. Figure 8.8 shows the lighting setup.
FIGURE 8.8 Floor plan of lighting setup for Figure 8.7.

Light and Shadow
DP Guga Millet describes how the director envisioned the shot in Figure 8.7: “The blue face shot was something that Bernardo wanted from the beginning. We did lots of tests with this blue lava lamp. I wish it was a little stronger though (although we fixed that in post), but we can really see that the light source is really that lamp.” Millet explains how he lit the scene “like I was working with ISO 320 film with shutter at 1/60. The idea was to use only that lamp to light the actress. I also placed a 3.2°K in the background in order to create a backlight.” He felt that blue light “would be too much and the lamp didn’t have power enough to enhance her face. But I think it didn’t work exactly the way I intended. The light was too low on the ground, and we couldn’t raise it.”
Exposure and ISO Setting
ISO 320, f/2.8, shutter 1/60.
“Actually,” Millet explains, “I could not change ISO or shutter settings. The camera was in auto ISO mode in those days [when shooting in live mode]. I only had control over the f-stops”—because of the Sigma lens with a manual f-stop ring on it. They shot in April 2009 before the Canon 5D Mark II firmware that allowed manual control of aperture and ISO. The frame rate was stuck at 30 fps. According to Philip Bloom, the Canon 5D Mark II’s sweet spot is at ISO 320, so they hit the best ISO setting for the camera.
Lens
Sigma 24–70 mm, f/2.8
Guga explains the lens choice: “When we shot the film, the camera was still in its first firmware, fully automatic 30 fps. So I used lenses for Nikon mount,” allowing for manual control of the aperture on the lens.
Filters
No filters were used in the shot.
Camera Stabilization
The film was shot “on a kind of cinesaddle (which I like to call cinepillow). The camera sits on the bag and shapes itself around the camera through hightech foam. It helps stabilizes the camera,” Millet says.
ATTAINING THE FILM LOOK OUTDOORS—DAY
Uzeda notes how the scene in Figure 8.9 “was done completely at natural daylight (around midday or 1 p.m.).”
FIGURE 8.9 The arrow represents the direction of the sun.

(Still from Casulo ©2009. Used with permission.)
ATTAINING THE FILM LOOK OUTDOORS—DUSK
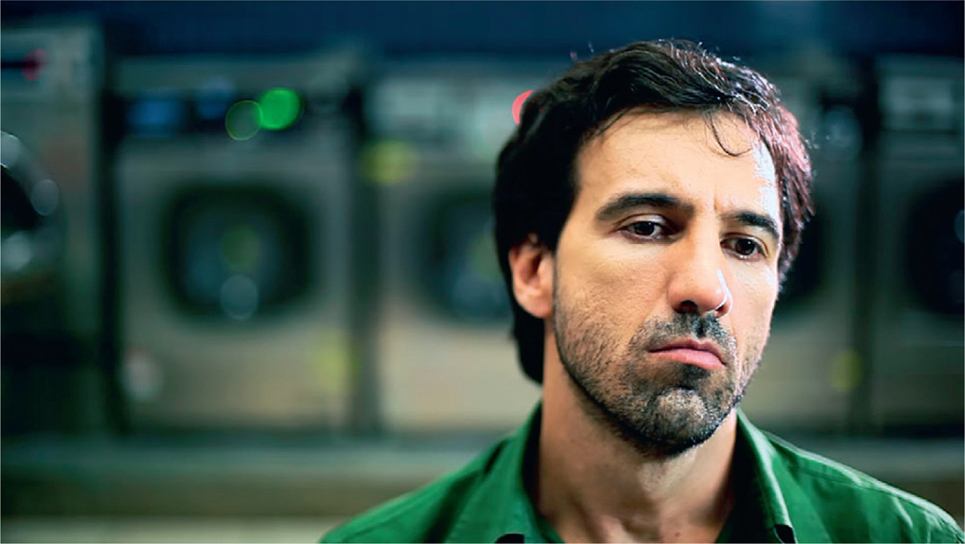
The silhouette in Figure 8.10 highlights the character’s loneliness and isolation.
FIGURE 8.10 The silhouette highlights the character’s loneliness and isolation. The setting sun is used as backlighting.
(Still from Casulo ©2009. Used with permission.)
Story Intention
The DP, Guga Millet, says how they “wanted to place her character in a world of her own. I think we achieved that with her silhouette against the blurred city.” The time of day enhances her loneliness; the image would say something much different if it had been shot in the afternoon.”
Light and Shadow
Guga explains the setup: “The woman silhouette shot was done only with natural light something like 10 minutes after sunset, at the magic hour. We raised the contrast in post to enhance the silhouette idea (in the flat image we could see more of the actress’s face).” The silhouette also helps set the character apart and heightens her loneliness.
Exposure and ISO Setting
ISO 320, f/2.8, shutter 1/60.
Lens
Sigma 24–70 mm, f/2.8.
“The idea was to defocus the background as usual,” Guga says, “with the intent of having a more dreamlike quality to the scenes.”
Filters
No filters were used.
Camera Stabilization
Tripod.
AUDIO
Another aspect of production was how Uzeda didn’t use location sound recording. “We shot the entire film without a sound recordist or location sound (with the exceptions of two small dialog scenes that were recorded on the set),” Uzeda explains. “This was another factor that helped to speed up the whole shooting process and keep us inside of the budget. Nevertheless, the postproduction months were loaded with intense work, but since this is something that is extremely cheaper than feeding and transporting 20 people with camera equipment from one place to another, I thought it was worth the time.”
They used a Sennheiser MKH-416 hyper-cardioid microphone with M-Audio Microtrack 2 digital audio recorder, for the two dialog scenes.
GETTING THE LOOK IN POSTPRODUCTION
After completing principal photography, Uzeda moved into postproduction—where his specialty lies. “The 5D Mark II is also very sensitive to the color red; I saw myself removing red from almost 100% of the shots.” The examples shown in Figures 8.11 through 8.13 reveal the redness in the originating shot.
FIGURE 8.11. Thaís Inácio after color grading in postproduction. Uzeda says that this shot represents an “example of the Canon overcapture of red and magenta. The challenge here was to remove the exceeding red captured by the sensor, without ruining elements like the (intentionally red) hair of the actress and also returning her costume color to its original/intended tonality (blue).”

(Still from Casulo ©2009. Used with permission.)
FIGURE 8.12 Another example of how color grading in post helped achieve the film look in Uzeda’s Casulo.

(Still from Casulo ©2009. Used with permission.)
FIGURE 8.13 In this scene set in the kitchen, director Uzeda explains how the DP “placed a cold light with a CTO (orange) gel, the resulting video in the camera (along with some color balance imprecisions on the 5D Mark II settings), was a completely green kitchen, so we had to fix that in post (note that the white/beige wall on the background turned purple because of this subtraction of green, which by the way, I think looks interesting),” Uzeda says.
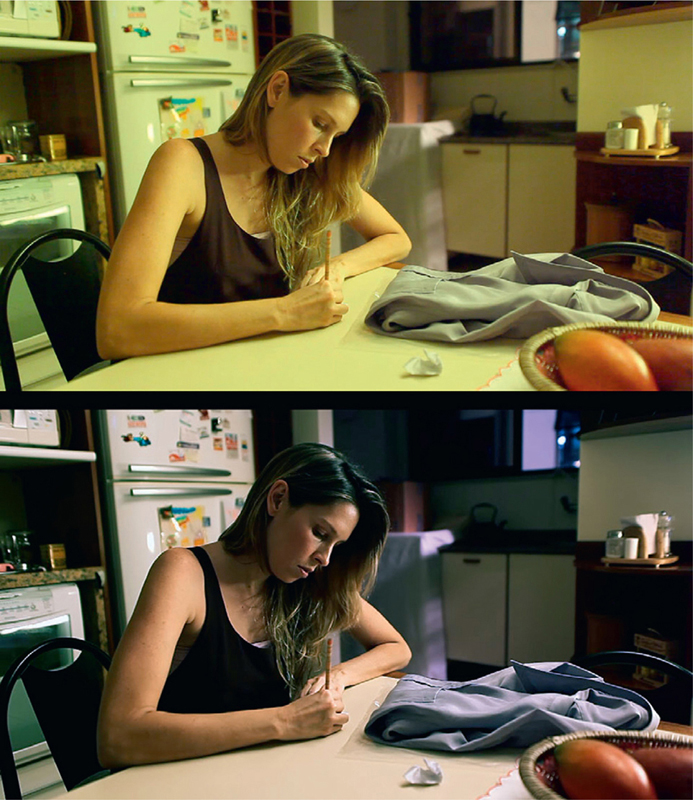
(Still from Casulo ©2009. Used with permission.)
Watch Out for Red
Shane Hurlbut, ASC, who shot a Navy SEALS movie, Act of Valor, on 15 different Canon 5D Mark II’s, noticed different color balance settings in several cameras. Guga Millet shot Casulo on a 5D Mark II that ran red. Uzeda admits that although Casulo was “a great achievement in cinematography, I can’t deny that 100% of the film was extremely color-graded in post, and we also did some RGB noise reduction, which saved some otherwise unusable shots.” For color grading, he utilized Color Finesse 2.0 and the Tiffen DFX 2.0 filters. Noise reduction was accomplished by using “the incredibly cheap and effective NeatVideo plug-in by ABSoft.”
Noise reduction software can be found on http://www.neatvideo.com/. The plug-in is available for After Effects, Premiere, Final Cut, VirtualDub, Sony Vegas, and Pinnacle Studio. A limited functionality demo is available free. The Pro version—which allows for HD 1920 × 1080 resolution—costs just under $100.
Because Uzeda wanted to transfer the digital film to a 35 mm film print, he had no option but to conform the 30P to 24P. “The pulldown process was done using two different methods,” he notes, “which depended on the nature of the shot. Sometimes I conformed from 30P to 24P, which doesn’t involve any sort of pulldown. Each frame is maintained. Only the speed is altered (20% slower), so we are actually reading 30 frames 24 times per second, which yielded a great effect in some shots (a smooth and dreamlike feeling), but this method is unusable for dialog scenes where the speed of the movements of the actors could be distorted. The other method used a plug-in called Twixtor in After Effects.”
POSTPRODUCTION WORKFLOW
After he transferred the files to the computer, Uzeda took the native H.264 .mov files from the 5D Mark II and decompressed them into MPEG files for editing purposes (although Apple Pro Res will work, as well). When he completed the final cut, he says he “reconformed the whole project to the original H.264 .movs from the camera and then went to After Effects. There, I processed the shots with (in this order): pulldown from 30→23.976 fps; digital noise reduction with NeatVideo; general color grading; miscellaneous filters (usually graduated NDs, vignettes, selective saturation, and so forth).”
As noted before, Uzeda wanted to project on a 35 mm film print to attain the best possible viewing experience for an audience. “There’s still no widely available digital projection that can match the color and pixel resolution of film,” Uzeda argues. He also wanted to do a Dolby Digital 5.1 surround sound mix. “Casulo is a very sensorial and visual film,” Uzeda exclaims. “Its sounds and images are everything in the experience. I could not afford making a digital exhibition copy and let the film end up screening in some festivals that only [have] two options: 35 mm or ‘DV family tapes.’”
Color Grading
When color grading and noise reduction was completed, Uzeda exported the final output to uncompressed .mov files at 1920 × 1080p/23.976 fps. But because the 16 × 9 widescreen format is at a 1.78 aspect ratio, he cropped his images slightly to be able to conform to an aspect ratio of 1.85 for 35 mm film transfer, providing a 1920 × 1037 resolution. He transferred the film at Technicolor USA “through a new technology called DTP (direct-to-positive or direct-to-print) using a machine called Cinevator (manufactured by a company from Norway called Cinevation).” Uzeda adds, “Through this method, there are no negatives involved. The digital files and your 5.1 mix in your MO-Disk are transferred directly to your final positive. You have less control since there is no color adjusting using the inter-negatives; nonetheless, it is a more affordable process for lower-budget productions, and I was very impressed and satisfied with the results.”
“We’ve all seen films shot with very little money and gear that impressed us, whereas every week there are lousy multimillion dollar features made with the best gear (and the best DPs) that are completely forgettable. Nonetheless, I suggest getting a very open-minded and experienced DP for shooting with a stills camera. Make tests and experiments in the locations where principal photography will occur if possible. Never think you are saving money having friends or nonexperienced people to handle important set functions like a director’s assistant, gaffers, set production crew, and so forth.”
SCREENING
The film was screened in fall 2009 at the Rio de Janeiro International Short Film Festival, in what Uzeda calls “a really nice theater, and that was the first time I could feel the power of the movie in a really large screen with a crowded audience which was very receptive to the experience. I hope to screen the film in other international festivals, of course, but nowadays with the overdose of short-films submissions, it’s getting harder and harder to find a proper space for a 17-minute silent short thriller. My goal in creating the film was to have a first experience directing actors and working with a good DP, and it sure was unforgettable.”
Uzeda plans to shoot his next project on a DSLR, again. “Things are getting better and cheaper. I think the cost-benefit result is amazing for lower-budget projects (although each day, more and more medium-/high-budget projects have DSLR cameras readily available for some miscellaneous shots),” Uzeda says. But Uzeda explains that a camera doesn’t make a film. “The main thing will always be: it is not the camera that makes a good film, and not even great cinematography. We’ve all seen films shot with very little money and gear that impressed us, whereas every week there are lousy multimillion dollar features made with the best gear (and the best DPs) that are completely forgettable. Nonetheless, I suggest getting a very open-minded and experienced DP for shooting with a stills camera. Make tests and experiment in the locations where principal photography will occur if possible. Never think you are saving money having friends or nonexperienced people to handle important set functions like a director’s assistant, gaffers, set production crew, and so forth.”
Uzeda faced these big drawbacks when using the Canon 5D Mark II before the firmware update:
• Problems occur with HD video monitoring, and no matte or reticules are available for monitoring on different aspect ratios or any kind of more-advanced image monitoring.
• Some strange artifacts can appear on fast-moving subjects, such as subtle ghosty motion blurs and things that you wouldn’t see in the same image if shot on 35 mm.
• Subtle use of focus is very hard to do and demands an experienced and patient focus puller; otherwise, you can end up with a completely ruined film.
• Color sensibility of the sensor is still not uniform. Moiré-patterns show up.
• No matter how beautiful the image is, it is still being digitally compressed frame by frame.
• DSLRs generate more noise than most people think.
• Slow-motion implementation is poor or nonexistent.
• Audio implementation (at that time) is poor.
In any case, Uzeda feels that the “main [benefit] of shooting with a DSLR is, of course, the price vs. quality of image (full HD resolution, big sensor, possibility of changing lens, rich color, and contrast).” And if it’s transferred to a 35 mm film properly, “you can get more than impressive results on the big silver screen.”
After seeing Uzeda’s film on 35 mm, some experienced postproduction people told him that they felt it contained “such sharpness and rich colors that it looked as if it was shot in 65 mm. I think this kind of a result for a camera that costs even less than the lenses and accessories we were using is quite a revolution,” Uzeda says.
NOTES
1 I’m using film “look” in the titles to stay consistent with the book title—which is a useful marketing tool—but, of course, there is a difference, and a film look is not just one formula and refers to a variety of cinematic elements.
1 All quotations in this chapter are from interviews conducted by the author.
2 The Canon 5D Mark II has an HDMI out for high-definition playback, but mysteriously only outputs in standard definition in live mode when shooting. The 7D does not have this problem.