RECORD SOUND LIKE A FILMMAKER
Lancaster law of sound: No one can watch a film if the audio sounds bad. No matter how good the image, poor sound quality will block your viewers from ever appreciating the image. Do not ever skimp on sound. It is the most important element in scenes with dialog. In fact, you can present a fairly poor image and if the audio is spot on, people will enjoy the movie—more so than good images accompanied by bad sound. Bad sound is a dead giveaway that the film was made by an amateur.
With DSLR cameras, it’s pretty easy to get bad sound. But with some basic knowledge and the proper tools, the DSLR shooter can record great audio. Dialog should never be recorded with the built-in camera mics. Ever.1 Jeremy Abrams, the news director at Cinema5D, says he likes the fact that DSLRs make you go “back to basics” of filmmaking:
The way they started motion picture was one frame at a time. And eventually they just strung ’em together until it looked like something they were used to and liked, and off we went. The DSLR cameras are doing just the same thing. It’s a great sync-sound camera. If you treat it like that, then you’ll get the most out of it. If you run separate sound, you will get better sound. And the fact that they didn’t jam all this audio into it just makes it a more potent camera. That’s one of the bad things about standard little video cameras is that they’re trying to jam all this audio technology into it.
(Interview with author, March 2010.)
Because DSLR manufacturers decided to deliver a strong picture over strong audio—and there’s a compromise on space—DSLR shooters must shoot like filmmakers when recording sound. Ideally, recording sound separately, or at the very least, disabling the automatic gain control (AGC) in the camera, getting the proper microphones, and connecting the mic to a professional audio adapter (containing a preamp with limiters) are essential in getting the best possible sound.
DSLR shooters must shoot like filmmakers when recording sound.
The following are some basics you, as the DSLR film-maker, should consider when shooting:
1. What is the sound quality of the space you’re recording, whether indoor or outdoors?
2. What type of microphone will you use, such as a shotgun mic or a lavaliere? Or are you stuck with just an onboard mic? The choice will determine your pickup pattern (what area of sound the mic will favor when recording).
3. Will you use a condenser or dynamic mic? Will it be powered through its own battery or from the camera’s power, providing “phantom” power?
4. Will you have high impedance or low impedance—minijack input or XLR input?
5. Can you disable automatic gain control of your sound and manually control the sound?
6. What is the compression of your audio recording?
7. Where will you place the microphone? Will it be a camera-mounted mic, or will you use a boom pole or pistol grip?
8. Will you use an external audio recorder or just record it to the camera (or both)?
The answers to these questions will determine your audio quality. This chapter covers these topics so you can be more informed in your choices as you shoot and know the impact of compromises. You should test through postproduction and into a final export of your project to understand what your final field audio recording will sound like.
SOUND QUALITY
Just as the cinematographer must be aware of the quality and source of light in a scene, DSLR shooters need to be aware of the ambient room quality. Is it hard or soft? Hard walls and hard floors will reverb your audio, providing micro-echoes of sound in the space. Test the sound quality by yelling in the space. If you hear an echo, reverb will be abundant and the audio may sound a bit tinny. A room with carpeting, furniture, and so forth will absorb the sound and break up the audio wavelengths, so the reverb will be minimized. Outdoors (other than an alley) will likely provide a soft sound quality. A windy day will cause audio impacts, pretty much ruining the recording. Using a windscreen will minimize this damage—not the foam windscreen that usually comes with the mic, but a large, thick, furry screen covering a sound blimp for wind production (look ahead to Figure 5.8).
In addition, the DSLR shooter must decide if the subjects should sound close or far away. In most cases, their voices should sound as though they’re close, so the microphone must be brought in close (less than three feet or closer). If distance needs to be conveyed, then pull the microphone back so it sounds as though someone is talking across the room, for example.
In addition, many DSLR cameras utilize automatic gain control, which means the camera will adjust the levels of the audio coming into the recording, depending on how much sound is hitting the mic. A lot of sound will lower the input, whereas soft sounds will force the camera to increase the levels, typically causing unwanted hiss. In either case, the AGC will result in bad sound by recording uneven audio levels and adding extra noise when the levels are low and the AGC increases to compensate. In most cases, you want to turn off the AGC, which is really not an option for most DSLR cameras. The Canon 5D Mark II and Canon 60D allow for manual control of the audio. BeachTek and juicedLink are two companies that provide devices to disable the AGC of cameras and allow you to input XLR microphones (more about them later in the chapter). These devices trick the camera so that it thinks all the audio is even, allowing manual control of the audio.
In addition, audio is recorded at different qualities. A 44.1 k, 16-bit recording is lower quality than a 48 k, 24-bit recording. The first number refers to the sampling rate—the amount of times per second the audio is sampled (44,100/second), and the second number refers to the amount of information recorded per sample (16 or 24). Most DSLR cameras have a set recording compression scheme, and they will be of the two types. Both will provide good sound quality. If you’re using an external recorder, you have the option of setting different compression schemes. Just make sure you set the same compression as the camera so you can sync them up in post. Do not use compressed .mp3 recording—no matter how high the bit rate. Keep your audio data as raw as possible!
Also, when recording audio, such as dialog, be sure to record room tone in every space you record. Have everyone on set be quiet and record blank audio for at least a minute. This will capture the ambient sound you will need in editing in order to fill in gaps between takes or to even out the sound quality from different takes.
Checklist for Sound Quality
1. Are you indoors or outdoors?
2. What is the surface quality of the environment? Will the sound reverb, or is it absorbed in the environment?
3. Do you want your subject to sound close?
4. Do you want your subject to sound far away?
5. Can you turn off the automatic gain control? If not, then use an audio adapter that turns it off or use an external digital audio recorder.
6. What is your compression value? (You don’t need this unless you’re using a recording external device, in which case you want it to match the camera’s audio compression.)
The following sections provide an overview of some of the equipment you may think about using on your shoots. They include a justification of what works well and why. Some of this information may be a review for experienced filmmakers, so feel free to skip over it. If you’re relatively new to DSLR filmmaking, the information may be useful, especially if you’re trying to get better sound for your projects. The final section of the chapter will walk you through two audio workflow setups covering the recording of an external onboard mic and an external digital recorder with the intention of syncing your audio using PluralEyes software in Final Cut (covered in Chapter 6 on postproduction workflow).
MICROPHONE TYPES
Microphone types sound differently; they will convey different audio qualities depending on the space you’re in. The major mic types include lavalieres (lavs), omnidirectionals (omnis), cardioids, and shotguns. They will never sound the same.
• Lavs are needed for wide shots with dialog (we’ll see the boom pole with a shotgun mic in a wide shot).
• Cardioids are for use indoors.
• Shotguns are for outdoor medium and close-up shots.
Cardioids provide the best sound recording but pick up too much noise outside. Because shotgun mics have the rear lobe pickup pattern, they’ll pick up reflections of sound off the ceiling and wall, resulting in interference. Lavs, although useful for picking up dialog in a wide shot, don’t sound as good and need to be postprocessed to bring back the warmth of a person’s voice. For run-and-gun journalists and documentary filmmakers, the shotgun is the best choice if you can choose only one mic.
Many of these mics include space for a 1.5 volt AA battery, but you will want to use phantom power if available because it will increase the quality during recording, although it will reduce the battery life of your recorder. The voltage allows the signal to be picked up when sound waves hit the front plate, changing the value of the air quality against a capacitor and turning it into an electric signal. On the other hand, dynamic microphones, the ones you see reporters use on television news, are more rugged and do not require any external power. But the sound quality is not as good as condenser microphones.
Shotgun microphones are unidirectional, oftentimes with a cardioid or super-cardioid pickup pattern. A cardioid pattern allows you to record sounds from the direction the microphone is pointed (see Figure 5.1), whereas a supercardioid—found in shotgun mics—does the same thing but also picks up some sound from the rear (see Figure 5.2).
FIGURE 5.1 Cardioid pickup pattern.

(The Microphone, your voice’s Gateway to the World. Voiceover4us.com. <http://www.voiceover4us.com/blog/2008/07/15/14/>, accessed 02.02.2010.)
FIGURE 5.2 Super cardioid pickup pattern. Typically found in shotgun mics.

(The Microphone, your voice’s Gateway to the World. Voiceover4us.com. <http://www.voiceover4us.com/blog/2008/07/15/14/>, accessed 02.02.2010.)
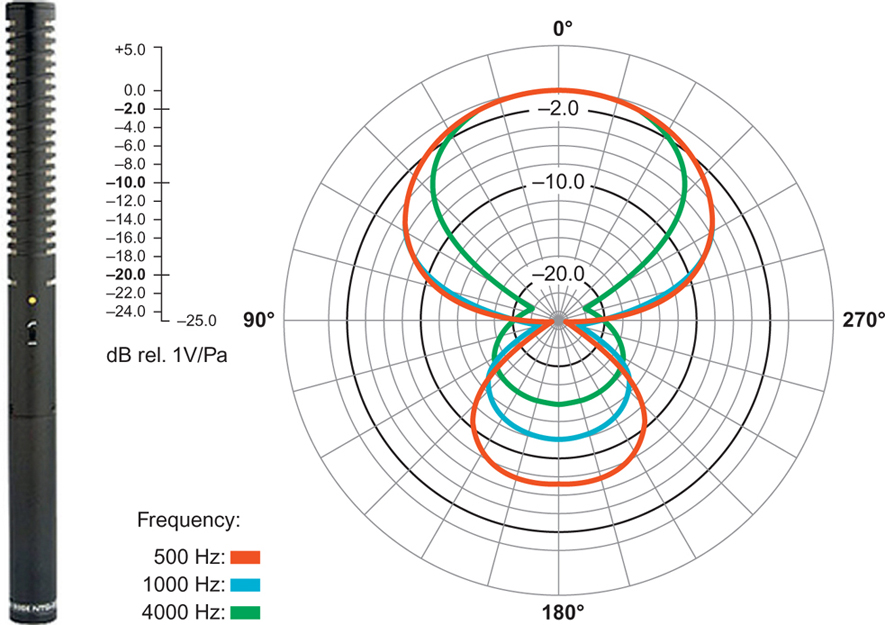
One of the popular mics that can be attached to the DSLR’s accessory shoe is the Rode VideoMic (see Figure 5.3), a light shotgun mic that attaches on top of the DSLR (see Figure 5.4 for a polar pickup pattern chart for this mic).
FIGURE 5.3 Rode VideoMic with foam cover. This mic includes a built-in shock mount to reduce noise from movement. The foam windscreen is not useful against wind; you’ll need a good windscreen (see Figure 5.8). The frequency response of this mic ranges from 40 Hz to 20 kHz. This mic uses a minijack connector; it’s a high impedance mic but can connect directly to the DSLR’s microphone jack without any kind of adapter. This minijack mic could be plugged directly into an external audio recorder, such as the Marantz PMD620 (∼$400). You may want to tape the minijack plug so that there’s less of a chance of having the cord accidentally being pulled during a recording.

(Image courtesy of Rode.)
FIGURE 5.4 Rode VideoMic’s polar pickup pattern measured in frequency response. The Hertz refers to the wavelength. The lower number is low-frequency sounds such as rumbles and base. The higher frequency expresses higher tones. A human voice can range from 80 Hz to 1100 Hz.

(Image courtesy of Rode.)
If you’re traveling light and shooting a news piece, documentary, or a wedding solo (without anyone helping out with sound), then this is probably one of the most useful mics you can get for your DSLR. It will not be as good as a shotgun mic with an XLR adapter, but it will provide usable sound for your production.
The Rode VideoMic will provide usable sound for run-and-gun style documentary and journalism work, but it’s recommended that it be used to record decent reference audio and backup sound. It is better to use a higher-end mic with an XLR adapter, especially if you’re submitting for broadcast or to a film festival, where audio really matters.
If you’re shooting solo and going for speed, attaching an on-camera mic, such as the Rode VideoMic, is a great choice. When you’re talking to someone, be sure that person is close, no more than three feet away, if you want to capture as clean a sound as possible. This may work great for news and documentary. However, when shooting short fiction pieces and commercials, you will want wider shots and still pick up clean audio. But because the performers are more than a few feet away (even five feet is probably too far), you’ll need to run longer cable. Be aware that microphones with minijack plugs (the standard tip-ring-sleeve, or TRS, connectors) are high impedance using unbalanced cables and the signal will weaken over distance, and these mics are prone to picking up noise. You need a balanced cable (XLR).
The Rode NTG2 shotgun mic is a decent dialog microphone, most useful for outdoor shots or indoors if sound reflection is minimal (see Figure 5.5), and if you’re shooting solo, attach this mic to a DSLR rig along with an XLR adapter that provides phantom power, and you’ll get really good sound. If you have a sound person, this type of mic is a great choice when attaching it to an external recorder (such as a Tascam DR-100 or Zoom H4n).
FIGURE 5.5 The Rode NTG-2 shotgun microphone and its polar pickup pattern. A good budget dialog mic. The frequency response of this mic ranges from 20 Hz to 20 kHz. This mic uses an XLR connector, which means you’ll need to use an audio adapter from BeachTek or juicedLink.
(http://usa.rodemic.com/microphone.php?product=NTG-2, accessed 02.02.2010.)
Whatever shotgun mic you end up using, knowing its strengths and weaknesses is important. Note, for example, the frequency response of the Rode VideoMic compared to the Rode NTG-2. The NTG-2 can go as low as 20 Hz, whereas the VideoMic is limited to 40 Hz. Fewer low frequencies will be picked up by the VideoMic. However, often a boom pole sound operator will engage the low-cut filter to minimize boom pole handling, removing the lower frequencies from the shotgun mic.
Shotgun mics provide the best sound in your recording work, but using a shotgun inside a room with a lot of reverb will cause extra audio muddiness. Also, the onboard VideoMic attaches to a high-impedance 3.5 mm connector. If attached to an extension cable, it may pick up noise (such as from a nearby radio station, for example), and the audio quality will drop off.
If, instead, you use a mic with an XLR connector (with balanced cable, which will resist the noise that high-impedance lines will pick up), you will have the advantage of running long cable, and it’ll pick up very little to no noise, and the audio quality will stay high. But you will need to hook it up to an XLR adapter or use an external audio recorder with XLR inputs, because DSLR cameras currently available do not contain an XLR input (see the “XLR Adapters” section later).
It must be noted that the interference tube in shotgun mics don’t work well indoors—unless there’s a lot of sound absorption material, such as furniture. Sound reflecting off the wall skews the frequency and draws attention to the echo sounds. If all you have is a shotgun mic, typical of run-and-gun style doc shooters, video journalists, and indies, be aware of the space you’re in and adjust the direction of the mic, as needed. Holding the mic from below, for example, may minimize sounds bouncing off the walls.
When pointing a shotgun mic at someone, remember that it will pick up sound behind the person, so if he is standing on a sidewalk and you’re facing the street with the camera-mic setup, you’ll get loud traffic noise. If you have the person turn around so you’re facing a storefront, you’ll get much cleaner sound. When shooting a documentary in Hood River, Oregon, I interviewed many people on the street asking them about their Sasquatch sightings. The shotgun mic was held close to them, and traffic noise was minimal, despite the number of cars and trucks rumbling by. In addition, holding the mic up in the air (with a boom pole or pistol grip) and pointing down toward your performer’s voice will also minimize external sounds because extra noise is minimal when pointing toward the ground.
Most lavaliere mics are omnidirectional, picking up sound from all directions. If you want someone to sound close up and personal, the lav mic, when wired properly, provides a good, clean sound. Lavs require a transmitter box that typically hooks to the subject’s belt, and a wire attached to the mic is strung up beneath the subject’s shirt and hooks onto the shirt collar (see Figure 5.6). An XLR wire connects the transmitter box to the camera’s XLR adapter. There are also wireless models, which allow the transmitter to send the audio remotely to a receiver that connects to the XLR adapter.
FIGURE 5.6 Sennheiser’s wireless lav G3 microphone system. It’s expensive at $600, but the wireless will give you flexibility on shoots.

Built-in mics, no matter the camera, are nearly useless and usually provide poor sound quality. They’re useful only for reference audio if you’re recording sound externally on a digital recording device. If you must use the onboard mic, make sure it’s not windy and make sure your subject is standing no more than three feet away.
For DSLR cameras, phantom power is provided only with onboard external XLR adapters or external digital recorders.
Getting the Right Mic and Using a Boom Operator
Filmmaker David Anselmi says that “even a crappy mic sounds better on a boom! A mic with a boom pole and a good boom operator can give you great sound—much, much better than a $1,000 Sennheiser 416 mounted on the camera!”
In addition, Anselmi recommends going for microphones in the $600–$1,000 range. “You may want to do an A/B comparison of a lower-end mic with a high-end mic with excellent audio monitors, so you can hear the difference—you’ll never be satisfied with a $250 mic again. Also, for outdoors—especially in heavy wind—a blimp is essential.” Words of wisdom as you shop for the right microphone. Testing is always the best rule of thumb. If you’re in New York City, B&H Photo has an audio room where you can test microphones (other professional video/audio gear stores will also allow you to test mics).
WINDSCREENS
Windscreens are absolutely essential when shooting outdoors, even if there’s only a light breeze. Wind impacts a microphone’s diaphragm hard and can easily damage your audio. The foam covers that come with microphones are really designed to soften the speech of the performer; they’re not windscreens and will not hold up to outdoor use even on a light windy day. Rather, using a windmuff or windscreen is the way to go (see Figure 5.7). They slip over the microphone, and their thick, furry cover breaks up the impact of the wind. Some models cover the microphone snuggly; others, such as Rycote’s Miniscreen, leave a gap between the mic and windscreen, which, from my tests, seems to work better in stronger wind (see Figure 5.8). (See Chapter 13 on gear for an overview of several different models.)
FIGURE 5.7 The Rycote Softie offers some protection against wind but is not good for moderate levels of wind.

FIGURE 5.8 Rycote’s Miniscreen is a great budget option (∼$80) for taking out moderate wind noise on a shotgun microphone.

XLR ADAPTERS
If you want to get good sound out of a DSLR, utilizing a preamp with XLR connectors is the best option if you’re not using an external recorder. You’ll get a rich and clean signal. This option also allows you to use professional XLR mics.
Furthermore, using an XLR cable is a must for recording over a distance of a few feet, and because DSLR cameras do not contain XLR inputs, you’ll need to use an XLR adapter. JuicedLink and BeachTek are two popular companies that build XLR adapters, but the two products I’ll describe here also allow for audio monitoring (with headphone inputs), provide phantom power to power your mics, and subvert the automatic gain control of the audio in-camera. As noted before, most, if not all, DSLR cameras use AGC; the only exceptions as of this writing are the Canon 60D and 5D Mark II (which updated its firmware in March 2010 to allow for manual control of audio).
Be sure the adapter has the proper transformer and circuits; otherwise, the noise resistance natural to the XLR cable will be lost. In addition, the XLR adaptor box contains a mini-jack that plugs into the DSLR’s mic input; this input can easily break. Some people hot glue the right angle connector into the minijack and cable-tie the slack to the camera, connecting and disconnecting the cable from the adapter box.
BeachTek DXA-SLR XLR Adapter
BeachTek’s DXA-SLR model includes a microphone preamp (15 dB) to help provide a clean signal for your microphone (see Figure 5.9). It’s designed so you can access the battery of the Canon 5D Mark II. It also has 48 volts of phantom power capabilities, which is an added bonus for powering your mics. It doesn’t have LED meters for monitoring audio input levels, but it uses a single LED to indicate red when audio clips.
FIGURE 5.9 BeachTek’s DXA-SLR model.

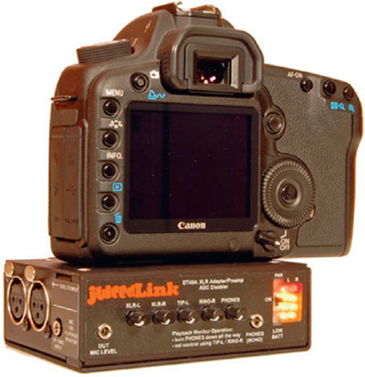
JuicedLink’s Preamp DT454
JuicedLink’s preamp DT454 provides clean audio with the circuitry of its preamp—a product designed for video cameras needing XLR adapters (see Figure 5.10). It overrides the automatic gain control of DSLR cameras with an AGC disabler (not needed for the Canon 5D and 60D). It allows you to use up to two XLR mics, as well as two minijack unbalanced mics (useful for those who own Rode’s VideoMic but want a clean connection and clean sound). It also includes LED level meters, a headphone jack (a must-have!), as well as 48 V and 12 V of phantom power.
FIGURE 5.10 JuicedLink’s preamp DT454.
PISTOL GRIP AND BOOM POLE
Pistol grips and boom poles are basic tools if you’re working with a crew. If you’re running and gunning, then stick with your onboard external microphone, but if you have at least one other person helping out on the shoot, use a boom pole to bring your mic in close to your subject. A pistol grip provides a similar tool for medium and close-up shots (see Figure 5.11). I’ve sat in a chair during an interview and handheld the mic with a pistol grip, just out of frame, and received excellent quality sound because I can place the mic a foot or two closer to the subject than just placing it on-camera. In this kind of setup, I put the camera on a tripod, use an XLR adapter, and sit beside the camera so I can monitor the image during the interview. When using a boom pole, be sure to strap the cord to the pole, so the wire doesn’t hit the pole, creating additional noise.
FIGURE 5.11 A Rycote pistol grip. Great for getting a mic in close when you have tighter shots. The device is designed to minimize noise when holding a shotgun microphone.

EXTERNAL RECORDERS
If you want to get the best sound possible with DSLR cameras, the Zoom H4n (see Figure 5.12) and Tascam DR-100 (see Figure 5.13) are two possible choices for you to record sound separately, while getting a professionally clean recording with XLR mics. They record digitally onto an SDHC card.
FIGURE 5.12 Zoom H4n audio recorder.

FIGURE 5.13 Tascam DR-100 audio recorder.

Essentially, these recorders allow you to hook up a professional microphone to their XLR inputs, so you’ll get the cleanest audio. There are also a variety of settings that can be chosen, but be sure to pick a non-MP3 compressed format. Use 44.1 kHz, 16-bit or 48 kHz, 24-bit (or the one that matches the audio compression of the camera. If it’s a different rate, you may get material out of sync). You will still record audio on the DSLR camera’s microphone and use it as a reference, and replace it with the clean audio after you’ve synced it up using a lip sync software, such as PluralEyes from Singular Software (PC version—Sony Vegas Pro; Mac version—Final Cut Pro) or DualEyes, a standalone application for PC or Mac. Record a slapping of hands or use a slate at the beginning of the take, and make sure everything’s recording; it’s sometimes too easy to forget to turn on the external recorder!
Use the Rode VideoMic connected to the DSLR’s hotshoe as your reference and backup sound; then bring in the XLR mic as close as possible. You could consider putting the device on a small tripod. If you’re using only a minijack microphone, you may want to consider getting the Marantz PMD620 audio recorder. It doesn’t have XLR inputs, but it’ll give you a clean recording—much better than the on-camera mic.
If you do not want to deal with an external recorder and you want the best possible sound out of a DSLR, you may want to consider a more expensive option (∼$665): Sound Devices MixPre (see Figure 5.14). It’s a portable field mixer and mic preamp that contains unclippable limiters, so, if set properly, it will not blow out any sound. It’s made of metal, so the rugged device will hold up to some impact abuse. Use the tape out as the output that you will plug into the camera’s microphone input. The chief advantage is the ability to use XLR microphones, but you can also monitor audio, adjust the levels, and view an LED level meter. If you want pristine sound, hook it up to the Tascam DR-100 or Zoom H4n when recording sound externally to the camera.
FIGURE 5.14 Sound Devices MixPre is a powerful preamp for adding quality audio to your recordings. Clean and quiet preamps with unclippable limiters make this one of the most powerful tools in your audio arsenal.

If you’re hooking the MixPre directly to the DSLR, be sure to get a special cable made by Pinknoise (http://www.pinknoise-systems.co.uk/pinknoise-25-p-459.html). It provides a −25dB attenuation pad, so the line level coming out of the MixPre isn’t too hot for the DSLR. For buyers in the United States, you can purchase the cable on eBay.
Without such limiters, you’ll want to record your audio at −12dBu or −20dBu to minimize the risk of clipping audio if a subject or performer gets too loud. However, the audio levels will be low and will have to be boosted in post (usually the normalization gain). When you’re boosting, the audio will usually result in increased noise, so you will need to use a noise reduction plug-in for the software.
HEADPHONES
You need to monitor the audio when shooting. The problem with most, if not all, DSLRs is their lack of a headphone jack—thus, the importance of getting an XLR adapter with a headphone input or using an external digital audio recorder. Monitoring sound will allow you to know when something’s not working right. Unfortunately, without a headphone jack on the DSLR and monitoring only through the XLR adapter, you don’t know if something is going bad with the sound in-camera. This is another reason why using external recorders for DSLRs is important.
With that said, there are headphones designed to sound pretty, and then there are headphones designed to sound accurate: monitor headphones. You want the headphones that sound accurate. One of the best websites detailing unbiased ratings and sales of headphones is http://headphone.com. For studio use—mics that will sound accurate—this site recommends four models for ∼$100 and under (two of which are at ∼$60): Beyerdynamic DT2325 (∼$60) and Shure SRH240 (∼$60; see Figure 5.15); and Sennheiser HD 280Pro and Shure SRH440 (at ∼$100). Go to their site and scroll down to “Headphones for Studio Use”: http://www.headphone.com/selection-guide/dj-and-studio.php. Sony also makes a monitoring headphone that is good for field production: the MDR-7506 (∼$90).
FIGURE 5.15 The Shure SRH240 (∼$60). A good budget headphone that offers clean, even monitoring of audio.

Getting the right headphones—within the parameter of making sure they’re designed for monitoring sound (studio and/or field production)—is essential. But once you have the choice paired down to headphones that are designed for accurate monitoring, the ones you purchase should be those that are comfortable for you to wear.
Checklist for External Onboard Minijack Mic
1. Choose your microphone (such as the Rode VideoMic), attach it to the accessory shoe plate, and plug the mic directly to the microphone jack of the camera.
2. Turn on the mic (be sure you put a fresh battery into the microphone).
3. If possible, turn off the AGC and set the audio input levels of the camera at −12dBu to minimize clipped audio.
4. Keep your subject no more than a few feet away or so; this will provide the strongest audio signal.
5. Input your files normally. The audio is recorded simultaneously with the video.
Checklist for External XLR Mic with XLR Adapter
1. Choose your microphone (such as an XLR shotgun mic).
2. Attach the XLR adapter and connect the XLR’s minijack plug into the camera’s minijack microphone input. (Make sure you put fresh batteries into the adapter.)
3. Plug the mic’s XLR cable into input 1 of the XLR adapter.
4. If the camera has automatic gain control (most DSLR cameras do, but read the manual to find out), turn on the XLR adapter’s AGC disabler.
5. Use either a boom pole or pistol grip, or mount it to the camera with a shockmount with an accessory shoe adapter. Plug the mic to the microphone input of the XLR adapter.
6. Turn on the phantom power (it’ll be either 48 V or 12 V). If you have a 12 V option, you may want to use this to save battery life, but be sure the mic you choose can utilize 12 V of phantom power.
7. Plug in your headphones.
8. Set the max levels of your audio to −12dBu to help prevent clipping if a performer or subject gets too loud. This will give you 12 decibels of headroom.
9. Keep your microphone no more than three feet away from the performer.
10. The audio is recorded simultaneously with the video, so no additional steps are needed when you export your files from the camera to the computer.
Checklist for External Recorders (Tascam DR-100)
1. Do two recordings: one on-camera for reference and backup and the other externally. Choose your microphone type and follow the previous checklist for minijack on-camera recording. Don’t worry about an external XLR adapter because that just complicates the workflow. You could just use the camera’s mic, but if you hook up a Rode VideoMic, for example, you’ll get usable sound, so if something did go wrong in the external recording, you’ll have a backup.
2. Most audio recorders contain a tripod screw hole, so you can mount the recorder onto its own tripod, if desired, or mount it to a DSLR rig.
3. Put fresh batteries into the recorder.
4. Choose your microphone for the digital audio recorder (XLR shotgun, XLR lav, or both—using the two different inputs) and hook it up to a boom pole, pistol grip, or tripod. Make sure it’s no less than three feet away.
5. Attach the XLR cable to the mic and the input of the audio recorder (if you’re using two mics, plug both into the recorder).
6. Set your audio recorder’s audio compression scheme; be sure it matches the camera’s recording capabilities (it’ll most likely be 44.1 kHz, 16-bit or 48 kHz, 24-bit). Some recorders can do 96-bit, which will give you an even better recording to work with in post. Just be sure the kilohertz (44.1 or 48) matches the camera setting.
7. Unless you’re using a field mixer with limiters (such as the MixPre), set the max levels of your audio to −12dBu to help prevent clipping if a performer or subject gets too loud. This will give you 12 decibels of headroom.
8. Turn on the phantom power (it’ll be either 48 V or 12 V). If you have a 12 V option, you may want to use this to save battery life, but be sure your mic can utilize 12 V of power. Otherwise, just stick with 48 V.
9. Plug in your headphones. There’s a separate volume control for the headphones, but what you’re hearing isn’t exactly what you’re actually recording!
10. Press Record on the digital audio recorder. The first time you press the Record button, it’ll flash red and provide an audio level signal so you can test your levels before actually recording.
11. Set your levels by doing an audio test. There are two input level dials, so you can adjust each microphone separately if you’re using two mics.
12. Press the Record button a second time to start recording. Double-check the timelapse clock to see if it’s ticking; this will assure you that you’re recording the audio!
13. Start recording on the camera.
14. Clap your hands or use a slate.
15. Begin the scene.
16. When the scene is completed, press the Stop button. (If you press the Pause button, you will keep one file recording; if you press the Stop, then each time you record, a new file will be created–which is useful when recording multiple takes of video.)
17. Take note of the file number on the audio recorder, so you can match it to the right take on the camera.
18. Export the camera’s video-audio footage into your computer. This will need to be processed (see the Chapter 6 on postproduction workflow). When you process it, keep the audio in its native format (44.1 kHz or 48 kHz). This audio will be your synced reference audio.
19. Export the audio from the audio recorder. You’ll use this audio to replace the camera audio after you’ve synced it using PluralEyes (see the next chapter), or if you do it manually.
This chapter should have provided you with the tools to get the quality sound you need for your DSLR projects. The next chapter covers the final toolkit for the DSLR shooter: postproduction workflow for audio and video.
NOTE
1 Use it only as reference audio.