Transcoding Footage, Syncing Audio, and Color Grading
Most HDSLR cameras shoot in some form of the H.264 codec, which is essentially a finishing or output mode designed for the Web and Blu-ray DVDs. It is not designed to be edited. Why is this codec used then? Because it’s what allows HD to be a viable form—putting a lot of data onto a memory card. When these cameras begin to shoot RAW, there will be a lot more data space needed. For now, this is the technology DSLR shooters are stuck with.
However, with that said, you can drag and drop Canon’s DSLRs native .mov files into Final Cut 7, Sony Vegas Pro, or Premiere Pro and edit straight without any transcoding. Despite that ability, though, it’s highly recommended—and post-production professionals agree—to transcode and decompress the files, especially if you’re doing any kind of color grading. Very few—if any—professionals would ever consider editing with the native files. A video journalist with a fast turnaround may try to make it work, and if you’re a student with a short project without any worries about doing any post finishing work, you could edit with the native files and see how that approach works out. The best school is to try it both ways and see what works best for you.
In either case, a transcoded file will provide much more “headroom” in post and allow for a smoother workflow when you’re editing. The transcoding process, whether you’re using Squared 5’s MPEG Streamclip, Cineform’s codec, or Final Cut’s ProRes, will provide a 4:4:4 or 4:2:2 color space (see Appendix 4 on chrominance and luminance compression).
This chapter includes a step-by-step guide in converting your DSLR footage using Squared 5’s MPEG Streamclip (freeware for both Mac and PC), Cineform’s Neoscene (which can be used for Apple and PC computers), and Final Cut Pro’s Log and Transfer process. In addition, it also provides the workflow necessary to convert external audio recording (such as with the Tascam DR-100) using PluralEyes syncing software. Lastly, it covers some of the basics of color grading with Magic Bullet Looks, a powerful tool for filmmakers to put the final touches on their project in crafting a film look.
Deinterlace Your Video
Most DSLRs, such as the Canons, shoot in 1080P, progressive scanned. A few may shoot in 1080i (interlaced mode, such as Panasonic’s GH1). Deinterlacing a DSLR movie if shot in 1080i is one of the key tools a cinematographer must utilize to avoid the video look. It is far, far better to get a camera that shoots progressive scan. If you need to deinterlace, use Magic Bullet Frames.
GETTING FILES INTO THE COMPUTER
One of the benefits of DSLRs is their tapeless recording. Cameras such as the Canon 5D Mark II and 7D record on Compact Flash, whereas the Rebel T2i, 60D, and Panasonic’s GH1 record on the smaller-sized SDHC cards (which are about half the price). It’s not practical to buy dozens of memory cards and keep them as permanent archive media (unless you have the money!).
There are two approaches you can use:
1. Drag and drop files onto the computer (and I recommend at least two other hard drives: one as a backup; the other as an archive).1 Use this approach only when you are using NeoScene or Streamclip or another software where you can drag and drop files or select files individually for decompression transcoding.
2. If you’re editing on Final Cut Pro, you must keep the original folder structure of the camera’s memory card intact, putting a copy of it on your hard drive.
SQUARED 5 MPEG STREAMCLIP WORKFLOW
To use Squared 5’s MPEG Streamclip freeware, follow these steps:
1. Download and install MPEG Streamclip from http://www.squared5.com/.
2. If you’re converting one file at a time, go to File→Open and search for the files you want to decompress. However, if you’re doing more than one file, then batch process the files. Go to List—Batch List (see Figure 6.1a), then click the button, Add Files (see Figure 6.1b).
FIGURE 6.1a

FIGURE 6.1b Open the files you need to convert using MPEG Streamclip.

3. Your file appears in the main window. You may set in and out points (I and O) if you need to convert only a section of the clip. Choose File→Export and select Export to QuickTime… (see Figure 6.2) or another format if desired.
FIGURE 6.2 Select the export type you need (typically QuickTime for Mac users); in this case, I chose Export to QuickTime….

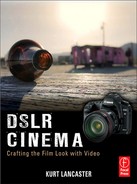
4. The Exporter window (for Mac) defaults to Apple Motion JPEG A and places the quality of your clip at 50% and with interlacing (see Figure 6.3). You will need to change these parameters. Slide the quality to 100%. Deselect Interlaced Scaling (if your footage was shot progressive, which the Canon HDSLRs do). The Frame size should default to the original footage size (in this case, 1920 × 1020)
FIGURE 6.3 You will need to change the default settings to make your footage look as good as possible: Deselect Interlaced Scaling (for progressive cameras, such as the Canon), slide Quality to 100%, and change Apple Motion JPEG compression.

5. For Mac users, select Apple ProRes 422 (LT) for a fast render (see Figure 6.4). Higher-quality renders should be used for work exporting to film (ProRes 4444). Philip Bloom uses 422 (LT) for web-produced work, and it works just fine. Use 4444 if you’re going to film-out or full-screen project—but it will increase your file size a lot, so be sure to have enough hard drive space. PC users should test what best works for them. A test I did of an AVI file failed to import the video track in Vegas Pro (only audio came in).
FIGURE 6.4 You can choose from a variety of codecs when exporting with MPEG Streamclip. Apple ProRes is the standard for Final Cut Pro users.

6. After completing the Compression format selection [Apple ProRes 422 (LT)], placing the Quality to 100%, and removing Interlaced Scaling (see Figure 6.5), click on the Make Movie button.
FIGURE 6.5 The screen as it appears when ready to convert the file.
7. After you click Make Movie, the file is encoded into a file size about twice the original [when using Apple ProRes 422 (LT); see Figure 6.6]. The LT version has a much faster rate than files used by Apple’s transcoding process in Final Cut Pro and is faster than CineForm’s Neo Scene. Because of its faster speed, I recommend that video journalists use MPEG Streamclip when working on tight deadlines.
FIGURE 6.6 The file transcodes, nearly doubling the file size after the render is completed.

CINEFORM NEO SCENE WORKFLOW
The Cineform Neo Scene Workflow software is available for about $130 and will convert your files into a form that can be edited in just about any software you choose to use. The software can be installed on a PC or Mac. When transcoding, follow these steps:
1. Open Cineform Neo Scene and select a destination folder for converted videos (see Figure 6.7).
FIGURE 6.7 As soon as you open Cineform’s Neo Scene on a PC, it will ask for a destination folder. Select it and then choose the Convert tab.

2. Import your files and click on the Convert tab. You may use the Capture window which appears when you plug in a camera, but this is not recommended. Rather, copy your folder and/or files over to the computer and copy them again onto at least one other external drive as a backup (having two backups is even better).
3. Click on Select Files or Select Folder and browse to the folder containing the files and select them (see Figure 6.8). Click on Open to bring them into the SourceClips window (see Figure 6.9).
FIGURE 6.8 Select files or folders and import the files needing conversion.

FIGURE 6.9 Files are imported into the SourceClips window.

4. Click on the Prefs button for preferences. Choose the following (see Figure 6.10):
• Automatically convert to CineForm Intermediate.
• Split file on scene changes.
• CineForm Encoder Options: High.
• Output Frame Format: Maintain the source frame format (you could also choose Convert to 24P if you didn’t shoot 24P natively). Select Deinterlace if your footage was shot 1080i (it’s highly recommended that you use Magic Bullet Frames for deinterlacing, however).
• Target Directory: Choose the folder where you want your converted files to be placed.
FIGURE 6.10 Select the capture and encoder options, output frame format, and the destination folder of the converted clips.

5. Click OK.
6. Click the Start button. As the files are converted, they’ll appear in the Converted Clips window (see Figure 6.11). If you click the Log button, you can see the conversion status of each file (see Figure 6.12). In addition, the files are checked off in the SourceClips window as they are completed.
The converted files will appear in the destination folder you chose, and you can now import them into your computer’s editing software.
FIGURE 6.11 After you click the Start button, the files are automatically converted and appear in the Converted Clips window.

FIGURE 6.12 As the files are converted, the Log window (which opens when you click the Log button) shows the progress of each file being converted.

CANON EOS PLUG-IN FOR APPLE FINAL CUT PRO WORKFLOW
In spring 2010, Canon created a plug-in for Final Cut Pro (versions 6.03 to 7.0), allowing user selection of Canon E1 EOS Movie in its Log and Transfer menu. Essentially, the software allows for an automatic preference transcoding of a 422 chrominance and luminance color space (or 444 with Final Cut 7; see Appendix 4 for additional information on chrominance and luminance).
Steps for Getting and Installing the Canon EOS Plug-in for Final Cut Pro
To get and install the Canon EOS Plug-in for Final Cut Pro, follow these steps:
1. Confirm you have or update to Final Cut Pro v6.0.6, v7.0.1, or later.
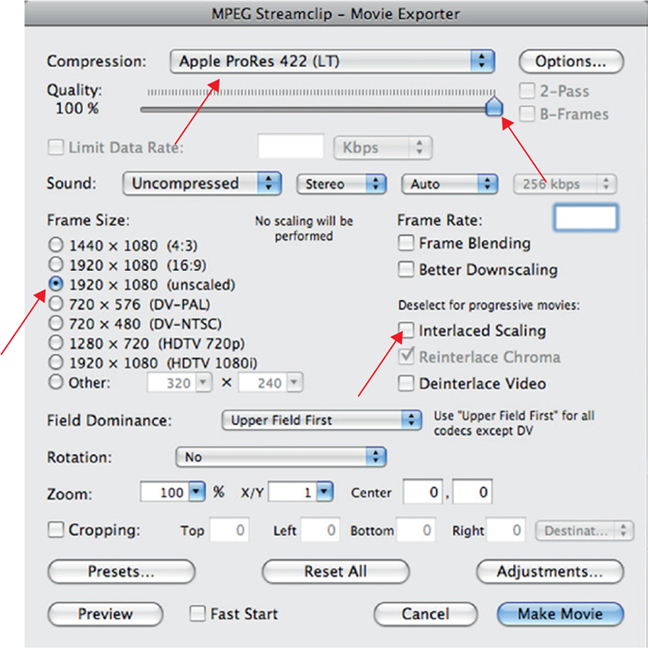
2. Go to http://www.usa.canon.com/cusa/consumer/products/cameras/slr_cameras/eos_5d_mark_ii.
3. Drivers & Software.
4. Choose Operating System = Mac OS X.
5. Click on “ce1100x.dmg.zip” EOS MOVIE Plugin-E1 for Final Cut Pro.
6. Select Mac OS X from the Drivers/Software Selection drop-down menu (see Figure 6.13).
FIGURE 6.13 Select the Mac OS X operating system; then download the EOS Movie plug-in.
7. Select CE1100X.dmg.zip beneath EOS MOVIE Plugin-E1 for Final Cut Pro. After it downloads and unzips, you will see the disk image, CE1100X.dmg.
8. Double-click CE1100X.dmg to mount the disk image.
9. A folder named CE1100X will open. Double-click on the installer.
10. Follow the prompts to install the plug-in.
If you’re using a Canon Rebel T2i (550), for some reason Canon did not include the plug-in for it. However, you can add it manually. After installing the plug-in, follow these steps:
1. Double-click the Macintosh hard drive.
2. Go to Library folder→Application Support→ProApps→MIO→RAD→Plugins→CanonE1.RADPlug→Contents→Resources→cameras.plist.
3. Open cameras.plist and add the following code in the text editor exactly as emphasized in bold on lines 20–23, below:
<?xml version=“1.0” encoding=“UTF-8”?>
<!DOCTYPE plist PUBLIC “-//Apple//DTD PLIST1.0//EN”“http://www.apple.com/DTDs/ PropertyList-1.0.dtd”>
<plist version=“1.0”>
<dict>
<key>1D</key>
<array>
<string>Canon EOS-1D Mark IV</string>
</array>
<key>5D</key>
<array>
<string>Canon EOS 5D Mark II</string>
</array>
<key>7D</key>
<array>
<string>Canon EOS 7D</string>
</array>
<key>T2i</key>
<array>
<string>Canon EOS REBEL T2i</string>
</array>
</dict>
</plist>
4. Save the document. The Rebel T2i should now be recognized in Final Cut Pro.
FINAL CUT PRO LOG AND TRANSFER WORKFLOW
To run Final Cut Pro Log and Transfer, do the following:
1. Connect the CF card to the computer and back up the files. Be sure to keep the folder structure intact, so copy the DCIM folder to the computer and back-up drive. The Final Cut Canon plug-in also allows you to back up the disk image (see Figure 6.14). Select the second menu listing and right-click on the CF name.
FIGURE 6.14 Final Cut Pro’s Canon plug-in allows you to back up the memory card as a disk image.

2. Open Final Cut Pro and go to File→Log and Transfer. The files should automatically open and show up in a list.
3. If the files do not show up, click on the folder image and scroll to the folder you want to import (see Figure 6.15). Final Cut will recognize the files and import them.
FIGURE 6.15 Click on the folder button to import your files in Final Cut.

4. Click on the Action button (the image of a gear, next to the menu list button to the right of the Finder window; see Figure 6.16). This will take you to the Import Preferences window.
FIGURE 6.16 Click on the Action button to take you to the Canon EOS plug-in.

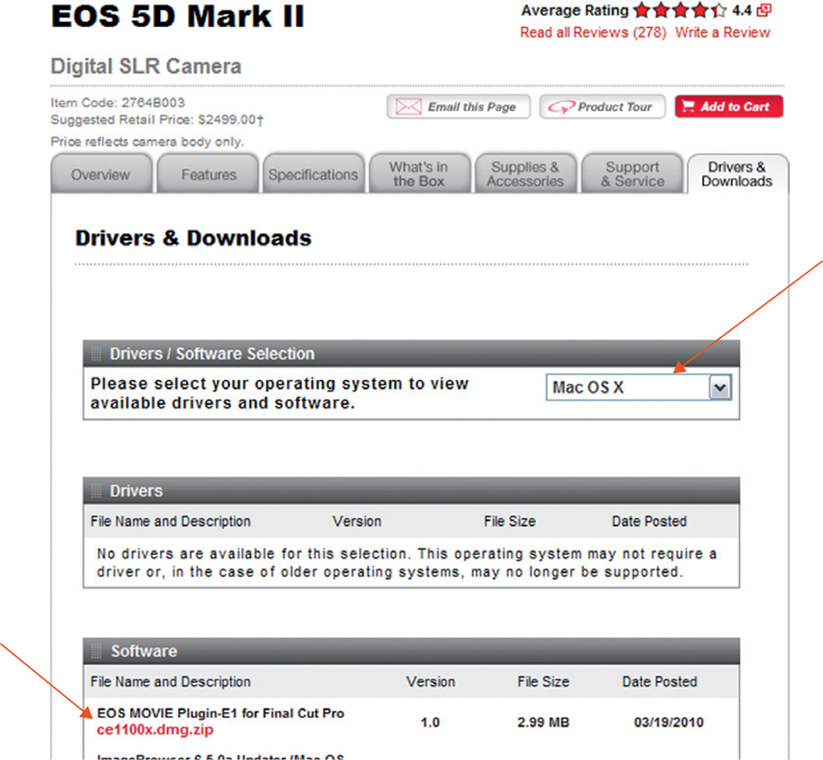
5. Scroll down to Canon E1 EOS Movie (see Figure 6.17). It defaults to Apple ProRes 422 (HQ), but if you right-click on it, you are provided with two other options. Click OK.
FIGURE 6.17 Import Preferences window revealing the Canon transcode plug-in with three transcoding options.
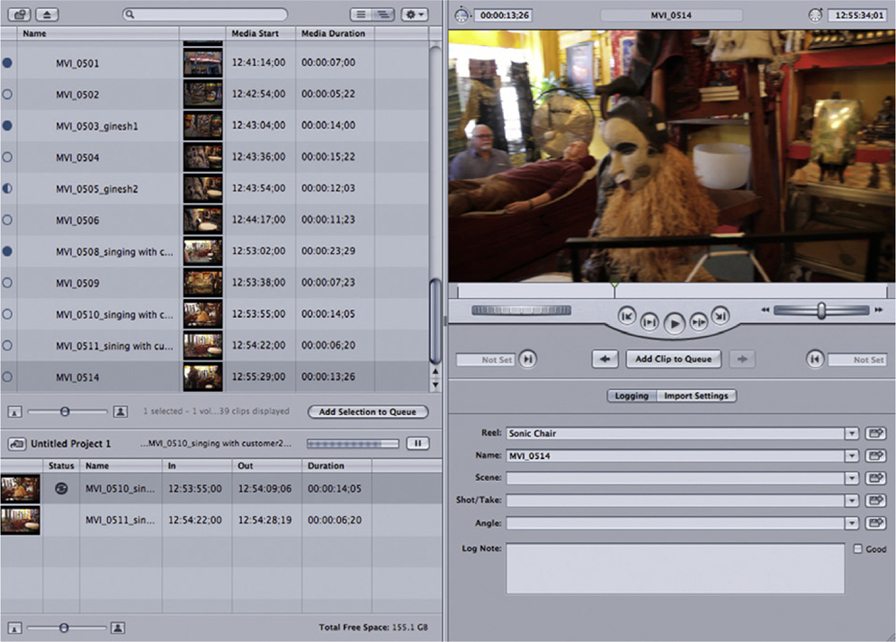
6. Back in the Log and Transfer window (see Figure 6.18), you can look at each clip by clicking on the thumbnail and reviewing it in the preview window. You can also choose (or mark) In and Out points (optional). You can also add comments in the Logging Area, so your clips can come in with the information you may need when editing.
FIGURE 6.18 Final Cut Pro’s Log and Transfer window. Double-click a file on the left, and it appears in the preview window, where you can mark In and Out points and write up comments and put a new name on each file.

7. You can then select Add Selection to Queue or drag and drop your clips to the Transfer Queue (the bottom-left window). Here, the clips will begin transcoding automatically (see Figure 6.19). After transcoding, the clips will appear in the browser window in Final Cut.
FIGURE 6.19 Once you choose Add Selection to Queue or drag and drop a file in the transcoding window on the bottom left, the files will begin converting automatically.
8. Close Log and Transfer and edit as normal. Your converted clips will appear in Final Cut’s browser window (see Figure 6.20).
FIGURE 6.20 The converted files will appear in Final Cut’s browser window, where you can edit them as you would any other clip.

If you used an external audio recorder, the next section covers how to sync up your audio files with the reference audio recorded on camera.
SYNCING AUDIO—PLURALEYES WORKFLOW
Up until the release of Singular Software’s PluralEyes, it was difficult to sync audio and video dialog. However, as of this writing (April 2010), the software can be used only in Final Cut Pro or Sony Vegas Pro. But in the fall of 2010, the company released DualEyes, which is a standalone application for syncing audio with DSLRs with the PC and Mac. To sync your audio, follow these steps:
1. Open Final Cut Pro.
2. Import your converted video files if you used MPEG Streamclip or Cineform’s Neo Scene (it should be there already if you used Final Cut’s Log and Transfer). Be sure to import the audio files recorded onto the external recorder (again, be sure to make a backup and place it into your Final Cut project folder; do not import directly from the recorder!).2
3. Go to File→New→Sequence to create a sequence in Final Cut and name it “pluraleyes” (see Figure 6.21).
FIGURE 6.21 Before using PluralEyes, be sure to create a new Sequence and name it “pluraleyes.”

4. Click on the new pluraleyes sequence tab and drag in your video (which includes the audio you recorded on-camera) to the timeline; place it anywhere on one track (see Figure 6.22). Then drag in the audio files you recorded on the external audio recorder below the on-camera audio; again, place them on one track.
FIGURE 6.22 Place the video files anywhere on one track. Drag the separately recorded audio onto a track below it.

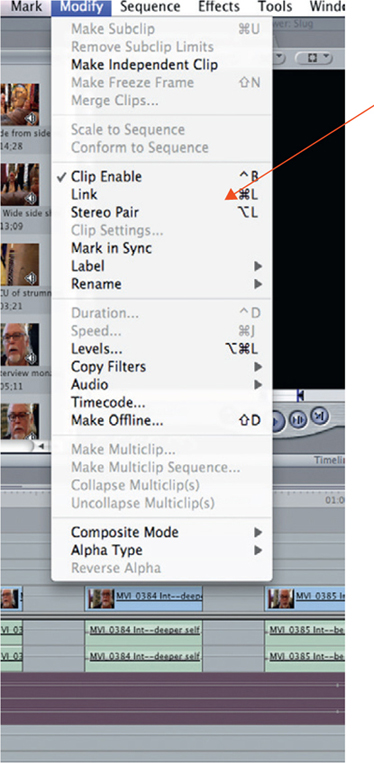
5. If you recorded only one channel of audio (used one XLR microphone in either the left or right input of the recorder), delink the stereo pair (if paired, you can tell when the two little triangles are facing each other). Select Modify→Stereo Pair (see Figure 6.23). Delete the empty track. Select the track with audio. Simultaneously press Option-Shift, left click mouse, and drag down the audio track to make a copy. Select both tracks. Then select Modify→Stereo Pair to relink. Both tracks are now paired stereo audio.
FIGURE 6.23 Select Stereo Pair from the Modify menu to delink and relink pairs of audio.
6. Open PluralEyes (external to Final Cut) and click the Sync button (see Figure 6.24).
FIGURE 6.24 Open PluralEyes and click the Sync button.
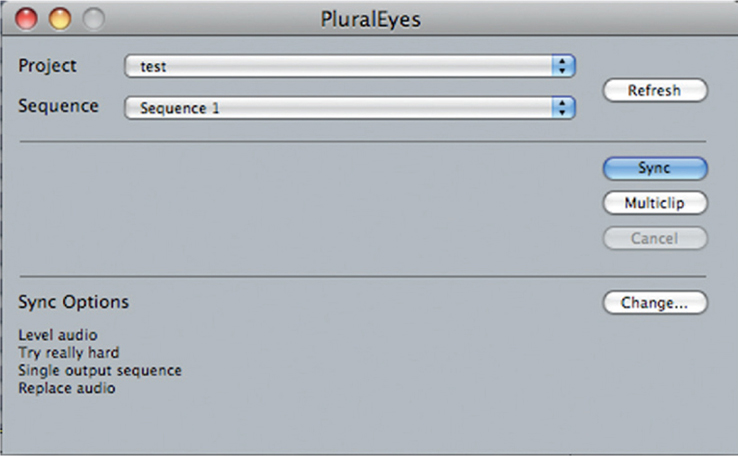
7. You can select options by clicking the Change button, allowing you to choose a single output sequence and a replace audio option, for example (see Figure 6.25). Then click OK.
FIGURE 6.25 Clicking the Change button will give you options to select so that you can fine-tune the syncing process.

8. Click the Sync button. The files are automatically processed, syncing up the different audio files (see Figure 6.26).
FIGURE 6.26 Files being processed in Final Cut through PluralEyes.

9. After files are processed, multiple sequences will be opened, one for each synced file (unless you chose Single output sequence in step 7). Click on the tab of one of the synced audio files on the Final Cut timeline, and you can see the external audio lined up with the video-camera audio (see Figure 6.27). Simply use the blade tool to remove the extra audio you don’t need. Delete the on-camera audio and move the new audio into its place. Link the audio and video by selecting the audio and video and then selecting Modify→Link.
FIGURE 6.27 Here, we can see the one video file with its audio lined up with the external recorder’s file below it. If you didn’t use the Replace audio option with the Change button (see step 7), then use the blade tool and slice away any extra audio you don’t need. Delete the on-camera audio and replace it with the new. Copy the video and the new audio and paste them together on the timeline of your main project sequence.

10. Sometimes PluralEyes will fail to sync specific audio. These files will appear in the pluraleyes unsynced sequence. Go to this sequence and run the program again. If it still fails to sync up, there may not be much more you can do other than manually syncing the unsynced files (see Figure 6.27).
11. Create your main project sequence in Final Cut’s browser window. Go to each PluralEyes synced tab (if you didn’t select Single output sequence in step 7) and copy each video with the new audio and paste it on the timeline in your main project sequence. (Otherwise, bring in the files from the single synced sequence tab.) Note: There’s also a Replaced audio tab for audio if you chose the Replace audio option in step 7. In either case, your original sequence is untouched, and you will want to replace the files with the new synced audio.
12. Edit the files as normal.
Once you go through this process a couple of times, it becomes rather simple and you’ll realize that the quality of the audio is so much better than on-camera audio that it’s worth the extra steps to deliver the best possible product.
A recommended alternative to using PluralEyes when using a dual-audio recording system setup is one developed by David Anselmi of Practical Mystic Productions (http://www.practicalmysticproductions.com/):
1. Separate the audio tracks of the two separate recordings.
2. Pan hard left on the first track and hard right on the other track.
3. Adjust relative volume so both tracks match.
4. Listen on headphones.
5. Nudge one of the audio tracks back and forth, until the flanging—the audio delay between the two—stops. You’ve just synced the audio!
COLOR GRADING WORKFLOW
After you’ve synced up your audio and edited the piece, your final step in the postproduction workflow is to color-grade your images. This can be done in any professional editing software, such as Sony Vegas or Final Cut Pro, and Apple’s Color is a professional color grading software with powerful tools. However, this book will not cover how to use them because doing so would go beyond the space requirements and scope of this book. Books have been published on how to use such software. But there is one tool that may be useful for DSLR shooters that I will cover, but not exhaustively. The next section provides the steps for doing basic color grading with automatic presets (that you can modify) in Magic Bullet Looks put out by Red Giant Software. This software is used by Philip Bloom in most of his works.
Filmmaker Khalid Mohtaseb used Magic Bullet Looks to grade his short, titled Haiti Earthquake Aftermath Montage (http://vimeo.com/9608637), shot on a Canon 5D Mark II. The two examples in Figures 6.28a and 6.28b show the power of this software in helping to create the film look. Mohtaseb actually uses Photoshop for his first step, “retouching a screenshot from the clip.” He uses that retouched still as a reference point. He then utilizes Final Cut Pro’s three-way color corrector “to shift the mids and shadows to a warmer color tone.” Lastly, he fires up Magic Bullet Looks “to fine-tune the exposure and colors. I rarely ever use the Looks presets as they are overused and [I] can get more precise results by building my own” (Mohtaseb, K. (2010, March 25). Into the Haiti Earthquake Zone—Khalid Mohtaseb Covers the Aftermath on 5DMKII. DSLR News Shooter. < http://www.dslrnewsshooter.com/2010/03/25/into-the-haiti-earthquake-zone-khalid-mohtaseb-covers-the-aftermath-on-5dmkii/>, accessed 19.04.2010). He shot in Standard picture style, with some of the shots’ contrast pulled all the way down.
Figures 6.28a and 6.28b Cinematographer Khalid Mohtaseb utilizes Magic Bullet Looks to color-grade his film projects. The before image (a) is on the left, while the postgrading process (b) is on the right.

( © 2010 Khalid Mohtaseb. Used with permission.)
Noise Reduction Software
A lot of video picks up noise—especially at high ISO settings. Noise reduction software is a useful tool that can help offset such noise. One such application can be found at http://www.neatvideo.com/. The plugin is available for After Effects, Premiere, Final Cut, VirtualDub, Sony Vegas, and Pinnacle Studio. A limited functionality demo is available free. The Pro version, which allows for HD 1920 × 1080 noise removal, costs just under $100. To see an example of the result of this software, read the case study for Casulo, a Brazilian short transferred to 35 mm film, in Chapter 8. For the same price, Red Giant Software sells Magic Bullet Denoiser at http://www.redgiantsoftware.com/store/all/magic-bullet-denoiser/.
MAGIC BULLET LOOKS FOR FINAL CUT PRO WORKFLOW
Follow these steps for doing basic color grading with Magic Bullet Looks:
Video tutorials of Magic Bullet can be found here: http://www.redgiantsoftware.com/videos/tutorials/#magic-bullet-looks
1. Once the software is installed, open your Final Cut project and select the clip to which you want to apply Magic Bullet Looks.
2. Go to Effects→Video Filters→Magic Bullet→Looks (see Figure 6.29).
FIGURE 6.29 The Magic Bullet Looks plug-in for Final Cut Pro.

3. Once the effect is applied, go to the clip’s Filters tab in the Viewer window of Final Cut (see Figure 6.30), and click the triangle to expand the window.
FIGURE 6.30 Filters tab of the Viewer window in Final Cut Pro. Click on the Looks triangle to expand the window and then click on Edit.

4. Click on the Edit box in the Look row. (If you’re using a trial version of Magic Bullet Looks, a Register button will appear above the Edit box; it’s a shortcut that will take you to Red Giant’s registration/purchasing page.)
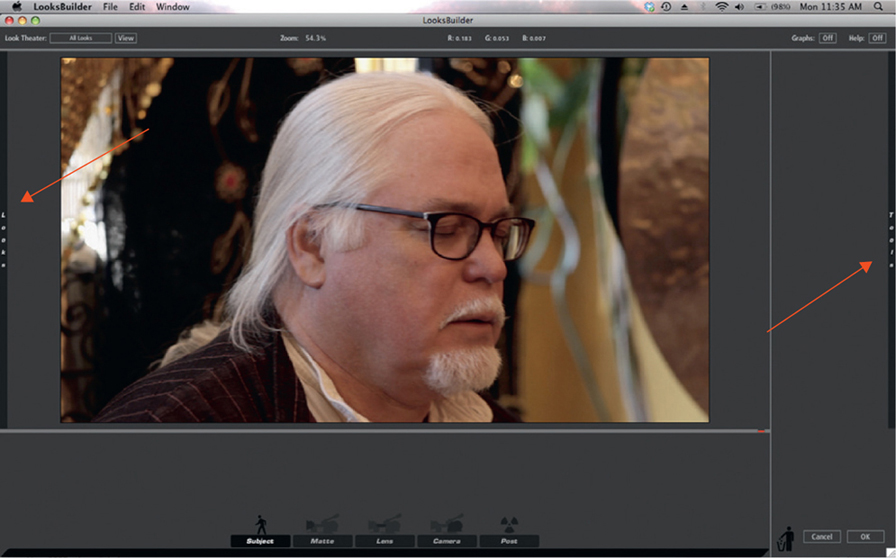
5. You will be taken to the LooksBuilder, or editor, of Magic Bullet Looks (see Figure 6.31). Your clip will appear as a large image in the center of the screen. Along the left and right edge are two vertical words: Looks (left) and Tools (right). These are the tools and plug-ins where the magic happens.
FIGURE 6.31 The Magic Bullet Looks editor, called the LooksBuilder.
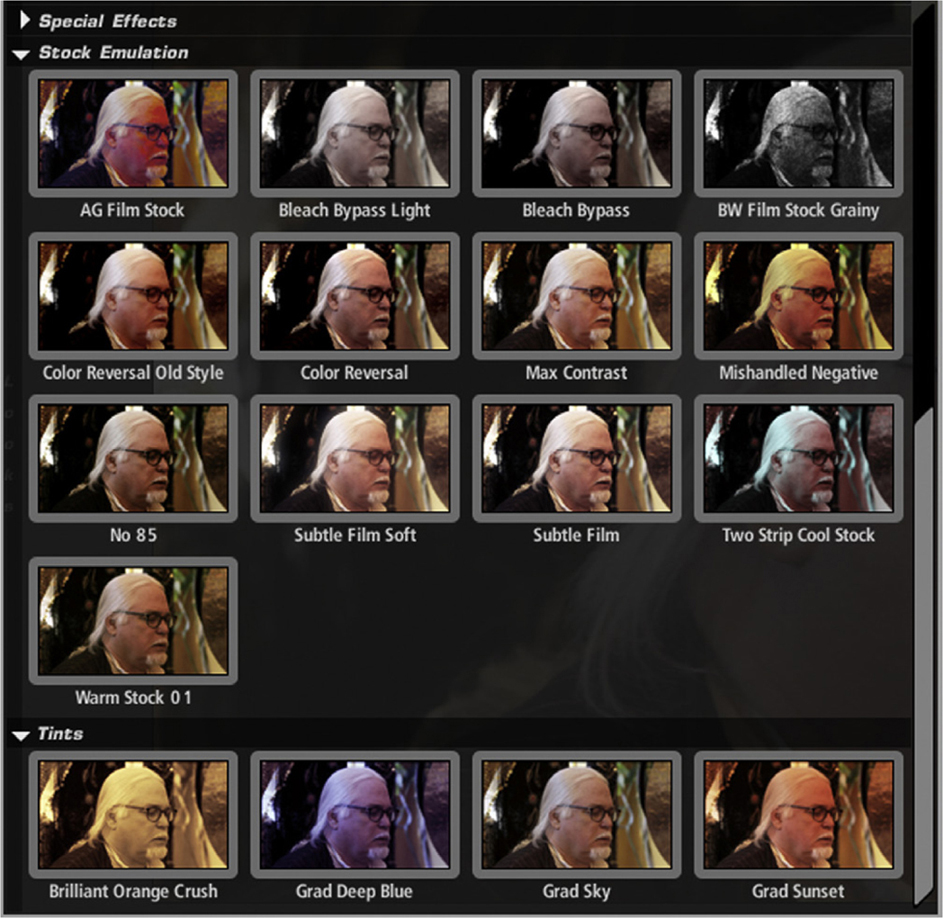
6. Click on the Looks tab in the far-left vertical. Here, you’ll see dozens of prebuilt effects plug-ins—everything from film stock emulation to crime show TV drama (see Figure 6.32). The software engineers have gone through the tools of Magic Bullet Looks and emulated a variety of looks found on television shows and in movies and music videos, among others. You can click on any one of the looks, and you’ll see an immediate preview in the center image of the main page. Take the time to experiment to get the one that’s closest to the emotional look you want to convey—the one that most closely fits your story.
FIGURE 6.32 Some of the Magic Bullet Looks preset effect plug-ins.
7. Once you’ve selected the effect plug-in you desire, notice the series of image tools along the bottom of the main screen (see Figure 6.33). The icons below reflect the “Coolish” effect in the Music Videos menu. (Although the project is not a music video, the look works for the piece.) Despite the names of plug-ins, you’re using them to get the look you want.
FIGURE 6.33 Once the effect plug-in is chosen, you can see a series of tools that were used to create that look. You can manipulate them further to fine-tune the look you want.

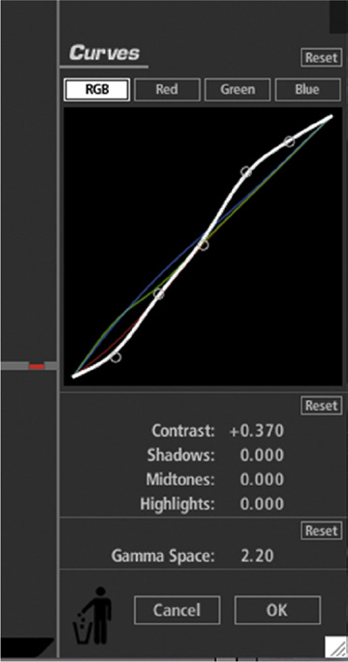
8. Click on any one of the tools along the bottom row, and you’ll see the parameters of the particular tool in the far-right column (see the bottom right of Figure 6.33). See Figure 6.34 for a close-up of the Curves tool. Different effects plug-ins will reveal different tools.
FIGURE 6.34 The Curves tool as used in creating the “Coolish” effect plug-in. The look can be manipulated further by adjusting the full RGB curve or individual RGB curves. You will be given instant feedback as you adjust them.
9. Examine the variety of tools and adjust the parameters as needed.
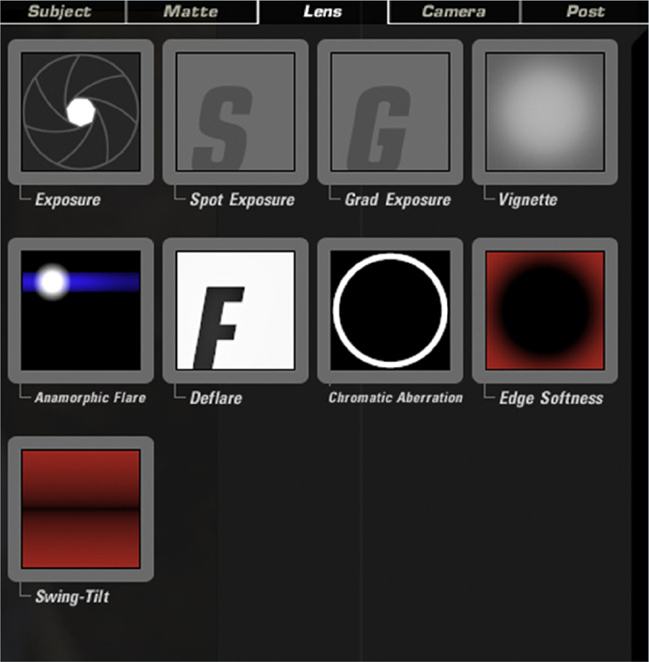
10. If you want to add additional tools to manipulate or simply not use any of the Looks preset plug-ins, click on the Tools tab along the far-right window, where you’ll see dozens of tools to shape the look you want from scratch. There are menus for manipulating the look of the Subject, Matte, Lens, Camera, and Post (see Figure 6.35).
The variety of tools allow you to manipulate the look of the scene—such as adding a filter that would normally be applied in-camera when shooting, but can be done in post with Magic Bullet. You can change the exposure or spot-meter a section and change the exposure of it. These powerful tools can help change the entire look of your film, but the goal is to adjust it so that it feels right for the story, not to have it stand out and look as though it was color-graded. (See Figures 6.35 and 6.36 for examples.)
FIGURE 6.35 Some of the tools used for subject manipulation—everything from changing the exposure of the image to adding a fill light.

FIGURE 6.36 The Lens tools allow you to adjust exposure, such as Vignette. The Spot Exposure is a good tool for adjusting foreground and background exposures.
11. When you have the look you want, you can save the look by going to File→Save Look As and then clicking OK in the bottom-right window (see Figure 6.37).
FIGURE 6.37 Back in the main screen, click on the OK button, bottom right, when you’re ready to apply the effect.

12. Once you click OK, you’ll be brought back to Final Cut, where you can see the effects filters in place (see Figure 6.38). Repeat these steps for each shot that you want to manipulate.
FIGURE 6.38 The Magic Bullet Looks Filters windows now shows some of the symbols for the tools used for the particular effects plug-in used. Click on the Edit button to go back and make further changes to your look.

Using Magic Bullet Looks is a great way to experiment and explore with the film look. In Part II of the book, there are examples of before and after shots of several films, showing how the color grading process worked for those projects. But to just show some of the potential power of this software, the examples shown here in Figures 6.39 through 6.42 reveal how you can change an image through Magic Bullet Looks’ color correction tool, adjust the settings of the f-stop along a graduated filter, and see what happens when you apply the Swing-Tilt (similar to the Tilt-Shift lens effect) to a shot in post.
FIGURE 6.39 The raw data from Final Cut before being adjusted in Magic Bullet Looks.

(Still from Jase Johnson’s Revival by Dennis Givens. Shot by Kurt Lancaster.)
FIGURE 6.40 The Magic Bullet Looks 3-Way Color Corrector allows you to adjust the colors of shadow areas, midtones, and highlights by using a slider along red, green, and blue. Comparing this image with the original, the reds have been lowered, making the image more cool.

(Still from Jase Johnson’s Revival by Dennis Givens. Shot by Kurt Lancaster.)
FIGURE 6.41 The Magic Bullet Looks Grad Exposure filter applied to the color-corrected shot with 2 stops of exposure drop-off on screen right, graduated to the left end of the dashed line hovering near the middle of the screen.

(Still from Jase Johnson’s Revival by Dennis Givens. Shot by Kurt Lancaster.)
FIGURE 6.42 The Magic Bullet Looks Swing-Tilt effect applied to the shot (before color correction). Notice the foreground blur along the edge of the guitar, while the performer’s face stays in focus. The horizontal solid line marks the depth of field, whereas the dashed vertical indicates the center point and angle of the tilt shift.

(Still from Jase Johnson’s Revival by Dennis Givens. Shot by Kurt Lancaster.)
In addition, Magic Bullet works well with neutral “flat” settings. The frame grabs in Figures 6.43 and 6.44 were shot with ExtraFlat on a Canon 5D Mark II and graded used Magic Bullet Looks.
FIGURE 6.43 Frame grab of a shot utilizing ExtraFlat picture style. Note the washed-out milky look; the colors do not pop, but when put into Magic Bullet Looks, the richness of the colors comes out (see Figure 6.44).

FIGURE 6.44 With Filmlike Color Curves, the flatness in Figure 6.43 is removed, and the image pops with color and contrast.

Here’s some final advice on color grading. No matter what effect you use—from something as simple as applying a little bit of tone brightening to a shot to shaping a complex graduated exposure—as you go through your scenes, shot by shot, be sure to remain consistent in matching shots in a sequence, as well as when making the transitions between sequences. You don’t want images to stand out because you improperly graded a shot or failed to match it with the previous shot. You may want to save presets in Magic Bullet, such as “Scene 1,” so you have the look down for that scene and can apply it to the other shots in that scene. If the tones need to change from shot to shot, be sure you color-grade by matching the skin tones of your performers from shot to shot. If the facial tones don’t match, then the audience will notice it. Use the eyedropper tool and save the profile and apply it to the other shots in the scene.
This chapter covered the basics of working with a postproduction workflow to decompress your DSLR footage into a form that can be easily edited, and with increased chrominance and luminance color space, it makes it better for color grading. The chapter showed the steps for converting these files with Squared 5’s MPEG Streamclip, Cineform’s Neo Scene, and Apple’s Final Cut Pro Log and Transfer process. In addition, it provided the steps to sync up externally recorded audio using PluralEyes. It then shifted into the process to convert the look of your project using Magic Bullet Looks—a powerful postproduction tool to finalize the look of your DSLR footage so you can fully apply the final touches in achieving a cinematic look.
NOTES
1 Don’t use a hard drive as a long-term archive solution. Use it as a backup throughout production and postproduction. If you know you no longer need the footage, then you’re good. However, if you’re working for a client or you work at a production company, keeping an archive is essential—and making hard drive backups is not recommended as the best solution for long-term archival purposes. Rather, going with an Enterprise Tape solution (LTO-4 800GB tapes) with an archival drive will cost about $7,000, which is a much wiser choice, and if you have a client needing archive material, that price is a lot cheaper than having to go back in the field and get new footage.
2 If you import files from the recorder, as soon as you disconnect it, your files will be missing. And if you formatted the memory card after disconnecting the recorder and you failed to make a backup, the files are gone. For good.