This chapter provides a list of recommended gear in three budget categories, including the pros and cons of different video DSLR cameras and accessories, such as audio adapters, microphones, tripods, digital audio recorders, and cinema packages. Most of this is my recommended list based on actual use in the field by myself and/or working professionals I’ve encountered while writing this book.1 It is not an exhaustive list of everything available—far from it. For example, I cover Canon cameras and the Panasonic GH1 because I’ve used them and the people profiled in this book used them in their projects. Other brands, including Nikon, were not included only because I have not used their DSLRs and I did not encounter anyone, when writing this book, using these cameras. The same is true with other equipment that you may actually be using. Also, if I included everything available to date, this information would require its own book!
In any case, before you start shooting, it’s recommended that you test equipment to make sure it’s what you want and it does what it needs to do to meet your needs.
At the end of the chapter, I put together recommended packages based on shooting needs and budget. We don’t recommend where you should purchase your equipment. The author consistently uses B&H Photo in New York City (bhphotovideo.com). Go to manufacturers’ websites for further information and dealers for each product.
CAMERAS
The following section describe low- to higher-budget cameras.
Cameras
Low-budget cameras: Canon Rebel T2i (550D) and Panasonic Lumix GH1 (~$900; ~$1200; with kit lenses)
Midrange budget cameras: Canon 7D ($1,600 body only)
Higher-budget cameras: Canon 5D Mark II: $2,500 (body only)
Low-Budget Camera: Canon Rebel T2i: $800 body; $900 with kit lens (18–55mm f/3.5–5.6)
Important features:
• APS-C sensor 22.3 mm × 14.9 mm (nearly the same size as 35 mm cinema film, 21mm × 14.9mm, minus the section for audio).
• Full HD video (1920 × 1080P) at 30P, 24P, 25P, as well as a 1280 × 720 size mode when shooting 60P and 50P—providing slow-motion capability after you bring it into your software and conform it to 24P. (The frame rates are NTSC, meaning 30P is actually 29.97, 24P is 23.976.)
• Microphone minijack. Essential for getting good audio.
• ISO settings range from 100 to 6,400, with the ability to go to 12,800. All ISOs are native.
• Filter thread size of kit lens: 58 mm. (Take note of the filter thread size so you can add protective glass and neutral density filters.)
FIGURE 13.1 The breakthrough budget camera offered by Canon in spring 2010. Although it has a plastic body, the chip size (APS-C 22.3 mm × 14.9 mm) is nearly the same size as a 35 mm cinema camera (minus the section for audio; 21 mm × 16 mm) and the same size as the chip found in the Canon 7D which costs nearly double. It’s also a lighter and smaller camera than the 7D. Jarred Abrams, the news director for Cinema5D.com/news/, recommends this camera for its lightness and image quality (nearly as good as the 7D).
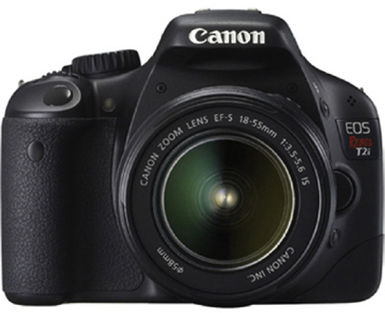
(Image courtesy of Canon USA, Inc.)
You are limited to 12-minute takes (as with all the Canon DSLR cameras).
The price with the kit lens includes a EF-SIS 18–55 mm (f/3.5–5.6). The S indicates a short mount designed for the APS-C chip sizes of the Rebel and 7D. IS indicates it contains image stabilization. If you cannot afford to buy additional lenses, this lens will do. It’s not as fast as a prime lens, and the glass is lower quality, so it’s recommended that you eventually get a faster zoom lens or a few primes.
In the field: Philip Bloom shot a poetic piece, Salton Sea Beach (available on Vimeo: http://vimeo.com/10314280), with this camera. Bloom used a Manfrotto tripod and the Kessler Crane Pocket Dolly Traveler to achieve the smooth dolly looks in the film. The tripod had the Manfrotto 701 HDV head. His lenses included the Canon 100 mm F2.8L, Canon 50 mm F1.2L, and a Canon Zoom 70–200 mm F2.8L IS. In addition, Bloom used a Tokina 11–16 mm F2.8 lens and variable ND filters. He also used the Zacuto Z-Finder eyepiece adapter.
As Bloom states in his blog:
Image-wise I have no idea if [the T2i] better or worse than the [Canon] 7D. I would literally have to shoot side by side and compare. Certainly from what I got I am very happy with the image out of the camera. I missed the extra dial, the dial in white balance, the mid ISOs and the top LCD panel. I really hate pressing a button and rotating a dial to get my iris to what I want it at. But these are niggly issues. Nothing major.
(http://philipbloom.co.uk/2010/03/20/saltonsea/, accessed 29.03.2010.).
FIGURE 13.2 Still from Salton Sea Beach shot by Philip Bloom on a Canon Rebel T2i.

For the value and some great glass (and when you’re saving money on the camera, it’s worth paying extra for good lenses), DSLR cinema shooters can make this camera shine. The images certainly look better than documentary images I shot on a Sony A1U HDV video camera—which cost three times more. Factor in the good lenses and the cost begins to even out. Yet, why pay $2,200 for an HDV video camera that doesn’t even come close to delivering images as good as an $800 stills camera that potentially shoots cinema-quality images?
FIGURE 13.3 Before Canon came out with the 7D and the firmware update for the 5D Mark II, the Panasonic GH1 captured the hearts of many potential filmmakers because of its 1920 × 1080i 24 frame rate—the frame rate that helps attain the cinematic look. For many DSLR shooters, this was the camera to get in mid-2009.

(Image courtesy of Panasonic Corporation of North America.)
Low-Budget Camera: Panasonic Lumix DMC-GH1: ~$1,200 (with 14–140 mm, f/4–5.8 Lens)
Although it is not strictly a DSLR, the advantages of this camera are its small, lightweight form, due to its micro 4/3 mount, and a live LCD viewfinder that replaces the SLR mirror found in DSLRs. In addition, the LCD pulls out and swivels like the LCD screens found in video cameras. Most of the other DSLR models have a fixed LCD screen, making it difficult to shoot from low and high angles without an external monitor. (Canon’s 60D includes a swivel LCD screen.)
However, due to its smaller chip size (17.3 × 13.0 mm) as opposed to Canon’s APS-C chip (22.3×14.9), this camera has been since subsumed by Canon’s Rebel T2i, which offers more features at a cheaper price. Panasonic’s ISO settings are also limited from 100 to 3,200, but see “Firmware Hack for the Panasonic Lumix GH1 Transforms It into a Cinema Camera” (described below) to really soup-up this camera, making it truly cinematic and putting it in competition with the Canons!
The camera comes with a 14–140 mm f/4–5.8 lens, which, due to the smaller chip size, is equivalent to a 28–280 mm zoom on a 35 mm camera. This is a micro 4/3 mount lens, and you’ll need an adapter to fit other manufacturers’ lenses.
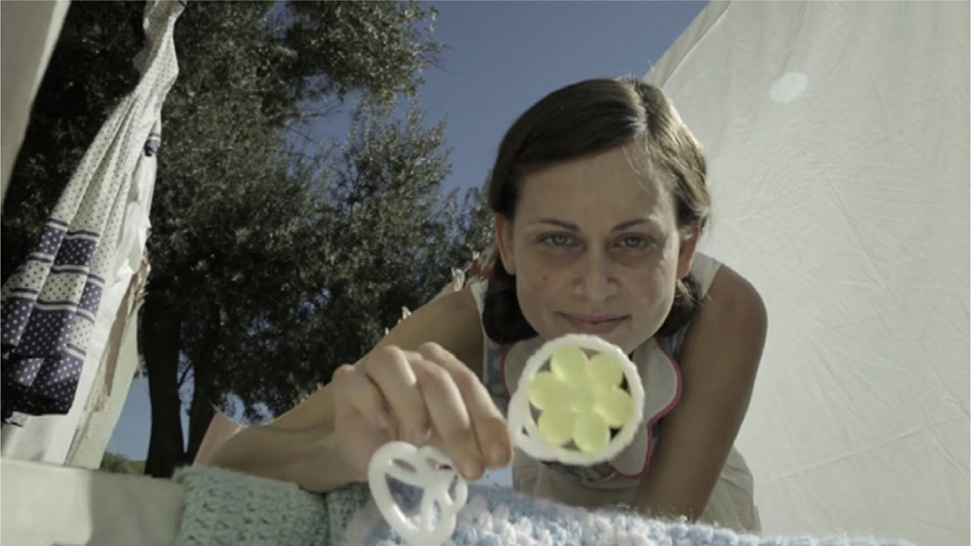
FIGURE 13.4 Ken Yiu utilizes the Panasonic GH1 with smooth clarity in Wedding Highlights (http://vimeo.com/6272661), along with the Merlin Steadicam.

(© 2009 Ken Yiu. Used with permission.)
The GH1 also has a microphone jack, which is smaller than a standard minijack plug, so you’ll need to purchase a male–female adapter to fit a standard minijack mic or an XLR adapter’s miniplug.
Important features:
• Sensor size: 17.3 mm × 13 mm.
• Full HD 1920 × 1080i at 24 fps. It can also shoot 1280 × 720 at 60 fps and 30 fps. Note that the image is interlaced, so you’ll need to deinterlace in post to maintain a film look.
• Microphone jack (sub minijack). Essential for getting good audio. Needs adapter to plug in a Rode VideoMic or XLR adapter.
• ISO settings range from 100 to 3,200.
• Filter thread size of kit lens: 62 mm. (Take note of the filter thread size so you can add protective glass and neutral density filters.)
• Tilt and swivel 3-inch LCD screen—One of the few HDSLRs utilizing this useful feature found in pretty much all video cameras.
In the field: Ken Yiu’s Wedding Highlights uses the GH1 with kit lens and the Merlin steadicam, providing smooth motion looks, and is color-graded using muted colors with Final Cut.
Firmware Hack for the Panasonic Lumix GH1 Transforms It into a Cinema Camera
A couple of hackers have developed a firmware update to overcome Panasonic’s limited 17 Mbps bit rate, one by which the bitrate is increased to a 50 Mbps motion JPEG at 30P, while the other utilizes the AVCHD codec but increases the bitrate to 32 Mbps at 24P. In either case, those testing the firmware hack (which will void your warranty) claim “zero compression artifacts, zero mud, and much more photo-like gradients, tones, and textures” (see http://philipbloom.net/2010/06/11/3rd-party-firm-ware-transforms-wimpy-gh1-into-optimus-prime/). Some claim that it’s superior to Canon’s 5D Mark II codec, but Bloom says he will still shoot on the 5D; however, it’s “making me use my GH1 again.”
A post on dvxuser.com by PappasArts claims a 70 Mbps throughput (see http://www.dvxuser.com/V6/showthread.php?t=213364).
For a beginner’s guide to using this hack, see http://wiki.eoshd.com/index.php/Beginners_GH1_Custom_Firmware_Guide.
Midrange Budget Camera: Canon 7D: ~$1,700 (body); ~$1,900 with Kits Lens (28–135 mm f/3.5–5.6)
The Canon 7D has become the cinema camera to get for many independent filmmakers. It’s not only cheaper than the 5D Mark II, but you don’t have to fight focus so much with the APS-C-sized sensor. Furthermore, Hot Rod Cameras will modify your 7D so it can accept cinema lenses (PL mount). (They’ll also modify the Panasonic Lumix GH1 and Canon 5D Mark II.) (See http://www.hotrodcameras.com/products/lens-mount-kits/pl-mount-and-mods/.) Includes a microphone jack, but the audio is limited to automatic gain control, as of this writing; However, by the time this book is published, new firmware may be available to provide manual control of audio, as in the 5D Mark II. This camera also allows for full HD output to a field monitor (the 5D is limited to standard video output in live shooting mode). The ISO ranges from 100 to 6,400 (with an expansion to 12,800). Unlike the Canon Rebel T2i, the 7D contains an LCD screen on the top of the camera that allows you to quickly view a variety of settings, such as f-stop, ISO, and white balance. This feature is handy when you’re not in live shooting mode. It also uses the more expensive Compact Flash card—but is more durable and less easy to lose than the SDHC cards found in the T2i.
FIGURE 13.5 Containing the APS-C chip 22.3 mm × 14.9 mm, this model became the breakthrough camera in late 2009 into 2010.
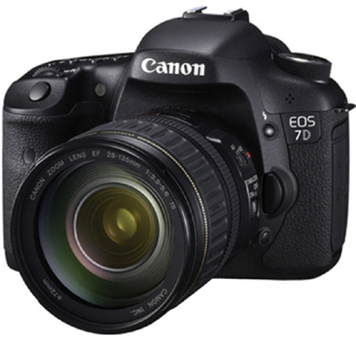
(Image courtesy of Canon USA, Inc.)
Important features:
• APS-C sensor 22.3 mm × 14.9 mm (nearly the same size as 35 mm cinema film).
• Video resolution: Full HD 1920 × 1080 at 24P, 25P, and 30P, as well as 1280 × 720 at 50P and 60P.
• Microphone minijack.
• ISO settings range from 100 to 6,400, with the ability to expand to 12,800. Native ISOs: 160, 320, 640, 1,250, and 2,500 (the other ISOs will be noisier).
• Filter thread size of kit lens: 72 mm. (Take note of the filter thread size so you can add protective glass and neutral density filters.)
In the field: The Canon 7D is a workhorse professional camera provided at a great value. The chip is about the same size as in a 35 mm cinema camera (minus the section of the film used for audio), and much larger than any video camera in its price range, providing stronger image quality than cameras five times its cost. The Canon 7D became the first camera to be used in filming an independent feature that won a best film award: Tiny Furniture by Lena Dunham (2010 South by Southwest Film Festival). A preview of this film (found on Vimeo: http://vimeo.com/9749563) reveals strong cinematography and images that I’ve not seen in indies shot with unmodified prosumer HD video cameras. It was also used by Shane Hurlbut, ASC, for The Last 3 Minutes (profiled in Chapter 12; see Figure 13.6), as well as Jeremy Ian Thomas in The Chrysalis (profiled in Chapter 11; see Figure 13.7).
FIGURE 13.6 Still from The Last 3 Minutes directed by Po Chan, cinematography by Shane Hurlbut, ASC. This scene was shot with the Canon 7D to take advantage of a needed slow-motion shot.
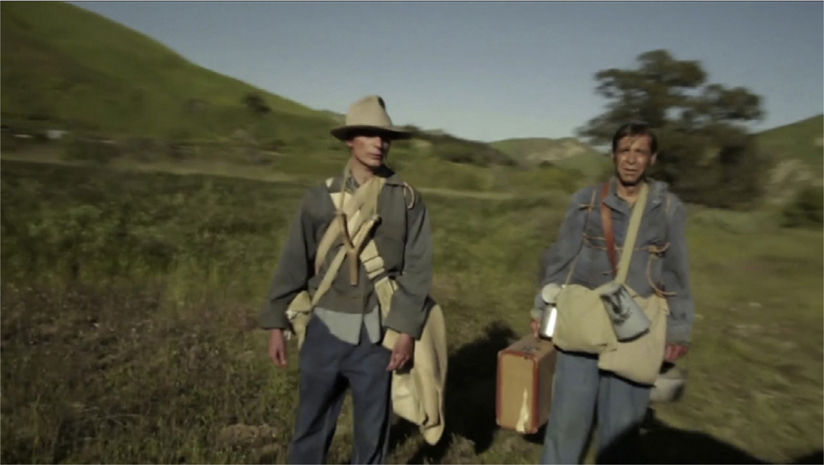
(© 2010 Hurlbut Visuals. Used with permission.)
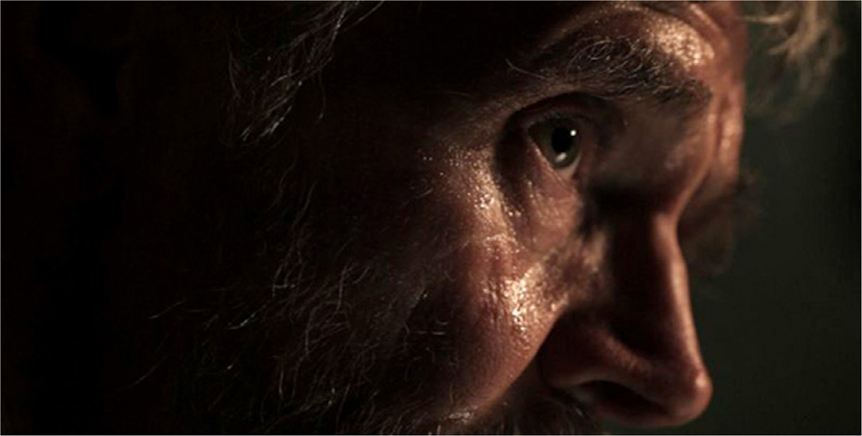
FIGURE 13.7 Shot from The Chrysalis directed by Jeremy Ian Thomas with Dave Christenson as DP. Notice the tonal range of contrast of the salt flats against actor Mike Wade.
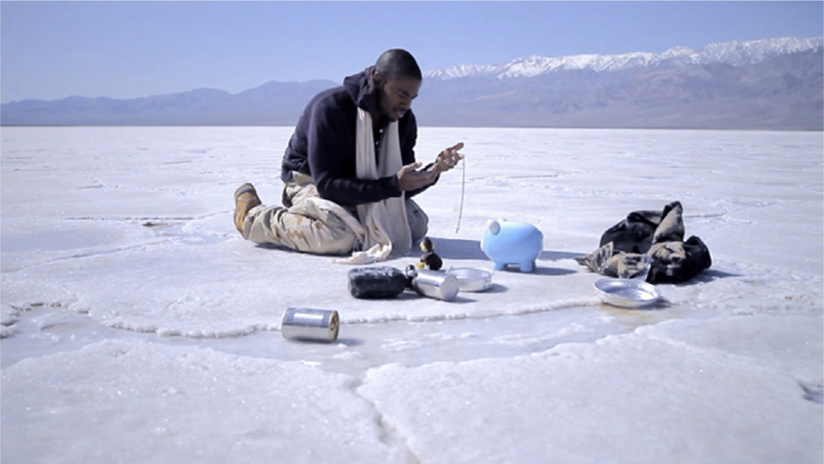
(© 2010 by Hdi RAWworks. Used with permission.)
Higher-Budget Cameras: Canon 5D Mark II: $2,500 (Body); $3,300 with Zoom L-Series Lens (24–105 mm, f/4).
Important features:
• Full-frame sensor 36 mm × 24 mm [nearly the same size as VistaVision cinema film (36 mm × 25.17 mm), which is essentially the same size as film in a 35 mm stills camera].
• Video resolution: Full HD 1920 × 1080 at 24P and 30P.
• Microphone minijack.
• Manual control of audio levels.
• ISO settings range from 50 to 25,600. Native ISOs: 160, 320, 640, 1,250, and 2,500 (the other ISOs will be noisier)
• Filter thread size of kit lens: 72 mm. (Take note of the filter thread size so you can add protective glass and neutral density filters.)
FIGURE 13.8 The Canon 5D Mark II was the second HDSLR video camera to hit the market, and for many, it’s still considered the best due to its 36 mm × 24 mm full-frame sensor with full HD 1920 × 1080P resolution. Jared Abrams of Cinema5D says it is the standard by which all the DSLRs will be measured. “It’s the camera that will carry the HDSLR cinema movement,” he says. It has strong light sensitivity and low video noise compared to many of the full HDSLRs (ISO 50–25,600). (The Nikon D3s with its full-frame sensor has ISO settings spreading to 102,400, but lacks full-size HD, instead using only 1280 × 720P.)

(Image courtesy of Canon USA, Inc.)
In the field: The Canon 5D Mark II not only takes great photos, but is a great cinema camera—with the proper settings and lighting (which is true of any camera). Shane Hurlbut, ASC, calls this DSLR the “King of the Hill.” He feels that this camera is superior to the 7D not only because of its full-frame sensor allowing for great low-light sensitivity, but for its ability to gradually drop off shadows on a person’s face, for example. Its lightness and portability allow for shots not seen before in cinema, Hurlbut claims. Eli Jane, an actress in the short, The Last 3 Minutes, describes how she felt less intimidated with the smaller form factor of the DSLR, even during auditions.
FIGURE 13.9 Still from The Last 3 Minutes directed by Po Chan and cinematography by Shane Hurlbut, ASC. The tonal range from Rachel Kolar’s skin tones to the blue sky performed well with the 5D Mark II’s sensor.
(© 2010 Hurlbut Visuals. Used with permission.)
VIEWFINDERS
One of the worst features of the DSLR is the inability to see the LCD screen in daylight. Unlike regular video cameras, DSLRs do not utilize the viewfinder in the live view mode.
Viewfinders
Low- to mid-budget viewfinder: iDC Viewfinder: ~$200
High-range viewfinder: Zacuto’s Z-Finder Pro: ~$375
Low-Budget Viewfinder: iDC Viewfinder: ~$200
This piece of gear from iDC Photo Video is the best value of the existing viewfinders because it includes a diopter (allowing you to adjust its focus for your eye) and the mounting base plate.
Higher-Range Budget Viewfinder: Zacuto Z-Finder Pro: ~$375
In the field: The eye cup actually helps you to keep the camera steady with handheld shots because it acts as an extra point of contact against your body. Absolutely necessary for daylight shots (see Figure 13.12). Great for magnifying to get critical focus and a great tool when light is too bright to see the screen. Without it, you may need to throw a jacket over your head to see (see Figure 13.13).
FIGURE 13.10 Bruce Dorn, one of Canon’s Explorers of Light educators, designed a viewfinder with a diopter for those on a tight budget. The device attaches to the camera’s LCD screen and is braced by a baseplate adapter; it’s one of the most affordable viewfinders on the market (and it includes a diopter for focusing the eyepiece). An optional hood cup with 33 magnifier costs an additional ~$40—which I highly recommend, because it will cushion your eye (important when you’re using this point of contact as a brace). (see http://www.idcphotography.com/kart/index.php?p=product&id=118&parent=30). The viewfinder comes with a plate adapter where you can mount a standard video quick release plate. Be aware that you must purchase the proper viewfinder for your camera (the 5D Mark II has a different setup than the 7D, for example). The available models are for the Canon 5D Mark II, 7D, Rebel T2i, and Nikon D300s.

(http://www.idcphotography.com.)
FIGURE 13.11 A bit expensive, the Zakuta Z-Finder Pro is the flagship of the DSLR viewfinder adapters. This model includes a diopter to focus it with your eye. The baseplate screws into the camera and can be attached to a tripod. It includes nonfogging glass, probably the biggest advantage of the Z-Finder’s higher price—as well as its lifetime warranty. Philip Bloom, who is an affiliate of Zacuto, recommends the purchase of a Zacuto Z-Finder even before buying good glass because it’s an essential piece of gear for shooting outdoors. (He was a firm believer of the Z-Finder before becoming an affiliate.) The Zacuto Z-Finder is designed to magnify the LCD monitor of a DSLR, such as a Canon 5D and 7D, by 2.5× to 33×, allowing for increased ability not only to see a larger image—essential for achieving critical focus—but also to use an eye cup so you can see in daylight. (The 33 will show more details of the LCD pixels.)

(http://store.zacuto.com/Z-Finder.html.)
FIGURE 13.12 Shane Hurlbut, ASC (l), directs elite team member Rudy Harbon (c) for a handheld shot with Zacuto’s Z-Finder on location in The Last 3 Minutes, while actor David Scales observes (r).

(Photo by Kurt Lancaster.)
FIGURE 13.13 Cinematographer Guga Millet and director Bernardo Uzedo look at the LCD screen of the Canon 5D Mark II, using a jacket to block light so they can see. Viewfinders help shooters get the look they need without having to go dark.

(Photo courtesy of Bernardo Uzedo. Used with permission.)
LENSES
The following sections describe low- to higher-end lenses.
Lenses
Low-budget lenses: Kit lens
Midrange lenses: Used Prime Contax Zeiss lenses or used Leica R lenses
Higher-end lenses: Zeiss Primes and Canon L series
Low-Budget Lens
If you’re on a tight budget and can’t afford any lenses right away, be sure to purchase the camera with a kit lens. The low-end Canon kit lenses (Rebel T2i, for example) are made of plastic and feel as if they’ll break if you drop them. They will do an adequate job until you save up enough money and upgrade to better glass, and they’re probably equivalent to the kind of glass you’ll find in the prosumer video camera market. (The Canon 5D Mark II kit lens is an exception with a professional L series lens, 24–105 mm, f/4.) In addition, these are not fast lenses, so you’ll need to be working with brighter light and higher ISO settings to make them shine. You also won’t get the full benefit of a shallow depth of field provided by fast lenses (probably a minimum of f/4 is necessary; faster is always better when playing with shallow depth of field). It’s highly recommended that you upgrade lenses as soon as possible, especially if you want to take advantage of the cinematic quality of shallow depth of field. One of the reasons to shoot with HDSLRs is to take advantage of good glass, so even investing about a $1,000 on a set of three used Zeiss primes is preferable to using most of the kit lenses on the market.
Midrange Lenses: Used Prime Contax Zeiss Lenses or Used Leica R Lenses
If you have an extra $1,000 or so, an affordable way to get nice prime lenses is through the used market. The website www.KEHcamera.com is one such place that offers used Zeiss primes (made for the phased-out Contax stills camera) and even Leica R lenses at budget prices. You will need to purchase the proper adapter for your camera.
For around $1,000,2 you can equip the Rebel T2i and the Panasonic GH1, or most other DSLRs (with the proper mount adapter) with three used Zeiss lenses. This is about the same cost as a Canon L series lens. If you’re working on an HDSLR project, you cannot go wrong with Zeiss primes.
• Zeiss Contax/Yashica—~$27–;80 (for Canon: see diox.com; the consumer model is ~$27, while the pro versio runs close to $80)—but don’t get the consumer model with the 5D; it does not fit properly and will jam the lens. Get the pro version for the Canon 5D Mark II.
Some of the Zeiss Contax lenses listed on the www.KEHcamera.com page are listed here. The market changes, so some lenses may be available one week but not available the following week. Also, prices reflect the quality of the used lenses, ranging from “like new” to bargain.
• Zeiss Contax Distagon f/2.8 28 mm can be purchased used for around $300.
• Zeiss Contax Planar f/1.4 50 mm normally costs around $725, but a used one can be purchased for around $300.
• Zeiss Contax f/2.8 100 mm ~$500 (not pictured)
• Zeiss Contax Sonnar f/2.8 135 mm ~$250
• Zeiss Contax f/4 Tele Tessar 200 mm ~$235 (not pictured)
FIGURE 13.14 Zeiss Contax/Yashica adapter for Canon cameras, allowing you to hook up Zeiss lenses to the Rebel T2i, Canon 5D Mark II, and 7D (available at www.amazon.com and www.fotodiox.com).

(Image © Carl Zeiss.)
FIGURE 13.15 Zeiss Contax Distagon 28 mm f/2.8 lens.
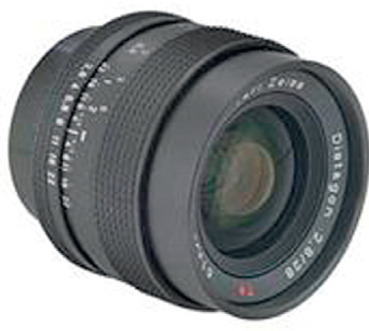
(Image © Carl Zeiss.)
FIGURE 13.16 Zeiss Contax Planar 50 mm f/1.4 lens.

(Image © Carl Zeiss.)
FIGURE 13.17 Zeiss Contax Sonnar 135 mm f/2.8 lens.

(Image © Carl Zeiss.)
These lenses lack autofocus and iris—you’ll set your f-stop on the barrel of the lens (as you would do with a professional cinema lens). But Zeiss does make glass for Canons, such as a Planar series EOS lenses, which has automatic focus and in-camera f-stops. Although not profiled here, look up Lecia R series lenses on KEHphoto.com for current used prices.
Higher-Budget Lenses: Canon L Series
Canon L series lenses are the cream of the crop for Canon cameras. These lenses are designed for professional use and help bring across some of the bestlooking images in the business (for noncinema lenses).
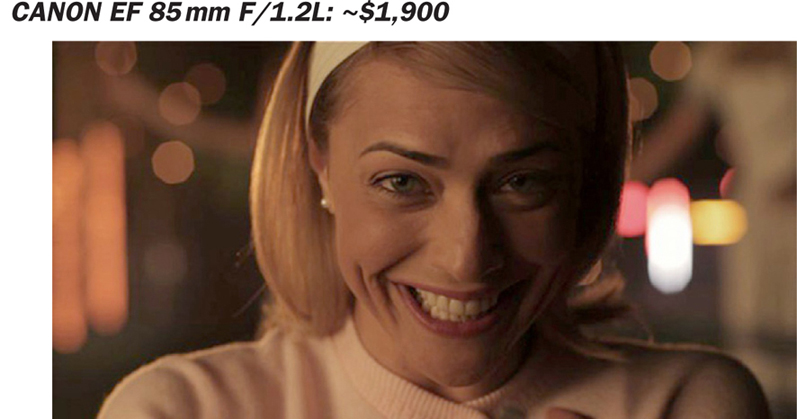
In the field: Shane Hurlbut, ASC, used the L series 24 mm, 35 mm, 50 mm, 85 mm, and 100 mm in The Last 3 Minutes (profiled in Chapter 12). As he recently noted, Hurlbut was not a “big fan of this glass because of the resolving power of their wide-angle lenses and the endless focus ring. It took me down day one of the untitled Navy SEAL [Act of Valor] movie because I made the wrong lens choices and I have never looked back.” However, with the adoption of a remote control follow focus, he worked around the focus ring issue. In The Last 3 Minutes, Hurlbut was glad he went with the Canon lenses: “I was blown away with the contrast, color and resolving power of the 50 mm, 85 mm and the 100 mm Canon macro lenses. They became my go-to lenses on the short and gave me more latitude in the under-exposed areas, much more than the Zeiss. The image was creamy but sharp. When have you ever heard these words associated with one another?” (Hurlbut Visuals, “Inside Track Newsletter,” March 31, 2010). He notes that the normal EF lenses (the non-L series) do not hold up on the big screen (http://hurlbutvisuals.com/blog/category/lenses/).
FIGURE 13.18 F-stop range goes from 1.4 to 22, with an 84-degree angle of view. Minimum focal distance is 9.8 inches. Filter size: 77 mm.

FIGURE 13.19 Still from The Last 3 Minutes. Canon 24 mm L with f-stop at 1.4.

(© 2010 Hurlbut Visuals. Used with permission.)
FIGURE 13.20 F-stop range goes from 1.4 to 22, with a 63-degree angle of view. Minimum focal distance is one foot. Filter size: 72 mm.

(Image courtesy of Canon USA, Inc.)
FIGURE 13.21 Still from The Last 3 Minutes. Canon 35 mm L with f-stop at 5.0; color temp: 5200 degrees K; ISO 160.

(© 2010 Hurlbut Visuals. Used with permission.)
FIGURE 13.22 F-stop range goes from 1.2 to 16, with a 46-degree angle of view. Minimum focal distance is 1.5 feet. Filter size: 72 mm.

(Image courtesy of Canon USA, Inc.)
FIGURE 13.23 Still from The Last 3 Minutes. Canon 35 mm L with f-stop at 4.0; color temp: 2800 degrees K; ISO 640.
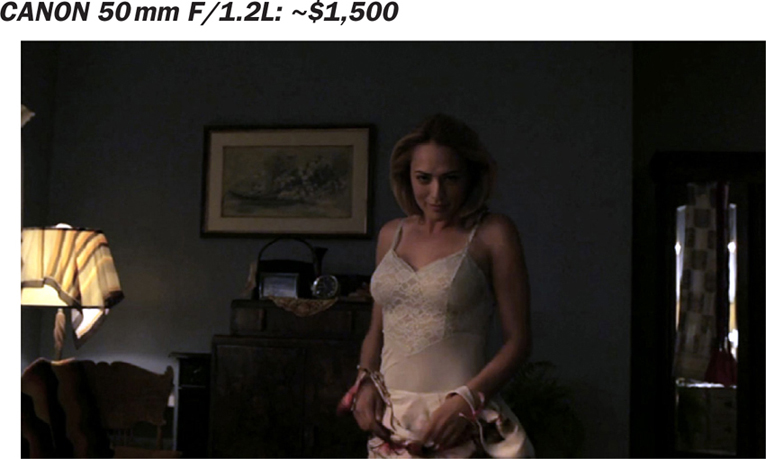
(© 2010 Hurlbut Visuals. Used with permission.)
FIGURE 13.24 F-stop range goes from 1.2 to 16, with a 28-degree angle of view. Minimum focal distance is 3.2 feet. Filter size: 72 mm.

(Image courtesy of Canon USA, Inc.)
FIGURE 13.25 Still from The Last 3 Minutes. Canon 85 mm L with f-stop at 3.5; color temp: 2800 degrees K; ISO 320.
(© 2010 Hurlbut Visuals. Used with permission.)
FIGURE 13.26 F-stop range goes from 2.8 to 32, with a 23.4-degree angle. Minimum focal distance is one foot. Filter size: 67 mm.

(Image courtesy of Canon USA, Inc.)
FIGURE 13.27 Still from The Last 3 Minutes. Canon 100 mm L with f-stop at 3.5; color temp: 3400 degrees K; ISO 640.
(© 2010 Hurlbut Visuals. Used with permission.)
FIGURE 13.28 The best of the best for Canon zoom lenses, the 70–200 mm f/2.8 with image stabilization renders beautiful images and is fast, which is great for interior documentary work. Can be used instead of a set of primes in this zoom range. But it is a heavy lens and difficult for handheld work—unless it’s for short periods of time. You may want a tripod handy when using this lens.

(Image courtesy of Canon USA, Inc.)
FIGURE 13.29 iDC Photography makes a “run-and-gun” adapter for long lenses, where you can configure a follow focus, and if desired, a follow zoom. (~$760 with both wheels and LCD viewfinder adapter; ~$630 with both wheels without the viewfinder.) (See www.idcphotography.com)
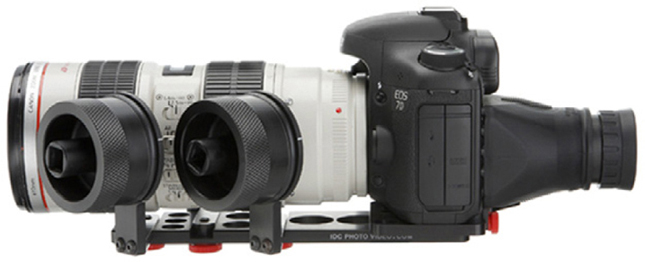
(Image © iDC Photography)
FIGURE 13.30 Lensbaby (www.lensbaby.com). The Lensbaby lens allows you to adjust the focus of the lens by using an inexpensive tilt-shift technology. As of this writing, there are three different models of the Lensbaby: Muse, Composer, and Control Freak (pictured here), with prices ranging from $100 (plastic lens) to those made with glass (up to ~$350). They can fit on Canon, Nikon, Pentax, Sony, and 4/3 DSLR mount cameras.

FIGURE 13.31 Masbro’s Rome video utilizes the Lensbaby on a Canon 5D Mark II. It provides a similar effect as the more expensive tilt-shift lens (which can be seen in Vincent Laforet’s Reverie profiled in earlier chapters of this book).

(© 2009. Used with permission.)
In the field: “Masbro” shot a Rome music video with the Lensbaby on a Canon 5D Mark II, providing artistically blurred images along the edge of each shot (see Figure 13.31).
NEUTRAL DENSITY FILTERS
DSLR cameras do not have built-in neutral density (ND) filter settings as found in regular video cameras, so getting a set of ND filters is important, especially if you want to maintain your ISO settings and aperture for depth of field to get the best look for your project. If you’re on a budget, the Tiffen 58 mm (for the Canon T2i) is a decent choice. Buy all three: 0.3, 0.6, and 0.9. They will provide one stop, two stops, and three stops, respectively, on your DSLR. They run about $43 each. They are not the best choices but will get the job done. Tiffen makes higher-quality (high transmission series) filters, which run higher. It’s not recommended to put low-end filters on high-end glass. Pay the extra money for the high transmission series.
In addition, getting a protective glass filter, covering UV protection, is essential to protect your lenses (such as Schneider or B + W brands). Furthermore, some ND filters counteract infrared, which is useful because the infrared spectrum can impact the autofocus feature and bias the camera toward red.
Low-Budget ND Filters: Tiffen 77 mm ND 0.3, 0.6, and 0.9 glass filter: ~$43 each
If you’re on a budget, these filters will do the trick. The price will be different, depending on the size you need. Be sure to match the filter ring size for the lens you’re using.
Midrange ND Filters: Tiffen HT (High Transmission Series): ~$130–140 each
Although more expensive, the high transmission series allows for a more professional look to the project.
Higher-End ND Filters: Tiffen Water White Glass: ~$190 each (3×4 inch)
The highest-quality filters recommended by Shane Hurlbut, ASC, but the most expensive. These filters are designed to be used with matte boxes only, and you will need to gauge the proper size based on the matte box you’re using.
Variable ND Filters
Variable ND filters are a great money-savers and you won’t have to switch out ND filters while shooting. Also, you’ll save money because you won’t have to invest in a matte box and rails for it. If you have a variety of lenses with differentsized filter threads, you’ll need to buy more than one.
LIGHT CRAFT WORKSHOP 77 MM VARI-ND FILTER: ~$125 (NOT PICTURED)
Light Craft Workshop’s 77 mm variable neutral density filter provides 2 to 8 stops of light blocking. I use this filter and have no complaints about it. (See http://www.lightcraftworkshop.com/site/page1000.html.)
SINGH-RAY 77 MM VARI-ND FILTER ~$400
FIGURE 13.32 Philip Bloom swears by the Singh-Ray variable neutral density filter, which allows for up to 8 stops of light blockage. An affordable option when considering only using one filter. Test for vignetting. (http://www.singh-ray.com/varind.html)

(Image courtesy of Singh-Ray Filters.)
LIGHTS
Available lights are described in the following section.
Lights
Low- to midrange budget light: Dot Line DL-DV60 LED Light: ~$100
Higher-range budget light:
• LitePanels LED light: ~$275
• LitePanels kit: LitePanels LED light field kit: ~$1,100
Low- to Midrange Budget Light: Dot Line DL-DV60 LED Light: ~$100
In the field: The Dot Line DL-DV60 daylight balanced 5600°K LED is best if used from a side angle, rather than having it sit directly on the camera, which will flatten the look of your subject. Sculpt with light and shade. Use available practical lights and pull this out when you need to shape the scene a bit more; also useful to punch in a little eye light in the subject. Battery operated, but you may want to purchase a spare battery, especially if you’re in the field for more than a couple of hours. There is no way to adjust the brightness of the light, so you may want to tape on diffusion (such as the Rosco #116 filter: ~$6.50; in the recommended accessories on the B&H page for the Dot Line light). The film-like filter will also soften the light, which is great when using it as a fill and you don’t want to use harsh lighting. Layer on more than one sheet to dim the light and defuse it more. You can also purchase an optional barn door to help shape light placement (I’ve also used black tinfoil, available at B&H Photo).
FIGURE 13.33 Sixty LEDs brighten up a scene that may be a bit too dark.

If you want a three-point lighting kit, buy three of these lights, three smaller tripods (such as the Smith-Victor RS75 for about $37 each), and a bag for the tripods, batteries, and lights. This will make a nice portable field kit for around $450.
Higher-Range Budget Light: LitePanels Micro LED Light: ~$275
FIGURE 13.34 For an additional ~$175, the LitePanels light (similar in size to the Dot Line model) provides a dimmable knob. The lamps are daylight-balanced at 5600 degrees K. It also can run off a power adapter, as well as four AA batteries. Buy three of these and three tripods (described above in the Dot Line light) for a 3-point light kit.

(Image courtesy of Litepanels, Inc.)
HIGH-END LITEPANELS LED LIGHT FIELD KIT: ~$1,100
FIGURE 13.35 The LitePanels field kit includes a minilight, as well as a series of filters, power adapters, and a carrying case.

(Image courtesy of Litepanels, Inc.)
REFLECTOR: IMPACT 5-IN-1 COLLAPSIBLE REFLECTOR DISC 32′′: ~$40
In the field: A reflector is a great piece of gear when you need to bounce some light or diffuse light with the translucent screen. The gold is great for adding a warm tone to a subject. This disc can be purchased in several sizes. You will need someone to hold this disc for you, so it’s not the best tool for solo work.
AUDIO
The following sections describe low- to higher-budget audio options.
FIGURE 13.36 The five colors include gold, silver, silver/gold, white, and translucent. This reflector folds in on itself, making it just a bit over 10? long, small enough to slide into a pouch.

Audio
Low-budget audio: Rode VideoMic: ~$150 and miniscreen: ~$80 (Total: $230)
Midrange budget audio: Rode NTG2 shotgun mic (~$250) with XLR adapter (~$400) and miniscreen: ~$730
Higher-budget audio: Rode NTG2 shotgun mic (~$250) and minscreen (~$80), and Tascam or Zoom digital audio recorder (~$400), and wireless lav (~$600): Total ~$1,230
When it comes to audio equipment, microphones do not go obsolete. If you already have a mic or are looking for older mics at a rental house, take note of these classic mics:
• Sennheiser MKH-416—the classic outdoor shotgun mic (~$1,000)
• Sennheiser ME-66/K6—a lower-end version of the MKH-416 (~$500)
• Schoeps CMC641—one of the industry standards for indoor recording (~$1,700)
What follows are recommended budget mics that will do the trick, but be aware that the higher-end mics listed above will provide you with even clearer sound quality, and if you can afford them, get them.
In addition, due to space limitation, I’m not profiling any headphones, but two low-budget ones are mentioned in Chapter 5, covering audio. In addition, be sure to check out www.headphone.com for an unbiased review of headphones by budget, but be sure to get monitor headphones.
Getting the Right Mic and Using a Boom Operator
Filmmaker David Anselmi says that “even a crappy mic sounds better on a boom! A mic with a boom pole and a good boom operator can give you great sound—much, much better than a $1,000 Sennheiser 416 mounted on the camera!”
Despite that, Anselmi recommends going for microphones in the $600–1,000 range. “You may want to do an A/B comparison of a lower-end mic with a high-end mic with excellent audio monitors, so you can hear the difference. You’ll never be satisfied with a $250 mic again. Also, for outdoors—especially in heavy wind—a blimp is essential.” Words of wisdom as you shop for the right microphone. Testing is always the best rule of thumb. If you’re in New York City, B&H Photo has an audio room where you can test microphones (other professional video/audio gear stores will also allow you to test mics).
Low-Budget Audio: Rode VideoMic: ~$150 and Rycote Miniscreen Windjammer: ~$80 (Total ~$230)
In the field: The Rode VideoMic is lightweight and can easily sit on the camera, especially if it has a long lens. Be careful when using a shorter lens that the tip of the mic doesn’t appear in the shot! The audio is not great, but it is usable. Recommended for run-and-gun video news shooters and as a backup sound for on-camera work—far better than the camera’s built-in mic.
FIGURE 13.37 If you do not want to deal with XLR adapters or an external audio recorder, the Rode VideoMic will do the trick. It’s light—because it’s made of plastic—but it also includes an LED on light (the mic is powered by a 9 V battery), so you know when it’s on.

Replace the foam windscreen with the Rycote Miniscreen Windscreen (see Figure 13.38), an essential piece of gear if you’re shooting outdoors with even a light wind.
Midrange Budget Audio Kit 1—On-Camera Audio: ~$1,000
Kit option 1: Rode NTG2 shotgun mic: ~$250; windscreen kit: ~$120; XLR adapter: ~$400; on-camera shockmount and pistol grip: ~$200; XLR cable of varying lengths: ~$20 (see Figures 13.38 and 13.39).
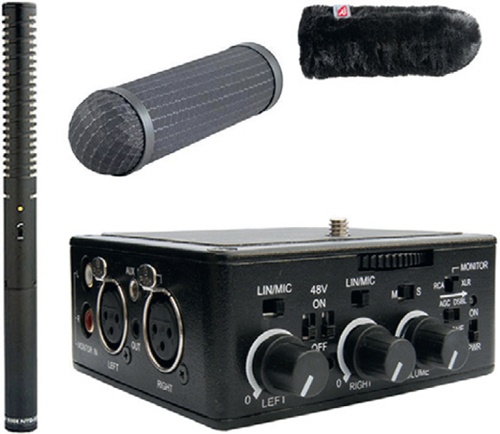
FIGURE 13.38 The midrange audio gear lineup for Kit 1: Rode NTG-2 shotgun mic (one of the best dialog mics for under $500), Rycote’s Miniscreen Windscreen with the Miniscreen Windjammer (designed to fight unwanted wind noise when shooting outdoors), and BeachTek’s DXA-SLR active XLR audio adapter. This setup will provide professional audio recording when recording directly into your HDSLR. The BeachTek was profiled in Chapter 5. In short, it has the option of defeating the automatic gain control of HDSLR cameras, provides 48 volts phantom power to two different XLR mics, and has a headphone input with its own volume control as well as input levels for each microphone. In lieu of BeachTek’s XLR adapter, you may consider getting juicedLink’s DT454, described below.
JUICEDLINK’S XLR PREAMP, THE DT454 (~$420)
FIGURE 13.39 JuicedLink’s DT454 XLR adapter for HDSLRs. A powerful preamp with more features than the BeachTek version. Profiled in Chapter 5, this device contains a headphone monitor with its own volume control, two XLR inputs (with adjustable audio), a tip/ring input for a minijack microphone (such as the Rode VideoMic) or monitor playback, and volume levels for all three of these. It also includes a four-level LED meter with red LEDs for clipping indication.
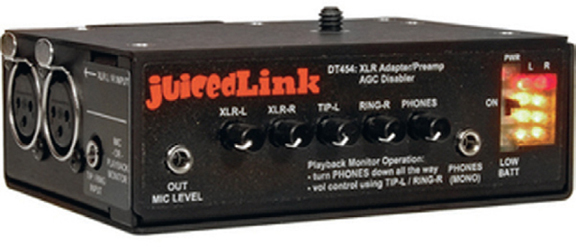
(Image courtesy of juicedLink, Inc.)
What may stand out for audiophiles on this device is the bottom control panel (see Figure 13.40), where the discriminating sound artist can get into the details of the adjusting the different audio elements.
If you do not want to use an XLR adapter (Kit 1), then you may want to get a good microphone and an external digital audio recorder (Kit 2, described next).
FIGURE 13.40 JuicedLink’s DT454 bottom panel. Here, you can adjust the type of automatic gain control disabling feature (whether it’s off or whether you engage a tone or noise pattern), engage 48 or 12 volts of phantom power, adjust microphone or line inputs, and place a low or high gain boost on inputs, among other features.
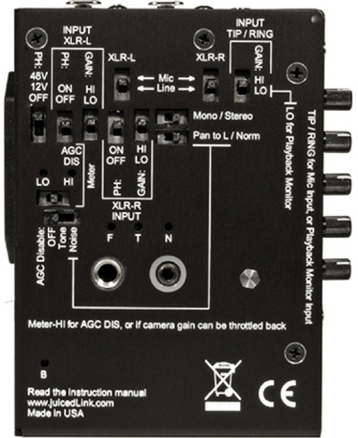
(Image courtesy of JuicedLink, Inc.)
Midrange Budget Audio Kit 2—External Audio: ~$1,050
Kit option 2: Rode NTG2 shotgun mic: ~$250; windscreen kit: ~$120; external digital audio recorder: ~$300; Rode VideoMic: ~$150 (for on-camera recording of reference and backup audio); on-camera shockmount and pistol grip for handholding the mic: ~$200; and XLR cable: ~$20
FIGURE 13.41 This setup will provide crisp and clean audio. The Rode NTG-2 shotgun mic is one of the best dialog mics for under $500, and Rycote’s Miniscreen Windscreen with the Miniscreen Windjammer is a good price to fight unwanted wind noise when shooting outdoors. The Tascam DR-100 was profiled in Chapter 5 (along with the Zoom H4n); whether you choose the Zoom or the Tascam is really up to personal preference. The Tascam is made of metal, more rugged, and includes a minijack line out (useful for monitoring sound with Sound Device’s MixPre, described later), while the Zoom’s AA batteries will last longer than the Tascam unit (although the Tascam contains a lithium rechargeable battery, which can be charged through a computer’s USB port or you will need to purchase the charger separately).

If going with Kit 2, be sure to use a slate or clap your audio on the camera and don’t forget to turn on the Rode VideoMic attached to the camera. Both mics are necessary; at the very least, the Rode VideoMic will provide adequate audio as a backup, as well as provide a fairly clean reference. You will need to sync up the audio of the Tascam or Zoom with the on-camera audio using PluralEyes software (~$150); otherwise, sync it up manually using David Anselmi’s audio sync trick described in Chapter 6.
In addition to this equipment, you’ll need either a pistol grip, boom pole, or a shockmount for the microphone. If you’re a doc or news shooter and you have a crewmember running sound, you may want to use a pistol grip for in-close work; otherwise, you’ll need a boom pole.
If you’re shooting solo, you could mount the shotgun mic onto the hotshoe of the camera with Rycote’s InVision adapter.
RYCOTE INVISION MICROPHONE SHOCKMOUNT WITH HOTSHOE ADAPTER: ~$80
FIGURE 13.42 Rycote’s InVision microphone shockmount. The adapter slides into the camera’s hotshoe, while the shotgun mic sits inside the shockmount. The unit opens and closes, fitting snugly around the mic.

(Image courtesy Rycote Microphone Windshields, Ltd.)
RYCOTE LYRE MOUNT AND PISTOL GRIP: ~$120
FIGURE 13.43 Rycote Lyre Mount and Pistol Grip. Useful for up-close audio work, especially when using a Tascam or Zoom digital field recorder.

(Image courtesy Rycote Microphone Windshields, Ltd.)
FIGURE 13.44 Sennheiser Evolution G3 100 series is one of the best wireless lavaliere setups you can get. It includes the ability to add wireless to a shotgun mic, as well as one transmitter and receiver for the lav, an ME2 lav mic, and cables for XLR and minijack setups.

Higher-Budget Audio Kit: ~$2,500
Choose Kit 1 or Kit 2 from the midrange budget described above: ~$1,000
Sennheiser wireless lavaliere: ~$800
Sound Devices MixPre field amplifier: ~$665
SOUND DEVICE’S MIXPRE PORTABLE FIELD MIXER AND PREAMP: ~$665
FIGURE 13.45 Sound Device’s MixPre is a portable field mixer and mic preamp that contains unclippable limiters, so, if set properly, it will not blow out any sound. It’s made of metal, so the rugged device will hold up to some impact abuse. Use the tape out as the output that you will plug into the camera’s microphone input. The chief advantage is the ability to use XLR microphones, but you can also monitor audio, adjust the levels, and view an LED level meter. If you want pristine sound, hook it up to the Tascam DR-100 or Zoom H4n when recording sound external to the camera. And when it comes to getting pristine sound, that should be your standard, because it’ll save a lot of time and money in post when you have to fix low-quality audio.

If you’re hooking the Sound Device’s MixPre directly to the DSLR, be sure to get a special cable made by Pinknoise (http://www.pinknoise-systems.co.uk/pinknoise-25-p-459.html). It provides a −25dB attenuation pad so the line level coming out of the MixPre isn’t too hot for the DSLR. For buyers in the United States, you can purchase the cable on eBay (or do a word search, “Pinknoise Cable”).
STABILIZATION: BENRO MC-91M8 MONOPOD: ~$130
In the field: Some people use a tripod head, but if you’re traveling light, just screw the Benro MC-91M8 monopod to the tripod hole on the bottom of the camera. Despite the fact it has legs, this is not a tripod, so don’t walk away from it thinking the monopod is going to balance it! The legs help with extra steadiness so you can get that still shot without the encumbrance of a tripod. If you can’t afford a handheld support rig, such as Zacuto’s Target Shooter (~$450), the monopod is an inexpensive way to get a handheld look to your piece. Philip Bloom used a monopod for some of his shots in a commercial for Greenpeace (see http://philipbloom.net/dslr-films/greenpeace-commercial-voices-of-change/).
FIGURE 13.46 A compact monopod constructed of carbon fiber with leg extenders for extra steadiness—important in cinema work! It can extend to over 64″ and folds up to just a hair over 21″ for storage. Four twist leg-lock sections. It also contains a dual ¼″ and ⅜″ male thread.

TRIPOD
The following section describe various tripod options.
Tripod
Low-budget tripod (~$225): Manfrotto 190XB Tripod legs: ~$140 and Manfrotto 700RC2 Mini Video Fluid Head: ~$85
Midrange budget tripod (~$435): Hakuba HG-503MX carbon fiber tripod ~$275 and Manfrotto 701HDV fluid mini head: ~$160
Higher-budget tripod (~$800): Manfrotto 535 carbon fiber tripod: ~$400 and Manfrotto 504HD fluid head: ~$400
Ball head: ~$80–300
Low-Budget Tripod: Manfrotto 190XB Tripod Legs: ~$140 and Manfrotto 700RC2 Mini Video Fluid Head: ~$85
In the field: Nothing beats small and portable. The lightness and sturdiness of the Manfrotto 190XB makes it a dream. Great for DSLRs. However, if you’re using a large lens (such as the Canon 70–200 mm 2.8L), you may want a heavier tripod—see the midrange budget tripod. You could just screw this tripod onto the camera without a head, but a video head is recommended for smooth pans and tilts. You will want to avoid extending the smallest legs since the tripod wobbles too much. You could spend $225 and get sturdier legs with the Manfrotto 190XP, and it’ll be much sturdier, but a bit heavier.
This package is small and light enough that you could close the sticks on this tripod and double it as a monopod (or even as a steadicam using the folded sticks as counterweight as you float the camera through the air).
FIGURE 13.47 These “sticks” are light and strong, but they’re not as a light as a carbon fiber tripod, which can be a bit more pricy. It extends to just over 57” and can also sit as low as 3.3” with a low angle adapter. It folds up to a nice compact size of just under 25” (without the head). If you can afford the video head from the midrange budget, go for it, but if you can’t, this little one is adequate. It’s a standard small fluid head for video work, enabling you to do fairly smooth pans and tilts with your DSLR camera. You will need to use some pliers and pull out the plastic pin in the plate because DSLRs don’t have the extra hole found in video cameras.

Midrange Budget Tripod (~$435): Hakuba HG-503MX Carbon Fiber Tripod ~$275 and Manfrotto 701HDV Fluid Mini Head: ~$160
FIGURE 13.48 The Hakuba HG-503MX carbon fiber tripods is one of the lightest and most pleasurable tripods I have used. The legs twist and drop. It has foam on the top part of the legs for soft and easy grip. However, I recommend replacing the included head and getting the Manfrotto 701HDV fluid head.

Higher-Budget Tripod (~$800): Manfrotto 535 Carbon Fiber Tripod ~$400 and Manfrotto 504HD Fluid Head: ~$400
FIGURE 13.49 A great combination: The Manfrotto 535 three-section carbon fiber tripod with Manfrotto’s 504HD fluid head. A rock-solid choice.

Advantages of Using a Ball Head Instead of a Fluid Head
Filmmaker David Anselmi recommends using a ball head because “it makes setting up nearly instantaneous, leveling the tripod in one quick motion. You can even get a Manfrotto bolt-on version for low-end tripods, and it works great.” The advantage: “It replaces the ‘three-leg adjustment thrash’ when setting up on nonlevel ground.” You can search for a variety of ball heads, instead of a fluidhead. In Figure 13.50, the Manfrotto 494 mini ball head with an RC2 plate sells for about $70, which would fit well with the low-budget tripod listed earlier. A higher-end model—better for the higher-budget tripods—such as the Acratech GV2 will cost you about $350.
FIGURE 13.50 Manfrotto 494 mini ball head.

Tripod Dolly
Kessler Crane Pocket Dolly Traveler (Version 2.0): ~$580 with crank and belt
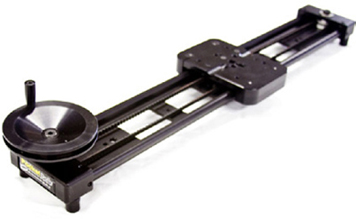
FIGURE 13.51 An essential piece of gear, the Kessler Crane Pocket Dolley Traveler (Version 2.0) mounts onto a tripod and provides smooth, slow dolly shots—an essential element of cinematic storytelling. The basic model does not come with the quick release plate (Manfrotto 577: $70 and Giottos MH621: $40). Be sure to get the more expensive crank and belt version because it allows for smoother operation. The new version includes ball-bearing wheels that are silent and nearly frictionless, preventing any binding during movement (an occasional slight problem with the older model). However, because the new version was released over the summer of 2010, you can scour the Internet for used versions of version 1 for possible deals because some filmmakers may be replacing their older models.
In the field: Kha lid Mohtaseb, Jonathan Bregel, and Georges Yazbek provide a montage video of Egypt and Lebanon in a documentary short, Egypt & Lebanon Montage (3:30) where they made great use of the Kessler Crane Pocket Dolly (standard; see Figure 13.52). See http://vimeo.com/7058755.
FIGURE 13.52 Khalid Mohtaseb, Jonathan Bregel, and Georges Yazbek make use of Kessler Crane’s Pocket Dolly in a montage documentary, Egypt & Lebanon Montage (see http://vimeo.com/7058755). The camera tracks left in the first image, resulting in the ending shot in the bottom image. Notice that the tracking shot doesn’t move too much but, when viewed, feels poetic. Placing objects in the foreground of a shot when moving the camera will help ascent the dolly move, such as the object out of focus screen left on the bottom image.

HANDHELD AND SHOULDER SUPPORT RIGS AND FOLLOW FOCUS
For many HDSLR shooters, the tripod isn’t used as much as handheld shots. Due to the ergonomics of DSLRs, steady handheld shots are difficult to attain. Furthermore, because focus is often challenging to achieve, a good follow-focus setup becomes a viable option for shooters. Several companies have designed a variety of handheld and shoulder-mounted rigs designed for the HDSLR shooter.
The advantage of a shoulder-mounted system is the extra brace support allowing for fairly smooth operation and great yaw bracing; it takes the pressure off your wrists and allows you to shoot much longer durations than handheld. However, it is a lot more difficult to get those low-angle shots. The handheld support rigs give you more flexibility, allowing you to reach high and low and do some handheld crane movements, but your wrists will get tired fast, so you’ll be forced to shoot shorter durations.
“The Franken-Camera” by Travis Fox
Travis Fox of Travis Fox Films (www.travisfox.com)—and formerly a video journalist for the Washington Post—didn’t like the feel of DSLR cinema rigs, which to him felt as though he was carrying a shoulder-mounted video camera. He missed the feel of his Sony Z1U “cradling it like a baby or a football as is my practice,” he says. He continues:
I ended up saving money and getting a fit I could deal with. An $8 bracket (it’s literally the cheapest flash bracket that B&H stocks) holds the Ikan monitor out in front to the left of the lens just like the Z1U. I splurged on the other bracket (it was a hundred bucks), which holds the audio gear and balances the camera out by moving weight to the back of the camera. … (©2010 Travis Fox. (http://blog.travisfox.com/) Used with permission.)

Fox’s setup could be added to a Zacuto Target Shooter for body brace support.
Low-Budget Handheld and Shoulder Support Rigs with Viewfinder: ~$700
• iDC Photo Video’s viewfinder: ~$200 (featured early in the chapter)
and
• iDC Photo’s Video Run & Gun kit (follow focus and viewfinder): ~$530
or
• Zacuto’s Target Shooter (handheld support): ~$475
or
• Redrock Micro’s nano-RunningMan (handheld support): ~$470
Low-Budget Viewfinder and Follow Focus: iDC Photo Video Run & Gun kit: ~$488
FIGURE 13.53 iDC’s Run & Gun kit includes an adjustable baseplate, follow focus and viewfinder. Designed by photographer Bruce Dorn. For handheld work, where you need to get tight focus and see the LCD better, this is one of the most affordable setups out there. Add this to Zacuto’s Target Shooter, and you’ll have a powerful combination for getting extra steady shots. When you consider Red Rock Micro’s follow-focus setup costs just under $500, you can begin to see the advantage of this setup because it includes a viewfinder. Screw on the Zacuto baseplate to the bottom of iDC’s baseplate. Be sure to get the eye cup!

(http://www.idcphotography.com)
Low-Budget Handheld Support
Following are the low-budget options.
ZACUTO TARGET SHOOTER: ~$475
FIGURE 13.54 Zacuto’s Target Shooter provides that extra level of handheld steadiness you may need on a shoot. The product pictured here includes the viewfinder but is not included with the Target Shooter. Philip Bloom uses this device for much of his personal handheld work (he favors the tripod when doing hired shoots).
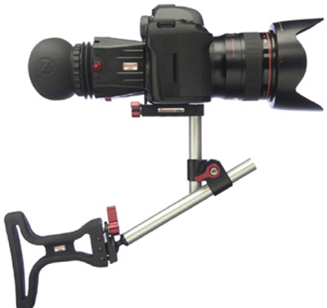
(http://store.zacuto.com/Target-Shooter.html)
FIGURE 13.55 Philip Bloom sets up a shot using a Canon 5D Mark II, Zacuto’s Z-Finder, and a Tactical Shooter to steady the shot. (The Tactical Shooter has since been replaced by the Target Shooter.)
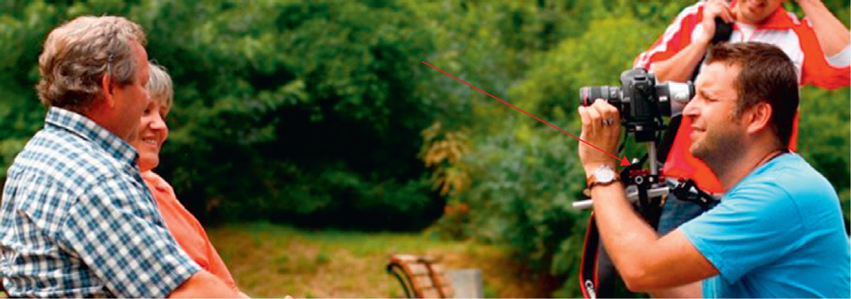
(© 2009 Philip Bloom.)
REDROCK MICRO’S NANO–RUNNINGMAN: ~$470
FIGURE 13.56 Redrock Micro’s nano series presents a variety of handheld options for the DSLR shooter. The RunningMan is similar to Zacuto’s Target Shooter in function and shape.

(http://store.redrockmicro.com/Nano; Image courtesy of Redrock Micro.)
Midrange Budget Handheld and Shoulder Support Rigs: ~$1,200–1,500
• iDC viewfinder : $240 (with 3x eyecup)
and
• Redrock Micro’s theEvent: ~$850
or
• Redrock Micro’s eyeSpy Standard: ~$825 (~$1100 with counterbalance weights)
or
• Redrock Micro’s Captain Stubling: ~$1100
or
• Zacuto’s Striker: ~$900
REDROCK MICRO THEEVENT: ~$850
FIGURE 13.57 Redrock Micro’s theEvent allows for two-handed grip with extra body support.

(http://store.redrockmicro.com/Catalog/DSLR-Handheld-Rigs/ theEvent-DSLR-2-0-hybrid-rig; Image courtesy of Redrock Micro.)
REDROCK MICRO EYESPY: ~$825
FIGURE 13.58 Redrock Micro’s eyeSpy allows for shoulder-mounted steadiness with one handgrip, freeing up the other hand to focus. It may be a bit front heavy, depending on the camera and lens you use. Counterweights can be added to help balance the weight (~$1,100 package).

(http://store.redrockmicro.com/Catalog/DSLRShoulderMountedRigs; Image courtesy of Redrock Micro.)
REDROCK MICRO CAPTAIN STUBLING: ~$1,100
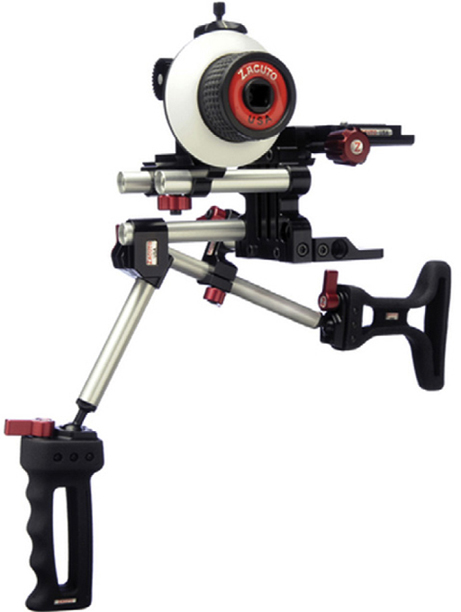
FIGURE 13.59 Redrock Micro’s Captain Stubling provides handheld work with a follow-focus setup. It is designed for solo-shooting work, where the camera operator can use the follow focus without a focus-puller.

(http://store.redrockmicro.com/Catalog/DSLR-2-0-accessories/ Captain-Stubling-DSLR-Bundle; Image courtesy of Redrock Micro.)
ZACUTO’S STRIKER: ~$900
FIGURE 13.60 Zacuto’s Striker provides a handgrip and body mount when setting up handheld shots.

(http://store.zacuto.com/Striker.html; Image courtesy of Zacuto, USA.)
Higher-Budget Handheld and Shoulder Support Rigs: ~$3,000–3,500
• Zakuto’s Z-Finder Pro: ~$375
and
• Redrock Micro’s Cinema Bundle (matte box and follow focus for tripod support): ~$2,400 (~$3,000 with shoulder mount)
or
• Zacuto’s Cross Fire (follow focus with handheld support): ~$2,500
or
• Zacuto’s Double Barrel (follow focus with shoulder mount): ~$3,600
REDROCK MICRO’S DSLR CINEMA BUNDLE: ~$2,400
FIGURE 13.61 Redrock Micro’s Cinema Bundle is designed to sit on a tripod. It includes a top handgrip for lifting the unit, as well as a matte box. If you need shoulder-mount versatility, purchase the microShoulderMount Delux Bundle for an additional ~$570.

(http://store.redrockmicro.com/DSLR-Cinema-Bundle; Image courtesy of Redrock Micro.)
ZACUTO’S CROSS FIRE: ~$2,500
FIGURE 13.62 Zacuto’s Cross Fire provides for a body brace, handgrip, and a follow focus. The follow-focus unit can be detached and placed on a tripod.
(http://store.zacuto.com/Cross-Fire.html; Image courtesy of Zacuto, USA.)
ZACUTO’S DOUBLE BARREL: ~$3,600
FIGURE 13.63 For those needing the full enchilada on an all-day shoot, Zacuto’s Double Barrel sets on your shoulder and includes a counterweight, two handgrips, a follow focus, and the Z-Finder Pro.

(http://store.zacuto.com/Double-Barrel.html; image courtesy of Zacuto, USA.))
STEADICAMS
If you’re looking for a floating handheld steady camera that works for HDSLRs without spending thousands of dollars, Camera Motion Research’s Blackbird and Tiffen’s Merlin are designed for extra smooth handheld work but can be somewhat temperamental to use, requiring precision adjustments to evenly balance the camera. If you change a lens, it’ll need to be rebalanced, for example. And shooting on a windy day outdoors is nearly impossible because the wind will unbalance the camera. Neither of the products comes with a vest and swing-arm support such as with higher-end steadicams, so your forearms may get tired when shooting lengthy takes. You will need to walk with your body held straight and knees slightly bent. It takes practice to really make these devices shine.
Once you master the balancing of these devices, you can achieve really nice camera motion, such as smooth swooping crane shots, as well as push in dolly and tracking shots. When you follow performers as you walk, it appears as if the camera is another person walking with them.
CMR Blackbird: ~$485–675
In the field: Sean Seah (www.firewerkzfilms.com) in Singapore offers a review and test video that shows off what the Blackbird can do with a Canon 5D Mark II attached to it (see http://vimeo.com/6463988).
Tiffen Merlin Steadicam: ~$800
FIGURE 13.64 Camera Motion Research’s Blackbird is an affordable gimbal-based steady camera device utilizing an adjustable mounting plate with knobs for precise adjustments along the X-Y axis. The six-ball-bearing gimbal provides extra smooth precision, as well as friction. The unit can support one to eight pounds of weight. You can purchase the basic model for ~$485, but the extra price provides a resting stand, so you can set the entire device down on the ground without removing the camera.

In the field: See http://vimeo.com/6272661 for Ken Yiu’s amazing use of this Steadicam at a wedding. Rii Schroer also used it in her 16 Teeth project profiled in Chapter 9.
FIGURE 13.65 The handle of the Tiffen Merlin Steadicam utilizes a three-axis gimbal for extra precision. The center hinge allows for compact storage of under a foot, so a traveling package on the go makes this a great Steadicam device. It comes with six counterbalance weights, dovetail plate, and tripod mounting plate. It can handle weights from ½ to 5 pounds.
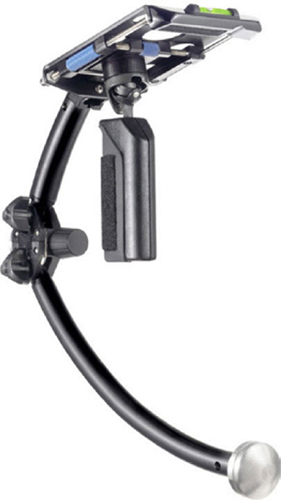
(Image courtesy of The Tiffen Company.)
CASES AND BACKPACKS
The following sections describe options for cases and backpacks.
Cases and Backpacks
Carry bag: PortaBrace CS-DC2R: ~$100 and CS-DC3R: ~$130
LowePro Pro Runner 350 AW backpack: ~$150
Portabrace backpack (BC-1NR):~$150
PORTABLE CS-DL2R: N$100 AND CS-DC3R: N$130
FIGURE 13.66 The PortaBrace bag is a recommended piece of tough pro gear that includes an interior brace, adding extra protection to your camera. It includes exterior and interior pockets and can hold a DSLR as large as a Canon 5D with an attached zoom lens. It has room for two additional lenses. If you need extra room, PortaBrace makes additional sizes.

(http://www.portabrace.com/dslr.php)
In the field: Great for portability and it’s tough, including a rubber bottom so water and mud won’t seep through when it’s on the ground. Comfortable suede-padded shoulder strap and handles.
Backpack
Many companies make a variety of backpacks for camera and video gear. A nice piece of gear for traveling and hiking.
LOWEPRO PRO RUNNER 350 AW BACKPACK: ~$150
In the field: Studio in a bag! Great backpack for the traveler. Includes space for a laptop computer, with extra interior pockets for batteries, memory cards, notepad, and so forth. A small tripod and/or monopod can be secured to the outside of the backpack.
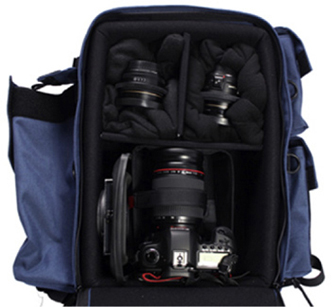
FIGURE 13.67 The Lowepro backpack includes space for your DSLR camera and three to four lenses. It also has a separate pocket for a laptop computer. You can also put in your audio gear into this bag.

PORTABRACE BACKPACK (BC-1NR): ~$350
FIGURE 13.68 A more expensive backpack, but PortaBrace products are handmade and durable.
(http://www.portabrace.com/productB-BC-1NR)
SOFTWARE
I’m not recommending which editing software to purchase. It’s assumed that you already know how to edit, have a computer, and can use the proper software. The professional Hollywood standard for large projects is Avid (for PC and Macs). Final Cut Pro for Macs is used by a lot of indies. Adobe Premiere Pro (for PC and Mac) is another option. If you’re on a PC, Sony Vegas Pro is one of the most intuitive editing software packages out there (and probably contains the most powerful built-in audio editor in the business).
Decompression Software
In most situations you will want to decompress the camera’s footage. If you’re shooting great hi-res HD, and if you’re doing simple editing with no color grading, you can drop the files into some of these software packages and just edit (Vegas Pro, Adobe Premiere Pro 5, and Final Cut Pro for Canon cameras). However, if you’re doing any kind of postproduction color grading or using effects, you’ll need to decompress your footage. Here are two:
SQUARED 5 MPEG STREAMCLIP FOR MAC AND WINDOWS: FREE, HTTP://WWW.SQUARED5.COM/
An essential tool if you’re on a budget. The Mac version allows conversion to Apple ProRes 422 (LT), 422 (HQ), 4444, as well as many other formats. The PC version includes AVI, among others.
RED GIANT SOFTWARE MAGIC BULLET GRINDER: ~$50, HTTP://WWW.REDGIANTSOFTWARE.COM/PRODUCTS/ALL/MAGIC-BULLET-GRINDER/
An inexpensive powerful tool, this software can utilize batch processes for each of your computer’s CPU cores, so if you have a fully decked-out Mac, conceivably you can render a separate file for each core (up to eight). It’s really compatible with Final Cut Pro with export format for Apple ProRes 4444, Apple ProRes Standard, but it also includes PhotoJPEG High and Max qualities. You can also create a timecode stamp. In addition, the software can conform 30P and 60P frame rates to 24P.
COLOR GRADING: RED GIANT SOFTWARE’S MAGIC BULLET LOOKS: ~$300
A plug and play software that allows you to tweak individual effects—from color correction to exposure control, Magic Bullet Looks is an essential piece of software for the HDSLR shooter when shaping your cinematic look in post. It is more than plugging in a preset look. It allows careful control of your film in the postproduction stage, making it one of the most powerful postproduction tools on the market (when you’re on a budget). You can purchase the Magic Bullet Suite for ~$700 and it includes Looks, Colorista, Frames, Instant HD, and Steady. The student price for the suite is under $400. (http://www.redgiantsoftware.com/products/all/magic-bullet-suite/)
In the field: Philip Bloom recommends that you shoot a neutral flat look on your DSLR if you’re planning to use Magic Bullet (or any other color correction software). He adds, “Because even if you are not a professional gradist you can get some affordable software like Magic Bullet Quick Looks or Magic Bullet Looks. One is a hundred bucks, one’s four hundred bucks and they work with every edit system out there apart from the really, really basic ones.”
AUDIO SYNC: SINGULAR SOFTWARE’S PLURALEYES: ~$150 OR DUALEYES: ~$150
PluralEyes was the software used by many HDSLR shooters needing to sync audio when doing external recording. The software was specifically designed for multicamera shoots (and is recommended when you are doing a multicamera shoot), but the company has since engineered DualEyes, designed specifically for DSLR shooters using external recorders (such as the Tascam DR-100 and Zoom H4n). There are versions for PC and Mac.
ALTERNATIVE TO ATTAIN AUDIO SYNC
An alternative free way to attain audio sync is to use this technique by David Anselmi of Practical Mystic Productions (http://www.practicalmysticproductions.com/):
1. Separate the audio tracks of the two separate recordings.
2. Pan hard left on the first track and hard right on the other track.
3. Adjust relative volume so both tracks match.
4. Listen on headphones.
5. Nudge one of the audio tracks back and forth, until the flanging—the audio delay between the two—stops. And your sound is now synced.
HDSLR SUGGESTED GEAR PACKAGES
The following sections describe sets of packages based on your budget—this is only a guide. Create your own packages.
Low-Budget Packages: ~$2,100–4,000
If you’re a student filmmaker or journalist, a multimedia journalist doing solo projects, an event shooter, or an indie shooter, these setups will provide quality work while on a tight budget. The equipment listed here is certainly not exhaustive. More accessories are seemingly added weekly to the huge take-off of DSLR cinema cameras. Also, the prices reflect summer 2010 costs. As competitors come out with new equipment, prices get lower, especially for cameras.
I feel this equipment package contains the minimum needed to engage at some level of cinematic quality in your work. If you want to just grab a camera and shoot, then go for it. But if you’re trying to perfect your work and attain a higher-level film look with your camera, then the following recommendation may work for you. Modify this list and experiment. For example, you can get a Canon 7D and use it with this equipment listed below.
THE BASIC SHOOTER: ~$2,150
Camera
• Canon Rebel T2i: ~$900 (with kit zoom lens) (If you want the Panasonic GH1, then add ~$300 to your budget.)
• Spare battery: ~$60
• SDHC memory cards (16 GB, class 6): ~$40 each
• Light Craft Workshop ND filter: ~$125
• iDC viewfinder: ~$200
Light
• Dot Line DL-DV60 LED light: ~$100
• Impact 5-in-1 Reflector: ~$40
Stabilization
• Manfrotto 190XB Tripod legs: ~$140 and Manfrotto 700RC2 Mini Video Fluid Head: ~$85 (or Manfrotto mini ball head ~$80).
• Benro MC-91M8 Monopod (for handheld stabilization): ~$130 (Note: I’m recommending the monopod over Zacuto’s Target Shooter ~$475, Redrock Micro’s nano – RunningMan for ~$470, or Redrock Micro’s nano–RunningMan ~$470 because the extra price for these products doesn’t jus tify their use over a monopod, but if you want to spend the extra money, add about another $500 to the budget!)
Carry Case
• PortaBrace carry bag CS-DC2R: ~$100
• or
• LowePro Pro Runner 350 AW backpack: ~$150
THE BASIC SHOOTER WITH ONBOARD AUDIO: ~$2,800
Same as the Basic Shooter listed above, but replace the listed audio equipment with this audio package:
Audio (~$900)
• Rode NTG2 shotgun mic: ~$250
• Rycote windscreen kit: ~$120
• XLR adapter (BeachTek DXA-SLR or juicedLink’s DT454): ~$400
• Rycote InVision on-camera shockmount: ~$80
• XLR cable: ~$20
THE BASIC SHOOTER WITH EXTERNAL AUDIO: ~$3,000
Same as the Basic Shooter listed above (including the Rode VideoMic and Windscreen for audio reference), with the addition of this audio equipment for external recording:
Audio (~$900)
• Rode NTG2 shotgun mic: ~$250
• Rycote windscreen kit: ~$120
• Tascam DR-100 or Zoom H4n: ~$300
• Rycote InVision pistol grip: ~$120
• XLR cable: ~$20
• DualEyes or PluralEyes software: ~$150
THE BASIC SHOOTER WITH USED PRIME LENSES: ~$3,300 (~$4,000 WITH ONBOARD AUDIO PACKAGE OR ~$4,200 WITH EXTERNAL AUDIO PACKAGE)
The same as the Basic Shooter listed above, but with these prime lenses from www.KEHphoto.com:
Lenses (~$1,200)
• Zeiss Contax/Yashica adapter (for Canon): ~$80
• Zeiss Contax Distagon f/2.8 28 mm: ~$300–400 (used)
• Zeiss Contax Planar f/1.4 50 mm: ~$300–400 (used)
• Zeiss Contax Sonnar f/2.8 100 mm: ~$500 (used)
Note: These lenses do not work well with iDC Photo Video’s follow focus.
Midlevel Budget Packages
For those wanting to use a professional camera, a follow-focus setup, and a shoulder or handheld support device, the budget increases significantly.
This equipment contains the next level up in engaging cinematic-quality storytelling.
MIDLEVEL PRO SHOOTER ~$7,200–7,400
Camera
• Canon 7D: ~$1900 (with kit lens: 28–135 mm f/3.5–5.6)
• Spare battery: ~$80
• Compact Flash card (16GB, minimum 200x speed): ~$50 each
• Singh-Ray ND filter: ~$400
• iDC viewfinder: ~$240 (with 3x eyecup)
Lenses
• Zeiss Contax/Yashica adapter (for Canon): ~$240 (~$80 each 33 for an adapter fitted to each lens)
• Zeiss Contax Distagon f/2.8 28 mm: ~$300–400 (used)
• Zeiss Contax Sonnar f/2.8 135 mm: ~$250 (used)
• Zeiss Contax f/4 Tele Tessar 200 mm: ~$235 (used)
Audio (On-Camera):
• Rode NTG2 shotgun mic: ~$250
• Rycote windscreen kit: ~$120
• XLR adapter (BeachTek DXA-SLR or juicedLink’s DT454): ~$400
• Rycote InVision on-camera shockmount and pistol grip: ~$200
• XLR cable: ~$20
Audio (External Recording with On-Camera Reference):
• Rode VideoMic: ~$150
• Rycote Miniscreen Windscreen: ~$80
• Rode NTG2 shotgun mic: ~$250
• Rycote windscreen kit: ~$120
• Tascam DR-100 or Zoom H4n: ~$300
• Rycote InVision pistol grip: ~$120
• XLR cable: ~$20
• PluralEyes or DualEyes software: ~$150
Light
• LitePanels Micro LED light: ~$275
• Impact 5-in-1 Reflector: ~$40
Stabilization Tripod
• Hakuba HG-503MX carbon fiber tripod ~$275 and Manfrotto 701HDV fluid mini head: ~$160
Dolly
• Kessler Crane Pocket Dolly Traveler (version 2): ~$580 (~$70 additional tri pod plate)
Stabilization Handheld
• Redrock Micro theEvent: ~$850
or
Stabilization Shoulder Mount
• Redrock Micro eyeSpy: ~$825
Carry Case
• PortaBrace carry bag CS-DC3R: ~$130
or
• LowePro Pro Runner 350 AW backpack: ~$150
Midlevel Pro Shooter with iDC Follow Focus 1: ~$7,500–7,700
For those wanting to do follow-focus work, add one of these kits to the Midlevel Shooter package described above (subtract the iDC viewfinder for a package deal). However, this follow focus will not work well with the Zeiss Contax lenses (because they’re more narrow).
• iDC viewfinder and follow-focus package: ~$500
MIDLEVEL PRO SHOOTER WITH REDROCK MICRO FOLLOW FOCUS 2: ~$7,700–8,500
You may get just the follow-focus attachment without the Captain Stubling setup.
• Redrock Micro follow focus with three gears: ~$530
• Redrock Micro Captain Stubling: ~$1,100
This device will set down onto your tripod.
High-Level Budget Packages
For those wanting to use the best HDSLR camera with a follow focus and matte box setup, as well as a shoulder or handheld support device, the budget increases significantly.
This equipment is more expensive, so you must gauge your need and budget your cinematic storytelling projects. These packages assume you want the best lenses, but you could save money by getting used lenses. You can swap recommended items with others and create your own list.
HIGH-END PRO SHOOTER: ~$12,600
Camera
• Canon 5D Mark II: ~$2,500 (body only)
• Spare battery: ~$80
• Compact Flash card (16GB, minimum 200x speed): ~$50 each
• Singh-Ray ND filter: ~$400
• Zacuto Z-Finder Pro: ~$375
Lenses
• Canon EF 24 mm f/1.4L: ~$1,700
• Canon 50 mm f/1.2L: ~$1,500
• Canon 70–200 mm f/2.8L: ~$1,900
Audio (On-Camera)
• Rode NTG2 shotgun mic: ~$250
• Rycote windscreen kit: ~$120
• XLR adapter (BeachTek DXA-SLR or juicedLink’s DT454): ~$400
• Rycote InVision on-camera shockmount and pistol grip: ~$200
• XLR cable: ~$20
or
Audio (External Recording with On-Camera Reference)
• Rode VideoMic: ~$150
• Rycote Softie: ~$50
• Rode NTG2 shotgun mic: ~$250
• Rycote windscreen kit: ~$120
• Tascam DR-100 or Zoom H4n: ~$300
• Rycote InVision pistol grip: ~$120
• XLR cable: ~$20
• DualEyes or PluralEyes software: ~$150
Light
• LitePanels Micro LED light: ~$275
• Impact 5-in-1 Reflector: ~$40
Stabilization Tripod
• Manfrotto 535 carbon fiber tripod ~$400 and Manfrotto 504HD fluid head: ~$400
Dolly
• Kessler Crane Pocket Dolly Traveler (version 2): ~$580 (~$70 additional tripod plate)
Stabilization Handheld
• Zacuto’s Striker: ~$900
or
Stabilization Shoulder Mount
• Redrock Micro eyeSpy: ~$825
Carry Case
• PortaBrace carry bag CS-DC3R: ~$130
or
• PortaBrace backpack: ~$360
HIGH-END CINEMA SHOOTER (MATTE BOX AND WIRELESS FOLLOW FOCUS): ~$15,000
Same as above, but take out Zacuto’s Striker and add RedRock Micro’s DSLR Cinema Bundle: ~$2,400, as well as RedRock Micro’s wireless follow focus (basic): ~$1,000.
You can do the same with the other cinema bundles. You will also need to get different filters for the matte box.
This is just some of the equipment you can get for your HDSLR camera. Obviously, you could take the Basic Shooter package, take out the Canon Rebel T2i, and add in a Canon 7D, for example, or 5D Mark II with the Basic Shooter with Onboard Audio and Prime Lenses for about $5,600. Mixing and matching to suit your needs is the best way to create the best package for your needs.
The following is my kit used for short documentary and fiction projects.
AUTHOR’S SHOOTING PACKAGE: ~$9,000
Camera
• Canon 5D Mark II: ~$2,500 (body only)
• Spare battery: ~$80
• Compact Flash card (16GB, 200x speed) x2: ~$100
• Light Craft Workshop 77 mm Vari-ND filter: ~$125
Lenses
• Zeiss Contax/Yashica adapters: ~$80 each
• Zeiss Contax Distagon f/2.8 25 mm: ~$400 (used)
• Zeiss Contax Planar f/1.4 50 mm: ~$400 (used)
• Zeiss Contax Sonnar f/3.5 100 mm: ~$400 (used)
• Canon 70–200 mm f/2.8L: ~$1,900
Audio (External Recording with On-Camera Reference): $1,200
• Rode VideoMic: ~$150
• Rycote Softie: ~$50
• Rode NTG2 shotgun mic: ~$250
• Rycote windscreen kit: ~$120
• Tascam DR-100: ~$300
• Rycote InVision pistol grip: ~$120
• XLR cable: ~$20
• PluralEyes software: ~$150
Light
• Dot Line DL-DV60 LED light: ~$100
• Impact 5-in-1 Reflector: ~$40
Stabilization Tripod
• Hakuba HG-503MX carbon fiber tripod ~$275 and Manfrotto 701RC2 fluid mini head: ~$150
Dolly
• Kessler Crane Pocket Dolly Traveler (version 2): ~$580 with Manfrotto plate: ~$70
Stabilization Handheld
• Manfrotto 894CX carbon fiber monopod: ~$180
• Motified Redrock Micro micro shoulder mount: ~$500
Carry Case
• PortaBrace carry bag CS-DC2R: ~$100
• LowPro backpack: ~$150
• Hakuba tripod case (holds tripod, monopod, and Pocket Dolly Traveler): ~$40
NOTES
1 Bloom, P. (2010, Aug. 8). The future of video DSLRs. PhilipBloom.net. <http://philipbloom.net/2010/08/13/the-future-of-video-dslrs/.>
1 Please also note that any prices listed in this chapter were based on known prices at the time this book was being written. No guarantees of similar pricing models can be made.
2 Checking KEH on 5 May 2010, I could pick up three used Zeiss Contax lenses: 50mm f/1.4, 135mm f/2.8, and a 200mm f/4 for $814.