Composition, blocking, and camera movement are the building blocks of your story. They’re intertwined like DNA. You cannot have one without the others, so this first chapter begins with defining these three elements and showing examples of how DSLR shooters compose their image along the golden mean, how they tell a story through the blocking of performers, and how they utilize camera movement poetically.
COMPOSITION
Your three-dimensional subjects and the scene they’re in are composed through your lens. This composition relies on many factors, including lenses and shot sizes, as well as camera angles. But one underlying principle can’t be understated: the golden mean appearing in nature, a ratio studied by mathematician and philosopher Pythagoras (whom you might recall from that high school geometry class). Many cameras are equipped with rule-of-thirds grid lines, which provides a decent way to compose your images—keeping eye lines on the top third of the image and your subject in either the right or left third, for example. But photographer Jake Garn argues that the Rule of Thirds isn’t as naturally dynamic as the use of the golden mean, which we can see in one of his photos in Figure 1.1—the girl in the foreground composed along the golden mean.
FIGURE 1.1 Jake Garn’s photo with the golden ratio symbol laid out on top of it by the photographer.

(Photo ©Jake Garn [http://jakegarn.com]. Used with permission.)
Garn explains how Mario Livio explores this topic in his book, The Golden Ratio: The Story of PHI, the World’s Most Astonishing Number (Broadway Books, 2003). The ratio provides a spiral and rectangular pattern that reflects a pattern found in nature and, when used by photographers and cinematographers, can create powerful compositions.
If you want to learn how to do this and train your eye to compose your images around the golden mean, the Shutterfreaks team—a group of photographers who have created a website with tips and tricks (shutterfreaks.com)—offer a Photoshop application that allows you to take stills of your compositions and see how well they fit within the golden mean. You may download Shutterfreak’s application for Photoshop, so you can analyze a still within a golden mean grid; see http://www.shutterfreaks.com/Actions/RuleOfThirds.php.
Vincent Laforet’s Reverie, shot on a Canon 5D Mark II was the first sensational DSLR web hit that highlighted the low-light capabilities of the camera. It features a man longing for a girl, failing to find her during a late-night rendezvous. Let’s look at a few random stills and apply Shutterfreak’s golden mean app in Photoshop, just to see how it holds up compositionally along the golden mean (see Figures 1.2–1.4).
FIGURE 1.2 In the opening shot of Laforet’s film, we can see how the man and woman kissing become the compositional center point, the naturally occurring spot on the “canvas,” placing the Brooklyn Bridge in the background into balance. If Laforet had composed the characters dead center, the choice may not have been as compositionally powerful as the one he chose. Whether or not Laforet was conscious of it, the golden mean used as a tool helps provide compositional resonance to the scene.

(Still from Reverie. ©2008 Vincent Laforet. Used with permission.)
FIGURE 1.3 In this tight close-up, we can see again how Laforet’s compositional choice resonates with power around the golden mean.

(Still from Reverie. ©2008 Vincent Laforet. Used with permission.)
FIGURE 1.4 The woman waits for the man, but he’ll be too late. Whether or not he was conscious of it, Laforet composed her along the golden mean, providing strong composition to the scene as the camera tilts up. Note the back light placement causing a rim light glow, as well as her shadow to fall across the ground right across the golden mean line, presenting a strong compositional vertical for the shot. (Three-point lighting setup is covered in the next chapter.)

(Still from Reverie. ©2008 Vincent Laforet. Used with permission.)
Another aspect of composition includes creating the illusion of three dimensions by providing depth to a scene. The woman in Figure 1.4 appears to stand out from the background due to the fact that lights are on in the background—this gives the scene depth. Also, you may stage background and foreground characters and move them along different planes of action to signify the sense of depth as well.
Practicing with depth, light, and placement of your subjects is the best way to train yourself for good composition. Ultimately, there are no rules, only what looks and feels right for the story. But an understanding of where and why these rules work—and a mastery of them in your DSLR shooting—is important if you want to create powerful shots. Don’t break the rules until you know how to use each of them well.
Checklist for Composition
1. Who owns the story and/or who owns the scene? Your compositional choice may revolve around your central character or characters. Know who they are so your composition can reflect the central power, point of view, and/or ownership of the scene.
2. What is in the frame? What you see is what you get. If you don’t want something in the frame, get it out of the way or move your subject(s) until everything you see is meant to be there.
3. Place your main characters along the golden mean for strong composition. Follow the general principles of framing a character screen left if they’re looking right and screen right if they’re looking left. Keep eyelines around one-third from the top as a general rule. Break these rules when your story demands it.
Golden Mean Application
To use the Golden Mean application from the Shutterfreaks team in Photoshop, first download the app from http://www.shutterfreaks.com/Actions/RuleOfThirds.php.
How to Install the Actions
1. Open Photoshop.
2. If you haven’t already done so, extract all the files from the ZIP file into a folder on your hard disk.
3. Click and drag the .atn file from that folder to your Photoshop window. If you look in the Actions window in Photoshop, you will see the action set appear there.
Using the Actions
Open the action set by clicking the little arrow just to the left of the name RuleOfThirds. You may need to scroll down in the Actions window to see the actions.
Open a photo you want to analyze.
Highlight one of the actions by clicking it, and then run the action by clicking the Play Selection arrow at the bottom of the Actions window.
The actions will make changes to a duplicate of your file so that you can protect your original.
Notes
1. If the Action window isn’t visible, you can show it by going to the Photoshop menu and selecting Window/Actions.
2. If you’d like an action that will help you crop your images to conform to the Rule of Thirds and the golden mean, check out our Rule of Thirds Pro Action (http://www.shutterfreaks.com/Actions/RuleOfThirdsPro.html).
3. If you are new to using Photoshop actions, http://www.shutterfreaks.com/Tips/GettingStartedPS.html offers an introduction to the basics.
4. If you see an error similar to “The Command Make is not currently available,” you may be running the action on a 16-bit image in an older version of Photoshop that doesn’t support layers in 16 bits. To correct the problem, convert your image to 8 bits before running the action.
Your Shutterfreaks Team (Used with Permission)
BLOCKING
Blocking is where, when, and how subjects are placed and move in the composition, whether working with actors or characters in a documentary. How they are placed, when they move, where they move from, and where they go are dependent on the story. There should be nothing random because these movements (the blocking of the performers) need to be motivated; otherwise, random movements not grounded in the story will appear weak on-screen. The job of the director is to shape or choreograph the blocking (see Figure 1.5), while the cinematographer needs to capture these movements with the camera.
FIGURE 1.5 Po Chan directs the blocking of William (performed by Harwood Gordon) in the opening sequence from her short, The Last 3 Minutes.

(Photo ©2010 by Kurt Lancaster.)
Po Chan’s approach to blocking in The Last 3 Minutes (featured in Chapter 12) is as precise as her direction on all aspects of the short: “All elements in this short film, from casting and the music to the wardrobe; from makeup (the choice of lipstick color) to the hairstyle and hair color; from the patterns and textures of the set dressing pieces to the looks of the crystal itself, are all carefully chosen so that they all work in harmony to tell the story,” she explains to me in an interview on set.
In the scene, Po takes time to set up the physical actions for actor Harwood Gordon, as his character William Turner has a heart attack and collapses to the floor. Po knows what she’s looking for. She understands very well (and is glad) that Gordon has had no such experience before. She goes into extreme detail and wants Gordon to convey the pain in this moment. She explains to him the different layers of emotions that should be inside him in this scene. By doing so, she keeps the actor fresh in his imagination, and the physical action conveys that naturalness she’s looking for. Some actors may be hands off with the director, but Po says she looks for actors she can communicate with, heart to heart, look into their eyes, and know their feelings: “I trust them and I want them to know that they can trust me.”
Every gesture Gordon does, every expression he makes, is carefully observed by Po. In this scene, there is no dialog, so the physical actions are the main vehicle to convey the story. “I trust my instinct within—it’s always correct,” she says. She puts herself emotionally into the scene as she directs: “If my actor cries, I cry. I apply myself to them. Even though I can only live one life, I can experience many more different lives through the art of cinema.” Figure 1.6 shows how the blocking in this scene is tied to the shots.
FIGURE 1.6 A series of shots from the opening sequence of The Last 3 Minutes (Dir. Po Chan) reveal how her blocking visually reveals the story. The movements and position of Harwood Gordon’s character, William, on-screen provides the information for an audience to understand what is going on; Shane Hurlbut’s shots support the blocking by conveying these emotions through shot sizes, composition, and lighting.

(Stills from The Last 3 Minutes ©2010 Hurlbut Visuals. Used with permission.)
There are several possible combinations of blocking with a camera:
• A performer can stand still and the camera remains locked down.
• A performer can stand still and the camera moves.
• A performer can move and the camera is locked down.
• A performer can move and the camera can move.
Each one of these changes the dynamics of the scene. There is no “right” choice since it depends on an understanding of the story and what you want to convey to the audience. Each scene has an emotion shift, a change that alters the emotion of the scene, and an understanding of when this change occurs will help you make the better choice.
For example, in this particular scene (refer to Figure 1.6), the camera remains fairly static (with slight handheld motion, but no dolly or crane shots), and the character moves. In the second image, we see a low camera angle looking up before it cuts to the third image, when Gordon drops into a tight close-up frame of the camera. These two shots contain the shift in the scene—conveying to the audience the suddenness of his heart attack in the first, while the close-up expresses his surprise and pain. This is the first time the tight close-up is used in this scene. It’s the crux, the point where the scene shifts into a new direction. In the beginning of the scene, William is mopping the floor, alone with his thoughts. But in the close-up, we see his pain and struggle, and the scene shifts as he struggles for a meaningful heirloom in his pocket and his life flashes before his eyes. The filmmakers could have added camera movement at this point to emphasize this point, but it may have come across as melodramatic or overly manipulative, whereas the low angle followed by the tight close-up does the job in this particular instance.
In summary, blocking is the visual depiction of the story by actors’ bodies—their body language, gestures, and movement through space—and this blocking must be tied to the shot, whether the camera is locked down or moves. In the opening sequence to The Last 3 Minutes, we can see how the story is fully told by not only how the character of William is composed in space, but how he moves and how the camera captures his movements. Whatever decision you make as a cinematographer when shooting with DSLRs, be aware that blocking and camera movement are intrinsically tied together (see the next section on camera movement).
Blocking is the visual depiction of the story by actors’ bodies.
Checklist for Blocking
1. Who owns the scene—the point of view character? This is the character who, perhaps, has most to lose in the scene or the character impacted by the events in the scene. When you know who owns the scene, then, as the director, you can determine what the emotional state of this character is at the beginning of the scene and at the end of the scene: where does this change occur? You need to know this to be able to effectively block the scene (and determine how you’ll emphasize this moment—through shot size/angle changes and/or camera and/or actor movement).
2. Set up your camera so that you capture not only the action of this character, but more importantly, the reaction of the character to the events occurring in the scene—especially where the scene change occurs. The character’s actions and reactions will motivate where and what you capture on camera—and will help immensely in editing. The choices for blocking and the use of the camera include these four combinations:
• A performer can stand still and the camera remains locked down.
• A performer can stand still and the camera moves.
• A performer can move and the camera is locked down.
• A performer can move and the camera can move.
The choice you make should be dependent on the needs of the story; this takes analysis (see Chapter 7 on stories for more details).
3. Make a list (mental or physical) of the shots you need to tell the story—and for editing, especially as it relates to the scene’s emotional shift. Think about the actions of the characters and what they’re doing from shot to shot. What shots do you need to tell the full story when you edit? Where do the performers’ eyelines take us? This is one good clue to choosing shots to edit, and a good shooter needs to capture these eyelines. What will the shots look like as you edit? Do you have enough shots? Can you condense several shots into one shot with camera movement? Documentary filmmakers the Renaud brothers mention how important it is for shooters to be editors: “We started out as editors as I believe all young filmmakers should do. If you can become a good editor first, it is easy to become a good shooter.”1
CAMERA MOVEMENT AND STABILIZATION
If blocking expresses the movement in the composition of a scene, the camera movement moves the composition and will result in strong visual dynamics. Just as a character needs to be motivated before moving on-screen, the camera needs to be motivated in its movement. The camera’s movement needs to be tied to character motivations and movements because the camera captures emotions and actions through its lens.
To quickly attain an amateur look in your DSLR projects, just handhold the camera and move around a lot. Controlling the movement of a camera takes discipline and proper tools. And DSLR cameras are less stable than typical video cameras; they’re shaped for photography, not for handheld video movement. When you are engaging in handheld movement, the cameras are awkward and difficult to keep stable for longer sustained shots. One of the problems with handheld work is that it’s hard; it’s easy to make the movements unprofessionally shaky! Move in slow motion and make the camera feel heavy. It’s easy to whip a light camera around and make it jiggle too much as the body of the DSLR shooter fails to remain still. You must Zen your body and focus your attention on the shot. In many of the shots of The Last 3 Minutes, Shane Hurlbut, ASC, handheld the camera, but his body was rock steady and the movements of the camera were slight and were never jerky.
Several companies have designed a variety of handheld and shoulder-mounted stabilization devices for helping with handheld shots. But they can still provide poor results if you’re moving around and bouncing too much. Holding still, moving in slow motion, and moving as if you’re carrying weights will help your handheld work. Proper stabilization, whether using a tripod or Zacuto’s “Target Shooter,” for example, when properly practiced, will help provide a professional cinema look.
When handholding shots, you may tilt up and down along the vertical axis (yaw) or move side to side, left to right (pitch). A roll occurs when you move front to back like a ship riding waves at sea (rarely used).
One of the safest ways to get a clean shot is to use a tripod … when the story warrants it. It’s one of the best ways to get stable and acceptable shots for DSLR projects, but the shots may appear too static, so some slight motion may be needed. Again, let your story determine the best way to convey the emotion you want in a scene. You may pan or tilt on a tripod (whether on a tripod or handheld), but be sure to move slow motion to minimize shakiness and “Jell-O effect” of the camera’s CMOS sensor—when vertical lines shift diagonally while panning when you move the camera fast because the sensor speed is too slow to keep up with the movement. Also, remember that the longer the lens, the faster the apparent motion and the more unstable the shot will be when handholding. It may be best to use a tripod when using a long lens.
It’s easy to whip light cameras around and make it jiggle too much as the body of the DSLR shooter fails to remain still. You must Zen your body and focus your attention on the shot.
Panning a DSLR and the Jell-O Effect
A lot of video tests revealing how a fast pan can cause verticals to shift have been posted online. Critics point to these shifts as a weakness to the camera. At the same time, however, this issue doesn’t seem to impact many professional filmmakers. Shane Hurlbut, ASC, says he’s rarely encountered the problem. Vincent Laforet (dir. Reverie) recently said this about it:
While the “Jell-O effect” exists with any CMOS sensor given their design, I didn’t find it to be a factor in this project—or, for that matter—on any of my other productions. It’s important to keep in mind that any camera out there, film or digital, has limitations on how fast you can pan it—especially when projected onto a large screen. In general, a Camera movement includes DP will always plan for this on any camera moves they are directing the speed of the camera’s move. It’s important to remember that a pan may look just fine on a 170 monitor—but the same pan may be a bit painful for the audience’s eyes on 50 foot silver screen. Unless you are doing dynamic and fast moving action sequences, where you are purposefully moving the camera at extremely high rates (whip pans, running sequences, etc.), I would say it’s unlikely you will encounter issues with the “Jell-O effect.”2
In the end, it’s the DP’s responsibility to know the strengths and weaknesses of his tools and to know how to shoot around those limitations.
Camera movement includes
• Pan: left to right on the tripod axis (see Figure 1.7a)
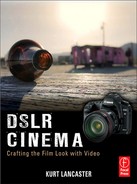
• Tilt: up and down on the tripod axis (see Figure 1.7b)
• Push-in through space (see Figure 1.7c)
• Pull-out through space (see Figure 1.7d)
• Tracking (or dolly): lateral movement through space (see Figure 1.7e)
• Crane: up and down movement through space
FIGURE 1.7a Panning.

FIGURE 1.7b Tilting.
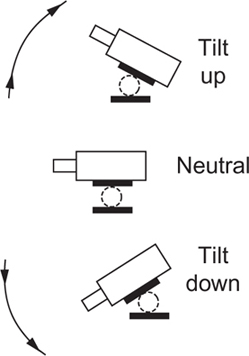
FIGURE 1.7c Push-in.

FIGURE 1.7d Pull-out.

FIGURE 1.7e Tracking.

Despite the suggestion of using a tripod, one of the most powerful tools to create the film look revolves around camera movement—that poetic push-in or tracking shot that moves the viewer smoothly through the space of the cinematic world. But getting a dolly that works really well will blow the budget (let’s face it, cheaper tripod dollies—tripods with wheels attached to them—just don’t cut it). And the skateboard dolly or wheelchair trick goes only so far (and requires a smooth surface). Laying down tracks just isn’t doable for most DSLR shooters, either.
However, there’s an affordable way to get that high-end filmic look: the Kessler Crane Pocket Dolly Traveler, a fairly inexpensive device that can produce high-end results. In Philip Bloom’s short, Salton Sea Beach (http://vimeo.com/10314280), he masterfully attains tracking shots by using this dolly (see Figures 1.8 and 1.9).
FIGURE 1.8 Two stills from Salton Sea Beach, showing how subtly Philip Bloom slowly pushes in on a shot using the Kessler Crane Pocket Dolly Traveler, which allows for Hollywood-type dolly/track camera movements both laterally and in and out. (Note the change in the sides of the shot—the 2 × 4 in the bottom screen left is no longer visible above.) The slow push-in offers poetic power around its smooth rhythmic beat. Push-in shot from 1:31. Film shot on a Canon Rebel T2i with a variety of lenses. Color grading with Magic Bullet software.
(©2010 by Philip Bloom. Used with permission.)
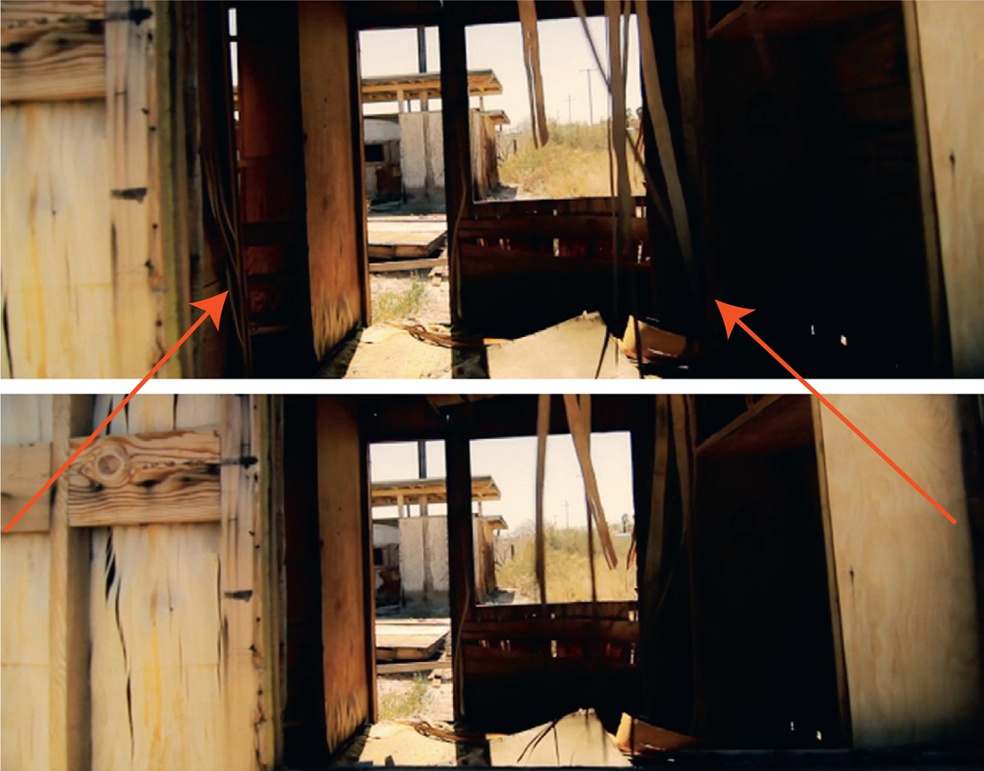
FIGURE 1.9 Philip Bloom sets up a tracking shot in his short, Salton Sea Beach, using the Kessler Crane Pocket Dolly Traveler on his tripod. By moving the camera on this micro dolly, the DSLR shooter can achieve high-end Hollywood-style cinema motion.
(©2010 Philip Bloom. Used with permission.)
High-end dollies can be bulky and expensive. For low-budget DSLR shooters—especially those one man- and one woman-band shooters—the 25-inch pocket dolly (see Figure 1.10) becomes a portable solution that can be thrown in a tripod bag.
FIGURE 1.10 The 25-inch Kessler Crane Pocket Dolly Traveler (version 1) used by Philip Bloom in Salton Sea Beach. The image in the foreground shows the product with the crank and belt. Bloom recommends the one with the crank because he feels it’s “definitely smoother … and is quiet. I don’t actually use the crank on the Pocket Dolly,” he notes. “I find I get better results using it by hand, but the addition of the crank and belt system makes it smoother than the non crank one and I was able to get first takes almost every time” (Bloom, P. (2010, May 5). Kessler Crane’s Motorized dolly tripod system now shipping. PhilipBloom.net., http://philipbloom.net/2010/05/25/kessler/.)
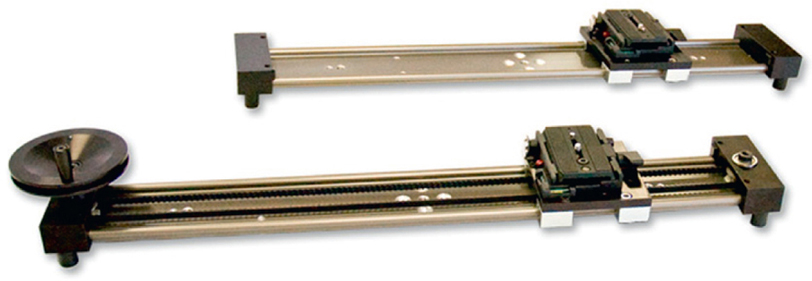
(©2010 Kessler Crane. Used with permission.)
If the Pocket Dolly Traveler adds a rhythmic beat like a line of poetry, Ken Yiu’s use of Tiffen’s Steadicam Merlin presents a song. He achieved amazingly smooth handheld shots in Wedding Highlights with a Panasonic Lumix GH1 with kit lens (see Figure 1.11).
FIGURE 1.11 Ken Yiu achieved amazingly smooth motion in his Wedding Highlights using the Panasonic Lumix GH1 and the kit lens (14–140 mm, f/4-5.8) with Tiffen’s Merlin Steadicam. Color grading with Final Cut Pro (see Yui, K. Lumix GH1-Wedding Highlights. Vimeo.com. <http://vimeo.com/6272661>.)

(©2009 Ken Yiu.)
Tiffen’s Steadicam Merlin balances the camera on a handheld support device, providing the ability to shape smooth ndheld shots. It requires perfect balance based on the camera’s and accessory’s weight—so windy days are not good when using this tool outdoors. The “Merlin Cookbook” is a website that assists Merlin users to achieve balance with their particular camera. Instructions can be found there as a PDF file: http://www.merlincookbook.com/MerlinBetaBalInstr1-27.pdf. The site also includes a metric and English meaement scale to create the “Magic Formula” for balance; see http://www.merlincookbook.com/formula.php.
WEBLINKS
“Merlin Cookbook” http://www.merlincookbook.com/MerlinBetaBalInstr1-27.pdf
“Magic Formula” http://www.merlincookbook.com/formula.php
Ken Yui’s setup for his wedding shoot includes these settings (they only make sense for Merlin users who’ve read the manual; see Figure 1.12):
GH1 + stock lens (– low profile quick release)
Front: |)
Bottom: ||)
Arc: −1
Stage: −2
Gimbal position: 32 mm
Z: −5
FIGURE 1.12 Tiffen’s Steadicam Merlin used by Ken Yiu on his poetically smooth project, Wedding Highlights.

(©Tiffen Corporation.)
Vladimir Chaloupka of Santa Fe, New Mexico, presents a video tutorial using a Canon 5D Mark II on the Tiffen page at http://www.tiffen.com/merlin_canon5d_qtmovie.html.3
However smooth the Merlin may be, it does take considerable practice, including support, to make it really shine. For longer-duration shots, you may need some sort of wrist and/or waist support. Redrock Micro may also offer a more affordable way to go, but if you’re really on a low budget and want the steadicam look, the do-it-yourself steadicam may prove useful (http://steady-cam.org/). It costs about $14 in parts, but after having built and used one, you do get what you pay for: bulky and too heavy.
WEBLINK
Merlin video tutorial using a Canon 5D Mark II
THE FRANKEN-CAMERA
By Travis Fox, 5 June 2010
Recently, a couple people have asked me about my (and these are not my words) ghetto fabulous or franken-camera Canon 7D video system (see Figure 1.13). In some ways, the DSLR system for me simply represents a better camera, not a fundamental shift in video storytelling. Over the years, I’ve changed cameras when technology changed and quality got better but my style has more-or-less remained constant.
FIGURE 1.13 Travis Fox of Travis Fox Films (travisfox.com)—and formerly a video journalist for The Washington Post—didn’t like the feel of DSLR cinema rigs, which to him felt as though he was carrying a shoulder-mounted video camera. He missed the feel of his Sony Z1U “cradling it like a baby or a football as is my practice,” he says.

(Photo by Mark Mann ©2010 Travis Fox Films. Used with permission.)
The biggest reason I had for not adopting the DSLR sooner was ergonomics. I could deal with the lack of timecode, the audio fixes, and the overheating, but I simply couldn’t handhold the thing steady and interact with my characters at the same time. I wanted a DSLR built like the Sony Z1U, which I used lovingly for years. I checked out all the standard “rigs,” the Zacuto and the Redrock Micro, but they seemed to push me towards holding the camera like a Betacam [shoulder-mounted camera], not cradling it like a baby or a football as is my practice.
In the end, I ended up saving money and getting a fit I could deal with. An $8 bracket (it’s literally the cheapest flash bracket that B&H stocks) holds the Ikan monitor out in front to the left of the lens just like the Z1U. I splurged on the other bracket (it was a hundred bucks), which holds the audio gear and balances the camera out by moving weight to the back of the camera. …
With the ergonomics worked out, one of the first assignments I had was a series of stories with NPR’s Adam Davidson in Haiti for PBS/FRONTLINE. As soon as I headed out in the hot Haitian sun I was soon confronted with a series of new issues to work out. The biggest surprise was the overheating. I had worked with 5D in the Chihuahuan desert in July, so I thought I was prepared, but in Haiti the 7D would shut down sometimes only after 30 minutes of shooting in the heat of the day. I quickly changed the way I work in order to minimize this DSLR flaw. (Fox, T. (2010, June 5). The Franken-Camera. Travis Fox Films. <http://blog.travisfox.com/>)
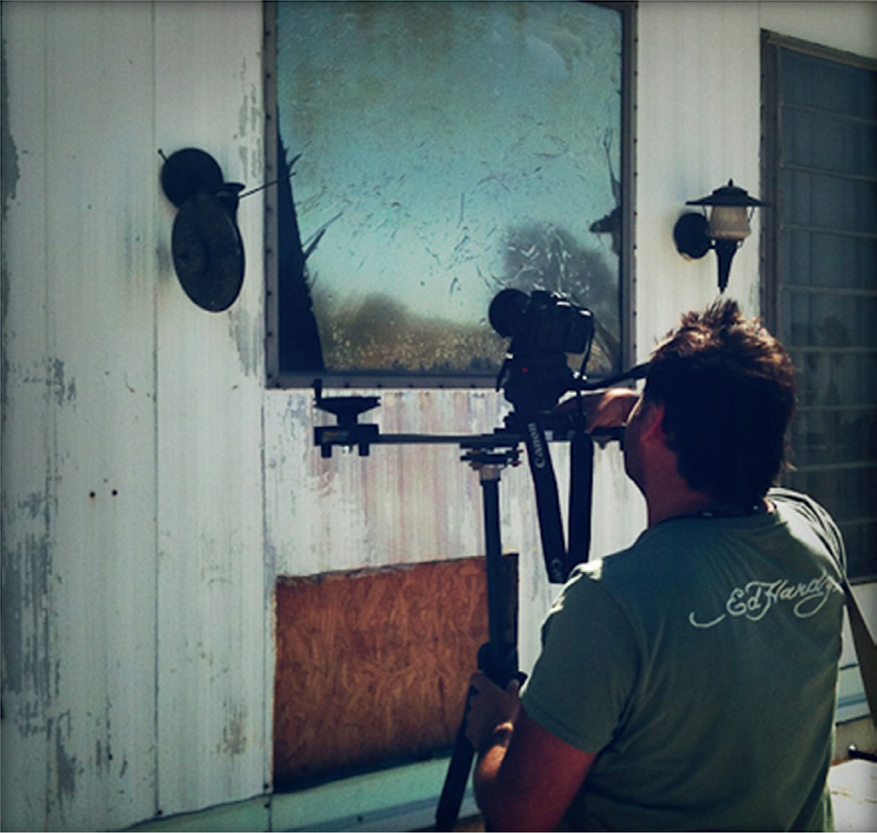
Philip Bloom, in Cherry Blossom Girl, utilized a variety of lenses, as well as Zacuto’s Striker around the streets of Chicago (see Figure 1.14).
FIGURE 1.14 Still from Philip Bloom’s Cherry Blossom Girl (see http://vimeo.com/5223767) was shot handheld with Zacuto’s Tactical Shooter. Shot on the Canon 5D Mark II. The Tactical Shooter has since been replaced by a newer model, the Target Shooter.

(©2009 Philip Bloom. Used with permission.)
Unlike the Merlin, where we see how Ken Yiu engaged smooth handheld movement while walking, Bloom stands still, allowing for a slight bobbing movement of the camera as the tactical Shooter is braced against his body (see Figures 1.15 and 1.16). He’s in full control of his 5D Mark II camera.
FIGURE 1.15 Bloom stabilizes his Canon 5D Mark II with Zacuto’s Tactical Shooter (replaced by the Target Shooter model), giving him the ability to engage fairly stable handheld shots. Attached to Bloom’s 5D is the Zakuto Z-Finder eyepiece for the camera’s LCD screen and a Rode Video Mic. (Bloom, P. (2009, June 18). Cherry Blossom Girl. PhilipBloom.net., http://philipbloom.co.uk/2009/06/18/new-web-series-and-new-short-film-on-canon-5d-mkii-the-art-fair/.)

(©2009 and courtesy of Philip Bloom.)
FIGURE 1.16 Zacuto’s Target Shooter (the later model of the Tactical Shooter used by Philip Bloom in Cherry Blossom Girl). Attach a Z-Finder, and you’ll have an essential eyepiece for outdoor shooting. It not only adds another point of contact to the body when shooting (for better handheld stabilization), but allows for better viewing of the LCD screen because it includes either a 2.53 or 33 magnification.

(© 2010 Zacuto; http://store.zacuto.com/Target-Shooter.html.)
Checklist for Camera Movement and Stabilization
1. What does your story demand? Your story—the emotional intention you’re trying to express in your shot—should indicate whether the shot should be locked down on a tripod or contain smooth movement (such as with the Pocket Dolly) or a little bit more rough (perhaps the Zacuto Target Shooter). Also, take note at what point in a scene the camera should move or stay still. This should convey the emotional shift in the story.
2. What angle of lens are you using? Long lenses = tripod in most cases. Normal and wide lenses = handheld and handheld stabilizers.
3. What kind of shot do you need? If you want the handheld look, providing a sense of immediacy or presence to the scene, then utilize a handheld stabilizer—such as the Steadicam Merlin—with a wide to normal lens. If you need a stable shot, no matter the lens size, then lock down the camera on a tripod.
4. Are you short on time? Do you need to “run and gun”? For video journalists and documentary filmmakers on the move, the handheld stabilizer, such as Zacuto’s Target Shooter or Striker, or Redrock Micro’s nano—RunningMan will be best for quick setups and to get in and out of a scene quickly.
NOTES
1 Fauer, J. (2008). Cinematographer Style: The Complete Interviews, Vol. 1, (p.395). American Society of Cinematographers.
2 Fauer, J. (2008). Cinematographer Style: The Complete Interviews, Vol. 1, (p.395). American Society of Cinematographers.
1 Lancaster, K. (2010). Shooting in Haiti: an interview with the Renaud brothers. Documentary Tech. <http://documentarytech.com/?p=3489>
2 Laforet, V. (2010, June 1). VW Spec Ad posted with behind scenes video. Vincent Laforet Blog <http://blog.vincentlaforet.com/2010/06/01/vw-spec-ad-and-canon-digital-learning-center/>, accessed 02.06.2010
3 Chaloupka, V. On Steadicam Merlin and Canon 5D Mark II still camera. Tiffen.com., http://www.tiffen.com/merlin_canon5d_qtmovie.html.