Studio Lighting
The Good Life
The studio environment offers many advantages over location work. It represents the good life because it has sufficient power, a rigging system of some type to hang instruments from, and probably a power distribution arrangement with a dimming control package. In addition, air conditioning will keep you from melting during repeated takes. For all of its comforts, the studio still poses a problem you do not face on location. How do you create the illusion that the background for an exterior scene has the expanse that occurs in nature? How do you create natural-looking exteriors outside windows and doors of studio sets or create the illusion of infinite space?
There are two basic approaches to these problems. The first solution is to use a large neutral background known as a “cyclorama,” or “cyc.” The second method is to use electronic devices such as chroma key, Newsmatte, Ultimatte, or create a Virtual Set, which may be used in conjunction with a good cyc. All of these approaches have special lighting requirements that must be taken into consideration. The degree of success you achieve with these methods is directly proportional to the care you take with the lighting. The better the lighting, the more convincing the end results will be.
Cycloramas
One of the most versatile and valuable assets of any studio is a good cyc setup. However, it places high demands on power and air conditioning requirements, and must be connected to a dimming stem to be truly effective. There are two basic types of cycs: hard and soft.
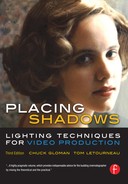
When cycs are constructed using a variety of solid materials such as concrete, lath, and plaster or plasterboard, they are referred to as “hard cycs.” Usually, however, cycs are made of fabric stretched over a frame to form a smooth surface and are called “soft cycs.” Each type has its own advantages and can be configured in any of the three basic shapes, as shown in Figure 10.1.
Hard Cycs
The simplest form of a hard cyc is illustrated on the left in Figure 10.2. It is a plain plaster wall with cyc strips mounted about 8 feet in front of its surface at the top. The simple straight wall arrangement has a separate, movable, ground row sweep that is placed at the base to help create the illusion of infinity and make it more difficult to detect where the wall meets the floor. A “sweep” is a curved masking piece that sweeps up from the horizontal surface toward the cyc or back wall (see the illustration left of center in Figure 10.2). However, such an arrangement will not equal the effectiveness of a cyc that has an integrated sweep like that shown right of center in Figure 10.2. It is the most expensive form of cyc and blends the wall with the floor in a gradual integrated sweep. These hard cycs, with a built-in sweep, create the most convincing illusion of infinity. If the cyc is higher than 12 feet, it will probably require light from below as well as above to be lit evenly. In such cases, the ground row sweeps can be moved forward and lighting instruments can be placed behind them as illustrated on the far right in Figure 10.2.

Figure 10.2: Basic cyc designs.

Figure 10.3 shows an example of a curved cyc. Note the bend in the wall behind the talent. In Figure 10.4, the curve in the wall appears much more pronounced; it is the same set as in Figure 10.3, but the telephoto lens gives you a better idea of the angle of the curve. In Figure 10.5, the curve on the wall seems to disappear when viewed straight on.
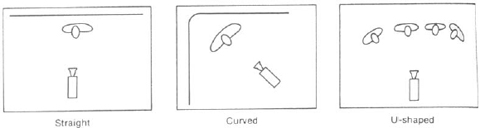
In more expensive installations, if the cyc is more than 12 feet high and requires additional lighting from the bottom to achieve an even wash, a trench may be created in the floor to conceal the strips rather than using a ground row sweep (see Figure 10.6). As the contour of the cyc increases in complexity from a straight line design to a curve or U-shape, the costs rise accordingly, especially when an integrated curved sweep is formed to join the cyc with the floor.
Soft Cycs
If the cyc is constructed of fabric, there are a number of ways to approach the situation, and some of them are quite sophisticated. In the simplest case, a large, seamless piece of muslin or canvas can be stretched with grommets and tie lines between an upper and lower batten, and vertical battens on either end. Again, as with hard cycs, if the surface is over 12 feet high, it will be necessary to light it from the bottom as well as the top to obtain an even wash of sufficient intensity in deep colors. This can be accomplished by hiding the lower lighting instruments with a ground row or sweep, or by creating a trench in the studio floor to conceal the instruments. These methods of concealment will work with a straight, curved, or U-shaped arrangement.


Figure 10.5: Straight cyc.
A great variety of effects can be created with multiple-layer fabric cycs using nothing more than close control of the light on each layer of fabric. Although multiple-layer cycs have traditionally called for a hefty investment in instrumentation, power, space, and air conditioning requirements, newer instrumentation and cyc materials available today make the same effects possible with fewer layers and less consumption.
While a single layer of material is adequate in many situations, the multi-layer approach is often used when many different effects have to be made on a real-time basis during performances of musical numbers or within a dramatic scene. Such effects might involve changing the background from a bright blue sky with white clouds to a stunning sunset and on to a star-filled evening sky.
The type of cyc you construct should be based on the needs of your productions. If they require nothing more than a plain neutral sky, install a single-layer blue cyc material that can be lit with white light only. This arrangement requires less expensive, single-circuit cyc lights that use fewer watts, since the light output is not cut by the use of gels, and puts less burden on the air conditioning system.
If you must produce minimal changes in your backgrounds during production, choose an off-white or gray muslin and light it with a two-circuit arrangement of cyc lights. White muslin or canvas should never be used as cyc material, even if you desire a white background, because once you start with a material that reflects more than 60% of the light that falls on it, you will create a situation in which the actors and scenery placed in front of the cyc will tend to be silhouetted against the bright background. Even if you do not put any light on such a cyc directly, spill from the other lights can create problems.
With a two-circuit cyc lighting system, you can gel the instruments with the two colors needed for the scene and then cross-fade from one to the other, as required, to introduce a change during the scene.
For the greatest flexibility in the creation of effects, a two-layer cyc and a three- or four-circuit cyc light arrangement work best. A natural-color shark’s tooth scrim is hung about 1 foot in front of the off-white muslin or canvas backing. This has a twofold advantage over the single-layer cyc. As the light strikes the mesh scrim, it creates a much softer look, which creates a more believable impression of infinity. You can also place small Italian lights on the front surface of the muslin layer. When these lights are turned on, they shine through the open mesh of the scrim and create very believable stars in the evening sky. Since there is bound to be some movement of the scrim in front of the lights, caused by natural drafts in the studio, this movement causes the stars to twinkle in a believable and random fashion as they are alternately exposed to the spaces and solid areas of the shark’ s tooth scrim.
Ages ago, CBS used a three-layer cyc in which the third layer was used to create the illusion of clouds in the sky. An opaque black Duvetyne (a black cloth) layer backed up the entire cyc with random cloud-shaped holes cut out and lined with mesh or scrim to maintain their shape. When the scoops or skypans were lit, they projected a soft-edge, cloud-shaped pattern on the muslin, and the effect was further softened by the front layer of scrim. This arrangement of the back layer and its associated backlights required a great deal of backstage space and is not used today because of more efficient special effects projectors such as the Great American Scene Machine covered in Chapter 11. These effects machines achieve even better effects with no sacrifice in precious studio floor space.
Efforts to blend the ground row evenly with the floor and cyc can be handled effectively by using a series of Fresnels aimed directly down on the ground row and controlled by dimmer circuits. This is an effective way to control the intensity of the ground row and achieve the desired results. These Fresnels must be gelled with the same colors used in the main cyc strips. Placement of the cyc strips should be guided by the manufacturer’s photometrics to achieve the greatest efficiency. You want an even wash with the greatest output per watt. Generally, this will mean placing the cyc strips 8 to 10 feet in front of the cyc.
Cyc Lighting and Equipment
For the past 30 years, we have had to use pretty much the same type of material and lighting instruments to build functional cycs. Since this older material and equipment is more universally available, we will deal with it in this chapter as we discuss cyc lighting methods and equipment.
During the past couple of years, some new items have been developed that reduce cyc construction costs, space, power, and air conditioning requirements. These newer materials will be discussed in Chapter 11. The concepts and techniques remain pretty much the same, whether new or old technology is involved. Live theater makes frequent and extensive use of cycs. The lighting instruments used usually consist of relatively inexpensive strip-lights or borderlights that have three or four circuits of lamps ranging in size from 100 to 300 watts. The lamps may be R-40s or as simple as conventional household lamps, each in its own separate compartment. This compartment may have a colored, round, glass lens called a “roundel” that covers the opening, or it may be equipped to receive any color gel sandwiched in a gel frame.
A typical three-circuit arrangement may consist of alternate circuits of primary red, blue, and green, and use roundels or gels to color the light. A fourth circuit may add pure white light to the mixture to increase the versatility of effects. Because of the relatively low wattages and heat dispersion involved, permanent glass roundels or inexpensive gel material may be used in front of the lamps. Unfortunately, these instruments do not produce enough intensity to adequately light a television cyc. What looks great to the human eye in the theater will do little to produce an acceptable image for the television camera.
Television cyc lights range from 750 to 2000 watts each and require larger, more expensive instruments and more costly color media, but there has been little choice in these matters until some recent developments that will be covered in Chapter 11.
Newsmatte and Ultimatte
Although chroma key has been improved technically since its introduction in the early 60s, it still has some drawbacks and telltale signs that limit its use when high-quality matting is required. A father and son team, Victor and Paul Vlahos, have invented more sophisticated matting systems. The less costly of the two is Newsmatte, designed for live telecasts involving such things as matting graphics for weather reports, with live studio shots of the weather forecaster. The more costly and sophisticated unit is called Ultimatte. It is intended for critical use in post-production matting to combine live-action foreground material with prerecorded background information. Thanks to a major breakthrough in encoding and decoding techniques, it is even possible to achieve flawless Ultimatte composites using foreground material that has been recorded on any of the digital formats.
In addition, many news sets are going the route of virtual reality or virtual sets. In a virtual set, nothing exists except the talent and a cyc or background. When combined in the virtual system, the computer removes the phony background and the talent now walks around a set that is completely computer-generated.
For fans of the old TV series Star Trek: The Next Generation the Holodeck was an example of a virtual set or environment. Just as the weather forecaster looks at a monitor to tell where he or she is pointing on the map, the talent will only see the completed set they are in when looking at the monitor. After the initial investment in the virtual system, a substantial cost savings can be realized because new sets do not have to be built—they are simply created in the computer and layered into the video.
Composite Lighting
Realistic lighting of the foreground is as important as anything else in making the composite look natural and realistic. Again, the key light must come from the same direction as the light in the background scene, but it is just as important that the contrast ratio of the foreground lighting match that of the background. If the background material has flat lighting, then so must the foreground elements.
TV stations and post houses that still use chroma key have to make sure their lighting is exact. The switcher removes everything it sees of a particular color saturation and hue. Most places use either chroma key blue or green. These colors were selected because they are unique enough to not appear in most fabrics, set props, or people.
Everything that exists in that deep color saturation and specific hue disappears. A background, generated by another source, replaces the blue or green. This presents a few problems.
If the talent is wearing anything that matches the blue or green, it too will disappear when keyed. Often, people with blue eyes had to get tinted contact lenses that wouldn’t “key out.” Orphan Annies don’t go over well on television.
Lighting is also extremely important. It must be flat. If too much shadow is thrown on the chroma key background, that will make it darker and harder to key. Everything must remain even. Backlighting is not as critical in this type of setup because the background will be eliminated.
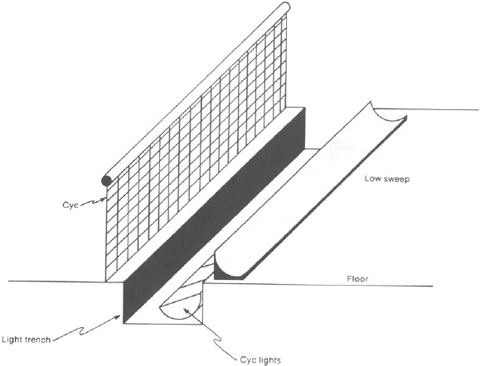
The switcher operator on a live broadcast or the NLE operator on a taped event must adjust the clip until the background color disappears and the desired background is in its place. Hairstyles used to be a problem because the fine ends and frizzies would leave traces of electronic noise and pulsate wildly. Most of the newer equipment has eliminated this problem and leaves sharp, clean edges (see Figure 10.7).
The way to achieve the best matting is by using Stewart Ultimatte blue screen material for the background screen, because it provides the greatest separation between the blue and green spectrums. If it is not available or your budget does not permit its use, there are two approved sources for Ultimatte blue paint. They are Rosco and Gothic Color. Of the two paints, the Gothic Ultimatte blue comes closest to the blue-green separation provided by the Stewart Ultimatte blue screen material (see the Appendix). If the background element was an exterior scene, the easiest method to achieve a convincing composite is to shoot the blue screen outside in the parking lot or up on the roof. The easiest way to match sunlight is to use sunlight. It is the best way to get a match between exterior background material and foreground subjects that are to look as though they were a part of the original background.

When planning a composite, shoot the background material first, and then light the foreground to match. If you light the foreground subject in the studio so that it looks good to the naked eye and then matte it over previously unseen background material, the end result will never be believable.
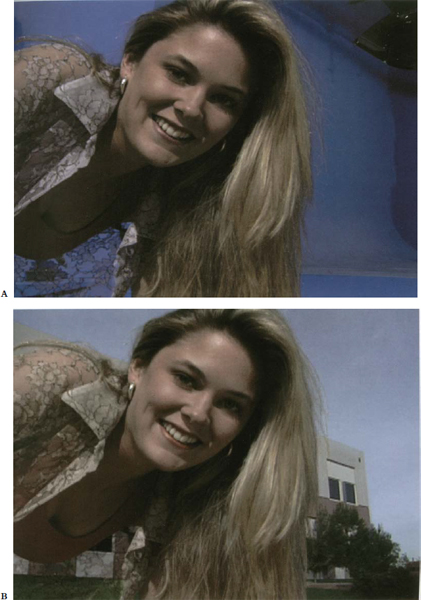
With the background in the can, the next step is to light the foreground subject to match it. When you go into the studio to complete the composite, light the blue screen after you light the foreground talent or scenic element, especially if you want it to cast a shadow on the background. If you want cast shadows to appear on the background, position your key light so it causes a shadow to fall on the blue screen. Such a setup will result in spill from the key on the blue screen background. If you already lit the blue screen so that it was extremely evenly lit, you would create a problem for yourself. Even though you can see a shadow on the blue screen in the studio, it will not key in because it will be necessary to set the clips on the Ultimatte or Newsmatte to a lower setting to remove the excess light from the key that strikes the background. When you make this adjustment, it will bring the level of the cast shadow even with the normal background level of the blue screen, and the shadow will disappear from the final composite (see Figure 10.8).
There are two crucial elements involved when lighting foregrounds for convincing matting. They are backlighting and side lighting. Side lighting is particularly crucial because often when you look at someone standing in front of a blue screen, you will notice light bouncing off the screen onto the talent. To the naked eye this looks like good backlight or side lighting. However, when it is properly adjusted, the Ultimatte will remove that blue spill and produce a negative effect on the final composite. Without good white light directed at the subject from the back and the side, once the blue spill is removed, the foreground elements will be surrounded with what looks like a dark shadow in the final composite. You will naturally think the matte is bad. It is not. The electronics are doing precisely what they are designed to do.
The problem is an absence of good white side light. This effect is bothersome when the background material is high key. If, however, the background material is low key or very dark, this absence of sidelight will work in your favor to create a more natural composite. In such a case, side light would only cause an unnatural glow around the edge of the foreground elements. Side-light sources can be soft or specular in nature, depending on the look you are trying to match. Fresnels might be used when matching the look of a background that was shot outside on a sunny day, but softlights might be appropriate if the background material was shot in a fluorescent-lit office environment or outside on an overcast day.
The use of an amber backlight, like that recommended in some chroma key situations, is not a good idea for Ultimatte. It will only give an amber cast to the foreground subject. It will not create a better matte. The design of the Ultimatte automatically takes care of blue spill without creating a ragged edge around the talent. (Light for Newsmatte or Ultimatte composites as though the foreground subject were situated in front of a black velvet drape. Any spill from the blue screen will not be seen in the final composite. Whatever light you want to see in the finished matte must be put there by you.)
The most important thing about lighting the blue background screen is consistency in terms of evenness and color temperature. If the color temperature of the background screen varies, it will cause a hue shift in the final background scene. For this reason, dimmers cannot be used to even out the illumination of the background screen. The instruments must be moved closer to the screen, or farther back, to adjust for intensity differences. Scrims might also be used, but they provide definite steps rather than gradual degrees of intensity correction. Cyc strips are the easiest instruments to use since they are designed to produce an even wash of light over large areas.
Even lighting is relatively easy to achieve over a limited blue screen area when you are only matting the upper body of talent in the foreground. If the foreground subject must be seen from head to foot, walking down a path for instance, the lighting task becomes far more complicated as you try to achieve even lighting where the blue back wall blends with the blue floor. When you light the floor, do not light it straight down from above, because the light will kick back into the camera as specular white light and destroy the even wash you are trying to create. The use of a polarizing filter, because of its ability to remove glare, is highly recommended if you are going to shoot a floor. Like a hard eye, the best way to achieve an undetectable blend between floor and back wall with blue screen matting is to sweep some of the Stewart blue screen material down the back wall and out onto the floor in one continuous piece. If you have to, you can use ground rows, but the issue of detection becomes more critical. If you already have a good hard eye with sweeps, just paint it Ultimatte blue.
The polarizing filter is especially good if your background material suggests that the foreground subject is strongly backlit by the sun and you want to key the subject’s shadow into the final matte as it comes forward from the feet. To do this, you must use a strong backlight in the studio. By the very nature of its placement, it will put a bright glare on the floor. The only way to remove that glare is by using a polarizing filter. As with any filter, it will reduce the amount of light that reaches the camera’s CCDs. Do not boost the gain on your camera to compensate for this reduction. Add more light to the entire setup, or you will degrade the composite by adding more noise with the increased gain.
The ratio of light on the background screen to the foreground subject should be roughly 1 to 1 when measured with an incident light meter. If a gray card is placed directly in front of the blue screen, it should read the same as when that card is placed directly in front of the foreground subject.
Uneven lighting on the back wall will affect the way the background scene is reproduced in the composite. You can use this fact creatively to re-light your background scene. If you wish your background scene did not have such a hot spot in the upper-right corner, for instance, you can reduce the light level on the corresponding area of the blue screen and the Ultimatte will reduce the level of the background scene in that area of the final composite. It is a bit like dodging in the print process of still photography. When you reduce the light on a given area of the blue screen to tone down some element of the original background scene, be sure you do not dim the light electrically, thereby reducing its color temperature. If you do, you will change the color temperature of the prerecorded background material in that area, causing it to appear warmer.
By the same token, you can add colored light to the blue screen to paint the background scene if you have some area or object that did not photograph to your liking in the original scene. If you want the sky to be more orange in the final composite, you can wash the upper portion of the blue screen with an orange light, and it will transfer to the final composite.
You could use blue-colored gels to light the blue screen and increase the density of the blue, making the matting process easier. This can be done only when you are able to place the foreground subject far enough from the blue screen so that the blue light will not be cast on the subject and reduce the contrast of the foreground subject in the final composite. Blue light cannot be used in cases where you need to shoot the floor, as this light would bathe the foreground subject and obscure the final composite.
With a nonlinear editing system, layering backgrounds is easily achieved. The computer has totally changed the process of editing with the ability to add as many layers as needed. It has also affected the way we light.
In some non-linear editing systems, any color may be the background that is “keyed out.” If chroma key blue or green is not available, any solid color can be selected. This color is clicked on with the selection “eyedroppered,” and that hue is now essentially removed from the shot. This poses the same problems as with chroma blue or green in that if the talent is wearing the same color that is selected to be removed … the talent disappears. The rarity of chroma key blue or green appearing naturally is slim, but any normal color might be much different.
Hollywood still prefers to use green screen rather than blue. It is hard to find a film that does not incorporate it somewhere in the effects production. This has made wire removal much easier. Once again, watch the “special features” on any action DVD. The green screen process will be explained.
Advancements in fluorescent lighting has made illumination of cycs and blue/green screens much easier. The low-wattage lights are flat, even, and produce less heat than their tungsten cousins. Whether shooting outdoors or inside, the fluorescents may be color balanced to do the job evenly.
An early pioneering film in digital technology was Forrest Gump. Tom Hanks (Forrest) was intercut shaking hands with President Kennedy—30 years after Kennedy’s death. Through digital manipulation and, more importantly, lighting, Hanks’ material shot in the 1990s could be intercut with footage shot in the 1960s. If the lighting in Hanks’ segment didn’t match the lighting in the Kennedy segment, the two separate elements would stand out.
The same technique has been used with long-deceased leading men like Fred Astaire, John Wayne, James Cagney, Frank Sinatra, and others in current TV commercials. Other than the computer technology, lighting was the key in combining the old material flawlessly with the new.
Blockbuster films like Jurassic Park, Godzilla, Mighty Joe Young, Star Wars: The Phantom Menace, and numerous others all have villains that are computer generated.
How do you light for something that only exists in the creator’s mind? When these films are shot, the computer-generated characters are being created and staged elsewhere. Sometimes lighting is no more difficult than a video shoot. The computer-generated characters have their own lighting and shadows created electronically. Does this type of lighting fool the viewer? At times it may, but as long as images are recorded on film, tape, disk, or an optical medium, there will always be a need for lighting—the good old-fashioned way.