Location Lighting
Battling the Elements
Exterior Daylight Scenes
In earlier chapters, we dealt with sunlight and its effect on indoor locations. Locations that may be lit by one or more different incandescent, fluorescent, or vapor discharge lamps may also contain large or small window areas that add yet another color temperature to the mix. You will recall that it is necessary to decide which source is the most dominant. Make that your standard, and then color-correct all other sources to it. When you shoot outside during the day, there is little question about the dominant source or what the standard will be. The problem is that the sun is a tough act to follow or even keep up with.
There is a tendency to characterize daylight as 5600°K and to set the camera filter to that position before performing the white balance. However, Table 1.1 shows that the color temperature of daylight ranges from 2000°K to 5600°K. This wide range of color temperature and the different qualities of light produced by the sun’s interaction with the earth’s atmosphere and surrounding structures provide you with the opportunity to get just the look you want. The trick is to be patient enough to wait for optimum conditions and fast enough to get the shot or shots needed before conditions change. When the sun is your primary source and it’s not the color temperature or quality of light you would like, you can do a lot to modify it for narrow- and medium-angle shots. The extremely wide-angle shot will require greater patience for nature to get it right or a greater budget to assist nature.
Often, the attitude that good illumination is good lighting comes into play on exterior daytime locations. Having enough light to keep the engineer happy does not mean the scene is well lit. In fact, unless it is a very overcast day, chances are that you are dealing with excessive contrast for the video system and have highlights the system cannot handle. You are also likely to have shadows that contain little or no detail. You can begin to solve these problems by using a neutral density (ND) filter pack on the front element of your lens. It will reduce the excessive highlights and allow you to work at a larger f-stop. Once your NDs are in place, you can begin to control the lighting even further.
It is an unfortunate fact of life that if your script calls for many long shots, you will need some pretty high-power equipment to deal with specular lighting on exterior locations. You will need generators, powerful lights, and a sizable budget to pay for the large crew necessary to light properly. The assumption behind this text is that you are not dealing with a major motion picture production, so we will not deal with the needs of such costly projects. What we will address is your ability to provide fill and control source levels for medium shots and close-ups.
Often, when you need an exterior wide shot, you have to concentrate on lighting only a small area of that shot. Usually, some action in the foreground needs attention. Regardless of how confined the area requiring attention may be, you still need some powerful lights and large sheets of diffusion material to temper nature. You are either operating at an extremely small f-stop or are using ND filters to reduce your depth of field. In either case, it will take a great deal of supplemental light to get the job done.
Other than using a camera-mounted Frezzi to fill in some shadows on the face of a news reporter doing a stand-up, television shooters tend to take what nature provides and call it fine. There is no need to settle for “what you see is what you get,” but you will need some different equipment than that required for shooting indoors. If your camera has black stretch, an electronic circuit designed to bring out details in heavy shadows, this can be a big help on outdoor shoots, but additional lighting will still be necessary for good control over the look of your shot.
If you do not shoot outdoors often, you can rent what you need for those few occasions.
If you find yourself shooting outdoors in daylight frequently, you may want to invest in some of the equipment necessary to do the job properly. Many reflectors that are used outdoors are also valuable tools for indoor setups; so some of these smaller items will be a good investment, whether you shoot outdoors frequently or not.
Controlling Sunlight
The sun can serve as your backlight or key, depending on how you position the talent. Your job is to provide fill (or key and fill) as needed. To some extent, you can also control the intensity and quality of the sun itself.
The quality and intensity of sunlight can be controlled over an area large enough for medium shots and close-ups using a butterfly or overhead (see Figure 3.1). This is nothing more than a large, up to 30 × 30-foot, lightweight metal frame over which is stretched a lighting control material such as a diffusion silk. These frames can be supported by two or four legs, or can be hung overhead by wires attached to other structures or equipment at the location site. The choice of material can affect both the quality and quantity of the sunlight that reaches the talent. While all material suspended overhead, scrim or silk, will reduce the intensity of the sun, some materials will also diffuse as well as alter color temperature so you can get the warm, soft look you want. Hollywood often uses these when shooting outdoors to soften the light.
Butterflys also reduce the amount of bounce or fill needed to establish desired lighting and exposure ratios. These units are not difficult to set up, but they can be difficult to keep up. Because of their large surface area, they pose a considerable anchorage problem if there is more than a slight breeze. Have plenty of sandbags available to weight down their stands, and be sure to keep a close eye on the weather conditions.
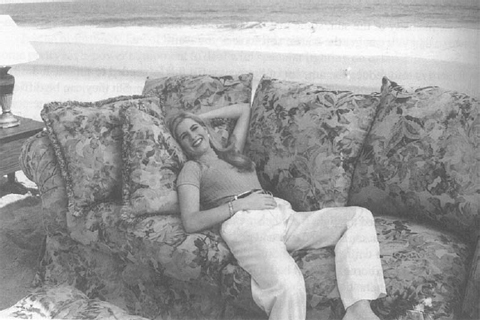
On a video commercial shoot on the beach, I had to deal with an overactive sun. I set up a 6 × 8 butterfly directly over the sofa on the sand (doesn’t everyone shoot furniture commercials on the beach?) (see Figure 9.1). Note in Figure 9.2 how the butterfly shades the model. The silk softened the light over the sofa and the model sitting on it. But the wind … the butterfly stand was sandbagged (we had plenty of sand), but the wind was making a sail out of the silk. Even with people standing directly on the Matthews stand, the butterfly wanted to become airborne. We just had too much wind and too little butterfly. We ended up using a small, handheld silk to shade the model’s face (see Figure 9.2).

Figure 9.1: A little sun on the beach with furniture (unsilked).
As with anything else in lighting, you can improvise if you do not have professional equipment. You can use a bed sheet or shower curtain tacked to scrap lumber suspended from trees and/or a C-stand. Be a little creative, but do not settle for light that is too harsh to satisfy your requirements. Bed sheets can serve as reflectors as well as overhead diffusion material.
Using Reflectors
Other items common to the exterior sets are reflectors, HMIs, or nine-lites that are used to provide fill. Obviously the use of reflectors is the easiest way to provide fill light out in the middle of nowhere, but their use is not without problems.
Like the reflectors in lamp housings, reflector boards can be specular or diffuse. One side of these boards is usually called the “hard” side and the reverse side is generally a “soft” side. The hard side of traditional reflector boards is covered with a smooth, unbroken silver paper that produces a harsh and somewhat spotty light. It can be used for relatively long throws and must be repositioned frequently as the sun moves across the sky. The silver material may be replaced with a gold foil to produce a warmer color temperature. If a cooler color temperature is desired, a bluish foil can be applied to lower the color temperature.
The soft side of traditional reflector boards is covered with small squares of silver leaf. The edges of these squares are not adhered to the board, but are bent outward to provide a small flap that diffuses the reflected light and provides a far softer source. Like the hard side foil, the soft-side material may be gold or blue to alter color temperature.
Generally, these boards range in size from 2 × 2 feet to 3½ × 3½ feet. They are mounted in a gimbaled yoke on a heavy-duty stand to provide a flexible method of aiming. I refer to them as “traditional reflector boards” because they have been used for years on exterior locations by the motion picture industry. They are costly, their surfaces (especially the soft side) are easily damaged, and they are very heavy to transport.
More recent developments in plastics and laminates have made a wider range of reflective material available to the lighting director. Material offered by Rosco in sheets 20 × 40 inches or in 100-squarefoot rolls, 58 inches wide, is extremely durable and lightweight. It is available in more than a dozen surface configurations that provide you with a wide latitude of control over the quality and color temperature of the reflected light. This material can be stretched over open frames or laminated to foam core or the more durable Gator foam to form extremely durable and lightweight substitutes for the traditional reflector boards. These homemade boards can be held in place by grip heads on Century stands, commonly referred to as C-stands. Reflector boards made of these materials also have wide application as reflectors on interior sets. In my view, such boards are superior to the more traditional units in all respects: cost, weight, durability, flexibility of use, and range of control. The natural white surface of foam core or Gator foam makes a good soft reflective surface by itself. You could spray one side of such boards with gold paint for those times when you need a warmer fill.
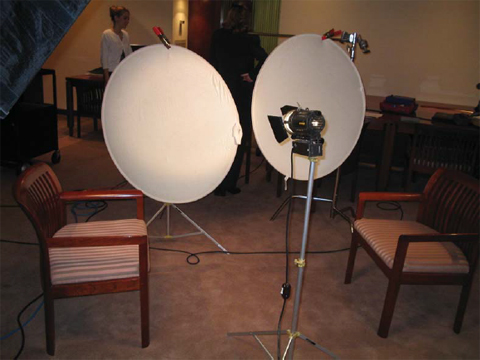
For close-ups involving small areas of fill, Flexfills, a product manufactured by Visual Departures, Ltd. offers a unique solution to extremely lightweight, portable reflectors (see the Appendix). The units are circular in shape and come in three diameters: 20, 38, and 48 inches. They collapse into compact storage units 7, 14, and 17 inches in diameter. They can be hand held or mounted in special stands that are available from the manufacturer. Like some of the materials available from Rosco, these units are reversible and come in several different surface colors (see Figure 9.3).
Reflector boards can be used in combination with one another to provide greater flexibility of talent placement. In Figure 9.4, you can see how a hard reflector was used to reflect the sun onto a soft board to provide fill for the talent. Hard or soft reflectors may also be used to direct sunlight into an interior set for use as key or fill. The reflector may be a single hard board placed low to reflect light on the ceiling of a room for the purpose of fill, or it may be a combination of hard and soft boards. Reflector boards are useful in conjunction with standard studio lighting equipment to reduce the number of instruments required to light a set and to reduce heat and electricity required to light interior subjects.
Some lighting directors never focus any light directly on the talent, but reflect light from the sources to the subject. Reflector boards can also be used to create cluster lights (see Figure 3.27). The extent to which you choose to use reflectors should be based on the look you desire and the amount of current available. Remember that they have many uses for interior shots as well as exterior locations.
How Buildings Effect Shots
In the same way that reflector boards can influence the color temperature of the light they reflect on a scene, so can buildings and other large structures such as semitrailers or billboards. If you have ever toured the backlot of a motion picture studio, you may have noticed that most of the buildings, sound stages, carpentry shops, etc., are painted tan. This is to prevent the large buildings from reflecting light with strange color temperatures onto the exterior sets that are located on the studio property. Actual sets on the backlot are painted with realistic colors, but surrounding structures are kept neutral to prevent color temperature contamination of reflected light. Because buildings and areas of open sky or patches of cloud cover can influence the color temperature of daylight to a large extent, you should perform camera white balance often when shooting outdoors. I suggest that you white balance at least every half hour if the camera remains in the same position (more frequently in early morning or late afternoon). White-balance each time the camera changes position, regardless of how soon it has been since your last white balance. You can never “over—white-balance,” but you can do the opposite.

In Figure 9.5, two people are standing in front of a building, carrying on a conversation. Actor A is facing the building. Actor B has his back to it. You might be amazed at the difference in color temperature of the light falling on the faces of these two people at any given moment. Assume you are going to shoot a master two-shot from camera position 1, a close-up of actor A from camera position 2, and a reversal medium shot of actors A and B from camera position 3.
Here are the actual color temperature readings taken at the scene in a span of less than 30 seconds. The first reading is taken with the color temperature meter in position X, facing camera position 1. The second reading is taken at Y, facing camera position 2. The third reading places the meter at Z, facing camera position 3. First reading is 5200°K, second reading, 4950°K, and third reading, 5400°K. The difference in color temperature reading is caused by a number of environmental factors. Things such as open sky, clouds, and building surfaces influence reflected light, as does the color of the surface under foot, i.e., concrete, asphalt, sand, grass, etc. Since such variations in color temperature exist, it is wise for you to conduct a white balance procedure each time the camera is moved to shoot in a different direction, regardless of how recent your last white balance procedure was performed. Keep in mind that the human eye will not react to these differences, but the camera will. You may end up with a series of shots that require expensive post-production color correction if white balance is not performed frequently.

If it is a beauty shot of your client’s new headquarters that you are after, an important aspect of the shoot is the site survey. Find out what time of the day the building is lit most flatteringly by the sun. Building offsets and projections may make it necessary to shoot in the early morning hours or late in the afternoon when the sun is low in the sky and provides a natural fill in recessed areas. Check shadow patterns throughout the day so you can schedule your shot when nature can be the greatest help for the look and feel you want. Attempting exterior architectural shots at the wrong time of day will produce less-than-optimum results. This is not to imply that a building should not be shot at a time of day when there are no cast shadows, because they can lend a great deal of visual interest. Often shadows may obscure an entrance that must be used for on-camera exits or entrances and require extensive use of supplemental lighting. As with all lighting, plan ahead and work with nature rather than fight it.
I had to shoot the exterior of a jewelry store with the owners on a Harley-Davidson for a commercial. After several site surveys, I determined the best time to shoot was 12:00 p.m. At that time, the sun was where I wanted it. With silks and butterflys strategically placed on the sidewalk, I had shadows exactly where I wanted them to be.

Because the building was sandwiched between others, I had to get the establishing shot from the middle of the street. The shoot was scheduled for a Friday before a 3-day holiday weekend. I had determined the best time of the day to shoot, but had not considered the rush of traffic I would have to deal with on a long weekend. When traffic did subside long enough to shoot the brown-stone exterior, the sun disappeared behind clouds. It was at that point that I had to settle with a cloud-diffused shot. Expect the unexpected and have a back-up plan—it will happen most of the time (see Figure 9.6).
Exterior Night Scenes
Up to this point, we have dealt with supplementing, assisting, diffusing, and changing the color temperature of the sun on exterior shots. In many ways, it is easier to deal with the sun convincingly than it is to simulate or amplify moonlight on nighttime exteriors. If the moon is the only supposed light source, the scene is often overlit, producing unnatural results. Exterior night scenes that have a number and variety of incandescent, fluorescent, metal vapor, and neon light sources are a great deal more fun and interesting to work on because of the greater latitude and variety of setups available to you.
In my film school days, I experimented with shooting day for night. Many movies I studied were obviously shot day for night—people were casting weird shadows, and car headlights just never looked right. In black-and-white film, a red filter and underexposure is used to simulate day for night. However, unless you’re shooting a horror film, the red filter makes flesh tones too pale. Day for night just doesn’t look convincing.
With modern video cameras it doesn’t make sense to try to recreate night unless you are unable to shoot at night. Night shots may be supplemented with artificial lighting to create the exact mood you desire. Wide exterior shots sometime require no additional light (but that’s not the purpose of this section). Whether you are dealing with moonlight or multiple artificial sources as your supposed source of illumination, your setup must take its cue from the actual source and must be consistent with the natural look of existing lighting in order to be convincing.
The moon, like the sun, provides light from only one direction. For some reason, moonlight scenes are often lit from a variety of directions. Perhaps this is done on the theory that no one will notice because it is so dark. I notice because, among other flaws, often it is not dark enough. The problem faced is the exact opposite of the one in exterior daylight scenes in which there is often too much light. For night scenes, you must provide a base level sufficient to satisfy the circuit requirements of the camera. Beyond that are the artistic considerations of the scene. Fortunately, current cameras and film stocks are sensitive enough to produce good pictures without requiring light levels that are unconvincingly bright for night scenes (or ones that are too blue to simulate night). With video cameras shooting in light as low as 1 lux, almost no light is needed to create an image.
Whether the scene is supposed to take place under conditions lit by moonlight only or by a combination of moonlight and artificial light sources, there is less need to be concerned about normal color temperature. The concern should be how to achieve a convincing result. We do not expect to see perfect flesh tones in moonlight or under a variety of nighttime exterior light sources.
In Figure 9.7, I had to capture a romantic, moonlit beach in the Caribbean. The moon was the key source of illumination, with the fill being provided by the surface of the sand and water. The color temperature reading was close to 8000°K extremely blue. I white-balanced and achieved a realistic shot. If people were to be walking on the beach, I would have had to add supplemental lighting because their faces would have been too dark. Luckily, the camera was able to expose an actual moonlight scene with 5 foot-candles of illumination. Sometimes it’s better to let God provide the lighting rather than create it yourself.
In Figure 9.8, the actors walk along the sidewalk from screen left to the gate, open it, and go up the steps onto the porch. They stand by the front door for a moment and talk before crossing to the swing on the screen right end of the porch, where they sit and talk for the remainder of the scene.
From position 1, the camera follows the action as a two-shot from the sidewalk, through the gate, and up to the front door. Then we cut to a close-up of actor B from camera position 2, followed by a two-shot of their heads, and then a wide shot from camera position 3, as they cross to the swing and sit. Then, there are alternate close-ups of actors A and B from camera positions 3 and 4.


This sequence gives lighting an opportunity to make a number of interesting contributions to the feel of the scene. If we establish that the moonlight is coming from screen right, we can light from that direction with blue gels to cover the action of the walk down the sidewalk. The use of cookies to simulate light filtering through leaves will heighten the illusion and add visual interest. It will also make it easier to blend the multiple instruments that serve as sources for the moonlight. Naturally, their light should strike the actors from the same height and angle.
We can add some white backlight to the action as they walk along the sidewalk. An off-screen streetlight can be used as motivation. The lamp and post could be included in a wide shot at the head of the sequence. The backlight will separate the actors from the dimly lit sidewalk and trees behind them. If you want more separation than the backlight alone will provide, you can throw some broken light splotches on the shrubs to the left of the actors. If the light on the shrub is blue, it should come from the same height and angle as the moonlight. If you use white light, it should come from the same height and angle as the backlight. Do not just hit the bushes with some blue light from a convenient low angle off screen left. Such an approach has been used often, and the resulting shadows created by such a placement have ruined the illusion. Since there is a practical porch light, we can use it as a motivation for lighting the exterior of the house and as a motivation for backlighting actors as they stand in front of the door before their cross to the swing.
An overhang at the roof line of the porch will serve to mask the placement of small Fresnels and broads or mini-trips to create the desired look.
Often, a small pin spot is aimed directly at a practical wall sconce from directly in front to provide a circular wash on the wall behind it. This approach always looks phony because it casts a shadow of the light fixture on the wall and lights do not cast their own shadow. That is exactly what happens when practicals are lit by a single Fresnel from the front in an effort to simulate reality. It is better to light these practicals from an oblique angle with a carefully controlled inky so the light can wash the wall without casting a shadow of the practical. It is generally best to use two such spots, one from each side, to complete the effect without casting fixture shadows and spoiling the intended illusion.
A couple of broads, like the Lowel Tota-lights or LE low-voltage mini striplights, or Nooklites (see Chapter 11) can provide a general wash on the front of the house, scrimmed to provide fall off on the ends of the porch away from the practical. Placing these well away from the area directly above the steps will prevent the actors from walking into a hot spot when they enter the porch.
As they stand in front of the door area, they are side lit by the practical and backlit by light coming through the window light of the door. Blue moonlight can wash them from screen right to maintain the evening illusion. If the moonlight was established as coming from a high angle, it should not fall on their faces because the porch roof overhang would prevent it from striking their upper bodies when they are up by the door.
As they cross and sit on the swing at the end of the porch, another interesting lighting situation occurs. Now actor A is backlit by the cool blue moonlight and is lit from the front by warm yellow light coming through the living room window. Actor B is backlit by that same warm window light and is lit from the front by the cool blue moonlight. Depending on the degree of texture the director wishes to introduce into the scene, several things can be done. One of the first things is to decide whether the moonlight should be a continuous wash on the front wall of the house and the actors, or be broken up by cookies to provide splotches of light. Careful control of these areas of light and dark can serve to pull focus to an actor’s eyes or lips in close-ups.
The next opportunity to introduce texture can be motivated by carefully planned scenic elements such as the type of window light in the front door and the use of lace curtains and/or shades on the living room windows. Stained glass and/or curtains on the window light in the front door can provide interesting background material for the two-shot of the actors in front of the door. Such elements can motivate texture and color in the backlight or key for that area. The same holds true for the treatment of the living room windows. If heavy lace curtains are used on the windows, you can project that pattern onto the face of actor A and the back of the actor B in the final shot of the sequence. Colored shades can also introduce motivation for a colored wash that can be projected on the acting areas. If the shades are partially closed, actors can move from areas of colored wash or darkness into areas of different color, with lace patterns adding light and texture to the scene.
From this one simple example you should be able to see how a variety of different looks can be achieved. Whatever combination of effects you desire, it is important to plan early with set designs and dressings to achieve maximal effect through lighting. Consistency and attention to detail will make the difference between creative, convincing results, and conflicting, unbelievable attempts.
If shooting deep in the woods at night, an HMI is an excellent source of light to simulate moonlight. HMIs give off a very white light on video and this looks more natural than the deep blue commonly used for moonlight. If the daylight-balanced HMI (5600°K) is used and the camera is white balanced for tungsten, you have your slightly blue light. The trees will cast long, deep shadows exactly the way the real full moon does.
One brief note on white balancing scenes such as this. If you have all your lights in their positions and gelled, you may think that it’s time to do a white balance. If you did, the camera would not recognize the blue light as a desired effect, but it would average all the colors available. In situations where you want a specific type of colored light to be prominent, it’s best to white-balance before the colored gels are added. Use this as a rule of thumb. Once the white balance has been set, any colored light will remain that color.
You may also ask which type of filter to use when white balancing night exteriors. Use the filter position that most closely matches your light source. If most of the lights (ungelled) are tungsten, then use that setting. If the moon really is your key, use the daylight balance. You will get an entirely different look if you white-balance using the “wrong” filter. Look at a color monitor and see the difference balancing on each filter makes, then choose the setting you prefer.
May the Force be with You
Adequate power is the force I am talking about, and let’s face it: Most of the time it is not with you. When you get into any situation that involves more than simple three-point lighting of a static head shot, chances are that the power available will not be adequate. When that is the case, you have one of three choices for interior shooting. You can rent a generator and its associated distribution equipment, a costly solution that may be necessary if the project is an ambitious one. You may be able to get by with installing a tie-in to the existing service entrance panel, or you can phone the new business division of your electric utility company and request the installation of a temporary service drop at the location site.
A request should be made 1 to 2 weeks before the scheduled shoot date, and you will have to install your own bull switch or breaker box, following local codes, at the site before they bring power to it. The cost for such a service ranges from about $250 for locations that are fed by underground feeds to $500 for sites requiring an aerial or overhead drop. For that fee they will provide you with 100 to 200 amps of current and a meter of your own. You will have to pay for the current used plus the initial installation fee. Though this method is technically not a tie-in, it uses the same basic hardware as a tie-in but provides more power than would otherwise be available and removes the possible hazard involved in connecting your leads to an existing service entrance.
However, you do need the necessary lead time and the cost for the installation fee.
A generator or temporary service drop will provide more power at the location than would be available from a tie-in. The tie-in does not make additional power available, it merely makes it possible for you to get maximum use of unused power in a very convenient manner. If the service entrance panel is rated at 200 amps, that is the maximum amperage available for the combined use of your needs and the normal, necessary power requirements of the location. If there are computers, air conditioning, or refrigeration units, etc. that must remain on during your shooting schedule, you have to subtract their consumption from the 200-amp total in order to determine the remainder available for your use. Generator setups and temporary service drops bypass the normal power requirements of a site and allow you full use of whatever current capacity they provide.
Tie-Ins
If you determine that there is not enough current available at the outlets located in the vicinity of your set but that there is sufficient unused power available at the entrance panel for your needs, you should plan for a tie-in. That will make it possible for you to distribute all the power not required by the normal needs of the location directly to your area. You will bypass house wiring, eliminate voltage drops, and give yourself more complete and readily accessible control of the circuits you are using.
Tie-in Equipment
You may not own the proper equipment necessary to complete a tie-in, but it is readily available from any major lighting rental facility. The cost for such equipment ranges anywhere from about $300 to $500 per day, depending on the extent of distribution required and your location. This cost is less than that for renting a generator and will pay for itself in speedier setups and strikes as well as eliminate delays caused by blown breakers or fuses during shooting.
The following information regarding tie-ins is not intended to encourage you to attempt making a tie-in if you do not have a basic knowledge of electricity or have a general fear of electricity. That fear could keep you out of serious trouble. It is best to leave tie-ins to a professional electrician if you have any doubt about the techniques or equipment involved.
Installing a tie-in is not difficult, but care should always be taken when you are working with electricity to avoid fire or personal injury. The greatest hazard exists at the time you connect the clips to the service entrance bus bars. Be sure to wear insulated rubber gloves and to stand on a dry, nonconductive surface. The gloves should be handled carefully to prevent any punctures from occurring. A pinhole in a set of rubber gloves will render them useless as insulators between your body and the current present in the service panel.
The equipment required for a tie-in is not expensive, and only the best should be used. A tie-in is no place to cut corners. Do not try to use ordinary alligator clips to fasten your cables to the buses of the service entrance panel. Use only approved clips that screw tightly to the current source and provide adequate insulation. After they are attached, be sure to secure them with dry ropes to some solid item to prevent their being pulled loose or being brought into contact with other legs or a ground by accident. Your first connection should always be to the ground bus of the service entrance. The other end of this connection should be securely fastened to a known earth ground such as a cold water pipe or a brass rod that you have driven into the ground to a depth of at least 3 feet.
The next connection should be made to the neutral wire of the entrance bus. Your final connections should be made to the hot bus or buses of the panel, taking great care not to short two hots together or short a hot to a neutral or ground. You can place a piece of heavy rubber or fiberboard between the two hot clips to prevent accidental shorting.
The secured leads from the service entrance panel are then connected to your own breaker panel, commonly called a “bull switch,” taking care to keep the polarity straight throughout your distribution system.
It’s important that your bull switch not only have a master breaker and disconnect switch for emergency shutoff of your entire distribution system, but that each branch have its own breaker for selective shutdown of circuits as a way of preventing a short on any one branch from taking your whole system down.
From the branch breakers of the bull switch, power can be distributed by two methods:
1. You can use 15-, 20-, 30- or 50-amp female twistlock connectors that are mounted in power strips on the same board as the bull switch. Distribution cables with the appropriate male twistlock plugs on one end and stage boxes on the other can be used for further distribution before being converted to Edison plugs using a 1900 box.
2. Distribution cables with twistlock plugs on one end can be terminated on the other end directly with 1900 boxes. This is really a matter of personal preference, tempered by the necessary cable lengths needed to get from the service entrance to the location site.
In most cases, if you need to bring large amounts of current from the butt switch to the location site over long distances, you will be better off using welder’s cable for each leg and neutral rather than more expensive heavy-duty three- or four-conductor cable. Such multiconductor cable is extremely heavy and bulky to transport and is incapable of handling the large loads that can be readily handled by individual strands of welder’s cable. Welder’s cable is generally terminated on each end with a male or female Mole-pin connector.