
10 Three-point lighting
In the previous chapter we saw how balancing a fill light against the hard shadows cast by the key light helped to lift the shaded areas of the person to a level that the camera could see without contradicting the sense of shape and texture the shadows gave. Now if we add a third light we can achieve the nearest thing to three-dimensional pictures on a flat two-dimensional screen that is possible without extra technical trickery.
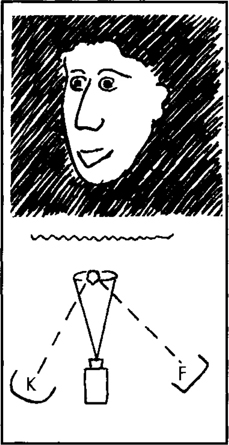
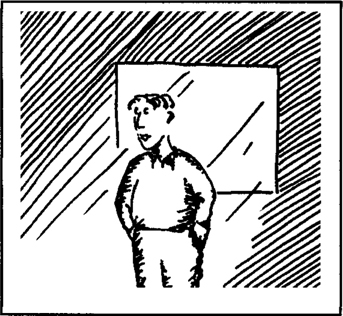
Imagine a performer wearing dark clothing, perhaps also with dark hair, against a dark background, looked at by a camera. The camera cannot discriminate between the different layers of dark tone. The black jumper combines with the black background curtains, and the black hair to form one unbroken mass of darkness. By the time this image has been processed, recorded, played back and put into a monitor, or receiver, the different blacks (which our eyes, looking directly, would be able to separate) are one solid mass. All we can see is the face, floating magically, in the midst of the black (Figure 10.1).
Figure 10.1
How can we overcome this? The solution is to use a luminaire that will put a rim of lighting emphasis around our subject to separate them from the background. This third light is placed behind the subject and it shines towards the camera position. It is called a ‘back’ light. With no other light its effect is dramatic.
The camera sees only the outline of the figure, plunging the face into darkness (Figure 10.2). Whilst this may be useful for interviews with criminals or Mastermind we usually want to see more of our subject so we add this light to our key light and its balancing fill light (Figure 10.3).
Figure 10.2
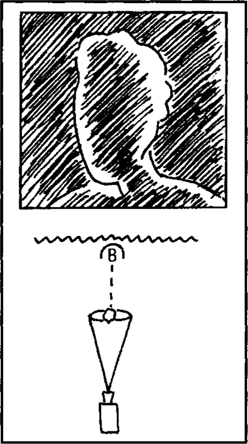
Figure 10.3
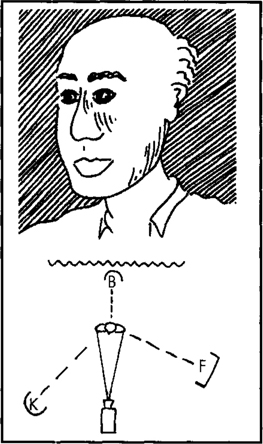
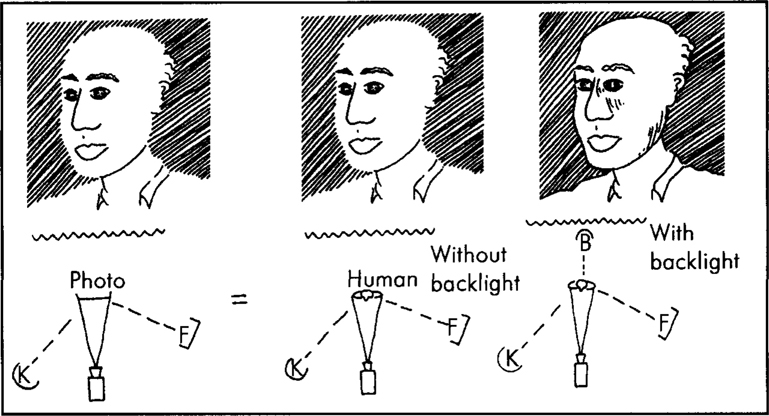
Of course the camera can’t see most of the light from the back light because it falls on the subject’s back, but around the edge of the subject the light reflects on the surfaces of the shoulders and top of the head, and gives them an emphasized brightness. This brightness tells us, when we look at the camera’s image, that there is a separate, closer layer in the scene, away from the background. It also shows that the subject is three-dimensional. Without it the camera would not be able to discriminate between a good, life-size (but flat) cut out photo and the real, live subject (Figure 10.4).
Figure 10.4
Back light should come from behind the subject!
Back light is an artificial device with no direct equivalent in natural lighting. Its function is to offer the camera an even rim of lighting emphasis around the subject, which creates an illusion of depth. Because of this its position is critical.
The back light should be as close as possible to the axis of the camera lens, beyond the subject. Too much light on one side, from behind, looks wrong (Figure 10.5). With moving cameras, multiple cameras, moving performers, or large groups it all becomes more complicated, as we shall see in later chapters.
Figure 10.5 (above)

Sometimes a scene justifies an off-centre back light. For instance a character in front of a window on a sunlit evening (Figure 10.6). We see, through the camera, the sunshine streaming through the window and that explains why one side of the character’s head is brighter.
Figure 10.6 (below)
The height of a back light is also critical. Too low a back light will squirt straight into the camera’s lens and ruin the shot. If it is too high the illusion will be destroyed by a bright top-of-head and darker shoulders (Figure 10.7). If it is much too high the light will creep over the top of the character’s head and give them a bright nose and unsightly bright areas down over the shoulders (Figure 10.8). As is often the case in production a judicious compromise is the order of the day.
Figure 10.7
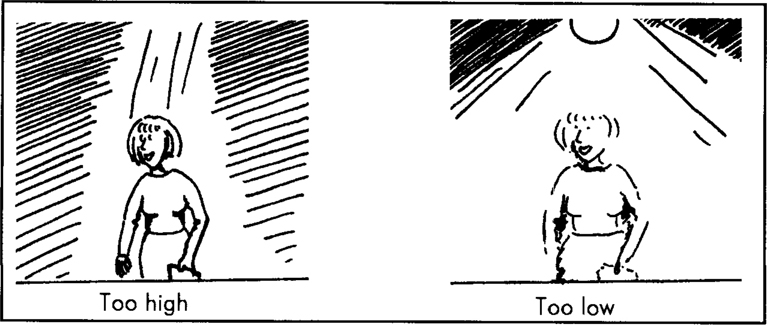
Figure 10.8
Either a hard or soft source could be used as a back light since the shadows it casts are (hopefully) invisible to the camera, but hard sources are used more often because they are more controllable. It is important that the back light does not go where you don’t want it.
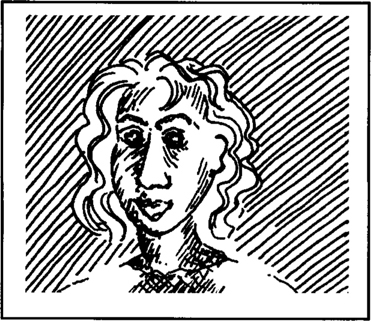
Back light is artificial – too much, or wrongly placed back light will ruin your scene. An excess is, briefly, glamorous – like glinting teeth and sparkling eyes – but not realistic (Figure 10.9). Like any artificial effect it should not be over-used.
Figure 10.9

Use it only to separate layers with similar tone, and to give three-dimensional solidity to your images, and then very carefully, and with great subtlety!