8 Single-point lighting
Over the next few sections we will look at how to build a simple system of lighting that will give exciting pictures, with good illumination and the illusion of depth and texture. We will take the very straightforward set-up of a single camera looking at a single performer, but the system we will evolve can be extended and modified to cover a wide range of scenes.
The camera must have illumination to be able to see a picture, and even for relatively sensitive CCD cameras that illumination has to be at quite a high intensity to yield a good quality image. Our eyes are both very sensitive and intelligent. We can see and discriminate detail down to very dark levels. Because our brain interprets what the eyes see we can still make pretty useful guesses about colour and texture even though we can’t actually see it correctly. It can be quite misleading to use our eyes to judge the brightness of a scene to plan how we would light it. Better by far, and actually very simple, is to look at the scene we are lighting through the camera that is being used. If we arrange for its image to be on a nearby monitor we can immediately see what effect our lighting is having, and how we can improve it. Preferably this monitor should be colour, but useful information about the distribution of light and shade can be obtained from a monochrome one.
So we have set up our performer, our camera is in position, our monitor is showing what we’re getting – how do we now choose what luminaire to use and where to put it? It’s worth saying at this point, that however experienced you are at lighting design you can never claim that there is one correct way of lighting a particular scene. There is always scope for interpretation and, frankly, trial and error, so don’t be afraid to change your lighting set-up if it doesn’t seem to quite work.
On the other hand, although there is never an only way’ of lighting a scene, a good starting point for all set-ups is to ask yourself (or your programme’s director) a simple question. Where do we imagine that the light for this scene is coming from? If the scene is a prison cell with only a small high window looking out into an enclosed courtyard we would expect a different lighting set-up from a beach scene on a sunny afternoon or a moonlit graveyard. It doesn’t matter that the director may never actually show a shot of the high window, or the sun beating down, or the full moon going behind the clouds – we know they are there because that’s where the light (apparently) comes from.
So if we have one luminaire we might choose to put it in a position where it appears to shine from the ‘natural’ light’s position. This at least would give a sense to where the light fell on the face of our performer. We might choose that position, but not necessarily so. In each of the examples above putting one luminaire in that position may give us unpleasantly large shadows in the performer’s eye hollows and under their chin. The director may quite rightly demand to see more of the face. At least we know the starting point for where the luminaire might shine from. Now we have to do something to try and control the excessive shading.
There are two approaches to this. We can either move the luminaire so that the shadow it casts is less visible to the camera or we can choose a luminaire which gives less pronounced shadows.
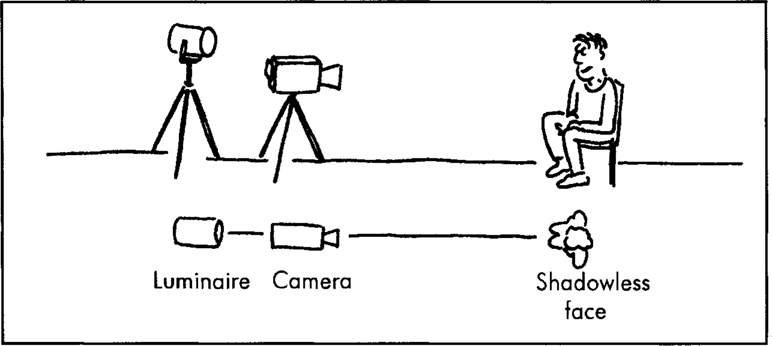
Moving the luminaire will directly affect the shadows the camera can see. Because the camera picks up light from the subject, which moves in a straight line into the lens, if we shine a luminaire directly down that same line, by definition, the camera cannot see the shadows it casts. On the other hand the further away from the camera lens line the luminaire is, the more visible shadows the camera will see. Incidentally moving the performer, or the camera will have same effect as moving the luminaire, but as the director will have planned the performer’s actions, and his or her camera positions we (on the lighting team) do not have that as an option (Figure 8.1).
Figure 8.1 A luminaire shining along the line of a camera’s lens creates no visible shadows

The other option, of keeping the luminaire’s position, but choosing one which gives less noticeable shadows, is perhaps safer. Perhaps now would be a good time to look in a little more detail at shadows and angles.
Shadows and angles 1
When we look at any scene in the natural world our eyes and brain interpret the information given by light. Without knowing exactly how, most people could tell the difference between a room in the evening, in the middle of the day, at night, even from quite poor quality photos. What we look at to get this kind of information is the distribution of the light within the image, where it appears to be coming from, and therefore where its shadows are cast. Clearly then an immensely important decision for the person designing lighting for the camera is just how to place and manipulate those shadows and angles.
Inexperienced lighting designers sometimes try to remove shadows from the images they are lighting, with the result that the shots end up bland and uninteresting. Don’t forget that we expect to see shadows in the natural world. Shading gives a sense of depth. Until we get other information our brains assume darker areas to be further from us than bright ones. This simple fact allows us (as lighting designers) to re-create a feeling of depth and texture in the flat image the camera yields. Welcome shading, don’t try to eliminate it, but control where it goes.
The important thing is to do what natural lighting does – give one clear defined set of shadows, but not more. There is one sun in the sky, not two, so seeing two conflicting sets of shadows on a face seems wrong.
With only one luminaire we won’t have the problem of multiple shadow sets, but we do need to think about the nature of the shadows. Again a simple question should give you a hefty clue about the type of shadow you’re trying to create. What is the weather like? I know this sounds a bit daft as a question for a lighting designer, but if you look at a picture of a face you can tell whether it has been taken in sunshine or under a cloudy sky by looking at the sharpness of the shadows. Sunshine casts clearly defined, focused shadows; a cloudy sky gives diffuse shadows and it is difficult to tell where they end.
In lighting terms we use the phrases ‘hard light’ and ‘soft light’ to make this distinction. We have different luminaires to give the different light types. Like sunshine hard light can give exciting vibrant pictures, but it can sometimes seem a bit too harsh. We need to use it with care so that we control what kind of shadows we create (Figure 8.2).
Figure 8.2 Hard light from a single point source creates focused shadows, soft light from multiple point source creates diffused shadows

One last thought about shadows. Often they fall where we don’t actually want them, and look intrusive in the image. Especially nasty is the horrible shadow on a background behind a performer. Not forgetting that we are used to one consistent set of shadows from the sun, we would quite rightly want to reduce the unsightliness of such a shadow. We have a choice. Do we want to totally remove the shadow, or do we simply want to tone it down.
The only way to eliminate it is to move one of three things, the luminaire, the performer (or whatever is casting the shadow), or the background. Moving the luminaire is self-explanatory. Moving the performer away from the background (with the permission of the director of course) will throw the shadow somewhere harmless like on the floor, out of shot. Moving the background away a short distance will also achieve the same effect (Figure 8.3).
Figure 8.3 Increasing the distance between a performer and the background will help to eliminate an unwanted shadow

If we want to tone down the shadow the trick is to put a wash of soft light (so it won’t create more shadows) onto the background. This will dilute the intensity of the shadow. Note that simply pouring more light onto the background won’t remove the shadow, and could make the background itself obtrusively bright. It’s also worth trying switching off, or fading down the luminaire causing the shadow – do you really need it?
This discussion about shadows links quite naturally to thinking about angles. Quite unconsciously we use information about the angle at which light is falling on a subject to interpret the circumstances. Look at six different photos of faces, you will see six different angles of light falling onto them suggesting six different times of day perhaps. We need to bear in mind these angles when planning our lighting.
Going back to the key question when choosing where to place our single luminaire – where is the imagined source of light for the scene – it becomes obvious that although we may not have an actual ‘sun’ in our shot we can shine a luminaire to look like the sun. This gives us an angle of shine (measured if you like against the reference of the line between camera and subject). By changing that angle we can change the apparent position of the imagined ‘sun’, maybe suggesting a change of time of day. By looking at the face of the performer and seeing where the shadows fall we can work backwards to where the ‘sun’ must be. A high noon sun will give shadows under the nose, in the eye hollows and under the chin. An evening sun will give horizontal shadows across the side of the face.
The camera doesn’t see the ‘sun’ – it sees the effect of its angle of shine. This gives us (as lighting designers) an enormous practical bonus. With two characters in the scene, each apparently lit by the same ‘sun’, we don’t need to have only one luminaire for both of them. This would have to be quite big and quite far away to spread sufficiently. As long as there is consistency of angle of shine we could light each of them with their own luminaire, shining in parallel beams. As far as the camera is concerned they would look as though they were under the same ‘sun’.
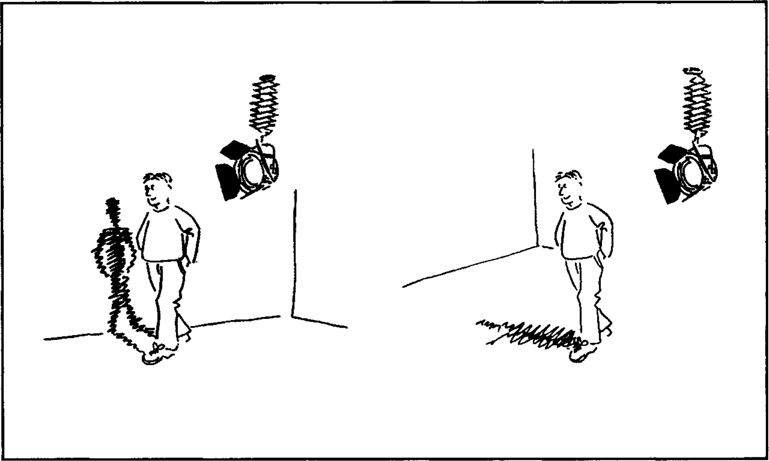
Usually we expect the ‘sun’ to be above us so very often the angle of shine is downward, but the steepness of the angle says a lot about the imagined conditions we are trying to create. This expected downward angle can also help us to deal with the intrusive shadow on the background. A near horizontal shining angle would throw a shadow on a background however far back it was, but if we shone downwards, a small separation would put the shadow out of harm’s way (Figure 8.4).
Figure 8.4 A low angle of light will cause shadow on the background wherever the performer is

