
13 Location lighting – little power
As part of the detailed planning necessary for a production a director will undertake a ‘recce’ or survey of possible locations to be used. Rarely will the lighting designer be able to join the recce, so the key questions he or she will need answers to must be included in the director’s check list. Apart from the obviously crucial question of what ambient lighting there is perhaps the most important one is what, if any, additional power is available.
Although it is very helpful to be able to run cameras, recorders, and monitors from mains each of these units can operate quite simply from battery power. Lighting units are power hungry so very often the limitation on lighting design is the lack of adequate power to supply lots of luminaires.
The possibilities fall into four main categories. There could be no power supply at all, a restricted supply, a plentiful supply, or (with large budgets) the possibility to bring in power supplies for the production.
With a plentiful supply, or the possibility to bring in power, the lighting team will not be hampered by that limitation, so they can concentrate on other problems. More often than not there is only a restricted supply, or none at all, so how can the lighting designer deliver good shots in such circumstances?
With no supply at all, all supplementary lighting must be battery powered. Battery-powered lighting gives independence from the mains, but because it takes a fairly large amount of current it tends to be used only with small scale shots (a close up of the interviewer for instance).
Battery-powered lights which clip onto the top of the camera and take power from a battery on the camera give the camera operator total mobility, but can have unattractive effects on the background if the camera moves, as the bright hot spot traverses across the scene.
If battery lights are required a process of calculation is essential. A 250 W luminaire will consume 20 A of current from a 12 V battery. If that battery is rated at 30 amp/hour it will last for 1½ hours. From fully discharged, it may then take six or seven hours to fully recharge.
The current will be used whenever the light is shining, whether the luminaire is switched on to line it up, the director is rehearsing the shot, or the shot is actually being recorded, so 1½ hours may actually only yield 15 minutes worth of usable shot.
Bearing in mind how expensive batteries are, and how heavy to transport, the natural temptation is to economize on the number used, so the lighting designer has to ensure that such lights are used to their best ability.
Whilst some battery-powered luminaires give out more light (watt for watt) than mains-powered units most battery lights are small and can only cover relatively small areas. It would be unrealistically costly to light a large scene requiring long shots to cover it from battery power. The sensible decision would be to try to shoot the long shots under ambient lighting conditions, with some areas supplemented by battery power if necessary. Close-up shots, even though in the same scene, could effectively use battery power and could be shot when the ambient lighting was gone. This obviously requires close liaison between director (or production manager) and lighting team about the scheduling of shooting.
Battery-powered luminaires do have the great advantage of mobility, being free of cable connection back to mains. Very compact units, which can clip on to camera tops go wherever the camera goes and provide good lighting for close shots. As they are pointing almost directly down the camera lens line they don’t provide modelling, but with a diffuser in front of them they can give useful fill to ambient key light sources (sunlight) which may cast uncontrollable shadows.
Their biggest disadvantage is that in circumstances where the shot opens out, or moves across a scene, their relatively narrow angle creates a visible hot spot moving over the background. We are therefore more aware of the artificiality of their light. This is great in news shooting where urgency is paramount, but not so good in drama where we want to create a consistent illusion. They can also cause difficulties with reflections off shiny surfaces behind the subject such as windows or gloss painted walls or doors.
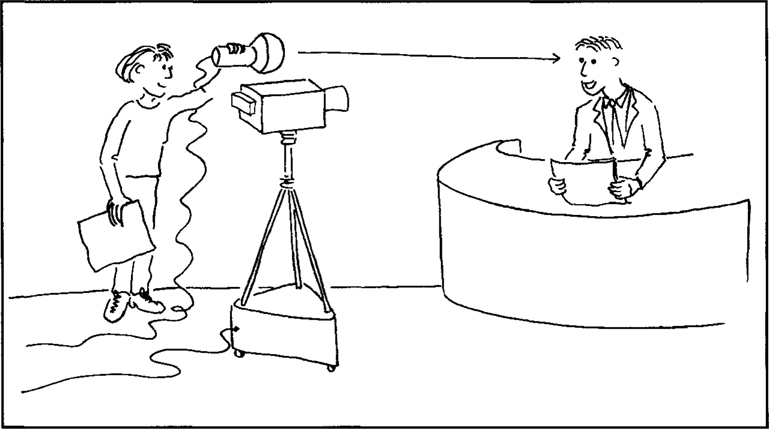
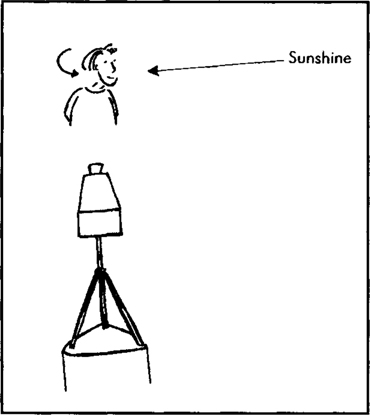
Funnily enough this reflection makes them the ideal luminaire for one specialist purpose – that of the eye light. If you shine a fairly small light source almost directly down the camera lens line it will reflect off the surface of the performer’s eyes, giving them an attractive glint or sparkle (Figure 13.1).
Figure 13.1 Camera with top light shining at presenter, light beam causing glint from the eyes
It is perhaps more controllable to use a battery-powered luminaire off camera axis. This would then provide some modelling and be usable as a key. Although they can be stand mounted many such luminaires are possible (and safe) to hand hold. This has the benefit of great mobility, but the disadvantage that it can sometimes be disconcerting to see the effect of a wobbly ‘sun’ as the person holding the luminaire doesn’t move in exact conjunction with the camera.
A little safety
Situations where there is some mains power available, but it is restricted are perhaps the commonest. Shoots taking place in ordinary homes and offices will be dependent on ordinary mains supply. This comes into the house with sufficient capacity to power cookers, electrical heating, water heaters, and the wall sockets that other items can be plugged into. Unfortunately, although the total supply may be quite large, it is divided when it enters the premises into a number of smaller capacity circuits.
Short of disconnecting the cooker or immersion heater, which (apart from the possible danger if not done by a skilled electrician) will cause enormous disruption to the normal activity of the house, no more power is available. Sometimes in a house (or office) taken over completely for the purposes of shooting (such as the houses in Brookside) it is possible to provide a large supply for production lights, but usually it is a matter of using standard wall sockets. The key concept to remember here is the idea of the ‘ring main’.
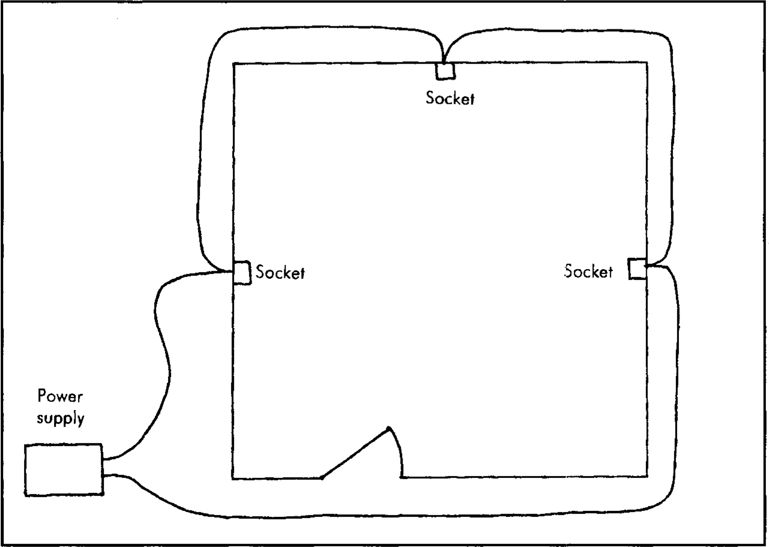
A ring main is a way of sending power to a number of wall sockets by means of two cable routes (which effectively make a large electrical ring supplying all the sockets for a particular area) (Figure 13.2). This ensures, in normal operation that the load (which may be unevenly plugged in) is balanced between the two supply cables. This ring may be capable of delivering 20 to 30 amps in total.
Figure 13.2 Diagram of a simple ring main
If it is properly installed the cables should be protected from dangerous overload by a fuse (or circuit breaker) which will cut off the supply in the event of an inadvertent overload. Considering that a ‘blonde’ spotlight – a fairly common 2 kW unit – will take about 8 amps, you will realize that it doesn’t need many luminaires to get perilously close to the maximum capacity of the ring. If the house wiring is of a good standard and you plug in too many luminaires, the fuse will blow and you will shut off the ring main – not very popular with the rest of the crew!
If the wiring is not good (and sometimes it is difficult to judge from the external appearance) your extra luminaire may not blow the protective fuse, but instead cause the cabling to heat up dangerously with the serious risk of a fire. Although it is not desirable to get so close to catastrophe, an early warning of possible overload could be unpleasant burning smells, so a lighting team should have keen nostrils! If you do have any reason to believe something is amiss, switch off your luminaires as soon as possible.
You should be deeply suspicious where there appear to be damaged or old wall sockets, or where there are very few of them. Load up your luminaires onto the ring one by one, switching them on cumulatively, rather than all together.
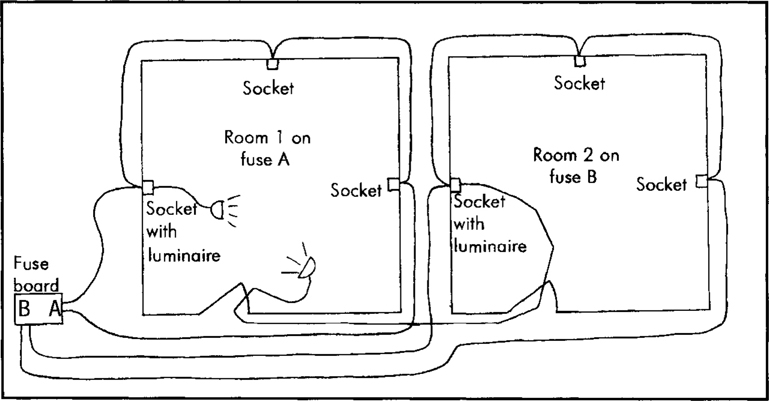
If you can work out (by asking the householder, or by looking at the fuse box) which rings supply which sockets (often there is more than one ring in a house) you may be able to safely distribute your luminaire load between two or more circuits by feeding them from adjacent rooms (Figure 13.3).
Figure 13.3 If you can spread your lighting load over different rings you will be less likely to overload the fuses
Your feeder cables should be safely installed. There should be a small amount of slack cable at the foot of the light stand to allow for accidental tripping without toppling the stand. Indeed the cables must never be taut, and must never lift off the ground. Where they cross, or go along walkways they must be firmly taped down, but if possible try to find a route for them which will go over walkways – over the top of a door frame rather than across the floor. Any necessary splitting of the output of a socket should not be done by a ‘Christmas tree’ of adaptors in the socket, but by adequate splitter blocks fed by cable of sufficient capacity to power all the luminaires plugged into it.
Finally remember that if a fuse or circuit breaker does blow, it does so for a good reason, so you should correct what is wrong before replacing or resetting it. Do not ever defeat a breaker, or replace a fuse with one of the wrong rating (or worse with something else) to get your lights to work. That way lies certain disaster.
With all these warnings of the dire consequences of using available power supplies you may feel it is not worth all the worry, but alas, directors still want well-lit shots, so how do you provide them with beautiful lighting? The crucial first step in designing lighting for restricted locations is to look critically at the ambient light and try to assess what it is going to do to the shot. More often than not the ambient light will have at least some natural daylight so you must also be aware of the weather and time of day.
The ambient light will almost certainly set the decision of the angle of the key light since it will be a dominant part of the lighting, and presumably the director, having chosen to shoot in such conditions, wants the effect of the natural light as a significant aspect of the shot.
Working with limited power supplies or from batteries you must ensure that all your luminaires contribute – they are a scarce resource. It is unlikely you will be able to achieve full ‘three point’ set-ups, and even if you do changes of sun position or cloud cover may make them unreliable. Think of the ambient light as one of your three points. Which will it do best? Bright sunlight could be the key, but it will cast such powerful shadows that you will need to add considerable fill to lift them. Diffused sunshine, or cloudy daylight could serve as a fill, but then where should you place the key? Daylight can provide backlight, but it will be so strong you will need quite bright key and fill lights to balance against it.
Shadows and angles 2
Let’s look at examples of how each of the above combinations may work.
If you have bright sunshine, or some similar hard bright source, as an element of the ambient lighting how might you use it as a key? The first requirement is that the angle of the sun must be suitable for the camera and subject alignment. As you can’t move the sun, re-orientation of the camera and subject to get the best angle is the only possibility, obviously in consultation with the director (Figure 13.4). It doesn’t necessarily need a huge movement – a slight turn of the performer’s head may give a much better fall of light (Figure 13.5). Be careful about previous and following shots in the programme to ensure the lighting continuity works and the eye line of the performer is appropriate.
Figure 13.4 If possible rotate the camera/subject line to make best use of the sunshine
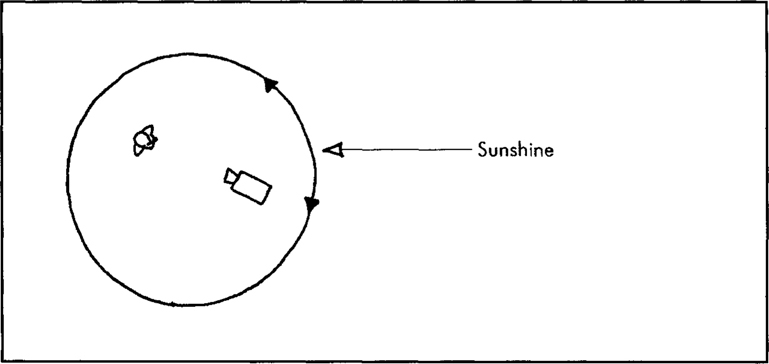
Figure 13.5 Head turn effect
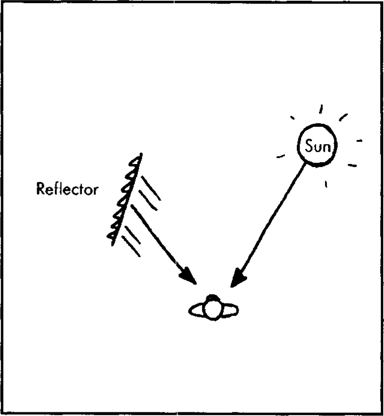
The big problem with sun as a key’ set-ups is the strong shading. Here much depends on the size of shot the director wants. With a long shot you will probably have to add a softened luminaire as a fill, but with closer shots you may find it possible to use a reflector to bounce some of the plentiful sunshine back into the shadows (Figure 13.6). Remember that a silver reflector will keep the reflected light quite hard and may give unwanted double shadows, so choose instead a softening reflector (matt white or grey).
Figure 13.6 Plan of ‘sun as key’ plus reflector as fill
Easier perhaps to manage is the use of daylight as a fill. Naturally it would have to be softened to do this effectively, and this implies that all the daylight in that shot (and therefore in that sequence of the programme) is diffuse. Partial softening of daylight is very tricky to achieve. Bearing in mind the climate in Britain, where continuous sunshine is the exception rather than the rule, softening all the daylight has practical advantage since it cuts out the possibility of a shot being ruined because the clouds come over. This decision must rest with the director. Is the sunshine a significant part of the shot or not?
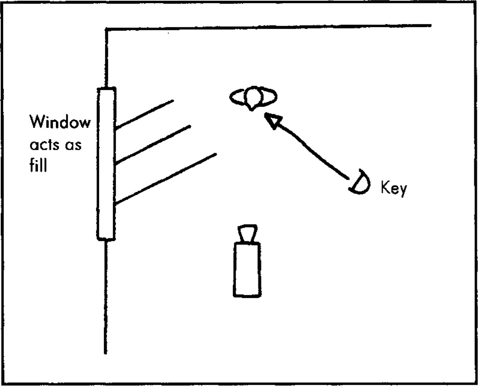
Having softened the daylight the question of the angle of it arises. Once again orientation of the camera/subject line must match the angle to the available light, so unusually, we set the key angle dependent on the fill rather than the other way round. Obviously the key has to come in from opposite the approach of the fill light (Figure 13.7). Care should be taken that the new key angle is justified and not contradictory to the overall lighting distribution.
Figure 13.7 Plan of window as fill plus additional key
The third possibility of using natural light as one of our three points – that of back light – is the most dramatic and the most dangerous. Sunshine would be the usual source for this purpose, and it is actually a very good back light. However it poses problems of exposure for the camera, particularly in relatively longer shots.
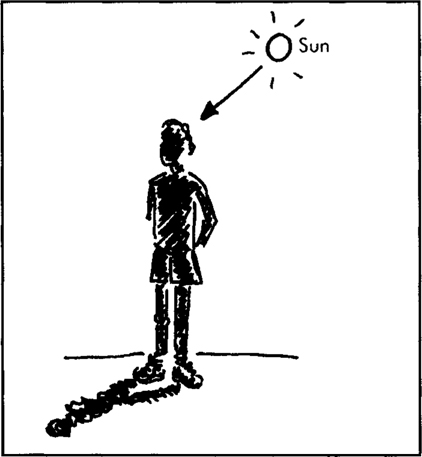
If the camera can see areas of plane surface lit by the sun (perhaps ground in front of the performer) those planes will be very bright. To avoid over-exposing them the face of the performer would have to be under-exposed, so we need to add to it quite powerful key and fill lights (Figure 13.8).
Figure 13.8 Bright sun, with a light foreground, makes exposing the performer’s face difficult
One useful trick worth trying if the shot is relatively small is to have a reflector in front of the performer to bounce light back into their face. If this is silver it will maintain the hardness and could work as a key; if it is white or grey it will soften it and be the fill (Figure 13.9).
Figure 13.9 Use a silver reflector for hard light(key) – a white one for soft (fill)

The problem with this use of natural light is the sense (or justification) of an apparent light source in front of the performer when we can see bright sunshine behind them. It could look odd.
The horrible truth is that every single location shoot poses a different set of problems which are unique to it, so there is no right answer’ that will always work. You must be prepared to experiment.
Reassure yourself that even the most experienced lighting designers will go through a similar process – the difference will be that they may have lit similar shoots before, and so they may have some notion of what might work.
Try to get the director to give you plenty of time to set your lights. Despite their obvious need for speed, directors cannot get the best shots unless you have time to light them. Be sure to look through the camera to see what is happening as you light the scene.
It might be worth going to the location with a camera and your luminaires before the day of the shoot to try some possible solutions. Use the time whilst the director is rehearsing the shot to make final adjustments, but once he or she moves on to do takes you then cannot change your set-up, as the shots will have to cut together. Be aware as well of where these shots fit in the final programme sequence so that you can plan for lighting continuity.