10. Drupal Blocks Explained
By this point in the book, blocks are not entirely new to you.
In Chapter 7, “Drupal Modules Explained,” you installed modules that added blocks to your site. You published both weather and map blocks. In Chapter 9, “Drupal Themes Explained,” you learned that themes control the layout of your entire site.
This chapter builds on what you’ve already learned and provides a comprehensive introduction to blocks.
At the end of this chapter, you should be able to
![]() Understand that different Drupal themes have different block regions.
Understand that different Drupal themes have different block regions.
![]() Place blocks in regions.
Place blocks in regions.
![]() Change the order of the blocks displayed.
Change the order of the blocks displayed.
![]() Control the pages that blocks appear on.
Control the pages that blocks appear on.
![]() Edit the settings of blocks.
Edit the settings of blocks.
![]() Add a block manually.
Add a block manually.
Theme Regions Explained
Go to Structure and then Blocks. In the top-left corner you can see a link called Demonstrate Block Regions, as shown in Figure 10.1. This provides you with a clear overview of the regions available with Marinelli.

If you want to find the same link for other enabled themes, you can choose other themes from the tabs in the top-right corner, as shown in Figure 10.2.

Now start with Marinelli. Click the Demonstrate Block Regions (Marinelli) link, and your screen looks like Figure 10.3. Here are some examples of what you can do with Marinelli:
![]() Show a block in the left column by placing it in the First Sidebar region.
Show a block in the left column by placing it in the First Sidebar region.
![]() Show a block in the right column by placing it in the Second Sidebar region.
Show a block in the right column by placing it in the Second Sidebar region.
![]() Show a block over your main content by placing it in the Over Node or Highlight regions.
Show a block over your main content by placing it in the Over Node or Highlight regions.
![]() Show a block under your main content by placing it in the Under Node region.
Show a block under your main content by placing it in the Under Node region.
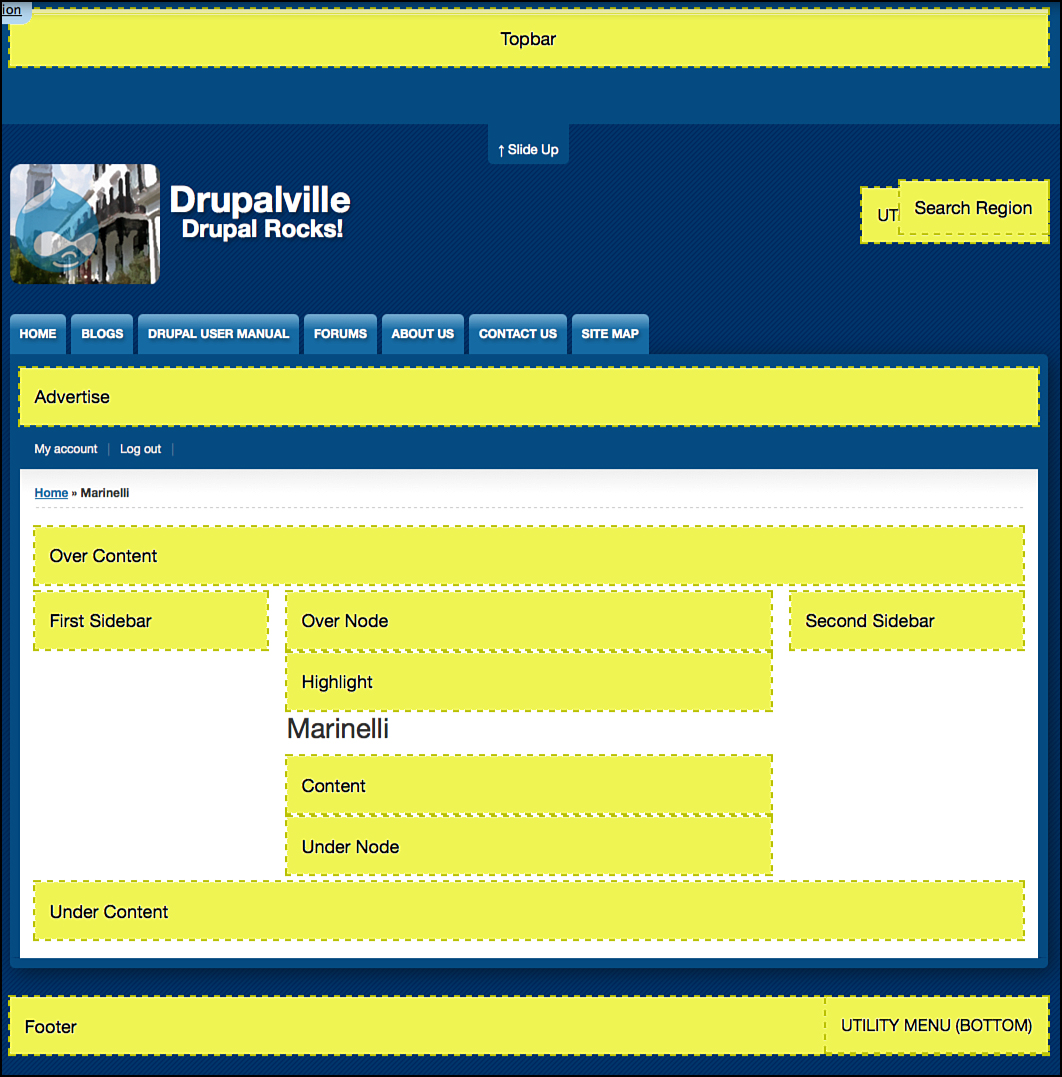
You haven’t seen all those regions live on your site, even though you’re using Marinelli. This is because many regions simply hide if they’re not being used.
Now see the block regions for another theme:
1. Click Exit Block Region Demonstration in the top-left corner, under the black admin bar.
2. Click the 0 point tab in the top-right corner.
3. Click Demonstrate Block Regions (0 Point) and you see a screen like Figure 10.4.

Notice that although the layout is actually fairly similar, almost all the region names are different when compared to Marinelli:
![]() The left column region is now called Sidebar First rather than First Sidebar.
The left column region is now called Sidebar First rather than First Sidebar.
![]() The right column region is now called Sidebar Second rather than Second Sidebar.
The right column region is now called Sidebar Second rather than Second Sidebar.
![]() The region over your main content is now called Highlighted rather than Over Node or Highlight.
The region over your main content is now called Highlighted rather than Over Node or Highlight.
![]() The region for your search block is called Search rather than Search Region.
The region for your search block is called Search rather than Search Region.
There are also some small layout differences. For example, there isn’t a region under your content.
Now see the block regions for a third theme:
1. Click Exit Block Region Demonstration in the top-left corner, under the black admin bar.
2. Click the Bartik tab in the top-right corner.
3. Click Demonstrate Block Regions (Bartik), and you see a screen like Figure 10.5.

Again, there are some similarities with the other themes that you’ve seen but also lots of differences.
One thing that has been consistent until now is that all the themes have had a three-column layout. Marinelli, Zero Point, and Bartik have all had both left and right columns with the main content in the center. This is not going to be true for all themes, including the next one. Now look at the Company theme’s block regions:
1. Click Exit Block Region Demonstration in the top-left corner, under the black admin bar.
2. Click the Company Theme tab in the top-right corner.
3. Click Demonstrate Block Regions (Company Theme) and you see a screen like Figure 10.6.

With the Company theme, there is no left column. If you want a three-column theme, Company would simply not be an option.
Repeat the process you used for the previous four themes and look at the remaining five enabled themes.
Figure 10.7 shows the block regions for the Danland theme.

Figure 10.8 shows the block regions for the Garland theme.
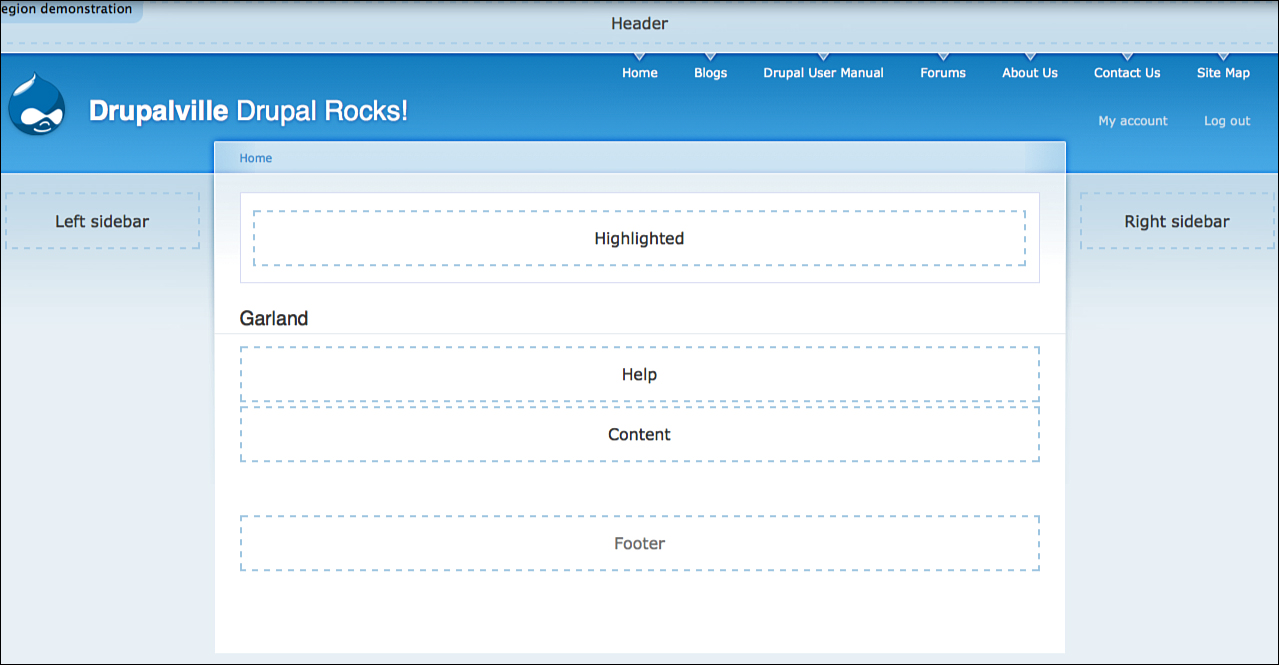
Figure 10.9 show the block regions for the Seven theme. Remember, it is the administration theme and is not designed to show to visitors!
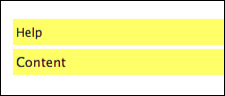
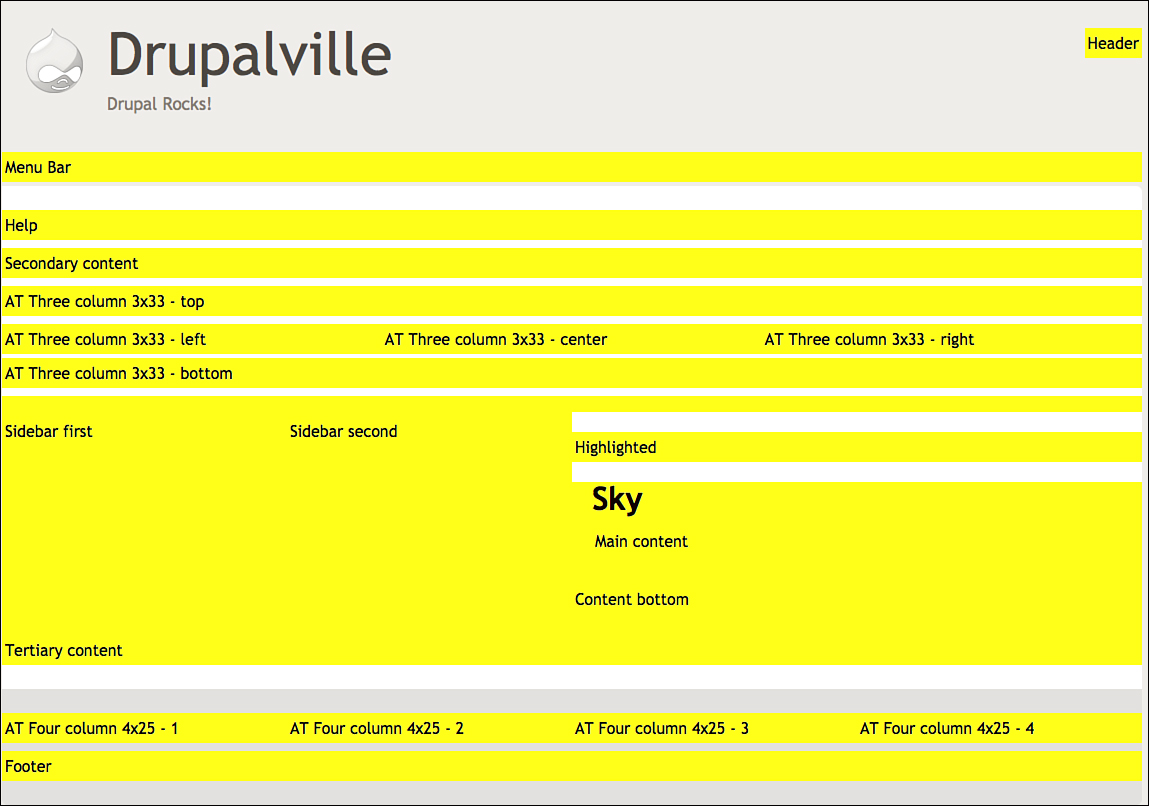
Figure 10.10 shows the block regions for the Sky theme.
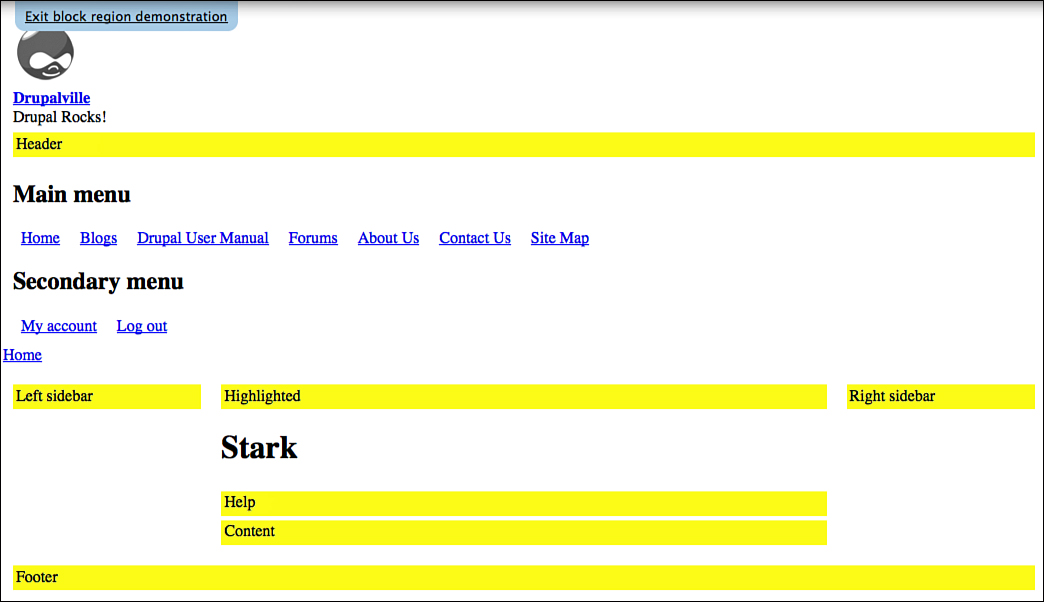
Finally, Figure 10.11 shows the block regions for the Stark theme.
As you can see from the tour of your enabled themes, each theme is different. You must know what regions are available to you before you choose a theme. You would need to be an advanced Drupal user to add and remove regions to a theme, so make sure that a theme has the regions it needs before you use it on your site.
Placing Blocks in Regions Explained
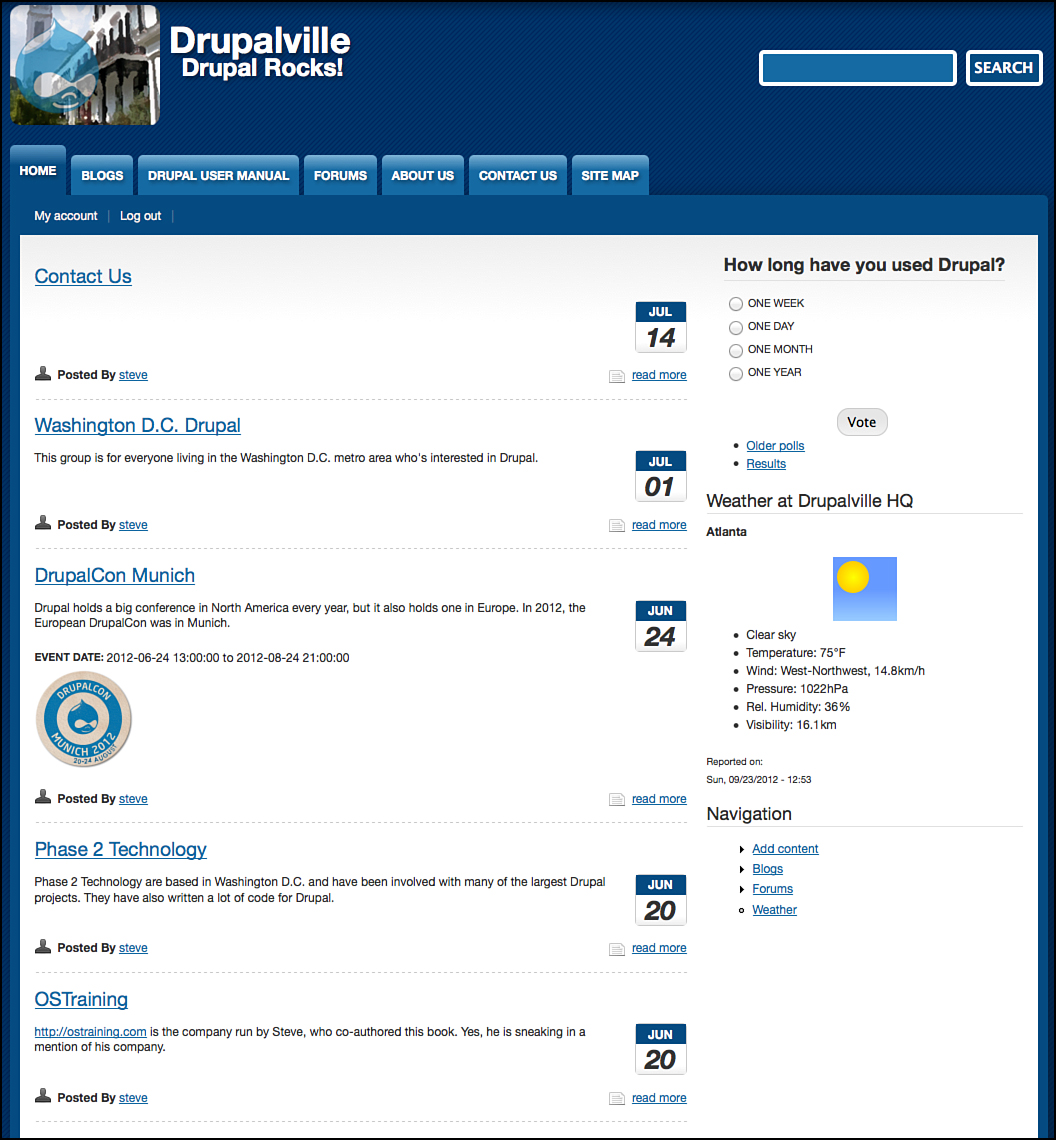
Table 10.1 lists the blocks you can allow on your site. You create more blocks in Chapter 11, “Drupal Views Explained,” but for now, these are several blocks you can work with. Notice you can use the right column (called Second Sidebar in Marinelli), but not the left. This keeps the layout simple and gives you more space to work with in upcoming chapters.

Now place all your blocks:
1. Click Structure and then Blocks.
2. Locate the User Login block.
3. In the row for the User Login block, select Second Sidebar, as shown in Figure 10.12.

4. Repeat the approve process and place these blocks into the Second Sidebar region:
![]() Address Field Static Map
Address Field Static Map
![]() Most Recent Poll
Most Recent Poll
![]() Weather
Weather
![]() Recent Blog Posts
Recent Blog Posts
![]() New Forum Topics
New Forum Topics
![]() Book Navigation
Book Navigation
![]() Navigation
Navigation
5. Place the Search form block into the Search Region.
6. Place the Main Menu block into the –None– region.
7. Click Save Configuration.
Visit your site’s homepage. It should now look like Figure 10.13.

It is also possible to rearrange blocks within regions.
In Chapter 6, “Drupal Fields Explained,” you rearranged the order of the fields you added. In Chapter 8, “Drupal Menus Explained,” you changed the order of your menu items. The same technique used in these chapters applies to blocks as well.
Now change the order of your blocks in the right column:
1. Click Structure and then Blocks.
2. Scroll down to the Second Sidebar area.
3. Locate the crosses.
4. Rearrange the blocks so that they are in the same order as in Table 10.1. The final order should match Figure 10.14.

5. Click Save Configuration
Showing Blocks Under Certain Conditions Explained
So far, you have placed the blocks directly into regions, and by default the blocks have appeared on every page and for every user. However, that might not be the right choice for all sites.
Sometimes blocks need to appear only on certain pages. For example, here are some ways to make the blocks appear in a more relevant, targeted way:
![]() Place the Most Recent Poll block only on the homepage.
Place the Most Recent Poll block only on the homepage.
![]() Place the Recent Blog Posts block only on blog posts.
Place the Recent Blog Posts block only on blog posts.
![]() Place the New Forum Topics block only on forum pages.
Place the New Forum Topics block only on forum pages.
Here’s how you place blocks only on certain pages. Start with the Most Recent Poll block:
1. Click Structure and then Blocks.
2. Locate the Most Recent Poll block.
3. Click Configure.
4. Scroll down to the Visibility settings area.
5. Click the Only the Listed Pages radio button.
6. Type <front> in the space provided, as shown in Figure 10.15.
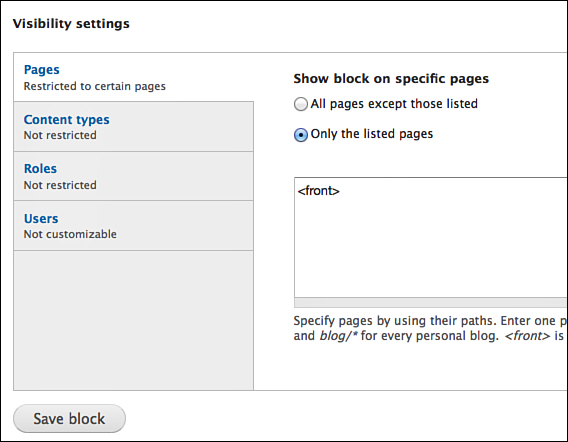
7. Click Save Block.
8. Go to your homepage, and you see your poll block. Browse to other pages and the block will have disappeared.
Repeat that process with the Current Weather block:
1. Click Structure and then Blocks.
2. Locate the Current Weather block.
4. Scroll down to the Visibility settings area.
5. Click the Only the Listed Pages radio button.
6. Type <front> in the space provided.
7. Click Save Block.
8. Go to your homepage and you see the Weather block now appears only on the homepage.
There are several other ways to control which pages blocks appear on. Often blocks are placed on different pages using URLs. Now see how that works:
1. Click Structure and then Blocks.
2. Locate the Recent Blog Posts block.
3. Click Configure.
4. Scroll down to the Visibility settings area.
5. Click the Only the Listed Pages radio button.
6. Type blog on one line and then blogs* on the next line. It should look like Figure 10.16. The asterisk (often called a wildcard) after the word “blogs” means that any pages with a URL starting in blogs will be included. This saves you from typing in the URL of every blog post.

7. Click Save Block.
8. Go to your homepage, and you won’t see the Recent Blog Posts block. Click Blogs in the Main menu and you now see the block.
Repeat the process with the New Forum Topics block:
1. Click Structure and then Blocks.
2. Click Configure next to the Recent Blog Posts block.
3. Scroll down to the Visibility settings area, and click the Only the Listed Pages radio button.
4. Type forum on one line and then forums* on the next line.
5. Click Save Block.
6. Go to your homepage and click Forums in the Main menu.
That process works when there is a distinct URL for part of your site. However, some parts of your site don’t always have consistent URLs. For example, click Drupal User Manual in the Main Menu, and you can see that the URLs don’t always contain a single word, such as blogs or forums. Fortunately, there is an alternative. All the Drupal User Manual pages are created by the Book module, and you can assign a block to appear only on the Book Content type:
1. Click Structure and then Blocks.
2. Click Configure next the Book Navigation block.
3. Scroll down to the Visibility settings area, and click the Content Types tab
4. Check the Book Page block, as shown in Figure 10.17.
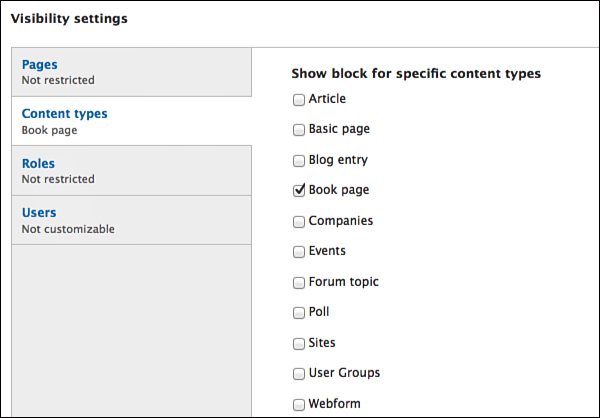
6. Go to your homepage and click Drupal User Manual on the Main menu. The Book Navigation block now appears only on Book pages.
There are two more options under Visibility Settings for each block: Roles and Users. These enable you to show blocks only to certain users or groups of users. However, before you can fully take advantage of these settings, you need to know more about Drupal users and groups of users. You find out more about Roles and Users in Chapter 13, “Drupal Users Explained”.
Editing Blocks Explained
In the previous chapter, you often needed to make adjustments after enabling a new theme. The same is true after enabling blocks or putting them into a new region.
Here are some ways to make adjustments to a block.
Block Settings
Now look at your Most Recent Poll block, as shown in Figure 10.18.

There are at least two things you could improve about the display of this block:
![]() The Poll label is unnecessary because most people will know what it is.
The Poll label is unnecessary because most people will know what it is.
![]() The title of the poll is too long for this region.
The title of the poll is too long for this region.
First, fix the label and see a quick way to edit blocks:
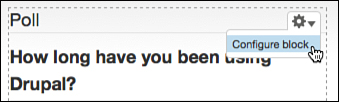
1. Hover your cursor over the top-right corner of the block.
2. You see a cog appear in the top-right corner and a dotted line appear around the block, as shown in Figure 10.19.

3. Click the cog and the words Configure Block will appear, as shown in Figure 10.20. Click Configure Block. This is a quick way to get to the settings for the block without clicking Structure, Blocks, and then Configure.
First, let’s remove the Poll label:
1. In the Block Title field, enter <none>, as shown in Figure 10.21.

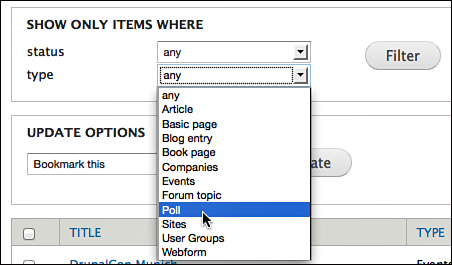
3. Click Find Content on the admin menu bar.
4. In the filters at the top of the page, set Type to Poll, as shown in Figure 10.22. Click Filter. This results in only your Poll content showing and makes your poll easy to find.
5. Click Edit in the row for How Long Have You Been Using Drupal?
6. Change the Question to How Long Have You Used Drupal?
7. Click Save.
8. Go to your homepage, and your Most Recent Poll block should now look like Figure 10.23. It is cleaner and more visually pleasing than before you made those two adjustments.

Try that again with another block. Take a look at the Weather block, which should look like Figure 10.24.

There are at least two things you could improve about the display of this block:
![]() The Current weather title is not descriptive.
The Current weather title is not descriptive.
![]() The block uses Celsius but your weather is for the United States, which uses Fahrenheit.
The block uses Celsius but your weather is for the United States, which uses Fahrenheit.
First, change the block title:
1. Hover your cursor over the Weather block.
2. Click Configure Block in the top-right corner of the block.
3. In the Block Title field, enter Weather at Drupalville HQ.
4. Click Save Block.
To change the data showing on the page, you need to do something different. The How Long Have You Been Using Drupal? poll was produced by content, so you can edit it via the Find Content link. However, the Weather is produced by a module, so you need to look elsewhere to find the configuration settings.
1. Go to Modules and click Configure in the Weather row.
2. Click the System-Wide Display (#1) title.
3. In the Temperature drop-down, change Celsius to Fahrenheit, as shown in Figure 10.25.

4. Click Save.
5. Go to your homepage, and you’ll see your block with the new adjustments, as shown in Figure 10.26.

During these exercises, you’ve seen that there are some settings inside the block itself. However, the settings inside the block mainly relate to the title of the block, which region it appears in, and which pages it appears on.
If you want to make changes to the content of the block itself, you often need to go to the original source of the block’s display, which might be a module or perhaps a content item.
Creating Blocks Explained
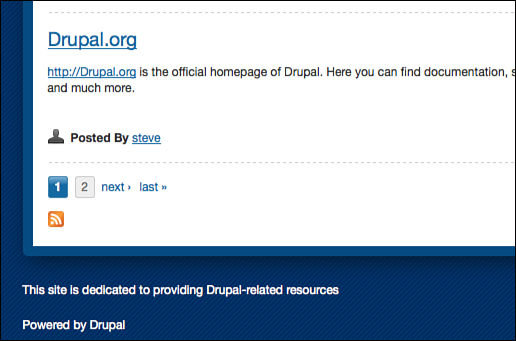
Until now, you focused on blocks that already exist. In this final part of the chapter, you see how to manually create a block. At the beginner level, creating blocks will be useful if you have a small amount of text or perhaps an image that you want to show in a block region. Use the example of a site mission statement:
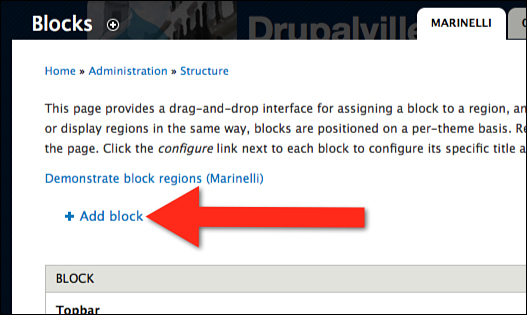
1. Click Structure and then Blocks.
2. Click Add Block in the top-left corner, as shown in Figure 10.27.
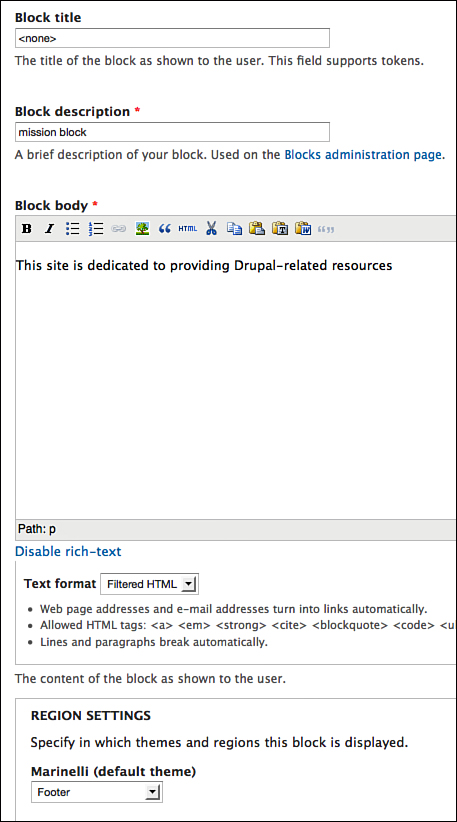
3. Block title: <none>.
4. The Block description is what appears on the page where the blocks are listed. Type mission block as the description.
5. In the block body, type the site mission statement of This site is dedicated to providing Drupal-related resources.
6. Under Region settings, set the Marinelli (default theme) drop-down to Footer.
Your new block should now look like Figure 10.28.
7. Save Block.
8. Click the homepage icon and see the mission block at the bottom of the page, as shown in Figure 10.29.
What’s Next?
In this chapter, you saw that the theme you use has control of where you can place blocks. Together with Chapter 9, you hopefully now have a good understanding of how Drupal themes control both the design and layout of your site.
You now have control over your site’s appearance, but some key questions remain:
![]() You have several companies on your site, but can you make a single page listing all those companies?
You have several companies on your site, but can you make a single page listing all those companies?
![]() You also have several events on your site, but how do you browse them easily?
You also have several events on your site, but how do you browse them easily?
![]() How do you add a photo gallery to your site?
How do you add a photo gallery to your site?
The answer to all these questions and many more is the Views module. Views is the most important module in Drupal, and it’s the first module that gets its own chapter.
At this point in the book, your site should look like Figure 10.30. As always, don’t worry if your site has some small differences compared to the figure. That’s OK. The goal of this book is not for you to perfectly mimic the Drupalville site. The goal of this book is to help you understand the key concepts underlying Drupal. If you understand how blocks work, you’re ready to move on to the next chapter.
At this point in the book, we hope that our recommended workflow, shown in Figure 10.31, is starting to make more sense for you.
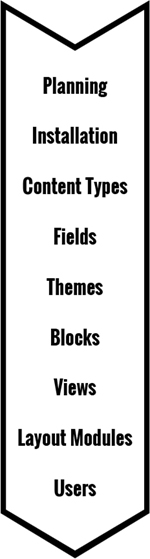
Let’s quickly recap what you’ve done so far.
After planning and installing the site, you started building your site with content types.
You started with content types because you needed them in order to use fields.
Next you added your theme. Why did you not choose your theme as the first step? Because without any content on the site, it’s very hard to picture what your site is going to look like.
Then you added blocks. You added blocks after the theme because the theme dictates where your regions will be. Without a theme you don’t know what your regions are and where you can place blocks.
As we continue through the book, we’ll introduce you to the rest of the steps in this Drupal workflow. Each step in the workflow proceeds logically from the previous step.