7. Drupal Modules Explained
If you’ve used a mobile phone in the last few years, you can understand modules. Modules in Drupal are like the apps on a phone. Modules are the source of all the features on our Drupal sites.
We’ve already seen modules in Chapter 5, “Drupal Content Explained,” and Chapter 6, “Drupal Fields Explained.” In Chapter 5, you went to the Modules page on your site and turned on four core modules: Blog, Book, Forum, and Poll. In Chapter 6, you went a step further. By using the FITS workflow, you added modules from Drupal.org to your site.
![]() Find
Find
![]() Install
Install
![]() Turn on
Turn on
![]() Set up
Set up
In this chapter, you use modules to add many more features.
At the end of this chapter, you should be able to use modules to add these features:
![]() Links that enable visitors to share your content on social sites
Links that enable visitors to share your content on social sites
![]() Links that enable visitors to print content or email it to friends
Links that enable visitors to print content or email it to friends
![]() Links that enable visitors to bookmark content
Links that enable visitors to bookmark content
![]() Ratings so that visitors can vote on content
Ratings so that visitors can vote on content
![]() More flexible URL patterns
More flexible URL patterns
![]() Forms so that visitors can contact you
Forms so that visitors can contact you
![]() A text editor so that you can format your content.
A text editor so that you can format your content.
You also see how to research and evaluate modules on Drupal.org.
Adding Modules Explained
After Chapters 5 and 6, you have nine content types. The plan is to add six features to one or more of your content types. Table 7.1 lists the content types and which features will be set up for each.

This chapter’s introduction described the features you’re going to add. Here is a list of the modules you can use for each feature:
![]() AddtoAny: Social sharing links that enable visitors to share your content on sites such as Facebook and Twitter
AddtoAny: Social sharing links that enable visitors to share your content on sites such as Facebook and Twitter
![]() Printer, email, and PDF Versions: Links that enable visitors to print content or email it to friends
Printer, email, and PDF Versions: Links that enable visitors to print content or email it to friends
![]() Flag: Links that enable authenticated users to bookmark content
Flag: Links that enable authenticated users to bookmark content
![]() Fivestar Ratings: So visitors can vote on content
Fivestar Ratings: So visitors can vote on content
![]() Pathauto: More flexible URL patterns
Pathauto: More flexible URL patterns
![]() Webform: Forms so that visitors can contact you
Webform: Forms so that visitors can contact you
![]() WYSIWYG: A text editor so that you can format your content
WYSIWYG: A text editor so that you can format your content
Sharing Drupal Content
Have you ever visited a web page and thought, “This would be a great page to share on Facebook or Twitter”? In this section, you can make it easy for your visitors to share your content.
The Share Buttons (AddToAny) by Lockerz module (AddtoAny module for short) is one of the modules that provides this feature.
Use the FITS workflow to find, install, turn on, and set up this module.
Step 1: Find the Module
1. Go to http://drupal.org/project/addtoany.
2. Copy the tar.gz link for the Drupal 7 version of this module.
Step 2: Install the Module
1. Go to your site.
2. Click Modules on the black menu bar.
3. Click Install New Module.
4. Paste the link from Drupal.org into the Install from URL field.
5. Click Install.
6. Click Enable Newly Added Modules.
2. Click Save Configuration.
Step 4: Set Up the Module
The setup process for modules varies from one module to the next.
With some modules, such as Blog and Poll, all you need to do is turn them on. That was true of the modules in Chapter 5.
With other modules, such as Links and Date, you need to create fields to put them into action. That was true of the modules in Chapter 6.
Some other modules have one or more configuration pages that need to be managed and saved before the module will work.
For the AddtoAny Share buttons to appear, you need to manage and save the module’s settings. Do that now.
You can find the configuration page in two ways:
![]() Click Configure next to the module on the Module page.
Click Configure next to the module on the Module page.
![]() Click Configuration on the black menu bar and find the entry for the module.
Click Configuration on the black menu bar and find the entry for the module.
Now use the second of those two ways, because the black menu bar is always available no matter where you are in your site:
1. Click Configuration on the black menu bar.
2. In the right column, under the System block, locate and click AddtoAny, as shown in Figure 7.1.

3. Click Placement to view the options, as shown in Figure 7.2.

4. Observe the list of content types, as shown in Figure 7.3.

5. Check the box for every content type.
6. Click the Button link, as shown in Figure 7.2.
In this area, you choose from several existing images or you can add your own image.
7. Click the Additional Options link, as shown in Figure 7.2.
8. Observe this is for more advanced, custom configuration.
9. Click Save Configuration.
Step 5: See the Results
There are two places where the share button will appear: on the full view of a page created with a content type and on teaser lists. Now take a look:
1. Click the home icon in the top-left corner on the black menu bar.
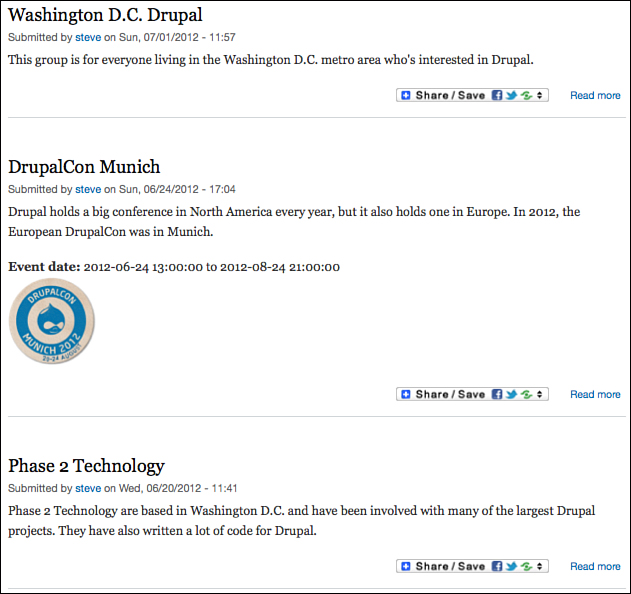
2. The pages in the teaser list now show the Share button (see Figure 7.4).
3. Click one of the page titles.
4. Observe the Share button, as shown in Figure 7.5.

5. Hover over the AddtoAny button. You can see the sharing options available, as shown in Figure 7.6.

Printing Drupal Content
Have you ever printed a webpage and wished you could just print the article on that page versus all the ads, menus, and such that surround the article? Well, you can provide that feature to your site visitors with the module called Printer, email, and PDF versions.
This feature is particularly useful with the Book page content type. Recall that your plan is to have a user manual with multiple related pages connected in an outline. This module allows your visitors to print the entire book to one page or any subsection in the book to one page. Now see how you can do this.
Step 1: Find the Module
1. Go to http://drupal.org/project/print.
2. Copy the tar.gz link for the Drupal 7 version of this module.
Step 2: Install the Module
1. Go to your site.
2. Click Modules on the Administration menu.
3. Click Install New Module.
4. Paste the link from Drupal.org into the Install from URL field.
5. Click Install.
6. Click Enable Newly Added Modules.
Step 3: Turn on the Module
Similar to some modules you saw in Chapter 6, this module actually comes with three modules: Printer-Friendly Page (Required), PDF Version, and Send by Email:
1. Scroll down your module list and check the box next to Printer-Friendly Pages and Send by Email. You can skip PDF Version for now because it can be difficult to set up on many servers.
2. Click Save Configuration.
Step 4: Set Up the Module
Unlike the AddtoAny module, you don’t need to go to the module’s configuration screen before you see the results of this module. But, there are setup options available to you, so take a look. There are two places where you can configure this module:
![]() Printer, Email, and PDF Versions module configuration page
Printer, Email, and PDF Versions module configuration page
![]() Each content type’s configuration page
Each content type’s configuration page
Print, Email, and PDF Module Configuration Page
Although you don’t have to set anything on this page, it is worth reviewing your options:
1. Click Configuration on the black menu bar.
2. Click Printer, Email, and PDF Versions link in the User Interface block on the right, as shown in Figure 7.7.

There are two options in here that you might want to change:
![]() Printer-friendly page link: Controls where on the content the links are shown
Printer-friendly page link: Controls where on the content the links are shown
![]() Link style: Controls whether visitors see text links or image links
Link style: Controls whether visitors see text links or image links
Content Type Configuration Pages
1. Click Structure; then click Content Types.
2. Click Edit for any content type.
3. Scroll down and click the Printer, Email, and PDF Versions tab, as shown in Figure 7.8.

4. Observe that each content type has printer-friendly options enabled by default. The plan in Table 7.1 is to provide this feature on article, blog entry, book page, companies, events, and sites content types.
5. Edit these content types and uncheck all the Printer, Email, and PDF Versions boxes: Basic Page, Forum Topic, and Poll.
Step 5: See the Results
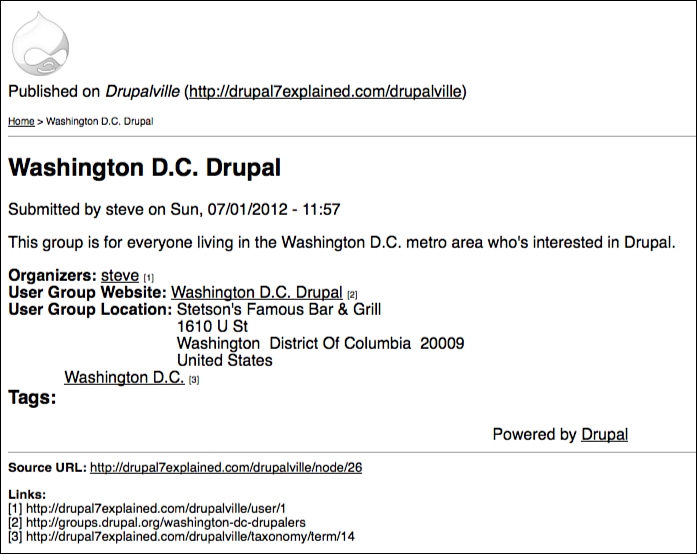
1. To see the Printer-Friendly options, go to one of the many pages you have already created and observe the link, as shown in Figure 7.9.

2. Click Printer-Friendly Version, and you’ll see the screen, shown in Figure 7.10.
3. Click Send by Email, and you’ll see the screen shown in Figure 7.11.

Bookmarking Drupal Content
We’re now going to use the Flag module to allow our visitors to bookmark content.
Step 1: Find the Module
1. Go to http://drupal.org/project/flag.
2. Copy the tar.gz link for the Drupal 7 version of this module.
Step 2: Install the Module
1. Go to your site.
2. Click Modules; then click Install New Module.
3. Paste the link into the Install from URL field and then click Install.
Step 3: Turn on the Module
Again, you see that the Flag module has more than one module that can be turned on: Flag and Flag Actions. For this activity, you need to turn on only the Flag module:
1. Scroll down; check the box next to Flag.
2. Click Save Configuration.
Step 4: Set Up the Module
Unlike some other modules, you don’t have a separate configuration page for the Flag module. All of your configuration settings are specific to the flag itself:
1. Click Structures and then Flags.
2. Click Edit for the Bookmark flag, as shown in Figure 7.12.

3. Review the options and notes under each option.
4. Locate the Flaggable content list.
5. Observe that this is where you tell the Flag module to which content type the flag should be applied, as shown in Figure 7.13. This is a different way to link the module and the content type. With the AddtoAny module you went to the Configuration area and with the Print, Email, and PDF Versions module, you edited each content type.
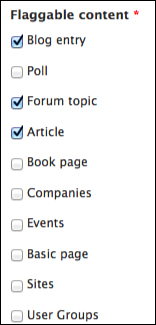
6. As per your plan in Table 7.1, check all the content types except for Poll.
7. Click Submit.
Step 5: See the Results
1. Return to the homepage. You’ll see that the Bookmark This links have appeared, as shown in Figure 7.14.
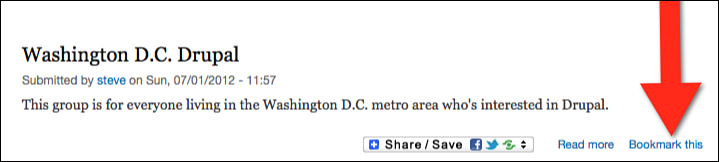
2. Click the Bookmark this link, and it will change to read Unbookmark This.
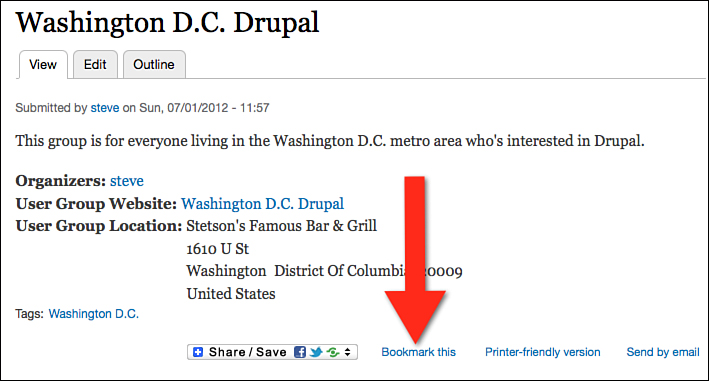
3. Click the content title, and you can see that the Bookmark This link appears, as shown in Figure 7.15.
At the moment, it’s not possible to see a list of all the content you’ve bookmarked. That comes in Chapter 11, “Drupal Views Explained.” We will add the Views module to the site and that will allow you to display all of your bookmarks.
Voting on Drupal Content
Feedback is often good to have, and one way to accomplish this is to allow your visitors to vote on the content on your site. The Fivestar module is one of the modules that provides a voting feature.
Step 1: Find the Modules
As you’ve seen, some modules rely on others to work. This time you need the Fivestar module but also the VotingAPI module:
1. Go to Fivestar page on Drupal.org: http://drupal.org/project/fivestar. Copy the tar.gz link for the Drupal 7 version of this module.
2. Repeat the process for the VotingAPI module: http://drupal.org/project/votingapi.
Step 2: Install the Module
1. Go to your site.
2. Click Modules; then click Install New Module.
3. Paste the link into the Install from URL field and click Install.
4. Repeat this process for the VotingAPI module.
Step 3: Turn on the Module
1. Scroll down your module list; check the boxes next to Fivestar and Voting API.
2. Click Save Configuration.
Step 4: Set Up the Module
You’ve noticed that the setup process for modules varies greatly from module to module. The way a module is set up depends not only on what type of module it is, but also on choices made by the module’s developer. Many different developers write Drupal modules, and not all of them choose the same approach.
To get Fivestar set up, use the process used in Chapter 6.
According to your plan in Table 7.1, you can allow visitors to vote on articles, blog entries, book pages, events, and sites. Now add this voting feature to the Sites content type and then repeat the process for the other content types:
1. Click Structures; then click Content Types.
2. Click Manage fields for the Sites content type.
3. Add the new field:
![]() Label: Vote
Label: Vote
![]() Field name: vote
Field name: vote
![]() Type of data to store: Fivestar Rating
Type of data to store: Fivestar Rating
![]() Form element to edit the data: Stars (rated while viewing)
Form element to edit the data: Stars (rated while viewing)
4. Click Save, Save field settings, and then Save Settings.
5. Chapter 6 showed you how to reuse fields. Use that technique to reuse this field to add ratings to Articles, Blog Entries, Book Pages, and Events.
Step 5: See the Results
1. Go to the homepage; locate one of your Sites pages in the homepage teaser list.
2. Click the page title. The voting option will be down at the bottom of the screen, as shown in Figure 7.16.
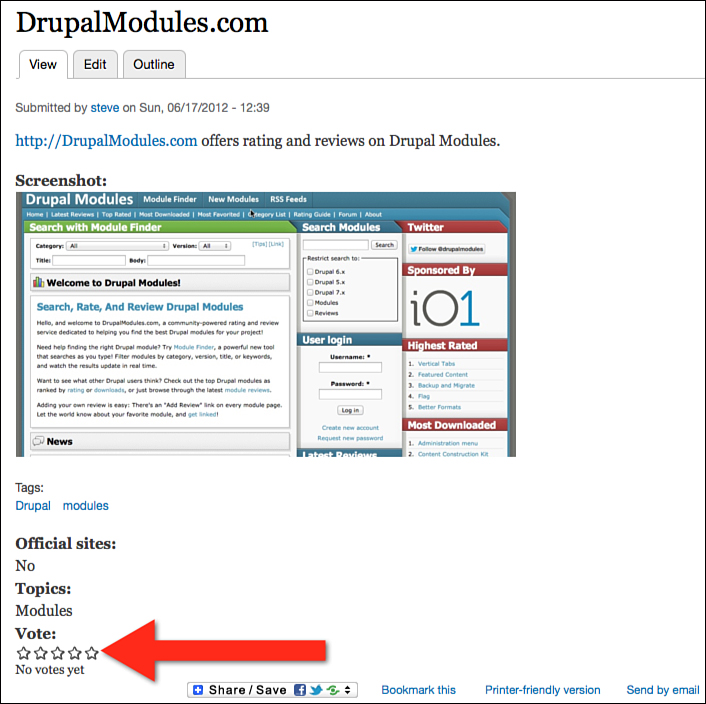
3. Click the stars, and your vote will be recorded. Drupal enables each authenticated user to vote once on each content item.
Changing Drupals URLs
When you save content on your Drupal site, the URL for that page looks like this: /node/23.
What does this URL mean?
![]() Node is a word that Drupal sometimes uses when it means content.
Node is a word that Drupal sometimes uses when it means content.
![]() 23 shows that this is the 23rd content item added to your site.
23 shows that this is the 23rd content item added to your site.
However, although these URLs are logical, after you know what they mean, most sites won’t find them to be user-friendly or search engine optimization (SEO)-friendly.
Default Drupal comes with a Path module that enables you to manually define the URL you would like for your content, but this requires that you manually set it up whenever you create content.
The Pathauto module provides a way to automatically create URLs according the pattern you decide. Pathauto relies on the Token module, so you’ll install that also.
Step 1: Find the Module
1. Go to http://drupal.org/project/pathauto.
2. Copy the tar.gz link for the Drupal 7 version of this module.
Step 2: Install the Module
1. Click Modules; then click Install New Module.
2. Paste the link into the Install from URL field, and then click Install.
3. Repeat Step 1 and Step 2 for the Token module: http://drupal.org/project/token.
Step 3: Turn on the Module
1. Check the box next to Pathauto and Token.
2. Click Save Configuration.
Step 4: Set Up the Module
1. Click Configuration.
2. Click URL aliases in the Search and Metadata block.
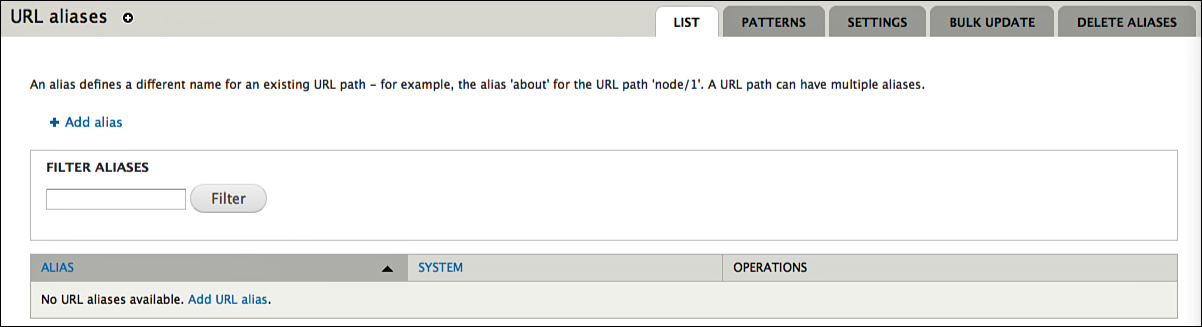
3. Observe the five tabs across the top-right of the screen, as shown in Figure 7.17.
4. Click the Patterns tab.
5. By default, Pathauto creates a pattern for all your URLs. That pattern is content/[node:title], as shown in Figure 7.18. With this pattern, your About Us page would have the URL /content/about-us. Remember that node is the word that Drupal sometimes uses to refer to content, so node title means the title of your content.

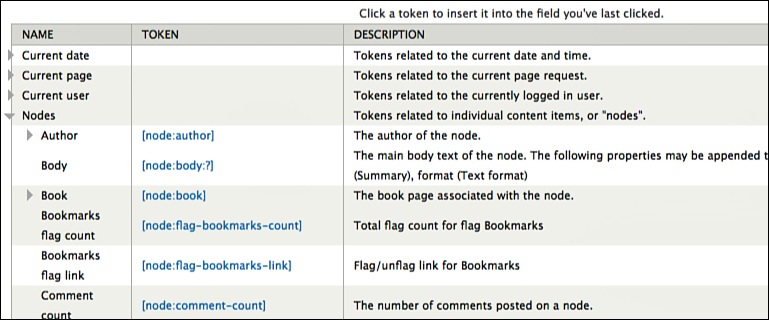
6. Click Replacement Patterns at the bottom of the Content Paths block. You now see a list of tokens, as shown in Figure 7.19. As you gain more experience with Drupal, you’ll see tokens in many places. They are provided by the Token module and enable you to easily create automatic patterns for all sorts of things on your site.

For example, click Nodes and you see a list of options, as shown in Figure 7.20. These tokens provide a variety of ways in which the URL for a content item can be created.
7. The default pattern content/[node:title] is not terrible, but we’re going to try to provide some more relevant and descriptive URLs. Here are some example URL patterns to try. When you enter them, your screen should look like Figure 7.21.

We are inserting the word /resources/ into some patterns for a reason: Later in this book we will create landing pages for several content types. Those landing pages will be located at URLs such as /articles/, /companies/ and /events/. By adding the word /resources/, we make sure those URLs will still be available.
Here are the patterns to create for your URLs:
![]() Article: resources/articles/[node:title]
Article: resources/articles/[node:title]
![]() Basic page: [node:menu-link:parent]/[node:menu-link]
Basic page: [node:menu-link:parent]/[node:menu-link]
![]() Blog: blogs/[node:author]/[node:title]
Blog: blogs/[node:author]/[node:title]
![]() Book: [node:book:parent]/[node:book]
Book: [node:book:parent]/[node:book]
![]() Companies: resources/companies/[node:title]
Companies: resources/companies/[node:title]
![]() Events: events/[node:title]
Events: events/[node:title]
![]() Forum: forums/[node:taxonomy_forums]/[node:title]
Forum: forums/[node:taxonomy_forums]/[node:title]
![]() Poll: polls/[node:title]
Poll: polls/[node:title]
![]() Sites: resources/sites/[node:title]
Sites: resources/sites/[node:title]
![]() User Groups: resources/user-groups/[node:title]
User Groups: resources/user-groups/[node:title]
If you make a mistake with your URL patterns or just want to try something different, you can delete and re-create the URLs, as follows:
1. Click the Bulk Update tab in the top-right corner.
2. Check all the boxes and click Update.
3. Click the Delete Aliases tab in the top-right corner.
4. Check All aliases and click Delete Aliases Now!
Step 5: See the Results
Go to your homepage and click one of the titles in the teaser area. You see the new URL in the browser bar.
Using Pathauto, you can also manually create the URL for any page, as follows:
1. Click the Edit tab for any content item.
2. Scroll down, and you’ll see a URL path settings box where you can modify the URL (see Figure 7.22).

Creating a Form
Almost everyone needs to allow their visitors to contact them easily. The Webform module is a convenient way to collect information from your visitors. You can use Webform to create a contact form, registration forms, survey forms, and more.
For your Drupalville site, create a contact form.
Step 1: Find the Module
1. Go to http://drupal.org/project/webform.
2. Copy the tar.gz link for the Drupal 7 version of this module.
Step 2: Install the Module
1. Go to your site, click Modules, and click Install New Module.
2. Paste the link into the Install from URL field; then click Install.
3. Click Enable Newly Added Modules.
Step 3: Turn on the Module
1. Scroll down your module list and check the box next to Webform.
2. Click Save Configuration.
Step 4: Set Up the Module
1. Click Add Content.
2. Click Webform.
4. Menu Settings: Check the Provide a Menu link box.
5. Comment Settings: Closed.
6. Click Save.
7. You’ll now see the Webform interface, as shown in Figure 7.23. This is where you can build your form. This is similar to the process you used to add fields in Chapter 6, although Webform is simpler and more limited than Drupal’s fields.

8. Start by collecting the name of people contacting you. Enter Name for the Label and choose Textfield for the Type, as shown in Figure 7.24.

9. Click Add.
10. Keep the default settings, but you can review your options before you click Save Component.
11. Enter E-mail for the Label and choose E-mail for the Type, as shown in Figure 7.25.

12. Click Add and then Save Component.
13. Enter Message for the Label and choose Textarea for the Type.
14. Click Add and then Save component.
You can modify the settings for your Contact Form by clicking small tabs in the top-right corner, as shown in Figure 7.26.

Click each of those sublinks to see the settings they offer:
1. Click Form components, and you’ll be on the screen where you can add more fields to your form.
2. Click E-mails, and you can choose where messages from the form will be sent.
3. Click Form settings. Here you can write a thank-you message to people submitting your form and modify other settings.
4. Click View, and you see the form live on your site, as shown in Figure 7.27.

Now, test the form:
1. Enter a name, email, and message.
2. Click Submit.
3. You’ll see a thank-you message. Click Go Back to the Form.
4. Click the Results tab.
5. You’ll see a list of the submissions made via the form. You’ll also see other options, including Analysis, Table, Download, and Clear in the top-right corner, as shown in Figure 7.28.

Showing Weather
Throughout this book, there are times when we’re going to give you a gentle, short introduction to something we’ll deal with in more depth later. This is one of those times.
You work with blocks in Chapter 10, “Drupal Blocks Explained.” Blocks are accurately named. They are small blocks of content or information that often appear in the sidebar of your site. Some modules work by creating blocks. Now we’re going to look at two examples that visually illustrate exactly what blocks are.
First, the Weather module provides a way for you to display the weather from around the world. This module uses a block to show a regional weather forecast in the sidebar of your site.
Step 1: Find the Module
1. Go to http://drupal.org/project/weather.
2. Copy the download link.
Step 2: Install the Module
1. Go to Modules.
2. Install New Module and install Weather.
Step 3: Turn on the Module
1. Enable the Weather module.
Step 4: Set Up the Module
1. Click Configuration.
2. Locate Weather in the User Interface block and click the link.
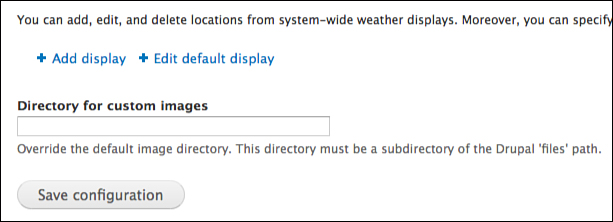
3. You’ll see a screen similar to Figure 7.29. Observe that you have three options: Add Display, Edit Default Display, and Create a Directory to hold any custom images you want to use on your weather blocks.
4. Click Add Display.
5. Observe your options and click Save.
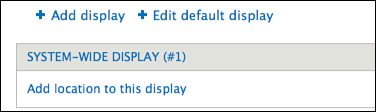
6. Click Add location to this display, as shown in Figure 7.30.
7. Select a country.
8. Select a place.
9. Select an alternative name for the selected place. This enables you to give the place a more human-readable name. For example, I selected GA - Atlanta, De Kalb-Peachtree Airport for the Place, but simply wrote Atlanta in here.
10. Your finished screen will look like Figure 7.31.

11. Click Save.
12. Save the configuration.
Step 5: See the Results
1. Go to Structure and then Blocks.
2. Scroll down the area marked Disabled at the bottom of the page.
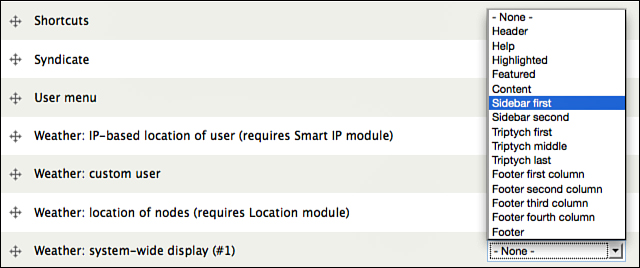
3. Find the row with the title Weather: System-Wide Display (#1), as shown in Figure 7.32.

4. In the Weather: System-Wide Display (#1) Row, choose Sidebar first from the large drop-down, as shown in Figure 7.33.
5. Click Save Blocks.
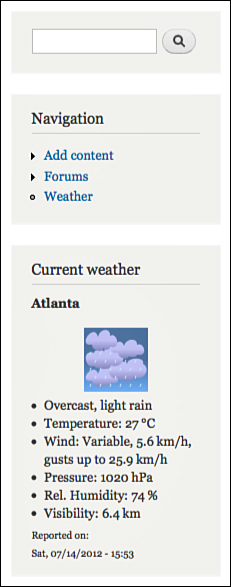
6. Click the Home icon in the top-left corner of your screen, and you see that the Weather block is now live on your site, as shown in Figure 7.34. Notice that there is also a link called Weather in the Navigation area. That was automatically created by the Weather module and enables people to search for weather in their own area.
Showing Maps
When you installed the Address field module, you took the first step to display a map on your site. The Address Field Static Map module works with the Address field module. Each time you create an event page on the site and include an address, a block appears with a map and a marker showing the location of the event.
Now install and set up the map.
Step 1: Find the Module
2. Copy the download link.
Step 2: Install the Module
1. Go to Modules; then install the new module and Address Field Static Map.
Step 3: Turn on the Module
1. Enable the Address Field Static Map module.
Step 4: Set Up the Module
1. Click Configure on the black menu bar.
2. Locate Address Field Static Map Block in the System block and click the link. Enter these settings:
![]() Address Field: field_address
Address Field: field_address
![]() Image Size: 170x170
Image Size: 170x170
![]() Click the Get Directions link and check the box that says Display Get Directions.
Click the Get Directions link and check the box that says Display Get Directions.
3. Click Save Configuration.
4. Go to Structure and then Blocks.
5. Scroll down the area marked Disabled at the bottom of the page.
6. Find the row with the title Address Field Static Map.
7. In the Address Field Static Map row, choose Sidebar first from the large drop-down, as shown in Figure 7.35.

8. Click Save Blocks.
9. Click the Home icon in the top-left corner of your screen. You’ll notice that the Map is not showing yet. This is because it shows only when there is an address field on the content. Visit one of your User Group pages and you’ll see the map in the left sidebar, as shown in Figure 7.36.

Text Editors for Drupal Explained
Most people writing content for websites want a text editor. They want to add bold, italic, underline, and other formatting to their text. They also want to create tables and insert images.
There are two problems with doing that in Drupal:
![]() Drupal 7 does not install with a point-and-click text editor by default. Drupal’s developers know this is a problem and will probably include an editor in Drupal 8.
Drupal 7 does not install with a point-and-click text editor by default. Drupal’s developers know this is a problem and will probably include an editor in Drupal 8.
![]() Installing a text editor is more difficult than installing a normal module.
Installing a text editor is more difficult than installing a normal module.
This section tries to overcome those two problems. You see how to install a text editor, or to give it another name, a WYSIWYG (What You See Is What You Get) editor.
Step 1: Install the WYSIWYG Module
Use the FITS workflow to install the WYSIWYG module:
1. Go to http://drupal.org/project/wysiwyg and copy the link.
2. Go to Modules; then Install new module and install WYSIWYG.
3. Enable the WYSIWYG module.
Step 2: Upload the TinyMCE Files
Now upload the files for the editor. You need to access your Drupal site’s file structure. This exercise shows you how to upload the TinyMCE files. This exercise also gives you an introduction to Drupal’s folder structure, and you’ll learn some important lessons for managing a Drupal site:
1. Click Configuration.
2. Click WYSIWYG Profiles in the Content Authoring block. You’ll see a list of text editors that you could use together with Drupal, as shown in Figure 7.37.
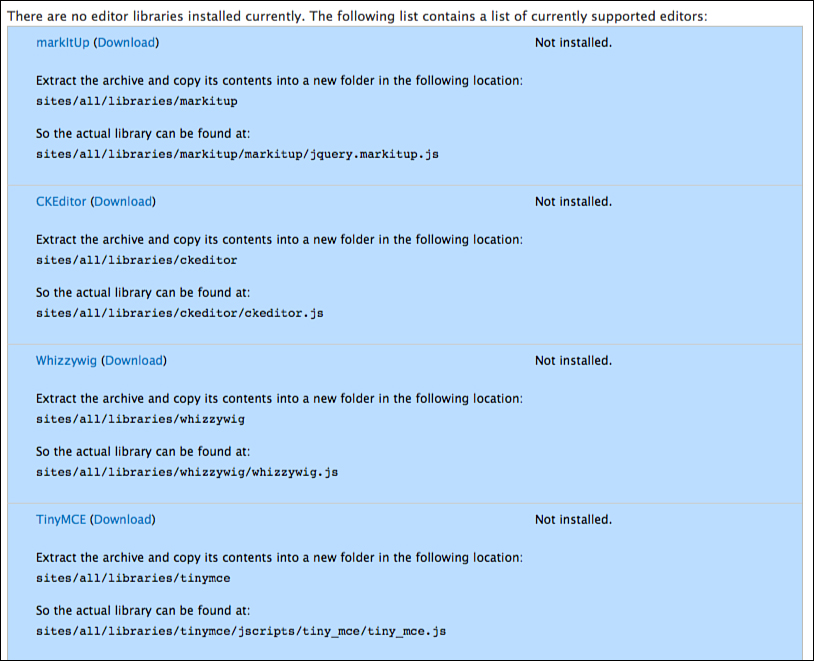
In addition to suggesting editors, Drupal gives brief instructions for uploading each one. For example, try to install an editor called TinyMCE. Figure 7.38 shows that Drupal provides a download link and also tells you where to upload the files.

3. Click the Download link next to TinyMCE, and you’ll be taken to a screen like the one in Figure 7.39. Click the Download button for TinyMCE 3 (Please note that at the time of writing, the WYSIWYG module does not support TinyMCE 4.).

4. A file downloads to your computer. The file has a name similar to tinymce_3.5.4.zip. Click this file to extract it. You’ll see a folder called /tinymce/. Open this folder and check that the contents look like Figure 7.40.

5. Now you need to log in and access your Drupal files. In Chapter 3, “Drupal Installations Explained,” you needed a login to install Drupal. You either had a login to your hosting Control Panel or you had a direct FTP login to your sites files. Whichever login you had, you need it again now. If you’re stuck, ask the person who hosts your website.
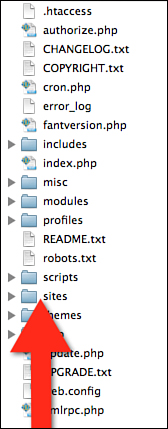
6. Log in to your Drupal site’s files. You’ll be in the correct place when you see files and folders that look like Figure 7.41.

There is one mistake that is easy to make at this point. If you upload a module or related files, you might expect to upload your module to the /modules/ directory. Actually, you need to upload the files to the /sites/ folder. There are two reasons for this:
![]() Updating: The /modules/ folder is only for Drupal’s default modules. Every time you update your Drupal site, the /modules/ folder is overwritten and all changes are lost.
Updating: The /modules/ folder is only for Drupal’s default modules. Every time you update your Drupal site, the /modules/ folder is overwritten and all changes are lost.
![]() Multisites: The /sites/ folder enables you to run multiple Drupal websites from just one set of files. Everything you upload to the /sites/ folder can be made available to all those websites. Actually setting up and using multisites is out of the scope of this book, but you can find more information at http://Drupal7Explained.com/Chapter7.
Multisites: The /sites/ folder enables you to run multiple Drupal websites from just one set of files. Everything you upload to the /sites/ folder can be made available to all those websites. Actually setting up and using multisites is out of the scope of this book, but you can find more information at http://Drupal7Explained.com/Chapter7.
As a reminder, Figure 7.42 shows where you’ll upload all of your files.
7. Click the /sites/ folder.
8. Click the /default/ folder. The folder is called /default/ because, if you were using multisites, everything in here is only available to your default site, which is the one you’re working on now.
9. Click the /files/ folder. You’ll now see all the images that you’ve uploaded in this book so far, as shown in Figure 7.43.

10. Click the /all/ folder. The folder is called /all/ because if you were using multisites, everything in here would be available to all your sites.
11. Click the /modules/ folder. You’ll now see all the modules that you’ve uploaded in this book so far, as shown in Figure 7.44.

As you can see, everything that you’ve uploaded to the site has gone into the /sites/ folder. If you upload modules or anything else to your site, make sure they go into the /sites/ folder. Now that we’ve explained how to avoid a common error, finish installing your text editor:
1. The original instructions in Figure 7.38 asked you to upload the TinyMCE folder to /sites/all/libraries/tinymce/. At the moment, you don’t have a folder called /libraries/, so you need to create it. Click up one level and create a directory called /libraries/ in the sites/all directory, as shown in Figure 7.45.

2. Upload the /tinymce/ folder to sites/all/libraries/.
3. Check to see if the following directory/file naming structure is in place: sites/all/libraries/tinymce/, as shown in Figure 7.46.

4. Go back to the admin area of your Drupal site and click Configuration, Wysiwyg profiles. After a successful installation, your screen should look like Figure 7.47.
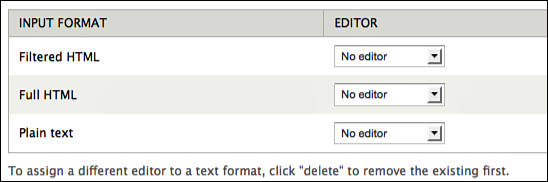
Figure 7.47. How the WYSIWYG profiles configuration area looks if an editor is successfully installed
Step 3: Choose What Code Is Allowed
You’ll notice in Figure 7.48 that there are three Wysiwyg profiles, which are designed for different purposes and allow different levels of code use.

Filtered HTML is the default option that you have been using throughout this book, so it’s the one you’ll modify. Now see what tags the Filtered HTML text format allows and doesn’t allow:
1. Click Configuration on the black menu bar.
2. Click Text formats in the Content Authoring block.
3. Click Configure for Filtered HTML.
4. Notice that the Limit Allowed HTML tags box is checked.
5. Scroll down to the Limit Allowed HTML tags area. You’ll see that the following HTML tags are permitted <a> <em> <strong> <cite> <blockquote> <code> <ul> <ol> <li> <dl> <dt> <dd>.
6. You need to add images to your content, so add <img> to this list by typing <img> in this space. Your screen will look like Figure 7.48.
7. Click Save Configuration.
8. Click Configure for Full HTML, and you’ll see that the Limit Allowed HTML tags box is not checked.
9. Click Save Configuration.
10. Click Configure for Plain Text, and you’ll see that the settings are exactly the same as for Full HTML, only the box Display Any HTML as Plain Text is checked.
Step 4: Choose What Buttons Are Available
Now that you know which HTML tags will work with each text format, you can enable the applicable HTML editor buttons:
1. Click Configuration.
2. Click Wysiwyg profiles in the Content Authoring block.
3. Click the drop-down next to Filtered HTML and select TinyMCE, as shown in Figure 7.49.

4. Click Save.
5. Click Edit in the Filtered HTML row.
6. Click Buttons and Plugins.
7. Check the box next to the buttons that support the HTML tags permitted by the Filtered HTML text format: Bold, Italic, Bullet list, Numbered list, Link, Blockquote, and Citationas, as shown in Figure 7.50.
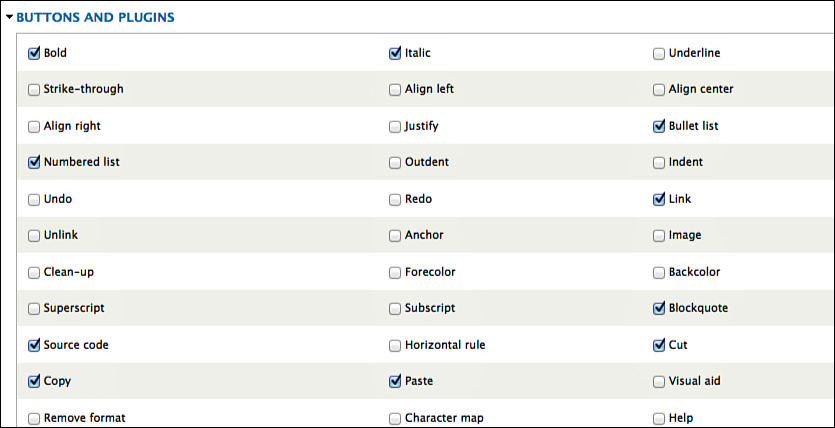
8. You can also safely check the boxes for these buttons because they don’t produce HTML that would be stripped out by the Filtered HTML setting: Source code, Copy, Cut, Paste, Paste text, and Paste from Word.
9. Click Save.
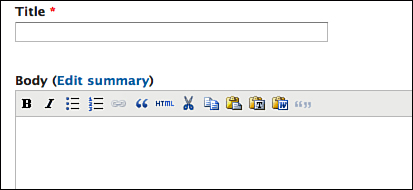
Step 5: See the Results
The HTML Editor will be present when you create a page. Add a page using any of the content types so far, and you’ll see the HTML editor buttons that appear by default, as shown in Figure 7.51.
Select the Full HTML from the Text format drop-down located below the body field, as shown in Figure 7.52. You’ll see that the editor disappears because you haven’t applied the editor to that format yet.
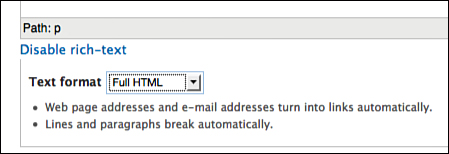
Image Management
Now that you have better formatting for your text, also add an improved image-handling feature to your editor. You can use the IMCE module. The name is a little geeky: IMCE stands for Images for Moxie Code Editor. The phrase Moxie Code Editor has been shortened to form the MCE part of the acronyms IMCE and TinyMCE. The IMCE module allows you to upload, browse, and insert images more efficiently than you can do with the basic TinyMCE editor.
Step 1: Find the Module
1. Go to the Drupal.org page for IMCE at http://drupal.org/project/imce and copy the download link.
2. Repeat that process for the IMCE Wysiwyg bridge module: http://drupal.org/project/imce_wysiwyg.
Step 2: Install the Module
1. Go to Modules, and then Install new module and install IMCE.
2. Repeat the Installation process for the IMCE WYSIWYG Bridge module.
Step 3: Turn on the Module
1. Enable both the IMCE and IMCE WYSIWYG API Bridge modules.
Step 4: Set Up the Module
1. Click Configuration; then click IMCE in the Media block.
2. Click Add new profile, as shown in Figure 7.53.
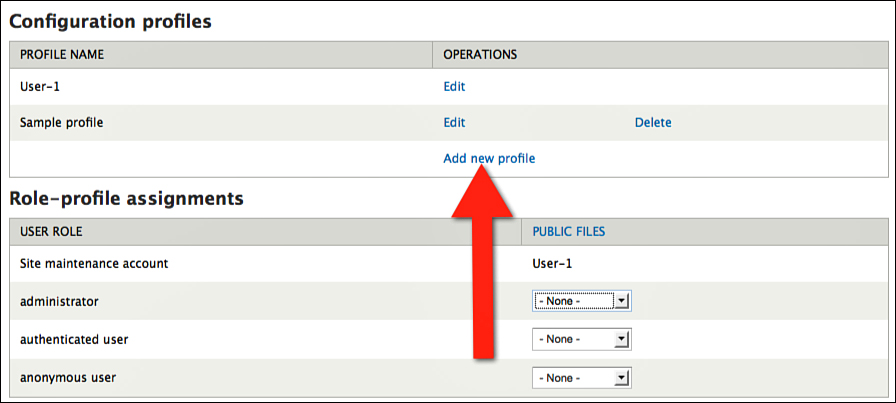
![]() Profile name: Filtered HTML
Profile name: Filtered HTML
4. Assign the new profile to the Administrator and Authenticated roles, as shown in Figure 7.54. Chapter 13, “Drupal Users Explained,” covers the meaning of those roles, but briefly, the Administrator role is for people running the site, and the Authenticated role is for anyone who has an account on the site.

5. Click Save Configuration.
6. Click Configuration; then click Wysiwyg profiles in the Content Authoring area.
7. Click Edit in the Filtered HTML row.
8. Click Buttons and Plugins, and then check the Image and IMCE boxes.
9. Click Save.
Step 5: See the Results
1. Click Add content. You’ll see that an Image button has been added, as shown in Figure 7.55.

2. You’ll now see a pop-up, as shown in Figure 7.56. If you didn’t have IMCE installed, you would need to know the URL of an image to paste it in here.
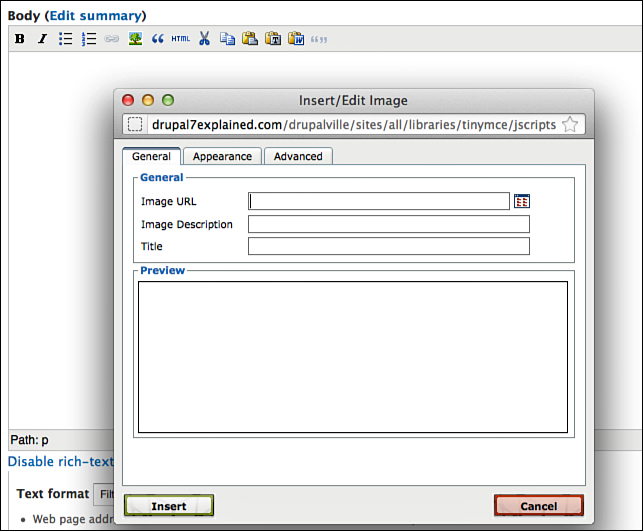
3. Fortunately, you have IMCE, which gives you better image management. Click the IMCE button on the top-right of the pop-up, as shown in Figure 7.57.

4. You now see a larger pop-up, which enables you to browse all your current images, as shown in Figure 7.58. You can also upload new images, create thumbnails, delete or resize images, and insert images into your content.

5. To insert an image, click the filename of the image you want to use. The image then appears in the bottom half of the pop-up, as shown in Figure 7.59. Click Insert File, and you’ll be back to the smaller pop-up. Click Insert, and your image will be placed inside the content.

If you want to upload a new image rather than use an existing image, here’s the process:
1. Click the Image button.
2. Click the IMCE button
3. Click Upload.
4. Click Browse to find the image you want to upload.
5. Click Upload.
6. After the upload finishes, click the image, Insert file, and then Insert.
Finding Modules Explained
In the first part of this chapter, we hand-picked modules for you to use. However, as you build you’re own sites you’re going to need to find extra modules. Here, we show you how to evaluate the modules available for Drupal and whether they are the right choice for you.
If you have used almost any other blogging platform or content management, you will find some things to be surprising and different about Drupal, including the following:
![]() Add modules are hosted on Drupal.org. It’s never recommended to download modules from other sites. Drupal provides security checks on all the files you download from Drupal.org.
Add modules are hosted on Drupal.org. It’s never recommended to download modules from other sites. Drupal provides security checks on all the files you download from Drupal.org.
![]() All modules are free. Drupal companies make the money from many sources such as selling the services, training, or hosting, but there is a general feeling in the Drupal community that modules should not be sold.
All modules are free. Drupal companies make the money from many sources such as selling the services, training, or hosting, but there is a general feeling in the Drupal community that modules should not be sold.
![]() Collaboration, not competition. You won’t find many modules with duplicate features. With other platforms, it’s not unusual to find many solutions to the same problem. Drupal tries to encourage people working on a problem to collaborate and work on the same module.
Collaboration, not competition. You won’t find many modules with duplicate features. With other platforms, it’s not unusual to find many solutions to the same problem. Drupal tries to encourage people working on a problem to collaborate and work on the same module.
![]() There are no ratings or reviews of modules. The Drupal community is thinking about adding them, but for now only http://DrupalModules.com hosts a good number of ratings and reviews about particular modules.
There are no ratings or reviews of modules. The Drupal community is thinking about adding them, but for now only http://DrupalModules.com hosts a good number of ratings and reviews about particular modules.
How to Search for Modules Explained
Now that you know that you can find all Drupal modules for free on Drupal.org, see how to find modules.
Go to http://drupal.org/project/modules and you’ll see a screen like the one in Figure 7.60. As you can see there are more than 10,000 modules hosted on Drupal.org.
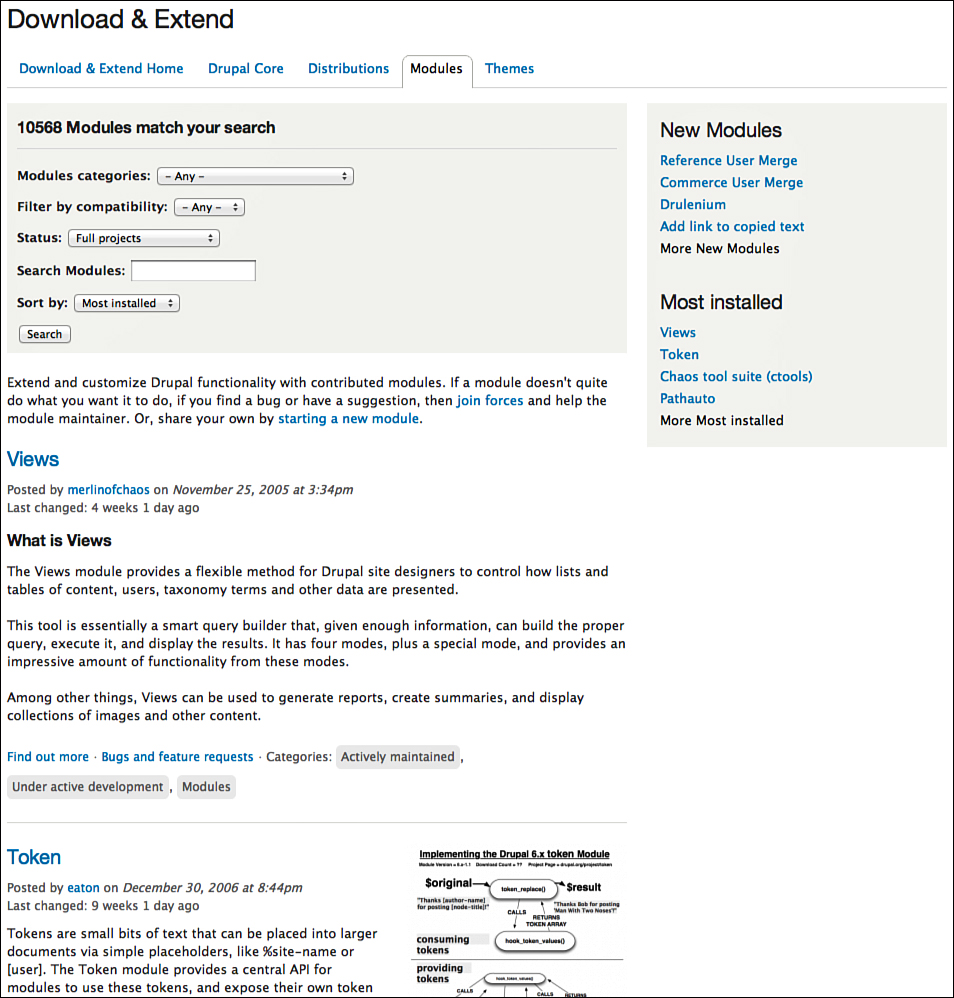
By default, the modules are sorted from the Most installed to the Least installed, so you can see that Views is the most commonly installed Drupal module.
If you’re searching for a module, there is a detailed search box on the top of this page. You can see in Figure 7.61 that you can search in five ways. Four of these will be useful to you.

You can search by the category of module, as shown in Figure 7.62.

You can search by Drupal version to make sure that you’re looking only for modules that work with Drupal 7, as shown in Figure 7.63.

You can use the Search Modules field to search by keyword, as shown in Figure 7.64.

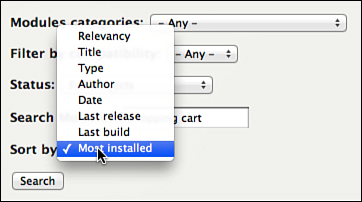
Finally, you can choose how Drupal.org returns your results, as shown in Figure 7.65. Don’t overlook this option. If you entered a keyword in the previous Search Modules field, you’ll probably want to change this option to Relevancy. If you don’t, you won’t find the most relevant module, but only the most installed module that contains your keyword somewhere in the description.
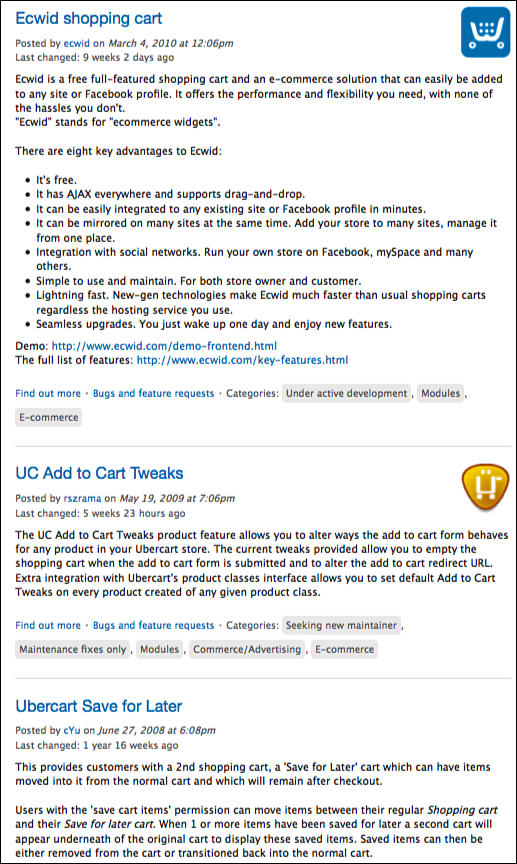
Drupal now returns your search results, as shown in Figure 7.66. From here, you can click through and find out more about each module.
How to Evaluate Modules Explained
Each Drupal module is different and needs to be evaluated before you use it.
There is no official stamp of approval or certification given to Drupal modules. The Drupal community aims to ensure some things about each module. It ensures that the module install and that the code is completely open source and unencrypted. Beyond that, you’ll need to rely on a variety of techniques to evaluate modules.
Let’s look at a couple modules and show you our recommended techniques to evaluate modules.
At the time of writing, Token is the second-most installed module, and that will be our example. Visit http://drupal.org/project/token and you’ll see a screen, as shown in Figure 7.67.

We encourage you to evaluate each module based on four different criteria. We call this the IRIS evaluation, and it involves the four areas of the page that you can see marked in Figure 7.68.

![]() Introduction: This area gives you an overview of all the module’s key features and requirements.
Introduction: This area gives you an overview of all the module’s key features and requirements.
![]() Releases: This area tells you if there is a module available for your Drupal version and if it is stable or perhaps only released in an alpha or beta version.
Releases: This area tells you if there is a module available for your Drupal version and if it is stable or perhaps only released in an alpha or beta version.
![]() Information: This area tells you if this module is actively updated and maintained, plus how many sites have installed it.
Information: This area tells you if this module is actively updated and maintained, plus how many sites have installed it.
![]() Sidebar: This area shows you the people who coded the module and when they were last active. It also provides important links, such as issues users have found and documentation for the module.
Sidebar: This area shows you the people who coded the module and when they were last active. It also provides important links, such as issues users have found and documentation for the module.
Area 1: Introduction
This area requires the least explanation. It provides a clear explanation of what this module does. Figure 7.69 shows the example from Token, which also has an image to help explain the module’s purpose.

If the module’s introduction makes it clear that this isn’t what you need, end your evaluation and move on.
If the module’s introduction isn’t clear, you’re not the first person to think that. These introductions are often geeky and contain Drupal jargon that you won’t understand without more experience. If this leads to you getting stuck, we have some advice at the end of this chapter in the section, “What to Do if You’re Really Stuck.”
Area 2: Releases
This area is the most important of all. If there isn’t a version of the module available for your version of Drupal, stop your evaluation right here and start looking elsewhere.
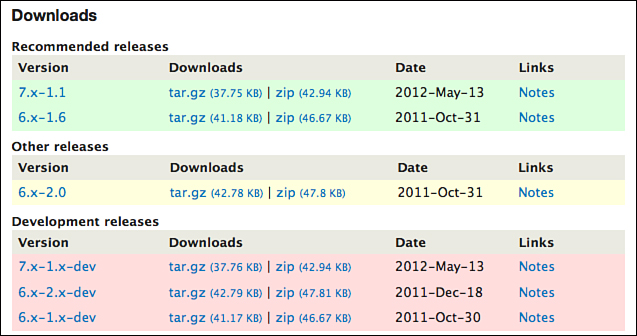
Drupal.org uses a color-coded recommendation for its release, based on traffic lights:
![]() Modules in the green area are recommended for use on live sites.
Modules in the green area are recommended for use on live sites.
![]() Modules in the yellow area need to be carefully evaluated before use.
Modules in the yellow area need to be carefully evaluated before use.
![]() Modules in the red area are generally only for developers to test.
Modules in the red area are generally only for developers to test.
Not all modules will have a green, yellow, and red area. You can see Token’s downloads in Figure 7.70.

Figure 7.71 shows an example of all three colors from http://drupal.org/project/pathauto.
First, it tells you if the module is actively maintained and updated.
Second, it tells you if the module is frequently download or installed. The most popular Drupal modules have been downloaded more than two million times and are run on more than 400,000 websites.
Finally, it tells you when the module was last updated. If a module hasn’t been updated recently, be cautious. It might mean that the module works perfectly and doesn’t need updating, but it might also mean the module’s coders are not providing necessary updates and fixes.
Figure 7.72 shows you the Information area for Token. This proves that Token is a module that’s regularly updated and trusted by many users.

Figure 7.73 shows the Information area for another module. Be much more careful installing this one.

Area 4: Sidebar
It was straightforward to explain the information contained in the first three areas on a module page. The fourth area, the sidebar, contains much more information and it is much more diverse. Figure 7.74 shows the sidebar on the Token page. Here’s what’s in each of the four areas:
![]() Maintainers: This is some of the most important information of all about a module. This module has five maintainers, one of whom was active 8 weeks ago. However, sometimes, this area shows only one maintainer who hasn’t been active for years. Be cautious with those modules.
Maintainers: This is some of the most important information of all about a module. This module has five maintainers, one of whom was active 8 weeks ago. However, sometimes, this area shows only one maintainer who hasn’t been active for years. Be cautious with those modules.
![]() Issues: This area provides links to all potential bugs that people have found with the module. A high number is not necessarily a bad thing because the more popular it is, the more bugs people are likely to find. At first, it won’t be easy for you to get useful information from this area, but as you get more experience, you can read the list of issues and look for potential problems.
Issues: This area provides links to all potential bugs that people have found with the module. A high number is not necessarily a bad thing because the more popular it is, the more bugs people are likely to find. At first, it won’t be easy for you to get useful information from this area, but as you get more experience, you can read the list of issues and look for potential problems.
![]() Resources: This area contains key links. Perhaps the most important of all is the documentation link. Not all modules have documentation, and you should probably avoid those that don’t.
Resources: This area contains key links. Perhaps the most important of all is the documentation link. Not all modules have documentation, and you should probably avoid those that don’t.
![]() Development: If you’re researching modules, this area might give you ideas for similar modules to evaluate.
Development: If you’re researching modules, this area might give you ideas for similar modules to evaluate.

You might be stuck because you don’t know the right word for what you’re trying to do.
You might be stuck because none of the modules are descriptively named, so their actual functionality is not clear.
You might be stuck because the feature you need is only available by combining multiple modules, and it’s not clear which modules you need.
You might be stuck because there just isn’t a module available to provide the feature you need.
Regardless, you’re going to get stuck at some point. Here are some suggestions for how to move forward if you’re stuck while looking for a module:
![]() Ask: Log in to Drupal.org and ask about your problem: http://drupal.org/forum. The Drupal community is also active on public chats. You can find out more about joining and asking your questions at http://drupal.org/irc.
Ask: Log in to Drupal.org and ask about your problem: http://drupal.org/forum. The Drupal community is also active on public chats. You can find out more about joining and asking your questions at http://drupal.org/irc.
![]() Search: There’s a lot more information on the web than is available on Drupal.org. Use Google or your favorite search engine to look for suggestions.
Search: There’s a lot more information on the web than is available on Drupal.org. Use Google or your favorite search engine to look for suggestions.
![]() Use other Drupal sites: There are sites out there, made by Drupal users, to help people find the module they need. You can find a list of these sites at http://Drupal7Explained.com/Chapter7.
Use other Drupal sites: There are sites out there, made by Drupal users, to help people find the module they need. You can find a list of these sites at http://Drupal7Explained.com/Chapter7.
Testing Modules
You must follow one golden rule, when testing a Drupal module: Never, ever install a Drupal module for the first time on a live site. Always have a second Drupal site that you use for testing, such as the one you use throughout this book.
If you need to make a copy of your own site for testing, see http://Drupal7Explained.com/Chapter7.
Why do we recommend always using a test site? Because websites are not exact or scientific. Modules that work fine on one site can fail on other sites. Some modules can cause conflict with other modules. You need to test all modules thoroughly before adding them to your live site.
Evaluating Modules
So far, you installed a good number of modules. You also saw how to research and evaluate modules.
In the final part of this chapter, we ask you find, install, and use two modules. These are the features we’re looking for:
![]() Add an e-mail field to your content types.
Add an e-mail field to your content types.
![]() Add spam protection to your comments.
Add spam protection to your comments.
Can you find two reliable modules that provide those features?
Remember to look at each module page carefully and evaluate all four areas of the page:
![]() Introduction
Introduction
![]() Releases
Releases
![]() Information
Information
![]() Sidebar
Sidebar
If you get stuck, we have some recommended modules at http://Drupal7Explained.com/Chapter7.
What’s Next?
In this chapter, you added features to your site by using modules. You saw that modules come in many different forms:
![]() Configuring modules is not always consistent from one module to the next.
Configuring modules is not always consistent from one module to the next.
![]() Modules can have dependencies on other modules.
Modules can have dependencies on other modules.
![]() Modules can add additional functionality to a module.
Modules can add additional functionality to a module.
![]() Modules can create pages and blocks.
Modules can create pages and blocks.
You also saw how to evaluate and test modules before you use them on a live site.
Now we know how to add features to Drupal. Your Drupalville site should look like Figure 7.75. Don’t worry if it’s not exact. The important thing is that you understand the concepts behind this chapter. If you feel that you know how to search for, evaluate, install, and use modules, you’re ready to move on to Chapter 8, “Drupal Menus Explained.”

So, our site now has content, fields and features. What it does not have is much organization that the visitor can see.
In Chapter 8, we’ll explore our site’s navigation and show you how to create and organize menus.